Platbands are special strips for hiding assembly joints between the window frame and the wall. In addition to its direct purpose, platbands can be used to decorate the window and facade of the house. To choose the right platbands and make their correct installation, read our article.
The main rule when choosing platbands is that their material matches the material of the window. If you have a wooden window, then the platband should be wooden, if it is plastic, then plastic. Although there are exceptions, in the form of a successful combination of platbands and windows made of different materials.
Wooden platbands
Wooden platbands are made of strips with a thickness of at least 30 centimeters. The width of the wooden platbands can be different, depending on the profile pattern and design. The profile pattern of simple wooden platbands is made using a milling machine.
Advantages: affordable price, easy installation.
Disadvantages: poor design, poor resistance to moisture and temperature extremes, the need for regular painting or varnishing.
Release form: rounded or beveled strips with a convex pattern, or smooth, 1.5-2 meters long.
Application area: hiding assembly seams on wooden windows. Additional protection of seams from environmental factors.
Carved platbands
Carved wooden platbands are made by hand or using a jigsaw. There are many options for the platband pattern: from simple ornament to sacred symbols that protect the house from evil spirits. Self-production of carved platbands is a job that requires skills in carpentry. If you want to make platbands with your own hands, but have no experience, choose a pattern without complex elements.
Advantages: very beautiful appearance, the ability to improve the facade of the house without significant financial investments.
Disadvantages: high price, complexity of manufacturing, fragility, the need for regular painting.
Release form: depending on an individual order or a design developed by the manufacturer.
Application area: decoration of windows and the facade of the house, hiding assembly seams. 
Plastic platbands
Plastic planks are the generic name for planks made of plastic, PVC and foam. Platbands made of plastic are often included in the set of installed plastic windows. Due to the specifics of the production of this type of platbands, they cannot be made at home. Plastic platbands can have a regular and carved pattern. The strips are mounted on special fasteners, liquid nails, glue or double-sided tape.
Advantages: resistance to moisture, long-term operation, easy installation.
Disadvantages: fragility of some products, small choice of design when imitating carved platbands.
Release form: smooth, carved or profiled strips, 1.5-2.5 meters long.
Application area: hiding assembly seams on plastic, sometimes wooden windows. Additional protection of assembly seams from environmental factors. 
Platbands from MDF
Due to the low resistance to moisture, it is recommended to use Medium Density Fiberboard trims only for interior window decoration. MDF trims are great for wood windows, especially if they match the color and texture of the wood. The platbands are fastened with nails, screws or glue.
Advantages: low price, good appearance.
Disadvantages: poor resistance to moisture, inability to use for external decoration.
Release form: smooth, rounded or profile-patterned strips, 1-3 meters long.
Application area: interior decoration of wooden or plastic windows. 
Aluminum platbands
Platbands made of aluminum are mainly designed to hide assembly seams, when installing windows and stained-glass windows made of the same material. In appearance and design, aluminum platbands strongly resemble plastic strips. Fastening of aluminum platbands is carried out on a special profile or latches.
Advantages: strength, durability.
Disadvantages: poor combination with windows made of other materials.
Release form: aluminum strips with a different type of pattern except carved, 1.5-2.5 meters long.
Application area: exterior and interior decoration of windows and stained-glass windows made of aluminum. 
Making platbands with your own hands
You can make platbands yourself only from wood. To do this, you will need a special tool and wooden planks.
Simple platbands
To make simple wooden platbands, you will need:
- Electric jigsaw.
- Plane (simple or electric).
- Sander.
- Milling cutter (manual or machine).
- Fine-grained sandpaper.
- Wooden planks with a section of 30x100 mm.

Manufacturing technology of simple platbands:
- Work all sides of the wooden planks with a plane.
- Install the profile accessory on a handheld or stationary machine.
- Finish the front side of the trim with a router bit.
- Finish the trims with sandpaper or a sander.
In the absence of a milling machine, platbands with a smooth surface can be made. To do this, use a planer to cut the front side of the plank at an angle of 20-30 degrees and grind it with sandpaper.
Carved platbands
If you are going to make wooden platbands with a carved pattern, keep in mind that this is not a quick business and requires "iron" patience. To create carved platbands, in addition to basic tools, you will need a set of special chisels with different blade shapes and a hand jigsaw. To make it easier to navigate in a large selection of patterns, below are some templates for cutting: 


Carved platbands can be made in two ways - conventional and overhead. In the usual way, the pattern is cut directly on the casing itself. In the overhead method, the pattern is made in the form of overlays, at least 10 millimeters thick, after which the overlay is attached to the main casing. For beginners, it is recommended to use the overlay method, because in the event of an unsuccessful pattern, the overlay can be replaced with a new element.
The correct choice of wood species for the carved platband is very important. It is easier to carve softwoods because they are soft. Platbands made of hard larch species will last longer.
If you have not done wood carving, choose a very simple pattern for the first time and, as your skill increases, move on to more complex patterns. 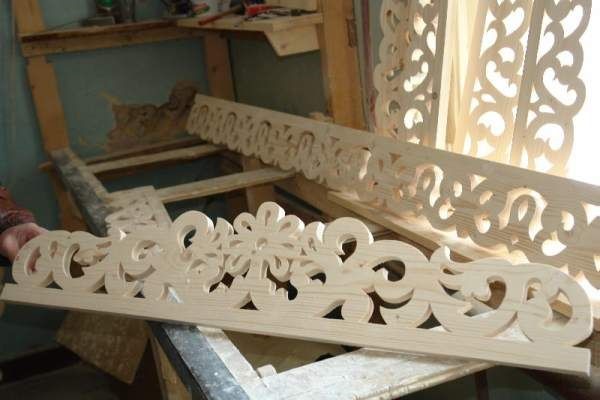
Stages of making a carved platband by an overhead method:
- Prepare the base for the platband, for this, process the strips with a thickness of 30 millimeters with a plane.
- Make overhead strips at least 10 centimeters thick.
- Draw the elements of the future pattern on thick paper or cardboard.
- Cut out the pattern with scissors.
- Place the cut-out stencil on the overhead strip and transfer the design to it.
- Use a drill and a jigsaw to make grooves along the lines.
- Finish the edges of the grooves with chisels, round the edges and finish the contours.
- Sand the finished cover piece.
- Install the trim over the main platband, securing it with glue or nails.
- Having collected all the overhead elements in one composition, proceed to the installation of platbands on the window.
Installation of platbands
Installation of wooden platbands

You can install wooden platbands on the window using nails, screws or glue. The slats are attached to the sides and top of the frame. In some cases, the platband is installed on the lower part of the window, if this is provided for by the design.
For a beautiful joining of simple platbands, their edges are cut at an angle of 45 degrees. This can be done with a hacksaw and a miter box.
In the case of a deep location of the window in the opening, the platbands can be placed on the wall using extensions.
Fixing the platband to the wall depends on the material from which it is made. For a wooden wall, it will be enough to use nails or screws, for a concrete or brick wall - dowel screws.
Installation of carved platbands mainly depends on their design and composition. Docking of carved platbands is performed in such a way as not to disturb the overall pattern.
After installation, the platbands are treated with wood impregnation, then painted or varnished.
Installation of plastic and aluminum platbands

Correct installation of plastic and aluminum platbands requires a special installation profile that is attached to the frame. Platbands are installed in the groove located on the profile. In the absence of a profile, the platbands are installed on snap fasteners attached to the frame or wall. In rare cases, plastic trims can be fixed with glue, but this type of fastening is unreliable.
When using telescopic platbands, fastening is carried out by inserting the edge of the strip into the groove located on the frame.
Foam platbands, attached only with glue.
The first platbands appeared in the days of wooden houses. Despite the simplicity of the design, to build such a house, you need to have experience and knowledge in the field of architecture. The platbands are a painted fresco located near the window frame. The platband will become not only an original decoration, but will also perform a number of additional functions.
Due to their tight fit to the window frame, the platbands block access to drafts in the window cracks, are protection against dust and moisture in the gaps, and also have thermal insulation properties. Indeed, for the installation of platbands, foam is used, which is already an excellent thermal insulation material.

Heat from the house will not escape through the window openings in the frame, which means that the cold will not enter the house. Also, the platband protects against damage to plastic windows under the influence of moisture and temperature. The only drawback is that the platbands deteriorate over time and will need to be restored. But after all, it is much more economical than doing window restoration.

The next important factor is design. Platbands are cut-in figures made of wood or plastic, which are selected individually for the image of your home, so that the harmony and aesthetics of both window frames and the house as a whole are observed.


Types of platbands
The designs of the platbands are similar to each other, so it is difficult to characterize them in any way. Therefore, the types of platbands are divided by the material from which they are made:
- Plastic
- Wood

Now, in order about each type, its advantages and disadvantages.

Plastic platbands
Plastic platbands are more resistant to moisture penetration on the surface, do not deteriorate under the influence of temperatures and are the longest in terms of service life. Modern technologies make it possible to make plastic platbands for the design of a tree.

Naturally, there will be noticeable differences in contrast between natural wood and artificial, but do not forget about the rest of the positive characteristics of plastic.

MDF platbands
MDF is a dense slab of sawdust and glue. In order to increase their service life, such plates are lacquered, which increases at times the time of operation and use of MDF.

Platbands made of wood
The most common are wooden platbands. Therefore, the types of wooden platbands are divided into the following types:
- Natural wood
- Environmentally friendly

Natural platbands are made from 100% wood. To extend the service life, such platbands are exposed to processing of special materials that protect the surface from environmental influences.


Environmentally friendly platbands are made of safe materials that, in the event of a fire, will not release harmful combustion products into the atmosphere.

Wood itself is a soft and plastic material, so you can make a platband of any shape and size, which is a huge plus and significantly distinguishes wood against the background of platbands and other materials.

Installation of platbands
Beautiful wooden platbands are installed in three ways:
- Overhead
- Telescopic
- Finnish

Installation of overhead platbands is done on the outside of the house and on the window frame. Telescopic mounting has a curved “L” shape and is inserted into the grooves of the window.

The Finnish installation of platbands can be immediately noticed by the presence of a visor over the window and the simplicity of the form. The choice of platbands depends on your taste preferences.

Material for the manufacture of wooden platbands
Many platbands are made to match the old design of the 18th century from natural wood, but what kind of wood is the best to use, read below. The ideal option is to use the kind of wood from which the house is made, so as not to disrupt the structure and design of the house.

In other cases, it is best to make platbands from oak or beech. Due to the density of the material, it will be costly to make a designer model on your own or simply thread without a special material.

If you are going to independently engage in the manufacture of wooden platbands, then it is best to use cherries or cherries. These varieties are more susceptible to carving and are more often than others used when creating platbands on their own.

Regardless of the type of wood, the main rule must be remembered - any wood must be varnished to protect the wood from environmental influences.

To emphasize the uniqueness and good taste of the owner of the house, wooden door frames will be an excellent addition to window frames. Thus, we can conclude that the use of platbands gives solidity to the house, and due to the universal component - wood, the platband can be made to order, taking into account your preferences.

Photo of wooden platbands


The old tradition of making and installing carved frames on windows in a wooden house was remembered relatively recently, when the first boom in the construction of log cabins from rounded logs and beams took place. Having lived for several years in a new wooden house, the owners almost always begin to treat it as a living creature, so it is not surprising that amazingly beautiful carved patterns began to appear on the windows and entrance doors made of wood, serving as decoration and protection at the same time.
Functions and purpose of carved platbands
Most experts dealing with the culture and history of wooden architectural monuments note that carved window frames, photos, are almost a status item. A house without carved patterns looks like a wooden hut, even if it is very large and beautifully decorated, with platbands - it turns into a tower.
Traditionally, carved window frames are installed for two purposes:
- Protection of cracks around the perimeter of the window frame from rain, snow and wind blowing;
- Additions and decorations of the window opening, the facade of a wooden house as a whole.
For a wooden house, builders traditionally offer window frames made of wood or metal-plastic window profiles complete with a double-glazed window. Ordinary plastic PVC trims can also be ordered in a carved version. Just choose a drawing or pattern, most likely, will not work, carved plastic window frames are made according to traditional patterns by stamping and only give the look of handmade.

Advice! Today, many restoration workshops and firms have at their disposal three-axis milling machines that can automatically cut a pattern of any complexity from polycarbonate, foam and epoxy plastics.
Such work will not be cheap, but the quality of carved platbands for plastic windows will be even higher than manual cutting. It remains to choose a drawing and a pattern.

About the third task of the casing on the windows, rarely any of the owners of the house can tell more or less clearly and reliably. We are talking about protective functions that protect a wooden house from the "evil eye", diseases and uninvited guests. You can treat beliefs and traditions in different ways, but taking into account the specifics of choosing a pattern for platbands in your home will obviously not be superfluous.
Patterns and figures on carved wooden platbands
It is clear that any self-respecting owner will not hang the first platbands on the windows of a wooden house, the process of selecting a theme and pattern can be delayed, so you should not abuse the use of symbols, the meaning of which is incomprehensible or unknown. If the mystical and culturological part of the carved platbands creates psychological discomfort, you can treat the carving as a way to decorate the window openings of a wooden house.
It was no coincidence that they were invented to decorate the carved platbands, and they were carefully kept and passed on practically unchanged. Most master woodcarvers cut just like copiers, so you will have to plan and decode the drawing on your own.
Advice! In any case, before using carved wooden platbands on windows with patterns and pictures of incomprehensible content, it makes sense to try to understand the meanings of carving elements, patterns and figures.
For example, figurines and images of animals have always symbolized positive wishes for the house of prosperity and well-being:
- A snake or dragon has always signified wisdom and strength to protect the home;
- Birds in flight mean hospitality and friendliness, sitting in the corners - attention to guests and news;
- Fish, deer, bunches of wheat and grapes mean a wish for wealth.
It was not customary to depict pets and figurines of people, especially in the same canvas with climbing plants and flowers.

More modern designs on carved wooden platbands usually have a traditional, regular pattern.
It can be intertwining flowers, vine leaves arranged in a regular pattern. In the carved compositions of the 18th-19th centuries, more modern images of columns, porticoes and drops, used in the wooden architecture of that era, have already appeared.

Most of the carved platbands are ordered from master carvers. If you wish, it is not difficult to make carved window frames with your own hands according to templates or ready-made schemes. The simplest lines and drawings can be transferred to a workpiece and cut out with an engraving nozzle; you will have to tinker with more complex schemes and remember drawing lessons at school.

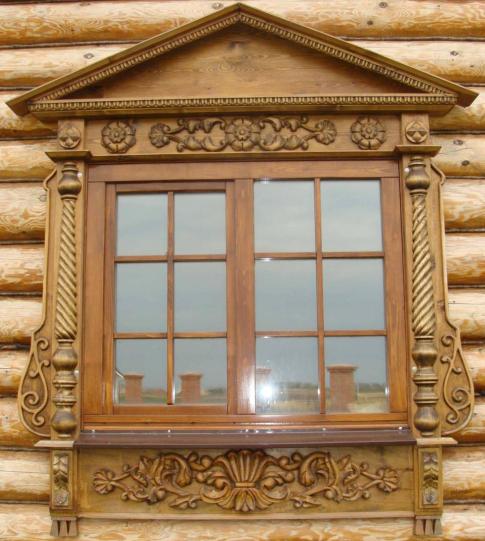
The upper part of the platbands was called an ochelya, this is the most complex and beautiful part of the decor, on the one hand, the ochelya set the general tone of the carved composition, on the other hand, it served as a visor over the window opening. At the top of the composition there was a diadem symbolizing the rising sun, and in the center there was always a medallion or crown made of plants. The lower part of the window was covered with a carved apron, usually in the form of an open fan.

If the mystical and culturological part of the carved platbands creates psychological discomfort, you can treat the carving simply as a way to decorate the window openings of a wooden house.
The usual intertwined pattern of vines or flowers will be far from any mystical content, while the beauty of the platbands and carvings of the frame of the window of a wooden house will only intensify. Carved platbands with a regular pattern have a serious advantage over a complex multi-tiered composition:
- First, the patterns of carved window frames are transferred to a wooden or plastic blank much easier and faster than a drawing with a complex multi-tiered composition;
- Secondly, even if you cut out an intertwining vine or edging with your own hands and make small flaws, it will be almost impossible to see them in a patterned field, this is how human psychology works.
Therefore, before making carved window frames, choose a simple pattern for yourself, with a minimum of individual details. Even the most uncomplicated pattern on the facing strips can transform the appearance of a wooden house window beyond recognition.

DIY carved platbands
Wood carving has always been and remains quite an expensive undertaking, so instead of buying ready-made platbands cut or stamped on furniture equipment, you can try to make decorative strips with simple patterns with your own hands. At home or in a carpentry workshop, you can use one of three methods:
- Transfer the template to the prepared board and cut the patterns using the engraving kit;
- Cast patterns under a carved platband made of polyester or epoxy resin, followed by painting or finishing with a laminate film imitating a tree;
- Cut out the overhead pattern of the platband using a jigsaw.
Before you try your hand at making carved platbands, you need to choose the right material. For carving and engraving, you will need hard types of wood, beech or oak is well suited, pine or spruce is slightly worse, poplar and aspen are not suitable. You can use a regular floorboard to cut the overlay pattern, but the material should be free of knots, defects or intricate weaves.
Templates for cutting an overhead pattern
To make the simplest patterns, you can use the simplest patterns of intertwining plants, flowers, grapes. In fact, this is a flat tracing paper from more complex carved reliefs. This pattern can be used to decorate the vertical side trims of the casing.

To decorate a window, you need to look not for regular, but single patterns, for example, a composition of symmetrically located figures or interweaving of plant stems.

The same pattern can be translated into a contour line and turned into a flat ornament that can be easily cut out of plywood, boards or even MDF board.

The most complex relief or volumetric patterns are made by typesetting method. Initially, ordinary wooden platbands are made from planks, individual elements of the cladding are carefully adjusted to the size of the window and assembled into a finished frame.

All other decorative elements are sequentially cut out of wood, cast from a casting polymer or sawn out from MDF board, after which they are sanded, primed and glued to the prepared frame.

Making carved platbands with your own hands
Most often, patterns for finishing a window are cut from a waterproof OSB plate in the form of overhead decorative elements. Initially, on tracing paper, a piece of graph paper and with the help of the program, the necessary template for the drawing is developed.


Next, you need to make a working template, with which you can transfer the pattern to a wooden substrate an unlimited number of times, photo. To do this, a drawing printed on a printer is glued to a fiberboard sheet and cut out with a slotted nozzle for a drill or with ordinary metal scissors.
After marking the wooden blank, you can start cutting the casing. The easiest way is to make cuts with a jigsaw on a joiner's workbench.

Along the line of the cuts made, you need to carefully remove the chamfer with emery paper so that during further processing the front surface of the carved pattern does not chip off. If a fairly thin strip was chosen as a blank, then the cut out carved part of the decor can be glued to the fabric base.
In the same way, small overhead elements in the form of rhombuses, squares, rings, braids are cut out. After sanding, the cut out elements are grinded on an electric grinder with a stone for grinding wood. With the help of a circle, you can quite simply give a rhombus or any other geometric figure the required shape, form faces or transitional curved planes.
After gluing the decor, the carved platbands are primed with hydrophobic impregnations and aged. This is done in order to remove the whiteness of freshly polished wood. For this, solutions of salts of iron, copper, chromium are used. As a result, it is possible to choose the color and shade of the carved platband to match the wooden window frame. It remains to open the tree with varnish or oil impregnation and install the carved decor on the window.

Conclusion
Very often, the owners of wooden houses, instead of making new decorative elements, prefer to buy old carved platbands that have been preserved in villages, abandoned houses and buildings. Often, the cost of a set of carved platbands for three windows of a building facade is cheaper than hand carving of one platband by a modern craftsman. In some cases, among the old décor, one encounters real works of art made by hand by the masters of the last century. Such carved platbands are usually deeply restored and installed not on the outer parts of the windows, but inside the room.
Do-it-yourself window frames are a wonderful decoration for the facade of a house (ready-made stencils and templates will be given in the article below). They make the house look like no other, visually change its proportions.
Today, with certain skills, you can independently create graceful frames for windows in a wooden structure. Moreover, they can be made not only from wood, but also from other materials.
 When the owner decides to install platbands, he seeks to arrange traditional decor in his possessions.
Platbands have the following advantages:
- Excellent decorative function. This is how the building visually increases.
- Complementing the overall style of architectural design.
- A defense of the space between the window opening and the wall plane from moisture and dust is created.
- Heat losses and noise levels are reduced.
- The individual features of the house and the style of the chosen era are highlighted.
The platbands have some drawbacks:
- Wood needs a certain treatment against high humidity and deformation.
- Products need regular care and treatment.
- They are not in harmony with metal-plastic windows. In this case, platbands are made in one color scheme.
Self-creation of templates
 Today there are many platbands. Their types are determined by the way they are mounted to the window. According to this criterion, there are two types:
- Telescopic. Their specifics: L-like protrusions coinciding with the grooves of the window frame.
- Overhead. Installation takes place on the window frame. Fasteners - construction glue or nails with screws.
The installation of carved products is considered an exquisite solution. Self-realization of such ideas is possible only with the availability of special equipment.
Popular materials

- The most common material for platbands is wood. Products made from it have an elegant and harmonious appearance.
- Plastic versions are also often used. They are characterized by strong resistance to temperature extremes and ultraviolet radiation. Plastic options are sold ready-made.
- Another popular material is MDF. It is prepared from wood waste. It is more environmentally friendly than plastic. In addition, products made from it are characterized by a look reminiscent of natural wood.
- Polyurethane. Variations from it are highly practical. Facade stucco molding is often made from this material.
The nuances of choosing the right wood
 As already noted, wood is the most popular material for platbands. And the performance characteristics of wooden platbands depend on the type of wood used.
Here, they usually pay attention to such options.
- Hard deciduous. These varieties include ash, oak and beech. They are very durable. But it is quite problematic to create patterns on them.
- Soft deciduous. These are: linden, aspen and alder. They are easier to process. On their surface, patterns are even created by hand. And such surfaces are thoroughly processed with special means.
- Sweet cherry and apple tree. They are optimal for creating small components that can be attached to the base.
- Pine and birch. They are also easy to handle. And they have excellent working qualities.
- Various combinations of wood varieties. The use of special protective compounds for powerful impregnation is mandatory here.
With the help of high quality wood, a beautiful original design of the window opening is obtained.
The nuances of creating templates with your own efforts
The basis of the work comes down to the creation of stencils and designs.
Self-printing of stencils is quite feasible for everyone. It is important to achieve a combination of the selected ornament with the entire style. Mixing geometric and floral patterns is not allowed.

The following subtleties are taken into account when working on platbands:
- There should be a harmony of the color palette of the walls and decorative elements.
- The appropriate parameter must be selected correctly. Platbands should not be very wide or small.
- A high-quality version of the coating is selected. Special paints and varnishes are used.
- A template is required for the manufacture of external carved components.
- The drawing is correctly positioned on the workpiece. Details follow along the wood grain.
When it is possible to achieve the color combination of the platbands and the plane of the walls, a holistic and harmonious facade is obtained.
Manufacturing stages
Before creating a window decor, carved platbands are selected from photographs. You need to make a template in advance. It should turn out to be the same for the decoration work of all openings.

Typically, the following methods of creating patterns are used:
- Overhead thread... It has separate elements of the pattern. They join the same base.

Installation of overhead components should be done on the base in accordance with the template.
- Slotted thread... A see-through ornament is made here. It looks like wood lace.

For all methods of work, the presence of stencils is mandatory. This is how they look:
 Also, the work requires the presence of such tools:
- Jigsaw.
- Hacksaw (oriented for wood).
- Knives and chisels.
- Drill.
- Milling technology
Platbands must be created from prepared materials. The working stages are as follows:
- Meticulous measurements are carried out.
- The selected tree must be dry. If it is wet or damp, it must be brought to dry condition. The width of the boards is determined by the parameters of the window opening. The material reaches a minimum of 3 cm in thickness if a slotted thread is made, and at least 1 cm when an overhead thread is made.
 All workpieces are pre-treated with a protective compound. They are cut using templates. And the cutting of ornaments is done using a jigsaw. It is better to use different types of files with this tool.
To work with an electric jigsaw, you need certain skills and special care. The holes created must be wiped. An excellent tool for this is sandpaper. After powerful grinding, the part is treated with a special impregnation.
Next, all the prepared parts are installed to the base. Here you need to use glue or special nails. In such work, it is better to refuse the use of self-tapping screws. They will cause cracking of the products.
Installation specifics
 The created platband can be attached to the desired position by the following methods:
- On a dull thorn. The installation of such parts is on the inside. Holes should be made specially for them in the frame. The glue is applied and distributed evenly on the spike. The spike is inserted into the groove. This fastening protects the platbands from dust and moisture.
- With the use of a through thorn. The butt area is thoroughly varnished here.
These techniques are justified when working with a wooden window. For attachment to metal-plastic, a special powerful liquid glue is used.
Required care
 The installed platbands need constant attention and care. For processing, special preparations are used - powerful impregnations. They create high-quality protection against:
- wood pests;
- the appearance of cracks;
- sudden fire.
Carved options must be covered with a primer, then varnish or paint. The intensity of such treatments is once every 3-5 years. Thus, the operational life of the products will be seriously developed, and at the same time their attractive appearance will be preserved.
When installing plastic or metal products, no careful maintenance is needed. For products, it is necessary to arrange high-quality corrosion protection. Periodic paint renewal is also required.
Thus, it is very possible to make platbands of extraordinary beauty with graceful patterns on your own. Certain skills of a carpenter, carpenter and working with tools are required. So you will decorate the window openings with a very original method and add an elegant twist to the chosen architectural style.
Platbands on windows do-it-yourself templates stencils: drawings, sketches and drawings for cutting out, photo gallery, manufacturing instructions
Do-it-yourself window frames are a wonderful decoration for the facade of a house (ready-made stencils and templates will be given in the article). They make the house look like no other, visually change its proportions.
Carved window frames: templates, photos
Old Russian architecture is invariably associated with carved window frames. This form of home decoration is distinguished by a variety of species. A few decades ago, craftsmen lived in each region with their own style of creating decorative elements. Today's return to basics is accompanied by a resurgence of interest in carved window trims.

Purpose of framing
The word "platband" itself speaks of its location - "on the face", that is, one of its functions is to decorate the facade of the building. Therefore, people tried to express their individuality through him and decorate the windows with carved frames. In addition to the decorative role, window trims, first of all, perform a constructive function, closing the gap between the frame and the opening. This prevents dust from entering the house, protects against precipitation, drafts and extraneous sounds.
In the old days, magical properties were also attributed to carved platbands. It was believed that framing the window with a certain shape of the bar protects from the evil eye and serves as a kind of amulet. Therefore, in the bizarre patterns, various figures and plants were seen, bearing a specific semantic load.
In modern architecture, the functional purpose of window trims is as follows:
- A well-chosen carved design allows you to visually stretch a low structure or expand a narrow wall.
- An opportunity to show individuality and design a building in accordance with the spirit of a particular era.
- Allows you to achieve a single architectural ensemble between all buildings on the site.
- Protection of cracks from the penetration of external negative factors (precipitation, noise, dust).
- It is one of the elements of thermal protection at home.

Carved decoration, especially made of wood, has a number of features that should be taken into account during operation:
- Dependence on the influence of atmospheric factors. Moisture and temperature extremes invariably damage the decoration.
- When choosing a frame, one should take into account the properties of the breed from which the platbands are made, and take care of high-quality processing. Timely preventive measures prolong the life of the window product.
- Difficulties often arise when combining carved wooden elements with modern plastic frames. With this combination, it is preferable to install windows that imitate a wooden texture.

The value of the carved elements
The desire to comply with ancient traditions requires knowledge about the meaning of the various elements of the carved platbands:
- The sun is usually placed on a kokoshnik. It symbolizes life and energy.
- The personification of wisdom and fertility lies in the image of a snake.
- The symbol of harmony between spiritual and material striving is a cross in a carved casing.
- The sense of unity with nature is emphasized through the vegetation.
- Earrings testify to the hospitality of the owners of the house.
- The connecting element of all times is the silhouette of a bird on the window.


Characteristics of materials and shapes
For the production of window frames, natural and artificial materials are used. Traditionally, carved elements were made from wood that is resistant to weathering. Characterization of the properties of individual breeds will help determine the most suitable species:
- Larch is minimally susceptible to decay processes, however, it is not suitable for the production of carved frames due to its fragility.
- Aspen, alder and linden are the most convenient species for creating openwork window decoration. However, the pliable and soft wood of the carved platbands needs special treatment due to its ability to absorb moisture well.
- Platbands for windows made of oak, ash or beech are characterized by resistance to negative atmospheric influences, but the processing of carved elements is weighed down by difficulties, overcoming which you will get a durable decor.
- A good choice would be birch or pine wood, which allows for neat carved decor. At the same time, the platbands have sufficient strength for external use.
- Small carved window decorations, which are fixed to the main elements, can be made from cherry or apple trees.

What other materials are used in the production of window coverings and what are their features, we will consider below:
- Laminated MDF allows you to accurately simulate the color of any type of wood, but is intended exclusively for indoor use.
- Plastic windows are harmoniously combined with platbands made of a similar material (PVC), which is not subject to decay, has a wide color palette that is resistant to solar radiation. The color of the platbands is selected taking into account the finishing of the house to match or contrasts with the facade.
- For round windows, polyurethane products are ideal, which are characterized by ease and unpretentiousness in maintenance.
- Metal strips are attached to protect the assembly seam, connecting them into a single whole with the profile box.
There are two main ways to install platbands:
- Overhead is the most common method for decorating windows. For fixing, special glue or nails are used.
- The telescopic method assumes an L-shaped form of manufacturing the casing, which allows the product to be fixed by entering the grooves of the box. Most often used for finishing doorways. Its characteristic difference is the absence of traces of fasteners.


Thread patterns and types
The carved forms of the platbands give the window individuality, but in order to make them, you will definitely need templates. The presence of woodcarving skills allows you to choose a complex ornament. If the ability to work with wood is not enough, it is better to find a light pattern for the trims on the windows. We propose to study:
- options for templates of single elements and their general appearance;
- top, bottom and side decoration details.


You can copy them in full or add your own details to the pattern. The picture of the carved platband you like or a fragment of it must be scaled up taking into account the size of your window. For the manufacture of carved templates, fiberboard, thick cardboard or paper are used. It is advisable to decorate windows with platbands with the same thread. Please note that making small carved elements is much more difficult, and they become unusable faster than others. In this case, a partial replacement of the frame will be required.
The upper part of the window casing is called a kokoshnik, the lower one is a towel. The most widespread in the ornament of carved platbands were the contours of plants, images of animals and geometric shapes.

The key drawing details for any window trim are:
- lower bar or sill girdle;
- vertical rail;
- top bar.
The scheme can also contain all kinds of hangers, vases or tiaras. A detailed description of the names of the carved decor elements is presented in the diagram below:

If your windows are of different sizes, experts advise making a drawing with an intermediate rapport, repeated as many times as necessary. For rapport, you can select one or two elements that repeat in turn. An example of such a scheme is shown in the photo below:

There are several ways to make carved wooden frames for windows:
- The most decorative and openwork are characterized by slotted platbands. The product is made of light wood or subjected to subsequent coating with white paint. Such window decoration on a darker wall looks sophisticated and refined, remotely resembling Vologda lace.
- With a laid-on thread, separately cut parts are fixed to a solid board by gluing or nailing. This technique allows you to design a window with a simple platband. The protruding elements are often covered with a contrasting paint.
Sometimes both types of threads are combined.


Manufacturing process
Having decided on the pattern, material, type of thread and the method of fastening the platbands, you can directly proceed to the manufacture of carved frames for the windows.
Places of the pattern, where it is necessary to make cuts, it is better to mark with color. The work on the manufacture of platbands consists of the following stages:
- Taking measurements from the window.
- For slotted carving, boards with a minimum thickness of 30 mm are selected, the overhead method allows the use of wood with a thickness of 10 mm. All work is carried out with dry lumber.
- Blanks are cut out.
- For a snug fit of the carved platband from the inside, the wood is selected to an insignificant depth (1-2 mm).
- The pattern applied using the template is cut out. To form holes, drills of various diameters are used, a jigsaw will be needed to make slots. To create a beautiful cut, the jigsaw insertion point is marked with a drilled hole.
- All carved elements of the window casing are smoothed with sanding paper. Wood dust is removed from blind holes with a vacuum cleaner.


The overhead thread provides for fastening the finished elements to the wide casing on nails with the heads removed. Strengthening the strength of the connection will allow the glue applied from the seamy side of the casing. The use of self-tapping screws is not recommended due to the risk of damage to the carved section of the joint.
Carved platbands are installed on wooden windows using blind or through thorns. The first option is distinguished by a reliable connection and a complex installation process. The second method is simpler, but less reliable. Installation of carved elements on a plastic window is carried out using liquid nails.
Pre-treatment of the carved frames and regular preventive maintenance will ensure the long-term preservation of the attractive appearance of the window.


Carved window frames
Carved window frames: templates, photos Old Russian architecture is invariably associated with carved window frames. This form of home decoration is distinguished by a variety of species. Yet
Stencils for window frames. How to make carved platbands?
Platbands on windows, despite their simplicity, are of great importance in the decorative design of the facade of the house. They not only create a neat look and add an element of individuality to the structure, but also perform a more mundane task of eliminating the gap between the wall and the window frame. In addition, platbands must withstand the influence of weather factors without losing their qualities.
The function of window frames and a little history
The platband was first mentioned as an element of the house back in the 15th century. Now the platbands have lost some of their relevance, but their function is still unchanged, regardless of the building material and its decoration. Due to the design features of the windows of high-rise buildings and in cases where glazing is used, their presence is inappropriate.
 Platbands appeared many years ago
In simplified terms, the platband is a wooden frame with a width of 30-40 mm, which frames the window.
The aesthetic function of this part is important, but the main task is to close the gap formed by the window frame and the wall, which increases thermal insulation and prevents the penetration of dust and moisture from the external atmosphere, and also reduces the noise level. In some cases, with shutters, it acts as a frame.
Types and types of window trims
Their shape can be:
They are characterized by simplicity of production and low cost, flat-shaped platbands. Convex platbands are made using special machines and, in this regard, the price of products increases significantly. Carved platbands are of great aesthetic value and significant value.
Platbands are classified according to the installation method:
- telescopic. They have special projections that fit into the corresponding cavities of the box;
- waybills.
An important factor when choosing the profile of this window element is the slope, which is performed at the top of the casing. Its purpose is to remove sediment.
Modern materials and requirements for the elements of houses have determined the trends in the needs of homeowners. The most popular are carved platbands made of plastic.
Requirements for the material of platbands
In addition to high aesthetic qualities, the casing must meet practical requirements. Its important qualities are its ability to withstand temperature fluctuations and high humidity. In addition, the material must withstand wind load.
It is important that the material has sufficient strength and is not prone to chipping and cracking. The use of MDF or plywood is out of the question. The properties of these materials are such that they are able to absorb moisture, are prone to cracking, the paint on them peels off over time. All this is a sign of the fragility of products made from these materials.
In this regard, MDF as a material for platbands can only be used inside the dwelling. The manufacturability of the material determines its simplicity and its relatively low cost. In addition, it does not take a lot of time to receive the finished platbands. Such platbands on the facade will require constant maintenance and additional processing.
Our ancestors made platbands from wood for many centuries. Oak and beech are the most common woods used for this. Pine and birch have found less use for the production of platbands. Wood tends to absorb moisture, therefore protective coatings are necessary to increase the product's life and appearance. In addition, over time, the tree tends to darken, therefore, the restoration of the original shade of the material is required.
When using gypsum as a decorative facade element, they also face the problem of the interaction of the material with moisture. When the water that has penetrated into the gypsum freezes and thaws in the process of temperature fluctuations, such architectural details are destroyed.
 Certain requirements are imposed on the materials
The use of glass fiber reinforced concrete and polymer concrete makes it possible to avoid the negative effects of temperature and moisture. Their use is limited by a significant mass of products. In some cases, when installing such platbands, the increased loads on the wall are taken into account and make it more powerful.
Polyurethane compares favorably with other platband materials. This is due to the fact that its use does not allow the problems described above, and also its characteristics allow you to create additional thermal insulation. In addition, its weight is comparable to the weight of wood, which facilitates the installation of these facade parts.
How to make stencils for window frames?
Choice of wood
Wood for the production of platbands can be used in various ways. These can be certain types of it, a combination of rocks by gluing or other connection.
Simple and shaped stencils for window trims are best made of pine.
The production of carved platbands requires the material to be soft. Linden has this quality. The material requirements are due to the manual processing of wood.
 The choice of wood must be done carefully.
Climatic conditions associated with high humidity or significant dryness, as well as significant temperature fluctuations during the day, determine the use of wood with a dense and solid structure. These include oak and birch. Manual processing is difficult, therefore it is necessary to use milling machines. Such products have a long service life.
Required tools
Before solving the problem of how to make carved platbands, you need to decide on the tool used for these works. The main tools for this are knives and chisels, different in shape and size.
 Tools for the job
For independent production of platbands, devices for manual milling, jigsaw, drill are used. When performing such work, a jigsaw is almost indispensable, since with its help you can create almost any pattern. In some cases, a home-made device can be used, which includes a step-down transformer and nichronomic wire.
In addition, it may be necessary to make a tool for filing corners. To make such a device, it is necessary to fix two hacksaw blades with a fine tooth between three wooden slats. When working with this device, the thorns are sawn with one blade, and the eyes of the product with the other.
How to choose patterns for the trim?
Using a slotted carving technique suggests that aspen, alder, linden or softwood is the best choice. The thickness of the board should be between 5 and 50 mm. It is necessary that the selected pattern of the pattern for the platband is well distinguished at a distance, and act as a single whole of the architectural ensemble. Therefore, it is not desirable to create an image with a lot of small elements.
 Platband options
For a long time, at the top of the casing there is a kokoshnik with the image of the Sun. If desired, the top of the casing can be extended using spikes as a connection. Towels - this is the name given to the bottom of the casing. The design must necessarily include the presence of a drainage bevel. The bottom plank should be 10 mm thicker than the plank at the top of the plank. It is important to maintain the unity of the style of both parts.
To avoid cracks in the threads, the parts should be positioned along the grain of the wood. As a rule, thin ends and openwork bends have significant fragility.
 Structural diagrams
The simplest cut can be obtained by drilling a round hole with a drill. That is why it is advisable to make a choice on a pattern with a predominance of round holes. In most cases, the ornament is made up of repeating elements, each of which is made up of holes and cutouts that have a more complex configuration.
Drawings of platbands for windows contain the following elements:
- lower bar or profiled belt;
- vertical slats or frame;
- top bar.
 Part names
To get a stencil, you need to stretch the pattern along its length. For this purpose, a life-size image is applied to paper. Places that suggest the presence of slots should be highlighted in color. Then, the resulting pattern is glued to the workpiece. Using a drill, drill holes of the appropriate diameter. If necessary, work with a jigsaw, make small holes where necessary.
Manufacturing of platbands for windows
The direction of opening the window must be taken into account. In the case when it opens outwards, the platband should be installed at a distance of 30 mm from the window sashes. In addition, the platbands should not interfere with the opening of the window frame. Other parameters depend on the geometric dimensions of the windows.
At the initial stage of the production of platbands, it is necessary to plan a dry board, the dimensions of which are in the range: thickness up to 30 mm and width 75-150 mm. In this case, the width of the platbands should exceed the corresponding size of the window box by 25-50 mm. For a better fit of the platbands to the wall surface, choose a groove or make a gap of no more than 2 mm so that it is at a distance of 10-15 mm from the edge.
When operating a power tool, do not use excessive force, as if helping it. This can lead to its failure. If you have any difficulties with cutting wood, you should pay attention to the sharpening of the blade. Long cuts are recommended with a wide blade.
How to mount carved platbands
Fastening of platband parts is carried out by means of blind or through thorns. Moreover, it is believed that the use of the first of them is preferable, since there is no need to decorate the places where the connection takes place.
The grooves for the tenons are made by drilling several holes, the depth of which is slightly deeper than the tenon. Removal of partitions between the holes is done with a drill designed for metal. The entry of the cleat must be firm, however, without the use of force.
The thorns are fixed with dowels made of solid wood. It is not advisable to use glue. This is due to the fact that adhesives are not able to work for a long time under the influence of an aggressive atmosphere.
Installation of platbands: features
Installation of platbands is carried out without the use of glue using nails. They are driven in with a pitch of 400-500 mm so that the head is recessed into the wood. Most often, platbands are attached tightly to the box. In some cases, an indent of 5-20 mm is made to the side, which depends on the direction of opening of the flaps.
Platband drawing
The window sill board at the window opening and the platband are installed close to each other. This design allows you to install side tables that protect the lower part of the platbands.
Upon completion of the installation work, it is imperative to carry out a protective treatment of the platbands. You should also apply paint or varnish, which needs to be renewed from time to time.
Stencils for window frames
Stencils for window frames. How to make carved platbands? Platbands on windows, despite their simplicity, are of great importance in the decorative design of the facade of the house. They not only create
Do-it-yourself carved wooden window frames
For buildings from a log frame, carved platbands simply suggest themselves for decorating window openings. Their independent production is not at all a whim or an attempt to save money, because now there are very few really good wood carvers.

Required minimum tools
The manufacture of platbands, in contrast to artistic woodcarving, involves the repeated execution of the same type of operations, as a result of which a rather primitive repeating pattern is obtained. Therefore, most of the work is done with an electric tool: this not only increases the processing speed, but also achieves its uniform quality in different areas.
 1 - jigsaw; 2 - drill; 3 - belt grinder; 4 - vibration grinder; 5 - manual router
The main work is done with a jigsaw and a drill. The tool must be reliable and of high quality, capable of being in continuous use for a long time. For cleaning and grinding products, it is better to use an electric grinder, at least the simplest belt one. Rapid finishing of the terrain is possible with the use of vibration-type machines.
If you intend to add additional small details to the edges of your product, you cannot do without a router. Slopes, chamfers and curly edging can also be made manually, but only if you have a variety of chisels, cutters and specific skills in working with wood.
 Wood cutter set
How to choose wood
Hardwoods are best suited for platbands: oak, birch, ash, maple, alder. Since the thickness of the finished product is relatively small (30–45 mm), hard rocks will be less susceptible to rotting and drying out, therefore, they will retain their appearance longer.

If you plan to decorate the carved platbands with flat-relief elements with many small details, you should give preference to softer rocks with a small texture pattern. Linden, poplar, aspen, walnut and spruce will do.
Wood for platbands should be selected and, preferably, chamber drying, moisture content not higher than 12%. The presence of traces of warpage or other pronounced defects, large branches is not allowed. Ideally, you should immediately order calibrated boards with a width of 100–150 mm and a thickness of 30–40 mm.

The length of the blanks should be sufficient to completely cover the window opening horizontally and vertically with an overlap in each direction by 1.5 times the width of the board. It is important that you initially calculate the number of blanks required and, in addition to them, purchase several more boards of the cheapest breed for training and practicing carving skills.
Making templates and stencils
Almost any wood carving begins with drawing on the workpiece according to a pre-made template or stencil. There are plenty of thread schemes in the network, the main difficulty comes down to transferring the lines to the part accurately and without distortion. We warn you right away: do not pursue the high complexity of the drawing. A set of even the most primitive elements in the correct sequence and with well-chosen indents takes on its modesty and quality of processing.
 Templates of the upper and lower platbands for the window
 Example of a platband ornament template
The first option for applying markings is to make a small piece of plastic or hard sheet material, on which a single element of a repeating pattern is applied. Such a template is sequentially applied to the workpiece and outlined with a pencil.
It is also possible to make a one-piece template. You need to take a strip of paper of the appropriate width, fold it like an accordion several times, and then cut out the pattern according to the principle of a Christmas tree garland. The resulting tape must be glued to cardboard or LMDF, and then cut out the desired shapes. This method is welcomed with a significant amount of work.

The resulting stencil is subsequently simply superimposed on the board and outlined with a soft pencil. Ideally, rich, but precise cut lines and boundaries for further processing should remain. When marking out the details, it is necessary to take into account the pattern of the pattern, so that the platbands form an integral and complete contour, and the repeating pattern does not interrupt inappropriately.

Sampling of through holes
The first step is trimming the edges of the workpiece and sampling holes in the center. With the edges, everything is simple: we cut out the excess with a jigsaw, retreating from the marking line 1–1.5 mm outward for subsequent processing. To cut shapes in the center of the plane, drill the part at the very line of each cutout, then select the inner contour with a jigsaw.

For large holes, it is wise to use core drills. In this case, it is necessary to mark on the template not the contours, but the centers of the circles in which the centering drill of the crown will be installed. A similar technique can also be used in the manufacture of oval holes or elements with small radii of rounding: a complex bend is drilled with an appropriate radius, and everything else is cut out with a jigsaw.

When the excess parts of the workpiece have been cut off, the cut edges must be carefully processed with a rasp and then with sandpaper. It is recommended to use square, round and rounded profiles with sandpaper stuffed on them. This way you are less likely to "roll off" the edges and be able to get right angles at each edge.

Rectangular edges look rather rough, so they are smoothed with chamfers and slopes of different profiles. The easiest way to diversify the product is to walk along the outer and inner contours of the casing with a curly cutter. But manual processing options are also possible:
- for chamfering, walk along straight edges with chips, keeping the angle of inclination of the handle to the part constant;
- a semicircular convex descent can also be performed with chips, changing the inclination of the blade, or use a concave cutter for this;
- a concave semicircular mate is performed with a chisel or a cutter with a rounded edge. Such elements need to be cut out in stages, removing small chips layer by layer and carefully controlling the depth of the tool and the inclination of the handle;
- if the descent has a profile of a complex shape with several convex, concave and straight elements, this profile is divided into several stages and cut in a strict sequence, starting with the widest outer part and ending with the deepest and shallowest tier.


Blind thread: apply relief
Once you've finished shaping, it might be a good idea to diversify the remaining flat elements with simple ornamentation or floral designs. Here are the simplest ways to work:
- A groove (branch, groove) is made with a narrow chisel or a cutter with a square, triangular or concave blade shape. The carving is carried out strictly along the line, the relief is selected with small chips and then grinded.
- Sheet - several small grooves imitating veins cut with a circular knife. From the center between the veins, small notches are made with a semicircular chisel to each of them, imitating the body of the sheet, then the outer contour is induced with a thin incisor.
- The flat areas adjacent to the slope can be diversified with a dull carving of small ornamentation. For example, cut two grooves from the edge, forming a triangle with it, and pierce an asterisk in the center with a notch.


Wood processing and installation of platbands
Due to the carved elements, the wooden product has a large surface shape, due to which it is more susceptible to aging. Therefore, the wood must be treated in a special way.
First of all, carved products for placement on the facade should be soaked in an antiseptic composition for 5–8 hours, for which you can dig a small trench in the ground and put a plastic wrap there for temporary arrangement of the bath. After soaking, the parts are dried in a stack with linings for several days after 30–40 cm.

When the wood is dry, it must be carefully sanded, achieving smoothness and finally eliminating all traces of sawing and carving. The protective composition is selected in accordance with the type of facade finish, it can be either alkyd enamel or polyurethane varnish, tinted or transparent.
Finally, for the correct installation of the platbands, the window opening should be framed with a flat strip 10–15 mm thick and of such a width that its outer edge cannot be seen through the carved pattern along the contour of the platband. The purpose of this plank is to eliminate any remaining unevenness in the wall and to provide a solid base for anchoring the carved element. Often this strip is painted in a color that contrasts with the coating of the casing itself for greater expressiveness of the pattern.

Platbands can be attached with straight and oblique trimming, which depends on the type and density of the pattern. Oblique trimming is performed by sawing each side at 45 °, while the cutting line must pass through identical sections of the pattern and not intersect the figures cut out inside.

With straight clipping, a horizontal element is positioned between two vertical ones. Their top edge should be 1–2 cm higher than the crossbar if the cut edge is straight. It is also possible to manufacture on the edge of the thread according to the general scheme, if during the manufacturing process the fitting and precise adjustment of the platbands are carried out. The fastening of the platbands itself is elementary - ordinary brushed nails without a cap are used for it. It is only important that the nail stitches the platband and the bar, protruding at least 5 mm from the inside out.
Do-it-yourself wooden carved window frames
For buildings from a log frame, carved platbands simply suggest themselves for decorating window openings. Their independent production is not at all a whim or an attempt to save money, because really good
The decorative framing of windows and roof ends has always been considered the element of decoration that gives the entire structure individuality and recognition. But due to the fact that the labor intensity and cost of such a decoration is simply enormous, many owners prefer to install platbands on windows in a wooden house with their own hands.
When planning to save on this operation, you need to soberly assess your capabilities, since the method of manufacturing and installing platbands has a large number of technological nuances, ignoring which can nullify all costs and time.
In this review, several methods of making and installing decorative platbands are considered and emphasis is made on non-standard technical points.
Depending on the design of the cashier, different types of equipment may be needed for its self-production. In some cases, a standard set of "home carpenters" is sufficient, but if there is woodcarving in the decor elements, you will have to purchase special tools and accessories.
Let us consider the relationship between the design of cashing and the complexity of the technical equipment used in its manufacture.
From industrial blanks
If the window trims are supposed to be made from purchased blanks with an already formed pattern or profile, then the need to purchase additional equipment most likely will not arise.
When writing a review, we proceed from the fact that the workshop of the owner, who decided to equip a wooden house, already contains the following minimum of tools:
- universal screwdrivers;
- pliers and pliers;
- rasps and files;
- hand saw;
- plane;
- hammer;
- clamp;
- axe;
- measuring devices (tape measure, square, building level).
It will not be a mistake to assume that an electric drill and an electromechanical jigsaw are also included in the mandatory set of tools for any self-respecting home craftsman.
The only thing worth purchasing before self-assembly of platbands from industrial blanks is a device for cutting boards at a given angle ("miter box") and an end mill for punching blind holes for pins.
We emphasize that the tools listed in this subsection are a basic set, supplemented by more specialized models with the complication of the platband design.
With elements of wood carving
In those cases when it is planned to make platbands with woodcarving elements with your own hands, the stage of preliminary preparation of the workshop will be more difficult.
Note that it is not at all necessary to buy all the tools listed in this review, since there is a narrow specialization in this area of construction work.
So, to create slotted decorations, it is enough to supplement the basic equipment with the following tools:
- Sander;
- an electrified jigsaw that can use a circular saw.
 The use of a machine for sawing patterns is not necessary, but it is highly desirable in cases where the patterns are large in area and contain small elements.
Another situation where you cannot do without a stationary jigsaw is the manufacture of a casing from plywood, since it is extremely difficult to accurately follow the lines of the template with a manual model of such a saw.
Please note that when creating slot patterns, it is strongly recommended that you use not a flat, but a round version of jigsaw saws. This will allow you to avoid accidental deviations from the lines of the drawing, the occurrence of which is especially unpleasant in the last stages of processing the product.
To make voluminous carved decorations yourself, you will need to purchase a set of special chisels.
To cash out the whole house with a patterned decor, it is necessary to perform a very large amount of work, therefore, it is necessary to provide for the possibility of quickly sharpening chisels. For these purposes, you can purchase an inexpensive sharpening machine, which, moreover, is useful for dressing drills, knives, planer blades and some types of cutters.
Using machine profiling

 An overview of the tool base used in the exterior decoration of wooden houses will be incomplete without mentioning hand and stationary milling cutters.
A relatively inexpensive manual model of such a device will allow you to solve the following tasks:
- creation of profiled frames from ordinary edged boards for external and internal platbands;
- quickly cut the grooves for docking joints "tenon-groove" or chamfer when assembling frames "with overlapping";
- make patterned figures on blanks, both in the slotted technique and in the form of volumetric carving (moreover, do this as soon as possible).
- to carry out inlaid wood panels using the original technique of internal carving.
Note that when buying a milling cutter, you need to decide in advance what types of them will be needed in the future, and add the corresponding items to the purchase estimate. The figure below shows the most commonly used designs of bevelling and internal milling cutters.
We select the material
We talked in detail about what platbands are made of in our article.
Let us remind here that in the manufacture of cashing it is necessary to be able to find a balance between the technological qualities of wood and its climatic resistance.
In general, you should adhere to these rules:
- take soft woods (linden, cherry, alder) for volumetric carving;
- for the manufacture of frames, use durable and resistant types of wood (larch, oak, ash, pine).
 If the decoration is carried out using slotted technology, then all the elements of the casing can be made of hard rocks, since manual cutting of patterns is practically not used today.
Separately, we emphasize another advantage of the slotted technology - for the manufacture of such a decor, you can use ordinary plywood. Surprisingly, after impregnation with water-polymer compounds, this material becomes as strong as oak, while remaining the most convenient for cutting patterns.
Moreover, plywood can be used to make volumetric compositions by gluing several layers into one overlay block.
The only disadvantage of such glued compositions is that a stationary machine is needed to cut large patterns, which allows the installation of a round-shaped jigsaw. It is almost impossible to go through all the bends of the drawing without errors and serifs, using only classic flat files, on such a thin material.
When making platbands with your own hands, it is necessary to take into account that any decoration, although it is an original decoration element, at the same time remains part of the structure of the window opening.
- First of all, cashing should not interfere with opening windows and closing shutters. This, seemingly simple, requirement is not so easy to implement in practice, and it is precisely when determining the dimensions of the frame that mistakes are most often made.
The inner dimensions of the frame should be such that the platband completely covers the end of the window, but does not interfere with the full opening of the windows. That is, when drawing up a drawing, you must first determine the working area of the windows in the open position and only then develop the mounting scheme of the casing.
In cases where the platband is joined to the outer slopes (and this often happens when installing PVC double-glazed windows in the casing from the embedded beam), its inner contour must correspond to the outer perimeter of the slopes.
- The next general requirement for the design of the casing is that the upper block (strip) should be thicker than the lower one. This is to reduce the amount of water falling on the bottom of the cash.
 In the classic designs of platbands for wooden and log houses, this requirement was implemented in the form of a massive cornice, which creates a kind of cover for the entire lower part of the window.
Stricter options for exterior window finishes do not imply a difference in the thickness of the slats, but the installation of ebbs, both under the window and above the frame.
- Separately, we emphasize that the platband is exposed to direct exposure to solar ultraviolet radiation for a long time, as well as to strong changes in temperature and moisture. No matter how high-quality the wood processing is, it will in any case change its original dimensions and begin to pass moisture to the fasteners.
In view of what, the classical method of its assembly does not involve the use of metal nails and screws (they rust and fall out). The best option for making a wide frame and shields for platbands is the use of glued compositions from boards and wooden dowels.
Below is an example of making a prefabricated panel for a decorative cornice without using metal parts.
The illustration shows that the shield is assembled from butt-glued boards. Planks are laid with the approval of the internal wood pattern. Adhesive composition - PVA or waterproof wood glue (holding time - 2-3 glue polymerization time).
Pulling is done with ropes and pegs that reinforce the compression.
Manufacturing of slotted platbands
As a detailed answer to the question of how to make platbands for a window opening in a wooden house yourself, consider the technology for manufacturing and assembling a slotted platband.
Despite the fact that there are more complex options for framing frames (for example, with three-dimensional wood carvings), this description sufficiently conveys all the subtleties of this stage of facade decoration.
First, we give a complete list of operations that must be performed to make the platband:
- Drawing up a technical sketch and calculating basic dimensions.
- The choice of the artistic scheme of the product (drawing patterns, preparing templates).
- Preparation (or purchase) of the necessary lumber and fasteners.
- Marking of parts and joints.
- Cutting blanks and adjusting dimensions.
- Manufacturing of the bearing frame of the platband (for those cases when the cut-out pattern of the invoice).
- Transfer of a drawing of templates to blanks.
- Development of a cut pattern and definition of points for drilling start and end holes.
- Cut out the picture.
- Chamfering and sanding.
- Antiseptic treatment and priming of all parts.
- Painting each part separately (especially if a multiple color scheme is used).
- Installation of overhead parts on the frame.
- Installation of supporting rails on the wall of the house (if the house is made of timber or frame, this operation is not needed).
- Installation of the frame on the window opening.
Now let's look at the most difficult stages in more detail.
Selection of drawing
 Immediately, we note that, without practical experience in wood carving, the pattern for the casing should be chosen as simple as possible, without small details.
The easiest way is to take a ready-made template and print it in full size. It is best to do this on a large plotter, but you can use the print in parts function, which is present in many graphic editors.
Frame making
There are two different approaches to making a casing frame:
- Cutting out a solid frame from a glued board.
- Assembly from boards of each element of the base (frame, shield for decorative cornice).
The first option was discussed above, but for its application it is desirable to have the appropriate experience and skills.
The second scheme is classic and consists in assembling a square frame from four slats.
Corner joints are made in two ways:
- the thorn-groove method;
- overlap.
The connection of the thorn-groove type is considered more reliable, but special equipment (milling cutter) is required for its manufacture. The overlap joint is made using a simple hacksaw and drill.
Please note that the base of the platband may include not only a frame, but also a triangular shield for placing decorative elements of the cornice. When assembling it, the problem of connecting several boards into a single whole arises. If you exclude end gluing, this problem can be solved using anodized brackets and self-tapping screws.
Manufacturing of carved elements
 The slotted casing can be either overhead or solid. In the first case, the frame and patterns are made as separate structural elements. In the second, each frame strip simultaneously performs a functional and decorative role.
The most popular is the first option (consignment note), due to its manufacturability and versatility.
The pattern is cut after transferring the pattern from the template to the workpiece. Through holes are drilled at the points of the beginning of the cut and in the area of bends.
The working tool in this case is a manual or stationary jigsaw.
If, nevertheless, a hand saw model is used, then in order to avoid distortions, the workpiece must be fixed with a clamp on a horizontal plane.
In most cases, the plane of the cut is strictly perpendicular to the outer surface of the board, but chamfers can be removed from the outer side of the pattern to give a volumetric effect.
After completing the drawing, the workpiece is cleaned from large burrs and chips (inside and out), after which grinding is performed. Cleaning the surfaces inside the decor is performed using a drill and a shreiber. The outer planes are most conveniently finished with a grinder.
Protective treatment and painting
 All efforts to make a wooden platband will be in vain if you do not take measures to protect it from rotting and moisture deformation. This is especially true of carved elements, since they are made of unstable wood species, as well as internal platbands installed in baths and saunas.
In order to properly process the carved and power elements of the frame, we recommend that you adhere to the following sequence of actions:
- Painting.
- Protective varnish coating.
The antiseptic composition can be used the same that is used to stabilize the logs during the construction of log cabins.
 Painting should be started only after the antiseptic is completely dry. Please note that most modern protective compounds have priming properties, so a separate primer need not be applied.
To cover the inner surfaces of the pattern, use narrow brushes, for the outer ones - wide.
The varnish treatment is carried out before the assembly of the product: when the painting of all products is completed and after the paint has completely dried.
Acrylic wood varnish is suitable for protecting the platbands on wooden windows.
In cases where plastic decorative overlays are used, all operations listed in this subsection apply only to frame elements.
Assembling the platband
After all the necessary components are made and painted, they must be assembled into a single structure.
This is best done on a flat surface, prior to installation on a window opening.
Fastening of decorative elements to the supporting frame can be done in the following ways:
- self-tapping screws;
- finishing nails;
- deaf wooden dowels with glue landing.
In those cases when it is necessary to sheathe the upper edges of the casing with carved patterns, the decorative element and the frame are joined perpendicularly. Mounting corners provide reliable fixation in this type of joints.
Separately, we note that the most durable platband will turn out when the decor is planted on wooden pins. At the same time, not only the contact area is covered with glue, but also the entire inner surface of the carved element (to prevent moisture leakage).
If, nevertheless, metal fasteners are used, then it is necessary to select the most protected samples of screws and nails.
Tip: A good "camouflage" for screw heads is obtained from a mixture of fine sawdust and waterproof wood glue.
Installation on a window
 In order to correctly install the assembled platband, it is highly desirable that at least two workers perform this operation. This is necessary in order to accurately align its position before final fixation.
Despite the fact that the assembly of the assembled frame is carried out at pre-marked points on the casing, a visual correction of its position is still required.
It should also be borne in mind that when assembled, the entire structure can be very heavy, and if you follow all the points of the safety rules, then the installation of such products should be carried out only from the scaffolding.
Conclusion
At the end of the review, let us dwell on one more feature of the platbands: non-standard joining with the wall of the house.
Since it is impossible to make fixed connections between the elements of the framing frame and the wall of the house, the problem arises of sealing the gap between the inner surface of the casing and the uneven contour of the logs. From a technological point of view, its presence is insignificant, but from an aesthetic point of view, it is quite noticeable.
Therefore, in cases where the casing too clearly emphasizes the uneven contour of the wall, wooden slats are installed between the wall and the casing, providing sliding contact and giving the entire window block a more complete look.
The company "Master Srubov" accepts orders for the whole range of works performed in the course of the transformation of a log or squared frame into a comfortable house, including the manufacture and installation of platbands. You can clarify the terms of cooperation and calculate the cost of work by going to the page and contacting us by any of the communication methods published there.