Kitchen furniture– an extremely necessary and quite expensive element of the interior. You can significantly reduce costs by making your own kitchen set. Fortunately, there are no problems with purchasing accessories and materials for its production, but various projects and the design options are simply huge.
DIY kitchen design
The production of a kitchen set begins with a project. The project requires the overall dimensions of the place where it will be installed. After which you can begin to select the component elements.

Fig.1.
Kitchen set consists of drawers that can have different contents, from shelves to pull-out baskets. For both the top and bottom row compartments, standard sizes in width starting from 15 cm to 100 cm, in increments of 5 cm, i.e. 15, 20, 25, 30, 35 cm, etc. You need to know them for design.
When preparing a project, you should be guided by standard dimensions, because... All accessories are manufactured taking them into account.
When determining the layout, it should be taken into account that standard height The bottom row of drawers is 72 cm, the top ones can be 60, 72 or 90 cm. The depth of the bottom row is 55 cm, the top row is 30 cm.
Of course, when making a kitchen set with your own hands, you can set arbitrary sizes, but then you will have to abandon ready-made kitchen components (for example, the facade), and make all the elements individually.
If standard drawers do not fill the entire space allocated for the kitchen, then in the remaining space they make either shelves custom sizes.
The corner kitchen set has a distinctive feature. A corner kitchen cabinet can have several options: straight (Fig. 2) and with an angle of 135 degrees (Fig. 3). The same feature applies to the top row (Fig. 4).

Fig.2.

Fig.3.

Fig.4.
A corner cabinet for a sink (see drawing above) is often used if the space of the room allows it; for small kitchens, a straight cabinet. Thus, a rectangular or round sink, in angular - angular or round.
When preparing a kitchen furniture project, you should follow the following recommendations:
- The space for installing the slab should be equal to the width of the slab itself, usually 50, 60 cm.
- For a built-in stove, the cabinet must be 60 cm wide and at least 55 cm deep. The same applies for the oven.
- The space for the hood should be 60 cm for built-in and 90 for other types.
- The distance between the hood and the stove must be at least 70 cm. The height of the cabinet for a built-in hood must be 30 cm less than the others.
- The space under the refrigerator must be at least 60 cm.
- Roll-out baskets are installed in standard-sized kitchen cabinets only.
How to make your own kitchen from chipboard
It is easiest to make a kitchen with your own hands from chipboard, since this material can be called traditional for such furniture. Laminated chipboard, abbreviated as laminated chipboard, is used with a thickness of 16 mm. All elements except the tabletop and apron are made from chipboard.
The facades of kitchen units are made from laminated chipboard, from chipboard covered with plastic (postforming technology), and from MDF.
The back wall of the cabinets is made of fiberboard or laminated fiberboard, 4.6 mm thick.
The countertop of the kitchen set is made using postforming technology. It can be 28.32 and 38(40) mm thick.
How to build a kitchen with your own hands? Three approaches can be distinguished. The first is to make all the parts yourself from laminated chipboards, the second is to make them to order, the third is to buy ready-made elements and assemble kitchen furniture from them. Finished cabinets can be purchased in stores such as IKEA, Leroy Merlin, etc.
The most economical and moderately complex option is when you do the detailing of the kitchen cabinets yourself and all the elements are made to order, after which the assembly is done by yourself. The advantage of this method is that you can make parts to individual sizes and at the same time save a lot of money.
To order parts, you need to draw a kitchen and determine all the dimensions, as well as the need for edging material and the presence of mounting holes.
Kitchen cutting is carried out based on the following considerations. The dimensions of the side walls of the cabinets are the height and depth of the cabinet. Dimensions of the bottom and lid: width equal to the width of the cabinet minus 32 mm, height equal to its depth.
The edge is made of plastic with a thickness of 0.4 and 2 mm. It is necessary to protect the ends of the laminated chipboard from moisture and mechanical damage. It is advisable to glue it on all ends of the parts. To save money edge tape may not be used on invisible ends.
Ready-made holes for fasteners (additive) greatly facilitate, but introduce additional costs for the manufacture of parts. If saving is not your first priority, then before cutting the kitchen you need to prepare drawings of kitchen cabinets with details.
The tabletop and façade, as well as the drawers, can be made to order or purchased ready-made.
DIY kitchen furniture assembly
Assembly begins with the cabinets. Their parts are connected using a confirmat (Fig. 8). Holes for it are drilled at a distance of 8 mm from the end, with a slab thickness of 16 mm. It is convenient to assemble using a special device as shown in Fig. 5. It is easy to make it from scraps with your own hands. To simplify drilling holes for confirmat, it is convenient to use a special drill (Fig. 6). The additive can be made in each part separately; for this it is convenient to use a jig (Fig. 7).

Fig.5.

Fig.6.

Fig.7.

Fig.8.
On assembled cabinets the rear wall is installed. Next, the legs are mounted. They can be decorative or adjustable plastic, then the kitchen plinth is attached to the legs. Their standard length 100, 120 and 150 mm.

Fig.9.
The cabinets are installed in their places one by one and pulled together. For tightening, a special intersectional screed is used. Alternatively, you can use 30mm long self-tapping screws. They will work just as well. The caps of the screws can be hidden with a self-adhesive plug; the caps of the confirmat are also masked.

Fig. 10.
The upper cabinets are tightened after installation in place. An adjustable suspension is used to install wall cabinets. It allows you to set all elements horizontally and vertically.

Fig. 11.
The final stage of assembling the frame is installing the tabletop. The tabletop is attached to the cabinets with 30 mm long self-tapping screws.

Fig. 12.
Installation of facade, sink, plinth
You can install a façade, plinth, sink, etc. on the finished frame.
The façade is secured with hinges. Recesses (milling) are made on the doors for the hinge cup. Depending on its size, the diameter of the recess is different. It is advisable to order milling for hinges when cutting. It's not expensive, but it will help you avoid extra work, possible errors and the need to purchase a special Forstner drill.

Fig. 13.
When installing doors in corner cabinets, it is necessary to use hinges with a non-standard opening angle.

Fig. 14.
After the doors are installed, you can install the handles.
For the kitchen plinth, a piece made of chipboard or a special plastic strip can be used. Using the latter is preferable, as it is protected from moisture and will last much longer.
The plinth strip is attached to the legs of the kitchen unit. It is advisable to recess the base into the body of the kitchen unit by 7-10 cm, so it will be more convenient to use the kitchen.

Fig. 15.
Most sink models cut into the countertop. Using the template that comes with the sink, mark the cut line. After preparing the hole, the sink is installed using special fasteners.

Fig. 16.
Apron for kitchen set
An apron is an integral element of any kitchen that decorates and protects the wall between the countertop and the top row of cabinets. It can be made of MDF or ceramic tiles.
An MDF apron can be purchased ready-made or made to order. It is attached to the wall with self-tapping screws, which are later hidden with corner covers.

Fig. 17.
How to make a kitchen apron with your own hands? It’s very simple to make it from ceramic tiles. However, this approach takes longer, because Installation work may take several days. At the same time, a tile apron is more durable and fundamental, which cannot but affect the design.

Fig. 18.
The final element is the wall plinth. He has and functional purpose- covers the junction of the apron and the kitchen unit, thereby preventing dirt and moisture from entering unprotected areas.
Kitchen furniture lighting
Lighting on a kitchen set is not only a decorative element, but also lighting working area, which directly affects fatigue, so it is important to make good and functional lighting.

Fig. 19.
As can be seen from the infographic (Fig. 19), the most functional is the lighting under the kitchen cabinets. You can make lighting for the kitchen work area from LED strip. To do this, it is glued to the bottom wall of the top row of cabinets. Kitchen countertop lighting can be done using special boxes with a diffuser for ice strips.

Fig.20.
Drawings of kitchen units

Fig.21.
A clearly developed kitchen drawing is a guarantee of quick and trouble-free furniture assembly. A detailed kitchen design with dimensions will help you avoid common mistakes during installation. The article contains practical advice professional furniture makers, answers to frequently asked questions from beginners, ready-made drawings of standard and corner kitchens, as well as well-calculated detailing of the main types of cabinets.
The dimensions of the kitchen set are dictated by the dimensions of the premises, the nuances of the location of communications, doorways, windows, niches and ledges. Therefore, it is extremely important to make accurate measurements, marking all the elements on the plan.
Measurements on the form:


When developing a kitchen project, you should take into account the dimensions of household appliances, countertop standards, and acceptable cabinet dimensions (height, width, depth).
- Information about the dimensions of the equipment is in the technical data sheet prepared by the manufacturer.
- Standard dimensions of laminated chipboard countertops:
- height: 28 and 38 mm;
- length: 3050 and 4200 mm;
- depth: 600, 800,1200 mm.
Standard sizes of kitchen cabinets
The height of the upper tier varies between 70-90 cm in increments of 5 cm.
Height of the lower tier of the kitchen: 850 or 900 mm. Depth of the lower cabinets: 500 mm - in this case, the overhang of the tabletop will be 4 cm in the front (above the facades) and 6 cm in the back.
The depth of the wall cabinets is 30 cm excluding doors.
Standard width of kitchen cabinets: 300, 400, 500, 600, 800, 1000 mm. Standard for cargo net (bottle holder): 150, 200, 300 mm. Hood cabinet width: 600, 700, 900 mm.
Overall size of the lower corner cabinet: 800x800 or 900x900 mm.
Upper corner cupboard: 550x550 or 600x600 mm.

Location of standard cabinets in a direct kitchen

Drawing of a standard set of furniture for a direct kitchen

Location of standard cabinets in a corner kitchen

Standard drawing corner kitchen with horizontal hanging drawers
Design principles for custom cabinets
If it is impossible to use standard sizes of kitchen cabinets, you must independently create a drawing of each cabinet separately, taking into account the nuances of the room. Some options when you need non-standard furniture:
- Protrusions or niches in the wall. In this case, the depth of the cabinet varies depending on the size of the wall deformation. That is, if there is a 200 mm niche behind the proposed furniture, it is quite possible to increase the depth of the cabinet by 150-180 mm. If, on the contrary, there is a protrusion behind the back wall of the furniture, then the depth should be made smaller.
- Availability of communications, sockets. Here you need to make sure that there is free access to important communication nodes (joints, connections, ventilation grates, valves, taps, etc.) and to the free use of the socket for its intended purpose. To do this, a schematic representation of the objects is first placed on the kitchen drawing, and during the design of each cabinet, they are drawn with a dotted line on the back wall. The dotted line is an option for indicating the locations for cutouts during assembly and installation.
- Individual idea complex configurations furniture, etc. In this option, each element of furniture is developed individually with a separate drawing. It is advisable to draw all complex connections close-up.

Projection in the wall: rough drawing of a lower kitchen cabinet

Drawing of a hanging box with a recessed back wall for a gas pipe
Examples of kitchen sets with dimensions
Building and designing a kitchen is always based on overall dimensions premises. After all strategic objects (pipes, sockets, protrusions, etc.) have already been placed on the drawing, you can begin arranging the cabinets under household appliances. Next, standard furniture should be placed, and only then non-standard structures.
Ready-made direct kitchen projects
When developing your own kitchen drawing, you can rely on ready-made kitchen designs with dimensions, while correlating the actual dimensions of the room with those indicated in the sketch.
Standard kitchen set with dimensions:


Drawing of a straight kitchen with custom cabinets:


Options for drawings of corner sets
Standard corner kitchen with dimensions:

Standard corner kitchen with dimensions
Designing a kitchen with a trapezoidal corner element:

Corner kitchen drawings custom size:


Detailing of main kitchen cabinets: drawings and dimensions
- Calculation of detailing is carried out taking into account the thickness of the chipboard.
- Standard thickness Laminated chipboard for the manufacture of kitchen furniture - 16 and 18 mm.
- Lower kitchen drawers are installed on adjustable feet 10 cm high.
- It is recommended to make the support bar (lower plinth) one-piece - inseparable for the entire kitchen set.
- The details and drawings of the kitchen below are designed for 16 mm chipboards and a 28 mm countertop.
- The height of the lower tier is 850 mm including the tabletop, the upper tier is 720 mm.
Cabinet for built-in oven

Sink cabinet
The width of the cabinet varies depending on the length of the sink.

Drawing of a kitchen cabinet for a sink 800 mm
Cabinet with drawers
The width varies according to the specified dimensions of the room or the wishes of the customer.

Sketch of a cabinet with 4 drawers, size 400x500
Bottom cabinet with hinged fronts
The size can be varied in width within the range of 300...1000 mm.

Drawing of a kitchen cabinet with two doors, width 600
Corner cabinet: two options

Sketch of an L-shaped corner section 900x900

Drawing of a lower corner cabinet in the shape of a trapezoid 900x900
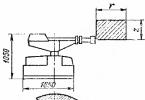
Cabinet for telescopic hood
The width of the cabinet varies depending on the width of the hood; the height is calculated relative to the dimensions recommended by the manufacturer of household appliances.

Project of a wall kitchen cabinet for a standard 600 mm telescopic hood
Wall cabinet with hinged fronts

Drawing of a top drawer with hinged fronts 800x720
Wall mounted corner cabinet: two options

Drawing of a corner L-shaped cabinet 600x600

Sketch of a trapezoidal corner upper cabinet 600x600
FAQ: answers to common questions from newbies
- How to take proper kitchen measurements yourself?
It is necessary to measure the room at different heights: at floor level; near work surface(850...900 mm from the floor); at the level of human growth. This is necessary to identify any unevenness in the wall. It is also better to measure the height at several points - to detect the curvature of the floor and ceiling.
Important! Horizontal measurements to objects located in the kitchen (counters, pipes, windows, etc.) must be taken from one corner, taken as the base.
- Which computer programs Suitable for a beginner to independently develop a kitchen drawing?
The most simple program for design – PRO100. Intuitive and easy to understand: Astra Furniture Designer, bCad furniture maker, KitchenDraw, WOODY, IKEA kitchen planner (excellent for standard furniture sets), AutoCad, 3D-constructor, Basis.
- Why do kitchen unit drawings with dimensions always contain a gap near the walls?
When designing kitchens, especially corner ones, it is very difficult to predict how perfectly the furniture will “fit” into the given dimensions of the room. No one is immune from the mistakes of builders who leave uneven walls after their work. A small gap of 5-7 cm helps furniture makers install the set without major alterations - if the sizes do not match, the furniture can be moved within these limits, and upon completion of the work, the remaining gap can be covered with a part in the color of the facade.
- What distance should be between household appliances in the kitchen?
It is best to leave at least 500…600 mm between equipment.
- Is it possible to install a washing machine in the kitchen?
Yes, sure. The main rule: distance from washing machine the nearest kitchen cabinets should not be less than 3 cm on each side.
- How many centimeters should there be between the lower and upper tier of kitchen furniture?
The optimal distance is 60 cm. The exception is the cabinet for the hood - here you need to rely on the recommendations specified in the technical data sheet of the device.
- In what order is it better to arrange household appliances on a kitchen drawing?
For right-handers, the most acceptable option is: refrigerator, sink, stove. In this case, the housewife moves from left to right: she takes food out of the refrigerator, cleans and washes it, then cuts it (between the sink and the stove), and then cooks, fries, and stews. For left-handers, it is better to use a mirror arrangement of household appliances: stove, sink, refrigerator.
- Why is it believed that furniture with legs is more durable than those whose side parts of the body are lowered directly to the floor?
Kitchen cabinets with adjustable legs can always be leveled relative to the floor. In addition, if various types of emergencies occur (neighbors above are flooded, a faucet breaks, etc.), only the lower base is damaged, replacing which is less expensive than updating the side parts of the cabinet.
- What should the back wall of kitchen cabinets be made of?
Here it is better to use fiberboard - it does not negatively affect the reliability of the structure, and the price is more attractive.
- In what units of measurement should the dimensions of kitchen units be indicated on the drawings?
Only in millimeters.
- Where should the outlets be located?
Layout of sockets for household electrical appliances:


- Is it possible to install a countertop 40-50 cm deep against one of the walls in a corner kitchen?
No problem. The only condition is that this part of the kitchen unit should not have built-in household appliances or a sink. All kitchen appliances have standard sizes designed for a 60 cm countertop.
- Are standard kitchen drawings with dimensions better or worse than designer designs?
There is no clear answer. For typical kitchen You can use a standard set of furniture, but for rooms with redevelopment, an individual calculation of the kitchen set is really necessary.
Creating a drawing is a difficult and time-consuming process. But step-by-step planning, clear measurements, correct placement of furniture and equipment, as well as strict adherence to instructions and advice from professionals will certainly be crowned with success. Line sketch direct location or a 3-D drawing of a corner kitchen with dimensions and details - the first step towards the kitchen set of your dreams.
I'll try to tell you about how I made simple kitchen furniture with my own hands. Let's begin...
The client wanted a kitchen like this
Those. In total, you need to make 3 wall cabinets, a sink and a cabinet with drawers and a work surface.
Built 3D models, drawings and cutting in Basis-Furniture Maker. I highly recommend it to everyone. When drawing such standard things, an irreplaceable complex!
Cabinet No. 1 - working


List of panels
- Vertical 704x510 - 2 pcs.
- Horizontal 1100x510 - 1 piece
- Horizontal 1068x150 - 2 pcs.
- Vertical 688x510 - 1 piece
- Base strip 1100x100 - 1 piece
- Drawer side 500x80 - 6 pcs
- Back wall of the box 310x80 - 6 pcs.
- Drawer side 500x195 - 2 pcs.
- Back wall of the box 310x195 - 2 pcs.
Cabinet No. 2 - sink
During assembly, the crossbars were rotated 90 degrees and shifted towards the wall and doors, respectively.


List of panels
- Vertical 704x510 - 2 pcs.
- Horizontal 800x510 - 1 piece.
- Horizontal 768x150 - 1 piece.
- Base strip 800x100 - 1 piece.
- Horizontal 768x80 - 1 piece.
Wardrobe No. 3 - Large wall cabinet

List of panels
- Vertical 400x385 - 2 pcs.
- Horizontal 768x385 - 2 pcs.
Wardrobe No. 4 and No. 5 - Small wall cabinet
We will make 2 identical wall cabinets. Maybe it would have been better to make one at 400 and the other at 700 to maintain the line with the lower cabinets, but we decided to do it this way

List of panels
- Vertical 400x385 - 2 pcs.
- Horizontal 518x385 - 2 pcs.
The facades will be purchased and ready-made. Therefore, they are not in the lists of panels on the diagrams.
- 148x386 3pcs.
- 257x386 1 piece.
- 299x706 1 piece.
- 405x706 1 piece.
- 715x396 2 pcs.
- 396x796 1 piece.
- 396x546 2 pcs.

The fronts of the top drawers will have inserted glass.

But with furniture fronts for small drawers - it flew by a little. Either I didn’t indicate where in the order, or who accepted the order, or at the factory - somewhere, someone didn’t take everything into account. In the end this is what I got

Two horizontal millings were made along the lower facade. But it was necessary to make one on the lower facade in the lower part, one on the upper facade in the upper part. The first major jamb of the project - Now I’ll know for the future.
Cutting chipboard boards
I ordered cutting the chipboard from the same place where I bought the chipboard itself.
Size of laminated chipboard - 2440x1830
Here is an approximate layout. Check.


I have to say, they did a terrible job this time. We will hide and mill :)
In addition to blanks with large chips, we also came across such specimens.

It happens that a part is either not finished, or the wrong size is cut, or it is cut with the wrong direction of the texture. Therefore, when I brought the chipboard home, I checked the dimensions of each part, glued a piece of paper tape to each and wrote the size of the part on it. Something like this.

This then helps you find the part you need faster.
I try to glue the tape to the side of the part where there are the least amount of chips. This will then help to correctly install the part in the product in order to hide chips from view. Although this is not strict - still, when installing, you twist the part ten times, choosing the best position.
Edging
The next stage in the manufacture of our kitchen is edging - processing the ends of the finished parts with PVC edges.
I always glue the edges on all the parts, and only then start assembling. This is how I break the work into several stages. This makes it possible to prepare more convenient place for a specific stage and minimize the amount of tools and material at the workplace. This is more practical and convenient, especially if the entire furniture manufacturing process takes place on small kitchen- like mine:).
I always tape edges to ALL the ends of each piece. Those who are too lazy or think it’s superfluous can only glue the visible ends with edges (this is done in all furniture manufacturing companies). I process all ends without exception, as this minimizes the evaporation of formaldehyde resins that are harmful to health. Secondly, you never know where water might appear. There was an incident with a hidden bottle of champagne. She decided to open herself in the closet. After that, I had to replace 2 shelves, as they were all swollen from moisture. I don’t know if an edge would have saved the shelf from such a fate – I think so. Therefore, when ordering furniture, I recommend that everyone insist on edging all ends. Yes - it's more expensive. But health is more expensive - although this is a personal matter for everyone.
What do I use to edge the ends of chipboard parts when making furniture.....

Let's start in order:
Two clamps and a flat guide. In my case, a piece of tabletop. I press the guide to the table with clamps. When gluing the edge, I rest the part against this guide. This makes it possible to free left hand. I use it to guide the edge when gluing it and hold the sheet of paper.
Edge roll with glue applied. I put clamps on the screw. It unwinds very conveniently and does not fall anywhere.
A stationery knife with a wide blade and a large, comfortable handle. They can carry out all operations on edge cutting. But I only use it for trimming the end overhangs of the edge.
Convenient longitudinal double-sided edge trimmer from Wegoma. The tool is nice but not indispensable. All of its work can be done by an ordinary stationery knife and does it no worse, although it takes longer.
Well, the process of edging itself
I put the part on the table and rest it against the guide. I stretch the edge along the entire end and lightly fix it at the beginning of the end by touching the iron. I don’t level the edge along one edge, but give overhangs evenly on both sides.

After this, I lay down a sheet of paper and begin to iron the entire end through it. I warm it evenly along the entire length. I don’t stop, otherwise the edge will quickly overheat and swell with bubbles. Without paper it happens much faster. I control the process by the condition of the glue on the open overhang of the edge. I try to catch the moment when the glue begins to flow, but does not bubble yet.

When the glue is in this state along the entire length of the end (of course, if the part is small), I lift the nose of the iron and press with the heel of the sole along the entire length of the part. You need to make sure that the heel touches the entire end, and not just one of the edges. In this case, the edge is pressed very tightly against the chipboard, which means it sticks well.

While the glue has not yet completely hardened, I turn the part over and place it on the table with the edge glued on the end. I press on the part from above and shake it slightly. By pressing and rocking the part on a flat surface, a good fit of the edge on the overhang lines is achieved. In addition, heat is transferred from the edge (glue) to the table. The glue hardens faster. You need to cut the edge only after the glue has hardened.
In this position, I immediately form the end overhangs of the edge with a stationery knife.

There is no need to cut anything by tearing the edge. You just need to install the blade and press harder. I usually do this by laying a strip of fiberboard with the sanded side up.
All that remains is to use the Wegoma longitudinal trimmer. I didn’t get the hang of cutting on both sides at once. So I cut one side at a time. Fortunately, the trimmer is detachable. For achievement best result I first trim the edge a little from one end (otherwise there will be chips and breaks when it comes out), and then I move the trimmer from the opposite end. This is roughly how the process works – easily and without stress. Accidental cuts of the laminate with this method are excluded (but when “burying” a stationery knife, they happen).

After this, you can put into assembly the parts that will be attached in places where access to the sealed edges will be limited, i.e. the likelihood of catching the edge is minimal. Although I still advise you to go over it with a rag to remove any escaping glue. Here is a photo of the edge after trimming. Don't be alarmed, the white is not chips - it's glue.

But we strive for the ideal. Therefore, we go through with fine sandpaper wound on a block. Wipe off excess glue. And we get this end!!

For example, cutting an edge using a regular stationery knife.

I put a sheet of paper and the blade of a stationery knife extended to its full extent. I press the nose of the knife with my left hand, and hold the handle of the knife with my right. It is important that the sheet of paper lies tightly against the glued edge. Then with my hand lying on the sheet of paper and pressing the nose of the knife, I pull the sheet of paper towards myself. It turns out that the knife lies on a sheet of paper, and the paper slides along the edge. In this case, the knife will not bury itself in the chipboard laminate and scratch it.

There is no left hand in this photo - she is holding the camera. In general, she should press the tip of the knife and pull the sheet of paper along the edge.
Here you don’t have to try too hard and don’t worry if the edge is cut by waves. The main thing is not to remove the laminate. In the photo below, I deliberately chose a worse area - after trimming the furniture edge with a knife.

Next, I remove the sheet of paper, place the knife directly on the laminate and trim the remaining edges. The remaining edges are small - often the thickness of paper, so they do not create such resistance when cutting that the knife cuts into the laminate. Therefore, placing the knife along the entire line of the tip on the laminate, I cut off the remains.

Here, too, it is advisable to press the nose of the knife - I just have a camera in my left hand.
We sand it on the block, holding it at 45 degrees (we make a chamfer), wipe off the remaining glue with a rag and get this end.

Assembly
Well, now about the assembly...
In general, I don’t really know what to say here.
When assembling I use corner clamps.

I clamp the parts to be fastened from above and below. I add sheets of paper, otherwise there is a high probability of scratching the laminate or tearing off the edge.
I first mark the drilling location with a pencil and then with a wood drill (nail). I drill it and screw in the Euroscrews without disassembling it.
When choosing a drilling location, I am guided by the following rule. I retreat 60 mm from the edge. If the length of the connection of parts is more than 400 mm, I use 3 Euroscrews. Although this must be looked at locally, of course.
To drill for Euroscrews, I use a special drill with a cutter. Very convenient - all 3 diameters in one go.

I drill under the hinge cups for facades with a special cutter with a stop. The stop prevents you from drilling deeper than the hinge cups require. A very convenient thing. Before this, I had to look for Fostner drills and grind the guide pin down to a minimum. Check the drilling depth by eye. Now everything is much easier and faster - I recommend it to everyone.

I’ll tell you how I made hanging boxes using the largest one as an example. With dish drainer. The cabinet is low. It was not possible to insert a drying rack for mugs and plates - there was not enough height. I decided to divide it into two sections. One has a drying rack for mugs, the other for plates. I bought a long dryer 800 mm. Then I cut it to fit the sections. The dividing wall hangs on the lid - it does not reach the bottom. Therefore, I put a standard 800mm dryer tray there.


In general, everything is clear with the assembly. The bottom and lid are removable. We secure the parts using corner clamps up and down. We drill and twist with Euroscrews. When the frame is assembled, screw it on back wall(back) made of fiberboard. In stores, they increasingly began to nail down the back walls, or even simply shoot them with a stapler. I still prefer to screw it on. I tighten thin screws 20 mm long in increments of 80-100 mm. You can use regular fiberboard, not laminated. But stains appearing from moisture and grease are clearly visible on it. Therefore, I still recommend laminated fiberboard - it can be washed.
It is worth stopping at installing loops - frogs. I installed regular Boyard overhead hinges. The cheapest they ever were. In general, they work fine - but over time - we'll see.
From the edge, the center for the loop cup is marked 21-22 mm. I try to maintain 21.5mm. According to the height of the box from the top and bottom, I outline the center of the box to be 80-100mm. You need to look at the place. BE CAREFUL NOT TO DRILL IN THE MILLING PLACE!!! On these facades, I milled at 70 mm from the edge. So I moved the hinge to 110mm.

After the hinge cup is drilled, I install the hinge, place the metal corner, align one side of it with the edge of the facade, and the other side of the corner sets the hinge in the desired position. I mark the holes for the screws. After that, I drill blind holes and screw the hinge. In order not to drill through the facade, I use one very simple technique. I take a drill and wind it on required height a strip of paper tape. Now it is very convenient to control the drilling depth.

A special metal corner was chosen as a suspension. It is attached to the cabinet with a bolt through and through a large washer. Allows adjustment and is easy to attach to the wall.

Now I’ll show you how I install the front with screwed hinges on the cabinet.
I open the hinges, move the support platforms to the middle position and place the front on the desired surface of the cabinet. We shake the facade and catch the moment when the hinge platforms lay completely on the surface of the cabinet. Only in this position do we mark the drilling locations for the screws for fastening the hinge platform.

Do not mark when the nose or heel of the hinge platform is raised above the chipboard (as in the photo below). In this case, there is a high probability that it will not be possible to adjust the loop at all - the adjustment limits will not be enough.


All that remains is to drill and screw the facades. After this, it is necessary to adjust the hinges so that there are equal gaps everywhere and the front lies clearly along the perimeter of the cabinet.
Kitchen sink.
There are several nuances when making a kitchen sink. First, here are pictures of the assembled sink. Is it true door handles not installed here yet.


The tabletop must be selected (cut) according to the depth of the cabinet so that the drip tray extends beyond the facades. A drip tray is a special groove made of water-repellent material or a shallow groove, which is located on the lower front side of the tabletop. When water gets on the countertop, the drip tray prevents it from flowing inside the kitchen cabinets, causing the water to fall to the floor, bypassing the front part of the kitchen.

In general, the packaging of stainless kitchen sinks already has a template for marking the countertop. But the last 2 sinks I installed came with the wrong templates. Therefore, I advise you to check the template first. Cut it out and just try to put it on a stainless kitchen sink. On the first one, my template was 1 cm smaller than needed on all sides. The second one was missing 1 cm on the side.
Now - how I inserted the sink into the countertop. First, I drew the boundaries of the free space on the countertop. Those. on the left and right, the lines at a distance of 16 mm from the edge are the sidewalls. Rear 21mm (stiffness bar 16mm + 5mm – canopy over the fiberboard wall). In front, starting from the drip tray line - 34 mm (16 mm - facades + 16 mm stiffener bar + 2 mm - gap between the facade and sidewall). Now there is a rectangle on the countertop into which you need to fit the sink. I measured the sink and the resulting rectangle. I needed to position the sink in the center. Therefore, I placed the sink on the countertop, leaving equal distances from all sides of the sink to the rectangle obtained on the countertop, and traced the sink along the countertop with a pencil. Then I stepped back 15mm inward from the resulting outline and drew another outline simply by hand. I cut along this line with a jigsaw. To insert the jigsaw file, I first drilled a through hole with a 10mm drill bit. I inserted a jigsaw blade into it and then went out to mark. It turned out that when installing the sink, it overlaps the countertop by 15 mm.
After cutting, it is necessary to seal the tabletop to protect it from water. The outer ends were covered with a wide furniture edge. The resulting internal cut and the lower plane of the tabletop were coated without sparing, rubbing well, with a transparent sealant.
Before installing the sink, you need to secure the countertop to the cabinet itself. Since the sink is large, we had to be clever. Screwed into the corners metal corners- photo below.

In the middle of the sidewalls and stiffeners I installed cut corners. I drilled a hole at the bend and screwed a screw at 45 degrees into the tabletop.

After that, I installed the sink and tightened it with standard fasteners. You need to watch the screws you screw in. In some places, at a certain angle of twist, the screw, when fully tightened, can rest against the stainless steel and squeeze it out.
I installed the included sink seal. It is self-adhesive. Glued along the edge of the sink. Maybe I just couldn’t - but I couldn’t pull it across the entire surface without a gap. The gaps are minimal - a nail will not fit through. But a hole is a hole. Therefore, I unscrewed everything and additionally applied a strip of transparent sealant around the entire perimeter of the sink, in front of the glued standard seal. In general, some craftsmen throw out the standard seal and install the sink only with sealant. Squeeze the sealant like a “sausage” onto the edges of the sink, turn it over and tighten it. At the same time, there are no gaps, the sink fits well, and is also well sealed with silicone sealant, which can also be antiseptic.
Additionally, the side ends of the tabletop were covered with a polished plank. It is screwed on with screws. Before installing it, I coated it with silicone sealant. This strip prevents the destruction of the tabletop from possible side impacts and additionally protects against water ingress.

Desk with drawers
Now I’ll tell you how I made the next piece of furniture for my kitchen. This is a desk with drawers. First off - photos of my kitchen workbench - the end result.


Both the sink and the work table are mounted on 100mm adjustable supports. A plinth strip is attached to them in front using standard clips.
For small drawers I used Boyard ball guides with a load capacity of up to 25 kg. For large roll-out boxes I used wide ball guides from the same company, with a load capacity of up to 45 kg.
There are no special features when assembling the desktop. The tabletop is screwed through the planks with screws. The only subtleties are in installing the facades.
I fastened the facades with screws. 2 screws per facade. First, I glued small pieces of double-sided tape to the box. Then he carefully brought the façade up, holding onto the pre-fixed handle. I placed pieces of fiberboard on top and on the sides (for installation with equal gaps). Pressed down. After this, the facade turns out to be quite well fixed. Installed all the facades. If it was sagging, I boldly tore off the façade and glued it back on - very convenient. When I was completely satisfied with the location of the facades, I drilled them with a thin drill and screwed in the screws. That's the whole trick.

This is what happened in the end


The cost of making a kitchen - cost
Position |
Price, rub |
| 2 chipboard sheet laminated 1.83x2.44 16mm | |
| Chipboard cutting | |
| Edge with adhesive base | |
| Facades | |
| Fiberboard - 1 sheet | |
| Pens | |
| Glass | |
|
|
| Washing | |
| Drainer | |
Total |
11580,72 |
A small number of screws, euroscrews, silicone sealant, Double-sided tape, stubs, were already there and were not bought. Plus consumables: jigsaw files, sandpaper, drill for euroscrews (the cutter gets dull quickly). Therefore, the real costs are not much, 300-400 rubles more. |
|
Blanks from furniture panels
It happens that the choice in furniture stores is large, the price range is varied, but you just can’t find a kitchen set! Either the color is wrong, or the quality is not satisfactory, or the dimensions are not suitable for a particular apartment. Then there is only one way out! Make your dream kitchen with your own hands from furniture panels - a high-quality, rewarding and responsive material.

DIY kitchen set from furniture panels
Advantages of furniture board
This environmentally friendly material is often used for the manufacture of stairs and furniture; it is also in demand in decorative works. The furniture panel is wooden board, but the board is glued and pressed, where is the strength of the connection individual parts happens to be the highest.

Types of lamination of furniture panels
Furniture panels are made from oak, birch, and pine wood. This material is durable and easy to process. It holds nails, screws and other fasteners securely.

The process of assembling a kitchen from furniture panels
Furniture panels are used to make kitchen sets for a number of reasons:
- Durability and practicality. Such furniture can last for more than one year. And during operation it is not subject to deformation or distortion.
- Environmental friendliness. The basis of the shield is wood. And during gluing, PVA glue is mainly used - a safe material that, after hardening, does not emit harmful substances.
- Aesthetics. Appearance Products made from panels are not very different from furniture made from solid wood.
- Low cost. Furniture panels belong to economy-class materials, but the price-quality ratio is the best here.
- Large size range. What makes it possible to make furniture? different sizes, and also save significantly on material.

Kitchen made from furniture panels with an island area
Work design
Before starting work on creating a kitchen set, it is worth updating the entire room. Check the condition of the windows; if you do not have double-glazed windows, then you can think about installing them. Pay attention to the ceiling, how long ago you plastered it. If the walls require new wallpaper, apply it before installing the furniture. You also need to check plumbing equipment. Changing or repairing it after installing the furniture will be quite inconvenient.

Drawing of a kitchen set from furniture panels
In parallel with these works, you can come up with a plan for placing kitchen furniture. It is best to make your own drawing or sketch with the dimensions of the future furniture. It must show the dimensions of the kitchen, communication and ventilation diagrams.

Kitchen set made from furniture panels
Its functionality and practicality in use depend on the arrangement of furniture. Typically, a kitchen set is installed in several ways:
- Linearly, along one wall;
- In the form of the letters G or P;
- With the addition of an island.

Corner kitchen made of furniture panels with a dining area
Before drawing up a sketch, try to imagine what kind of kitchen you want. Consider the locations of built-in equipment: hob, ovens, microwaves, as well as the arrangement of the rest electrical appliances and backlight. The classic triangle: sink, stove, refrigerator are usually located close to each other.
note! Sockets and gas shut-off valves must be in an accessible place.

Location of sockets in a kitchen made from furniture panels, assembled with your own hands
In do-it-yourself kitchen drawings, five mandatory sections are distinguished from furniture panels:
- Worktop;
- Gas or electric stove;
- Washing;
- Place for dishes;
- Grocery area.

Kitchen made from furniture panels with a bar counter according to your own design
Furniture set calculations
All communications are drawn on the drawing, which is preferably done to scale. Naturally, the washing needs to be done next to the drainage and water supply outlets. Between the stove and gas pipe should be no more than 2 meters.

Wooden kitchen with geyser
When designing kitchen furniture, the height of the housewife must be taken into account, because she will be the one who will spend a lot of time preparing food. In addition, the sketch should reflect:
- Socket installation locations;
- Location of switches and lamps;
- Height of working surfaces;
- Finding a sink.

Making a kitchen sink from furniture panels
Each element of furniture, shelves, drawers is carefully calculated. There are also free computer programs that will help you correctly make calculations based on the location of the built-in equipment, and select the necessary dimensions of the furniture, taking into account specific wishes.

DIY upper kitchen cabinet made from furniture panels
Required tools and materials
Usually, if a man knows how to do some housework: change sockets, repair plumbing, screw shelves, then necessary tools there are in the family.

DIY door installation
You can check if it is in stock:
- Wood saw or jigsaw;
- Plane;
- Drill;
- Grinder;
- Angle clamps;
- Screwdrivers (screwdriver), hammer, nails;
- Construction level, tape measure, square;
- Chisel.
Each master can add something of his own to this list.
When purchasing furniture panels, be aware that they can be different thicknesses: 15 mm are suitable for the back walls of furniture, 20 mm for the rest of the cabinets, 25 mm are used for complex decorations.

The process of gluing furniture panels
Furniture panels are cut according to drawings. This must be done carefully using a jigsaw; inaccuracies can lead to distortion of the entire headset. For a beginner, it makes sense to order cutting of the material at the place of purchase.

Screwing door mechanisms using a screwdriver
After cutting, you should have parts for each cabinet, doors, shelves, countertop, sink, and fittings. Check quantity door hinges, handles, ball guides, furniture legs and other components. If you planned a tabletop from the same material, then to protect it you should cover it with furniture oil in several layers, and silicone the ends and cuts.

Kitchen set made from furniture panels in the process of assembly
Note! To prevent the cabinet doors from touching the neighboring ones, they are made smaller in height and width by several millimeters.
Cabinet assembly
The prepared and numbered parts of each module are laid out where it is planned to be installed. Such actions will prevent confusion and loss of some parts.

Kitchen layout from furniture panels
The assembly procedure includes the following:
- Parts made from furniture panels are pre-ground, polished and varnished. If you decide to make the facades yourself, you can use hand router apply to the front of the doors simple pattern. It is better to carry out such work outdoors or in a special room, because there is a lot of dust and shavings.
- The assembly of the lower tier of furniture begins. First, the legs are marked and screwed to the bottom of the cabinets using screws.
- Let's move on to the sides. If planned drawers soft closing, then the guides are marked and screwed. Usually for such boxes there are detailed diagrams installations. The boxes are assembled and inserted into the grooves. Where there will be regular shelves, special corners are attached.
- The sides are attached to the bottom panel using corner clamps. The screws are screwed in. To avoid through holes, do not rush when working with the drill. The top cover is attached in the same way.
- Plywood cut to the size of the cabinet is screwed onto the back side. The facades are installed last. Install them in an open state. The doors are fixed at 95° and the fastening points are marked with a pencil. Place the facades on hinges, attaching them to the sides with self-tapping screws.
- Finally, the handles are attached, and then the modules are filled with shelves, drawers, and grids. The rest of the cabinets are also being assembled.

Ready-made kitchen set in the kitchen interior
Installation of kitchen units
The entire set is assembled in a renovated kitchen with smooth floors and dry walls.
- You need to put furniture in place from the outer cabinet. The lower modules are aligned according to construction level. If the horizontal line is uneven, problems may arise when laying the countertop. After installation and alignment, the sections are connected to each other with ties. To do this, drill a hole, insert the part and tighten it.
- A tabletop is placed on top of the cabinets and secured with self-tapping screws. The place for the stove and sink is marked with a pencil, the holes for which are cut out with a jigsaw.
- The next stage of creating a kitchen with your own hands from furniture panels will be the installation of the upper tier. Unlike the bottom line, wall-mounted modules are mounted on the walls. It is necessary to carefully calculate the weight of each cabinet with shelves and fasteners. Usually they are hung using special loops attached to the back walls from above.
- The standard distance between the bottom and upper cabinets- approximately 65 cm. This is the height of a traditional kitchen apron. We add to it the size of the cabinet minus a few cm for the fastening. The resulting number will be the height of the upper tier.
- Finally, they install the hood, sink, hob. Glass and mirror elements facades.

Kitchen interior made from furniture panels
Making a kitchen with your own hands from furniture timber is not a difficult task. At great desire and a certain skill you can get not only exclusive furniture for little money, but also the title home handyman, and respect from all household members.


https://youtu.be/uXb6yr_IXtI
Photo gallery (52 photos)
Any furniture showroom can offer a wide range of kitchen furniture. But buying a kitchen set is not always affordable for the apartment owner. In addition to the high cost of kitchen furniture, many have to deal with the problem of its large dimensions, which do not correspond small apartment. The solution to such issues could be self-production kitchen furniture. With the help of ready-made components, which can be easily found in almost any specialized store, this task is quite simple to cope with. The cost of a self-made kitchen, as you understand, will be noticeably different from that purchased in a store.
Figure 1. The first stage of creating a kitchen with your own hands is taking measurements and creating a drawing of the kitchen.
The process of making kitchen furniture with your own hands is actually not as complicated as it might seem at first glance. As for the tools that you will need for work, they are so primitive that you probably have them in your home. Purchasing hardware can be a lot of fun, with various hinges, handles and drawer slides providing inspiration for DIY kitchen cabinetry.
Step-by-step instructions for making kitchen furniture with your own hands

Figure 2. A furniture placement drawing must be made in order to clearly verify that the kitchen set will fit into the size of the kitchen.
Armed with a tape measure and a simple pencil, you can proceed to the 1st stage of work - taking measurements and creating a drawing (Fig. 1). First you need to take accurate measurements of the kitchen and write them down on paper. It is recommended to display the room on a certain scale, so that the finished kitchen furniture will fit into it as profitably as possible. A drawing of furniture placement in the kitchen is shown in Fig. 2.
At this stage of the work, it is worth deciding on the location of the sink and stove. If their location does not suit you, the drawing should indicate the place where you are going to install them. As for the sink, the issue here is not particularly important, but the installation location of the stove needs to be thought out to the smallest detail, since the dimensions of future furniture for your kitchen will depend on this. In addition, considering big sizes refrigerator, it is important to decide on its location in advance. At the same time, do not forget about free access to it.
The next step is to fit kitchen furniture into the resulting space dimensions. In addition to the bottom row of future cabinets, it also takes into account top part furniture, do not forget about placing the hood on top of the stove. When calculating the width of cabinets, keep in mind that the resulting dimensions will have a direct relationship with the width of standard furniture facades.
If you have such an opportunity, you can order all the components for the kitchen space, taking into account the specified dimensions, including furniture fronts. When calculating furniture dimensions, special attention is paid to the size of the drawers, which, according to your idea, will be pulled out. In addition, you should decide where the internal shelves will be located.

Figure 3. Drawing of kitchen furniture taking into account chipboard dimensions.
By correctly calculating the dimensions of the drawers, you will ensure their convenient use; in addition, this will determine what size decorative facades you will need. Based on where you decide to place the shelves, you can determine how many of them you will need. It is advisable to make this calculation so that household appliances can be freely placed in the finished cabinet.
Having indicated all the dimensions in the drawing, you should decide on the material that is ideal for making kitchen furniture. If you want to meet minimum costs, you can give your preference to laminated chipboards; the back walls in this case are made of fiberboard. At the same time, the most the best option there will be furniture facades made of MDF material, since they are distinguished by their practicality and durability. In addition, the material comes in a wide variety of colors. There are no special recommendations regarding the choice of countertops; here you should only take into account your material capabilities and rely on your own taste. In Fig. Figure 3 shows a drawing of a kitchen unit taking into account chipboard dimensions.
Return to contents
Component parts

Figure 4. Corner drawing kitchen sofa.
Considering the fact that you will not be able to buy ready-made parts that have the dimensions you need, any company that deals with this can provide you with a similar service. It’s worth noting right away that home conditions are absolutely not suitable for the manufacture of high-quality parts. In this case, a jigsaw can only ruin the material, since by using it you risk getting chips and other defects.
By contacting any relevant company, you will receive perfectly sawn material, taking into account all sizes with already processed edges. If you wish, you can save money by doing the edging yourself. But in this case, you will need melamine film, which, as practice shows, is not particularly durable.
The melamine film should be glued to the end side of the part; for this, a regular iron is used. Excess material is trimmed using a utility knife. Such a process cannot be called complex, due to the fact that the basis of this finishing material It's paper, it's very convenient to work with.
Your kitchen will last much longer if you choose ABS plastic edging. It is glued using specially designed equipment. In the case of other types of edging, they require appropriate processing of the end part of the part.
When placing an order for parts, be prepared for the fact that you will be required to take all their measurements, which must be indicated in millimeters. It is very important that the dimensions of the fronts are approximately 3 mm smaller than the dimensions of the cabinets. In addition, keep in mind that their height should be calculated so that the doors do not touch the floor. It is recommended that the height of the legs be around 80-100mm. The drawing of the corner block of the kitchen sofa is shown in Fig. 4.
Many companies that accept such orders provide the opportunity to purchase accessories here. In this case, there is no point in going to specialized stores.
Return to contents
Materials and tools

Figure 5. Drawing with dimensions of an L-shaped wall kitchen cabinet.
- Furniture hinges.
- Confirmations.
- Self-tapping screws.
- Dowels.
- Electric drill.
- Jigsaw.
- Screwdriver.
- Forstner drill.
- Roulette.
- A simple pencil.
Return to contents
Build process
Assembling the furniture that will be in your kitchen is carried out in stages. You should act using the drawing. First of all, the cabinets are assembled. To fasten parts it is necessary to use confirmats (special furniture ties). To install them, you first need to drill holes; for this purpose you will need a drill with a diameter of 5 mm.
The back wall should be attached to the finished cabinet body, for which it is better to use laminated fiberboard material. After assembling the cabinets, all that remains is to install the adjustable legs. In Fig. Figure 5 shows a drawing of an L-shaped corner wall kitchen cabinet

Figure 6. Design of the side wall of the kitchen cabinet - pencil case.
The tabletop must be laid so that it lies on the lower cabinets. Use self-tapping screws to secure it. The sink should be mounted in a pre-cut hole in the countertop of the size you need. To ensure the hole fits your sink exactly, place it on top of the countertop with the bottom facing up. By using a simple pencil outline its outline. After removing the sink, inside Draw a line from the resulting drawing so that it deviates from the previous line by 1.5 cm.
Then, using a jigsaw, cut out the hole you need.
The cut must be well treated using silicone sealant.
This way you will protect the countertop from negative impact moisture, thereby significantly extending its service life. In Fig. Figure 6 shows a drawing of the side wall of the kitchen cabinet.
Before you begin installing and securing the sink, also treat its lower part using the same silicone sealant. This will prevent water from getting under the sink.
On next stage work, drawer guides are installed, as well as fasteners for shelves. Self-tapping screws must have a length corresponding to the thickness of the chipboard. For shelves in which you are going to store heavy objects, it is advisable to use metal corners.