Repairing a geyser cannot be compared with any other home appliance in terms of its complexity and the number of possible technical problems. More complex and rich in possibilities technical nuances There may only be repair of gas boilers at home. If you can still try to repair the water heating device yourself, then it is best to entrust the maintenance and repair work of the heating boiler, regardless of the amount of built-in automation, the presence of a secondary circuit and the manufacturer, to a certified specialist.
What can you repair in a gas water heater with your own hands?
Of course, a gas hot water heater does not always wear out or break so thoroughly and irrevocably that it is impossible to do without the help of a specialist. According to reviews from the same mechanics of the gas maintenance service, in 70% of cases repairs geysers comes down to routine maintenance and the elimination of minor defects, usually associated with poor quality parts or improper adjustment.
The list of works available for repairing geysers at home can include the following:
- Minor repairs and repackaging of coupling and nut joints of pipelines;
- Replacing the elastic membrane in the water-gas column regulator;
- Cleaning and adjusting the operation of the draft sensor;
- Cleaning and washing the heat exchanger;
- Ignition board repair.
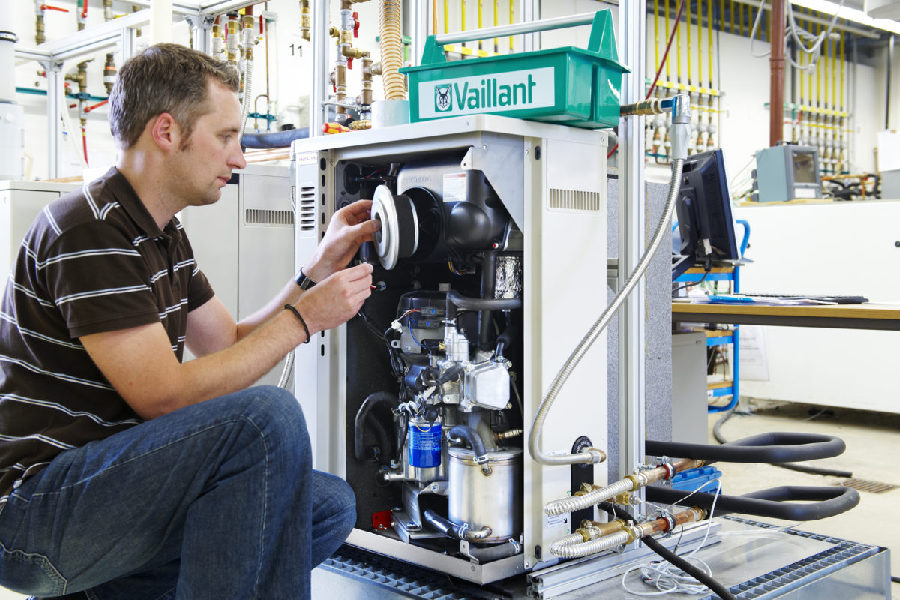
It is clear that there is a certain category of expensive hot water heaters, full of automation and electronics, which there is simply no point in even trying to repair at home. For example, repairing Electrolux or Vaillant geysers will cost less service center due to the high cost of spare parts. The exception is particularly critical nodes, such as three-way valve or ignition board, it is better to buy them from official dealer, even if the price is higher. This is the only chance to carry out repairs and not destroy an expensive Italian or German speaker with substandard spare parts.
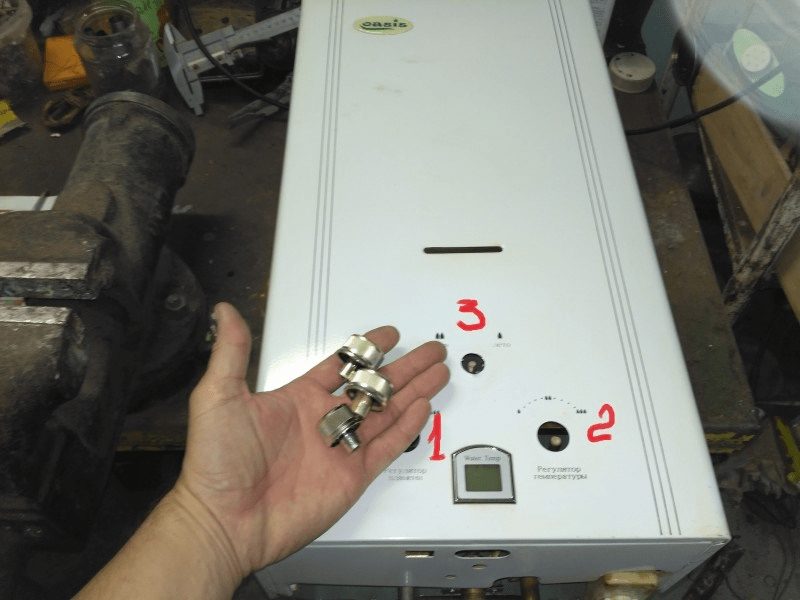
Repair of geyser Oasis
Chinese Oasis water heating devices have attracted attention on the domestic market, primarily due to their low price and simplicity of design, which allows for do-it-yourself geyser repair in almost any problem situation. The structure and format of the main parts are very similar to most domestic systems, so there are no problems with disassembly and repair, even if there are no repair instructions or diagrams for the Oasis gas water heater.

It is known from practice that Chinese gas apparatus Oasis suffers from three types of defects:
- Rapid battery discharge;
- Failure of spark plugs;
- Water leakage on the seal of the membrane water pressure sensor.
In the first case, the problem with the batteries manifests itself quite unusually; the indicator panel pleases with blue or green light, but when you try to turn on the gas water heater, nothing happens. Repair of such a defect is carried out by simply replacing conventional salt batteries with alkaline cells with increased charge capacity. They should last for at least a year.

Disassembling the Oasis for repairs
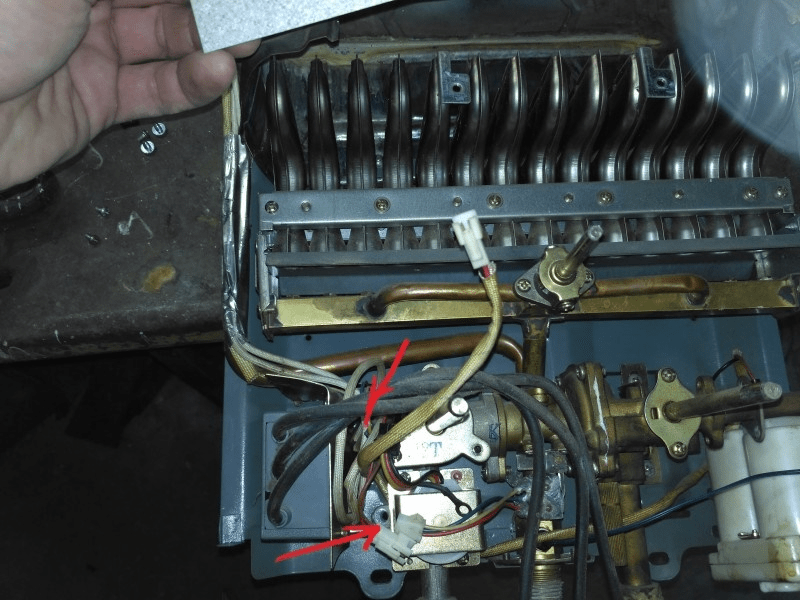
If drops of water begin to appear under the column, this most likely means that repair of one of the flow parts of the water heating apparatus will be required. To determine the cause of water leakage and carry out repairs, the Oasis must be disassembled. First of all, you need to remove external cladding apparatus. To do this, remove the handles and unscrew the screws in the lower part of the case.
The next step is to disconnect the connectors from the indicator panel and microswitch.
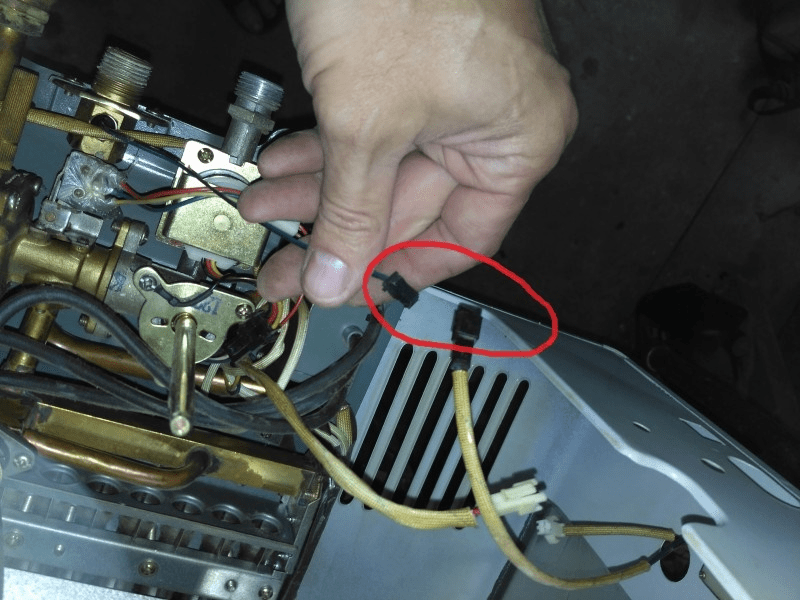
We gain access to the future place of repair - the membrane water pressure control unit.
We repair the gas water heater control unit
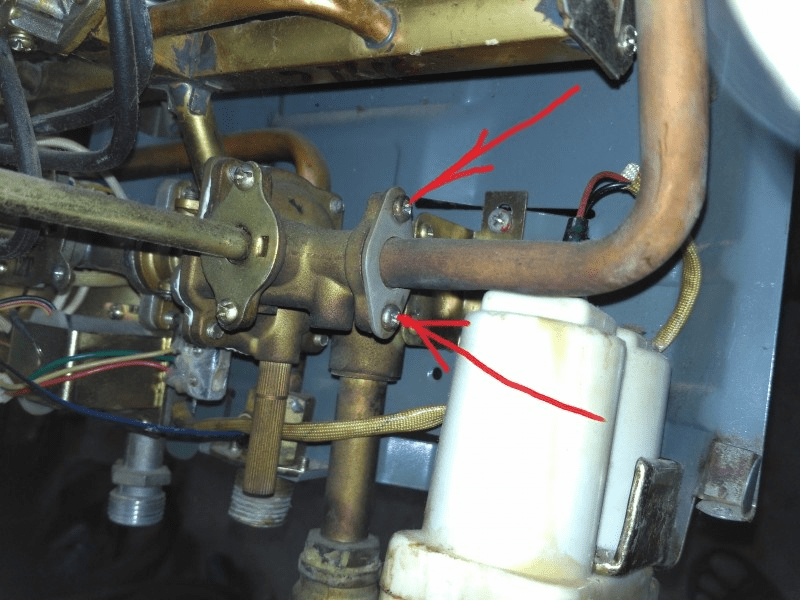
In order to remove the pressure control unit, you must carefully disconnect the microswitch connector and remove the two screws securing the heat exchanger flange to the unit body.
It is clear that before repairing a gas water heater, the water must be turned off and the remaining water pressure in the system must be released by opening the tap.
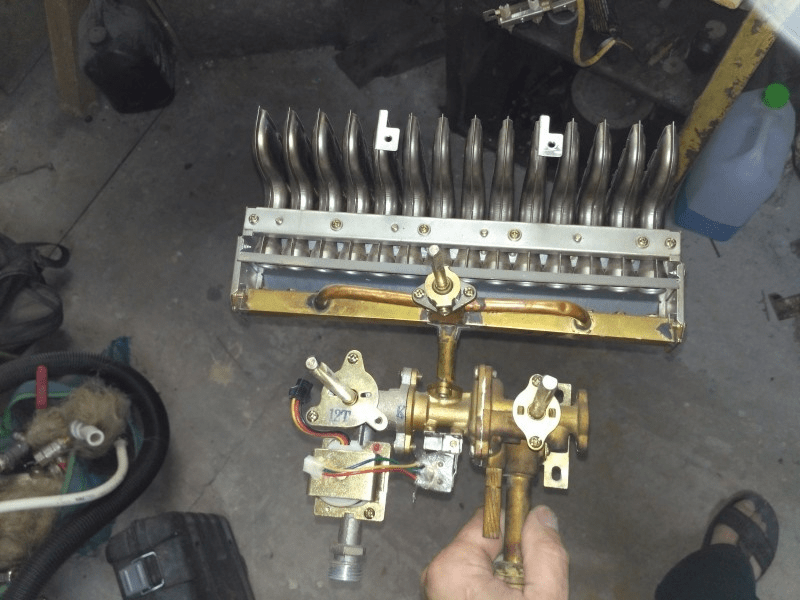
For repairs, additional removal will be required. gas block water heating apparatus and burner device.
The removed unit can be disassembled for repair by removing four steel screws. Typically, steel fasteners stick strongly to brass, so the joint is pre-treated with VD-5 or brake fluid.
The pressure control unit operates as follows:
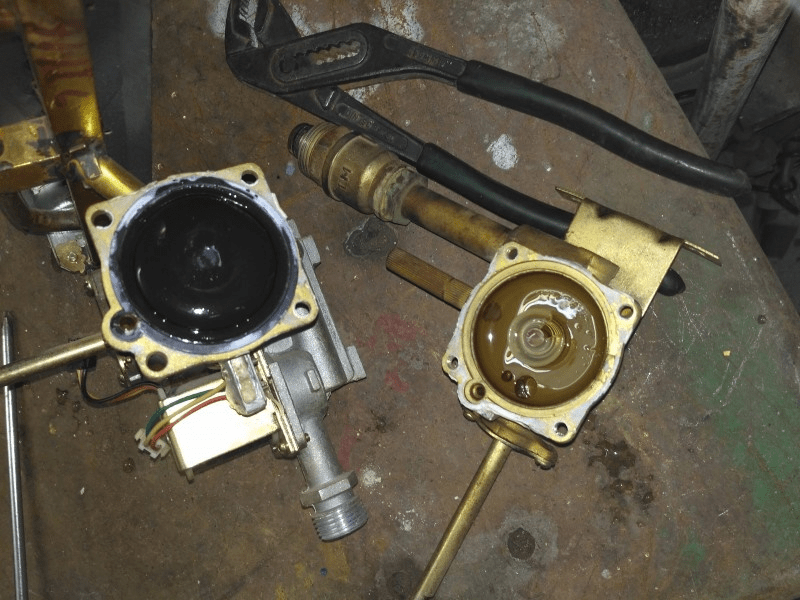
It is clear that the surface of a steel rod, when in contact with rubber, intensively corrodes and becomes covered with cavities. Each movement of such a rod leads to catastrophic wear of the oil seal, which begins to leak within a year. In addition, during any repair, at the first opportunity it is necessary to change the membrane to a high-quality rubber one.
A situation often occurs when, before repairing the seal, the geyser begins to boil and spew steam. This suggests that the membrane also needs to be cleaned of dirt and, if possible, replaced.
Repair of the geyser electrode system
Chinese manufacturers of Oasis geysers always like to save on the quality of the materials used. An example is a situation where a new, fully operational gas water heater stops igniting even with a working water and gas control unit and ignition board.

The reason is the failure of one of the three spark plugs of the burner flame. The design of the burner device is such that in order to ignite the gas, it is necessary that all three spark plugs be in good working order.
Repairing the gas water heater ignition system begins with identifying the faulty spark plug. To do this, you need to remove the cladding, turn off the lights and shade the room. When starting the gas water heater, you can see how on one of the spark plugs the electric discharge strikes not into the gas flow, but much lower, into the housing.

The situation is extremely dangerous and requires urgent repair of the ignition system of the gas-air flow in the column. Repairs cannot be postponed, even if the column lights up the second or third time it is started. When starting into the fuel chamber and exhaust device pumped up a large number of mixture of gas and air, and if the ignition of the column is triggered with a long delay, an explosion and fire are possible.
For repairs, it is necessary to dismantle all three spark plugs, clean them of carbon deposits and oxidation products. One candle definitely pierces the body, the rest are unknown in what condition, so all three are put in an insulating heat-shrinkable polymer tube, at least three or four layers. During the repair, you will need to insulate the clamping bar in the same way, which secures the spark plugs to the burner body.
Repair of geyser Neva
Most models of Neva geysers have proven themselves to be simple and easy to repair. water heating devices. They are far from the reliability of European models, but repairing them is much cheaper, and you can almost always do it yourself.
Failure and subsequent repair of a spark plug is considered by the rules to be an atypical case of breakdown, therefore, after performing repair work, it would be correct to look for the cause of the defect. Most often, plastic burnout occurs due to condensation flowing through the ventilation system onto the body of the gas burner.
How to repair a heat exchanger union nut
One of the most common defects of Neva geysers for almost all models is the low quality of the metal of the heat exchanger. According to the rules, the heat exchange circuit through which water moves should not come into contact with aluminum parts, for example, a gas burner or a control unit. Any such contact may cause electrochemical corrosion copper walls, and then repairs will simply be useless.

In addition, wrapping rules are not always followed. union nuts, with which the heat exchanger is attached to the regulator and outlet pipe. With each heat exchanger removal and repair, the nuts cut a thin, barely visible path into the copper wall. Ultimately flared end and part copper pipe the tenth time the twists simply break off.
In this case, you have to trim and level the broken area, install a new nut with external thread and connect the heat exchanger to the block regulator with a conventional flexible hose. Any other repair option, as practice shows, turns out to be short-lived.
Repair of a microswitch in the geyser starting system
A situation similar to the Oasis with dead batteries also happens with the Neva gas water heater. When you try to start the Neva, the indicator board lights up, but the gas burner does not ignite. Sometimes the column can be turned on 4-5 times.
In this situation, repair of the microswitch is required due to premature wear of the part or improper adjustment of the unit.
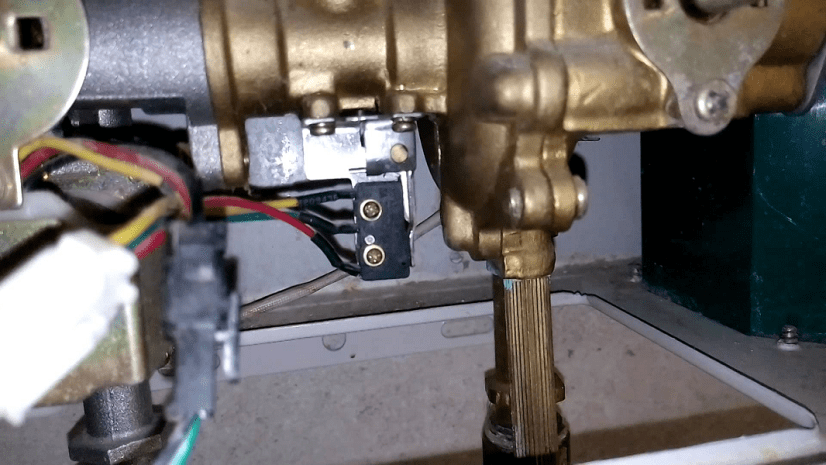
The switch is located next to the water pressure control unit. When the column starts, the membrane on the block pushes out the rod, which unlocks the switch contact. Unlike the Oasis, all parts of the unit, including the rod, are made of brass, so there is no corrosion; the microswitch itself must be repaired and replaced.
For execution repair work you need to disconnect the connector, unscrew the two M3 screws and remove the switch body from the strip, as in the video
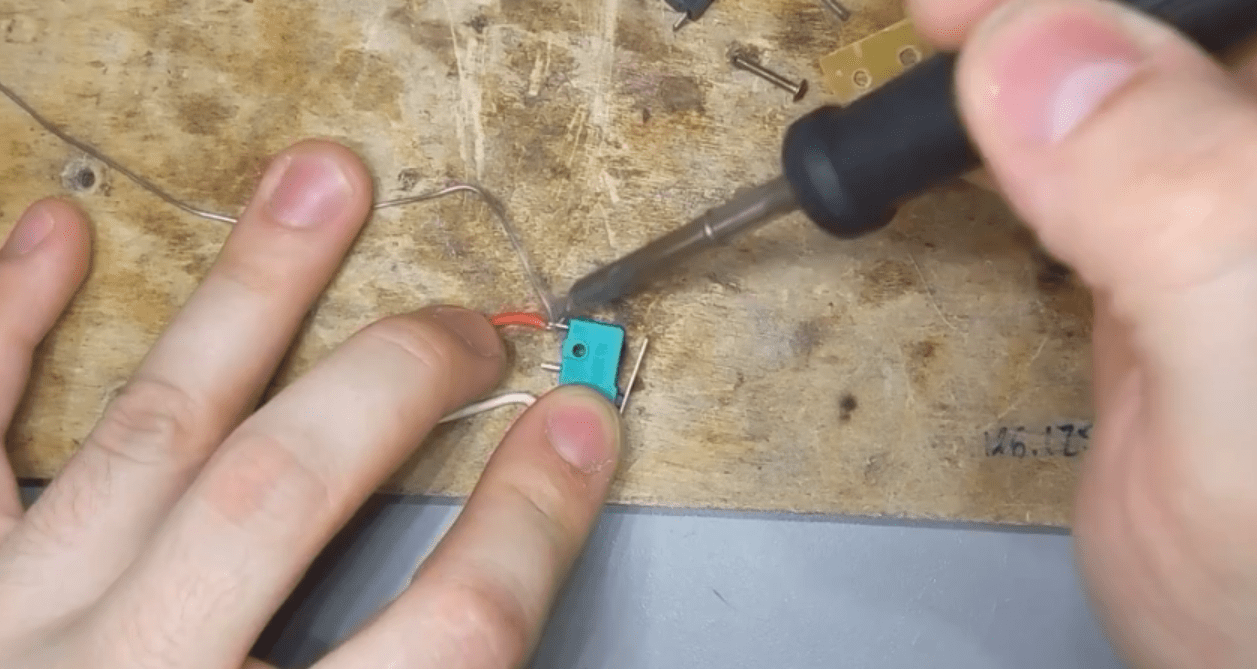
Replacing the microphone is easy. You can buy an original part for 400-500 rubles. in a specialized salon or purchase an analogue for 50 rubles. in any radio parts store. There is no difference for repairs; in both cases they will sell a part from Chinese consumer goods.
In order to carry out the repair, you will need to unsolder two wires with a connector from the switch legs, put on a heat-shrinkable tube and solder them to the contacts of the new part.
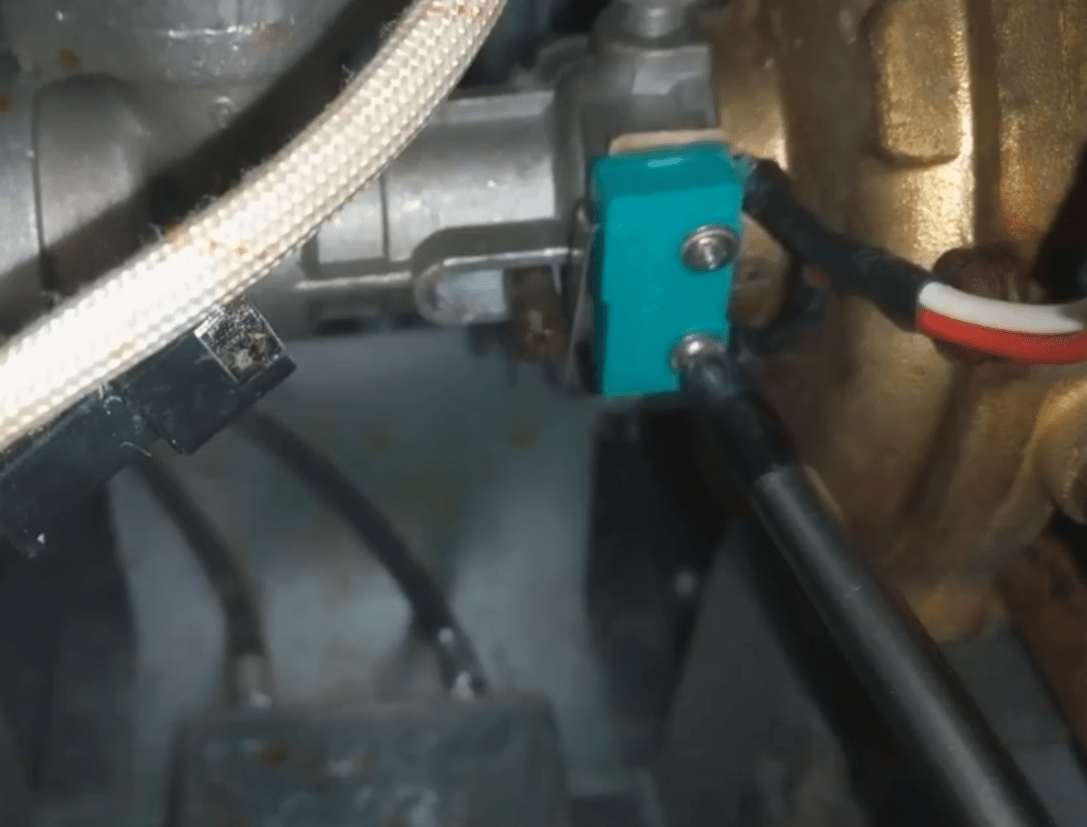
At the final stage of repair, the switch is screwed with old screws onto the mounting strip on the block. Next, you need to adjust the position of the microswitch body so that the rod completely releases the contact when moving. This is done using mounting screws. One of the screws bends with a radius; accordingly, by rotating it, you can move the switch body in the desired direction.
Repair of the Junkers geyser
The advantage of domestic geysers is their high resistance to overloads and poor quality of water, and first of all, gas. Experts say that German equipment traditionally shows long service life without repair, but under one condition - the system must be protected from power surges in the network and equipped with protective filter elements that soften the hardness of the heated water.
But even in such conditions, you have to periodically carry out minor repairs on the Junkers geyser yourself. The reason is simple: automation, ignition and ignition devices turn out to be very sensitive to dirt, dust and rust in household gas. On the dirty gas fuel The igniter is the first to fail.

To restore the column, you will need to remove the cover and pull out by hand the thin profiled aluminum tube that ensures operation in standby mode. The tube is carefully cleaned with copper wire and washed with alcohol. Due to the high content of iron pentacarbonyl in the gas, fine metal dust falls on the walls of the gas pipeline, killing the spark plugs and igniter.
Filters practically do not retain pentacarbonyl, so craftsmen often replace the aluminum tube with a copper one of larger diameter. The new gas pipeline is wrapped around a heat exchanger, which ensures the decomposition of carbonyl in the pipe before entering the ignition zone.
In addition, dirty gas requires regular opening and cleaning. gas burner columns.
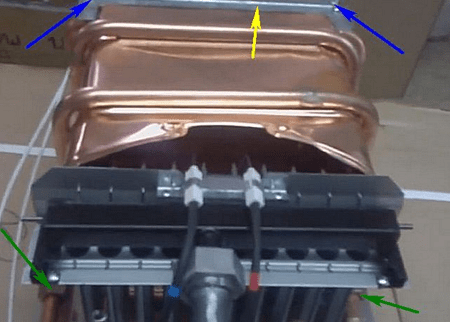
Repair of heat exchangers of geysers
One of the most severe cases damage to the column is considered burnout, fracture or through corrosion copper heat exchanger. In the first two cases, repairs are performed only by replacing the part with a new spare part. In the case of through corrosion, thin, 02.-0.5 mm holes are formed on the walls of the heat exchanger, through which water flows out of the circuit.
A defect, as a rule, is detected by intense soot formation, water leakage and a drop in pressure in the circuit when the tap is closed.

To repair the heat exchanger, you will need to remove it from the geyser mount. Next, the copper surface is cleaned of layers of soot and scale and subjected to a hydraulic test.
The easiest way is to identify the location of corrosion by pumping air or water under overpressure. For example, the output of the heat exchanger is plugged with a rubber plug, and at the inlet hand pump air pressure is supplied. The geyser heat exchanger is immersed in a container of water and the location of the damage is determined.
You can repair the damage at home by soldering with copper-silver tin solder. The first is used to restore the hottest spots located close to the flame front. To seal with tin, the copper surface is etched with a solution of zinc in hydrochloric acid, heat it with a torch and tin it with a massive piece of solder. For normal operation, the thickness of the tin patch must be at least 0.5-0.7 mm.

After repair, the heat exchanger is checked twice more - using traditional air injection and holding it under operating water pressure after installing the unit on a gas water heater. The pressure in the circuit should not drop for at least 15 minutes.
Bosch geyser repair
Water heating gas appliances produced by Bosch are distinguished by their compact size and enormous automation capabilities. The more components and mechanisms there are in the design, the greater the likelihood of failure.
Bosch WR10 water heating systems are characterized by two types of breakdowns - random shutdown after a successful start and leaking seals due to high water hardness.
Arbitrary shutdown can occur for three reasons:
- Loss of draft in the chimney;
- The ignition electrode is dirty, as a result of which the automation does not recognize the very small ionization current and turns off the gas supply. Repair comes down to regular cleaning of the electrodes;
- Triggering of the heat exchanger overheating sensor.
The last case is the most relevant. The overheating sensor is a bimetallic plate with contacts. When a certain temperature is reached, the plate bends and opens the contacts.
To restore it, you first need to check the operation of the sensor, for example, short-circuit the contacts directly with a paper clip or copper wire. If the geyser continues to operate normally, then you need to buy and replace the sensor. Severe overheating means that the gas flow regulator will need to be adjusted and tested.
Mechanics in Soviet gas water heaters long-term operation may cause malfunctions. This article shows the process of repairing a locking gas tap using the example of flow-through gas water heater VPG-18 produced by the Lviv heat plant gas equipment.
Soviet geysers have served many people for decades, and perhaps they will last just as long. Their important advantage is energy independence. The automation in such devices is completely mechanical and, with timely maintenance, is quite reliable. The Soviet dispenser is completely disassembled, which allows it to be effectively repaired, which cannot be said about modern analogues, the repair of which most often involves the replacement of entire components.
Using a flat-head screwdriver, unscrew the two screws securing the flange with the limiter.

We take out the flange along with the bushing and two springs.
Note: the second spring is located inside the bronze bushing.

Using wrench No. 10, turn the tap plug.

We take out the plug along with the washer.

Use a rag to wipe the surface of the cork. If the grease has dried, it can be removed with gasoline or alcohol. Using a rag, we clean the inner surface of the valve body, the flange cavity and the bushing from old grease.


Apply gas lubricant thin layer over the entire surface of the cork.

We install the plug into the faucet body with the large hole facing up. The correct operation of the blocking valve depends on its initial position.

Apply a thick layer of grease to the bushing.

We install the bushing into the flange so that the bump on the bushing fits into the groove on the flange.

Install the spring into the bushing.

We put the washer on the plug rod with the rolled side towards itself.

We install a large spring and press it with a flange, while aligning the groove of the sleeve with the slots on the plug rod. To do this, we adjust the position of the bushing in the flange, turning it a little until it hits.


We install the flange with the slot to the left. Press it evenly with two screws.


We put on the faucet handle and check the smooth operation.

Checking the correct assembly
Place the faucet handle in the closed position. We open the gas supply. Press the automatic button. We bring the match to the igniter. The igniter must not light up!

Turn the tap handle to the igniter position. Press the automatic button. We bring a match. The igniter should light up (this may take up to a minute, since air may have entered the system during disassembly and reassembly). Release the automatic button. The pilot light should be lit; when the hot water tap is opened, the main burner should not flare up!

Turn the tap to full open mode. Open the hot water tap. The main burner should light up.
Place the faucet handle in the closed position. The igniter should go out completely.

After making sure that the gas tap is working correctly, we light the column and check the tightness of all gas connections with a soap solution. If the column is not ignited, the tightness can only be checked up to the automatic button.

Results of the work done
The gas shut-off valve performs its function correctly and is completely sealed. The tap operates smoothly, which allows you to easily and, most importantly, accurately regulate the flow of gas to the burner to ensure desired temperature hot water.
If you do not use a gas water heater for a long time, it is advisable to still perform a test run once a month. This will eliminate many problems associated with downtime and will allow you to start the equipment without problems if necessary.
For most families, a gas water heater is the only way to cook warm water V home life. Regardless of the intensity of use and the country of origin, geysers often break down, stop heating and become useless. Considering that in hot water everyone needs it - a damaged gas water heater becomes a headache.
Now consider the reasons why the geyser refuses to work, we will divide them into two types:
- Mechanical: wear of working elements (membrane torn, thermocouple, sensitive sensor burned out);
- Natural: clogged burner, igniter tube, radiator - which significantly reduces efficiency.
These are the consequences of the lack of annual maintenance, which the owner neglects, bringing the device to an inoperative state.
Repair of geysers at home on the same day!
Keep in mind, this type equipment is prohibited from being dismantled and taken to a service company, so repairs of geysers in Moscow are allowed to be carried out with a technician visiting the customer’s home. Thus, current repairs And preventative work The engineer is carried out directly to the installation site of the column, where, after a diagnostic inspection, the type and nature of the malfunction is revealed, and subsequent repairs are carried out with the replacement of new spare parts.
- Soldering the heat exchanger - from upper reinforcement water is dripping or pouring;
- Replacing the valve (servomotor) - does not turn on, the red LED is blinking.
Breakdowns and malfunctions of geysers
Breakdown No. 1. Turns off the wick after releasing the button. The most common damage occurs in manually switched speakers. Caused by a clogged igniter tube or a faulty bimetallic sensor. It is possible to clean the igniter yourself, but only with full analysis, therefore, if there are any doubts about the confidence of such work, the right decision will entrust repairs to qualified craftsmen.
Breaking №2. The water does not heat well or does not heat at all. The first step is to check the integrity of the membrane - if there is visible deformation, replace it with a new one. Clean the radiator and remove any accumulated soot. Soot interferes with heat exchange between hot gas and water. Eliminate the smoking factor to increase heating efficiency. To prevent the heater from losing heat in winter, the above actions should be carried out as part of regulated inter-seasonal prevention, otherwise there is an increased risk of completely losing the device or its main part - the heat exchanger.
Breakdown No. 3. It turns off after 1-2 minutes of operation. Pay attention and clean the removal channel if necessary. carbon monoxide(check traction). Light a match and bring it to the viewing window; if the flame does not deviate towards the window, you should consider calling a specialist to professionally check the carbon dioxide exhaust system.
How to repair a gas water heater
Call the master at urgent repairs geysers is carried out by prior agreement, with the reservation of arrival time and price. You can contact the specialist by calling the number provided. Having trouble connecting? Use the electronic application form or send a letter. To increase the speed of service and eliminate initial diagnostics, describe in detail the breakdown of the column without using technical terms.
It is worth noting that the gas water heater should be trusted to authorized persons, as it is a potentially dangerous piece of equipment. Unqualified intervention or maintenance by an incompetent person for the purpose of saving Money, can lead to disastrous consequences and increase the subsequent price of services. We offer a professional approach to business. We have more than 6 years of experience working with geysers.
Professional experts argue that gas equipment is a potentially dangerous piece of equipment, so it must be repaired and maintained by experts. You can figure out which parts are broken on your own, and this will help you quickly restore the functionality of your gas equipment; some problems can be easily fixed with your own hands.
Malfunctions that do not affect the operating principle of the gas water heater can be repaired by home craftsmen themselves. It is important to know the list and description of the most common breakdowns and follow the recommendations from the manufacturer.

Geyser does not light up
When technical device refuses to ignite, there may be several reasons.

Broken igniter. When the igniter is faulty, it cannot burn; in this case, you need to contact the gas service. A qualified specialist will replace the faulty element; it is not recommended to replace it yourself - this is a real danger.


To satisfy consumer needs for hot water, many water heating devices, both electric and gas, have been developed. For reliable operation they are equipped with new control and protection systems for safe and long-term operation. But no matter how reliable water heaters are, over time they also fail. Repair of geysers, as a rule, should be carried out by professionals, but in some cases it is possible to troubleshoot problems yourself.
The geyser is a fairly unpretentious device to operate and can operate for a long time without breakdowns. But if they happen, then diagnose the gas water heater for proper repair the device can be based on the following characteristics:
- power problems;
- water unit malfunction;
- problems with the gas block;
- incorrect installation.
If problems are discovered in the gas block, then you cannot repair the Ariston gas water heater or repair the Junkers gas water heater, as well as any other water heater yourself. The breakdown must be corrected by a qualified technician. In other cases, you can try to cope on your own.
Power problems
For normal operation of most components inside the unit, a stable power supply is required. Therefore, if malfunctions of the gas water heater appear in the form of malfunctions, which are characterized by the fact that the flame does not ignite or goes out during operation of the device, then possible reason there could be such a problem lack of current power supplied from batteries.
This does not apply to units without electronic components in the design. For example, you will not find it in the Neva 3208 unit, which you want to repair, or when repairing an old model Astra gas water heater.
Often, when repairing an Oasis gas water heater, as well as a Junkers gas water heater, users are misled by the fact that the LCD display lights up and there seem to be no problems with power supply. But it should be borne in mind that ignition requires a sufficient charge to form a spark in the spark plug. In addition to this, the electronic unit also requires power to transmit it to the solenoid valve in order for it to be in the “open” state. Therefore, if the batteries are already low, then there may not be enough power to ensure the operation of these modules.
In the instructions for the water heater, the manufacturer indicates the operating time of one set of batteries. As you might guess, this value is approximate, and it depends on the quality of the batteries used. When purchasing batteries, you should pay attention to the markings on them. For long-term operation of the gas water heater, it is recommended to choose batteries marked LR20. This means that they are alkaline, that is, alkaline.
Cheaper ones, labeled R20, fail very quickly and cannot cope with a constant load. Ideal option CR20 lithium batteries can be considered. Their main difference from alkaline ones is their high capacity, stable current generated, and long-term operation, several times longer than the service life of LR20 batteries. The only drawback of batteries marked CR20 is their high price. So, buying LR20 alkaline batteries will be the right choice in terms of efficiency and cost-effectiveness.
Remember: never buy batteries from street kiosks, much less from trays in the market. This recommendation especially applies to winter period, since the batteries lose their charge due to cold.
Removing the column lining
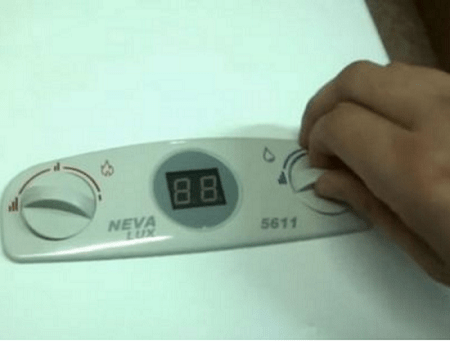
Repairing a geyser with your own hands, such as replacing batteries, is the only way to troubleshoot problems that does not require removing the outer casing of the unit. To repair geysers Vector, Oasis and any other malfunctions, you will need to open the device. To begin removing the casing from the water heater, you need to turn off all the water and gas supply valves, and then do the following (for example, we take the Neva 5611 water heater, which we will disassemble on the table).
Water unit malfunction
Most often, geyser repairs are made due to a faulty water block. Its work is that under the influence of liquid pressure, the membrane located inside it, arching, transmits movement to the rod, and it then moves the pusher gas unit. As a result, it opens spring valve, and the feed is turned on electrical supply to the control module. Therefore, if the water unit is faulty, the device will not start.
A broken water block can be determined by external signs.

If you notice even one sign, the unit will need to be removed and repaired. The water assembly can only be removed together with gas module, since they are a single structure. You can do this in the following way:
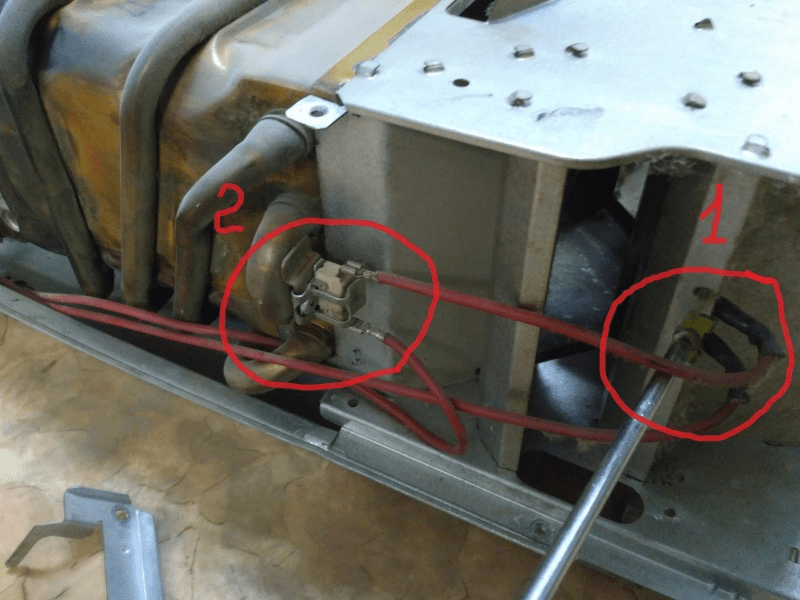
- after you have made sure that the gas valve on the pipe is in the closed state, you can disconnect the supply hose (a);
- similarly, when the water supply is turned off, the nut on the water block pipe (b) is unscrewed;
- further using wrench it is necessary to unscrew the nut that connects the water block to the heat exchanger (c);
- disconnect the terminal block (d) on the conductors connecting the solenoid valve to the control module;
- wires (d) going to the switch are disconnected in the same way;
- using a screwdriver, you need to unscrew the 2 screws (e) attaching the pipe to the water-gas unit, through which fuel is supplied to the burner manifold;
- After unscrewing the fasteners, the entire assembly can be easily removed from the device.


Repairing a Neva 3208 gas water heater due to a faulty “frog” is similar and intuitive, although internal view the unit is slightly different. The Neva 4511 gas water heater can be disassembled in the same way, and repairing it yourself is quite feasible.

When repairs are made Chinese gas water heater, the size of the water node is always surprising. It is quite small in size, and to disassemble the “frog” you only need to unscrew 4 screws.

Heat exchanger repair
Repair of the geyser heat exchanger will be required in the following cases:
- if insufficient water pressure is noticed at the outlet of the gas water heater;
- low heating of the liquid;
- Noises are heard when the unit is operating.
The reason for all this could be scale, formed on inner surface copper tubes. Therefore, the heat transfer and throughput of the latter are reduced. In addition, if the unit has not been serviced for a long time, oil may accumulate between the heat exchanger plates. dust and soot, which also interferes with the water heating process. The heat exchanger is easy to remove.
Repair of heat exchangers of any geysers begins with washing them under a strong stream of water to remove dust and other contaminants. After which it is recommended to immerse it in water for half an hour with the addition of detergent, for example, for dishes.
Cleaning of the unit continues with a small, soft brush, after which it is washed again under running water. Water heater tubes clogged with scale are cleaned with a strong flow of water in the opposite direction. If the scale is not completely removed, you will have to pour it into the tubes special acid solution. To prepare it, you can use regular citric acid. You need to take 100 g of acid and dilute it in 1 liter of water heated to 40C. This solution is poured into the heat exchanger pipe until it emerges from the other. The reaction will be immediately visible in the form of escaping foam. The poured solution is left for 15 minutes, after which all channels of the unit are thoroughly washed under water pressure.
If you are not satisfied with the result, dissolving the scale can be repeated.
In this way, the heat exchanger of the gas water heater Neva Lux, Dion, KGI, Selena, as well as the gas water heater Neva Transit is washed.
Incorrect installation
The reason that the water heater turns off after starting may be due to its incorrect installation. The diagram below shows how the unit should be installed.
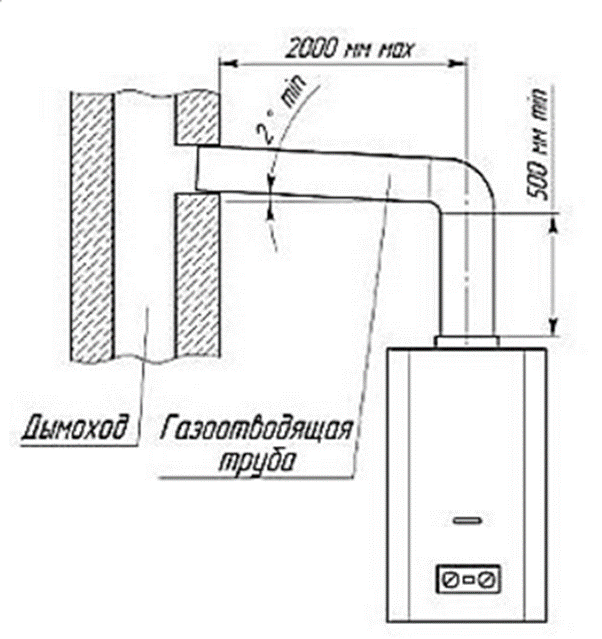
The following pictures show common mistakes when installing a water heater.

Such installation methods disrupt normal draft, as a result of which the operation of the water heater becomes incorrect, and in some cases, impossible.


