Cracks in the walls of a house, both inside and outside, are a common occurrence, and they appear for various reasons, which we will discuss below. You will also learn how to repair a crack in a brick wall concrete surface, cracks in drywall, or in a wall plastered with cement. Self-sealing cracks in brick walls Can be done by every owner who is not afraid of work and has a minimum set of household tools.
Repairing cracks in brickwork
Destruction brickwork may occur due to:
- Soil shrinkage under the base of the foundation;
- High groundwater level;
- Shallow foundation deepening;
- High load due to erroneous calculations;
- Incorrectly prepared mortar and violations of construction technologies.
The area where cracking has appeared indicates the cause of the destruction. Thus, the appearance of cracks in the wall below means that the load-bearing loads from the pressure of the floors are calculated incorrectly. If cracks grow at the top of the wall, then most likely the foundation is shrinking.
Before covering up cracks in the brickwork, it is necessary to check their condition - whether the cracks are growing or not. This is done by placing plaster beacons, which are placed along the edges of the crack and hold the strip of paper. There are also special devices with measuring graduations. The crack is monitored for 7-10 days. 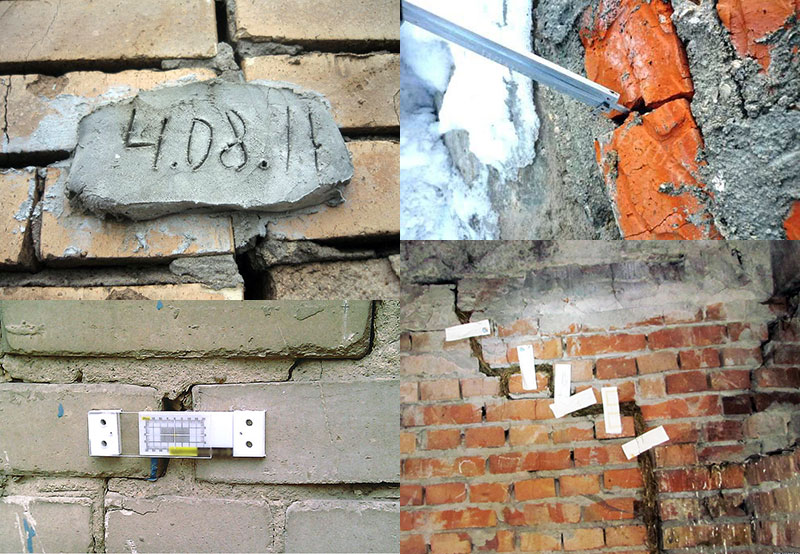
Minor repairs of cracks in brick walls up to 0.5 cm wide are done as follows: cover the damage with liquid cement without adding sand. Process technology:
- The gap is freed from dirt and moistened with water;
- The edges of the crack are expanded to increase the area covered by the solution, the solution is tightly packed inside;
- The same solution, only with the addition of purified sand, can seal cracks 0.5-1 cm in size;

Large cracks (≥ 10 mm) must be repaired in several ways:
- The destroyed local section of the masonry is dismantled and the brick is laid over a new one:
- They remove the bricks, starting from the top rows, and put the bricks back “into the lock”;
- The area of the new masonry is reinforced with any metal scraps that are suitable in size;
- If it is impossible to disassemble the brick in the damaged area, cracks in this area can be repaired with a thick layer of cement-sand mortar, as described in point No. 2 above;
- The crack is also wedged with T-shaped steel spikes, the edges of which are attached to the wall with dowels. With this method of repair, the same crutches need to be driven in from the inside;
- You can repair cracks in brickwork using an installation tool. construction foam or sealant, after the substance has hardened, deepen the damage by 1-2 cm, seal the depression with cement mortar. The sealant is squeezed into the gap with a special construction gun;
- Internal crack in the wall brick house it is sealed as follows: first, the edges of the crack are tightened with a steel plate (plates), the edges of which are secured with anchors or dowels, then the area is covered with mortar;
- If during the inspection of the building it is discovered that the wall is cracked due to shrinkage of the foundation, the base must be strengthened with an external concrete grillage along the entire perimeter. The grillage is poured into a trench, which is dug along the entire base to the depth of its placement.

How to repair cracks in a plaster wall
It would seem that a crack in the plaster is not a dangerous and insignificant problem, but this is not only visual flaw. Not only does it suffer decorative coating, but also brickwork. Most often, plaster cracks on external walls, since their surface is affected by both moisture and temperature changes. Through such small cracks, water enters the bricks, and in frosty weather it turns into ice and destroys the wall. 
From the inside, such cracks in the plaster are more like a spider's web - they are small and shallow, and appear due to incorrect proportions of the plaster solution or a thick layer of plaster applied at one time. That is, the technology here is clearly broken, and the problem can only be corrected radically - by knocking down old layer and apply a new one.
How to repair microcracks that may occur after wallpapering, plastering or painting walls? First you need to reinforce these damages with fiberglass mesh, glue a piece of glass wallpaper or fiberglass, and then plaster this place. Plaster mortar for these purposes it can be external and internal, and the differences lie in the composition - external mixture is based on the use of cement, internal - using lime. 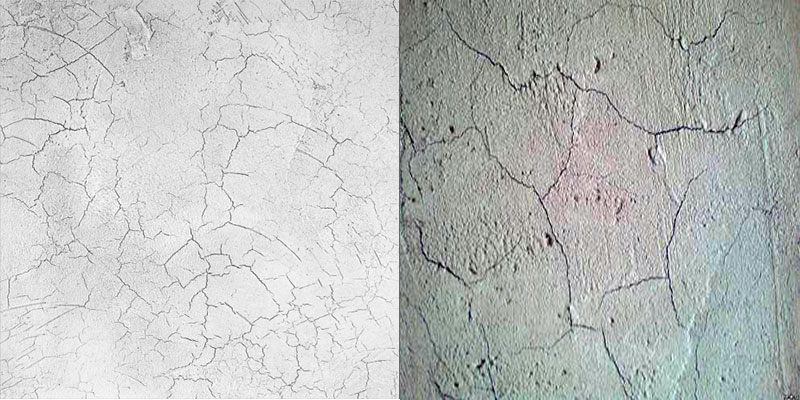
When damage occurs on the plaster, how to repair microcracks? The repair solution can be industrial or homemade, and the repair technology is as follows:
- Using a paint brush, the solution is applied to the area where there is a crack, and the surface is rubbed with a grater or spatula;
- If the old layer of plaster was applied by spray, then to obtain the same effect after the repair, the brush is wetted in water, and then the plastered wall is moistened with a clap of a wet brush;
- What to do if cracks appeared during the shrinkage of the foundation? Such damage is repaired deep impregnation cement mortar. The dried solution is coated with dispersion paint.
It is also recommended to plaster a crack in a brick wall with the addition of astringent plasticizers - gypsum, alabaster, slaked lime. 
The use of gypsum accelerates the hardening of the solution; in addition, the mixture with the addition of gypsum does not shrink during use. Adding lime is only necessary for repairing external walls, since lime mortar sets well only with free access to air flow.
Repairing cracks in drywall sheets
Reasons for cracking of plasterboard walls:
- Improper installation of the frame and fastening of drywall sheets;
- Incorrectly formulated putty solution;
- High humidity in the room or temperature change.
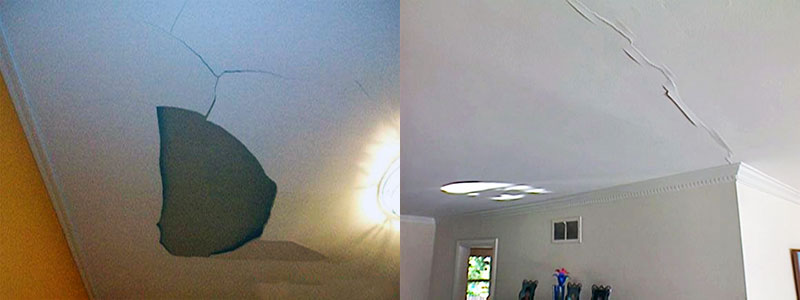
Drywall as a building material absorbs moisture well; moreover, a wet sheet can be deformed, and after drying, retain a curved shape. A severely curved sheet or section of a plasterboard wall can only be replaced with a new sheet. And horizontal, diagonal or vertical cracks in plasterboard wall houses can be renovated like this:
- Fill the crack with putty or fill it with acrylic;
- Plaster, and put a piece of fiberglass on top, apply putty on top, and cover the plastered area with a finishing layer of construction mixture.

Before repairs, the wall surface is treated:
- Gets confused old plaster, the area is cleared;
- The putty is prepared from a ready-made dry construction mixture in the following proportions: two parts dry mortar to one part water;
- The putty layer should be no more than 2 mm; it is necessary to repair not only the cracked area, but also 5-10 cm of the adjacent surface;
- If reinforcing mesh is used, it is not stretched over the damaged area, but driven into the gap and then plastered;
- After the solution has dried (1.5-2 hours), the surface is sanded and cleaned of dust.

Repairing cracks in a concrete wall
Disproportionate concrete mortar in the manufacture of a concrete wall (slab) – main reason formation of cracks. When concrete is being placed into a mold (formwork), it must be constantly compacted with a vibratory compactor, or, in extreme cases, bayoneted with a shovel or crowbar. The air remaining in the concrete not only weakens the structure of the material, but also promotes the movement of moisture into the pores, which in cold weather will lead to cracking of the concrete. But it’s not enough just to make the right solution and pour it - concrete must be constantly looked after, and especially at the beginning of the hardening process. Freshly poured concrete must be covered with a waterproofing agent so that moisture does not evaporate from the surface quickly and unevenly - if the moisture saturation of the concrete layers is not adequate, the upper, drier layer will crack, as the lower wet concrete will expand and put pressure on it. 
Cracks most often appear on walls that are in conditions of contrasting temperatures, that is, outdoors. Freezing in winter, moisture in the cracks expands and causes the crack in the weak point of the wall to grow larger. If reinforcement is encountered along the path of such a gap, it begins to rust, which weakens the entire structure. Therefore, in order to avoid numerous repairs, the building must be periodically inspected for new defects in the walls in order to prevent them further development.

If a concrete wall cracks, it can be repaired by performing the following operations:
- Using a hammer drill or a hammer and chisel, the crack is deepened and widened, the area is cleaned of dust and moistened. If there is open reinforcement in the crack, it is painted;
- The proportions of the solution are 1:3, with the addition of Bustilat or PVA glue;
- If the crack is deep, lay a reinforcing mesh and apply a solution, which is smoothed with a spatula;
- After the solution has set, the irregularities are sanded with a grinder.
Cracks must be repaired in any case, even if they are small and short in length, since there is always a danger of their growth.
I saw several written requests in my mailbox, where people asked me to tell them why it was in the walls and how to seal them. It turned out that everything they knew and did before did not work. Not a single method saved them from new formations. So I decided to write this article.
I haven’t talked about this topic with anyone for a long time, and I came across similar work about a dozen years ago, so I decided to update my knowledge and see what great minds have come up with that’s new in this regard. By the way, we always try to give you the latest information so that you keep up with the times. After all, something new is often invented, and applying it is often cheaper and more effective.
Let's get to the bottom of the problem
Well, let's start by defining the types of cracks. Yes, they are radically different from each other, divided into two types. The first is erosion cracks, caused by a process called erosion, although weathering may also be involved. So, erosion is a process of destruction that is associated with time, with the influence of mold, precipitation, wind or thermal expansion.

For example, we have a wall that was plastered with ordinary cheap cement, and even in a 1/3 ratio. Yes, the plaster holds up and looks beautiful. But it absorbs moisture and crumbles due to insufficient molecular bonds. But as a result, water penetrates into it, washing away all our connecting elements from the top layer.
When it's time autumn rains, they abundantly saturate and saturate everything around with moisture. The wall does not have time to dry thoroughly before winter, and the moisture freezes, and at the same time it greatly increases in volume. Try typing in glass bottle water and place in the freezer. You will see that once it freezes, it will easily crack the bottle. And if it is a metal container, then it will simply bend or inflate.
So, the same thing happens in the thickness of the plaster, water tears it apart from the inside. Do you see how much there is? So, all these factors, of course, destroy the surface layer more and more over time. And what is the result? That's right, microcracks appear. The length of each of them is approximately 1 cm.
If they are not sealed, then even more water will get into them, or some other factors will act doubly intensely and increase the cracked areas several times. If in this case you do not cover them up, then after some time such plaster will completely fall off.
In general, you understand, we have now described an example of an erosion crack on the surface of the plaster of a building. Exactly the same can be found indoors. For example, if the wrong composition of cement was selected, then it may not respond very quickly to thermal expansion and may also crack.
There is another type. For example, if we talk about a very old brick house, which was not decorated with plaster, but simply had brick laid under the jointing. Yes, here erosion, even over a long period of time, cannot do anything to brick, that is, to compressed and baked clay.
Most likely, erosion will begin to wash away the joint cement, and as a result, small cracks may appear in the brick wall. If the cement from the joints is washed enough so that the main load is removed from it, then where will it fall? Of course, it will either attack the remainder of the concrete in the seam, or it will move to a larger section downwards, and then overcome it too.
All this, it would seem, is nonsense. But tell me, what is the purpose of plaster? That's right - prevent harmful factors from reaching the main wall. And I’ll tell you that even plaster with minor defects can cope with this. The cracks that have appeared are the result of your savings, because the wrong type of cement was selected that was needed. Either you didn’t know about the existence of another, or you just saved money.
After all, there are any kind of cement mortars. For example, decorative, heat-resistant, structural, lightweight, dense, porous, astringent, tensile, protective-radiation, polymer, chemical, heavy and several dozen different ones!
Yes, in regular ones construction stores you won’t find them, because it is profitable for the buyer to purchase only one type, the cheapest, and sell it to you at the highest markup. But, as you can see, if you want, you can choose a special one for any type of work. Well, not about that now.
In general, the plaster described above copes with its task, that is, it protects the main walls from destruction. And if you saved on it on purpose or not on purpose, then be so kind as to patch it up a little, and everything will be fine. We will describe how to do this later.
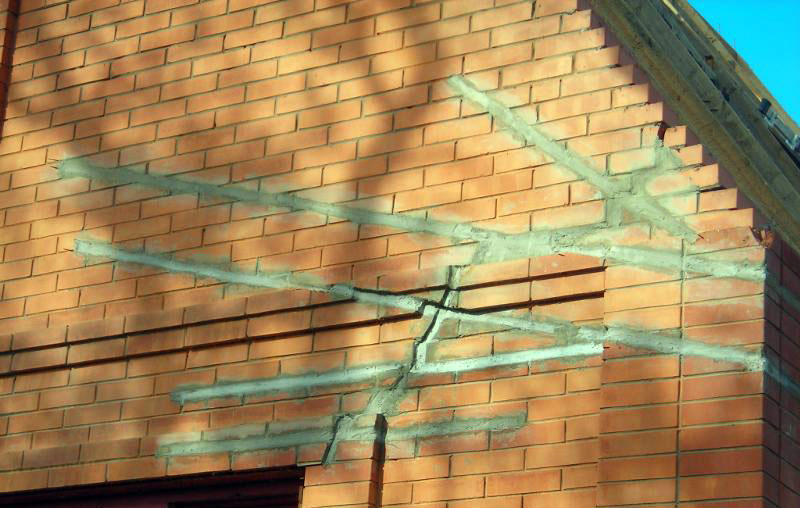
Now comes the fun part. I am almost 100% sure that you asked for advice not because you need to fix a dozen tiny cracks, but because you have a real problem with the formation of significant cracks. If you have not small cracks on the wall, but large ones, half a meter or a meter long, and they arose not just on the plaster, but in the body of the main, that is, load-bearing, wall, then you do not have an erosion crack, but a real one deformation
Remember for the rest of your life, a deformation crack never just appears, and you will never eliminate it with any coating. If you have one, then you need to fight not with it, but only with the cause of its occurrence.
So, let's figure out what are the causes of deformation cracks and list them.
Excessive one-sided shrinkage of the foundation
The most terrible type of deformation. In addition, this is the most common situation, it occurs everywhere. If the foundation was not poured according to technology, if dozens of conditions for its pouring were not met, then it may crack. As a result, the wall located on it will also crack. In this case, a shear will occur - not a shear, but a shear - of the static loads, and the entire structure will begin to move relative to the axis, which will yield to this movement.
Yes, it's a little difficult to understand. Let's diagram what we're talking about:

As you can see, part of wall "A" begins to move. This movement can be either vertical or horizontal. In any case, this is an extremely serious building defect. And if such a problem arises, we are faced with global work.
Many people advise foaming the crack, covering it up, and that’s it. But if you think rationally, you can realize that on average square meter the wall weighs about a ton. Of course, there are 500 kg, there are also 5 tons - it doesn’t matter. So, part of the wall weighing 20–30 tons goes down, while also pushing through the foundation. It is simply unrealistic to solve such a colossal problem with simple putty. Well, never mind, more on this later.
Damage to the foundation due to damage to the blind area
The blind area is connected to the base and is an element that protects the foundation from water. So, if the blind area is damaged, water begins to flow into the foundation space. It liquefies the soil and accelerates shrinkage.
If the thickness of the freezing layer reaches the level of water in the foundation, then when it freezes, it similarly begins its destructive effect. And when destroyed, we get, again, the consequence that was described above.
Thermal expansion
This can also be a problem, but quite rarely. The atmosphere inside the room does not change quickly. The house is like a thermos in which the temperature is constantly maintained. Inside, it is almost equal to the temperature of the room walls. If it is -10 outside and +25 indoors, then constant heat exchange occurs. From heating devices to walls, from walls to atmosphere and vice versa. So, the temperature inside, as we know, does not change, and thermal expansion is either completely absent or extremely insignificant.
Now let's imagine a house that has had no window for several years. For example, at your dacha it was broken, but you didn’t see it or decided not to put it back in. So what happens? The weather outside changes very quickly. In the autumn-winter period, it often happens that during the day the temperature is +2, and at night it drops to -8. As you remember, our window is broken, and the temperature in the room is changing at exactly the same speed as outside.
The walls of the building, having heated up during the day, cool down very quickly at night, and vice versa. So they begin to play like an accordion: sometimes they expand, sometimes they narrow. Since the rate of temperature change is high, the speed of this “game” is also high. But concrete or brick walls are not an accordion, so they can’t stand it and burst.
In this case, only the walls burst, but the foundation remains intact. Although it is difficult to eliminate such a malfunction, it is possible. At the same time, it is possible to make it as if it did not exist.
Design changes
These also cause deformation cracks. To help you understand faster, let's give an example. Let’s say you bought a house, and in the middle of the hall there is a column, and it’s like an eyesore. If you don't like it, kill me. Without thinking for a long time, you tear it down, and six months later you begin, perplexed, to ask: why are the walls cracking?
Well, how can they not crack or burst if you demolished the support beam, which carried the lion's share of the load. The walls took on a load they were not designed for and began to burst. Everything is simple and sad. If you have a similar situation, then now you have serious work ahead of you, which we will describe below.
Rotting, damage to stiffeners or support beams
Cracks can also occur for this reason. If, for example, you have a two-story building, and the span above the window was built using not a channel, but wooden beam, then when he can no longer bear the load, what will happen? That's right, at this point the wall will burst, or something even worse will happen.
The same applies to damage to stiffeners or concrete lintels. If, for example, you had a seismic beam in your apartment, but you didn’t like it and you demolished it without permission, get ready for serious problems and punishment, because cracks are now inevitable. And they will arise not only for you, but also for all your neighbors, who will definitely call the BTI.
Let's say you live in your private house, which you recently bought, you have one room upstairs that is empty, and you decide to put a lathe there. Yes, somehow you manage to get it in there, you are happy and everything is fine. And a month later you discovered that you had a finger-thick crack on your wall. Strange, yes, where did it come from?
Well, of course! You have placed a machine, the minimum weight of which is 3 tons, on an area of three squares. And the slab that took on the load began to put a huge mass of pressure on a section of the wall, which as a result could not stand it and burst.
We eliminate erosion cracks

Let's move on to the “sweetest” part of our story. I say this because everything is done extremely simply and does not require special effort. Understand that all your actions should be aimed only at preventing the damaging factor from entering the crack body, and nothing more.
If you pursue the goal of preventing their occurrence, then it is pointless; you will not be able to do this anyway. Perhaps you can treat the surface with a strengthening primer, but the effect of this is minimal. So, in order to eliminate erosion cracks, do the work in the following sequence.
- Since you still have to worsen the visual condition of the wall by applying some other solution to it, leaving stains, then treat the entire wall with a strengthening compound. It won't be redundant. And if you don’t want to do this manipulation with the entire wall, then apply it only to the crack and, preferably, into its cavity too. This can be done with a syringe or sprayer, which, for example, you have left over from a window cleaner.
- Dilute the solution, and it is better not to use gypsum-based putty or cement, but, for example, tile adhesive or a similar composition. Such products bond better with the surface, and in this case your putty will definitely not fall out of the wall.
- We put glue or some other solution into a large syringe or similar device and press it into the crack. Sometimes I even took a thick bag, poured a little glue into it, cut off a corner (a very tiny piece), and worked with it like a pastry bag. Just don’t press, otherwise the bag will split along the seam.
- We fill the crack until our solution begins to bulge out of it.
- We take spatulas and draw them from above, leveling our solution along the plane of the wall.

That's all. We carry out such manipulations with all our cracks. Upon completion of the work, it would be useful to prime everything again.
Elimination of deformation cracks
And this is the most serious, hard and thorough work. We have to spend a lot of money and work physically. So, information for general understanding. If there has been damage to the foundation, it is useless to build the wall; the foundation needs to be repaired. If there has been damage to the wall without damage to the foundation, then the wall must be sewn. If a seismic beam, stiffener or some other support was damaged, then it needs to be restored.
Regarding the restoration of beams and others supporting elements I won't tell you much. Remember the main thing: you don’t just have to restore this beam, weld it with reinforcement and concrete it. You will have to transfer the load that was there before to it, and this is done either molecularly or using jacks.
Now let's talk about the first two types of work.
Restoring the foundation
In order to do this, carry out the work in the following sequence.


That's it, the work is finished. Now, as soon as old foundation moves even a millimeter, the new foundation will take on its load; they are now tightly connected. All that remains for you is to plaster the crack. Only plastering should be done after at least two months. The entire structure must “play” and lie on a new foundation. If you plaster it the next day, you will see a tiny crack again in a month. This is exactly the distance that was needed for everything to rest on the new foundation. And if you did everything correctly, then you will never remember about it again.
This is how, friends, the cracks are eliminated once and for all, and not just covered over and forgotten. Understand that if you cover it up, it will do absolutely nothing. By the way, we once restored a building kindergarten, which burst during an earthquake. So, we measured the shrinkage by gluing a ruler to one side of the crack and measuring the discrepancy. It was a cosmic 2 mm per month, and this is critical.
We completely restored the damaged building in this way, and then the quality of our work was checked by gluing strips of glass to the control points of the cracks. None of them have burst to this day, since we always provided a guarantee, and every year we ask how our foundation stands there.
How walls are sewn
If there were cracks on the walls for some reason, you inspected everything and did not find damage to the base, then the foundation is intact and you will have to sew up the walls. So, necessary work depends on the type of damage, of which there are also two. The first is local damage, and the second is global.
In case of local damage, that is, in case of damage small area, small and simple work is required. And if the damage is global, for example, your entire building bursts, then you will have to do something more complicated.
So, local type of damage. These include small cracks one meter long, +/- 50 cm. These are sealed as follows.

Global damage. They are eliminated in exactly the same way as local ones. Only there, as you already understood, the crack is twice as large, and therefore we have to do something else.
You will have to throw several reinforcing belts over the entire building. It's done like this.
- We mark lines around the entire perimeter, at a distance of 50 cm from each other. We make as many of them as we can fit. If the damage to the walls is not so severe, then we do it at a distance of 1 meter from each other.
- Along the entire length of the marked lines we make grooves 20 mm deep.
- We lay the reinforcement along the entire length in one groove. And we grab it there with a few strokes of alabaster or putty - it doesn’t matter what exactly, the main thing is that it holds.
- And now the most difficult part, here you will have to work as a team. So, let's take the cutter. As you know, this is a cutting unit that runs on oxygen and propane. So, we take the cutter and warm up all our fittings. Let's do it as hard as possible. If its length does not exceed 6 meters, then great, you can use a cutter to heat it all up red-hot, this will be ideal.
- As soon as the reinforcement has turned red, and it must have a diameter of at least 16 mm, then we grab the other two segments close to the wall from both edges. And they didn’t just stick it with slag from the electrode, but made a high-quality, solid seam. Because we are making a tense tension coupling, and it will be constantly under load.
- We move on to heating the next one and repeat the same operations.
- Once all the belts are welded, we plaster them.
Well, in the end, as soon as the metal cools, the entire circuit pulls our house together with tremendous force. By heating the metal, the molecules expanded and the length of the reinforcement increased. Then she returned to her previous position, only there she already had points of support - other reinforcements, which were all pulled together, as if with a noose. And now your walls will never crack again; they will be constantly rigidly restrained by reinforcing belts. It's like a woman's corset tightening her waist.
Well, friends, as you can see, everything is not as simple as you expected. In another article we will tell you how such serious problems could have been avoided. Because prevention is always easier than correcting something that has already been damaged.
I hope you found our story useful. I want to tell you finally that our goal was to write an introductory article, not rigid technical literature, so it should not be relied upon as instructions for use. And as you understand, only you are responsible for all actions you take. Therefore, approach all work wisely and carefully, and you will never have any problems. Good luck!
A crack in the wall is a problem faced by residents, both private and apartment buildings. This defect can lead to a violation of the integrity of the finish. For example, paint falling off or wallpaper peeling off. Therefore, this situation cannot be ignored, regardless of the size of the crack.
Damage to brickwork occurs for the following reasons:
- Soil that has a heterogeneous structure settles after a certain time. This leads to the appearance of cracks.
- The same consequences have the deformation changes in the foundation, which are formed in case of insufficient deepening or placement near groundwater and increased load on the walls from the floors. Within 12 months after construction, the building shrinks, which also provokes the formation of cracks.
- Problems can also arise if the installation technology does not meet the established requirements. And also when using a low-quality solution.
You can determine the cause by localizing the problem:
- cracks in the lower part of the building indicate excessive ceiling pressure;
- the upper part is damaged as a result of subsidence of the foundation.
Before you repair cracks in a brick wall, you need to make sure that they do not increase in size. Otherwise, the work done will be ineffective. Paper guidelines should be attached to the wall and their integrity should be monitored.
To eliminate a small crack up to 5 mm wide, you can use a cement composition. The work is carried out in the following sequence:
- Initially, you need to remove debris from the crack and treat it from the inside with a moistened rag.
- Before work, the edges of the crack should be knocked down with a hammer, because... this will ensure better adhesion of the mortar and bricks.
- Medium-sized damage (from 5 mm to 10 mm) can also be eliminated using cement composition, but with the addition of an additional component - sand.
Cracks whose width exceeds 10 mm are critical. Lack of timely intervention may have Negative consequences. There are several ways to eliminate such damage:
- The damaged area should be dismantled and replaced with new material.
- The masonry is dismantled from the top row. The bricks are laid according to the “brick castle” method.
- Fragments of reinforcement are inserted into the masonry to bridge the crack.
- If it is not possible to dismantle the masonry, the damaged area is sealed with cement mortar.
- You can drive T-shaped metal elements into the gap, which are fixed on both sides with dowels. Application metal parts is optional. But in this case, the wall of the building must be strengthened from the inside.
- Cracks in brick walls can be sealed using polyurethane foam or a sealant. The gap cavity should be filled with foam, wait until it hardens and cut the material to a depth of 2 cm.
- The resulting space is filled cement mixture. When using sealant, it is important to choose the right composition. You should not use a silicone-based sealant, since this material does not adhere to plaster, putty and paint.
- It is necessary to prepare a special sealant for processing seams. It is placed into the gap using a construction gun. Sealant for wall cracks has a certain advantage over cement mixture. It has the ability to increase and decrease in size without cracking, which is unusual for ordinary mortar. This product belongs to the category of expensive materials, but its use allows you to get high-quality results.
- It is recommended to strengthen a cracked wall from the inside. This procedure involves sealing the damaged area and applying metal profile, which will act as a castle. It should be placed across the crack to prevent its subsequent spread. Anchors are used to fix this element. Steel staples can be used. In this case, you need to pre-drill the holes.
- If cracks have formed due to an improperly poured foundation base, it is recommended to install an additional concrete belt on it. Along the perimeter of the house you need to prepare a trench, the depth of which should exceed the depth of the foundation. Concrete is placed into this recess, from which the belt is constructed.

How to fix cracks in a wall covered with plaster mixture
The danger of cracks on plastered walls is not limited to just an aesthetic defect. Due to damage, both the plaster coating and the masonry may be damaged. This mainly applies to external walls, where the finishing is largely exposed negative influence low temperatures and moisture. Through cracks in the coating, moisture penetrates into the masonry, where it subsequently freezes. This causes the coating to lag and the masonry to collapse.
These damages to the plaster layer can occur not only on the outside, but also on the inside of the house. These are very thin cracks that visually resemble a spider's web and spread across the entire surface of the wall. The reason for this may be incorrect application of the composition, irregularities in proportions when mixing components and failure to comply with coating care requirements. Among the most common mistakes is applying a thick layer of mortar. Cracks in this situation are a natural consequence of technology violations.
Damage appears after finishing: wallpapering, painting or puttying. This can be prevented by using reinforcing elements that are installed before finishing. Several materials are used for this purpose:
- plaster mixture;
- fiberglass mesh;
- glass wallpaper;
- fiberglass
Most convenient option counts latest material. Fiberglass is attached to a primed and dry surface using a special adhesive intended for fixing glass wallpaper. After finishing the work, this material can be coated with finishing putty or paint. 
The plaster mixture is divided into 2 types according to its intended purpose:
- for processing internal surfaces;
- for external walls.
These types of plaster differ in the components included in their composition. For exterior finishing the solution is prepared on the basis of cement, and for interior work Lime compositions are considered more suitable.
To eliminate cracks using a plaster composition, you need to prepare:
- capacity;
- ironing board;
- graters of various sizes;
- plastering brush;
- brush;
- trowel;
- water.
You can make your own plaster solution or purchase it ready-made. In progress homemade it is necessary to monitor the consistency, because Plaster that is too liquid will not adhere well. The process of sealing cracks looks like this:
- Using a brush, the composition is applied to the damaged area, then leveled using a wooden trowel.
- If the plaster was applied to the wall using the spray method, so that the treated area does not differ from the brush, you need to dip it in water and make patting movements on the surface.
- The easiest way to eliminate shrinkage microcracks. They need to be treated with deep impregnation, which penetrates the structure of the coating and strengthens it. Then the cracks can be painted over with dispersion paint.
Mortar for cracks in a wall covered plaster composition must contain fillers and binders. This element can be used building gypsum, cement or building lime. The most durable is cement material. Its strength indicators can be determined by marking; grade 400 is used for solutions.
Construction plaster will make the mixture more durable. This component speeds up the setting of the composition. He has distinctive feature– does not shrink. Construction lime is used for exterior work, since it dries only in air. 
How to cover cracks in a plasterboard wall
Damage to plasterboard material are formed due to several reasons:
- The most common violation of technology during the installation of the frame and installation of sheets is considered.
- The appearance of cracks can be caused by improper putty and sealing of seams between sheets.
- Causes of damage also include sudden temperature changes in the room, increased humidity levels and contact with water.
Drywall does not have good resistance to moisture. When interacting with this factor, the sheets are deformed and retain this shape after drying. The only solution in this situation is to replace the material. There are two methods to get rid of cracks in drywall.
- The first option involves filling the cracks with putty or acrylic.
- The second method is to stick fiberglass over the damaged area. Then the surface needs to be puttied, after which you can begin the finishing coating.
The surface treatment process looks like this:
- Before repairing a crack in the wall of a house using a putty compound, it is necessary to remove a layer of plaster from the damaged area.
- Next, the dust is removed using a vacuum cleaner.
- Then you need to prepare the putty mixture in following proportions: 2 parts powder to 1 part liquid.
- The resulting mass is applied in a 2 mm layer using a spatula.
- In addition to the crack, the nearest area should also be treated.
- Using reinforced tape it needs to be placed in the gap and covered with putty.
- The putty dries within 1.5 hours.
- Then it is recommended to clean it and remove dust from the wall.

Repairing cracks in a concrete wall
The main reason for the appearance of defects in a concrete wall is a violation of the ratio of cement and water during the preparation of the cement-concrete composition. During the process of laying the mortar, it must be thoroughly compacted using vibrators. Failure to follow proper care instructions can also lead to cracks. It is recommended to cover fresh concrete with a cloth to prevent excessive evaporation of moisture.
Particularly dangerous is the presence of cracks in the wall, which is subject to frequent temperature changes. At low temperatures, moisture enters the crack cavity, freezes and thereby increases the defect. The damage reaches the reinforcement, and a corrosion process begins, which negatively affects the strength of the building. In order to detect defects in a timely manner, the structure must be inspected regularly. This will make it possible to eliminate cracks in walls at the initial stage of development. Even minor defective changes in the concrete material cannot be ignored.
So, to work you will need:
- hammer;
- chisel;
- Grinder;
- putty knife;
- metal brush;
- brush;
- vacuum cleaner;
- slats made of wood material;
- trowel;
- water, sand, cement;
- adhesive composition;
- wire fragments;
- ironer
The work process occurs in the following sequence:
- Using a hammer and chisel, the crack needs to be expanded to a depth of 5 mm. This will help prevent the repair compound from falling out.
- Next, the damaged area is cleaned of dust and moistened. Use a sponge to remove excess moisture.
- If the fittings are visible, they must be treated with an anti-corrosion agent.
- The mixture is prepared on the basis of sand and cement, ratio 3:1. You can add PVA to the composition.
- If the defects are deep, they should be filled in stages, moistening each layer of the repair mixture.
- If necessary, the crack is reinforced with wire fragments.
- Then the surface needs to be leveled, for this a trowel is used.
- After the composition has hardened, protruding areas are corrected using a grinding machine.

Conclusion
When planning wall repairs, sealing cracks should be prerequisite. This defect not only negatively affects the appearance of the building, but also threatens its strength. Today the walls of houses are constructed from various materials, each of which requires individual approach when eliminating cracks.
How to repair a crack in a wall. Video:
If cracks have formed in the wall, it is necessary to remove them urgently, because the niches in brick house may lead to its destruction. Cracks indicate destruction or deformation of the foundation. How to repair a crack in the wall of a brick house? You can prepare the solution yourself or contact to a professional master, which can eliminate the crack quickly and efficiently. At the same time, it is necessary to remember that only a specialist working in the construction industry can find the real cause of cracks in the walls.
Why do cracks appear in the walls of houses?
It is a well-known fact that after construction, any building needs several years to take a stable position. Until this point, it may shrink. But a cement-based solution hardens very quickly. This “velocity imbalance” can cause cracks, causing walls to lose strength. Lime mortar is not so capricious because its hardening speed is lower. Probably, here lies the secret of the durability of old buildings that are already over a hundred years old - many of them will give a head start to new buildings, decorated with cracks.
The damage itself is classified according to various criteria, including:
- reasons for the appearance(due to design, deformation, shrinkage, temperature, wear)
- direction(cracks horizontally, vertically or diagonally)
- “pattern” of cracks on the walls(straight, curved)
- size of damage(small cracks, developed or large)
- type of crack(walls can burst, tear, “crush”)
- danger of a crack in the wall(in some cases, damage to the wall of a brick house may not bother the owners of the building for years, in others, urgent major renovation, otherwise such seemingly harmless damage as cracks can destroy the structure)
There are a huge number of reasons why cracks appear in brick and other walls. Among the most common ones:
- ground donkey(in another way, builders call this reason uneven soil settlement). A dense area is replaced by a weak one, which is why the foundation spreads unevenly and water gets into the niches. As a result, cracks appear that can extend to the very edges of the walls.
- The ground froze and thawed unsuccessfully. Because of this, the foundation may rise unevenly (usually this occurs in cases where the “bottom” of the foundation is located above the level of the point where the ground is frozen). This kind of damage to brickwork is dangerous, especially for a new building under construction. When, on the contrary, the soil thaws in the spring, the exact opposite situation is observed, and the foundation shrinks - as a result, cracks also appear on the walls
- built a new premises- in this case, problems such as cracks also arise. The soil receives additional stress, which results in inclined cracks
- the load on the foundation part of the building is distributed unevenly, Accordingly, soil settlement is uneven, which leads to cracks in brick houses
- a pit is being dug next to the building- this can also lead to cracks in the wall. A similar deformation occurs if the pit is located close
- a brick wall is affected by neighboring foundations
- loads on the foundation are observed, and, therefore, on the walls of the building (even if a large number of heavy things are placed nearby on the ground, this can affect the soil and then the wall of the building)
- there is a sharp mechanical impact on the walls(for example, piles are driven)
- there is an effect of temperature (sharp jumps from heat to cold and vice versa can greatly affect the walls)
- deformation changes occur due to shrinkage of the new building(they are not dangerous, and often such cracks do not reach the edges of the wall)
Cracks at the junctions of walls are also considered safe. One look professional builder will be enough to understand whether urgent assistance is needed for the construction or not. In order to definitely avoid danger, you can order specialist diagnostics and consultation, and in case of a minor problem, make repairs yourself.
How to repair a crack in the wall of a house - methods
It is better to begin this process after the building has completely gone through the period of shrinkage - otherwise, the work of repairing the walls will simply be useless. To control the crack and its movement, you can use a plaster cap - it is located where damage may develop. If the poppy does not burst within some time, the cracks have most likely stopped growing and the walls are safe. In addition, beacons equipped with a special scale are used to monitor the gap.
So, the following methods will help to remove a crack in the wall of a house:
- cement mortar filling(but it is suitable for small damage, up to five millimeters)
- using a brick castle(remove the damaged brick and replace it with a new one)
- metal anchor insert- it is inserted exactly where a crack is spreading in the brickwork, for example, if the damage is at the top, the anchor is placed at the top, and vice versa
- if the building is in danger complete destruction, you need to use stronger methods, for example, install steel rods that will become a kind of cover for a brick wall
How to repair damage yourself
It is necessary to carefully monitor the condition of any building and monitor the occurrence of damage. The sooner a problem like this is noticed brick crack, the greater the chances of saving the building. If you decide to do-it-yourself repair, then you need to remember that not all methods of restoring masonry are suitable for sealing cracks without special equipment. Most often, amateurs use the most in a simple way such repairs - with cement mortar. It allows you to make do with improvised means and does not require special professional skills. If you need to repair a crack in a building whose walls are in danger of collapsing, you should contact professional craftsmen.
How to make cement mortar
If you nevertheless decide to solve the problem yourself and cover the walls with a cement-based solution, you will need a “recipe” for such a mixture. Most often it looks like this:
- cement (about 270 kg)
- sand (about 2.1 thousand kg)
- water (about 350 l)
The proportions may vary depending on the equipment used to repair the walls. For example, in order to prepare a solution in a concrete mixer, there is another recipe - in liters you will need:
- cement (33)
- water (54)
- sand (206)
Such proportions will allow you to prepare a solution for 200 liters.
How to properly seal cracks in the walls of a brick building
It is better to cover the damaged walls with several layers of mortar, allowing each layer to dry in turn. Special skills, as noted above, are not required. To work, you will need a trowel and a bowl for mixing the mortar (or a concrete mixer).
The walls are exposed various deformations and traces of destruction are formed on them. The solution to the question: “how to repair a crack in a wall” cannot be put off. It is necessary to find the cause of the defect and eliminate it. After this, quickly and correctly strengthen the wall at the defect site and veneer it.
Causes and dynamics of defect formation
There are many reasons why cracks form on the wall. Basically, this is poor quality work done during construction and poor material that does not comply with technical documentation. Ignoring the results of geological exploration or not conducting soil tests accounts for approximately half of the reasons for the formation of large defects in the facade. Among the most common causes of wall destruction:
- the use of raw material when laying walls;
- soil subsidence;
- high groundwater level;
- weak foundation cannot withstand loads;
- the depth of the foundation is less than the level of soil freezing;
- violation of construction technology;
- poor quality of building materials;
- unprotected façade made of hygroscopic material;
- lack of waterproofing between the base and the wall.

Strengthening cracks in the wall should begin with identifying the cause of their formation and, if possible, eliminating it. You should monitor the dynamics of the expansion of the gap for several days and seal it as quickly as possible.
Strengthening mixtures are selected based on masonry materials, and depend on the location inside or outside.
Installation of beacons
Experts recommend installing beacons on cracks in the wall immediately after detecting a defect and observing the result for 8 - 10 days while everything is prepared necessary materials to prevent further destruction. Plaster and solutions based on it, special devices and strips of paper are used as beacons.
Before installing beacons on a crack in the wall, you need to clean the place where they are attached. Otherwise, the beacon will slide off along with the plaster.
Paper strips are stretched across the break and glued on both sides. When the walls move, they tear.
Gypsum beacons are placed indoors. Mix the plaster with water until it reaches a thick putty consistency. The composition is made into something like a dumbbell with wide edges and a narrow middle. A beacon is attached across the defect. You can put marks on it on both sides at a certain distance. Then use them to measure the size of the displacement.
For external use, a cement-gypsum mixture is used. It is less susceptible to moisture.
Professionals are armed with various devices, including micrometers that are mounted on the wall and record the slightest displacement in hundredths of mm in both directions.
Defects in the base and their elimination
The base is in direct contact with the soil, constantly flooded with rainwater and covered with snow. Cracks form in the lower part of the house more often than in the walls.
Cinder block and other building blocks
Defects in a block base occur mainly due to the mobility of the soil underneath. If the foundation is weak, it is advisable to strengthen it by digging a ditch along the perimeter next to it to the full depth and filling it with mortar. This will strengthen the foundation of the house, and cracks will appear much less frequently. When poured from the roof of a corner of a building, it begins to sag, warping the base and causing deformation.

How to repair cracks in a cinder block wall after eliminating the causes of foundation subsidence:
- Remove plaster and other finishes.
- Clean out the cracks, remove all pieces that are not held firmly.
- Remove dust and sand with a damp sponge.
- Hammer the anchors into the crack with a hammer. Secure them with dowels on both sides.
- Connect the anchors with wire if the crack is narrow. If it is wide, secure the metal mesh.
- Fill the crack cavity cement-sand mortar outside and gypsum or gypsum-cement inside.
- A layer of plaster is applied over the mesh. After drying, it is cleaned with fine sandpaper, leveled and further finishing is done.
Slag filling base and walls
The reason for the formation of cracks in a slag-filling house is haste and violation of technology. After installing the formwork, the solution was poured quickly, without tamping it or releasing the resulting air bubbles. Over time, these internal voids become stress concentrators and cracks form along them.
When the temperature changes, condensation forms in the bubbles. Freezing, it expands the concrete particles and destroys it. Several steps are followed to seal a crack in the wall of a cinder-fill house.
- Clear the gap, increasing its width and depth.
- Remove all crumbling fragments and sand.
- Use a wet sponge to remove all dust.
- Fill the void with cement mortar.
- Place a metal one on top reinforced mesh with a margin of 40 - 50 cm in all directions. Secure it with dowels.
- Plaster the entire area with cement-sand mortar.

Further finishing is carried out in accordance with the rest of the plinth. It is advisable to cover the top with a moisture-resistant material to prevent moisture from entering and slow down destruction.
Often the cracks in slag-filling plinths can be through. In this case, they are sealed on both sides, compacting the cement mortar well into the void. Other materials are also suitable for sealing cracks in the wall. If it is not load-bearing or is lightly loaded, polyurethane foam is used. After hardening, its excess is cut off to a depth of 2 mm, the mesh is attached and everything is plastered.
Exterior wall repair
There is less risk of house destruction horizontal cracks walls The reason for their formation is related to the design of the house:
- different depths of the foundation of external walls and under partitions;
- lack of connection between internal and external walls;
- poor quality masonry;
- closely located groundwater wash away the foundation;
- wind movement of the roof.
Typically, a thin, winding crack, several mm wide, runs along the perimeter. It is cut up, cleaned of dust and primed. After this, fill with sealant.

An armored belt is made around the perimeter from a metal strip and anchors. After this, you should similarly seal the crack in the wall from the inside during repairs.

Note! Vertical defects in load-bearing wall dangerous, especially if they continue to expand.

Restoration of façade plaster
Timely repair of cracks in the plaster of external walls significantly extends the service life of the building. If the finishing technology is violated and the proportions of the components of the plaster are not observed, the facade resembles dry soil. How to remove cracks in plaster walls outside. It is impossible to cut them all apart; it is easier to completely remove the plaster.
- Clear the wall wire brush from all particles that are weak to hold on to.
- Coat with primer deep penetration. Use a coarse brush and rub the primer in different directions.
- Secure polypropylene or fiberglass mesh.
- Apply thin layer plaster. If you need to level big differences, plaster in 2 – 3 layers, cleaning and covering with primer.
- Cover the walls water-based paint or make another façade finish.
Small cracks in plaster themselves do not pose a danger. But it hits them rainwater, which destroys the wall covering. In winter, it freezes, penetrating deeper into the plaster and then the masonry. This is why it is necessary to repair a crack in the plaster on the wall.
Strengthening brickwork
Small cracks in the brickwork that formed instead of spilled mortar are sealed to prevent water from entering and further destruction. They need to be cleaned with a wire brush, dirt blown out from them and sealed with sealant or foam using a thin nozzle on the gun.
A crack in the wall of a brick house that is more than 1 cm wide, especially if it continues to expand, must be repaired using ties.
- The wall is grooved perpendicular to the crack or along the horizontal seams between the bricks. Holes are drilled along the edges of the recess.
- The reinforced metal rod is welded with the letter “P”, the crossbar is equal to the length of the selected recesses. The side pins go into the hole.
- A cross member is welded on the inside. The excess is cut off.

Such through staples are placed at a distance of 20 cm from each other along the entire length of the crack.
Local cracks in the wall that do not expand are best removed by re-laying bricks. Disassemble all broken bricks from top to bottom. Place a new one in its place, with dressing - shifting the bricks.

What is the best solution to seal cracks in the walls of a house to prevent it from leaking out? Plasticizers must be added. For external walls it is lime and Bustilat glue. IN cement mortar their content should not exceed 10%.
Concrete wall
Solid and waterproof concrete slab not eternal. Over time, defects form in it. The façade must be inspected periodically. It is easier to repair small cracks in the wall than to repair a crumbling panel.
- Use a jackhammer to clear out the crack.
- Cover the exposed metal fittings with a primer to prevent them from rusting.
- Seal the crack with a solution of cement and water.
- Plaster the top with river sand added to the cement.
In the presence of large quantity small cracks on concrete wall indoors, coat with concrete primer, glue fiberglass and putty.
Elimination of wall defects indoors
Often small cracks in the masonry appear in the finishing: wallpaper breaks and comes off, tiles swell. Repairing cracks in an apartment wall begins with removing the cladding and plaster. Having cleared the brickwork, the cracks must be cut and filled with sealant. Then lay a strip of sickle mesh on top and putty. After drying, clean and plaster.
Cracks in plaster
During repairs, small cracks in the wall are repaired. If a vertical gap has formed, and restoration work is far away, the wall should be restored.

Foam blocks, aerated concrete and other lightweight materials
A crack often appears in a wall made of foam blocks, how to repair a warm, soft material. All blocks made with air inside are suitable as a good heat insulator. The material is not designed for heavy loads. During construction residential buildings foam blocks are used for the inner layer of masonry and they have little effect on the strength of the house structure.

How to repair cracks in a foam block wall? Gypsum solution with the addition of PVA glue as a plasticizer - up to 5% and reinforcing polyethylene or plastic fiber.
- Clean out the defect with the corner of a metal spatula or a construction knife.
- Cover with primer.
- Fill with solution.
- Secure serpyanka or polypropylene mesh.
- Cover with a layer of putty.
After drying, clean and then finish the wall by painting or wallpapering.
Features of working with plaster
Gypsumite blocks are used to create soundproofing and lightweight partitions. If there is no foundation under interior walls, then you can lay it on beams, choosing hollow slabs. How to repair cracks in plaster walls. The name itself suggests the material. The cracks are sealed with a solution of gypsum with PVA or Bustilate. Small defects and gaps between the slabs can be filled with sealant or gypsum adhesive.
A beautiful corner instead of a torn gap
Depending on the size of the defect in the corner, it is reinforced with metal corners or only mesh. A large gap, especially if it grows, requires urgent repair.
- Clear.
- Select areas at a distance of 20–25 cm on both sides of the gap for fastening the corners.
- Drill holes, hammer in dowels and secure the metal corners with sides on different walls.
- Fill big gap foam if the wall is made of brick or foam block. Concrete joint with cement and water.
- Lay serpyanka or fiberglass.
- Plaster.
- For an even angle, insert a perforated metal corner - profile - into the plaster.
- Putty, clean.
If the house is made of panels and defects have formed at the joint, you must inform the homeowner and require him to carry out external repairs and seal the panel joints.
Drywall needs to be replaced
Used to level walls, they swell from moisture and warp. When they dry, tears in the outer coating form on them. You can seal a fine network of defects with putty. But a sheet repaired in this way will not last long.

How to repair cracks in plasterboard walls? Small defects can be repaired with acrylic. The deformed septum is restored by replacing the swollen gypsum board. The leaf is carefully trimmed. If installed, the fastener is removed. In its place another plate is placed or glued to the wall. The joints between the sheets are sealed.
If defects are formed due to drying out gypsum plaster, you can stick fiberglass as a reinforcing material.


