For the manufacture of shower trays they use various materials, on the properties of which the characteristics of finished products depend. Today we want to talk about steel models, consider their advantages and disadvantages, and also pay attention to how to install a steel shower tray with your own hands.
Steel shower trays
Characteristics and Features

If we look at shower bowls and divide them into groups according to the materials from which they are made, we will notice that steel products will be the most budget-friendly:
Cheapness is one of the indisputable advantages of steel models, but it can also have the opposite effect: most buyers believe that low cost is a sign of low quality.
This is not entirely true, and often the low price is caused by the peculiarities of product production, the cost of materials, as well as (and this is especially important) existing market trends and the related marketing policies of product manufacturers.

In the case of steel pallets, it cannot be said that they are definitely worse than their analogues, but in some positions, metal models do lose. Their lineup is not that diverse, especially in terms of design. It is quite difficult to find a bowl of an unusual shape; square and rectangular shapes predominate on sale; corner models are much less common.
There is also a limitation on the depth of the vessel, and it is almost impossible to find really deep steel shower trays, since this parameter is limited to 160 mm. At the same time, models with maximum depth 130 mm, and any pallet with a depth of more than 40 mm is called deep. However, this feature is not unique to this class.

On the other hand, steel is an excellent structural material, which is characterized by high strength and durability, which is not afraid of high temperatures, shocks, falls of heavy objects, fungal infections and other similar influences. Low cost makes steel models especially in demand for installation in country and country showers.
The products are made from carbon steel coated with anti-corrosion wear-resistant enamel. If you remember cast iron bath, then you can imagine what we are talking about. The bowl can be equipped with a frame for installation, special legs or supplied without them.

Important!
By the way, bathtubs can last for decades and still look good, so stereotypes about the quality of steel bowls are largely far-fetched.
Advantages and disadvantages

Despite their low cost, steel pallets have a number of advantages, thanks to which the demand for this class of products remains quite stable.
We list the main ones:
- High strength characteristics of steel. The material is not afraid of high temperatures, does not crack, does not split, can withstand significant weight, and withstands impacts and falling objects;
- Low cost. With quite acceptable quality, the products are several times and orders of magnitude cheaper than analogues made of ceramics or artificial stone. Even acrylic bowls cost about two to three times more;
- Possibility to choose enamel color. Unlike ceramic and acrylic counterparts, steel bowls can be coated with enamel of various colors and shades, which makes it possible to fit it much more harmoniously into the interior of the bathroom;
- Easy DIY installation. The product is quite easy to install using ordinary tools, without any special skills in construction or plumbing.

Important!
When installed on a frame, the need for wet processes and brick podium construction is eliminated, making installation much easier and faster.
Of course, there are also disadvantages.
We will list only the most significant of them; if they do not confuse you, then you can ignore the rest:
- Steel is afraid of electrochemical corrosion. The enamel coating may come off the surface or be damaged by mechanical stress, and then the bowl will begin to actively rust and deteriorate;
- The appearance and variety of forms leave much to be desired;
- Steel surfaces are very slippery, especially if they are not corrugated;
- When water flows from the shower, a noticeable noise occurs;
- If there is no frame or solid foundation under the bottom, it may sag under the weight of an adult. This is dangerous due to cracking of the enamel.

Important!
It should be noted that, unlike steel, it heats up quickly enough from water, and you can use the booth practically without preheating the bowl.
Installation

Installation of steel pallets is carried out in two ways: on a podium made of brick or concrete, as well as on a special steel frame with legs. It is advisable to choose a model with a frame and adjustable legs.

If there is no frame at the installation site, a brick podium is first laid out. To do this, the floor is stripped of finishing down to a clean screed, on which a ceramic brick structure is laid (silicate brick is not suitable due to its low moisture resistance).
The design is a parapet 0.5 - 1.5 bricks high around the perimeter of the bowl:

The shower stall looks beautiful in the interior of the bathroom. It takes up relatively little space compared to a bathroom. The installation of a shower stall is often done on a pallet. This structural element can be installed independently. To do this, you need to learn a step-by-step technique on how to install a shower tray. This will be discussed further.
Types of pallets
How to install a shower tray (photo finished work presented below) is of interest to many owners of private houses and apartments. Self-installation allows you to save money on the family budget. Even a novice master can cope with this task. To do this, you need to know several subtleties of carrying out such work.
There are several types of shower trays. They may differ in material. Before considering how to install a shower tray, you should pay attention to the distinctive features of each group of plumbing products. The following types of pallets are available for sale:
- Cast iron. These are enameled pallets that are highly durable and reliable. The weight of cast iron pallets is large. Therefore, certain difficulties may arise during installation. Cast iron pallets are difficult to transport home. When installing them, you cannot do without an assistant. Therefore, such pallets are rarely purchased.
- Steel. A more practical option for plumbing products. They are quite durable, but at the same time they are lighter than cast iron. Many novice craftsmen are interested in how to install an iron shower. pallet. This procedure will be much simpler than when using cast iron plumbing. You can cope with the task yourself. Disadvantage steel structures is a high noise level. Water falling on a steel surface will create vibration and ringing. In addition, a metal frame is required. Otherwise, the material may bend under the weight of a person.
- Ceramic. One of the most hygienic varieties. Ceramic trays are easy to clean. In this case, the material can have very different colors. However, ceramics is a rather fragile material. If a heavy soap dish or shower head falls onto the tray, chips may appear. Such products must be transported and installed very carefully. If the technician does it incorrectly, the pallet may crack.
- Acrylic. This type of pallet is installed much more often. The weight of such plumbing fixtures is minimal. Installation does not cause any particular difficulties. You can create an original shaped pallet from acrylic. This allows you to decorate the existing interior. You can also choose almost any shade for the pallet. Acrylic is not inferior to steel in terms of rigidity. However, the material may become deformed. It must be installed on a special frame. It comes complete with a tray.
Other types of pallets
How to install a shower tray? It is necessary to take into account the features of the selected product. In addition to the material, plumbing fixtures may differ in other characteristics. There are different sizes of pallets on sale. They are chosen in accordance with the dimensions of the bathroom and the weight of the home owners. Pallets can be symmetrical or asymmetrical. This allows you to choose an option that best suits the dimensions of the bathroom.
Some companies offer to make custom shower trays. In this case, the question of how to properly install the shower tray does not arise. This work should definitely be entrusted to professionals. They take into account all the features of the material from which the pallet is made. Specialists will install the original model correctly. Such pallets can be made from natural stone, for example, marble, wood. The last option is often used in the country. These are elite types of pallets. Their cost is several times different from standard models. In this case, the question of how to install a shower tray in a country house is also decided by a team of specialists. It is not advisable to install the original model yourself.
All plumbing products in the presented category are divided into two groups. Pallets can be deep or shallow. In the first case, the sides of the product will be high. Installation necessarily requires the use of a metal frame. Shallow pallets are also called flat pallets. They do not require a metal frame. Installation of this type of plumbing products is easier.
Even if you need to assemble a frame for installation sanitary product, this work does not cause any particular difficulties. Before installation, be sure to take into account the manufacturer's instructions. It describes in detail how to assemble the frame and install the pallet on it.
Installing a Shallow Pan
When considering how to properly install a shower tray (metal, ceramic or acrylic), you should pay attention to the features of installing a shallow shower tray. This is the simplest option. The most difficult thing in this case is to install the siphon correctly. This is where the installation process begins.

The installation process begins with the siphon. It is installed in the required location of the base (must correspond to the type of pallet). Having connected the siphon, we begin to assemble the pallet. It is installed in the required place in the bathroom. But you should not fix the product. Next, the structure is checked for leaks. You need to make sure that the structure is assembled correctly.
It is necessary to install the pan with a slight slope towards the drain. Next, the plumbing product is simply glued to the base. As a result, the level of the base of the tray will be several centimeters higher than the floor in the bathroom. The pallet is leveled using a level. Be sure to make a slope of several degrees towards the drain. Next, the space under the pallet is filled with polyurethane foam.
After such a procedure, weight is placed on the pallet (for example, several bags of cement). A day later it is removed. After this, you can safely use the pallet.
Acrylic tray
When installing a deep pallet, it is important to take into account the characteristics of the material from which the pallet is made. This determines some installation nuances. There are certain guidelines on how to install an acrylic shower tray. You must follow the manufacturer's instructions.

First you need to tip the pallet. At the bottom with reverse side Screw in the legs. They are supplied complete with a pallet. Manufacturers provide a set of 3 to 5 legs. This depends on the dimensions of the pallet. If the kit includes its own metal or plastic frame, then it must be assembled in accordance with the manufacturer's instructions. In this case, the holes for the legs will not be made in the pallet, but directly in the frame.
The legs should be longer than the siphon and drain system. Also, each support should extend to the same length.
When learning how to install a shower tray with your own hands, you should pay attention to the installation of the drainage system. To do this, the structure is installed on its side. On the side of the cavity for washing, you need to install a bushing in the drain hole. You need to put the siphon pipe on the bottom. It fits onto the end of the sleeve. To ensure a strong connection and no leaks, it is recommended to use sanitary sealant. You can install the drain on the thread. For this purpose, plumbing gaskets are used.
After this, the pallet is installed on the legs. When installed correctly, the bottom of the siphon should not touch the floor. After this, using a level and adjusting the legs, you need to establish the correct position of the tray. It must be strictly horizontal. Otherwise, it may develop a leak over time.
The side that touches the wall must be lubricated with glue. Next, the assembled pallet is firmly pressed to the surface. After this, the structure is left until the composition dries completely. After the joints need to be treated with sanitary sealant.
The siphon is connected to the sewer lines. Then you can install the decorative panel on the bottom of the pallet.
Brick frame
If the pallet is quite large and the frame is not supplied, you can install it using bricks. This option will allow you to firmly fix the plumbing product. How to install a shower tray on bricks? You will need to build a frame from this material.
Before starting work, you need to prepare bricks and cement mortar. A wall is built from these materials. This will be the support for the pallet. The height is determined in accordance with the dimensions of the pallet. Its drainage system should not touch the floor.
When considering how to install a shower tray on bricks, you should take into account that the wall cannot be monolithic. It is necessary to leave space for access to plumbing communications. Walling them up is strictly not recommended. If a leak occurs, it will be impossible to quickly get to the point where the system is depressurized. This is fraught with flooding of the neighbors below and the formation of fungus under the surface of the pan.
It is worth considering that the niche on which the pallet will be installed must be lined up in accordance with the dimensions of the pallet. Therefore, walls are erected only after purchasing plumbing fixtures. In accordance with its dimensions, a support is created on which the pallet will be placed. During construction work, the evenness of the masonry is constantly checked using a building level and plumb lines.
Between the bottom of the pan and the floor you need to make a layer of polyurethane foam or sand. The bottom will not sag. This step can be skipped if the plumbing product is thick. After blowing the foam, you need to put weight in the tray. In a day you will be able to operate the system.
The pallet is placed on a niche created from brick. The seams need to be treated with sealant. Sanitary silicone is suitable for this.
Cast iron pan
How to properly install a metal shower tray? If it is made of cast iron, you need to act a little differently. This product is quite durable. It doesn't need additional support. Therefore, there is no need to assemble the frame.

Almost always, the legs are cast together with the pallet. This is the most reliable option. Therefore, leveling the product in a horizontal plane can only be done by placing some objects under it. This, for example, could be steel plates of different thicknesses.
There are a few things to consider when considering how to install a metal shower tray. Cast iron plumbing without proper fixation can move off the metal plates. Also, do not fix the sides to the wall with glue. Therefore, you will need to create a cement frame around each leg. To create formwork, it is quite possible to use ordinary matchboxes.
It's also worth noting that manufacturers do not make the cast iron trays that come with the cabin structure. For them, special screens or curtains are purchased separately. In this case, precise geometry is not required during installation.
Sometimes the factory height of the legs is not enough to install a siphon under the tray. Therefore, a parapet is built for the structure. To do this, a brick niche is built. It should be built around the perimeter so that each side of the pallet rests on it. The legs need to be fixed with cement. WITH outside It is better to do the cladding with tiles or mosaics.
Steel pallet
How to install steel pallet For shower? The technology for performing this process is simple. It is worth noting that such products are made by stamping. Therefore, the legs are never made together with the body. They are always collected separately. A stand is almost always supplied with a steel pallet.
When considering how to install a steel shower tray, it should be noted that the procedure will be a bit similar to installing an acrylic product. A special frame is assembled around the perimeter of the bottom. This is a metal profile assembled in accordance with the manufacturer's diagram. They are screwed into the frame using threaded connection legs. Thanks to this design, it will be easy to level the position of the pallet. In the right places, the legs are either made longer or shorter. Steel pallets are often supplied complete with the cabin itself. Therefore, you need to carefully align the position of the structure.
If a factory-made cabin with a pallet is not supplied, you can install the pallet on a cement screed. Sometimes a small pedestal is built on which the pallet is placed. In this case, the bottom will not sag.
Ceramic tray
There are a number of other recommendations on how to install a shower tray. In this case, ceramic sanitary ware is used. This is one of the most popular options, not counting acrylic pallets. This is a fairly massive, durable type of construction. Therefore, legs and frames are rarely used in the design. Often the design provides for the presence of cavities. A siphon and a drainage pipe system are installed in them. In this case, the pallet is simply laid on the floor. After this, the walls of the booth are installed.

However, the pallet design does not always have internal cavities. Many models only have a drain hole. The bottom in this case is solid. In this case, the booth is installed on a pedestal.
To do this, you first need to cover the floor with waterproofing. To do this, rubber or a sheet of roofing material is installed at the installation site of the shower cabin. A screed is poured on top of the waterproofing. It must be absolutely horizontal. After this, you need to build a brickwork inside the contour of the pallet. It should be sufficient so that the drainage system does not touch the floor. Also, holes must be provided in the masonry itself to gain access to the drainage system.
After this, the siphon is connected to the pan and the drain system. You need to attach the outlet pipe to its branch pipe. A layer of cement is applied on top of the masonry. The assembled pallet is installed on it. A siphon and sewer pipes are placed in the designated cavities.
After this, the pedestal is lined. For this purpose, tiles or mosaics are often used. It is quite possible to install ceramic trays on the frame. However, the option with screed and bricks will be the most effective and reliable.
Homemade pallet
Having considered how to install a shower tray, you should pay attention to one more method. In this case, there is no need to purchase a pallet separately. It is created from screed and tiles. In this case, you can go two ways. The first of them involves the creation of special cavities for drainage communications in the floor. They are cut using an appropriate electric tool.

The second option involves building a pedestal, inside which all the necessary communications will take place. This option will be acceptable if the ceiling height in the room is medium or high. For small apartments, the first option is more suitable. In this case, the shower stall will be flush with the bathroom floor.
To drain water, not a siphon is used, but a ladder or a special channel. Using a tie, make an inclination towards the drain hole. Such a cabin looks no less impressive than equipment with a purchased pallet. When creating such a cabin, much attention is paid to high-quality waterproofing. It is desirable that it extends over the entire surface of the bathroom. The inside of the homemade pallet is tiled. It should be non-slip. The color can be chosen to match the main floor finish or highlight the booth with a different shade.
When considering how to install a shower tray, there are a few more things to consider. Sometimes the drain hole is far from the wall. In this case, it will be easier to install a rectangular pallet than a shaped one. When calculating the drainage system, it is necessary to take into account that the angle of inclination should be about 7º. This indicator is used as a starting point when choosing the height of the legs.

Sometimes pallets mounted on a frame require reinforcement. Steel, acrylic and reinforced varieties sometimes cannot function normally only on a structure made from a factory profile. Therefore, bricks or supporting pillars are placed under them. The supports must be the same height. Their surface must match the configuration of the back side of the pallet. Otherwise, you can only do harm. The support pillar will simply push through the bottom of the structure.
Home renovations are always perceived positively only at the first stage, when everything planned is brought to life on paper. When the stage of the actual installation process approaches, many disputes, disagreements and pitfalls arise that simply no one knew about.
In this article we will describe in detail the process of renovation in the bathroom, or more precisely, the installation of a shower stall on a “brick pillow”.
Shower cabin made from scrap materials
As you know, the price of a finished shower cabin sold in a store can vary greatly, this is due to various factors. For example, some devices are more modern, they have more electronics, others use cheap materials, and some have a completely non-standard shape.
The choice is quite large, it is extremely difficult to find something decent at an affordable price, so we suggest not focusing on ready-made products. Let's make a better shower cabin ourselves, save money, and at the same time work with our hands.
The very first thing you should pay attention to is the shape of the pallet:
- Rectangular.
- Semicircular.
- Pentahedral.
As for the materials from which pallets are made, the choice is quite varied:
- Cast iron- the most expensive, but at the same time, the most durable and durable. They are considered the heaviest by weight, so a reliable base is required for them. On the other hand, the supports can be placed around the perimeter, leaving central part in limbo.
- Steel pallets are slightly inferior in strength and durability, but they are also more affordable. There is one drawback: steel makes noise when exposed to water, so it is necessary to use a special noise muffler under the pan.
- Acrylic- the most diverse in shape, but the least durable. Under the weight of an adult, such a pallet will easily bend, and under increased load it will even crack. Therefore, pallets are installed with an additional support element made of metal parts.
Note! You can make a shower tray out of brick with your own hands, but it must be lined with ceramic tiles. Firstly, it is better from an aesthetic point of view, and secondly, tactile contact with brick cannot be called pleasant.
Now let's select one of the above pallets to describe the installation process using its example. We will give preference to the most durable and reliable - cast iron option.
Additional materials
To install a shower cabin with your own hands, we will need:
- Plumbing elements: siphon, hoses, valve, rubber rings, foam tape, shower head.
- Silicone sealant will also come in handy.
- To prepare the solution you need cement, sand and a plasticizer.
- Construction bricks (for example).
- For finishing it is better to use tiles.
As for tools, you need to purchase:
- Construction level (laser device).
- Roulette.
- Putty knife.
- Master OK.
- Mallet.
- Caulk gun.
Preparing the premises
Important! If a bathroom renovation is being carried out in a country house, then be sure to ensure that the pipeline is initially located correctly. To do this, the drain is installed in the floor, in any part of the room. It is better to install pipes for supplying cold and hot water in the wall, so as not to spend money on additional finishing during repairs.
- The first step is to vacate the room, dismantle the old flooring and cut off all the old plumbing elements.
- Measure the working area and calculate the amount of building materials.
- Prepare cement-sand mortar using water and plasticizer.
- Level the walls and floor using mortar or putty. This stage can be skipped, but, you see, in a more level room it is easier to do repairs, at least it is easier to attach finishing materials.
Installing the base
Below you will find instructions from which you will learn in detail how to attach the pallet to the bricks:
- After the floor is leveled, it is necessary to mark the boundaries of the cast iron pan.
- Now you can mix the cement mortar for the brickwork.
- The next step is to use a trowel to apply a few strokes of cement to the floor surface.
- Place a brick on them and move it lightly through the mortar. The final position of the material must coincide strictly with the line of the pallet.
- Then hit the brick with a mallet several times to press it to the floor as best as possible.
Note! The thickness of the joint for brickwork can vary, it all depends on where it is carried out. In this case, 5-7 mm is enough to maintain strength.
- Place a second brick perpendicular to the first to form a letter "G".
- Lay out as many bricks as high as necessary so that the pallet does not touch the floor surface and there is room for the drain hose.
In the photo - under the pan there is not only a drain, but also a water supply
- Do the same in all other corners, observing the drawn line of the pallet.
- While the solution dries, you can install the plumbing elements.
- After waiting a certain amount of time (at least 2-3 days), you can begin directly installing the pallet.
- Before you lay the cast iron product on the bricks, you need to apply cement mortar to them.
- Having placed the pallet, you should press it firmly and check with a building level whether the horizontal plane is maintained.
- If everything is fine, you can connect the drain hose to the drain hole of the pan.
The next stage is finishing. Since we took tiles as a basis, we only need two things: plastic crosses for installing them between the tiles, and grout for the seams. And in the right color. So, in fact, the shower stall is ready, all that remains is to hang the curtain from the ceiling so that splashes do not fly in all directions.
Acrylic tray
A cast iron product is still expensive and not everyone can afford it, so let’s briefly look at the process of installing a more flexible and elastic material - acrylic.
The main thing is to distribute the load evenly to extend the service life of the base.
- They should also be installed in the corners.
- The welded metal frame is attached between the brickwork and the floor using dowel nails.
- To prevent the metal from rubbing the acrylic surface, it is necessary to use an insulating material. The most affordable thing that can be found in available materials is ordinary rubber, which is glued directly to the metal.
Important! The joints of pallets (either cast iron or acrylic) should be treated with silicone sealant. If you think this option is not very aesthetic, then you can use plastic decorative corners, which are fixed with glue or sealant.
As you can see, a do-it-yourself brick shower is quite affordable, even for people not involved in construction and renovation. The main thing is to do everything as the professionals advise, then the result will please you longer.
Conclusion
Brickwork is not afraid high humidity, it is important to isolate other elements from direct contact with water. For example, the main source of excess moisture may be the drain hose.
If it is installed without the appropriate materials (fumulous tape and rubber rings), then there is a high probability of leakage, as a result of which water will accumulate under the pan. And this is an excellent environment for the proliferation of harmful microorganisms.
- Materials and tools
- Installation procedure
- Useful tips
A modern shower cabin is a wonderful addition to the usual bath, making pleasant and healthy water treatments as varied as possible. Here you can place a hydromassage system and an exotic shower, connect light music and create light and sound effects.
However, without a high-quality shower tray - the basis of any shower - all this is simply impossible. Therefore, you should know how to install a metal shower tray with your own hands.
Why is it better to choose, for example, not a ceramic shower tray, but a metal shower tray, and why is it better to install it yourself, rather than with the help of qualified installers? A metal shower tray is a great choice and is easy to install. Plus, you can save money this way.
Materials and tools
In order to quickly and correctly install a metal pallet, you need to stock up on the following materials, tools and accessories:
- ready-made shower tray;
- drainpipe;
- mixer with siphon;
- cement;
- sand;
- waterproofing mixture (silicone sealant);
- brick stock;
- sheet rubber;
- FUM tape;
- trowel for stone work;
- plaster spatula;
- paint brush;
- hammer;
- building level.
Return to contents
Installation procedure

There are many ways to quickly and efficiently install a metal tray in a shower room (chamber). Let's look at one of the simplest and most common options for installing a waste tray.
Before you begin the process of installing this structure with your own hands, you must thoroughly study technical instructions, which is usually attached to it when selling. It is worth noting that experts recommend doing this regardless of what material the shower tray is made of.
First of all, the shower stall must have dimensions that generally correspond to the dimensions of the metal base. In this case, the dimensions and finish should be adjusted in such a way that the facing ceramic tiles, if not the entire wall of the room is lined with them, have their lower edge descending slightly below the level of the tray placed against the wall. If there is a gap between the wall and the base of the cabin, it must be sealed with a waterproofing compound (sealant).
When starting to align the pallet according to all the rules, it is recommended to immediately use a building level to monitor the clear horizontalness of its upper plane.
This situation should not interfere in the future effective removal water, since modern drain products are produced with ready-made cone-shaped funnels.
To fix the structure in a certain position and to ensure its horizontalness, the legs supplied with the pallet are used. They are usually adjustable, so they can be used to quickly and easily position the base. Once the adjustment is complete, the legs are firmly fixed with locking mounting bolts.
In some cases, instead of legs, special plastic supports are used, which are supplied with the pallet. At the same time, very often builders install these products, resting them not on legs, but on specially constructed stands made of bricks or mounting cinder blocks.

The specified stand (or, as it is also called, a well) is built in accordance with such dimensions that the future bottom of the shower stall can be freely laid on it, resting its sides on the edge of the brick (cinder block) masonry. To fix the pallet, its sides are either glued to the masonry with a special adhesive mixture or placed on cement mortar.
When installing the base of the shower chamber on a stone well-support, one cannot ignore the fact that a siphon must be connected from below to the drain neck of the pan. To ensure that the height of the well is sufficient for it (the sewer outlet should be above the floor level at a height of 12-15 cm), care must be taken in advance when designing the bathroom. By the time the entire structure is finally secured to the brick support, the mixer must be assembled, and its components must be tightly screwed to each other according to the diagram.
For better stability of the pallet, the space between it and the floor can be filled with ordinary sand. This will create additional support for him. If you don’t have sand at hand, polyurethane foam can partially replace it.
It should be borne in mind that the shower stall is a place where, by definition, there should be a lot of water. Therefore, all the slightest seams, cracks and joints - between the sides and the brick on which they rest, between the edges of the tray and the tiles on the walls, between the tightly screwed elements of the mixer and the tray - should be carefully coated with silicone sealant and laid with FUM tape.
Every time you complete one or another stage of the installation procedure, it is recommended to immediately check the quality of what was done. In particular, after placing the support well (but without its final fixation), it is proposed to ensure its stability. To do this, all you have to do is stand on the pallet with the utmost care, and, most likely, balancing deficiencies will immediately manifest themselves.
It is also necessary to make sure that the junction of the pipe with the neck of the pan and the siphon with the sewer pipe is well sealed. For this purpose, water is supplied to the tray with low pressure. If there is no leakage of liquid, the shower can be used for its intended purpose. If water leakage is detected, additional sealing of the connected components will have to be done.
The bathroom is a place of relaxation, where a person puts himself in order. It should be practical and have a pleasant aesthetic design. A shower cabin is an ideal way to save space in the bathroom. A very important point in installation is the installation of the shower tray. Let's look at how to properly install different models.
Manufacturers are ready to surprise the most sophisticated owner, offering many shapes, sizes and design options. One of the first classifications is the division of models by shape. It can be square, oval, round, triangular, rectangular products. It is worth choosing the shape and size of the tray that will distribute the space in the bathroom as ergonomically as possible with the appropriate level of convenience.
Another classification is related to the material used. Today you can purchase a pallet from:
- cast iron;
- acrylic;
- marble;
- ceramics;
- become.
In this case, the tray can be installed using several methods, using a metal frame, a pedestal or a flat surface (for ceramic models). It is worth noting that marble products are very fragile and can be damaged by impact during the installation stage, so all work must be carried out as carefully as possible. A ceramic tray can also crack from an impact.
Marble pallets have a beautiful external design and will fit into any style of bathroom interior: from retro and classic to high-tech
It is worth noting that cast iron and steel models can be unpleasantly cold in the morning, which cannot be said about acrylic products. The latter are today modified with the addition of quartz dust. As a result, the structure becomes stronger and more durable. Such models are called quaril models.
Marble pallets have an impressive appearance and heat up quickly. They provide a pleasant tactile sensation upon contact with the skin. Ceramic models heat up slowly, but are practical for everyday use and durable. The prices for these solutions are significantly higher than others.
Pallets also differ in depth. When choosing, you can use the following guidelines: very flat (6-10 cm), flat (10-18 cm), deep (25-35 cm).
Tile or mosaic cladding
In many cases, side cladding is required to hide the mounting bases. One of the most convenient options for solving the problem is to use mosaic tiles on a plastic or glass base. A layer of glue is applied to the base using a notched trowel. After pressing the tiles, excess adhesive must be removed immediately.
Using mosaics, you can cover any uneven surfaces, because... It is easy to cut with construction scissors or a knife thanks to the paper base. It doesn’t matter whether you use tiles or mosaics - all seams must be sealed. This especially makes sense when you decide to build the pallet yourself.

The space between the pallet and the floor can be closed using mosaic or tile cladding. Mosaic fragments are flexible and allow you to quickly and efficiently line the sides or the entire pallet if you build it yourself
When forming seams, use crosses. After facing, you need to grout the seams using waterproof grout and a rubber spatula. Then the remaining grout is removed and everything is wiped with a piece of cloth. After everything has dried, you need to wash the tiles.
Pallet Installation Instructions
Installation rules often depend on the material from which the pallet is made, so we will consider four popular options. Acrylic and steel modifications are more common, while cast iron, marble and ceramic are less common.
Installation of acrylic models
Acrylic solutions are the lightest, most affordable, and come in a variety of shapes and sizes. Such models are equipped with brackets, legs and other fittings that help to install and secure the pallet to the base. A design flaw in many cheap models is the lack of reinforcing support under the bottom, so when choosing, you need to pay attention to ensuring that the bottom is reinforced.
First you need to turn the pallet upside down and screw the legs. Depending on the model, the kit may include from 3 to 5 supports. A number of products use a support frame based on plastic or metal. The holes for mounting the legs will be located in this frame.
When screwing in the supports, you need to ensure that the length of the legs is no less than the height of the siphon. Also, all supports must be screwed in to the same height (then you can adjust the horizontal position of the pallet using a level)

Make sure that all supports (studs, legs) are screwed in, and after installation, adjust the tray to a strictly horizontal position
Next is the installation of the drainage system. It is necessary to connect the pan to the sewer, placing the product on its edge. A complete bushing is inserted inside and is used for connection. The siphon pipe is placed on the protruding end of the sleeve. To prevent leaks, the joints are coated with glue.
You can use epoxy glue or epoxy plasticine. Connect the pipe and the bushing, and seal the connection with sealant on top. Some models of shower cabins may use a connection system with paronite or polymer gaskets. In this case, there is no need to use glue.
Place the tray on the legs, making sure that the edge of the siphon does not touch the floor. Now it's time to adjust the horizontal position of the tray. To do this, we rotate the legs, placing a level on the walls of the tray (the grooves in which the shower enclosure will be mounted).
Horizontal alignment must be checked on all sides of the pallet. If the product is installed against a wall or corner of the room, then it is necessary to lubricate the surfaces in contact with each other with glue and press firmly. You need to wait until the glue dries, and then strengthen the seal with sealant, applying a layer of it to the contact point between the sides of the pallet and the wall.

The space under the acrylic tray can be filled with polyurethane foam, which will serve as a support cushion and soundproofing protection
Installation of a cast iron pan
Installation of a cast iron product is similar in steps to installation acrylic pallet. The fundamental difference is only in the design cast iron models. Cast iron is a very durable and impact-resistant metal. There are no reinforcing elements in its design, and the legs are an integral part of the pallet and are cast simultaneously with the body.
To level such a model horizontally, you will have to place steel strips under the legs or other objects that will prevent pushing flooring, because The cast iron pan has significant weight.
The sides of the cast iron product are not glued to the wall of the room. But how to secure the pallet so that it does not move off the plates installed under the supports? This problem can be solved by cementing bosses that will frame each leg, preventing movement. An ordinary matchbox will do for formwork.
It is worth noting that assembled shower cabins are not equipped with cast iron trays. They are usually used with simpler fences, including curtains, screens, and other lightweight materials that do not require precision, so as not to fit them to the geometry of the pallet.

For cast iron pallets, a full shower enclosure is rarely used; curtains are usually used. If aesthetic integrity is maintained, curtains are sufficient
Sometimes the height of the legs of such a product is not enough to place a drain siphon under it. In this case, you have to prepare a special parapet. The procedure is not difficult to implement. It is enough to lay bricks around the perimeter of the pallet or erect a concrete collar - this will be the parapet. It must have space for installing a siphon and sewer outlet.
Then you need to level the pallet using a level, placing plates under the legs, cementing them with cement bosses. To hide the parapet and the space above it, you can use tiles or mosaic modules.
Features of installation of steel products
Steel models are produced using stamping, so making a one-piece structure from a tray and legs is quite difficult. Steel products are equipped with a stand. The plant that produces steel pallets also produces corresponding stands for them.
They have a rectangular or square shape and are a welded structure made of profiles containing threaded bushings. Threaded feet are screwed into them, with which you can adjust (level) the pallet.
Steel trays are often included with factory shower enclosures. It is also a reliable option for replacing a worn out acrylic tray. If the tray is installed as an independent product, then a cement backing or pedestal is mounted on the bathroom floor. Their height must be sufficient for the location of the siphon and pipe connection.

A cement pedestal, which is an ordinary leveled screed, allows you to make the installation of a steel or stone pallet as reliable as possible
The contact points between the pallet and the wall can also be glued and sealed, as when installing an acrylic product. The construction of the pedestal will be discussed in the next paragraph.
Installation of ceramic and marble models
Ceramic and marble sanitary ware are trending today. Shower trays are no exception. Such products are durable and massive, so they do not require the use of legs or reinforcing elements.
The installation method is selected depending on the design of the pallet. Many ceramic models have a niche in the tray cavity for installing a siphon and draining the sewer system. Such a tray simply needs to be connected to the sewer and installed directly on the bathroom floor without any additional steps. All that remains is to attach the walls of the shower stall.
But there are many monolithic options that do not have a corresponding niche. In this case, in order to connect the drain hole to the siphon, you will need to build a pedestal. Inside it there will be space for connecting to the sewer.
The construction of the pedestal occurs as follows. Apply a layer of waterproofing to the area where the pedestal will be built. For this you can use liquid rubber, roofing felt, polyurea or other composition. You must wait for complete polymerization if you used a liquid product.

Any material can be used as waterproofing modern version liquid compositions that, after application, polymerize and create a waterproof layer
Next, create a layer of cement screed with a horizontal surface (use a level). We wait until it dries completely. Inside the contour of the pallet we make brickwork with a height that would be enough for the normal location of the siphon. It is necessary to provide a cavity for the drainage system.
We connect the drain hole of the pan with a siphon, the reverse end of which is connected to the outlet pipe. Apply a layer of cement mortar on top of the masonry. Next, we install the tray on the pedestal so that the siphon and outlet are in the places designated for them. Finally, you need to line the pallet with tiles.
How to make a pallet yourself
The process begins with preparing the future space for the shower stall. To begin with, the installation area is waterproofed, as in the previous paragraph. This will help protect the walls and floors from mold, mildew and dampness.
The second stage is preparing the drain. A ready-made drain assembly can be purchased at a hardware or plumbing store. It is also called a shower drain. It must be of high quality. The drain hole is immediately connected to the sewer system. The installation must be very tight, so you can use glue and sealants on all threaded connections.

When purchasing a drain for a homemade pallet, you cannot save money. Choose a quality product that fits in size and will last as long as possible.
Now you need to lay the base (use brickwork or rough screed) after the waterproofing composition has dried. We lay the walls using silicate or ordinary bricks. Before this you need to put it on the base metal mesh for a monolithic structure.
We process the entire base of the pallet waterproofing material. After it dries, we apply a layer of screed over the entire surface of the pallet to hide all the brickwork behind it. It is important that the screed has a minimum slope towards the drain so that water does not accumulate after using the shower stall. After drying, apply the penultimate layer of waterproofing.
Next, we make the surface of the pallet as smooth as possible. To do this, you can use a self-leveling mixture. We apply the final layer of waterproofing and cover the pallet with tiles. It can be mosaic or any other tile.
Strengthening a steel or acrylic product
These solutions, especially acrylic ones, do not have a strong enough structure. Measures to increase strength come down to installing supporting elements, which can be bricks.

It is important that the pallet presses on all supports with equal force, otherwise one of them may simply push through the bottom
In this case, all supports in places of contact with the bottom must follow its shape. For this you can also use gaskets made of paronite or rubber.
Some complete models of shower cabins have a large height of the fence and tray, for the installation of which the ceiling height may not be sufficient. In this case, you need to make a excavation of the floor in order to install the tray and connect it to the drain.
How to install a shower stall correctly:
Installing a shower tray when the right approach does not take much effort and does not require special training. If you follow the instructions, you will get a first-class installation of a monolithic pallet with the highest possible reliability.
Modern homes have fairly large bathrooms, but many have a bathroom that only takes up a few square meters. For this reason, people try to install a shower stall in order to free up at least a little space for other things. We will help you cope with this work, consider the options for shower trays and the main points of their installation.
Which material is better - metal, ceramics or acrylic?
The easiest way today is to purchase a ready-made shower cabin, the installation of which will not take much time. This design is equipped with many functions, such as hydromassage, radio, telephone. However, such functionality is not always in demand, and the cost of the cabin can reach fabulous figures. In this regard, most people prefer not to spend money, but to purchase a shower tray that they can install in their home with their own hands.
Before installing the shower tray, you need to decide on the material for its manufacture, since some installation nuances will depend on this. And there really is plenty to choose from:
- A natural stone. Expensive options, the installation of which must be carried out by professionals, since they are heavy, and the slightest wrong movement can damage the pallet beyond repair.
- Metal. Such pallets are quite noisy and slippery, especially steel ones, although modern manufacturers are trying to make more advanced models to combat these shortcomings. But such options are still very few. Therefore, you need to be prepared to soundproof the bowl yourself.
- Ceramics. Heavy, but at the same time reliable structures. Their disadvantage is the price and the possibility of damage from heavy objects.
- Acrylic (plastic). The most common option, due to its affordable price and light weight. Such structures heat up easily, they are non-slip and do not make noise, unlike their steel counterparts.
Modern models can also be various sizes and heights. Here, as they say, everyone chooses according to their own parameters. If the house is inhabited by people of age or with any physical limitations, then options with a slight rise will be relevant so that getting into the tray is not difficult . But if you have small children and you plan to use the structure as a miniature bathroom, we recommend choosing pallets with high walls. Indeed, in some models they can reach 40 cm.
Preparatory stage – what needs to be taken care of in advance?
Installation of a shower tray should begin with preparing the site where installation is planned. For this, a corner of the room or a specially equipped niche is usually used. The walls must be leveled, waterproofed and finished before installation. ceramic tiles. This material, judging by reviews and practice, best tolerates direct contact with water. However, finishing with tiles is not mandatory, and everyone has the right to choose any other material at their discretion.

It should be noted that installation can be done on the floor, on specially designed supports or a metal frame. First you need to level the floor, especially if you have to mount the pallet directly on it. Pay special attention to the installation of plastic and acrylic models. They can bend under the weight of a person, so additional reinforcement must be provided. For this purpose, they lay out a frame of brick or foam blocks with their own hands, on which the pallet will then rest. Alternatively, you can fill the place with concrete - create a kind of screed right in the area where the structure is placed.
Before installing the shower tray, all pipes must be checked for serviceability and brought directly to the location of the font. Pay special attention to the drainage system, since faulty sewerage can subsequently cause great trouble for both you and the neighbors below. If you plan to install a shower tray, then you also need to think about the electrical supply system for connecting lighting and other functions inside the structure. For this purpose, hidden wiring is used, and a separate circuit breaker with an RCD is installed in the panel.
Installing a shower tray - each material has its own method
Acrylic pallets are the easiest to install. To do this, you need to put the bowl on its back and screw the included legs into it, the number of which varies depending on the model. It may be that the pallet will be equipped with a frame, then the legs will need to be screwed into it. On next stage We install a drainage system. Most of its elements are threaded, so assembling it will not be difficult. We recommend using a special thread or linen to seal the seams. Seal all connections with silicone sealant.

Since the acrylic bowl can bend under the weight of a person, it is better to make a supporting wall from bricks or blocks. Then place the tray on the floor and adjust the height so that the siphon does not touch the surface. The installation of the shower tray must be carried out strictly according to the level, otherwise there is a high risk of leaks. The edges of the connection between the tray and the bathroom walls must be filled with adhesive or sealant. At the final stage, connect the sewer pipe and install a protective screen, if one is included.
Cast iron, steel and other metal structures do not require additional support for the central part, so they are mounted either on legs or on a specially equipped frame. The installation method is similar, with the only difference being that for soundproofing steel structures, polyurethane foam is used, which is used to fill the cavities between the pallet and the base.
The installation of ceramic trays and models made of natural stone has its own characteristics. Such structures have impressive weight and are installed directly on the base, rather than additional fastenings. However, despite its heaviness, plumbing equipment is quite fragile, so when working with it, care must be taken not to damage it. When installing heavy pallets, pay special attention to the sewerage equipment and siphon installation. Since the font is placed directly on a permanent foundation, it is necessary to provide at the stage of designing and pouring the foundation a small niche where the drainage and drainage system can freely fit.
In addition, you need to create a technological gap through which it will be easy to service the siphon yourself if it malfunctions. This place can later be decorated by installing a hatch or a removable finishing element there. Glue is applied to the base where the bowl will be attached, after which a pallet is installed on it, which is leveled strictly horizontally on all sides. After this, we wait for the adhesive solution to dry completely and connect the sewer pipes to the siphon. We treat the place where the bowl touches the wall with silicone sealant or tile adhesive to create a reliable water barrier. If desired, you can install a ceramic or plastic corner at the joint.
After completing all the work, we begin installing the protective screen, and if the pallet was attached directly to a frame made of blocks or bricks, then we plaster the wall, prime it and line it with the material that best suits the interior of the bathroom. To protect against splashes, we install glass doors or hang a waterproof curtain. Each model may have its own characteristics, so before you begin, you should read the included instructions.
Are you planning to purchase an expensive shower cabin for your dacha? Take your time - there may always be a cheaper option! The low cost of a product does not mean its poor quality; more can be said - almost always it is just a simplified and minimized design. In this article, together with the website, we will study a steel shower tray, which will help you build a primitive, but quite nice shower stall.
Rectangular shower tray
Steel shower tray: advantages and disadvantages
It is generally accepted that steel enameled shower trays have no advantages and that the most attractive thing about them is the price. But this is not so, in addition to low cost, this type of plumbing fixtures has other positive traits, which for some reason everyone is trying to forget. Yes, they have a less attractive appearance than similar acrylic products, the enamel on them can peel off due to careless handling, they are a little colder than all their other brothers, but, you see, it would not be very correct to focus on the shortcomings alone. Especially considering that they are fixable.
In addition to low cost, metal shower trays have the following positive aspects.
- Durability that no acrylic can match. If you are a massive person, then a steel pallet can carry your weight without additional supports.
- Very easy installation, which any person can master if desired - there are no subtleties or nuances here that can affect the service life of this product.
- Versatility. Such a tray can be used either as a separate plumbing fixture or as a set. And what’s most interesting is that choosing a factory sliding tray for such a pallet will not be difficult.
And the shortcomings mentioned above, by and large, are not shortcomings at all - only the appearance cannot be corrected. But even here, if you think carefully, you can come up with something - products of this type, as a rule, are built either into the floor or into a pedestal made specifically for it. In general, the appearance of such a shower tray depends entirely on the quality of the cladding surrounding it.
Metal pallet: types and their differences
Another point that turns most people away from an enamel shower tray is the small variety of shapes and design solutions. The product is simple, has no frills and is designed to fulfill its sole purpose - to collect water and drain it into the system. In general, the conversation about the types of metal pallets will be short - metal pallets can be classified according to two criteria.

A visual guide to installing a shower tray can be seen in the following video.
Rectangular steel shower tray: installation technology
As mentioned above, one of the advantages of steel shower trays is its simple installation, which will be discussed further. To make the information easier to understand, we will present it in detail and point by point.
Previously, shower trays were sold without support, without legs, but today such cabins have gone out of fashion. Modern designs are so simple that anyone can perform all the operations with their own hands. Installing a shower tray has become a truly simple task.
We recommend that you do your research before purchasing. This is mostly impossible without visiting a store, but by reading articles like this one, you can get a clear idea of how to install a shower tray yourself.
Pallet structures
Shower cabins are currently equipped with four types of pallets:
- Deep ones are so called for the reason that some of them are only slightly inferior to the bathtub in terms of the height of their sides. A powerful frame supports their bottom from below, supported by six height-adjustable legs.
- Small pallets are more often called low pallets. They are completely flat with a few exceptions. In the modern version, they are placed on 5 legs, but you can still get a completely bare “sink”, for which a foundation is required.
- Pallets made of artificial stone and ceramics stand on a completely separate line. In all previous cases, under the bottom there is free space for installing a siphon, and in this case we have a slab with a drain hole in the center.
- Cast iron ones are much less common than steel ones, and they are often confused, but they have won recognition for their durability at an affordable price. They come in both deep and shallow, but complete cabins are sold extremely rarely. Cast iron pallets must be purchased separately.
It is clear that thin-walled pallets do not suffer from durability. This is explained by the fact that they constantly suffer mechanical deformation: from temperature changes, from the feet of swimmers and from other reasons. Thin-walled pallets are made of fiberglass-reinforced plastic, ABS and steel. Each of these materials is deformed and has its own disadvantages:
- The steel is painted and the coating peels off easily. A metal pallet must have a properly constructed frame. For example, in the form of a solid brick foundation.
- The acrylic tray could not overcome the same shortcomings. But over time, it not only bends, but also begins to break. There are plenty of videos about this on YouTube.
In addition to these features, it should be noted that steel rusts. Worth peeling off protective coating enamel, like metal will immediately begin to oxidize. This is all the worse because the process can go completely unnoticed by the owner. So one day there will be a hole through the steel. Acrylic is not afraid of moisture, sunlight, mold, but over time, like any plastic, it loses strength. When purchasing, the consumer participates in a lottery: whether he will be lucky or not (a high-quality polymer or the first one he comes across).
As for the cabin with a tray made of artificial stone or ceramic, this is the most profitable option. Both materials have proven themselves well throughout human history. An additional advantage is that the slabs are completely flat and fit well on any suitable pedestal foundation. And IDO cabins are distinguished by the fact that instead of legs they roll on rollers. Due to this, the structure can be moved around the room within certain limits (if there is flexible hoses and siphon). But you don’t need to put it on bricks - it won’t fall.

Cast iron is good because it does not rust. The walls of the pallet are noticeably thicker (by an order of magnitude), so the pallet is very durable. Among all varieties, cast iron is the most durable.
Foundation structures
At first glance, it seems that the cabins do not need a foundation. It is enough to adjust the legs to start using the product. But actually it is not. The factor of the installation height of the pallet comes into play. The drain hole must certainly be located above the sewer outlet. So that the drain leaves the pan safely.
The frame and foundation are not needed in most cases. But it should be noted that most products are specially designed so that replacement will be required over time. Of course, we want to avoid this for as long as possible. The design shows 100% exactly what bad things can happen.
Is it necessary or not?
As a rule, the need to build a foundation is determined instantly. To do this, just measure the level of the sewer pipe. The drain hole of the pan should be slightly higher. The greater the difference, the better the flow. Usually a slope of 3 centimeters per meter of distance (pipe path) is considered sufficient, but in practice there may be other ratios, and the water will still drain well.
Below the pan there is usually a place for placing a siphon, so no constructive solutions are provided for in the foundation for the drain. I would like to draw the attention of readers to the fact that in high (deep) pallets the drain is not located too high. Because most of the vertical is spent on the formation of walls. It’s not for nothing that this tray is called deep: you can wash clothes and wash children in it. There is often a seat in the corner.

In 90% of cases, a deep tray has a durable frame made of a metal profile. At first glance this is good, but in practice it turns out that the foot pushes the pallet between the guides. And since plastic becomes brittle over time, this is just enough for a crack to appear. That is why sometimes deep pallets are placed on the foundation. As for the small ones, this is prescribed to them from birth: the thin flat bottom breaks easily, as many owners have been convinced of. The effect does not appear at the very beginning, but greatly worsens over time.
Brick foundation
Many people do not think long about solving the problem of building a foundation. Traditional brick helps solve the problem. This is an excellent solution for a ceramic tray, but you need to leave room for a siphon. A properly executed foundation greatly extends the life of the pallet. Much depends on how tightly the bottom fits to the pedestal. Ideally, any deformation is eliminated.
The problem is this. Previously, many people installed a flat pallet without a foundation, or so that only the perimeter rested on the bricks. As a result, the statistics of broken pallets was replenished at incredible speed. The manufacturers quickly noticed this and corrected the matter by adding a fifth leg in the center: this is a plastic tubercle into which a threaded rod is embedded. It is almost impossible to remove this. You understand that a flat foundation is no longer suitable here; you need to leave a gap for this “fifth leg.”

Bricks are a fairly universal tool. For example, at the bend of the perimeter they are laid out like a fan outwards with butted edges. The free space is filled with solution. This scheme is often used for acrylic pallets. It is important to leave space here to control leaks. It would be in vain to think that concrete will stop moisture from reaching your neighbors. Special measures are needed to waterproof the floor. And in any case, dryness needs to be controlled somehow.
Example of a brick foundation for a ceramic tray
The ceramic tray looks fragile, but can last for many decades. Here is a foundation option for this case. We proceed from the fact that the frame for this type of pallet is made only around the perimeter, which gives very broad prospects in terms of control.
- You need to lay the bricks to the required height along two walls and one sidewall.
- The front part is used to access the siphon and control leaks. You can cover it with a decorative panel.
In case of big worries, place the pallet on two rows of bricks, in one of which there is a hole for control access and dismantling (if such a need arises). It is not necessary to mount it tightly, no one does that. Instead, a plumbing corner is placed on three sides between the tile and the tray, mounted with silicone sealant. If you want to hang the curtain from the sides, leave small protrusions along the width of the brick row. Place a board there and raise the threshold to the desired height.
This is sometimes necessary in cases where the corner is homemade and curtained. Then there is a certain reserve for moving matter so that it does not crawl out and water does not flow onto the floor. There are some other options.
A frame made of a metal tube is often placed under a purchased ceramic tray. It only covers the perimeter. For this type of structure, this is a completely suitable solution, as long as the weight of the entire cabin does not press on top. For example, Leroy Merlin reports that the pallet weighs only 3 kg. The frame is good if the cabin weighs a little. For obvious reasons, the threshold in this case is much more difficult to organize.
Foundation for acrylic pallet
It was written above that the acrylic tray has legs. So the instructions for building a foundation are as simple as possible: this is a flat stand on which the cabin supports will rest. Installation of a shower tray involves connecting it to the sewer and adjusting the height of the legs. It’s not difficult to do this correctly, having a construction level in hand, so we don’t see the need to describe the process itself.
Few acrylic pallets today come without legs, but if such a case occurs, then you need to do the following:
- There remains a slight depression around the perimeter, since the center of the tray is slightly higher.
- For metal (not acrylic) ones, a slab of extruded polystyrene is sometimes placed in the middle to provide thermal insulation to the area.
- The fastening is carried out using adhesive-sealant, so that if necessary, the pallet can be replaced.
The problem is that most flat pallets are placed on legs. In this case, their bottom is defenseless against the feet of users. Alternatively, you can secure removable formwork and pour concrete, where after a certain period of time a pallet can be mounted. The complexity of the operation lies in connecting the siphon, and the disadvantage is the inability to control leaks or change the sewer system.
Stone pallets
The easiest way is to install this type of pallet correctly. No frame is required, but a foundation is needed in all cases. The stone tray is very low. It would be a mistake to secure the slab too tightly, because someday the time for repairs will come, and it will be almost impossible to tear the slab off. That's right - just seal it around the perimeter with glue-sealant.
The biggest problem in this case is with the siphon. Obviously, you need to arrange it directly on the surface of the foundation (floor), or attach a flexible one, which, as it is finished, will hide in a niche prepared in advance. In the latter case, the foundation becomes a real work of art, because it would be nice to find a way to control leaks. No single instructions can be given here.
Cast iron pan
This type of pallet does not require installation. Simply placed on the floor. He doesn't need a frame, he doesn't need a podium. Its own height is enough to ensure reliable drainage into the sewer.
Let's start with the pros and cons of products such as deep shower trays. It would seem, why incur additional expenses when buying this kind of product? Do they have advantages over lower and budget analogues? Of course there is.
Photo of a shower cabin, perfect for installation in a bathhouse  Shower cabin in the bathhouse
Firstly, the presence of a deep tray contributes to more intense heating of the interior space of the shower stall. The materials used to make shower trays are mostly characterized by excellent thermal conductivity, heat up fairly quickly and retain the heat given off by water for a long time (with rare exceptions). In view of this, a cabin with a deep tray will be as warm as possible and generally comfortable to be in.
Secondly, the deep tray can be adapted for a bath, even a very small one. To do this, just close the drain and fill the pan with water. Of course, you won’t be able to relax comfortably while lying in a container with an area of up to 1 m2, but you can have a great time in a sitting position. And if you have a cabin with a deep tray, you don’t need to buy a baby bath – an additional plus for families with children.
Water procedures in a shower cabin with a deep tray A deep tray is an excellent replacement for a small bathtub
Along with this, deep shower trays also have their weaknesses. As noted, for the purchase of such a product, all other things being equal, you will have to allocate more money than for the purchase of a structure with a more modest depth.
In addition to additional financial costs, it is also worth noting the following disadvantages of the option under consideration:
- design. The disadvantage is purely subjective. For most users, low shower trays look more stylish and neat than deep containers with high sides. Otherwise this moment remains solely at the discretion of the owner - if he likes a high pallet and the presence of such a design, while it does not spoil the interior of the room, he can safely buy and install the cabin he likes.
presence of a high “threshold”. To get into the shower, the user will have to constantly step over the high side of the shower tray. Young and healthy citizens are usually not bothered by this point, but children and older people may experience a number of inconveniences. The problem is solved by attaching a special step to the pallet. Usually these simple devices are sold in the same place where the shower cabins themselves are sold;
Step with handrail
You can find information about existing forms and materials for the manufacture of shower trays and cabin walls, additional functions and other important related nuances in.
Next, you can read the instructions for self-installation of a shower cabin measuring 90x90 cm with a deep tray. The information received will allow you to refuse the services of third-party contractors or to monitor the correctness of their work and its final quality.
A tray as a necessary element of a shower cabin
One of the main parts of any shower stall is the tray. Its main purpose is to collect and remove dirty water through the drain system. The installation features of the pallet directly depend on its shape - corner, rectangular, round, oval.
Depending on the height of the sides, the tray can be shallow (flat) or deep, reminiscent of a bathtub.
Thanks to the low side height of flat products, comfort when using the booth is significantly increased, since there is no need to step over a high obstacle. However, such trays require an effective water drainage system, since they cannot hold large amounts of liquid.
Tray-bath. Unlike the previous model, this pan is deep enough, which allows you not to worry about the speed of water drainage. Some models provide for their use as a small bathtub.
 Deep tray-bath. If desired, you can sit down, and a small person or child can even take a full bath
When purchasing a shower stall, first of all you need to pay attention not to the number of functions and appearance, but to the tray of the product, since increased demands are placed on this element. A high-quality pallet must withstand heavy loads, and with the maximum allowable weight of the user, it must not crack, bend or deform.
Shower trays are made from different materials- expensive and cheap, high quality and not so good.
For example, faience. Everyone knows the material used in the manufacture of toilets. The earthenware tray is completely hygienic, easy to clean and can withstand heavy weight.
 The disadvantage of earthenware is the strong “causticity” of the material: the surface of the tray can be damaged even from falling, for example, a glass cup
Artificial stone is a reliable and durable material, beautiful and hygienic, but expensive. But enamel shower trays are cheap and durable. The only disadvantages that should be noted are the fragility of the enamel (however, the enamel coating can be easily restored or replaced with acrylic), as well as the roar of falling water on the metal surface of the tray.
Acrylic pallets are the most popular. The acrylic surface does not absorb dirt at all, warms up instantly, and does not darken over time.
 Scratches on acrylic are completely invisible - this is an important point, since trays are often scratched when a shower cabin is assembled with your own hands, especially for the first time
The disadvantage of acrylic pallets is the inconvenience of installation, since the installation of a special frame is required. As such it is used aluminum construction with adjusting screws, with which you can select the desired height pallet
Subtleties of self-installation of a shower enclosure

Shower doors are matte and transparent, and also differ in the method of operation.
It is necessary to begin the construction process by preparing a place for a shower corner. Also, it needs to be properly prepared. Set the level to an ideal plane. Designate for yourself what will lie at the base of the swimming area. Often this is a purchased pallet with strong legs, however, its frame may turn out to be unreliable, so for additional rigidity they make a brick base, and to avoid scratching the bottom, a rubber mat is laid.
Next, the installation of the sewer system must be thought through, if it has not been done in advance. If the bottom turns out to be shallow, a small podium is constructed, in which a gap is provided for the location of a siphon or corrugated tube. When all conditions are met: the angle drain tube is lowered into sewer system through a special rubber gasket. The bottom is fixed and sealed at the junction with the wall, this will help avoid the accumulation of dampness and fungus.
Next, an aluminum frame is installed; their connections to the walls and base are also best sealed with silicone. Afterwards all fastenings are checked. If aluminum strips need to be fixed to a tiled surface, holes are pre-drilled in it, then the installation is fixed with self-tapping screws placed in dowels.
Installation of a shower tray
Typically, a homemade corner for a shower stall is not equipped with a roof, so we immediately begin installing the doors. We handle them very carefully so as not to damage or scratch them. We glue seals to the edges of the panels, then put rollers on the frame along which the sashes will move. The wheels are adjustable if necessary to ensure ease of movement.
Note to the owner! Mandatory after all connecting work, problem areas need to be lubricated with silicone to prevent corrosion.
The finishing touch in arranging a corner with a pallet is to install handles on the doors and hide the gap between the floor and the pallet, if any. If you purchased transparent sashes, you can later apply a design.
How to install a shower enclosure
1. We begin assembly work. We choose in advance the place where to install the pallet and use a level. Adjust and set everything correctly. The screw legs are secured with nuts. The main task is to secure the pallet evenly to the adjacent wall.
The corrugated pipe, which should go from the siphon, is connected to the fan pipe. Make the connections at the bottom of the pallet as strong as possible. When the pan has been placed and the drain has been connected, the design must be tested. The test is done like this: pour a little water into the pan and watch how it drains. If a leak is detected, the connections are additionally secured to prevent leakage. 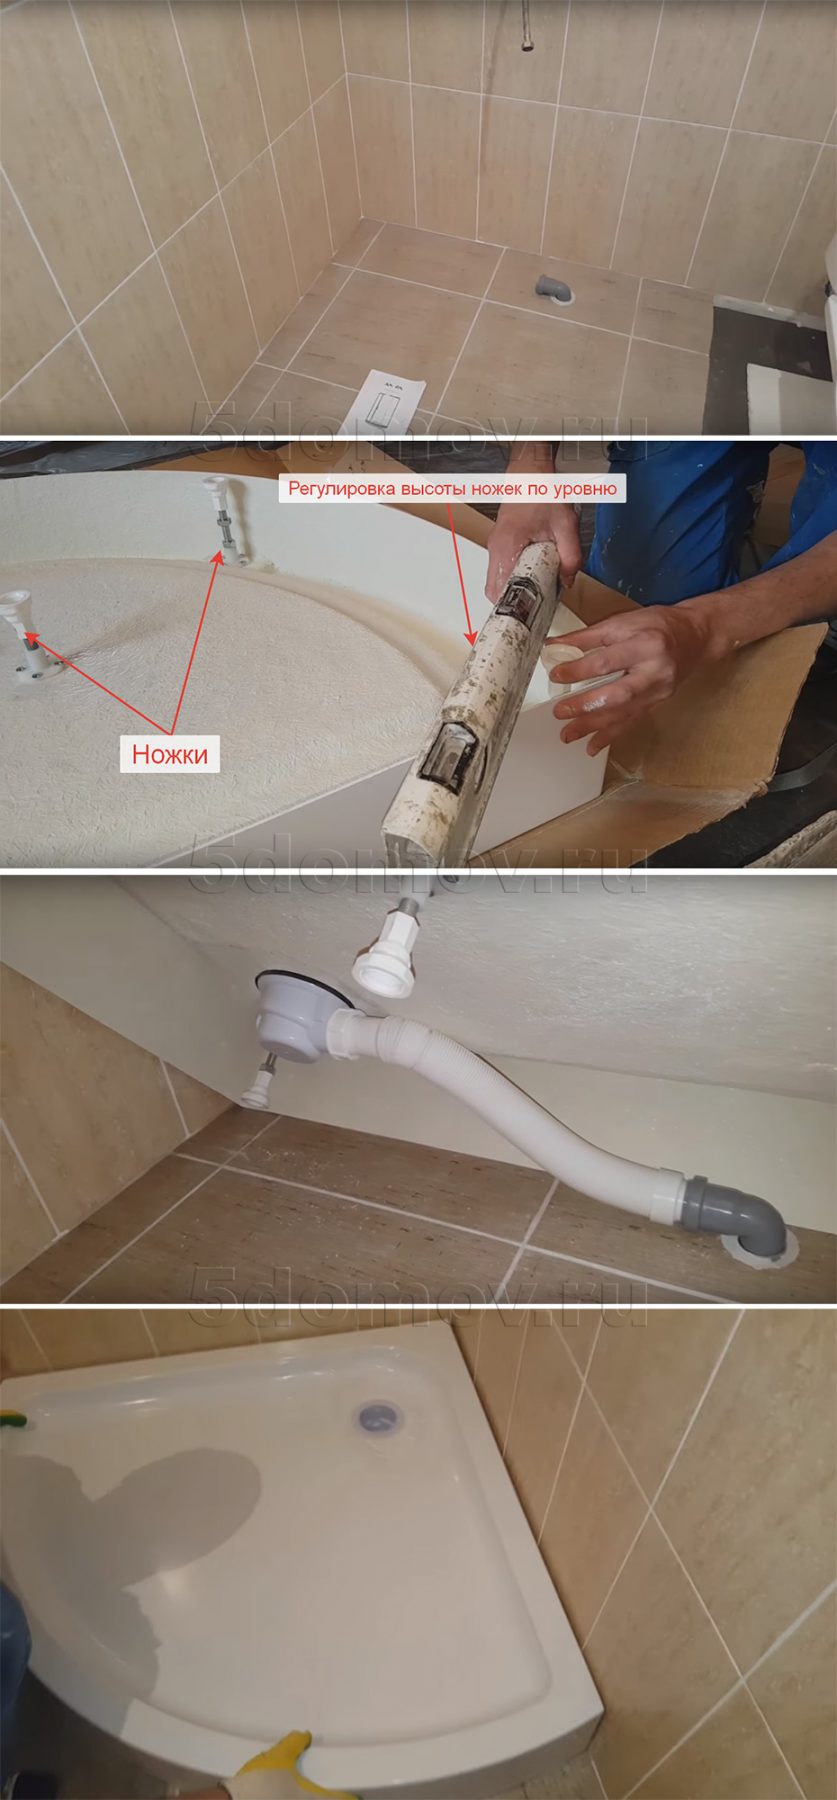
2. The next step is to secure the shower walls. The guide at the bottom is placed on a pallet and reinforced with moisture-resistant high-quality sealant. Along the edges, racks are installed vertically from the guide below. They need to be attached to the walls. We align the racks strictly vertically according to the level. After this, you need to mark the holes for drilling. Try to work very carefully with the tool on the tiles. Insert plastic dowels into the holes. It is recommended to apply silicone on the side of the frame adjacent to the wall to prevent water from getting out between the wall and the frame in the future. After this, align the stand along the markings and tighten the screws. 
3. You need to insert the sheets into the vertical racks and secure them with self-tapping screws. The lower guide is pre-treated at the joint with sealant and attached to the wall. Then install all the fencing sheets and begin assembling the top rail. Fastening is carried out according to the same scheme as on the bottom - with self-tapping screws. 
4. We move on to hanging glass doors on shower enclosures. When working with tempered glass elements, be extremely careful, because this material is fragile. Install special rollers in the guides on all corner doors. 
The door will fit into place, but it needs to be adjusted. The sash must acquire the maximum correct mate when closed, so that water does not flow through it. The door is aligned straight. The gaps at the top and bottom are eliminated. You need to open or close the door without any effort. Its movement should be smooth and easy. When the door is installed, you need to attach the fittings to it.
5. The final step is to apply adhesive protection at the seams. The long-term operation of shower enclosures depends on the quality of the sealant. Before applying the composition, the contaminated surface is cleaned. After applying the glue, wait a while for final drying. Then the joints are checked using a shower. If no water appears on the surface, it means the job was done correctly. If leaks appear in problem areas, they are dried and resealed.

How to choose a shower corner with a tray: materials, location, installation
5 (100%) 2 votes
Shower walls
The next stage is to place the bottom guide for the doors on the pallet; it is a semicircle.

The bottom guide must be placed on a moisture-resistant sealant, gluing it to the shower tray.
From the bottom guide on each side, vertical posts are applied to the wall, onto which the glass wall will be attached using The rack level is set strictly vertically and the locations for the holes are marked.

Marked holes are drilled into the tiles , inside which plastic dowels are inserted.

At the point where they adhere to the wall, a moisture-resistant sealant is applied to the racks, the racks are installed in place and attached to the wall using self-tapping screws.

The glass walls of the cabin are placed on the installed racks, then the wall is secured to the rack using self-tapping screws. The lower door guide is also connected to the wall with self-tapping screws, and sealant is first applied at their junction. After installing both walls and connecting them to the bottom door track, the top sliding door track is installed at the top. The upper guide is attached in the same way as the lower one using self-tapping screws.

DIY shower tray with
You can create a base for a shower without a tray at all - or rather, make it yourself rather than buy it in a store. The labor intensity of such work is much higher, but you are not limited by the size of the man-made shower. If you are not sure where to start renovating your apartment, feel free to choose the bathroom. Those who have done a good job of arranging the plumbing room will definitely not be afraid of rooms with attics and corridors.
DIY shower tray - step-by-step diagram
Step 1: Waterproofing and drainage
Location homemade cabin it is necessary to waterproof to a height of about 30 cm. For this, sealant, fiber rubber or other compounds are used, the choice of which is more than wide. The sewer pipe is routed to the very center of the homemade pan, making it easier to drain. All sewerage elements must be carefully taped and checked for leaks before installation. The outlet sewer pipe should protrude 12-15 cm above the base floor level. Do not forget to carefully seal the pipe so that construction debris or other foreign objects do not get inside.
Step 2: Lay out the barrier
Having installed the shower tray with your own hands, we lay out a barrier of bricks along its perimeter. The barrier line must correspond to the walls of the future cabin. The height of the brick perimeter is at least 5 cm higher than the level of the drain pipe. Sharp brick corners are unacceptable, so you will have to work with the mortar and carefully smooth them out. The solution is prepared to be moisture-resistant and durable; it can be mixed in a medium-sized container with a trowel and spatulas without using shovels - large volumes of cementation are not planned. When mixing the solution, the ratio of cement and sand is maintained at 1:1, with the obligatory addition of liquid glass for water-repellent qualities.
Step 3: Fill the floor
Pouring the floor under a homemade pallet is carried out in three stages. First, using a self-leveling cement mixture, a basic fill is made - smooth, from wall to wall, about 5-8 cm thick. After it dries, the entire surface is treated with waterproofing - Fiberpool, Decoprof etc., possible in two layers.
When the waterproofing layer has dried, a solution of tile adhesive and cement mortar is mixed. It is applied in concentric circles, gradually increasing the level from the drain hole. The work is painstaking. It is necessary to maintain the same radius of curvature; a rough transition cannot be hidden under the finishing. The cement surface must be thoroughly rubbed, getting rid of rough edges and miniature steps.
Step 4: Finishing
It is better to finish a cement floor with a slope using mosaics. Small mosaic elements can hide unevenness and look great for many years. Special glass mosaic for baths has anti-slip properties and does not lose its original colors during use. Of course, laying a mosaic is much more difficult than tiling a porch, but no one promised that a completely homemade shower tray would be a cakewalk in renovations.
The hand-made tray for an exclusive shower stall is ready. Yes, we almost forgot - Before installing the shower tray, be sure to replace the plastic drain with a steel or brass one! Even if the plastic one is included, and the manufacturer describes its incredible strength. It is customary to walk on the pallet and shift from foot to foot - so only brass or steel will withstand the load, and it is easier to clean them as needed.
Photo installed pallet for shower, stop55.com
The photo shows how to install a shower tray, archiproducts.com
In the photo - a do-it-yourself shower tray, etotdom.com
In the photo - installing a shower tray with your own hands, stroy-aqua.com
In the photo - installing a shower tray, stroy-aqua.com
Choosing a shower enclosure with a tray
Shower stalls are sold in various stores that provide this category of product - plumbing stores, various construction stores, as well as huge hypermarkets. Shower enclosures vary in size, shape and material from which they are made.
When choosing a corner, you should decide what size and shape you would like the shower corner to be, and what material the tray should be made of. Where in the bathroom it will be located - it will be very good if you think through all these details in advance, so as not to encounter difficulties in the future.
When purchasing a shower enclosure, it is not necessary to purchase the stall and tray that comes with the kit. Almost all plumbing stores offer separately different variations of pallets and separately all kinds and designs of shower enclosures.
If you purchase these components separately, you should remember that the tray and cabin from different manufacturers do not always fit together. Therefore, it is recommended to buy these parts at the same time and from the same store. Or you need to have the exact parameters and dimensions of the seats of the product that was purchased earlier.
What types of curtains are there?
The second most important element is the cabin curtains, which can be hinged or sliding. Hinged doors require more space
They are single-leaf and double-leaf.
As for sliding curtains, they have from two to six flaps, which are held in place by a rubber magnetic tape. The curtains move on rollers hidden inside the shower frame. High-quality curtains should open and close almost silently.
 Corner shower stall with sliding doors. In addition to models with transparent plastic (glass), there are options with frosted curtains
Shower curtains are made of polystyrene or high-quality tempered glass. Products made from polystyrene are quite cheap and light in weight, but they quickly lose their transparency and stains remain on them. Glass curtains are expensive, high-quality products.
 Hinged doors made of hardened frosted glass. In their production, specially processed safety glass is used, which is stronger than even automobile glass.
Water and dirt are very easily washed off from the surface of the glass, since it does not absorb anything and does not fade for years. You can also buy a booth with curtains made of classic transparent, tinted, colored and rough glass.
Benefits of a shower enclosure
Such a device as a shower corner has the following advantages:
- Compactness. Due to the fact that the shower enclosure is installed in a vertical position, it does not take up much space. Thus, the bathroom can easily accommodate elements such as a washing machine, sink, laundry basket, toilet and other elements without which you cannot imagine a bathroom.
- Affordable price. The price depends on the manufacturer, dimensions, electronic functions that may be inherent in the shower enclosure, as well as the quality of the material.
- Easy installation. The shower installation is completed in just a few hours. It all depends on the skills of the master and the availability of tools. Apartment owners who have decided to install a shower, but have never done anything like this, do not have to worry, since almost anyone can handle this task.
What to look for when choosing a shower enclosure
Fencing sheets are made using safety glass. Their thickness should be 4 - 8 mm. The surface is always covered with a special anti-dirt layer. This makes cleaning corners easier and faster.
The type of glass, profile color or hinge shape does not become an obstacle - you can choose them to your taste. An economical option is available when shower enclosures have fences made of special plastic.

Plastic shower corner
Shower enclosures consist of a tray, a siphon, a frame with doors and accessories. There are on sale a profileless corner or a cabin with a recessed tray. It is designed for families with young children, when the hygiene room allows you to choose only a corner without a bath.

Installation of a shower corner
Most high pallet corners suitable for the rhythm of life of young people, when they have to bathe a child in a deep shower tray. It is completely safe, and, importantly, is considered an economical option compared to a bath.
Shower corner with high tray
Shower enclosures with low tray more suitable for older people, since climbing over high sides will be more difficult for them.
Shower corner with low tray
The larger the tray, the more convenient and comfortable the shower will be. It is better to select the size of the pallet for the fullest member of the family. The most optimal pallet size is 80x80 cm.
If your hygiene room is small, you can install open shower enclosures(without a ceiling and part of the walls) with a free entrance or glass created specifically for such baths. They will cost much less than booths. Installing such corners is not difficult, so assembly will take a little time.

Outdoor shower enclosure
If there is space in the bathroom, or the decoration of the room may be damaged from excessive humidity, you can install closed showers- with a roof and its own walls on all sides.
Closed shower stall
Buy a shower corner, taking into account the existing water pressure in the apartment. The prices of shower enclosures depend on the quality of the material from which the tray is made.
Door installation
 From the inside we screw rubber stops for the doors onto 12 mm self-tapping screws.
 We screw the handles to the doors. On the outside, the cap on the handles should be on the bottom. If the screw turns, insert a plastic insert into the hole. A cut cross for tiles will do.
From the handle side we put magnetic moldings on the doors. On the other sides there are L-shaped moldings with the shelf facing outwards.
We put the rollers on the doors with the wheels facing out. Rollers with a button are attached to the bottom of the doors (the button should face up). The adjustment screws on the top rollers should face down.
We hang the doors on the upper rollers. To start the lower ones, press the buttons.
We check the smooth movement of the doors and the tightness of the connection. Doors must not open independently from any position. The connection is adjusted using screws on the upper rollers.
Installation Guide
The main installation steps are already listed
All that remains is to look at them in more detail and pay special attention to small but important details.
Installation of a tray, connection to the sewer
To install shower enclosures with your own hands, you need to start with installing and connecting the tray to sewer pipe. We will consider the optimal option in terms of labor costs - when the pallet is raised above the floor and pipes are placed in the resulting gap.
The instructions for performing the work will look like this:
- The pan itself is first tried on, the position of the drain hole is noted;
- Further sewer corrugation connects to the sewer pipe, its other end is attached to the siphon using a union nut;
- after this, the siphon is attached to the pallet itself, installed in the corner. The horizontal level of the pallet is checked by level and, if necessary, its position is adjusted using threaded legs;

The photo shows the installed siphon
Note!
Particular attention should be paid to the junction of the sides of the pallet and the walls; these places must be thoroughly coated with sealant.
If this is not done, then dampness, mold and mildew under the pallet are guaranteed.
- After this, all that remains is to secure the panels hiding the gap near the floor.

Instead of decorative panels you can lay out the sides from bricks
At this stage, the main problems most often arise with how to seal the shower enclosure. Regular silicone sealant is also suitable for this; you should not try to find a miracle composition, the main thing that needs to be ensured is the rigidity of the pallet, it should not bend even a millimeter.
This is what most often causes dampness in the space underneath. Even if the deflection is 1-2 mm, the edge of the pan easily peels off from the layer of hardened sealant, and water seeps into the resulting gap without any problems.
If the rigidity of the factory frame is not enough, then you can always place an ordinary brick under the pallet (put a piece of rubber on top so as not to scratch the plumbing fixture).

Checking frame rigidity
If, despite all the efforts to seal the shower corner in the bathroom, you still feel damp, musty and the fungus cannot be removed, then the cause should be sought in poor ventilation. Of course, you should first check the tightness of the joints.
Installation of walls
Much depends on the design of the corner:
- If the bathroom is tiled, then the walls of the bathroom itself can act as the back wall. In this case, installation is very simple - you just need to fix the metal profiles and insert glass or plastic into them;
- but a shower enclosure with a back wall will require a little more effort; you will also need to install rear opaque walls.
Note!
Shower corners with a back wall can be installed in wooden houses.
They can also be placed not only in the corner of the room, but also slightly away from the walls of the room.

Shower corner option with rear wall
As for how to properly install a shower enclosure, the installation procedure remains the same; if placed against a wall, you need to:
- install metal profiles on the wall and floor. Naturally, before installation, the vertical position is checked, then the holes are simply drilled and the profile is attached to the wall with dowels;

The pallet is installed, the profiles are secured
Note!
To seal the shower corner, the joint between the profile and the wall must be coated with sealant.

The joints are carefully coated with sealant
- then the glass walls are simply inserted into the profiles. Formally, rubber gaskets should provide sufficient tightness, but it wouldn’t hurt to be on the safe side and additionally coat them with silicone. In this case, water will definitely not get into the gap between the glass and the gasket;
Insufficient tightness of joints can lead to this result.
- It is also advisable to additionally fix the glass sheet on top with a metal bridge to the opposite wall, which will increase the rigidity of the structure. At this point, the question of how to assemble a shower enclosure can be considered closed.
For shower corners that are not adjacent to the bathroom walls, the procedure remains the same, except that the profiles do not need to be fixed to the wall. The frame is simply assembled, and then the walls are mounted.
Final details
After you have installed and secured the tray and frame of the future shower enclosure, you should begin installing the glass walls and cabin doors. Guide rollers and holders must be inserted into the holes pre-drilled by the manufacturer on the glass doors. All these components are included in the shower enclosure installation kit.
Decorative insert panels are placed on the glass edges of the solid walls, and rubber seals are placed on the sides of the doors, which make the shower enclosure airtight when the doors are closed. It is recommended to first rub the edges of the glass with soapy water - this will ensure easier installation of the rubber seals. Door leaves are checked for ease and accuracy of opening.
After the installation is completely completed, it is necessary to once again treat all seams and joints with silicone sealant from the outside. You should not treat the seams on the inside of the shower enclosure with silicone, because condensation may form in the remaining voids due to temperature differences. This moisture from condensation will encourage mold to form on the seams of the shower enclosure.
Finally, a faucet with mixer and various shower accessories (shelves, hooks, etc.) are installed.
After all this, you need to give time for the silicone to completely dry and you can enjoy the installed shower in your new piece of paradise.
Screen installation
 We install the screen in place, supporting it with wedges. If the pipes do not allow installing the screen, we make a cut with a jigsaw with a fine file.
  We expose the screen and trace it along the floor with a pencil.
We remove the screen and make marks opposite the brackets.  We adjust the brackets using a square from the markings on the floor, minus 2 mm. The lower edge of the bracket should be positioned with a gap of 2 cm from the floor.
  Tighten the nuts.
We install the screen by installing wedges from below.  We align and drill holes opposite the marks, departing 5 cm from the floor.
  We screw the screen to the brackets using decorative screws.
We check that the ceiling is tightly adjacent to the upper arc. If necessary, treat the connection with sealant and press it with a weight or spacer.
When the silicone dries, we spill the joints of the cabin and check the functionality of the watering cans and switch.
Installing a shower stall is a fairly simple procedure, provided you follow the instructions and know the basics of plumbing work. If you have never dealt with connecting plumbing, it is better to entrust the installation work to specialists.
Installation of reinforced water collectors
Regardless of the configuration of the container for collecting and draining water included in the hydromassage box, the assembly of such a structure involves preparing the base for installation.
Preparation includes work aimed at leveling the surface of the floor and walls in the installation area. In addition, all necessary steps are taken to create effective waterproofing. A sewer line is marked and installed to drain water.
 Preparation of the place where it is planned to install the collection and drainage of water from the hydromassage box. In this case, the option is with a foundation made independently
The drain line is connected to a point previously prepared and installed at the installation site, or to an existing bathroom drain system through a corrugated extension and tee.
In the latter case, it is necessary to maintain the difference in line level differences so that water can be drained without hindrance. The required drop value is achieved when assembling the shower tray by installing it to the required height. To construct a drain into the sewer, you will need the following tools and materials:
- corrugated pipe (d=40 -50 mm);
- sanitary siphon;
- fluoroplastic sealing tape (FUM);
- building level;
- set of locksmith tools.
The plumbing siphon and part of the corrugated pipe are mounted on the body of the pallet before its installation in the prepared place. It is necessary to ensure the accuracy of installation of the siphon in full accordance with the attached instructions.
The position of the gaskets and the tightening of the fastening rings must ensure reliable tightness. It is recommended to check the insulation of the connections, close the outgoing end of the corrugation and fill the siphon with a small amount of water. If no leak is found, you can safely assemble the system.
Features of installation of a hydrobox shower cabin
In closed shower stalls and hydroboxes, after installing the tray, it is necessary to assemble a panel covering the wall. It has mounting holes into which all the “gadgets” are pre-installed - nozzles, holders, soap dishes, seats, speakers, lamps, etc. The shape and size of the bottom is different for everyone, so it’s hard to make a mistake. It is advisable to coat all “mounting holes” with sealant: there will be less dripping later.
Particular attention should be paid to the installation of injectors. In addition to installing the sprayers themselves, they must be connected to each other with pieces of hose. It is put on the injector nozzles and tightened with clamps. All this is assembled according to the diagram in the instructions.
Pay special attention to ensure that the nozzle tips are intact and the clamps are well tightened. It wouldn’t be a bad idea to coat each seat with sealant (both under the nozzle and under the hoses)
Connection of shower nozzles from the rear side
The wall with connected accessories is placed in a special groove. The connection point is also pre-coated with sealant. Cold and hot water are connected, you can check the functionality of the system.
After installing the walls, the lid is assembled. There is usually a rain shower there, maybe a lamp. When installing them, you can also use a sealant - you never know where the water will get in... A hose is put on the shower pipe, which is tightened with clamps. Conductors are connected to the lamp terminals, the connection point is carefully insulated, using several heat-shrinkable tubes put on in series.
The assembled cover is installed on the wall. The joint is again lubricated with sealant. While the sealant has not hardened, the assembled door frame is installed. When doors are installed depends on the model. In some cases they need to be hung before installation, in others - after. All joints are sealed.
The assembly of the hydrobox shower cabin is shown in sufficient detail in this video. There are no comments, but the sequence of actions is clear.
We hope it’s clear how to assemble a shower stall. There are a lot of models and modifications, but we tried to describe the main problem units. If you missed something, write in the comments, we will add to the article))
Installation of a shower enclosure with a tray
The first step is to install the pan, but since most pans don't come with mounting hardware, you'll have to make your own. To assemble such a frame, iron corners and a pipe with a diameter of 30–40 mm are most often used. You will have to cut and weld these parts together. There is another option for mounting the pallet - this is installation on bricks and cement-sand mortar. The installed pallet should not wobble on its base, it should fit snugly to the base.

Let's start installing the drainage system. The process of installing the siphon to the base occurs even before the control installation of the pallet to the frame. You should think in advance about how the siphon will be repaired in the future, because sooner or later it may become clogged. Install a small ventilation window so you can make repairs later. After installing the siphon, check whether it is leaking water. To do this, you need to fill the pan with several liters of water and inspect the drainage system
Also pay attention to ensuring that there is good contact between the tiles and the pallet, and that all cracks are sealed with sealant.

Now you can begin installing the panels. First of all, you need to assemble the iron frame of the cabin. Next, you need to secure the bottom guide; this can be done using sealant. How to install vertical posts? To do this you need to use a plumb line and level, this way you can make exact angle tilt At the fastening points, use a marker to draw the points where you will drill the hole for the dowels. Using a drill and a special tile bit, make holes in the wall.
 Advice! When drilling tiles with a drill or hammer drill, do not use the hammer, otherwise the tile will burst and fly off the wall.
Before you attach the studs to the surface of the walls, lubricate the inside of them well with sealant, thanks to this you will achieve better adhesion. Next, using self-tapping screws, secure the vertical guide post. After all the above operations, you can safely begin installing the glass. However, when doing this work, be extremely careful, as you can easily injure yourself or damage the glass. The glass must get into all the mechanisms manufactured by the factory, only after that it can function normally. However, in order for the doors to close normally without coming into contact with other elements of the shower enclosure, they must be adjusted. This procedure is carried out according to the instructions supplied with the corner.

The last step in assembling the corner is attaching the door fittings and sealing. It is necessary to ensure that all cracks are properly sealed both outside and inside. The sealant is applied only after the surface has been cleaned and degreased. Sealing is carried out both near the tile and on the pallet. We can say that sealing the gaps between the tray and the tiles is one of the most important jobs in installing a shower enclosure.

You can learn more about how to install a shower enclosure by watching this video:
Installation process
During the installation of the shower tray, the following order of operations is observed:
- After unpacking the pallet and removing the protective film, you need to turn it upside down, placing it on a previously prepared thick cardboard. It will protect the product from accidental scratches.
- Using self-tapping screws, you need to attach a metal frame to the underside of the acrylic tray, on which the entire surface will subsequently rest, since the bottom can sag under weight. This must be done so that there is no gap between the frame and the shower tray.
- Long hairpin legs are carefully screwed through the frame holes into seats all the way. The level checks the plane of the legs.
- The pallet is turned over and placed on legs. Plastic support brackets are placed under them to secure the pallet screen.
- The horizontal position of the installed pallet is adjusted. This can be done by changing the height of the legs on which it stands. To set the required level of inclination of the pallet, the legs can be made of different lengths. After adjustment, their position is fixed using locking screws.
- The next step is to install the siphon. To do this, connect the upper and lower parts of the siphon through the drain hole at the bottom of the pan. The junction between the top and bottom is sealed with gaskets lubricated with silicone. They also need to additionally process all the joints of the siphon parts. The drain hose connected to the pan is discharged into the sewer.
- Be sure to check the tightness by pouring water into the pan. If leaks are detected, re-treat the joints with sealant.
- At the final stage, the screen is secured to the pallet using brackets.
Installation of a ceramic shower tray
Unlike acrylic sanitaryware, there is no free space under a rigid ceramic shower tray; it is placed directly on the floor. Therefore no supports are required. But when installing it, it can be difficult to provide access to drain pipe. You can solve this problem as follows:
- In the floor under the drain hole, cut a niche into which the siphon will go under the floor.
- To ensure easy access to the pipe, cut out a small section of the floor at the edge of the pan. A removable panel is made from the cut piece.
- The floor under the pallet should be covered with two layers of adhesive.
- Having secured the siphon to the drain hole, the pan must be laid on glue.
- After the solution has completely dried, connect the siphon to the drain pipe through a removable panel in the floor.
- Treat the area where the tray meets the wall with sealant.
- When installing a ceramic shower tray in a wooden house, it is better to use roofing felt or plastic film to insulate the walls.
In conclusion, it is worth recalling once again that the process of installing a shower tray in each specific case may differ slightly depending on the design features of the product. Therefore, before installing the structure, you should carefully study the attached instructions.
Instead of a conclusion
The installation options given are far from the only ones. There are dozens of installation methods. In particular, many of them, instead of bricks, provide for laying foamed or extruded polystyrene underneath. Some people place the pan directly on the floor, in the hope that the sewer pipe goes vertically down in the right place.
Finally, many pallets have wonderful legs, so no foundation is required at all. This is the most successful installation option, and it does not interfere with supplementing the caliper system with a traditional sheet of foam. The side edges, if necessary, are finished with any material, including mosaic tiles.
The main thing is that the pallet can be removed at any time to carry out renovation work. Polymer sewer pipes do not last forever. Sometimes they can crack. This is a whole problem when you don’t know that you’re flooding your neighbors. Because modern renovation expensive.
Tile or mosaic cladding
In many cases, side cladding is required to hide the mounting bases. One of the most convenient options for solving the problem is to use mosaic tiles on a plastic or glass base.
A layer of glue is applied to the base using a notched trowel. After pressing the tiles, excess adhesive must be removed immediately.
Using mosaics, you can cover any uneven surfaces, because... It is easy to cut with construction scissors or a knife thanks to the paper base.
It doesn't matter whether you use tiles or mosaics, all seams need to be sealed. This especially makes sense when you decide to build the pallet yourself
 The space between the pallet and the floor can be closed using mosaic or tile cladding. Mosaic fragments are flexible and allow you to quickly and efficiently line the sides or the entire pallet if you build it yourself
When forming seams, use crosses. After facing, you need to grout the seams using waterproof grout and a rubber spatula. Then the remaining grout is removed and everything is wiped with a piece of cloth. After everything has dried, you need to wash the tiles.
What you will need
To install a shower enclosure of any design, you will need a certain set of materials and tools. The list includes:
- electric drill with a set of drills of different diameters;
- screwdrivers, both flat and Phillips;
- hammer and chisel - if there is a need to dismantle old coatings;
- building level;
- fasteners, which necessarily include nuts and dowels;
- pipes and fittings for sewerage connections;
- cement and sand for screeding. If desired, you can buy a “liquid floor” mixture;
- waterproof sealant (usually silicone).
The rest of the set is selected in accordance with a specific plan: a pallet or bricks with mortar; tiles if the sides are being laid out or wall and floor coverings need to be replaced; insulating structure - glass doors with a frame or a curtain with a rod.
 How to properly install a drain
Installation of side walls
We remove the protective film from the top of the pallet, but leave the bottom protected for now.
 We move the pallet away from one wall and install an opaque wall there.
  We connect the holes in the pallet with the corner and screw it with 35 mm self-tapping screws (without much effort).
  We draw a marker along the corner and mark the holes.
 Remove the partition and apply a layer of silicone 5 mm thick.
 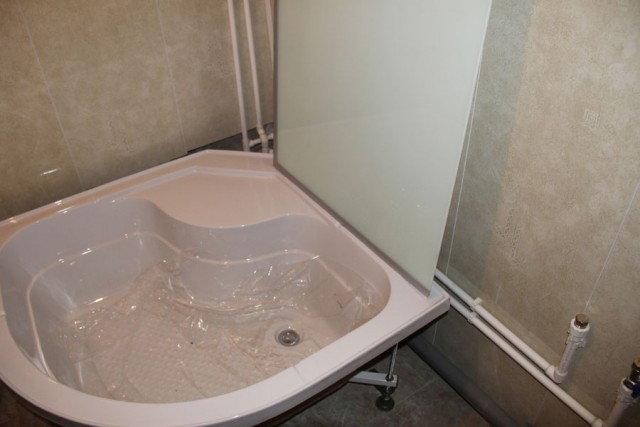 We install the partition back and remove excess silicone. Further I will not write about removing excess, remove it immediately after pressing the parts.

 We move the pallet with the partition to the wall and try on the central panel to see if additional lining is needed.
  We apply silicone to the junction of the side wall and the central panel.
  We tie them together with 10 mm self-tapping screws.
 Let's try on a fixed transparent partition. The bevel cut of the metal profile should be at the bottom.
If everything fits, we silicone the profile and install the partition. We set the top edge flush with the wall. From the upper outer side of the profile, drill a hole with a diameter of 3 mm and tighten the partition with the wall using self-tapping screws. This is what it looks like in practice.Install the upper and lower profile. The rounded parts are directed towards each other, the upper profile is wider than the lower one. We apply silicone under the bottom one.
Installing a ceramic shower tray
Attention! The installation of any ceramic tray must be done extremely carefully. The product is very fragile and can easily be damaged or cracked even with a slight impact or falling of a heavy object! . A distinctive feature of ceramic models is that no free space is left under this structure, which means that no additional supports are required and can be installed directly on the floor covering
This is convenient in that any manipulations to strengthen the structure are excluded, but there is a drawback - difficulties arise in providing access to the drain and all other communications.
A distinctive feature of ceramic models is that no free space is left under this structure, which means that no additional supports are required and can be installed directly on the floor covering. This is convenient in that any manipulations to strengthen the structure are excluded, but there is a drawback - difficulties arise in providing access to the drain and all other communications.
Work order:
- markings are indicated - using a marker/pencil, the future location of the drain is indicated and boundaries are drawn along the entire perimeter of the structure;
- a drain hole is equipped (it is important that it is as close as possible to the connected drain pipe) - the part of the floor where the siphon will stand in the future is carefully cut out with a jigsaw;
The siphon is connected to the pipe through an inspection hatch
- unhindered access to sewer communications is ensured - not far from the existing cutout, another small recess is made in the floor so that the floor section is outside the boundaries of the structure and it becomes possible to lay a siphon and a network of pipes under the floor;
- a small removable inspection panel is made from a piece of flooring cut out with a jigsaw, and PVA glue, previously diluted with a small amount of water, is applied to the location of the pallet in two layers;
- the siphon is connected to the drain;
- the pallet is fixed with a solution, while maintaining a horizontal position;
- when the solution is completely dry, the siphon is carefully connected to the pipe through the inspection panel;
- all joints are carefully sealed with silicone sealant.
Installation of a shower enclosure
The product installation steps include:
- Pallet installation;
- Fastening racks and guides;
- Installing side walls and hanging doors.
Installation of a shower tray
The first step in assembling a shower corner is to mount the tray, which can be done in two ways:
- On the legs;
- Floor mounting

Photo: Installing a shower tray
Installation on legs involves placing the base in a pre-prepared corner space and then adjusting the height of the legs in accordance with the level. Next, the screw fastenings are fixed using nuts; the pre-installed corrugated pipe is attached to the siphon using a union nut. After this, the siphon is attached to a pallet, which is placed in the corner of the room. Next, the position of the pan relative to the horizontal plane is checked using the spirit level and, if necessary, it is adjusted.
When connecting, attention should be paid to the reliability of the connection of the parts in order to avoid leaks in the future. To check the tightness, you need to pour a small amount of water into the drain.
If liquid passes into the hole and the connections do not flow, you need to check whether the area of the floor over which the unit is located is dry. If everything is in order, the connection is made correctly, and you can continue assembly.
Mounting a pallet into the floor involves placing the base in a pre-prepared recess and then securing the structure with a concrete screed. This installation option is considered labor-intensive, but guarantees reliability.
Special attention should be paid to the rigidity of the pallet; for example, acrylic structures are most susceptible to flexibility, so they should be additionally strengthened in the lower part using bricks, polyurethane foam or polystyrene foam.
After mounting the pallet, the lower guide is installed, which is secured after treating the mounting surface with silicone sealant.
Installation of racks and guides
After fixing the bottom guide and drying the sealing silicone layer, you can proceed to attaching the vertical posts. Vertical posts are attached from the bottom guide and extend upward towards the wall. Installation requires special marking of mounting holes, the position of which is determined using a construction spirit level.

Photo: Installation of racks and guides
To drill a surface lined with ceramic tiles, you will need a drill with a drill for ceramics, a hammer drill paired with a drill for concrete. The installation technology involves drilling holes according to preliminary markings. The hole depth should be 8 mm. Plastic dowels are driven into the resulting holes, the vertical guide posts are treated with silicone and connected to the wall using self-tapping screws.
The procedure for attaching the top guide is the same. The elements are connected to vertical posts and attached to the ceiling surface using sealant and self-tapping screws.
Fastening side walls and door hinges
The side walls are inserted into the finished frame of guides and secured with self-tapping screws. After this, the walls are connected to the lower guide, and the connecting seams between them are processed.

Photo: Fastening walls and doors
Next comes the installation of doors, which can have a plastic or glass base. It is necessary to take into account the swing or sliding principle of operation. When working with glass surfaces It is necessary to observe safety precautions so as not to damage the fragile base and injure yourself. To do this, you need to avoid impacts, do not press on the concave part of the glass, and do not hold on to the fittings so that the glass does not break.
Afterwards, the doors of the structure are hung, during which the door rollers are inserted into the grooves of the guides. Next, the position of the doors is adjusted and debugged, which should move smoothly, be in close contact with each other, and have no gaps or gaps.
At the end of the installation, the fittings are fastened.
What is the difference between a shower corner and a cubicle?
The modern market offers many varieties of shower stalls, which, in general, are divided into two types: open and closed. The latter type is so named because such a model is closed on all sides: it has walls, a floor, and a ceiling. Essentially, this is a small separate room for taking water procedures.
As mentioned above, such cabins can have a set of various interesting functions for massage, relaxation, and the like. In general, the equipment brings a considerable amount of comfort to the life of the owners, this is especially true for those who really love water treatments.
Of course, there were some downsides. Closed cabins have the following disadvantages:
- a complex installation procedure, especially if those additional functions are available. In principle, you can buy equipment already assembled and not bother with connecting each element. But it often happens that such an assembled model simply does not fit through the bathroom door. As a rule, the matter still ends with calling a master who assembles the stall directly in the bathroom;
- price. Plumbing in general is quite expensive, and when it comes not just to water supply, but also to comfort, it can be completely expensive. Moreover, the more functions, the more expensive the model, which is natural. On the other hand, they usually last a long time, and they bring a lot of pleasure;
- dimensions. The large dimensions mentioned in the first paragraph can be a critical factor when it comes to a typical bathroom in an ordinary apartment building. What can we say about the notorious combined bathrooms in Khrushchev-era buildings, where it is generally difficult to turn around. Such a cabin simply won’t fit there.

If all of the listed disadvantages - especially the last one - are of great importance to you, then this is where a shower corner will come to the rescue. It is easy to install, inexpensive, and most importantly, it takes up much less space than closed models.
In fact, the basic equipment of such equipment consists of a tray and doors. The adjacent walls itself act as side walls. Thus, you get a corner in which the shower equipment is placed, the tray is mounted, and the whole thing is closed with a door and, partially, panels.
This corner has no ceiling, so various “bells and whistles” like a tropical shower, of course, cannot be installed here. But the work is greatly simplified. And such equipment will in any case bring with it convenience and comfort, regardless of where it is located: be it in a city apartment or in a wooden house.
To make the installation procedure easy and problem-free, we suggest reading the instructions below for installing a conventional shower enclosure with a tray with your own hands. There is also a video attached to the article, by watching which you will further enrich your knowledge. So let's get started.
Preparing the premises
Do-it-yourself installation with a pallet begins with checking the geometry of the walls and floor of the room. For this check you will need a level, plumb line and angle. If the floor has a clear slope, it is leveled using mortar or ready-made liquid mixtures.
The curvature of the walls is checked using a level and plumb line, and leveling is done with building plasters or moisture-resistant plasterboard boards. To prevent moisture penetration, building structures are treated with a special primer. As finishing material The floors and walls in a room with a shower corner are ideally tiled. Well laid, it looks very good and at the same time perfectly protects the supporting structures from moisture penetration. Very rarely, plastic or aluminum panels are used as a finishing material for walls.
 Preparing the room for the shower: tiling the walls and floor
How to choose a shower enclosure
Shower corners are made of safety glass or plastic; the first option is more expensive, but more reliable, stronger and more resistant to mechanical damage..
Shower doors There are sliding and hinged ones. Firstusing rollers placed on additional profiles, they are moved apart. Sliding door leaves can be up to four in number. In this case, the frame of the shower enclosure is the most durable. Sliding doors preferable in small apartments and shower rooms, as they take up virtually no space. The main disadvantage of such doors is the increased complexity of their installation.

Shower corner with sliding doors
Big sales sliding doors and functionality brought them to the forefront. However, if there is enough space in the bathroom, you can install options with swing doors having two doors. Externally, the option is a traditional door. It is opened outwards.

Shower corner with hinged doors
Practical and affordable options include folding accordion doors that have 2 or 4 leaves that open both inward and outward. Hinges installed on the door are considered reliable and will last a long time compared to built-in rollers in sliding doors.

Accordion shower door
When choosing options for doors with rollers, remember the following important recommendations:
- It is recommended to choose metal rollers - this material is the most reliable. Plastic products quickly become unusable and wear out.
- It is recommended to shake the door a little before purchasing. Don't buy an unstable door that wobbles. One day she might just fall out of the cabin.

Rollers for shower enclosure sliding doors
Frame shower enclosures are always made of lightweight material. Reliable aluminum is used as standard. Sometimes cheap models use plastic, which is painted or chrome-plated. The aluminum frame will naturally last longer.

Shower enclosure frame
Choice glass There is a huge range of colors available to suit every taste. On the market you can find glasses to your liking - frosted, with patterns, tinted, etc. High-quality shower enclosures are equipped with tempered glass. It is durable, does not change color and is of the highest quality.

Glass shower enclosures are available in various colors
If this happens and the glass breaks, then nothing bad will happen. It crumbles into small, safe balls - this will not cause injury to anyone, and your child will not get hurt. As for plastic, it will begin to become cloudy over time, and later streaks will appear.
Most manufacturers use modern high technologies in production and apply an anti-plaque coating layer to glass shower enclosures. This composition allows virtually no retention of residual water (or lime), which immediately rolls into the pan. Glass is easy to clean from dirt.
Having arranged a house for a bathhouse, you need to purchase shower accessories. Manufacturers offer a wide range of shower enclosures for pleasure and convenience to customers. It is necessary to choose a high-quality mixer or shower set (stand with watering can).

Reliable brands from Germany, Italy, the Czech Republic, and Finland are considered the best for shower stalls. They are easy to assemble, just like a construction set. Each part is purchased separately, with the expectation that they will function with each other. Chinese plumbing fixtures are considered the cheapest. It is convenient because it is immediately sold with a complete set. A hired plumber will install a shower enclosure in a few hours.
If you have equipped a multifunctional cabin, then in such a shower corner you can use thermotherapy, hydromassage, a Turkish bath, listen to radio broadcasts, take chromatherapy and more. Such showers look attractive in a modern way. The cabin parameters affect the mood of the owner. However, all this pleasure will not be cheap.
Multifunctional shower cabin
Cabins, as mentioned above, are recommended to be purchased in dimensions of at least 80 x 80 cm. A rounded cabin may be an exception - you can purchase it with smaller parameters. Experts point to this requirement because certain movements are carried out in the shower, arms and legs move. In other corners with a rectangular (or square) cabin measuring less than 80 cm, it is impossible to turn around.
Types of showers
Before proceeding directly to the description of the assembly process, we will briefly consider the main types of shower stalls available for sale and the main criteria for their selection.
A shower corner (or a simple shower stall) is a simple design made from a tray and curtains. Instead of walls, which are typical for a full-fledged shower stall, the walls of the room are used. The shower corner has no ceiling. Its main advantages are low cost and compactness.
 A shower corner is one of the simplest, most convenient and cheapest models of shower stalls, it takes up minimal space and is suitable for self-installation
More sophisticated models have a roof and walls. Expensive multifunctional units have rich technical equipment: Turkish bath or Charcot shower, flavored steam mode, different types hydromassage, additional modes, various lights.
 An expensive model of a shower stall with a hydromassage function, lighting and a deep tray. Requires not only sufficient space for installation, but also the necessary pressure in the water supply
Control of such booths is carried out in a complex manner. electronic system. Before purchasing an expensive cabin equipped with a hydromassage function, you must first find out the level of water pressure in the pipes.
Combined shower cabins are a kind of compromise for those who like to take a bath with hydromassage and have a full-fledged shower cabin at home. Combined models are distinguished by the original and stylish design– on the market they are often positioned as home SPA centers. You can choose a model of any shape that best suits the dimensions and layout of your bathroom: round, square, oval, polygonal, etc.
For a small bathroom, the best option is a corner stall that doesn't take up much space. Corner booths are very popular among owners of apartments with standard layouts, which is why manufacturers produce a large number of models in a variety of price categories.


