This section contains various designs wind generators with a vertical axis of rotation, made by fans of this type of wind generators. There are many types and variations of vertical wind generators. Protozoa Savonius or simple barrels, and more advanced Daria rotors, which are more revving, but here each type has its own advantages and disadvantages.
>
Onipko rotor
Description of the Onipko rotor. What is this? Another project to find investors or is it a really effective wind generator  >
>
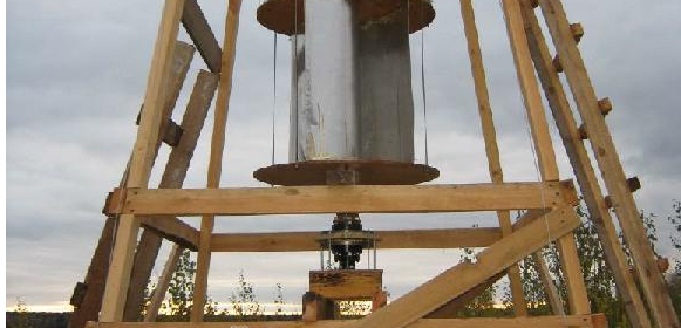
Vertical wind generator
Homemade wind generator, photos and videos. A few photos of the windmill itself, the tower and generators. Several versions of generators were manufactured for this windmill  >
>
Vertical wind generator of unusual design
An interesting design of a wind generator, the generator of which is made from an asynchronous motor, but the generator is made with three stators and a triple rotor. The two-blade rotor with polycarbonate blades also rotates in an unusual way.  >
>
Windmill made from barrels with folding blades
Wind generator made from tin barrels. The generator is made of a 2.2 kW asynchronous motor, the rotor of which is converted to neodymium magnets. Drive to the generator is belt driven. The windmill blades are folding with centrifugal weights, although in the wind they open and close when moving into the wind.  >
>
Wind generator from a motor-wheel
Some photos of a small vertical wind generator. The wheel motor from a scooter was used as a generator; the torque was transmitted to the generator by a chain, the ratio was approximately 1:2.5. Rotor dimensions are 1*1.6 meters, mast height is 9 meters. In an average wind, this windmill produces up to 3A and 17v to charge an alkaline battery.  >
>
Wind generator for water intake
The design of this wind generator, which has already become legendary in the vast expanses of the RuNet, which drives homemade pump, and he pumps water from the lake. Initially, the windmill was supposed to charge the battery, but too low speeds negated all attempts to generate electricity.  >
>
Vertical wind generator, Ugrinsky rotor
Homemade wind generator with a vertical axis of rotation and a rotor size of 0.75 * 1.6 m. The design of the blades according to the drawings of the Ugrinsky rotor is an improved Savonius, in fact, KIEV of this design is higher. The structure is made of two blocks with an angle of 90 degrees, the material is plywood and aluminum. The generator for this windmill is of an axial type using permanent magnets.The power of the wind turbine is about 50 watts in a wind of 7-8 m/s.
Vertical wind generator do it yourself, drawings, photos, videos of a windmill with a vertical axis.
Wind generators are divided according to the type of placement of the rotating axis (rotor) into vertical and horizontal. We looked at the design of a wind generator with a horizontal rotor in the previous article, now let’s talk about a wind generator with a vertical rotor.
Scheme axial generator for a wind generator.
Making a wind wheel.
The wind wheel (turbine) of a vertical wind generator consists of two supports, upper and lower, as well as blades.
The wind wheel is made from sheets of aluminum or stainless steel; the wind wheel can also be cut from a thin-walled barrel. The height of the wind wheel must be at least 1 meter.
In this wind wheel, the bending angle of the blades sets the rotation speed of the rotor; the greater the bend, the greater the rotation speed.
The wind wheel is bolted directly to the generator pulley.
To install a vertical wind generator, you can use any mast; the manufacture of the mast is described in detail in this article.
Wiring diagram for wind generator.
The generator is connected to the controller, which in turn is connected to the battery. It is more practical to use a car battery as an energy storage device. Since household appliances run on alternating current, we will need an inverter to convert 12 V DC to 220 V AC.
For connection, a copper wire with a cross-section of up to 2.5 square is used. The connection diagram is described in detail.
Video showing a wind generator in operation.
Issues of energy independence worry the minds of not only leaders of states and enterprises, but also individual citizens and owners of private houses. With the increase in monopoly and tariffs by electricity producers, people are looking for efficient alternative sources nutrition. One such source is a wind generator.
Main elements in a wind generator system
There are many models, options from different manufacturers, but as it shows practical experience, they are not always affordable in price and quality for a wide range of consumers. If you have information, certain knowledge of electrical engineering and practical skills, you can make a wind generator yourself.
Operating principle and main elements
The operation of a homemade wind generator is no different from industrial models; the operating principles are the same. Wind energy is converted into mechanical energy by rotating a generator rotor, which produces electricity.
Main design elements (Fig. above):
- propeller with blades;
- a rotation shaft through which torque is transmitted to the generator rotor;
- generator;
- design for mounting the generator at the installation site;
- if necessary, to increase the rotor speed, a gearbox or belt drive can be installed between the shaft with the propeller and the generator shaft;
- to convert the alternating current of the generator into direct current, a rectifier converter is used diode bridge, the current from which is supplied to recharge the battery;
- a battery from which electricity is supplied through the inverter to the load;
- inverter converts D.C. batteries with a voltage of 12 V or 24 V AC with a voltage of 220 V.
The designs of propellers, generators, gearboxes and other elements may differ and have various characteristics, additional devices, but the system is always based on the listed components.
Do-it-yourself selection and production
By design There are two types of axis that rotate the generator rotor:
- generators with a horizontal axis of rotation;

Generator with horizontal axis of rotation
- generators with a vertical axis of rotation.

Rotary wind generator with vertical axis of rotation
Horizontal axes of rotation
Each design has its own advantages and disadvantages. The most common option is with a horizontal axis. These models have a high efficiency of converting wind energy into rotational movements of the axis, but there are certain difficulties in calculating and making the blades yourself. The usual flat blade shape, which was used on ancient windmills, ineffective.
To use maximum wind energy when rotating the axis, the blades must have a wing-shaped shape. On airplanes, the shape of the wing, due to the force of the headwind, provides lifting flows. In the case under consideration, the forces of these flows will be directed to rotate the generator shaft. Propellers can have two, three, or more blades; designs with three blades are most common. This is quite enough to provide the required rotation speed.
Wind generators with a horizontal axis of rotation must be constantly turned by the plane of the propeller towards the front of the oncoming wind flow. To do this, it is necessary to use a weathervane-type tail unit, which, under the influence of the wind, like a sail, turns the entire structure with a propeller towards the headwind.
Vertical axes of rotation
The main disadvantage of this option is low efficiency, but this is compensated by a simpler design that does not require manufacturing additional elements to turn the blades towards the wind. The vertical arrangement of the axis and blades allows you to use wind energy for rotation from any direction; this design is easier to make with your own hands. The shaft rotates more stably, without sharp jumps speed.
The average annual wind speeds on the territory of Russia are not the same. Most favorable conditions for the operation of wind generators – 6-10 m/s. There are few such areas; winds of 4-6 m/s generally prevail. To increase the rotation speed, it is necessary to use gearboxes and take into account the height and wind rose in the area where the generator is installed.
An example of wind generator manufacturing
A variant with a vertical axis of rotation is being considered.
DIY wind turbine
The easiest option for producing blades is to use metal barrel for 50-200 l. Depending on the number of blades required, the barrel is sawn with a grinder from top to bottom into 4 or 3 equal parts.

Vertical blades from a metal barrel
You can simply use galvanized sheets roofing iron that are easy to cut the desired shape with your own hands using metal scissors.

Vertical blades made of sheet iron
Subsequently, the blades are attached to the top of the rotation axis. The basis for their fastening can be wooden disks made of six-layer plywood.
It is safer to use a metal frame made of a rectangular profile, to which the blades are bolted.

Example of placement of vertical blades

An example of attaching blades to a platform
The frame or disks are rigidly attached to the rotation axis; the axis itself is inserted into couplings with bearings, which are securely installed in the frame of the tower or roof of the building on which the generator is located.
Installing an axle with blades on a tower

A visual representation of the installation of a vertical axis of rotation on the roof of a building
- Turbine with vertical blades.
- Axle stabilization platform with double-row ball bearing.
- Stretch marks steel cableØ 5mm.
- Vertical axis, steel pipeØ 40-50mm, wall thickness not less than 2 mm.
- Rotation speed control lever.
- The blades of the aerodynamic regulator are made of plywood or plastic 3-4 mm thick.
- Rods that regulate the speed of rotation and the number of revolutions.
- A load whose weight sets the speed of rotation.
- Vertical axis pulley for belt drive, widely used bicycle wheel rim, without tube and tire.
- Support bearing.
- Pulley on the generator rotor axis.
A pulley for a belt drive or gears for a gearbox is attached to the lower end of the axle; this is necessary to increase the rotation speed of the rotor. Practice shows that at a wind speed of 5 m/s, the rotation of the shaft with horizontal blades from the barrel will be no more than 100 rpm. At a wind speed of 8-10 m/s, rotation reaches up to 200 m/s. This is very little for the generator to produce the necessary power to charge the battery.
A 1:10 ratio gearbox allows you to achieve the required rotation speed.

Installing Belt Pulleys
Low speed generator
The easiest way to convert mechanical rotational energy into electricity is to use car generators. But ordinary generators from passenger cars are not recommended for wind turbines due to the presence of brushes in their design. Graphite brushes remove the current induced on the rotor; during operation, they wear out and require replacement. In addition, such generators are high-speed; to generate a voltage of 14 V with a current of up to 50A, 2000 or more revolutions are required.
More efficient generators for wind turbines from tractors and buses G.964.3701 with magnetic excitation of windings. They do not have brushes and operate at lower speeds. The G288A.3701 generator has three phases and is used to supply power to vehicles in conjunction with a battery. It has good characteristics for use in wind turbine systems:
- produces a voltage of 28 V;
- built-in rectifier produces direct current up to 47 A;
- output power up to 1.3 kW;
- on Idling rotation 1200 rpm;
- with a current load of 30A, 2100 rpm is required.
The generator has suitable dimensions and weight:
- total weight 10 kg;
- diameter 174 mm;
- length 230 mm.

Generator from MAZ - 24V
Generators of this type are used in KAMAZ, Ural, KRAZ, MAZ vehicles with engines from the Yaroslavl plant YaMZ 236, 238, 841, 842 and ZMZ 73. In order to save money, you can buy a used generator at dismantling points. To generate more electrical power at low speeds, you can make a generator with your own hands using neodymium magnets, but this is a separate topic and requires a more detailed description.
Assembly sequence
- First of all, a tower or generator mounting structure is installed on the roof of the building. Attached vertical axis blades are installed in bushings with bearings.
- After installing the axis with the blades, a pulley for the belt drive is fixed on the lower part.
- At the level of the axle pulley, a generator with a pulley for the belt on the rotor shaft is attached to a specially prepared platform. The generator pulleys and axles with blades must be installed at the same level.
The diameter of the pulley on the axle should be approximately 10 times larger than the diameter of the pulley on the generator shaft. Based on the conditions that the estimated wind speed is approximately 10 m/s, the axis rotation speed will be up to 200 rpm.
The formula used is:
Wr = Wos x Dosd, where
- Wr – generator pulley rotation speed;
- Dos – pulley diameter on the vertical axis;
- d – diameter of the pulley on the generator rotor shaft;
- Wos is the rotation speed of the vertical axis pulley.
Wr = 200 rpm x 500mm/50 mm = 2000 rpm - sufficient rotation speed for the generator of the selected type to produce the required power.
- The belt is tensioned; to do this, there must be slots in the generator mounting platform, like on a car mounting.
- The output wires of the generator are connected to the battery terminals.
These generators have built-in rectifiers, the output is direct current, so the positive red wire is attached to the “+” terminal, and the negative wire is attached to the “minus” terminal.
- The 24V/220V inverter input is connected to the battery, also observing the polarities.
- The inverter output is connected to the circuit with the load.
Video. DIY wind generator.
Having necessary materials, practical skills in plumbing, using ready-made automobile generators with magnetic excitation of the windings, the wind generator is easy to install with your own hands. To manufacture a higher-power generator using neodymium magnets, more in-depth knowledge in electrical engineering and skills in assembling electrical equipment will be required. This is one of the most simple ways assemble a wind generator with your own hands.
Such devices have some advantages over wind-generating devices with a horizontal axis. They do not have components for orientation to the wind, which simplifies the design and reduces gyroscopic loads. Developed a large number of various wind generators with a vertical axis of rotation (Fig. 6.1),
Rice. 6.1. with a vertical axis of rotation: in which
To create torque, the resistance forces and lifting force of the working blades are used.
These are devices with plate, bowl or turbine elements, as well as Savonius rotors with S-shaped blades.  Wind generators of this type have a large initial torque, but lower speed and power compared to the Frenchman’s rotor, who proposed this design in 1920.” This rotor has been intensively developed since 1970 by specialists in many countries. At present, it can be considered as the main competitor of ring-type wind generators.
The rotor of the Daria design refers to a Wind Generator with a vertical axis of rotation, using the lifting force that occurs on curved blades having a wing profile in cross section. Its disadvantage is a small initial moment, the advantage is high speed and, because of this, a relatively large specific power related to its mass. To eliminate the main drawback and to increase the initial torque, the Darrieus rotor is combined with various types starters, for example with a Savonius rotor.

1- ; 2 — Savonius multi-blade rotor; 3 — plate rotor; 4 — cup rotor: 5 — Darrieus rotor Ø-shaped; 6 — Darrieus rotor Δ-shaped; 7 - rotor with straight wing-shaped blades (Giromill) 8 - with curved lamellar blades; 9 — Darrieus Ø-shaped and Savonius rotors; 10 — Savonius slotted rotor; 11- rotor using the Magnus effect; 12 - rotor with supporting sail planes; 13 - with a reflex device; 15 - with Venturi pipe; 16 - from
vortex device.
Another type of rotor with a vertical axis of rotation uses the Magnus effect; Such rotors with rotating cylinders include designs by Madaras and Fletscher. When a wind flow approaches a rotating cylinder, in accordance with the Magnus effect, a force acts perpendicular to the direction of the flow. These devices are capable of propelling ships or land vehicles. The force distribution is shown in Fig. 6.2 and 6.3.
In some cases, a wind generator improves power output in the presence of a guide deflector (see Fig. 6.1) and an ejector in the form of a Venturi tube (see Fig. 6.1: 15).
Also known wind generators with a rotor of vertical axial rotation, located on a pipe (or tower), inside which rising vortices are generated (see Fig. 6.1: 14). At the same time, such a tower provides for heating the air through direct use solar radiation or combustion of fuel with subsequent expansion of air, which creates the effect of a gas turbine, which, together with a wind generator, is installed at the exit of the tower. To increase efficiency with such towers and wind turbines operating using lifting force in the wind flow, the latter should be as powerful as possible: from 1000 to 20,000 kW.
At the same time, the dimensions of wind generators are limited by the stresses arising in the structure of the supports, blades and other loaded elements.
That's why wind generators should have as little mass as possible, and as driving force- lifting force in order to have greater speed when large values wind energy utilization factor.
Advantages of wind turbines with a vertical axis of rotation,
which produce stronger and more stable winds, can be realized by placing wind generators on the coastal territory of reservoirs or in coastal waters. Tower-type wind turbines designed for the formation and use of vortices in order to increase the flow speed and pressure gradient in the area of the wind generating device can be used after studying the laws of speeds during vortex formation.
Design diagrams of wind generators with a vertical axis of rotation
Due to the perpendicular direction of the wind action on wind generators with a horizontal axis of rotation, it was necessary to use an orientation system and relatively complex methods for extracting power. This reduced them and complicated the design of wind turbines.
Wind generator with vertical axis of rotation due to their geometry, they are in an arbitrary position in any wind direction. In addition, this scheme allows, by lengthening the shaft, to place the gearbox with the generator at the base of the tower (Fig. 6.5).
rice. 6.5. Structural diagram of a wind generator with a vertical axis of rotation of the Darrieus type: 1- starter (rotor
Savonius); 2 - shaft; 3; 4 — braking device; 5 - working to get there; b - stretch marks; 7 - frame; K voltage converter; 9 - battery
The most common types of vertical-axis wind wheels include the Darrieus rotor.
In it, the torque is created by the lifting force arising on two or three thin curved bearing surfaces having an aerodynamic profile. Lifting force maximum at the moment when the blade crosses the oncoming one at high speed air flow. The Darrieus rotor cannot spin on its own, so to start it, a generator operating in engine mode or a starter, called a Savonius rotor, is usually used. This wheel is also driven by resistance.
Its blades are made of thin curved sheets rectangular shape, are simple and inexpensive. The torque is created due to the different resistance provided to the air flow by the concave and curved rotor blades. Due to the large geometric filling, this wind wheel has high torque and is used for pumping water.
A significant number of wind generator circuits with a vertical axis of rotation have been developed.
According to a number of design features, some of them are more preferable even compared to propeller installations, especially for operation in regions with high wind potential. For example, very promising wind generator diagrams, shown in Fig. 6.6 - 6.11.
Rice. 6.6. Wind-electric weather vane for planetary wheels Fig. 6.7. Unit mounting option (general view)
Rice. 6.8. Kinematic diagram of the device for rotating the blades of a wind generator with a vertical axis


The wind generating unit contains a vertical shaft -1, a wind wheel mounted on it with rotating blades - 2 and horizontal bearing cross-beams - 3, a generator of a turning device, including
rods 2. The turning device is equipped with crank mechanisms, the connecting rod 6 of each of which is connected to the other ends of rods 4 and 5 of each pair using levers 7 and hinges. When making a wind wheel with a weather vane 8, the rotation device has a planetary gear, the planetary wheels 9 of which are connected to the cranks 10 of the mechanisms, and the 11th central wheel is connected to a weather vane 8. When making a wind wheel with a different fastening of the weather vane 8, the device is equipped with a differential gear consisting of two coaxial central wheels 12 and 13, respectively, with external and internal gearing and planetary wheels 14 engaged with them, and the central wheel 11 of external gearing is connected to the cranks 10 of the mechanisms, and the planetary wheels 14 are connected to
weather vane 8.
IN Lately fans of renewable energy sources prefer vertical wind turbine designs. Horizontal ones are becoming history. The point is not only that it is easier to make a vertical wind generator with your own hands than a horizontal one. The main motive for this choice is efficiency and reliability.
Advantages of a vertical wind turbine
1. Vertical design The windmill catches the wind better: there is no need to determine where it is blowing from and orient the blades to the air flow. 2. Installation of such equipment does not require a high location, which means that a vertical windmill with your own hands will be easier to maintain. 3. The design contains fewer moving parts, which increases its reliability. 4. The optimal profile of the blades increases the efficiency of the wind turbine. 5. The multi-pole generator used to generate electricity is less noisy.
We'll tell you how to make parts and assemble a vertical wind generator with your own hands.
Algorithm for making a turbine with your own hands
1. The supports (upper and lower) of the blades are two concentric circles of the same size. They are made from ABS plastic - cut with a jigsaw. A hole with a diameter of 300 mm is made in one of them (it will be the top one).
2. The lower support should rest on the hub, which can be used as a hub passenger car. To connect the parts you need to mark and drill 4 holes. 3. When assembling a vertical wind generator with your own hands, Special attention pay attention to fastening the blades. For correct location blades need a template. On the lower support we draw a six-pointed star (Star of David), the corners of which will be on the edge of the circle. We project the drawing onto the upper support. The blades are made from thin sheet metal in the form of a strip 1160 mm long, the width of which is slightly larger than the side of the star’s ray.
 4. The blades are secured with two corners at the top and bottom, and they should be bent so that a quarter circle is formed. They are placed one after another around the circumference, placing them on the edges of the rays.
We make a rotor
1. The bases for a rotor with a diameter of 400 mm are cut out of plywood 10 mm thick. Along the outer radius using liquid nails or epoxy glue, permanent neodymium magnets with high inductance are attached. They are arranged similarly to the numbers on the watch dial (exactly 12 pieces), observing the polarity (it is recommended to mark them). To prevent the magnets from moving out of their place, they are temporarily fixed with spacers made of wooden wedges.
 2. The second rotor is made similarly and symmetrically to the first. The difference is in the polarity of the magnets - it should be opposite.
How to assemble a stator
The stator is assembled from 9 inductors. There should be three groups of series-connected coils (3 pieces per group): the end of the previous one is connected to the beginning of the next one (star configuration). The coils are located symmetrically at the vertices of three triangles inscribed in a circle. Winding in progress copper wire 0.51 mm in diameter (24 AWG type). 320 turns are required. This will allow you to get a voltage of 100 V at 120 rpm at the generator output. turbines. You can make a vertical wind generator with your own hands using various parameters output voltage and current by decreasing/increasing the number of turns and diameter of the stator winding wire. The turns of the coils are wound in the same way. It is necessary to observe the direction of winding and mark its beginning and end. Epoxy glue is applied over the outer turn and electrical tape is wound in four places to prevent unwinding.

Rules and nuances of connecting coils
The ends of the coils must be cleaned of varnish insulation. Connections are made by soldering. The coils prepared in this way are placed on a paper sheet, on which a diagram of their location is applied (in accordance with the position of the permanent magnets of the rotor). Secure them with tape. All free fields of paper (except for the centers of the coils) are sealed with fiberglass, filling epoxy resin with hardener. The winding terminals must be located outside or inside the stator. To attach the bracket, holes are made in the stator.


Final assembly and installation
The following are assembled onto one axis (from top to bottom): the lower support of the blades, a disk with permanent magnets (the upper base of the rotor), the stator, the lower base of the rotor and the hub. All components are attached to the bracket with studs. For good contact we use bolts from of stainless steel. Having finalized the remaining details, we get the finished device. Vertical wind turbine do it yourself should be installed in an open area, where the wind force is greatest. It is advisable that there are no tall structures nearby. Then the wind generator will efficiently generate electricity, which will help save money.


