Many people have been familiar with the art of sawing with a jigsaw since school. This activity can be mastered by anyone, regardless of artistic abilities, and this is probably its main advantage.
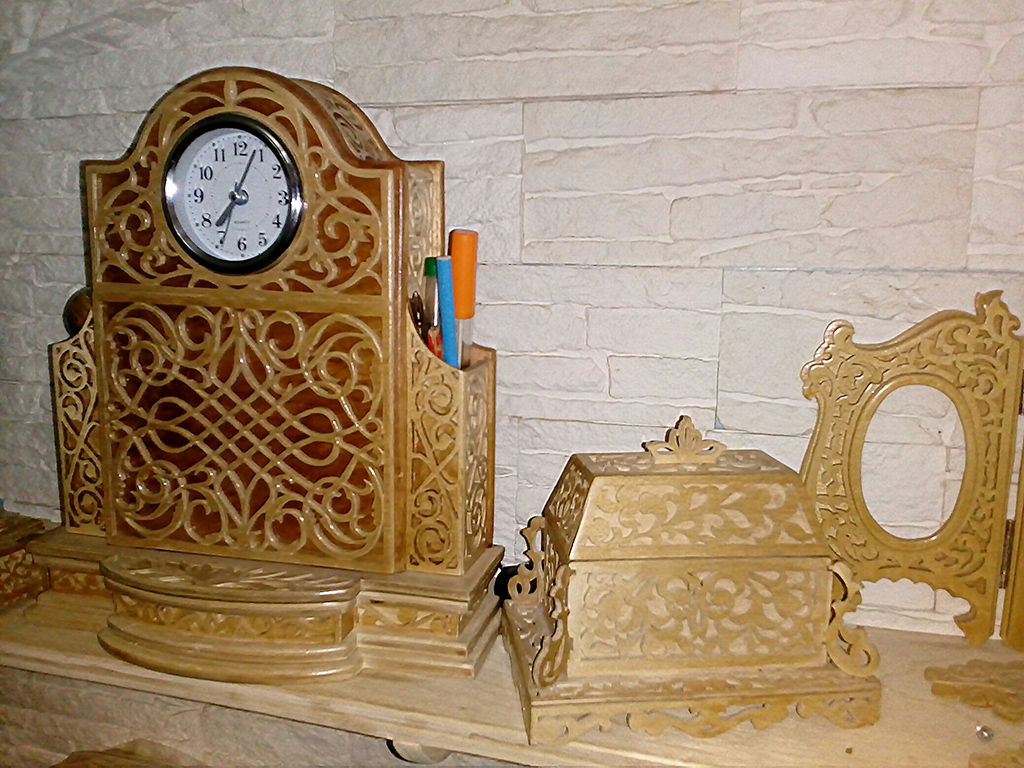
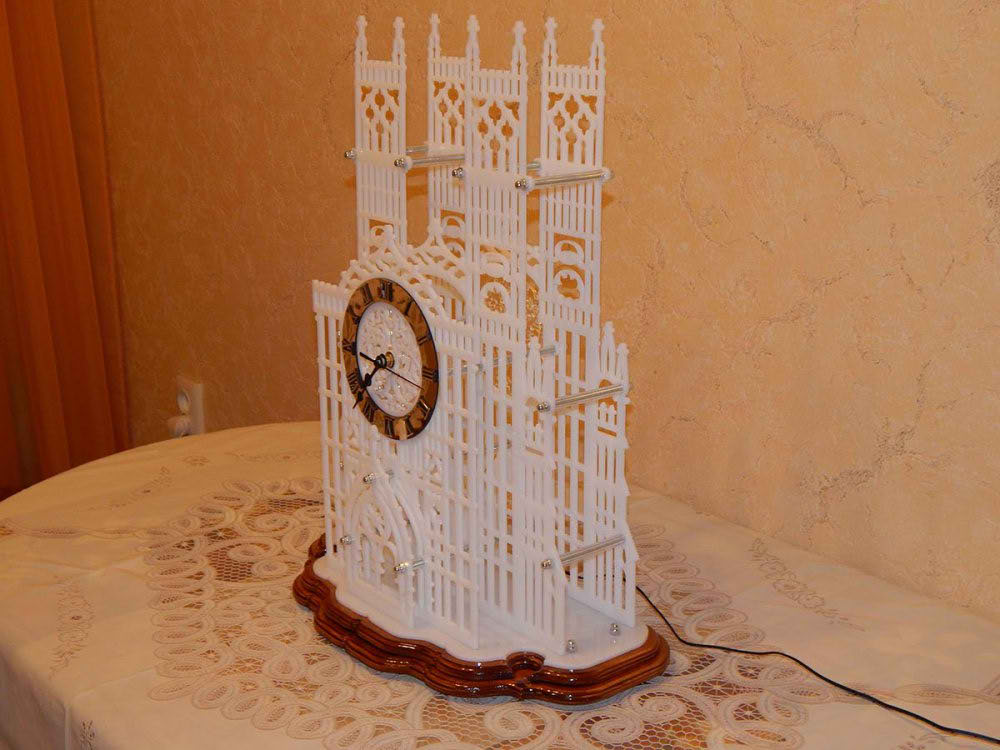
In addition, having mastered some skills with a jigsaw, you can create simply magnificent carved decorations that will serve to decorate the interior of a room or the facade of a house.

Sawing with a jigsaw: tools
The first thing you need to cut out plywood figures with your own hands is a jigsaw.
Such a tool is represented quite extensively on the domestic market and in several main types:
- Manual. A tool familiar to many from labor lessons at school. As the name suggests, all cutting work will need to be done manually. The best choice for creating small things or teaching children the skills of this fascinating process;
- Electric. It works much faster than manual, but at the same time, it has significant mass(1-3 kg), and therefore holding it “in weight” is quite inconvenient. Yes, and it will not be possible to create a thin pattern, since the blade of the file is too large for such jewelry work;
Advice. If the choice fell on electric tool, then you need to do all the work very carefully, otherwise you may get an uneven cutting line.
Children should not be trusted to work with such a tool at all, as there is a high risk of injury.

- Stationary. The only drawback of such a tool is its price - it is much higher than that of an electric or hand-held device. Nevertheless, the device is very convenient for the carver; it does not need to be held suspended, and although the cutting line will be rougher than that of a manual “colleague,” the speed of work is still many times higher.
Choosing a particular tool to create various designs made from wood raw materials depends only on the amount of work and personal preferences of the master himself. If, for example, working with a jigsaw on plywood is just a hobby, then a hand tool will be quite enough.
Advice: If such an activity brings in money and is put on stream, then you simply cannot do without an electric or stationary “assistant”.
Preparation of raw materials and stencil
For those people who have skillful hands and extensive experience working with tools, cutting out plywood with a jigsaw will not be difficult. First, you will need to take a piece of material on which the design will be applied and sand it to a smooth surface with fine sandpaper.
After such preparation, it will be enough to apply the desired drawing and begin the process itself. 
All you need to do after downloading the drawing is to print it, transfer it to a sheet (you first need to prepare it with sandpaper) and start working with the tool along the contour.
The process of sawing wood: features
The process of creating decorative parts from wood is even simpler than applying a design to a sheet of material. It is enough to simply insert the file into the pre-made hole (for this you can use a hand brace or an electric drill) and start working along the drawn contour. 
Moreover, if the work is performed with hand tools, then all movements must be smooth, without jerking, otherwise you can simply break the fragile jigsaw file.
If everything is done correctly, then in the end you can get a uniquely beautiful design, transferred exactly to the material, a detail that can advantageously decorate any room or facade of a building.
Additional finishing
To make a product created from a sheet of material using a jigsaw look even more beautiful and original, it can be further trimmed. First, you should sand all surfaces with sandpaper, eliminating all minor irregularities and roughness.
Afterwards, you can varnish or stain the entire surface of the plywood product, cover it with paint or other finishing materials. 
It should be noted that cutting out plywood with a jigsaw allows you to obtain not only solid, but also prefabricated structures. In the latter case final finishing will also be accompanied by the connection of several elements together using special glue or shingled nails.
The main thing in the process of creating a prefabricated product from several parts is still in the process of work Special attention pay attention to the cutting line, it should be positioned so that the notch is slightly smaller than always.
Advice: After finishing work with the tool, it is important to “fit” several plywood parts cut with a jigsaw and sand them correctly with sandpaper.
Only in this case can we guarantee high quality surfaces and the most attractive appearance finished product.

Conclusion
There is nothing complicated in the process of creating figures from plywood - you just need to pick up a jigsaw, prepare the material and start working. In the video presented in this article you will find Additional information on this topic.
Similar materials


Sawing with a jigsaw
In order to unravel the plywood sheet or cut the trim to size, you can use a fine-toothed hacksaw or a power tool - a circular saw or jigsaw. True, despite the significant performance advantage, power tools are not that great for creative tasks. The circular saw will cut the material very smoothly, but it is designed only for straight-line work. A jigsaw, on the contrary, is designed specifically for cutting along a curve. But, firstly, because of this, it is more difficult for them to make long straight cuts (although it is quite possible with the proper skill). And secondly, it is convenient to work with a jigsaw along patterned, smooth curves. So the tools described above are quite suitable only for making blanks of simple shapes - rectangular and oval. If you need to make a part complex configuration, and even with small cutouts inside, the only assistant in this situation is the good old hand jigsaw. With a thin jigsaw file you can create plywood lace or a plate of any shape, even the most complex. Therefore, a jigsaw is rightly considered the main tool for openwork carving.
Although a jigsaw is a very simple tool, it is still successful work You should know some rules and features of its use.
The jigsaw frame, shaped like the letter “P,” can be either metal or wood, but the latter option most often refers to homemade and not very convenient tools. Metal jigsaws come with flat and tubular (round in cross-section) frames. A tubular frame is preferable as it provides a more even tension on the file; The clamps of such a frame do not bend the file at the clamping points, which prevents its premature rupture. In addition, the length of a tubular frame is usually longer than a flat one, and this is important, since, other things being equal, a jigsaw with a tubular frame can cut out a larger part. The jaws of the clamps must fit well and tightly together, and the clamping screws must have a deep, clean thread. The frame handle is usually wooden or plastic. The axis of the handle must be in the plane of the frame, otherwise the edges of the cut part will not be perpendicular to the cutting plane.
Sawing files (there are 10 numbers of them) differ from each other in the thickness of the blade and the size of the teeth. Small files have barely visible teeth. There are also files with large teeth - up to 2 mm. Wide files They have larger teeth and are used when cutting large holes. The length of the files ranges from 110 to 130 mm. Small ones cut material more delicately and do not jam during sharp turns, so it is better to use them to cut out the most small parts drawing or complex contour pattern. Large elements, on the contrary, should be worked with large files: they cut faster. If the sawn part does not have a small ornament with sharp turns lines of the drawing, then it is quite possible to use coarse-toothed saws to complete the entire work. They are also convenient to use when quickly and therefore roughly cutting out a part along a given contour from a large sheet, as well as when cutting out tenons and slots. Cutting small ornaments, especially from wood or hardwood plywood, should only be done with fine-toothed saws.
When installing the file into the jigsaw, pay attention to the direction of the teeth - they should be inclined from the upper clamp of the frame to the lower one. First, the file is clamped in the lower clamp (at the handle). Before fastening it in the second (upper) clamp, you should squeeze the free ends of the jigsaw and, inserting the other end of the file into the upper clamp, secure it firmly with this clamp. Having straightened, the frame will tighten the file. The tension should be strong enough: if you touch the file with your finger, it should make a high, clear sound. Good tension will ensure that the nail file follows the contour of the pattern applied to the plywood accurately. In this case, the file should not have kinks at the clamps, since it most often breaks in places where there are kinks. The clamping screws are tightened tightly, but not too much, so as not to strip the threads.
If you need to cut out the inner closed part of a figure, then inside its limits (at the border) they pierce with an awl or drill a small hole and pass a file into it.
When sawing plywood with a tool with larger teeth than a jigsaw, flakes and chips usually form on the opposite side of the sheet. If a sheet of plywood is moistened with water along the cut line, there will be fewer defects and the edges will be smoother. In addition, to avoid flakes, it is recommended to cut the outer layer of plywood on the bottom side with a knife along the markings.
It is best to cut on so-called sawing tables - special bench boards. These tables are attached to a work table or workbench either with screws or with a clamp. In the first case, the design of the table is extremely simple - it is a rectangular board made of thick plywood with a cutout in the front part (Fig. 30, A). The table is screwed with three screws so that the cutout is located at a sufficient distance from the edge of the table for comfortable and safe work hand (Fig. 30, b).
If you plan to make the sawing table removable, then you will have to use a chisel or milling machine to select a recess for the clamp (Fig. 30, V). Another option is a composite table, in which another platform is screwed to the main platform from below, with the help of which the entire structure is held with a clamp (Fig. 30, G).
Rice. thirty. Sawing table: A– shape and main dimensions of the table; b– fastening the sawing table to the workbench using screws; c, d– options for fastening the table using a metal clamp.
Place the board or plywood on the cutting table so that the starting point of the cut is on the central circle of the table. The main trick proper operation with a jigsaw is that its file moves only vertically (up and down), and the cut line is formed by moving the workpiece. Therefore, when cutting with a jigsaw, you should follow a number of simple rules so that the work is done carefully and without unnecessary stress.
Sit so that your right shoulder is opposite the slot in the table. Remember that the saw blade must be in a strictly vertical position to the plywood being cut.
The hand in which you hold the jigsaw should move only up and down: as the teeth gradually cut into the wood, the other hand slides the plywood onto the jigsaw blade. Convenient to saw with your elbow working hand on your knee and without straining your hand. The movements of the jigsaw should be smooth and free. It is important to get used to holding the jigsaw strictly vertically, without tilting it forward or to the side. If you deviate in one direction or another, the cut will be oblique.
When cutting wavy lines or turns, the pattern line must be turned onto the jigsaw frame, smoothly pointing it with your left hand at the saw teeth. The actual sawing occurs only at the moment when the file goes from top to bottom. The reverse movement should be performed freely, without effort. But it happens that the forward movement of the jigsaw suddenly becomes difficult. This may happen for the following reasons:
1. The file simply heated up and expanded. With strong heating, the hardening of the metal of the nail file is weakened, and this is a sure way to its breakage. A heated tool must be cooled: you can take a short break from work, but if time does not allow, wet it cold water a piece of rag and wipe the heated area.
2. We encountered a denser section of plywood. It could be anything - wood compaction, a knot, a clump of glue, etc. You should not stop working, you just need to slow down until the file starts moving easily again.
3. The file is close to the edge of the part to be cut and is simply clamped between two already almost separated pieces of plywood. You can free the jigsaw by slightly moving the pieces of plywood apart.
4. Finally, it is possible that the file is stuck because you have warped it. If it deviates or gets stuck, continue to saw slowly, gradually bringing the tool into a strictly vertical position until the file moves freely.
An important nuance: if you follow the file exactly along the contour line, the area of the falling part will be slightly larger than that outlined in pencil, which is why the sawn ornament will not exactly match the original on paper. Therefore, when sawing straight and wavy lines, it is better to follow not exactly along the contour, but slightly inward after it. It is easy to control such sawing - you just need to make sure that the file does not completely destroy the pencil line, but leaves at least part of its width on the surface.
After finishing work with a jigsaw, the nail file should be loosened in the upper clamp; you should not leave it in a tense state during non-working hours. It's even better to remove it completely.
Obtuse corners are cut out by turning the jigsaw in place. To do this, having finished sawing to the top of the corner, stop pushing the plywood onto the jigsaw blade and, without ceasing to move the jigsaw up and down, turn the plywood in place until the direction of the saw teeth coincides with the line on the plywood. This technique is called “turning on the spot.” You need to cut not along the pencil line itself, but slightly to the right, so that the line is visible all the time.
It is much more difficult to cut out sharp corners. Here you can do things differently depending on the situation, work experience and the size of the ornament. To keep it sharp external corners the part being cut, do this. After sawing one side of the corner, cut the plywood a little further. Having described a small loop on the outside, cut out the second side of the corner. After the part has been cut roughly, it will be much more convenient to cut off the excess, and the “extra” cuts end up on the part of the plywood that goes to waste.
If the ornament is large, the file is very thin, and you have sufficient work experience, then sharp corners can be sawed out in the same way as obtuse ones, but at the top of the corner, when making a turn, the jigsaw file is slightly pushed towards itself to avoid excessive rounding.
With a finer ornament inside the part, the cutting method changes. Having sawed through one of the sides of the angle to its apex, do not stop working with the jigsaw up and down, but slightly return the file back and saw through an arbitrary line so as to get tangentially to the adjacent side of the angle and continue sawing to its apex. In this case, a small piece will fall out at the top and a clearly sawn sharp corner will form. Now they align the adjacent side of the corner, carefully using the teeth of a file to destroy the place where the broken line enters this side.
The same corner can be cut in another way. Before reaching its top, they smoothly move to the adjacent side, cut out the remaining contour until the fragment falls out, then return to the corner and align both of its sides.
When cutting out complex and small ornaments, you must remember following rules. First of all, the internal ornament of the part is cut out, and at the very end of the work - its outer contour (Fig. 31).
Particular attention should be paid to the order of cutting out the elements of the internal ornament. You need to start cutting out only after puncturing with an awl or drilling all the holes in the part, since the openwork part may crack during the next puncture. In addition, holes are needed not only for a nail file; the ornament can include small and large round holes, which are easier to drill than to saw out. Therefore, first, all the holes are marked and pierced or drilled in the still intact plywood, and then they begin to saw out and remove the internal fragments.

Rice. 31. Saw thread: A– drawing a drawing on the board; b– creating entrance holes for the saw in the internal pattern; V– sawing out the internal pattern; G– cutting out the outer contour.
The file is secured in the lower clamp of the jigsaw, then threaded through a hole punched in the plywood, inserted into the upper clamp, pressed slightly downwards on the upper arch of the jigsaw and only then secured with a screw. First, one of the internal corners adjacent to the edge. Having cut out one closed contour, the file is released from the upper clamp and inserted into the next hole in the closed contour. For beginners in sawing, most often the saw blades break when rearranged, so this must be done carefully and slowly.
When cutting out the next hole, first saw through the line that borders the already fallen out element of the ornament. In this case, the pressure from the file on the material falls on its stronger part, not weakened by the fallen elements.
A similar sequence of work is used for openwork carving (Fig. 32). Transfer the selected design using carbon paper to the prepared board and mark the points for drilling, placing them in the corner and around the perimeter of the design. Shade the areas to be cut out with a pencil. Then, from the inside of these areas, preferably near the corners, mark the centers of the holes with an awl. Drill the intended holes and carefully, strictly along the marking lines, cut out the painted areas.

Rice. 32. The sequence of performing openwork carving: A– a template and drawing a drawing using it on the board; b– applying guide grooves with an awl; V– drilling holes; G– sawing along the outer contour; d– cutting out internal openings; e– modeling of the relief of an openwork board.
Then the background is removed, after which the details are drawn and the drawing is finalized: the cutting outline must be clear. When making cuts with a chisel, remove the wood gradually, holding the chisel right hand and point with your left. Learn to work with your right and left hands, turning the workpiece only in exceptional cases.
In the corners, make a selection with a narrow, steep chisel. Sometimes the background is hollowed out with a chisel. This operation must be performed very carefully, gradually, in small areas so that there are no chips on the elements of the ornament. To avoid accidentally pushing through the cut area, place cardboard or a soft board under the slot.
To accurately cut plywood along the edge, it is best to use a knife, using a metal ruler to maintain the desired direction. A board is placed under the plywood, the plywood is cut to half the depth on one side, and then, turning it to the other side, the cut is completed. Thin plywood(three-layer) can be easily cut right through. When cutting plywood along the grain, you must keep in mind that the knife blade tends to go between the grain; this direction may not coincide exactly with the desired direction of the cut. In this case, it may turn out that the knife will begin to move the ruler, to avoid which you should hold it very firmly in place and make the first cut with light pressure on the knife.
The sides of the ornament adjacent to the cuts, immediately or after carving the relief, are cleaned with a knife-cutter, chisels, rasps different profiles, skins. Relief modeling is carried out using the method of flat-relief or relief carving. Carved parts of furniture and house decorations, which are clearly visible from both sides, are carefully processed on both the front and back sides: chamfers are removed, the product is cleaned with sandpaper, holes, recesses and corners of the cut relief are sanded. In the case of an applied thread, chamfers with reverse side the products are not removed, otherwise the thread will be “torn off” from the background.
An electric jigsaw is used by home craftsmen to create beautiful products from plywood and wood. Such crafts are used in the most for different purposes. They can be decorative or serve as household items. Every home craftsman who is interested in this activity should know the features of working with the tool.
You should learn more about how to use the “miracle jigsaw” and what can be cut with it.

Subtleties of working with a jigsaw
A jigsaw is a universal device that is used for cutting shaped products from various materials. All you need is to choose the right canvas. It is important to understand how to cut out shapes of complex shapes. Many novice craftsmen need to figure out how bevels on boards and various components of crafts are made. Electric jigsaws work best when cutting wood coniferous species. However, the thickness of the elements from which cutting is performed should not exceed 3.8 cm.

Blades that will be inserted into a jigsaw quite often bend and leave beveled edges. A straight cut is usually achieved with a well-sharpened blade. However, you should not put too much pressure on the tool while working.

You should first start the saw at the highest speed, and then select the blade angle. This will result in fewer chips. In materials that are highly brittle, it is necessary to drill holes. This will allow you to saw off the workpiece without unnecessary risk. As a result, there is no chipping of the part.

To ensure fast cutting, coarse blades should be used. However, it should be taken into account that when choosing such consumables, it will be more difficult to sand them later. Blades for electric jigsaws are made in such a way that the cut is made when the blade moves upward.
Choosing the Right Blade
Choosing a blade for an electric jigsaw is a major consideration when cutting wood and plywood. Often a jigsaw lies idle in a home craftsman's household. However, when you need to make a complex pattern, this tool is more necessary than ever.
Quite often, an electric jigsaw is used as a tool for cutting a hole in a tabletop or during installation. kitchen sink. This tool is also used for cutting metal. When using other saws, it is often impossible to complete the assigned tasks. A jigsaw is a universal device. Both beginners and experienced people can work with it House master. As a result, you can get excellent results using different materials- plastic, wood, plywood.

How to use the tool
A jigsaw is used for a variety of tasks. Its main function is to cut curved shapes into wooden products. Getting smooth curves using this tool is quite easy. The base of the tool should be kept level on the workpiece. When the preparation is completed, you can begin the main work. Then the engine is turned on and the device is slowly moved along a pre-marked line, at a distance of 2 mm from it. Fine sanding is done later.

The saw should be moved at such a pace that the blade cuts the material easily without any deflection. A jigsaw works great when cutting boards crosswise. A stop must be used if a perfect cut is required. Bevel cuts are fairly easy to make using a jigsaw. Before work, it is necessary to firmly secure the workpiece.
If an oblique or vertical cut is performed, the distance between the blade and the fence is set to the same as on circular table. If you need to make a precise and long cut, it is difficult to work with a jigsaw. In this case, first use circular saw. The final cutting of the element is performed with a jigsaw. It must be pressed firmly against inside marked line.

Where to start
First is well organized workplace. Fulfilling this condition is especially important for high-quality cutting. If the space is arranged correctly, work will be convenient and comfortable. This condition is necessary to create a quality product.
The thrust structure is a special machine. People call it “swallowtail”. This table is made from boards rectangular shape. It has a wedge-shaped incision that goes into work area. Dovetail attached to the edge of the table.

Job electric jigsaw carried out standing or sitting. The workpiece should be located at a distance of 40 cm from the eyes. It is necessary that the lighting lamp be installed in front of the master. It is placed at an angle to the surface.
Tool preparation
The saw blade in a jigsaw must be fixed in a strictly vertical position. The teeth should point down. Before work, you need to stretch the fabric well. The degree of tension must be adjusted by compressing the frame. The device must be rested against the edge of the table. Then you should tighten the lambs with pliers. When straightening the frame, the canvas will stretch.
To cut small parts or shapes with sharp contours with a jigsaw, you need to choose small files. This requires using fabrics with a large number of patterns per inch. When using them, the jigsaw does not jam when making turns. The cut is created neat and thin. If large-sized plywood products are made, it is necessary to use blades with large teeth.

How to cut with a jigsaw
To obtain an accurate cut, a number of conditions must be met:
- The hand holding the jigsaw should only move vertically.
- All movements must be made as smoothly as possible, without jerking. In addition, they must be performed with maximum amplitude. This is necessary to use the entire canvas.
- With the second hand, the workpiece turns smoothly during operation.
- Do not put too much pressure on the workpiece with the saw. No lateral pressure on the blade is allowed.
- Artistic sawing is carried out only when the file moves from top to bottom. For this reason, the reverse movement must be performed without pressure.

When working with a hand jigsaw it must be driven not along the marked line. The canvas should be drawn along the inside of the contour. This is due to the presence of a kerf after sawing. After completing the work, one of the clamps should be loosened. The frame of the device should not lose its elasticity.
Jewelry box
You can make a beautiful and spacious jewelry box for Valentine's Day or International Women's Day. To complete such a craft, you will need to use an accurate drawing. The work is divided into several stages.

Preparing the work area
Before you start cutting out the parts of the box, you should prepare your working space. A special table is installed for this purpose. The craft will be created on it. In this case, the following rules are observed:
- There should be no unnecessary items at the table while working.
- The cutting device should always be at hand. A specific place is reserved for it.
- Crafting table. It is placed in a ventilated area. The room should be light and spacious.

However, it is not always possible to install a table for cutting with a jigsaw in the right place. TO ordinary apartment The workbench is usually placed on the balcony if it is insulated. At the same time, you can work on crafts in any weather.
Plywood selection
For the box you need to use a plywood sheet. When choosing a workpiece, you should pay attention to defects that often appear - cracks or knots. The workpiece is selected with a thickness indicated in the diagram. To transfer the drawing to the material, you should:
- Sand the workpiece with sandpaper. You should start with coarse-grained material. This treatment ends with fine-grain sandpaper.
- The surface must be level. To do this, you need to fix the sandpaper in the sanding device. If you don't have one, you can take a small block and wrap it in sandpaper.
- Grinding is carried out along the layers of wood.
- The workpiece is ground until its surface becomes as smooth as possible.

After such preparation, you should transfer the craft template onto it.
Transferring the template to a plywood sheet
Before starting sawing, you should transfer the prepared drawing to a plywood blank. First you will have to print the drawing on paper. To transfer, you must have tracing paper and a pen. First, the template is attached to the workpiece with tape. Having a blank in front of you, you should think about how to cut out the different elements of the box, saving the available material as much as possible.

Sawing out the box
When cutting, you need to adhere to some rules:
- The jigsaw should be positioned perpendicular to the product.
- It is necessary to ensure that all movements are performed as smoothly as possible. You should not rush while cutting - this way you can make a mistake and ruin a piece of material.
- It is necessary to use a sawing table.
- First you need to cut out the internal elements. Only after this they begin cutting the contour.

When leaving the cutting line, it is necessary to correct the line with a needle file while assembling the product.
Advice! During work, your hands will get tired. In this case, productivity drops significantly. Fingers and eyes get seriously tired. All this can lead to hand injuries. This is why it is necessary to take breaks from work.
Assembling the box
Before assembly, you must familiarize yourself with the product drawing. Matching the pieces of a jewelry box does not require any delicate work. Before gluing different elements you need to make sure that they can be put together without problems. After several assemblies of the product without any difficulties, you should begin gluing the parts. Typically, a PVA composition is used for this purpose. During operation, it is necessary to eliminate any glue leaks.

Assembling a steam locomotive model
When the material is prepared and the drawing is printed, you should begin the process of transferring the diagram to the workpiece. In this case, it is necessary to take into account some operating rules. Many home craftsmen tend to transfer a drawing onto plywood using only a copy and a pencil. However, you can also use the “Black Ribbon”. When choosing this tool, the drawing is glued to the workpiece. Then the diagram is washed off the plywood with water, leaving only the marking lines.
Then you can make holes in the parts of the future locomotive. The parts of the locomotive contain parts of grooves cut out from the inside. To make such elements, holes should be made in them with a hand drill or an awl. The holes must be at least 1 mm in diameter. To avoid damaging the table surface when creating holes, you should place a board under the workpiece.

Now you can cut out the parts. You should not rush when cutting. The basic rule is to hold the jigsaw at right angles to the workpiece. All elements must be performed smoothly, avoiding unevenness.
All photos from the article
What can you cut out of plywood? What tools should you use for this? What materials to use for self-made various crafts? We will answer these and other questions within the framework of this article.

Practical hobby
The choice of topic is not accidental, since cutting out various decorative figurines and other crafts made from lumber, this is a fairly common hobby. The accessibility of such a hobby is also not accidental, since drawings for cutting from plywood can be found in various specialized magazines or, for example, on our portal.
In addition, the price of the material for making various crafts, as well as the cost of the tool, is low, and you can certainly afford such costs.
So, cutting patterns on plywood is a popular hobby that you can use to diversify your leisure time. But, before we start making certain fakes, let’s consider what materials and what tools can be used for these purposes.
Selection of material and tools
Since we cut plywood with our own hands, it would be logical to use it as the main material. There are many varieties of these lumber available for sale. For making small crafts, small pieces of plywood with a thickness of 3 to 5 mm are quite suitable.
Lumber should be chosen that is not laminated, that is, there should be a clean wooden surface on one side and the other.
From the tool you can use:
- manual jigsaw, the advantage of which is high precision cutting;
- jigsaw, the advantage of which is high cutting speed without the need for special effort.
Let's take a closer look at the listed tool categories.

A hand jigsaw is a .
The design of the tool consists of 3 main elements:
- frame made in the shape of the letter “U”, with two clamps;
- a handle installed near one of the clamps located on the frame;
- cutting blade - is a narrow metal strip with teeth.
The principle of use is quite simple - first the canvas is clamped in a frame. Then, holding the jigsaw by the handle, we make a series of progressive movements up and down. As a result, the plywood is sawn.
Important: Due to the small size of the teeth, the cut in wood is neat and even. But, due to the small thickness of the canvas, you have to work carefully, as it often breaks.
A jigsaw is a device that is driven by an electric drive.
The device comes in two types:
- manual modifications of power tools;
- stationary modifications.

The manual modification of the tool is a massive handle in which the engine and mechanism are located that transmits the force to the cutting part. In the manual version of the jigsaw, the blade is attached not to a frame on both sides, but to a clamp on one side.

The stationary modification is a tabletop on which a jigsaw is rigidly fixed. Unlike the manual modification, where the blade is attached on one side, here the fastening is carried out on both sides.
In addition to the listed categories of tools, working with plywood may require sandpaper with varying degrees of abrasiveness. Sandpaper will certainly come in handy for smoothing out the cut line and eliminating minor imperfections made during cutting.
Important: In order to assemble parts cut from plywood together, when making certain crafts, you may need wood glue.
Sawing out of plywood with a hand jigsaw is a technology that makes it possible to make the most bizarre shapes. Moreover, it can be used both in the production of designer furniture, making fairly large elements, and in decoration.
The basics of sawing are quite easy to master, and practically no equipment is required. Well, to do a really difficult thing, you have to work hard - however, this statement is true for almost any hobby.

Material base
What do we cut from?
If the goal of our work is to create an object with high aesthetic characteristics (and this is the case in most cases), then we need to start with the choice of material.
Plywood for sawing with a jigsaw must meet a number of requirements:
- Firstly, you should select optimal thickness sheet. If we cut out, then we can use panels 12-15 mm thick, and even thicker. If our goal is finer work, then we need to purchase material 5 mm or even less.

- The color of the veneer from which the plywood is made plays a role only if we do not plan to finish the finished product with stain, varnish or paint. But most often they don’t pay attention to the color - it won’t be visible anyway!
- The moisture content of the material is a critical parameter specifically for cutting with a jigsaw.. The plywood sheets must be thoroughly dried, otherwise our main task will be replacing saw blades.
As for quality, then for artistic sawing Only plywood of the first or second grade is suitable:
- There should be no knots or stains on the sheet.
- There should be no “pockets” of resin inside the slab.
- You should choose only those panels whose veneer is glued with sufficient quality.

Advice!
To determine the quality of veneer sizing, it is enough to saw off a strip 10-20 mm wide from the edge of the sheet with a regular saw.
If such a thin fragment does not delaminate, the sheet can be put to work.
What do we do?
So, we've sorted out the material. Now let's look at the equipment that will help us make furniture and figurines from plywood.
Naturally, the jigsaw itself will take its place at the top of our list.
The choice of instrument model depends primarily on the goals and objectives that you set for yourself:
- Fine work, such as decorative sawing on plywood for decorating frames, boxes, etc., is done exclusively with a hand jigsaw. The frame of the tool can be either metal or wood - this does not have much effect on the final result. (see also article)
Note!
Most models are available with regular wooden handle, but over time you can choose the optimal handle configuration and replace it “to suit you.”
- When choosing a manual jigsaw for cutting out plywood, also pay attention to the quality of the saw mount. Reliable screws will allow us not to waste time correcting the position of the blade every five minutes of work.

- A regular jigsaw is used only for fairly “rough” work, such as making furniture and large accessories. This is due to the fact that at high saw speeds, chips inevitably form on the end part of the plywood, and therefore work with thin material almost impossible.

- When choosing a jigsaw for artistic cutting, you should remember that the price of the product is directly proportional to the quality of the cut line. The whole point is that inexpensive models literally after a couple of months of active use the canvas begins to “walk” in horizontal plane, and cutting accuracy decreases. (see also article)
- A separate category consists of electric jigsaws with band saw, which can also be used for artistic work. These devices are small machines in which the workpiece is located on a special platform.

In addition to the jigsaw itself (and preferably two: electric and manual), we will need:
- Files for plywood. The larger the supply, the better, since a file is literally a “consumable item”.

- Drill with a set of wood drill bits(below we will tell you how it can be useful for mothers).
- Set of files for smoothing edges. It is advisable to select files different shapes: at least straight, semicircular and triangular must be required.
- Hand tool– hammer, chisels, pliers etc. Used for assembling sawn parts.
- Awl and pencil for transferring drawings onto plywood.
It is best to work on a special workbench equipped with a ledge for placing the workpiece for sawing. If you don’t have a workbench, you can adapt it for work regular table, securing a special sawing platform on it.
The platform is a wooden or plastic block with a specially shaped hole, which is attached to the tabletop using a clamp.
Sawing technology
Preparation
When we cut out plywood with a jigsaw, the quality of the finished product largely depends on how responsibly we approached the preparation process.
To avoid incidents during work, you need to spend just a few minutes:
- We inspect the plywood intended for work for damage and peeling of the veneer.
- We check the quality of drying by making a test cut.
- We attach the template printed on the printer to the plywood and secure it with tape or push pins.
- Simple forms can be transferred to plywood by piercing, leaving awl marks on the material.
Advice!
It is more convenient to saw plywood across the grain, so you need to place the pattern on the workpiece in such a way that the maximum number of cuts has to be made in this position.
- We transfer more complex ornaments through carbon paper, tracing the contours of the printed template with a medium-hard pencil.

- For clarity, we paint over with a pencil those places on the workpiece that must be removed after cutting. It is better to do this immediately after translating the template, since it will be more difficult to understand the interweaving of lines later.
Basic Operations
So, the preparation is complete, and you can begin your first attempts to cut something out of plywood with your own hands. Of course, if you have never picked up a jigsaw before, then you should practice on simple products before starting large-scale project. 
The work begins with cutting out the outline of the workpiece, after which internal cuts are made. To make a through hole, first drill the plywood with a drill, and only then insert the jigsaw blade.
Advice!
If you need to make several through closed cuts, then the holes for them need to be drilled at once.
This is due to the fact that after cutting out part of the material, the workpiece loses strength and may crack during drilling.
Below we will describe the sequence of performing basic operations using a hand jigsaw. Using an electric or band saw has its own nuances, but once you master the basics, you will not have any difficulties when working with more advanced equipment. 
The simplest operation is cutting in a straight line.
The instructions for this operation are as follows:
- We insert the jigsaw file into drilled hole so that the teeth are directed towards the handle.
- We stretch the canvas so that it does not vibrate during operation, and fix it with a screw.
- We place the workpiece on the workbench, press it with our left hand to the sawing table and gradually begin to saw through.
- When cutting a straight line, move the jigsaw up and down, gradually feeding the workpiece under the saw.
- Control of the straightness of the cut can be ensured by placing a guide bar on the workbench.

Figure cutting is more complex, and you should start it only when you have fully mastered straight cutting:
- We fix the jigsaw file in the same way as in the previous case.
- We lay the workpiece with a clearly drawn line on the workbench.
- We saw from top to bottom, feeding the plywood with our left hand so that the blade does not go beyond the line.
- When the file moves in relation to the template line, we stop moving with our left hand until the file begins to move freely. After this, we adjust the position of the plywood and continue working.
All elements are cut out using this principle, including obtuse angles. But you shouldn’t cut out an acute angle by turning the workpiece, since there is a high risk of the final fragment breaking off. In this case, two slits should be made, connecting them at the top of the corner. 
After cutting out all the elements, the workpiece must be processed with a file, since even the most careful work does not allow making a product with perfectly smooth edges. Using wood files, we carefully sand the outer and internal lines cut, after which we process the entire workpiece with sandpaper and sandpaper.
The final stage - finishing products. Plywood can be stained, painted or varnished.
Safety precautions
Sawing from plywood is not a hazardous activity, but safety rules must still be followed:
- For operation it should only be used good tool.
- It is prohibited to cut using blade fragments or band saw fragments.
- When working with power tools, you should check the quality of the insulation to avoid electric shock.

- Sawing with a jigsaw or band saw is carried out only on a special workbench, and the cutting part of the tool must be limited special devices(frames, shields, etc.).
- During the work you need to use tools personal protection: glasses, gloves, dust mask or respirator.
Conclusion
Artistic cutting on plywood with a jigsaw is quite simple, but at the same time efficient technology. Having mastered the basic techniques of working with a jigsaw, you will be able to independently make furniture, household items, toys, souvenirs, etc.
Wherein appearance products will be limited only by your skill and your imagination. In the video presented in this article you will find additional information on this topic.
Similar materials


