For lovers of country holidays, it will be useful to learn how to arrange decorative well at the dacha with your own hands. These once typical structures are now becoming bright decoration suburban area, if they fit harmoniously into the landscape design. Before making a decorative well at your dacha, you should think about its purpose, choose a suitable location, draw a design plan and purchase the necessary materials.
Decorative well. Functions of the structure
The construction and design of decorative wells at the dacha do not provide for the creation of a source of water for the owners. In most cases, a decorative well is just part of a landscape design. However, the majority of practical-minded summer residents can provide even a decorative object with some useful functions:
- can be hidden under a “house-well” sewer hatches or other engineering communications,
- with their help you can protect containers with rainwater from debris and dust,
- behind such original Slavic decor you can hide a well with drinking water.
Advice! The most important purpose of a decorative well is still its aesthetic function. If you properly design the well itself and its surroundings (a small body of water, garden paths, cart parts, alpine coaster or flowerpots with flowers, short wooden fence etc.), you can create a unique beautiful garden, which will capture the imagination of all guests without exception.
Design options
Construction companies offer to purchase ready-made designs decorative wells, but such products are quite expensive, and they are not original. A landscape designer will be able to advise on how to choose the right decorative wells and design them in accordance with the appearance of the garden, but you can also on our own, and not only with the choice, but also with the creation of the structure.
There are several designs of wells, in the likeness of which decorative structures are also built. This could be a mansion with a gable roof, a crane well without a canopy, or a column protruding above the ground (Abyssinian well). A well, similar to house.
The design of a well in a dacha must correspond to the chosen design style of the site and the house:
- for country style (an ordinary village hut with a cozy garden around) a well in the form of a mansion with interesting carved details is suitable,
- would be appropriate in oriental styles small building with a roof with curved corners,
Since ancient times, the well was considered mandatory element every yard and, despite all the achievements modern technology, people continue to use this source of water supply in their areas. This is quite understandable, because a well is often not only a source, but also important element landscape design. True, in order for it to really become a decoration of the site, it must be properly decorated, so next we will look at how to decorate a well in the country with your own hands.
It must be said that the upper part of the well, most often, in addition to its decorative function, protects the source from various debris entering it from the surface, and also insulates water-lifting equipment if it is installed inside the shaft. Therefore, it is necessary to finish the well for many reasons.
Design options
Wooden structures
This type of design fits harmoniously into any interior of the site. Most often, these structures are made in the form of built-on houses. They can be supplemented with carved figurines of birds and animals.
This design allows you to stylize the entire area as antique - additionally placing a wooden bench, a fragment of a wicker fence, a decorative windmill and even a cart. Such an interior will emphasize the individuality of your site and will look very impressive.

The wooden superstructure can be a quadrangular, round or hexagonal frame. It is not necessary to build a structure from logs or timber - you can lay out a brick box and cover it with clapboard or siding, stylized as timber.
Mounted on top of the shaft gable roof. Besides, top part The house can be made in the form of a tent.
Most often the following materials are used as coating:
- Tree,
- Polycarbonate;
- Bituminous shingles;
- Straw.

Advice! If you want to bring the design of the well closer to the design of the main house, then it is best to make the roof from the same roofing material that was used to build the house.
Functional elements and decorations
It is advisable to close the well on top with a tight lid, which will protect the shaft from debris getting into it and will not allow the water to warm up under the scorching rays of the summer sun. There are quite a few options for how to decorate a well cover, depending on the style of the above-ground structure. For example, forged elements will look great with wood.
It is logical to complete such a composition with a swing with a chain and a bucket. This element can perform a working function, but it can also be installed simply as a decorative item.
Buildings covered with lace carvings, as well as mesh and wicker elements look incredibly cool on a summer cottage. In addition, you can additionally decorate such a well with grapes, ivy, roses or other plants. We'll talk more about decorating with flowers below.

If in the design of the source, preferences are given to other styles, then above ground structure can be made of concrete, brick or forged elements. In any case, designing a well is a creative process that allows you to show your design abilities.
Related articles:
Marine and medieval styles
If the interior of the site is decorated in medieval style, then the well can be decorated with cobblestones or granite. It is best to use a metal dome as a roof for such a structure.
Without ornate decoration, the design will take on a modern minimalist style, which will be harmoniously complemented by forged supports. In this case, roofing material Polycarbonate can serve. Such a design does not require any special design; it is only important that it fits into the surrounding interior of the dacha.

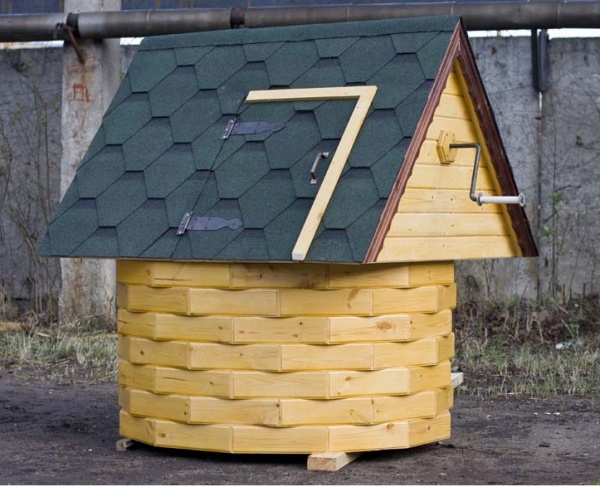
An interesting option is to design a well in a marine style. To do this, the poles can be wrapped with ropes, and the traditional bucket can be replaced with a beer barrel. Accordingly, it is best to use a steering wheel as a gate handle.
This image will be harmoniously complemented by hanging anchors, as well as sea stones and shells. In addition, the abundance of greenery, as well as a babbling stream nearby and original inclusions of stone will help to further decorate the structure. All this will create a favorable atmosphere of relaxation.

In the photo - color decoding
Decoration with flowers
The most beautiful and at the same time time-consuming design is decorating with flowers. In this case, the flower bed is the roof of the well and the base. Of course, flowers should be planted in the surrounding area.
You need to select plants in such a way that they constantly delight the eye with their flowering, or alternately replace each other.
Decorative buildings
If there is no well on the site, then this is not a reason to be upset. Recently, decorative wells, which are intended to perform only an aesthetic function, have become popular.
Most often they are made of wood. In essence, these products represent the upper part of the well installed on the foundation. Logs with a smooth or carved surface can be used as pillars.

Around the decorative structure, most often, a blind area is made of concrete or paving slabs. In this case, the design can be further stylized wooden wheels, a stork sitting in a nest and other “village” elements.
Advice! Such a decorative well can be an excellent decoration for a well. For example, you can place equipment for water supply in it.
We decorate the well ourselves
Undoubtedly, the best looking well on the site will be the one that is made independently. Therefore, let's look at how to make a house for a well in the Russian style.
To do this you will need the following materials:
- Logs for supports;
- Bars;
- Lining for cladding.
- Roofing material.

The instructions for making the “house” are as follows:
- First of all, you should secure the pillars along the outside of the box. To prevent the supports from sagging over time, you need to fill the holes with pebbles or crushed stone and, after installing the pillars, fill them cement mortar. First, wooden poles must be treated with an antiseptic composition.
- After installing the pillars, you should perform gable roof. The design is quite simple, so its manufacture will not be difficult. The only thing is that it is necessary to provide a door for access to the well.
- After completing the roof frame, it needs to be covered with roofing material, for example, tiles.
- Then the lower part of the building should be sheathed with forcing.
- After this, the resulting product must be varnished and decorated with all kinds of decorative elements, For example, carved platbands and a wind indicator. You can get additional ideas on our portal.
In the same way, you can make a decorative well and place a water container in it.
Wood, stone, concrete, plaster or brick are the main materials that allow you to decorate wells in a country house or country house.
Types of wells:
- According to the method of raising water: with a collar and a crane (a rope attached to a collar or a long pole that acts as a lever).
- The head is made open (base, racks and roof) or closed, like a “house”. IN open structures the well column is covered with a lid, in “houses” - with a door on one of the roof slopes.
- Lighting of the entire area around the well and the building itself is allowed. Beautiful lanterns are hung from the roof of the structure, and spotlights are hung on branches and bushes.
Material selection
Natural solid wood logs are treated with tinted impregnation, giving the desired tone and providing protection from rot and bugs. Carving or carved overlays look good. The decor can be easily prepared using a jigsaw using a stencil and nailed to the boards with small nails. Old log house or concrete rings are hidden under wood cladding. It is pre-cut to size, planed and treated with an antiseptic. The planks are nailed to the frame, then coated with varnish or drying oil.
When choosing weaving, you need to install wooden stakes or metal pins in the ground, braided with flexible vines.

For finishing brick or monolithic structures serves as natural or artificial stone, facade tiles, mosaic, large pebbles, broken ceramic tiles.
The decor looks good using façade mineral plaster coated with silicate paint.
Style selection
Decorating wooden wells in the Old Russian style
Wells made from natural solids look harmonious in any landscape. An excellent addition to them are houses with carved elements in the form of birds and animals. Flowers planted nearby and a bench, a barrel, a wicker fence, a stylized cart and a mill will emphasize the colorful style of the site. The upper house is made in a round, tetrahedral or multifaceted design using a log house. For wall cladding, cobblestones, bricks or planed boards are used to crown the structure. gable roof. The upper part of the house can take the form of a tent. Natural wood is used as a coating, bitumen shingles, polycarbonate or straw.

Advice: to design all buildings in one key, the roof of the well is made in a similar design, relative to the structure of the house.
To make the decorations functional, a number of steps must be completed:
- Cover the water with a tight lid that prevents debris from entering the shaft and provides protection from the sun's rays.
- Complete the composition with a wheel with a chain and a bucket, used for its intended purpose during a power outage.
- Buildings with lace carvings and wicker mesh structures look original.
- When landing climbing plants, such as clematis, roses, ivy or grapes, can successfully complement the landscape design, turning it into a shaded recreation area.

Medieval style
Choosing a direction requires preparing the stone in gray shade and aged wood of a similar color (boards or logs). At the base of the structure, a platform is constructed, concreted or lined with natural stone. Beams and roofing are made of gray materials. The resulting installation fits well into the environment bright colors like a visitor from the past.

Other styles
The Swiss chalet is associated with stone finishing at the bottom of the well and a predominance of natural wood at the top. The head is decorated using round cobblestones and pouring concrete in a circle. The roof is usually placed directly on the head, making a door for the bucket.

The oriental style is easily recognized by its peculiar roofing with curved edges, as in Japanese or Chinese houses. Wood or stone is used as a basis.

Concrete mixture, plastic or metal will give a modern design to the structure. The header is presented as concrete figure, colored plastic is used to develop the roof, and supports for the roof are made of forged metal.

The shaduf well is suitable for a house in an ethno style, if there is a large open area, the span of the crane handle is 3-4 m. Construction of the roof requires a lot of labor, so a flat cover is fixed to the top using hinges.

Wells-images
The design of the structures excludes the presence of a pronounced style, which determines their successful use for the design of any landscapes.
Decoration in a marine style
For lovers nautical style It is proposed to design a decorative well:
- the base is wrapped with rope;
- the steering wheel is used as a handle for the gate;
- hang a decorative anchor on the beam;
- choose a beer or wine barrel instead of a regular bucket.

Well-mill
Wooden structures are shaped windmill with 4 blades. The window inside the head, where the bucket is located, is placed on the back side, and the product itself is turned with its blades towards the central path of the dacha.

Well-house
A miniature house made of stone and covered with bright tiles will fit well in a barbecue area, where it is recommended to have drinking water near the cooking area.

Making a well from concrete rings
The implementation of the idea begins with the preparation of materials:
- cement-sand mixture - 4 buckets;
- 0.5 liters of pastel paint;
- Master OK;
- brush;
- tank for construction mixture;
- putty knife;
- small fraction stones.

Manufacturing process with photo
The design of a well includes a number of stages:
- Having mixed the solution with your own hands or using a concrete mixer, it is evenly applied over the concrete ring, maintaining the same layer thickness.
- Using a spatula, level the walls and allow time for the solution to dry.
- We begin to design the source. Its bottom is 1/3 finished with stone, pressing it with little force into the cement-sand mixture. The interior is decorated with flat natural stone.
- The remaining part (2/3 of the monolithic well) is decorated using a “brick” pattern: bricks or rings are drawn with a sliver on a slightly dried mixture, pressing into a glass jar. Leave the composition for a day, allowing the pattern to set.
Take a brush and paint and paint the bricks. Instead of a brush, a regular sponge will serve, convenient for painting.

Natural stone for finishing a well
For a dacha associated with a stone palace, ideal solution will be the creation of a well in the Baroque style. A harmonious atmosphere will be created by a well with stonework below, forming a successful combination with other materials. Large flat pebbles or “wild” stones with an uneven surface will serve this purpose. Curbs garden paths laid out from the stone used for the bottom of the structure. Alternative option Its arrangement features “aged” brick, the roof is made of reeds, setting a touch of romance and comfort.

To implement your own ideas, a selection of decorative materials is presented:
- granite;
- shell rock;
- sandstone

They are mounted on a brick, foam concrete or aerated concrete surface. Before lining the well natural stone, which is heavy, the structure is reinforced. Reinforcement or wire mesh is placed on the surface to ensure reliable fixation of the finish. Installation is carried out using a concrete solution applied to the surface according to the principle of placing plaster. The work is carried out using two spatulas and a building level. The solution dries for several days, then it is primed and natural stone is placed.
For the ground part, large boulders are used, connected with cement mortar. To facilitate the work, a wooden blind area is used (it is removed upon completion of the work). Usually a three-level base is laid out. To create the first level, large stones are used, giving massiveness and the ability to hold the further structure.
Attention! When processing the brick base of a well, additional reinforcement is not provided.

Finishing the source with decorative stone is characterized by low labor costs, which is explained by the low weight of the structures:
- gypsum;
- acrylic;
- synthetic.

Preparing the surface of the well for finishing with stone
The basis is concrete or drywall. The latter option is installed on a frame or without it. Frame technology will allow you to additionally insulate the well with sheet insulation (for example, foam plastic). Before installation, the surface is primed, which will ensure high level adhesion with adhesive composition.
To securely fix a decorative stone, a standard set of materials is required:
- Adhesive composition for ceramics and stone, intended for external use.
- Building level, ensuring smooth installation of decorative elements.
- Tile cutter for preparing individual sections of artificial stone.
- Spatula for applying the solution.
Tillage
The soil remains moist along the entire perimeter; to strengthen it, apply concrete pouring. The use of bedding is allowed
(crushed stone or gravel). Backfilling with stones promotes drainage excess moisture and preserving the finishing of the structure, giving the well an original design.
Do-it-yourself well cover development
For convenience, a fixed panel with two opening doors is considered. The fixed element can be made in the form of a round or square shield, with a hatch in the center. The hatch is equipped with two doors attached with long hinges. The doors easily open outward, providing access to water or equipment. The lid flaps are locked.

Procurement of materials:
- 2 cm boards;
- timber 4x4 cm – 4 pcs.;
- timber 2x2 cm – 4 pcs.;
- metal handles – 2 pcs.;
- loops – 4 pcs.;
- bolts;
- nails;
- sealant for solid wood;
- drying oil, varnish or paint.
Manufacturing principle:
- Boards are laid on 2 beams 4x4 cm. It requires the preparation of boards of different lengths, allowing you to create a rectangular hatch in the center. The shield bars will fit on the lower and upper parts of the hatch. An additional 2 bars are stuffed on the sides.
- Knock down 2 small panels made of boards and 2x2 cm timber, forming flaps for slamming the hatch. They are hung on hinges and fixed on the side walls of the hatch.
- Metal handles are fixed to the doors using bolts.
- The seams between the boards are lubricated with sealant.
- To impart moisture resistance, the lid is treated with drying oil. As it dries, it is treated with paint, stain or varnish.
Plastering and painting

Surface preparation
At the first stage, remove the old coating using a spatula or solvents. The cleaned surface is washed with a rag and detergent. If there are obvious defects and large cracks, they are leveled. The base is primed. If there are metal elements on the surface, they are treated protective composition, otherwise there is a risk of rust formation. The finishing of a new well is done using lime mortar.
Materials and tools

The list of required accessories includes:
- putty knife;
- grater;
- metal smoother;
- reservoir for plaster mixture;
- rollers or stamps for textured materials;
- dye;
- primer for paint.

Step by step instructions
Regardless of the choice of plaster, finishing of concrete rings is carried out according to the following algorithm:
- Prepare a solution for plastering according to the instructions (preferably a mineral composition).
- The mixture is applied taking into account the chosen technology (pebble, mosaic, Venetian technique or “bark beetle”). The maximum layer thickness is 40 mm. Subsequent layers are applied after completely dry previous ones. The mixture is applied manually or by machine. The first layer should correspond to the name “spraying”, which is determined by its even and thin application.
- Mashing. The work is carried out on a semi-dry layer, when the material is being processed and is already firmly fixed to the coating. A roller of a special configuration, graters, stamps, brushes, will help to give a special structure. plastic bags, leaves and feathers. Relief forms are created by applying and drawing them across the surface, applying patterns. The thickness of the layer is determined by the desired effect.

Advice. While the plaster has not dried, straight or broken grooves are squeezed out on it, imitating brick/stone masonry.
Applying paint
Before applying paint, the plaster is primed, allowing the surface to last longer. For the work, waterproof paint that is resistant to mechanical damage and ultraviolet radiation is well used. The process is carried out with a long-haired roller, but plain paint does not always give the desired effect, which requires shading the protruding relief. To fix the paint, use a water-based varnish. It is diluted with water in proportions 1:1, which ensures deep penetration into the structure of the plaster. The varnish is applied with a brush (it should be squeezed out well to avoid the formation of smudges) in 2-3 layers.

How to create a decorative well from a log house with your own hands? Step by step instructions

Preparation of the main structure:
- Dig a pit for a large container and leave it on the sides free space(up to 20 cm).
- They fall asleep at the bottom of the hole sand mixture(20-30 cm), when placing the container, its top will rise above the soil level by a similar distance. The tank is secured by sprinkling the edges of the pit with soil.
- The base of the well is surrounded by logs. To add density, a foundation is poured around the well at a depth of 30 cm.

Top design:
- Once the lower part has been prepared, they begin decorative finishing. Log houses are installed on the ground, having previously treated them with an antiseptic.
- The bottom row of logs is fixed to the base with anchors, then well masonry is made at a height of 1 m. Racks are placed inside the square - the basis for the roof. Nails are used for fixation. On each rack, 2 blocks knocked down by a house are mounted and connected using transverse bars.
- A drum and a handle are fixed to the racks, ensuring the rise of water. The decorative cover is made in round or square design. In place of the lid at the top of the decorative well, a flower bed is set up. To ensure long service life, the wood is treated with an antiseptic, varnish, paint or stain.
- The roof of the house is made of bamboo, straw or tiles.

- When preparing the finish for the top rings, you should plan in advance to arrange additional insulation. But many craftsmen neglect this condition if the water surface is below the ground freezing level.
- Decorative finishing allows you to create an external waterproofing layer. This rule is mandatory when working with brick and concrete rings.
- When connecting an autonomous water supply system powered by a pump to a well, Finishing work carried out upon placement of pipes in the ground and completion of installation work.
- The budget type for finishing wells is plastering using liquid glass and dye. This will give additional protection to the finished appearance.
- Regardless of the thickness of the cladding, the resulting coating should not extend beyond the edges of the blind area on the ground. Otherwise, it requires expansion with concrete mixture or facing material.
Important to remember! Price decorative works may cost an order of magnitude more than the price of another system.
Video
We are lucky to be born and live in a country where abundance exists water resources. There really is enough water, and not everyone appreciates this most important resource for humans. It would seem that you open the tap and use it. But in our cities the quality tap water far from ideal. Another thing in the village is to try well water. The taste is completely different, this water can easily quench your thirst. And what crisp cucumbers are stored for the winter if well water is used!
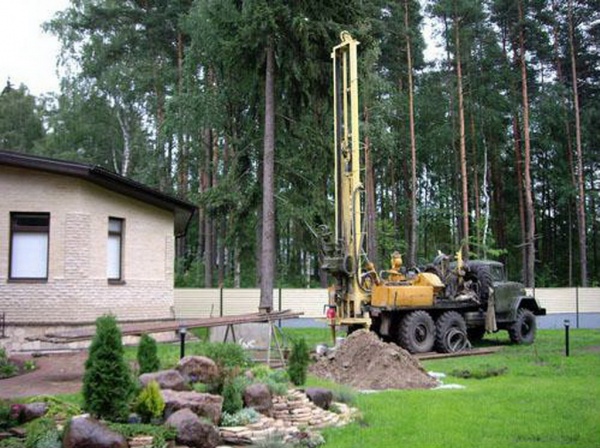
In our villages you can find two wells located not so far from each other. In one, water is taken only for irrigation, and only by residents of nearby houses. The whole village goes to the second well for water. You start asking why this happened, and it turns out that in one place they simply drilled a well where there should be an aquifer. There is water in the well, but no one is happy about it. And in another place they looked for water using the “old-fashioned” method - and in the mornings a small line forms at the well. There are at least 300 meters between the wells in a straight line, there is one aquifer, and the quality of the water is completely different. So where and how to look for a place for a well? And how to build a well at your dacha with your own hands?
Folk signs of the proximity of groundwater. How to search and not make mistakes?
Folk signs can tell you whether an aquifer lies close to the surface:
- Water in basements after snow melts.
- Thick fog in places where there are no bodies of water.
- Moss on the ground.
- Abundance of midges after sunset.
- In hot, dry summers the grass remains green.
- A pond nearby.
You don’t have to believe in omens, and then two things will help you decide on a place to dig a well: known methods. The first is drilling. There are geological maps water reserves. If your site is located on the expected location of the aquifer, drillers will definitely reach the water. Only no one will give you a guarantee that it can be used for drinking and cooking. You will need to take a sample for analysis. However, even a positive conclusion from the SES does not mean that “tasty” water will flow from your well in your area.
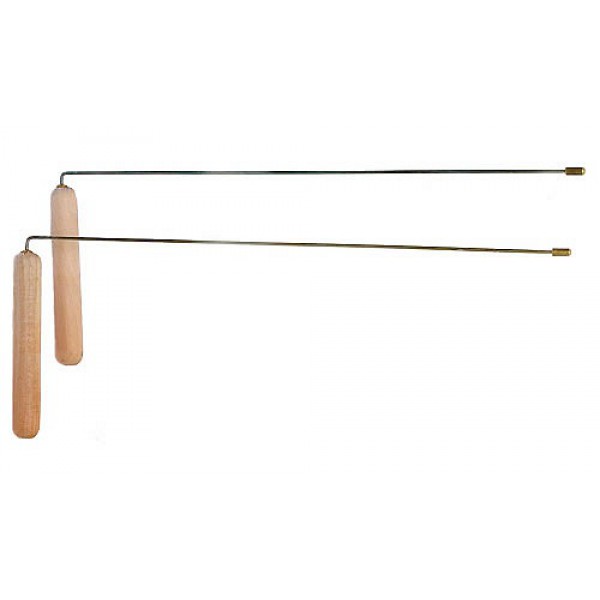
Another way to find a place for a well is dowsing. Previously, they used this method to search for water using two willow twigs. Nowadays they use brass wire with a diameter of 2 mm. Take two half-meter pieces of wire, measure 10 cm for the handle and bend it at a right angle. With such “devices” in each hand they walk around the area. The frames should not be held tightly in your hands; they should rotate freely. When they begin to move on their own, the water is close. Like in the children's game "hot - cold." Both frames spun and crossed - a place for the well was found. Despite the apparent simplicity of this method, it is better for an experienced person to look for water using the dowsing method, who has found a place for more than one well. In any case, the cost of the dowsing method is much cheaper than drilling.
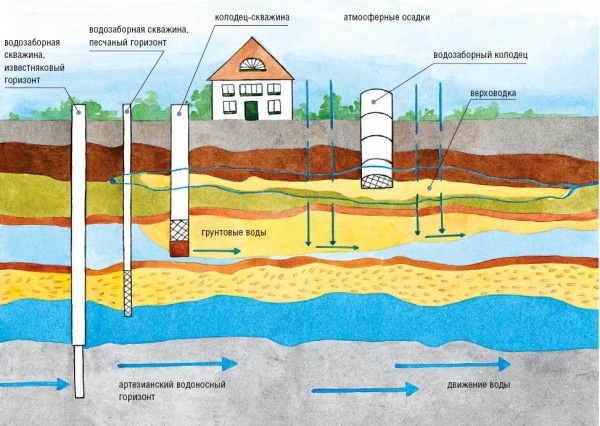
Important! Do not confuse a well equipped at the site of a drilled well with a well that is naturally filled with water. In the old days, wells were installed only in such places. In the first case it is a well-well, in the second it is a water intake well.

Do-it-yourself classic water intake well
You are lucky, and a place has been found on the site for the “correct” well - a water intake. There is no need to drill a well; the water will fill the reservoir itself.
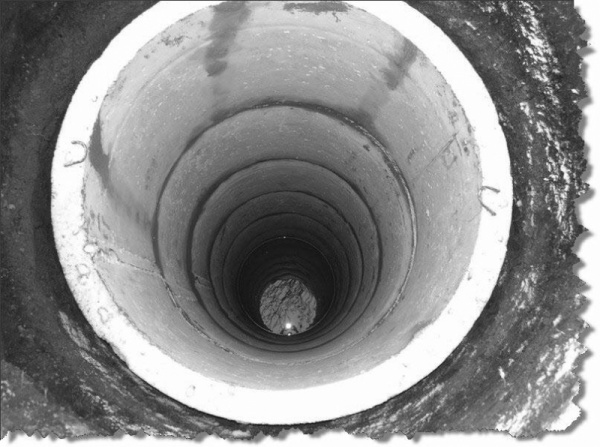
The well consists of three main parts: a catch basin, a trunk and a head. Water is collected and stored in a reservoir (also called a reservoir). The trunk protects water from crumbling soil. Now the trunks are made of concrete rings and they are round in shape, but before they were made of squares from logs. The purpose of the head is to protect water from dirt and precipitation (which has no place in the same reservoir with well water), as well as from freezing.
Get ready to dig the hole by hand, just as they did hundreds of years ago. Preparing the tool: bayonet shovel with a short handle (it is more convenient to dig in a hole with such a handle), a small crowbar, buckets, a strong rope with which your assistant will pull out these buckets, a ladder to the depth of the hole and a flashlight. Choose a flashlight that can be mounted on your head.
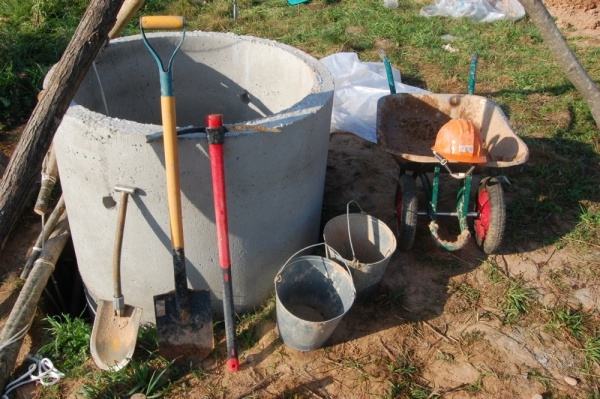

Important! We buy concrete rings for the well shaft and deliver them after the hole is dug. It’s expensive to pay for the downtime of a manipulator for the time it takes you to do excavation work, and you won’t be able to lower the rings into the ground manually. It is better to buy rings with a chamfer; this design is more expensive, but it fits more tightly during installation. It is advisable to buy the first ring in a cone shape or with a metal knife - this shape will simplify further deepening. When installing rings, constantly check the verticality of the walls using a plumb line.
We begin to dig a hole for a well measuring 30 centimeters larger than the diameter of the ring. We go deeper, taking the soil immediately to the side. We carefully monitor the crumbling of the walls. If the walls of the pit “hold”, everything is in order, we continue to work until water appears.

We lower the rings and continue digging. The rings will settle into the ground under their own weight. After installing the first rings, you need to go deeper to the height of two more.
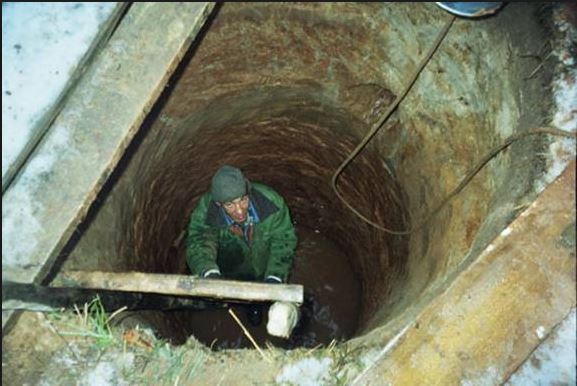
If the soil is very loose, this method is dangerous. We dig a meter deep hole and lower the first ring. We continue to remove the soil and deepen the hole. Then we put the second ring and continue digging again. And so on until the desired depth of the trunk is reached. Water and dirt from the pit must be pumped out with a mud pump or pulled out with buckets. After the water appears (this is when the hardest stage of the work begins), you need to dig another couple of meters deep. Try to select the soil from these last meters as quickly as possible.
So we have reached the bottom. All that remains is to scoop out the dirt and seal the seams between the rings. The seams are sealed with clay mortar or hemp is laid (as an option - tarred rope) and sealed cement composition. The walls of the rings are fastened together with staples and painted oil paint. A 10 centimeter layer of gravel is poured onto the bottom - it will serve as a natural filter.

Types of blind area for a well
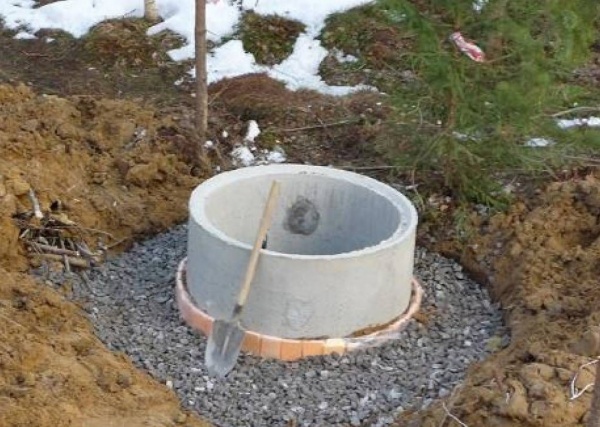
Now it’s time to install a blind area around the well. They arrange a blind area from concrete, clay, or make a so-called soft blind area. Remember that the blind area must be done, otherwise in the spring, when the soil swells, dirt will fall into the well trunk.
Traditionally, the blind area is made of clay ( clay castle). Around the rings, soil is dug up to a depth of 2 meters, and clay is poured in its place. The clay must be compacted thoroughly. The clay castle is protected from above with a layer of gravel or sand. After about three years, the rings will settle (shrinkage), and the clay layer will have to be compacted in the spring. The quality of the blind area is checked by the purity of the water in the well.
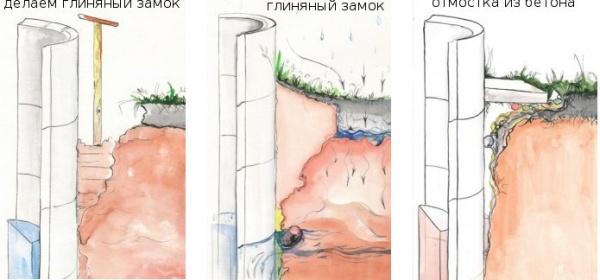

A soft blind area is made of sand and waterproofing film. To a depth slightly greater than the freezing depth of the soil, soil is selected and sand is poured. The sand is compacted and then covered with film. The edge of the waterproofing film is placed on the upper ring of the well shaft, carefully pressed and secured with metal tape. A layer of sand is covered with gravel and decorative stone, and lawn grass is planted.

Head device
The most enjoyable and creative stage of the work is the installation of the head. Of course, you can limit yourself to a knocked down box made of boards, which can protect the water from dirt and precipitation. But it is unlikely that such a “house” will decorate your site. And your labors should be rewarded with a worthy and beautiful conclusion. In stores you can buy nice ready-made “houses” for heads made of wood, metal, and plastic. As they say, for every taste and budget. However, what can compare with the creative process? Come up with an original design yourself and bring it to life. This is not scooping up dirt from a deep hole!
Wells in Russian villages are traditionally designed in the form of a log house. But you can come up with another solution for the design of the head. Such a well will decorate your country cottage area and will reward you after your labors with delicious and cold well water.
Designing a well in a personal plot and in a country house is very affordable option independently improve the village landscape and design a landscape design based on financial opportunities and creative abilities.
Currently, there are several main, most popular and popular types:
- ascending key;
- descending key;
- mine wooden;
- mine concrete;
- mine brick;
- mine stone;
- pipe structures;
- drilling or pipe structures.

A variety of materials can be used for arrangement, including:
- clay;
- wood;
- rubble stone;
- cobblestones and boulders;
- brick;
- flagstone;
- gravel or crushed stone;
- concrete mortar;
- reinforced concrete.
Most often, wells or wells on a site are the best option for water production in the absence of centralized communications, so it is very important to determine what types of water supply sources are suitable for each specific site. When choosing, you will need to take into account the type of soil, the depth of the aquifer and other important factors.
How to design a well with your own hands (video)
Design of wells: design techniques and solutions
When designing wells, both classic natural materials and modern ones can be used. unusual elements. Beautiful well houses- this is an excellent opportunity to fit the source of water supply into the overall concept of the landscape as harmoniously as possible, and also allows you to make the design an original and very individual architectural solution.
Design in accordance with the general style of the garden
More often country wells are made of wood, which blends very organically with garden plantings and wooden households. Natural materials and wood finishing is now highly valued not only for its external aesthetics, but also for its environmental friendliness and reliability. As a rule, even a base made of concrete rings is lined with planed boards. In this case, you can also cover the well with wood in the form of gable, tri-slope and hipped roof with a weather vane or decorative ridge.
You can cover the roof not only with boards, but also with cement, ceramic or soft tiles, as well as sheet metal, especially if the same coating was used for roofing works on households and outbuildings. The designs look very impressive oriental style. The Japanese well used to be covered with a lid, which was woven from bamboo and fastened with palm ropes. In Japan, the Tsukubai water source can be observed quite often in the territories of Buddhist temple complexes. Nowadays, such wells ideally complement landscapes and Japanese gardens, and their decoration are figures of animals and mythical creatures.

If the garden area is decorated in country style, then you can supplement the water intake source with the help of carefully placed carts and wheels. A decorative mill and wicker fences will fit well into the landscape design.
Color solutions
Today, concrete rings are most often used to construct a water supply source., which do not have a very presentable appearance and are dull grey colour. The wooden head and roof also need to be treated with varnishes and paints, which will make the structure not only more presentable, but will also significantly extend its service life. In this case, it is recommended to use contrasting color combinations, as well as rich and pure shades for painting the surface.
Artistically gifted homeowners can design concrete rings in any direction, using ready-made or individual sketches. You can also paint using stencils, or create geometric and abstract patterns. It should be remembered that before painting, wooden log houses must be treated with special compounds aimed at protecting the wood from rotting and burning.

DIY decorative finishing options
Do-it-yourself finishing largely depends on the characteristics of the material from which it is constructed.. The simplest, and at the same time popular, method of finishing is represented by decorating with natural stone in the form of small cobblestones or large pebbles, which must be selected according to size, basic coloring and shape. If there are color differences in the material, a beautiful and very original ornament is laid out around the head of the well on building mixture. The artificially “aged” appearance perfectly complements the “retro” style.
Many homeowners prefer to decorate with wood, imitating the appearance of a natural quadrangular or multi-faceted log house, which perfectly complements the green lawn. The combination of various finishing materials. Color matches well brickwork and hardwood, as well as brick and siding panels. It is possible to effectively illuminate the area around with beautiful lanterns suspended from the roof of the structure, and spotlights located on the branches of garden plantings or shrubs.
How to decorate a well with wood (video)
What plants to plant near the well
An interesting solution could be to use a gabion or a budget alternative to factory mesh for forming a mesh frame around the above-ground part of the well structure.Further design depends on the surrounding landscape design. If a significant part of the garden area is represented alpine slides and a recreation area, then the space between the base of the well and the mesh frame can be filled with decorative stones. If it is necessary to make the design more flowery and picturesque, then the mesh holding the stones is used as a support for the arrangement of climbing vegetation.
One of the most beautiful and popular methods among domestic homeowners decorative design well design is to surround the water source with densely growing plants. In this case, in autumn, the roof of a well is often used as flower beds, but it is allowed to place hanging planters and containers with hanging plants at the ends of the well. Also, flower pots with plants can be placed around the entire perimeter.

How to make a decorative well functional
The direct purpose of a conventional well is to obtain an autonomous water supply. However, very often such decorative options do not fulfill their main purposes, but are used as decorative elements of storm wells, well pumps, barrels for irrigation activities and other communications. Such structures are good as an original element in landscape design.
Decorative design or, the so-called shaduf, is most often equipped with a “crane”, and consists of a system of logs, for fastening which hinges are used. A functional design is characterized by the presence log house or reinforced concrete shaft, and also a chain which is attached to a wooden drum or swing-wheel attached to two posts. A bucket is attached to the other end of the chain to collect water by rotating the drum. Also, the functional design can be installed above wells for water of various depths.

Particularly popular are ascending, tubular and shaft functional structures, over which decorative structures are erected. It is very important that the cladding is not only a decoration, but also serves as protection from moisture and freezing. Depending on the type of water rise, the structures come with a collar or a crane. The head can be open, consisting of a base, pillar and roof, or closed, such as a “house”. The open well post is covered with a lid, and the “houses” are equipped with a door located on one of the roof slopes.
How to design a well from concrete rings
The cheapest solution to the question of how to qualitatively and beautifully equip the upper part of a house well system on your own is to line the concrete ring of the water intake structure. To carry out the work you will need to purchase masonry mortar, and facing material in the form of stone, river pebbles and substandard ceramic tiles or decorative artificial stone.
If necessary, the cladding solution is replaced with conventional frost-resistant adhesives for working with tiles. It is best to prepare a working facing solution using an electric drill attachment. The finishing material is glued over the entire surface of the concrete ring. It is recommended to expand the upper part to accommodate decorative elements.
How to install a well house (video)
Choosing design solution To design a well system or well, it is not at all necessary to strive to purchase and use the most expensive and modern finishing materials. The main thing is a great desire, as well as a little imagination and competent execution when decorating an individual source for water supply.


