An alternative to the usual wallpaper with a width of 53 cm - wide (meter-long) rolls modern models. Their purchase immediately raises questions: how to glue meter wallpaper Right? Can I do it myself or will I need an assistant to glue them on? How does the technology differ from gluing conventional rolls?
If it is not very convenient to glue ordinary wallpaper alone, it is possible, but for finishing with wide wallpaper you definitely need a companion. The exception is non-woven wallpaper. The fact is that in the process of gluing them, glue is applied only to the wall, and bringing a dry canvas to an already coated wall is much easier than one on which glue has already been applied. Although it’s still easier to glue wallpaper of this width with two people. These are most often vinyl models on non-woven or paper based or non-woven with a textile top.
Preparation for pasting
To do everything correctly and get a high-quality result when gluing meter-wide vinyl or non-woven fabrics, you need to do everything carefully, and preparatory work not an exception. Preparation consists of the following steps:
- calculation of the number of rolls;
- wall preparation;
- collection (purchase) the right tools;
- wall marking;
- dilution of the adhesive mixture.
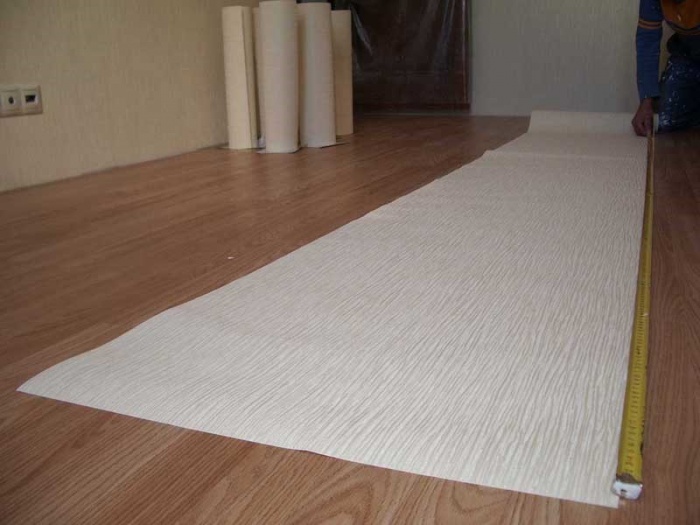
Correctly calculating how many rolls you need to purchase is quite simple. To do this, you need to measure the width of each wall and calculate how many canvases are needed for pasting, and then find out the height of the wall, which will also be the height of the canvas. The following calculations are carried out according to the formula: the length of the roll is divided by the height, and the number of required sheets is divided by the result obtained. When buying wallpaper, you can immediately find out which glue is recommended for it and purchase required quantity. If you don’t have the necessary tools at home, you can also buy them right away.
For pasting you will need:
- roller and brush for applying glue;
- bucket and ditch for glue (selected according to the width of the roller);
- rubber roller and plastic spatula for rolling wallpaper;
- building level;
- tape measure and pencil;
- covering film;
- ladder.
It is better to take a glue roller with a long handle, then you won’t have to climb up again. To paste wide wallpaper, it is better to stock up on two stepladders, then working with a partner will be more convenient.
It’s better to go to the store not with ready-made calculations, but with the dimensions of the walls, since both the width and length differ depending on the manufacturer wallpaper roll. The width varies from 53 to 140 cm, and the length from 7 to 18 meters. Therefore, write down all the measurements - the width of each wall separately - and calculate on the spot, already knowing the parameters of the finishing material you like.
Preparation of the wall means its preliminary leveling, cleaning and priming. In addition, you need to remove switches and sockets, and insulate the wires so that moisture does not cause a short circuit.
After preparing the surface and purchasing wallpaper, you can mark the wall.
- We start marking from the corner - measure 1 meter in each direction (with a wallpaper width of 1.05 m).
- Using a level, draw a vertical line.
- 1.05 m is measured from the drawn line and a vertical mark is made again.
- This way the entire wall is marked.
Glue dilution is carried out according to the manufacturer's instructions. Non-woven and vinyl wallpapers It is better to glue with special adhesives to avoid poor-quality results. It is best to create a whirlpool in the bucket before pouring the dry mixture into the water, and when a funnel appears, start pouring the mixture in a thin stream along the wall of the bucket. This procedure must be performed in advance, since the mixture must not only dissolve in water, but also swell. Exactly what time is required for swelling is indicated on the packs with adhesive composition. You can roughly estimate the time from 15 minutes to 3 hours. Heavy vinyl wallpaper can be applied using various types glue. Among them there are those that need to not only be stirred, but also boiled for 30-50 minutes.

Before work, you need to prepare the floor - cover it with a covering film. Then you can follow the step-by-step instructions.
- Cut the rolls according to the height of the wall. Since the wall may be uneven - slightly different in height in different places - it is better to measure the height for each canvas and number the cut pieces. If you don’t have pasting experience to do everything correctly, it is advisable not to cut everything at once. First you need to prepare two canvases, comparing the drawing. Next, one canvas is glued, and the drawing of the next one is compared with the second.
- Part of the glue from the bucket is poured into a ditch, and then applied with a roller to the wall along the width of one canvas, a little - about 20 centimeters - grabbing the next one. Hard-to-reach areas - joints and corners - are coated with a brush. Be especially careful when applying glue at the top.
- If the wallpaper is vinyl on a paper base, then the cut sheet is spread on the floor, and glue is also applied to it. There is no need to lubricate non-woven ones.
- The finished canvas is glued from top to bottom. First, the top and one of the sides are moored.
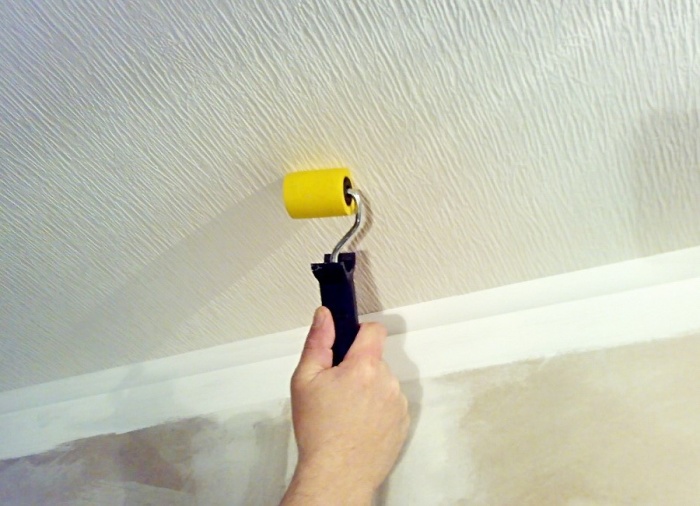
- The moored (baited) canvas is leveled with a rubber roller or plastic spatula. To perform leveling correctly, you need to start from the middle of the canvas. Further movements should be performed in the following directions: from the center to the side, up and to the side, down and to the side. Leveling must be done quickly, with wide movements. The choice of roller or spatula depends on the type of wallpaper. Non-woven textured fabrics can be damaged with a plastic spatula.
- After leveling, a thorough smoothing is performed to expel all air bubbles. Smoothing is performed in the same directions as leveling - all movements from the center to the edges.
- Use the tip of a spatula to press down the corners and boundaries of the canvas and baguette/plinth.
- Glue is applied under the second strip, also extending 20 cm after the mark. This grip is done so that when applying the next portion of glue it does not go onto the wallpaper.
- The next canvas is moored end-to-end with the first, with a complete fit to the pattern. This part must be done very carefully, otherwise all the inconsistencies will be visible.
- After smoothing the second sheet, you need to go over the joint with a rubber roller.
- Then all the canvases are glued in the same way.
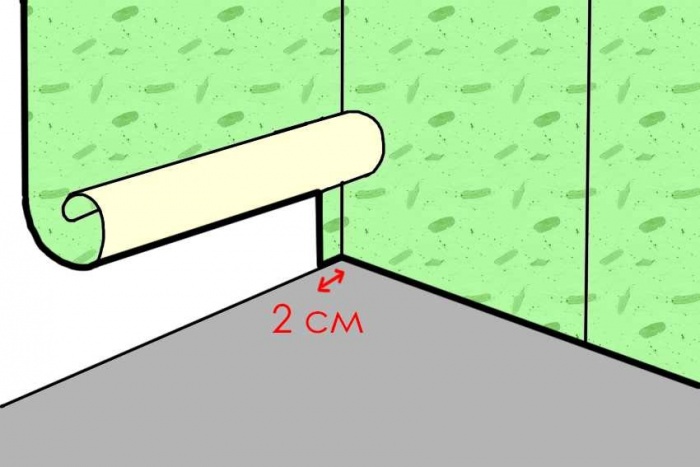
- Section of the wall behind the radiators and others hard to reach places It is not always possible to cover with a meter-long canvas. In this case, it is cut into pieces and wound up one by one.
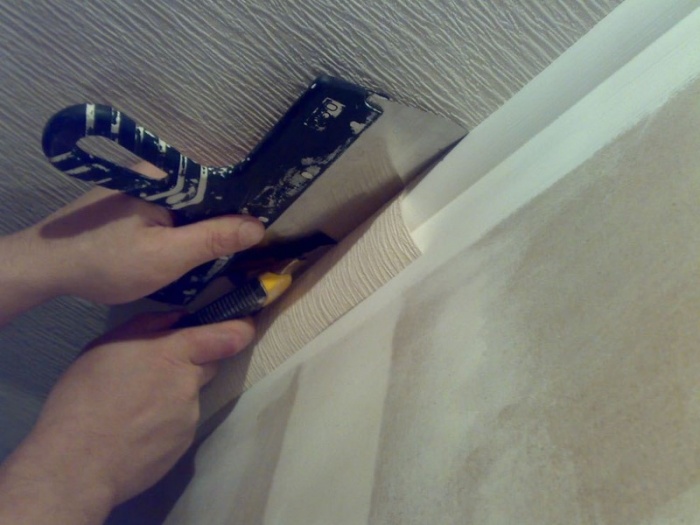
- The excess in the corners, top and bottom is trimmed with a stationery knife along the pressed line.
Smoothing with a spatula or roller must be controlled by hand so as not to miss air bubbles. By running your palm, you can detect all the voids and excess glue that are not visually visible. At the same time, your hands must be clean.

Some aspects of working with meter wallpaper
Wall unevenness is more noticeable if you use wide wallpaper, so the surface needs to be leveled more carefully than for conventional canvases. If you cannot perfectly level the surface, it is better to buy textured models.
If you don’t have the skill of pasting, but plan to purchase a model with a meter width, it is better to choose non-woven wallpaper or vinyl wallpaper with a non-woven backing. It is easier to work with them: if something goes wrong, then within 10 minutes the canvas can be removed from the wall and re-glued.
In order to hang wallpaper correctly, you need to follow temperature regime not only during work, but also after. The room where repairs are being carried out must be closed to prevent drafts for at least 24 hours. Heavy vinyl models can take up to a week to dry, since the moisture will only go into the wall. The ideal temperature is from 15 to 25 degrees. IN heating season better finishing Do not cover walls with wallpaper, as they will wrinkle in places near heating appliances.
Meter-long wallpaper, non-woven and paper-based, has some advantages. Working with them is not much more difficult, but the whole process is faster. After all, half as many canvases are required. The appearance of finished walls is much better, since the number of joints is reduced. We can say that when choosing meter-wide wallpaper, we choose to save effort and time, but we get good result – beautiful walls with a minimum number of joints.
“Repairs cannot be completed, they can only be stopped!” wrote M. Zhvanetsky in one of his miniatures. Is it really that bad? How to glue meter-long wallpaper on your own so that neither the quality of work nor family relationships are affected, and the repair does not take centuries? Let's figure it out.
Meter wallpaper - a sign of the new time
In our family, replacing wallpaper has always been a common task. Everyone took part: someone took out extra furniture, someone was clearing the walls of old paper panels, someone was marking and cutting what should replace them. Then they started spreading the paste, pasting, combining patterns, etc. This is where the fun began. Not without mutual complaints: sometimes the leaves and flowers don’t fit together, sometimes the overlap is small, sometimes large, or even too short in length. It’s no joke, with the standard width of Soviet wallpaper being 53 cm, on the walls of an 18-meter room it was necessary to cut and glue more than 30 pieces of 2.5 m in length.
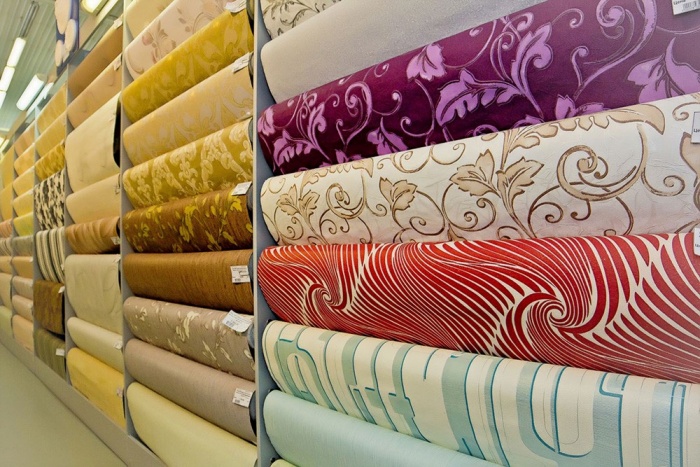
Today a lot has changed, including in the field apartment renovation. Foreign manufacturers, whose products are now abundantly represented on our market, offer many wallpaper options, and this applies not only to colors, patterns, materials from which they are made, but also to the length and width of the panels. For example, the Italians today produce rolls of 106 cm and 70 cm, the Belgians - 90, 100, 140, the French - 70 and 90 cm. Our enterprises still maintain the standard of 53 cm.
Specialists involved in the wallpaper business have long dubbed overseas specimens non-standard, wide or simply meter-long wallpaper. Neither give nor take, a kind of sign of a new time.
Most wide wallpapers have a non-woven base. However, there are also paper, bamboo, and fabric ones. Meter sheets can be light or heavy; for each type you need to select the required type of glue indicated by the manufacturer on the packaging. Please note that if you have not achieved perfection in gluing walls, then you should not purchase glue that hardens within a few minutes; this is only for professional craftsmen.
The site’s site masters have prepared a special calculator for you. You can easily calculate required amount wallpaper
How to glue meter-long wallpaper - pros and cons
If you decide to update the wallpaper in the room, then, first of all, try to approach the choice of new home design as responsibly as possible. Undoubtedly, retail outlets Now there are a huge number, but it would be better to go somewhere where there will be an opportunity to examine the panel on a special stand in expanded form and with long distance. It’s no secret that on a roll and on the wall, as they say in Odessa, these are two big differences!
By the way, remember that vertical stripes will visually increase the height of your room, and horizontal ones will seem to push the walls apart. Therefore, attentiveness and attentiveness again! It’s better to weigh and count everything again before purchasing this or that type of wallpaper.
If speak about positive aspects wide rolls, the main one is a significant reduction in the number of seams, due to which the so-called “seamless” effect is created. How is it achieved, you ask? The answer is simple: if the mentioned 18-meter room required 30 or so standard half-meter canvases, then the wide ones will need half as many - there will also be fewer joints, which means they will not be so conspicuous.
It is probably unnecessary to say that applying glue to 15-16 tapes will take significantly less time than the same operation with three dozen. Yes and in terms of costs physical strength it's not comparable. And the procedure for pasting walls with such panels is generally no different. And, by the way, many who decide to make repairs will probably be attracted by the fact that meter-long wallpaper, as it turned out, can save money on your budget. The fact is that in most cases, one wide roll is still cheaper than two standard 50-centimeter rolls. In addition, non-woven wallpaper will also be the most durable.
It would be dishonest to you, having talked about the advantages, to remain silent about the difficulties of working with meter-long canvases. But they still exist. So, wide wallpapers assume that they are glued to perfectly flat surfaces, since any flaws or unevenness will not allow you to achieve a perfect fit between adjacent panels. Let me remind you that this is their main “seamless” advantage. But in principle this can be solved, fortunately there are more than enough options.
The large width of the roll is fraught with another danger - you may not have enough of the last full tape, just a couple of centimeters wide. Collecting a fragment from pieces? This is hardly a solution. You'll have to buy a whole roll. With standard rolls it is easier to adjust the number of panels to the width of the walls. Well, and one more point, which, however, can only be called a minus with a stretch. It’s quite difficult to hang meter-long wallpaper alone. You will definitely need an assistant. I don’t know about you, but for our family this is not a question - we are Soviet standard wallpaper glued with four hands, so we have worked out this moment.
How to glue meter-long non-woven wallpaper - step-by-step instructions
If the choice of material for gluing the walls has already been made, then let's get to work. Let's repeat it again: Before gluing meter-wide non-woven wallpaper, you must carefully level the surface, because the flaws in the walls will not allow the canvases to be joined together properly.
How to glue meter-long non-woven wallpaper - step-by-step diagram
Step 1: Surface Preparation
True, we note that the smallest irregularities non-woven fabric, due to its characteristics (thickness and softness), is still able to hide. Old wallpaper even with perfect walls you need to remove it, if they don’t give in, then wet it and the paper will give in. If after treatment the wall is rough, that’s even good - it will be better connection walls, glue and canvas.
Step 2: Eliminate drafts
Remember that when covering walls with any wallpaper, the temperature regime is important, and the absence of drafts is up to completely dry- a guarantee that the joints will not separate, the canvas will not “bubble” and will not “lead”. This may take a day, or it may take three.
Step 3: Turn off the lights, remove everything unnecessary
Before starting work, do not forget to turn off the electricity in the room being repaired, remove top covers sockets and switches. When the wallpaper is dry, you will cut the canvas in the right places crosswise and return the covers to their original places. You should also temporarily remove all fasteners, screws, nails, and dowels from the walls.
Step 4: Prepare the glue
Let's start preparing the glue, which, as you remember, must correspond to the type of wallpaper you have chosen. Pour water into the vessel in which you are going to dilute it and, shaking in a circle, pour out the glue in a thin stream. After thoroughly mixing the mixture, let it brew - the required time and other features will be indicated on the packaging. Usually it's 15 minutes.
Step 5: Marking the Wall
As with any wallpaper, experts recommend starting to cover the walls from the window. Although in the case of meter rolls and non-woven ones, in particular, due to the fact that they are glued end-to-end, you can start from where it will be more convenient and economical for you in terms of material consumption. To glue the first fragment evenly, using a plumb line, a ruler and a pencil, draw a perfectly vertical line, from which you will begin gluing.
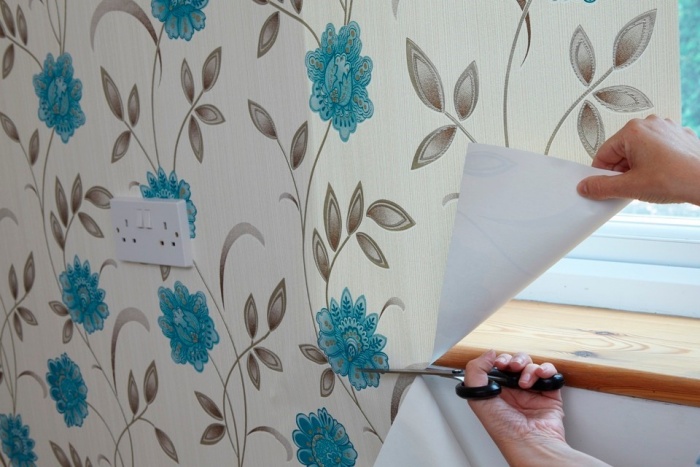
Step 6: Cutting the canvas
Are you ready to cut the required length of web from the roll? Leave a reserve on the ceiling and floor sides - 10 cm is enough. When the wallpaper is dry, you can cut off any excess with a sharp utility knife. And when pasting, if it suddenly turns out that you need to move the canvas up or down, you will have this opportunity, since non-woven wallpaper allows you to do this within 10 minutes.
Step 7: Let's start gluing
If all preparatory stages passed - let's get to work! Mix the glue thoroughly again and apply it with a wide brush to the part of the wall where, according to the markings, the first tape will go. As you know, non-woven fabrics are not smeared with glue, so together with your partner, carefully apply the dry wallpaper to the right place and begin smoothing the fabric. This work is traditionally done from top to bottom and from the center to the edges. It is convenient to use a special roller for this, and pick up excess glue around the edges with a damp cloth. We glue the second canvas as close as possible and attach it with an edge. If necessary, we connect the drawing. Repeat this operation the required number of times, and the job will be done.
Step 8: Taping off awkward areas
Particular attention should be paid to pasting the so-called inconvenient places. We're talking about corners, openings and behind radiators. There is nothing complicated, it just takes a little more time. The canvas is glued so that it is slightly on corner wall. On the other wall, do the same with the second tape. Then, using a ruler and a sharp knife, a vertical cut is made through these sheets. Having raised the edges, remove the excess parts of the wallpaper, and, having coated the joint with additional glue, put the sheets back. To paste the areas behind the battery, you will have to cut convenient small pieces.
By the way, don’t forget that when covering the walls of a room with new wallpaper, you can show your imagination. Moreover, we can talk about experiments with both color and shapes. It will definitely make your home completely unique.
Meter-long wallpaper remains a curiosity for many owners. But they are no different from ordinary material, with the exception of the increased width, which significantly reduces the number of seams in the room, and at the same time the effort and time required by almost 2 times. Today we will talk about the advantages of wide wallpaper, how to properly mark a wall and how to cover a room.
Our compatriots are accustomed to working with standard canvases wallpaper, the width of which is 53 centimeters. But foreign markets offer the opportunity to buy larger 70- and 100-centimeter rolls. The main advantages of using meter wallpaper:- Reducing the number of joints between individual wallpaper sheets, which allows us to talk about the so-called “seamless” effect, which has a beneficial effect on the interior.
- A simplified procedure for installing panels, which is due to the smaller number of pieces required for pasting the room.
- The price of a meter roll is lower than the cost of two rolls of standard 53-centimeter wallpaper, which allows you to save significantly when decorating a large room.


- First you need to coat the walls with primer. Also suitable wallpaper glue, which should be diluted first to a more liquid state. The cheapest product can be used as such impregnation, but such treatment is needed to increase the adhesion of the wallpaper to the wall surface and improve the properties of the adhesive composition. Before work, be sure to make sure the primer is dry.
- When using foam borders, they should be installed on the wall before wallpapering the surface.
- Measure the height of the wall from the floor to the curb/ceiling, add 5-10 centimeters to the result obtained, which is necessary as a reserve. Divide the length of a meter roll of wallpaper by this value to find out the number of stripes that will come from this roll. Read more about the calculation. When cutting panels, keep in mind that it may be necessary to match the pattern on the material.
- Step back 1 meter from the corner of the wall; here you need to draw a vertical line using a plumb line and a long ruler.
- Apply an adhesive composition to the surface, which should be prepared in advance.
- Adjust the height of the first canvas, and you can glue it to the base, focusing along the intended line. In this case, it is necessary to turn the second side of the panel at an angle. Also tuck the fabric in the upper part; it will be trimmed later.
- Next, you should smooth the wallpaper to expel any trapped air using a wallpaper roller or spatula.
- When you finish doing this procedure, you need to arm yourself with a knife and a wide metal spatula, which will serve as a kind of guide when cutting off excess wallpaper.
- Damp wallpaper may not be able to be cut, in this case, wait until it dries and then trim it.
- If you find that the wallpaper is not completely adhered in some places, correct this.
- If you have aligned the walls well, then gluing the next panel end-to-end without much difficulty.
- When fixing the second one, it is necessary to adjust it to the previous one in height, smoothing the wallpaper and at the same time expelling the air.
- You cannot stretch the wallpaper to achieve a clear joint - at first everything will work out, but it will come apart as soon as the panel dries.
- Non-woven wallpaper is the easiest to join, since this material can be moved after you have glued it, within 10 minutes.
- Do not use glue that contains additives for quick drying, as only experienced finishers can work successfully with these substances.
If you can’t get an even connection, you can make a small intersection if you use plain wallpaper. The overlap should reach two to three centimeters. Then use a knife to make a through cut where the two blades intersect to cut through them simultaneously. All that remains is to take out the scraps and straighten the canvases, having previously coated the joint with glue.

- When gluing stripes in the corner, you should overlap next wall, which will be 2-3 cm. If you tucked more material, then trim the excess to required size using a sharp knife.
- To wallpaper the area under the radiators, cut the material into small pieces. At the same time, it is important to ensure that the pattern matches; don’t be discouraged if you don’t succeed the first time. The same applies to the space above the window or door. It is best to cut pieces of wallpaper for these areas from one meter-long sheet of wallpaper.
- Pasting the ceiling with wide wallpaper is not difficult, because you will have to fix fewer sheets if you compare the material with standard rolls.

Meter-long wallpaper can be combined, just like ordinary wallpaper, to diversify the decoration of the room, hide design flaws - reduce the ceiling height, widen narrow passages, as well as to emphasize the advantageous aspects of the room or to emphasize the main piece of furniture.
Wallpaper on a non-woven basis is not uncommon today; you won’t surprise anyone with it. But wide canvases are still a novelty for Russians. Meter-long wallpaper made from non-woven fabric or based on it is produced European manufacturers, in Russia they are limited to the standard roll size - 53 cm. By the way, meter wallpaper is called conventionally, its actual width can be different - from 90 to 140 cm. The material, like others, has a number of pros and cons. You need to familiarize yourself with the features before buying wide wallpaper.
Advantages and disadvantages of wide canvases
Here we will consider the characteristics of not only those coatings that consist entirely of non-woven fabric, but also vinyl coatings with a non-woven backing. These materials are very similar in performance; they are also installed using the same methods.
So, wide wallpapers are convenient because:
- they form fewer joints - thanks to large size, more voluminous patterns are placed on the canvases, it becomes easier to select and combine fragments of the pattern, the canvases after installation are one whole - the seams between the stripes are almost invisible.
- Installation is faster - instead of two standard strips, only one needs to be cut, applied, leveled and trimmed.
- Material costs are lower - the price of a meter roll is less than the cost of two standard ones from the same manufacturer.
All the disadvantages of meter-long canvases are associated with the peculiarities of their installation:
- They are difficult to glue alone, especially on the ceiling. But, if you couldn’t find a partner, you can still hang meter-long wallpaper yourself, you just need to be patient.
- More difficult to buy optimal quantity material - there is a risk that a few centimeters of coating will be missing or, on the contrary, almost a whole roll will remain. In this regard, it is easier with narrow canvases - if there is any surplus left, there will be little of it.
- It is very problematic to cover a small room with wide strips; they will often have to be trimmed and cut (in corners, on slopes).
- It is permissible to use non-standard widths in rooms with slight deviations in dimensions - if the ceiling, walls or corners are very crooked, it will not be easy to join meter-long panels without distortions.
Summarizing the above, we can conclude: it is optimal to glue wide wallpaper in large rooms with a minimum additional elements(such as batteries, windows, doors, niches and arches) and with smooth walls. Rooms covered with plasterboard are ideal - all the corners there are correct and the surfaces are smooth.
Video on how to glue meter-long wallpaper together:
Installation of non-woven wallpaper on the ceiling
With the advent of non-woven finishing, the fashion for wallpapering ceilings returned. This happened thanks to the versatility of the material:
- he has different surface(corrugated, smooth, plain or patterned);
- durable;
- easy to clean with a vacuum cleaner and a damp cloth;
- suitable for painting.
It is necessary to glue wide non-woven wallpaper onto the ceiling in the following sequence:
- Prepare the surface - remove lighting, insulate the wires, clean the ceiling from the remnants of the old coating, putty and prime it.
- If this is provided for in the repair plan, stick rosettes, baseboards and borders to the ceiling.
- From the wall with the window at several points, measure a distance equal to the width of the roll. Connect the dots with a line.
- Coat the resulting strip with glue.
- Cut the fabric from the roll to a length slightly larger than the width of the room.
- Apply the strip to the ceiling, aligning the edge with a corner or border, while also focusing on the drawn strip.
- Use a roller to press the meter-long wallpaper, expelling air and excess glue in the direction from the center of the strip to the edges.
- Glue the following strips end to end.
It is quite difficult to glue heavy non-woven wallpaper to the ceiling. To make them stick more firmly, the glue needs to be made thicker than indicated in the instructions. A thick composition is also easier to apply to the ceiling; it will not run or drip.
The ceiling is often painted; it is important to remember that this can only be done on a dry surface. After wallpapering, at least 3 days must pass before painting.
The trick with which wide wallpaper can be glued to the ceiling alone is shown in the video:
Instructions for installing meter-long wallpaper on walls
In principle, working with wide canvases is no different from gluing standard wallpaper.

All actions are performed in the same sequence:
- Sockets and switches are removed from the walls, and the ends of the wires are insulated.
- Remove various fasteners (nails, brackets, screws, dowels).
- Clean the walls from the old coating (the paint is washed off, the wallpaper is moistened with water and scraped off with a spatula).
- The uneven surfaces are filled with putty and the dried putty is rubbed with fine-grained sandpaper. You can also watch the video to see how to properly prepare a room for wallpapering:
- Cover the walls with one or two layers of soil deep penetration. This must be done, especially on moisture-intensive materials (concrete, drywall, wood). The primer clogs the pores of the base, thereby preventing glue from penetrating into them. The adhesion of wallpaper and walls becomes an order of magnitude higher.
- After the walls have completely dried, they move on to wallpapering. Glue for non-woven fabrics is dissolved in water, do this according to the instructions on the glue packaging.
- Determine the starting point from which the meter-long non-woven wallpaper will be glued. Experts recommend starting from a corner - you need to step back 104-105 cm from it (with a roll width of 106 cm) and draw an even vertical line.
- Coat the wall with glue.
- Cut the first strip 5-10 cm longer than the height of the walls.
- Align the top edge of the wallpaper with the line of intersection of the ceiling and wall, while simultaneously aligning the vertical edge of the canvas with the line drawn on the wall.
- Press the canvas in the center and level it with movements in the form of a “herringbone” - from the center to the sides.
- Using a roller or spatula, remove excess air from under the wallpaper.
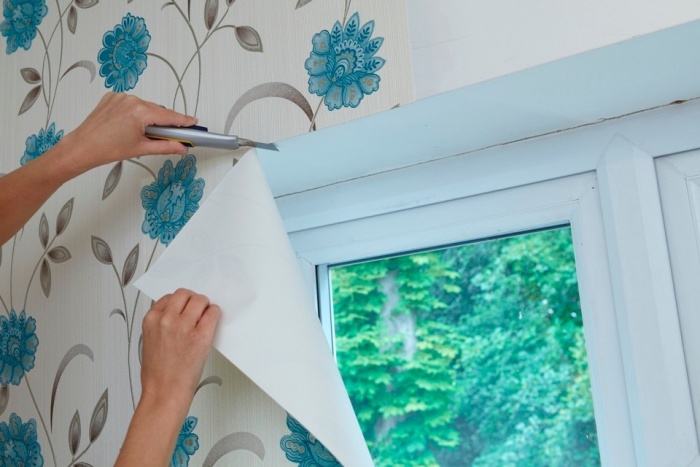
- Trim excess wallpaper from the bottom and top with a sharp knife.
- Continue gluing solid wide strips to the next corner.
- You can’t glue a whole strip into a corner - it can lead and wrinkle. From the outermost strip, the tape measure is moved around the corner by 1.5-2 cm, and this size is recorded.
- A piece of the width of the resulting size is cut from the new strip.
- The cut strip is applied to the wall coated with glue, aligning it with the edge of the previous strip.
- If the second section of the same strip is more than 20-30 cm wide, it is used for pasting the adjacent wall. If there is too narrow a strip left, it is better to cut a new one from the roll.
- A vertical line is drawn on the adjacent wall, departing from the corner the width of the next strip of wallpaper.
- Apply wallpaper to the wall coated with glue, aligning its edge with the drawn strip.
- A vertical cut is made in the middle of the resulting overlap in the corner. Excess wallpaper is removed and the strips are glued end to end. The seam should be invisible.
- Continue working in the same sequence.

Important ! If the wide wallpaper is not too thick and the owner will not paint it, overlapping corners are allowed.
In this case, there will be no need to cut through the thickening; just roll the overlap well with a roller.
As you can see, there is nothing complicated in the process. Additional information can be found in the video:
Still, it’s better to work together - one person stands on a stepladder and aligns the canvas with the ceiling line, and the second aligns the wallpaper vertically.
Pasting difficult areas
Gluing wallpaper on flat walls is quite simple; it is a little more difficult to properly glue the corners. But the most tricky places are the areas behind the batteries, external corners and various decorative elements.
- Heating pipes are different, and depending on this, they decide on the method of covering the walls behind them. It’s not easy to do this job in any case, and with meter-wide wallpaper it’s doubly difficult. You can cut the canvas into small fragments and stick them separately. But this method is only suitable for plain wallpaper, you won’t be able to fold the drawing this way. An easier way, accessible even to a beginner, is to paint the space behind the radiator to match the wallpaper. This is done with a brush on a long curved handle; it is better to use acrylic paint.
- Wallpaper can be glued to external corners in several ways; they do not differ from the processing options internal corners. These are the overlap method and the cutting method. In any case, you need to overlap not in the center of the corner, but 3-4 cm from it.
- If provided ceiling cornices or borders, it is better to secure them before gluing the wallpaper. This will reduce material consumption (no need to leave an upper allowance), and it will be easier to trim the wallpaper.
- Floor skirting boards, on the contrary, are best removed. They will subsequently hide unevenly cut or too short edges.
Tips from professionals on gluing difficult areas are shown in the video:
The process of installing wide wallpaper on a non-woven base is not much different from working with standard-width material. And small nuances and tips experienced craftsmen easy to find in photos or videos.
The traditional width of wallpaper, familiar to us from childhood, is 53 centimeters. But wide wallpapers are becoming increasingly popular. If some owners square meters have already acquired a taste and began to give preference only to them, others still doubt it.
They don’t know how to glue meter-long wallpaper so that they can clearly see its benefits.
Advantages and disadvantages
 Do meter-long wallpaper have any advantages? Without a doubt. Standard sizes wallpapers were changed for a reason:
- There are fewer seams, and the boundaries of the meter-long coating are practically invisible. There is a feeling that the wall decoration is a solid canvas.
- Spends twice less effort for cutting the roll, physical effort and time.
- The budget is saved because some wide wallpapers are cheaper than narrow ones.
Foreign manufacturers offer different widths roll. In Italy it comes in 70 cm and 106 cm, in Belgium - 90, 100 and 140 cm.
Which wallpaper is more suitable for a small bedroom? The meter ones also look great. But be picky about the choice of material. The most environmentally friendly option is non-woven covering.
After purchasing a wide roll, you may encounter the following disadvantages:
- With uneven walls and many protrusions, it is difficult to glue meter-long wallpaper.
- It is unlikely that you will be able to glue them correctly and beautifully without an assistant.
But all the disadvantages of a wide roll can be solved, right?
Preparation for gluing
 Before you learn how to glue wide wallpaper, you need to ensure a smooth surface of the walls. First we remove the old coating.
To make old wallpaper easy to remove, spray it with water from a spray bottle and let the water absorb. After this, remove them from the walls with a spatula.
To facilitate the gluing process and for beauty, remove the external boxes of sockets and switches, screws, self-tapping screws, small parts furniture. If there are dents and irregularities, smooth them out using putty, sand and prime. Otherwise, defects may spoil the impression of the repair. The surface of the walls should become dry, hard and rough.
Tools
 To hang meter-long wallpaper correctly, you need to prepare:
- level;
- putty knife;
- rubber spatula - for smoothing;
- scissors;
- knife, preferably a stationery knife;
- roller;
- brush;
- sponge;
- buckets for glue and water;
- roulette
Decoration Materials
 Before you start wallpapering the room and cutting wide wallpaper, keep it there for at least 2 days. Be sure to check whether all meter rolls are from the same batch - look at the markings on the label. This is important because batch differences may differ in the shade of the pattern.
Continue to study the label. On it you will read about how to glue wide wallpaper by adjusting the pattern:
1. Counter docking.
On the label you will see arrows that are located in the opposite direction. This marking means that you need to alternate the direction of the roll webs, completely turning them over from bottom to top and vice versa.
The coating should be correctly glued to the same length and direction.
3. Free docking.
Don’t think about the design, but glue one sheet after another without adjusting the pattern of the meter roll.
4. Docking with offset.
The most uneconomical, complex and time-consuming option, because meter-long wallpaper will have to be adjusted.
Taking into account the manufacturer's recommendations, you can begin cutting the roll. Using a tape measure, measure the height of the walls, add 5 centimeters from each edge and cut into flat surface. After cutting, number each roll so you don't mix up the order.
Glue
Even before cutting the roll, prepare glue that should match its type. Pour water into a bucket and pour in the powder little by little, stirring in a circular motion. Before gluing, let the resulting solution sit for 15 minutes. The glue will swell and become more sticky.
Sticking
 That's right - glue from a light corner. But don't expect it to be perfectly smooth. Using a level, draw a vertical line to guide you when gluing wide wallpaper.
Conduct renovation work at room temperature 18-20 degrees and at tightly closed windows and doors. Do not open them until new finish the walls won't dry out.
Carefully coat the wall with a roller and the corner with a brush. Why is it better to apply glue to the wall and not to meter-long wallpaper? If glue is applied to the canvas, it will become heavy and very wet. And raw material tears more easily and stretches greatly.
We apply the first canvas strictly along the line, the second - butt to the first, depending on the pattern. Once pasted, smooth it with a rubber spatula from top to bottom so that the wide wallpaper is free of bubbles.
Do not apply large excess glue because it will stain the surface. finishing materials. If glue does get on the wallpaper, wipe it with a wet sponge.
How to properly cut off excess fabric from below? Place a metal spatula at the cut site and run a sharp utility knife around the outside of it. Cut, move the spatula and cut again.
After finishing the renovation, in which you used wide wallpaper, you will be convinced that it has greatly facilitated your work and decorated your home.


