The variety of modern finishing materials allows you to decorate the interior of an apartment or house in absolutely any style. If desired, the walls can be painted or made unusual design using textured plaster. But such methods require certain work experience, the cost of materials is quite high, which makes them accessible not in all situations. This is the most acceptable finishing material like wallpaper. It can imitate almost any surface. The canvases are not only beautiful, but also able to give the room certain style and sophistication. They often decorate not only walls, but also ceilings.
Technologies for decorating room corners with wallpaper.
Pasting is extremely simple; you don’t need any special experience. But beginners often have the question of how to glue wallpaper in the corners so that the surface remains of high quality and there are no distortions or air bubbles. Pasting wallpaper in the corners is not so difficult, but there are a number of rules that you will have to follow. Internal and external corners are pasted over differently, but if you follow all the requirements, the work will be easy and the result will be amazing.
Features of gluing in corners
From the tools and materials for gluing you need to prepare:

Scheme for gluing wallpaper in the corners.
- wallpaper in calculated quantities;
- special wallpaper glue;
- rollers;
- a simple pencil, a metal ruler;
- if necessary, you need to prepare putty, a metal spatula, galvanized metal corners;
- To remove glue from joints, just purchase a clean rag.
How to properly glue wallpaper in the corners of a room? Processing external and internal corners It's a little different, but it doesn't require any special skill. Before work it is necessary to apply markings. If you need to paste canvases in the inner corners, then the material must be applied so that it wraps around 5 cm on the next wall. The problem of how to paste wallpaper in a corner is quite easily solved. A larger or smaller amount of rotation should not be allowed, as this will affect the quality of the gluing. If the allowance is too large, the coating will wrinkle, and this will require transverse cuts to remove all excess and release air from the formed bubbles. But if the allowance is too small, the likelihood of peeling off after the glue dries increases many times.

Scheme for wallpapering external corners.
How to glue wallpaper in corners inside? The surface of the wall is carefully coated with glue; if the wallpaper material requires it, then the canvas must also be coated with glue. After gluing, you can take a metal ruler and apply it to the joints of the two strips. A cut is made with a sharp knife, after which the trimmings are carefully removed. The remaining upper edge must be carefully coated with glue, firmly attached to the wall, and excess glue must be removed immediately.
How to hang wallpaper on the outer corners: instructions
Everything is not as complicated as it might seem, but this particular angle should be perfect. If there are chips, unevenness, or potholes on the surface, they must be puttied and then used. metal corner to check the accuracy of the work. The angle should be perfectly even.
When gluing wallpaper, the material must be carefully moved 5 cm around the corner, gluing it overlapping. After this, using a metal ruler, an incision is made at the joint.
Under no circumstances should you move the ruler, as the cut will be uneven, and this will lead to the fact that the canvas will have to be removed and the work started again.
To make it faster to hang wallpaper on the walls, you must first apply markings to the surface with a simple pencil.
This will allow you not to worry about the quality of work in the future.
Pasting non-woven wallpaper in corners and more

Scheme for gluing non-woven wallpaper.
When deciding how to hang wallpaper, many people prefer non-woven coverings, which are made from natural cellulose and fibers. This material is not only durable, but also beautiful; the gluing process is simple. Such coverings can even be glued to walls with slight unevenness, as the wallpaper masks them. Typically, such material is used for painting, i.e. After pasting the entire room, the non-woven wallpaper is painted with paint of the required shade.
Pasting does not require complex preparatory work; it is enough to clean the surface of dust and old coating, if any. In addition, the high density avoids shrinkage, which is very important for obtaining a beautiful and neat wall covering. If necessary, non-woven fabrics can be easily removed from the wall if there is a need to change the environment.
The process of gluing non-woven wallpaper is quite simple, although it differs slightly from how work is done with other types wallpaper coverings. Glue is applied to the surface of the prepared wall, after which the canvases are tightly glued. It is usually not applied to wallpaper, but if there is such a need, then the wall should be thoroughly dried, and only then begin Finishing work. During gluing, excess glue that appears must be immediately removed from the joints using a dry cloth. If this is not done, then after drying the paint will not be applied in these places, the defects will be very noticeable.

Necessary tools for gluing non-woven wallpaper.
You can hang non-woven wallpaper in the corners in the same way as regular wallpaper. During operation, the following parameters must be taken into account:
- Wallpaper glue is selected only for non-woven wallpaper.
- If there are strong unevenness of the wall, which is usually most pronounced in the corners of the room, then it is best to immediately use relief coatings. For smooth wallpaper Careful leveling of the walls is necessary, otherwise the surface will turn out ugly.
- If the corner is very uneven, it is recommended to use putty and galvanized perforated metal corners to prevent rust stains from appearing on the surface.
Otherwise, the process of gluing wallpaper in non-woven corners is no different from the conditions already given.
Wallpaper is one of the most common finishing materials. The gluing process is simple, but requires compliance with certain rules. Special attention It is necessary to pay attention to how to stick the material in the corners of the room. Otherwise, distortions and unevenness will be observed, and the canvas itself will be covered with air bubbles.
In the article you can find the answer to the question of how to glue wallpaper in the corners. It is worth treating the finishing process with all responsibility; unevenness can be obvious, thereby spoiling the impression of a freshly completed renovation.
Step-by-step instructions for gluing internal corners
When finishing main problem I can be uneven walls and the resulting folds in the wallpaper. You also need to take into account that with curved walls, the joints of the wallpaper may diverge.
How to glue an external corner (external)?
The protruding corner must be pasted over in the same way as the internal one, however, there are small differences that also need to be taken into account when working.

What to do if the corners are uneven?
Uneven walls common problem old houses. Before you start gluing finishing coat, it is advisable to carry out preparatory work and put the surfaces in order. If the corners are visually smooth and do not require overhaul, it will be enough to walk with a hard cloth, removing small irregularities and dust. If the unevenness is noticeable to the naked eye, then it is better to do a little work before you start gluing the wallpaper.

Features of gluing meter wallpaper
Wide canvases are convenient because they allow finishing with fewer seams on the surface. Gluing them is more difficult, but the result is worth it.


How to join in corners?
It would seem that such a trifle as gluing corners in a room can completely ruin the entire job if done incorrectly. And if the wallpaper also has a pattern that needs to be adjusted, then you should approach the finishing responsibly.

How to adjust the pattern in the corners?
It is important that the pattern is continuous and even around the entire perimeter of the room. To do this, you need to correctly combine the pattern and trim off the excess.

- The strips are also glued overlapping. An allowance is left on both walls.
- Using a plastic spatula, press the wallpaper to the corner.
- After gluing the second sheet, the wallpaper is trimmed according to the pattern. This method applies to wallpaper with small patterns. Larger designs may require trimming along the edges.
Before gluing, you must first prepare the material for work by spreading the coating on the floor and studying the pattern. The segments are cut off after selecting the pattern in height.

Features of trimming wallpaper in corners
In order to get a perfectly even seam in the corner, you need to properly trim the excess.

- After the wallpaper is pasted to the wall, a straight metal ruler is applied, it can also be a spatula or a rule. You can use a level to keep the cutting line straight.
- Using a sharp stationery knife, cut off the excess along the edge of the ruler, after which upper layer the wallpaper will come off.
- Carefully pry up the bottom layer of wallpaper and remove it in the same way.
- The canvases are coated with glue and pressed tightly to the corner. As a result, the coatings fit tightly together.
Gluing wallpaper in corners is not that difficult, but it requires special care and precision. Today there is a finishing method that allows you to do the job without any joints at all, namely liquid wallpaper. They are applied in an even layer and do not require such difficulties as adjusting the pattern, width, accuracy in rounded places and other nuances.
Glue modern wallpaper- it’s not a difficult matter. Even a novice repairman can handle this. But, if installing canvases on smooth walls is easy and simple, then you will have to tinker with the corners. It is the corners that become the stumbling block that slows down the entire process and requires a lot of effort. More often than others, non-woven wallpaper or vinyl sheets on a non-woven basis are used in repairs.
Features of the material
Wallpaper consisting entirely of non-woven fabric is easy to install and durable. They are made of non-woven cellulose with the addition of synthetic components. The cellulose component gives the wallpaper elasticity and breathability, while synthetics add strength. Such wallpaper is much more difficult to tear than paper-based vinyl, for example. In addition, they do not wrinkle at all and there are no folds left on the surface.
Non-woven vinyl wallpaper has the same properties. The only difference is that the canvases do not “breathe”, since vinyl does not allow air to pass through. Therefore, before gluing them to the walls, it is necessary to treat the surfaces with antibacterial primer or use glue with fungicidal additives. These measures will prevent the appearance of mold and mildew.
Non-woven wallpaper has a number of advantages over other coatings:
- Their feature is good adhesion to glue and to any wall material. Such canvases do not need to be treated with an adhesive; it is applied only to the walls. The same applies to non-woven vinyl.
- A useful quality of non-woven fabric is its tensile strength. The material does not shrink after the glue dries, and the dimensions of the canvas do not change. Thanks to this, the joints do not diverge, and the seams between the strips remain invisible. This feature is especially useful for wallpaper intended for painting, since painting makes all wall defects even more noticeable.
- Non-woven fabric cannot be washed, but can be dyed. But cellulose-based vinyl can even be cleaned detergents, it also lends itself well to coloring.
- Due to the bulk of cellulose fibers, such wallpapers level the walls and hide small unevenness. Durable synthetic components are resistant to tearing, which allows non-woven wallpaper to reinforce walls. They prevent cracking by holding the plaster in place.
- Non-woven wallpaper is easy to remove; its two-layer nature allows you to leave the backing on the surface and use it as a base for new coatings.
Installation of wallpaper on walls
There are several ways to glue wallpaper (you can easily see them from photos or videos). One of them involves the initial pasting of all smooth walls, and then the corners. Other artists advise starting from the most visible corner in the room. There is no consensus on this issue - everyone can glue at their own discretion.
Wall preparation is mandatory for any method. The old coating must be carefully removed and cracks filled with putty. Then the walls are covered with a special primer or wallpaper glue. Only after completely dry primers proceed to pasting the walls.

Draw a vertical line in place of the reference point; this should be done with a plumb line or building level. The first strip is cut from the roll, the length of which is equal to the height of the wall plus 5-7 cm. The wall is carefully coated with glue and wallpaper is applied. Level the canvas with a plastic spatula or wallpaper roller, focusing on the vertical.
Advice! It is better to use a special glue with a color indicator - in liquid form this composition has pink tint, and after drying it becomes colorless. This allows the adhesive to be applied evenly to the wall without leaving any “gaps.”

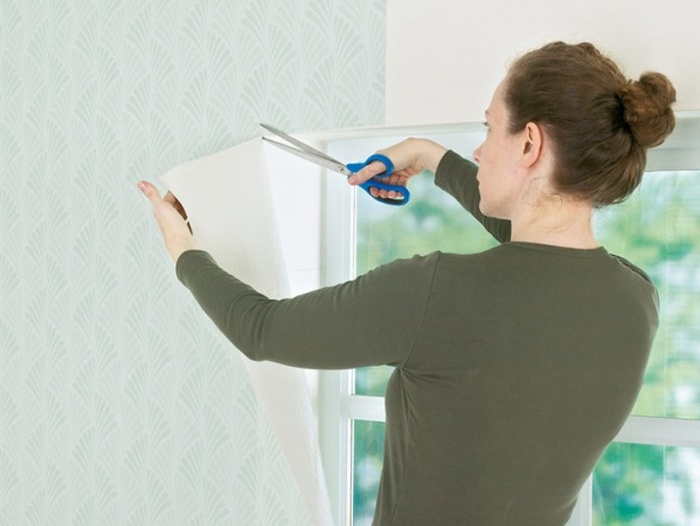
At the baseboard and under the ceiling, cut the wallpaper with sharp scissors or construction knife. Move on to the next lane.

How to glue wallpaper in corners
In order to properly cover corners, you first need to understand their types. The angles are:
- Internal - each room has at least several such corners (in the standard layout there are four). A very important factor is the correctness of these areas. If the angle is uneven, has differences, or “sinks,” the wallpapering method will differ from the standard one.
- External corners in apartments began to appear more often with the advent of drywall - these are various niches, arches, columns and others decorative elements. This also includes door and window slopes, if, of course, it is planned to apply wallpaper to these areas.
Easy way
It is easiest to paste over a completely flat corner. Unfortunately, these are quite rare. These are either plasterboard structures or walls prepared for painting (plastered perfectly smooth and even).
In this case, the wallpaper is glued in the same way both in the inner and outer corners - they are simply wrapped in a single piece of wallpaper. The main thing is not to stretch the coating; after drying, it can return to its original size and shape. If there are small wrinkles on the wallpaper, you can make several horizontal cuts in the corner. This will help to even out the coating, and the cuts will not be noticeable after drying.
Important! No matter how even the corner is, it is better not to use the method of covering it with a solid canvas if it is joined to external wall. In corners located near external walls, condensation appears more often - the wallpaper can peel off and become deformed.

Standard method for gluing corners
It is safer to glue wallpaper in the corners using the “overlapping” method. Its essence is as follows:
- After pasting the adjacent wall, measure the distance to the corner at three points.
- Based on the largest of the three values obtained, the strip is cut off - its width is equal to the largest number plus 2-3 cm for overlap.
- The wall is coated well with glue, especially paying attention to the corner (it is better to use a brush).
- The prepared piece of wallpaper is applied to the corner, aligning the joint with the previous sheet.
- The overlap formed on the adjacent wall is carefully pressed, tucking the wallpaper into the corner with a plastic spatula.
- For a tighter fit, the edge of the wallpaper can be trimmed - make short horizontal cuts every 5 cm.
- Trim the bottom and top edges of the wallpaper using a metal spatula and a sharp knife.
- From the very bottleneck overlap, retreat about one centimeter towards the corner, make a mark.
- Focusing on the mark, draw a vertical line in this place using a plumb line or level.
- Prepare the next strip (if necessary, select a pattern).
- A strip is applied to the wall coated with glue, aligning its edge with the previously drawn line in the corner.
- Level the strip, expelling air and excess glue. Cut under the ceiling and near the floor.

Corner processed! They move on to gluing a flat wall to the next corner - repeat the procedure. In this way you can glue external corners with different types of wallpaper.
Advice! Considering the considerable thickness of non-woven wallpaper, the overlap may be too noticeable.
In this way, you can paste over those corners that will be hidden by furniture or curtains, and choose another method for finishing the rest. You can also try cutting off only the top layer of wallpaper.

It is not necessary to glue the slopes with wallpaper; the video shows how they can be beautifully trimmed at the corners:
Corner cutting method
If the walls are to be painted, there should be no overlaps on them. Paint will make the thickening of the wallpaper too noticeable; another method will be needed here. This method is suitable for both internal and external corners.

The work is performed in the following sequence:
- Repeat the first seven points from the previous instructions - the strip is glued with an overlap to the next wall. Only in this case the overlap is made larger - 5-7 cm.
- A distance equal to the width of the roll minus one centimeter is retreated from the corner.
- Using a plumb line or level, draw a vertical line at this point.
- Cut a strip from the roll and apply it to the wall coated with glue, aligning the edge with the drawn strip.
- The second edge is placed on the previous strip with an overlap, the wallpaper is pressed and leveled.
- Carefully push the wallpaper into the corner with a spatula, leveling everything again.
- In the middle of the overlap, apply a metal ruler vertically, take a very sharp knife and, without breaking it, draw a line along the edge of the ruler. It is very important that the line is drawn in one motion.
- Remove a piece of the upper fabric, bend the edge of the lower one and also remove the excess.
- Both edges are coated with glue and folded end to end. You can pull the canvas a little in the right direction so that there is no gap or overlap.
- Roll with a roller for joints.

This method helps to make the connection of the canvases invisible. It also works well on external corners, in niches and on slopes.
Advice! It is better to use a small metal spatula 10-15 cm instead of a ruler
Due to the unevenness of the corners, the ruler may not fit tightly to the wall, and the cut will turn out crooked. The spatula must be moved along with the knife, avoiding breaks in the cutting line. How to properly trim wallpaper in the corners can be seen in the video:
July 11, 2017
Specialization: facade finishing, interior decoration, construction of cottages, garages. Experience of an amateur gardener and gardener. We also have experience in repairing cars and motorcycles. Hobbies: playing the guitar and many other things that I don’t have time for :)
The most common beginner mistakes
First of all, let's look at how not to glue wallpaper. The most common mistakes newbies make are:
- Poorly prepared surface. The level of complexity of pasting the joint of planes depends on their quality. If the apartment has crooked corners, then it will not be easy even for a specialist to complete the finishing properly.
Of course, it is not always possible to make the wall joints ideal, strictly at 90 degrees, but there should be no deviations from the vertical. Therefore, spare no time and effort in preparing the surface - putty the walls or even plaster them;

They will help you quickly and easily align external wall joints plaster corners. During installation, they are leveled and then glued with plaster or putty. The price of corners starts from 30 rubles per 2 meters.
- Cutting wallpaper. As a result of this decision, the edges of the canvases may diverge or, on the contrary, overlap each other unevenly, and accordingly, the gluing looks sloppy. Therefore, according to the technology, it is necessary to provide a slight turn onto the adjacent plane.

The exceptions are paper sheets, which can be cut vertically. The only thing is that in this case you need to first stick it on the joint of the walls. thin strip wallpaper in case the joints come apart;
- Big twist. If the joints of the walls are even, then such a mistake is not terrible, but in crooked corners a large turn will cause the strip to deviate from the vertical. As a result, all subsequent canvases will be glued crookedly;

- The canvases are not completely glued. When gluing the canvas, many beginners do not push it all the way, as a result small area, located opposite the inner corner, hangs in the air. This leads to the fact that over time the coating begins to peel off and even tear;
- Poorly applied glue. If wallpaper on a non-woven basis is pasted, then the glue is applied to the surface of the walls, and not the canvas. In this case, it is a mistake to work with a roller, which does not always allow you to completely coat hard-to-reach places.
Beginners are often interested in what angle should they start gluing wallpaper? If they are all level, then it doesn’t matter where you start gluing. Otherwise, start gluing from an even angle to avoid distortion of the stripes on the walls.
Gluing technology
As you know, there are two types of angles:

Each type requires its own approach when pasting, so next we will separately consider the process of gluing wallpaper on external and internal corners.
Domestic
The sticker instructions are as follows:
| Illustrations | Description of actions |
 |
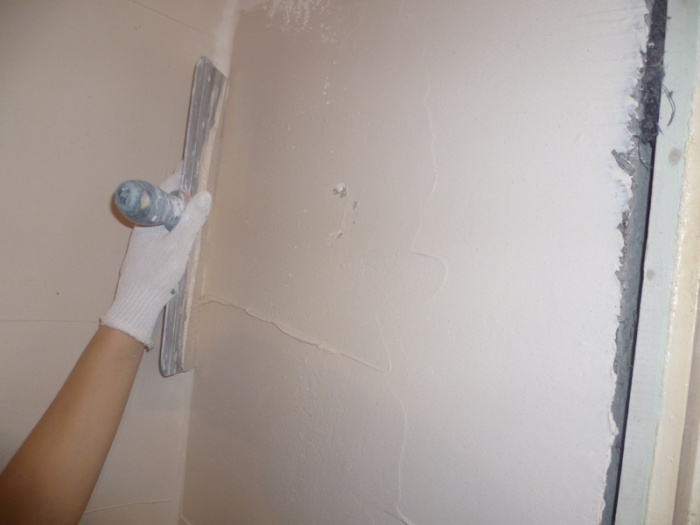
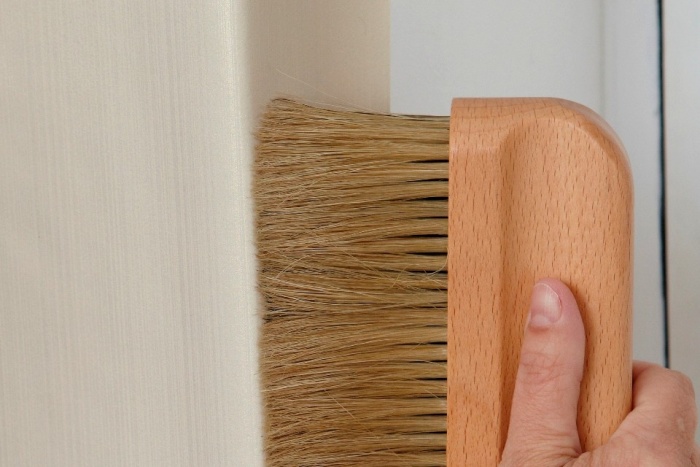
Surface preparation. Beginners often carry out priming of walls with their own hands only using a roller, however, as in the case of glue, it is difficult to properly process corners with this tool. Therefore, after priming the walls, be sure to “walk” through hard to reach places with a brush. |
 |
Applying glue. If non-woven wallpaper is glued, as mentioned above, the glue is applied to the walls, not the canvas. |
 |
Gluing.
|
This completes the gluing.
External
Now let’s look at how to stick this finishing material onto the external joints of the walls yourself:
| Illustrations | Description of actions |
 |
Surface preparation. As in the previous case, the surface must be primed and glue applied if the canvas is vinyl on a non-woven backing. |
 |
Gluing:
If the wallpaper has a pattern, with such a small fold, you may need to trim the edge of the second sheet to match the pattern. |
Many people are interested in how to protect wallpaper on outside corners? For these purposes there are special decorative corners, which are glued over the trim.
Using a rule or a metal profile and a plumb line, find the most protruding point of the adjacent wall. It is important that the profile fits closely to the wall and must be kept strictly vertical.
The corner spatula must be applied to the found point, and the profile must be attached to the spatula. Use a plumb line to check that the profile is strictly in a vertical position, then notches are made on the wall for the dowels.
Then use a hammer drill to drill holes in the wall, install dowels and secure the profile with self-tapping screws.
The next step is to apply putty to a corner that has been previously moistened with water. Using an angle spatula, putty is applied and an even angle is formed; excess gypsum must be removed.
When the putty layer has dried, it is sanded using zero grade sandpaper.
Method number 2.
A special metal or plastic is installed in the corner perforated corner, to the edges of which a mesh is attached. The counter-shultz is mounted strictly vertically and fixed with putty applied to the mesh. When the putty dries, it must be sanded.
Using these leveling techniques will help you prepare perfectly. flat surface for pasting wallpaper in corners.
How to glue wallpaper in corners
When hanging wallpaper, you will inevitably face the need to paste internal and, possibly, external corners. The choice of pasting method is influenced by the type of corner, and not the type of wallpaper. It is worth noting that the methods below apply only to plain wallpaper.
Let's find out how to stick wallpaper in the corners of the room.
External corners
Modern interiors rarely have external corners, but mostly internal ones. But if you still have to glue the outer corner, then recommendations on how to glue external corner wallpaper will certainly be useful.
Sequence for gluing the outer corner:
- Prepare a canvas of such width that it goes around the corner a few centimeters.
- Apply glue to the strip of wallpaper and the surface to be covered.
- Glue the trellis to the wall and carefully align it. This is necessary to remove air gaps.
- Fold the strip over to the other side of the corner. If wrinkles form on the surface, a small incision can be made.
- Step back 0.5 cm from the edge of the corner and make strictly vertical markings using a plumb line and a pencil.
- Apply glue to the next sheet and overlap it, first aligning it along the line.
- Using a guide, cut through the middle of the joined panels with one cut.
- Remove the cut strips and roll the seam with a rubber roller.
Internal corners
The most suitable method for gluing internal corners is overlapping gluing. The width of the sheet should exceed the width of the wall at the junction with an angle by 2-4 cm. Then the sheet is glued and drawn on the strip vertical stripe at a distance of 5 mm.
The edge of the next sheet should coincide with the vertical line when gluing. If the seam is invisible, you can proceed to further pasting of the walls. If the seam protrudes, make a cut and butt it, removing excess strips.
How to glue wallpaper with a pattern in the corners
The joint of the wallpaper in the corner can be almost invisible if the canvas has a clear geometric pattern or the wall collapse does not exceed 2 cm vertically.
However, you need to try to keep the pattern shift to a minimum. Below are tips from professionals on how to achieve this:
- Cut and joined according to the pattern with the outermost glued canvas, place the trellis on the floor with the side with the pattern facing up.
- Measure the distance from the edge last sheet to the corner above and below.
- The difference can reach several centimeters.
Mark points on the spread sheet using a pencil or small cuts. It is important to make a note of where the top or bottom is. - Add 5 cm to the resulting dimensions and cut a piece of wallpaper of the required width.
- Join the wallpaper sheet with the cut sheet and lay it overlapping, overlapping the minimum point from our measurement.
- The part that overlaps the mark must be cut off. Cut the sheet to length.
- Coat the sheet with wallpaper glue and glue it end-to-end with the last sheet, glue the overlap onto final stage. It is necessary to prevent the formation of folds by working the corner and seam.
- Using a plumb line, draw several vertical lines at a distance from the corner to the edge of the sheet. The pitch between the lines is 5 mm.
- Coat the next sheet with glue and fold it for impregnation.
- Glue the canvas so that the central pattern matches perfectly. We glue the wallpaper, smoothing it towards the corner, focusing on the vertical lines.
- According to the resulting overlap, cut the connected parts using metallic profile and a sharp knife.
- Remove excess strips and roll the joint with a rubber roller.
How to glue non-woven wallpaper in corners
The technology for gluing non-woven wallpaper in the corners is quite simple and the methods described earlier are applicable in this case. However, it is necessary to take into account a number of nuances when covering walls with this type of wallpaper.
- Do not try to cover both sides of a corner with one sheet. There is a possibility of wrinkles.
- Non-woven wallpaper is always glued end-to-end.
- When gluing non-woven wallpaper, glue is applied only to the wall.
How to fix joints in corners
Quite often there are situations when, after gluing wallpaper, the joints between them become visible. Let's find out how to seal the corners of the walls after wallpapering so that the joints are not visible.
A checkered or striped pattern will easily hide the joints, even if they are visible. The joints will be noticeably visible on plain wallpaper.
If you plan to paint the wallpaper, then the joint at the corners can be masked with a special sealant that can be painted to match the color of the wallpaper.
Often, joints occur at paper wallpaper. To avoid this, they need to be glued immediately after applying the glue. Otherwise, shrinkage of the canvas will occur and tears cannot be avoided.
You can apply tile grout of the same color to the joints between the wallpaper at the corners. You can also use a marker or pencil.
Moldings or special panels will help make the wallpaper more attractive and hide the joint at the corners of the wallpaper, more a budget option- paper borders.
Technology for working with uneven corners
- Buy wallpaper with a neutral pattern that does not require joining at the edges of the panel. The drawing probably does not match, which will look very unaesthetic.
- Give preference to non-woven wallpaper, because... they stretch perfectly, do not get wet, do not tear and are able to hide minor defects in the walls.
- Use a little trick - glue uneven corner in two layers. Glue a strip 8-12 cm wide under the main trellis. This is necessary in order to fill the gaps formed when trimming the outer layer.
- You can use painter's mesh to reinforce the corner and disguise small depressions.
- To level the spade, it can be trimmed in a herringbone pattern. An overlapped strip of glue will hide the cuts.
Other features of gluing corners
Pasting corners with wallpaper will not work challenging task, if you take note of advice from masters involved in finishing work.
- Carefully prime the corners. Instead of a special primer, you can use wallpaper glue applied a few hours before starting work.
- Apply glue in the corners only with a brush, this will help avoid unwanted gaps.
- Heavy and thick wallpaper is glued with a special transparent glue.
- Smooth the wallpaper in the corners until all air gaps disappear.
- Carefully move the edges of the sheets after cutting the seam and coat them with glue, because the adhesive mass will be removed along with the removed trimmings.