The opportunity to take a shower in the country stimulates not only gardening activities, but also the talents of home craftsmen. An aesthetic shower room, built independently, is the pride of the owner and the envy of his guests. A summer shower for a dacha made of sheets of multi-colored polycarbonate will decorate any area.
What is polycarbonate
Polycarbonate is a modern building material related to synthetic polymers. In the production of polycarbonate sheets, granules of a substance are used that are extruded. Sheets of material are formed in the form of monolithic or cellular (with voids separated by stiffening ribs) polycarbonate, which have unique characteristics.
Main advantages of polycarbonate sheets
- Strength. Due to its molecular structure, polycarbonate has high impact resistance (more than glass), which allows it to withstand strong wind or heavy snowfall.
- Ease. The weight of polycarbonate is 6 times lighter than the weight of glass, which simplifies the installation of structures made from this material.
- Plastic. The flexibility of the sheets makes it possible to create structures of any shape.
- Temperature stability. The range of temperatures that polycarbonate can withstand is from –40 °C to +120 °C.
- Thermal and sound insulation indicators cellular polycarbonate(due to the air in its voids) is twice as high as that of glass.
- Safety. With a strong impact, the material, unlike glass, does not create small fragments.
Polycarbonate is not affected by precipitation and chemical substances. Sheets of this material are easy to install, easy to process with ordinary cutting tools and easy to use.
How to build a polycarbonate shower with your own hands
Having decided to use it for construction country shower polycarbonate, first select a construction option. You can install a simple design with a water tank to refresh yourself during the hot season. If the budget allows and there is a desire, then you can afford a more thorough construction - on a foundation and with heated water. 
When choosing a location for installing a shower, consider not only its protection from the wind and exposure to sunlight, but also the possibility of water drainage. It will be good if it is located on a hill.
1. Project development
There is a lot of information on the Internet on the topic “How to build a shower,” but such an important part as design is often forgotten to mention. But even a schematic drawing by hand can significantly facilitate the construction process.

- When drawing a plan for the location of the shower on the site, take into account the water intake source and the place where used water is drained. If a major construction is planned, then it is necessary to take into account the electrics.

2. Arranging a shower stall
- To build a permanent shower, the selected location must be marked and wooden posts installed at its corners. Before this, the tree must be treated with an antiseptic and water-repellent agent.
- At the next stage, a metal frame is assembled. You can purchase ready-made parts that are held together with long bolts. A ceiling is mounted on the bottom of the frame, which will serve as the basis for the shower floor.
- The bevels are attached to the installed wooden posts, which will be the basis for the logs. The logs are placed at short intervals - sometimes to allow water to flow directly into the drainage. In this case, in cool weather, taking a shower will not be very pleasant because of the cracks in the floor that create a draft. Therefore, it will be more comfortable to build a floor with a pipe that drains used water to a certain place. In dacha conditions process water can be used for watering, washing cars, etc.
- If the project has a locker room and other compartments, then the shower part must be separated by a threshold. It will not allow water to penetrate beyond the established limit.
- The door is an important part of the capital structure. It should close tightly enough and not swell from moisture. Therefore, take your time Special attention overlay seal - so the heat will not escape from the cabin, and the door will not jam.
3. How to make a summer shower at the dacha all-season
The good thing about a DIY dacha shower is that you can make as much as you want. So, if you insulate the shower stall, you can use it even in the cold autumn. Typically, for this purpose, the compartments between the frames are filled with polystyrene foam, then the slabs are covered with a protective film. 
- The interior decoration of the shower building depends only on the preferences of the owner: PVC panels, linoleum, washable wallpaper or oilcloth - anything that is moisture resistant.
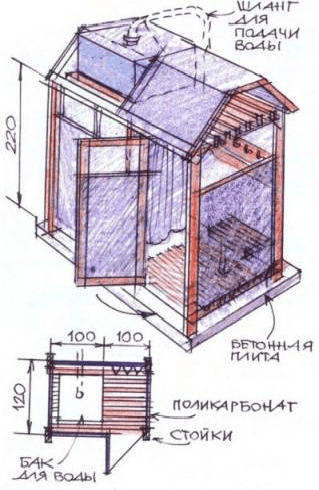
- For construction, it is better to purchase polycarbonate with a thickness of 8-16 mm. The walls are made of matte, and the roof is made of cellular (transparent) polycarbonate
4. How to choose a water container
For a summer shower structure, a tank of a certain capacity is installed on its roof - its volume depends on the number of consumers. The material used to make the tanks is metal or plastic, which is heated by the heat of the sun's rays. 
- The shape of the tank can be flat or cylindrical. For a summer country shower the best option is a plastic flat container. It is easy to transport and install. A significant drawback is that it must be winter time cover.
- A metal water container is more difficult to transport and install due to its weight. In addition, the properties of the metal require constant attention. However, water heated in a metal tank retains heat longer.
5. Method of heating water for a country shower
- For a summer shower structure, sometimes solar energy is enough. But the period of autumn (or spring) work is sometimes accompanied by cold weather. To ensure that dacha chores bring only positive things, you can build a “greenhouse” under the shower water tank. If you stretch polyethylene on slats, the temperature in the tank will be 10 °C higher.
- You can also use a mirror or a sheet of foil, installing them on the north side - they will reflect the sun's rays onto the tank.

- To heat 50 liters it will take an hour and a half and a water heater with a capacity of at least 2 kW.
6. Draining used water
There are many factors to consider here. Firstly, water intake. If your summer cottage is located on the territory of a cooperative, then everything is simple - connect to an already existing system water intake and sewerage. It is more difficult when the water on the site is taken from a well (no matter by artesian force or pump), draining it sometimes creates a problem. 
The installation of a septic tank and drainage around a country shower should include an understanding of groundwater. The further the water source is from the used drain, the less likely it is for unwanted bacteria to spread.
- The volume of a country shower tank should be half the volume of the compost pit.
- You can protect your family by covering the water inlet/outlet layer with a waterproof material (cement, roofing felt, film, etc.).
Summary
It is clear that this material is not complete instructions on the design of a country shower. However, there is an incentive here: to imagine a polycarbonate shower at your dacha, implement it and, most importantly, be proud of what you made with your own hands!
Conducting economic work on summer cottage requires a specially equipped place for hygiene procedures at the end of the day. The key issue in this case is the choice inexpensive materials for arranging a shower room that can provide long-term and comfortable use in any weather. A great alternative to cabins built from scraps building material, is an easily designed and self-assembled shower for a garden made of polycarbonate with a changing room. This shower stall is environmentally friendly and does not decompose when exposed to solar radiation, dries quickly, does not rot, does not corrode. A wide range of colors of materials allows you to create a building that will organically fit into the surrounding landscape and be a decoration of the site for a long time.
Polycarbonate is a polymer plastic with a closed cell structure, obtained by extrusion of primary raw materials with the addition of a coloring pigment and light-stabilizing additives. Thanks to its honeycomb structure, the material has good sound and thermal insulation qualities, moisture resistance. Unlike wooden structures, a polycarbonate country shower does not require additional processing of the material. In addition, due to their strength and light transmission characteristics, monolithic polycarbonate blocks are successfully used in places where increased demands are placed on glazing.
The relatively light weight of the product makes it possible not to further strengthen the foundation, as is done when building structures made of stone. Polycarbonate sheets can withstand a wide temperature Range, from -40 °C to + 100 °C, which allows this material to be used for construction in almost any climatic zones. And the flexibility and simplicity of cutting sheets make it possible to build almost any geometric shape from polycarbonate.
Choosing a location on the site and designing a cabin

First stage construction work involves creating a project, at least in the form of a schematic drawing (by hand or using a computer). The design stage makes it possible to determine the final dimensions of the shower stall, water heating system and lighting. Most often, a polycarbonate shower stall is designed on the front side of the building, not far from sewer pit, which allows you to significantly save on the organization and supply of electricity.
Next, before starting construction work, you need to choose the place where it will be located. To do this, it is important to take into account the surrounding landscape and position the cabin in such a way that it is protected from the wind, but warmed up by the sun, since the shadow and high humidity will promote the proliferation of blood-sucking insects, while solar heat will significantly reduce energy costs when heating water. And in order to avoid carrying water, to fill the tank with buckets, the shower stall must be installed near the water intake point.
To ensure good drainage of used water, the construction of a shower stall requires the presence of a slight elevation.
After choosing the construction site, they draw up a diagram of the shower stall itself, taking the dimensions 1x1x2.5 m as the standard, or focusing on the dimensions of the largest family member. If the project includes a country shower with a dressing room, then the project will imply an increase in the length of the cabin by 0.75 m, respectively, its width will remain the same size, 1 m, and the length will increase to 1.75 m.
The volume of the tank for a summer shower design is calculated based on the number of consumers. For example, for a family of 4-5 people, one 100-liter factory-made plastic container will be fully enough.
Containers can have either cylindrical shape, and flat. It is believed that for summer shower the best option is flat plastic container, which can be easily transported and installed. A metal tank is not as convenient to transport and install as its plastic counterpart, however, water heated by the sun in such a tank takes longer to cool, thereby saving money.


A heated shower for a summer cottage is in most cases used in the off-season, when solar energy is not enough to heat the water. In this regard, many summer residents use some tricks to heat it economically:
- A dark-colored container installed on a hill in sunny weather heats up faster than similar light-colored containers;
- A simple structure made of slats and plastic film stretched over the tank allows you to heat the water in it by 10 ° C and higher;
- Using a system of mirrors or foil attached to the north side of the tank allows you to achieve the same water heating performance as an improvised “greenhouse”.
If you plan to use a shower stall all year round, and not only in the cold off-season, then an industrial boiler or heating element from washing machine. In this case, the container with water is divided into 2 parts, for hot and cold water. When heating water with electrical appliances, it is necessary to calculate the required power and observe basic safety precautions. For example, in order to heat a volume of liquid of 50 liters, you will need a water heater with a power of at least 2 kW and 1.5 hours of time.
Modern summer residents use storage panels to heat water, allowing them to collect solar energy even under cloudy skies. However, in addition to the panels, you will have to purchase devices that allow you to convert energy into electricity, which in turn will warm the water in the tank.

In addition, it is recommended to insulate the shower stall. Why are polystyrene foam boards attached to the walls of the frame and covered with them? waterproofing materials. Transparent cellular polycarbonate is laid on the roof to protect it from frost and precipitation. On interior decoration Any water-resistant materials can be used for an insulated shower cabin.
Caring for a polycarbonate booth
Polycarbonate is impact resistant household chemicals, therefore, caring for the shower stall does not require specific products. Having built a shower stall from polycarbonate, you should remember that this durable material does not tolerate abrasive damage, so the base detergents should be gel. And if the shower walls are slightly dirty, just wash them thoroughly with water and wipe with a soft cloth.
In conclusion of the article, it is worth noting that a polycarbonate shower built with your own hands, in compliance with technology, will serve and delight aesthetically pleasing more than one decade.


Probably every summer resident knows that the second most important structure after building a toilet is, of course, an outdoor shower. After all, after spending some time in a dusty garden bed on a hot sunny day, fatigue and discomfort from dust on the body will certainly come. In order to get rid of these unpleasant sensations, you need a summer shower made of polycarbonate.
Pros and cons of a polycarbonate shower
Before starting the construction of any structure, it is necessary to select a material, consider its good and bad sides, and only after that make a decision. Let's look at the pros and cons of a polycarbonate shower.
Advantages of this design:
Flaws:

Project development
Before starting construction, it is necessary to develop a project, although it sounds funny for building a shower in the country, it still needs to be done. It is necessary to take into account many nuances so that in the future you enjoy bathing and not get irritated; we list the main ones:

Tools and materials
We list the main tools without which it is impossible to build a shower in the country:

The following materials will be needed:

We should also talk about water containers. Previously, containers made of metal such as steel or, less commonly, stainless steel were often used. They were durable and held heat well. But in Lately Plastic containers have become very popular.
This is explained by the fact that they are cheaper than their steel counterparts, in addition they can be manufactured in any shape, are lightweight, which is very important when selecting load-bearing support structures, and in terms of durability they are not inferior to metal. The cost of the tank is about 1500 rubles.
Step-by-step instructions for making a shower
To make it easier to understand how to build a summer shower in the country, we will divide the work into main stages.
Many summer residents after working on personal plot in hot weather they want to relieve fatigue. Water is the best way to refresh and cleanse the body. But dousing yourself in the yard with a bucket is extremely inconvenient. An excellent alternative would be a shower for a dacha made of polycarbonate with a changing room. It is easy to build with your own hands. This design is durable and easy to use.

Pros and cons of a polycarbonate shower for a summer house
Summer residents often prefer simple and prefabricated structures. This speeds up comfortable living in the country. Summer residents build an outdoor shower made of polycarbonate based on the merits of the materials.
Pros of polycarbonate:
- frost-resistant, moisture-resistant and durable;
- the structure is quick and easy to build with your own hands;
- does not deform under the influence of climate;
- easy to care for;
- soundproofing;
- thermal insulation;
- low cost.
The disadvantages include:
- polycarbonate bends only in one direction; incorrect installation will lead to breakage of the material;
- the absence of an ultraviolet protective layer can accelerate the destruction of the material;
- violation of installation affects the service life of the entire structure.
Types of designs
The flexibility of polycarbonate allows you to create structures various shapes and appointments.
The shape of the shower can be:

According to their purpose, the following types of shower stalls are distinguished:

An outdoor shower for a summer residence is a frame structure of various shapes. A water tank is installed on top of the cabin. It’s not difficult to create a design with your own hands:
- Prepare the base.
- They are erecting strip foundation or foundation on stilts.
- The frame is constructed from aluminum or steel profiles.
- Lined with polycarbonate.
- Install the tank.
- They supply water.
- Equipping inner space.
Wastewater is discharged in various ways:
- install a septic tank;
- pipes are used;
- construct collecting pallets;
- create drainage systems.
In some cases, they set up a summer shower at the dacha with hot water. The easiest way is using water pipes. However, not every dacha community has this luxury. Sources of supply hot water may be flow-through or storage water heater.
Most often, summer residents install a boiler for the kitchen and shower. In this case, the summer shower is adjacent to external wall kitchens.

Attention! For a family of three people, a storage water heater with a volume of 50 liters is installed. The water in it heats up within an hour.
Simple summer shower for a summer house made of polycarbonate
The base of a simple polycarbonate country shower design can be round or square.

Photo instructions for constructing a summer shower at the dacha made of polycarbonate with an absorption well:
- In the selected area, a pit is prepared according to the size of the shower stall, 1-1.5 m deep.

- A third of the pit is filled with fine gravel, the second third with medium gravel, and the third with coarse gravel. Formwork made of boards or bricks is installed around the perimeter and the foundation is poured, leaving a hole in the center for the drain.

- Assembling the frame. The second stage of pouring the foundation is carried out with a slope to the center.
- After the concrete has dried, the hole for draining the water is treated with bitumen mastic.

- The frame is covered with polycarbonate.

- A pallet made of boards is placed on the shower floor. Connect the water supply hose.

- A water tank is installed on the roof.

- Arranging the interior space of the cabin. The siphon, shelves and hooks are attached.

The country shower is ready. Before operation, check the water supply and drainage system. If deficiencies are found, they are eliminated.

Shower for a summer house made of polycarbonate with a changing room
When building a polycarbonate shower for a summer house with a dressing room, you should take into account its differences from a simple design. They consist of dividing the space into two sections using a waterproof bathroom curtain or a lightweight door.
To drain water in the floor, a slope is provided under the drain with a grate. Wooden sheathing will not allow moisture to accumulate in one place and will help the cabin dry out quickly.

Instructions for installing a shower with a changing room and a heated tank:
Shower with toilet for a summer house made of polycarbonate
Summer residents often set up a utility block at their dacha, which solves several problems. It includes:
- toilet;
- storage place for garden tools.
Sometimes the utility block includes a kitchen. Summer construction built from inexpensive building materials. Frame construction made of profile, sheathed with polycarbonate - a budget option.

A place on a summer cottage for arranging a utility block is selected according to the same parameters as a toilet. It is important that wastewater does not reach the source drinking water, therefore, if there is a well on the site, the distance from it to the utility block should not be less than 30 m.
Before arranging the foundation for a shower and toilet, a cesspool is prepared.

A frame made of metal profile or a wooden beam 4*4 cm. Build a base for the toilet seat.

The next step are erecting gable roof. Set up a base in the shower room. The frame and interior are sheathed.

Projects of showers for cottages made of polycarbonate
Even this simple design How a polycarbonate garden toilet requires planning. The project begins with choosing a location. When determining the location of a polycarbonate shower, the remoteness of water intake and drainage is taken into account.
When designing a shower, you don’t need to build complex digital drawings; it’s enough conditional diagram or a pencil sketch. At this stage, they consider what kind of structure needs to be erected:
- simple shower;
- shower with changing room;
- shower with toilet;
- utility block
Lightweight design that does not require installation drainage system, erected on the ground without preparing the foundation. More complex showers will require the construction of a drain and foundation.
Attention! If the design requires a sewerage system or a septic tank, the location of the well for collecting drinking water should be taken into account. The distance between these structures should not be less than 3 m.
When designing a polycarbonate shower for construction at the dacha with your own hands, experts recommend following the rules:
- The structure is placed in a sunny place, since the water tank is heated by the sun.
- Shower lighting is made from moisture-resistant lamps. During installation, use a sleeve to insulate live wires.
- When constructing a shower room with a dressing room, it should be taken into account that there will be a demarcation between them (a doorway or threshold and a curtain for the bathroom).
- The dressing room is equipped with a mirror, a bench and hooks for clothes and towels.
- The height of the structure from the tray to the tank should not be less than 2.2 m, since a watering can with a tap for water supply will be attached to the top.
Examples of simple shower projects for a summer house:


Shower and locker room projects:

Project of a shower for a summer house with a dressing room and heating:
Projects for a shower for a summer house with a dressing room and toilet:
Projects for a utility room with a shower, changing room, toilet and storage room for tools:

How to make a shower in the country from polycarbonate with your own hands
An outdoor shower is designed on the front side of the building, close to the water intake and drain. It also greatly simplifies the supply of electricity.
The area for arranging a shower for a polycarbonate cottage should be well heated and not located in the shade, this will prevent the breeding of mosquitoes and other insects.
The entire process of installing a shower cabin is divided into 5 stages:
- Construction of the foundation.
- Frame installation.
- Polycarbonate sheathing.
- Installing a water tank.
- Interior arrangement of shower and changing rooms.

The structure is located on a hill for good outflow waste water. A do-it-yourself dacha shower made of polycarbonate is designed according to the dimensions: 1.2 * 2 * 2.5 m. Since there is a shower with a changing room, it is necessary to arrange the foundation.
For a polycarbonate shower with a changing room, there are 2 types of base:
- on stilts;
- drainage hole.
To build a foundation on piles you will need:
- 4 metal or asbestos pipes, 8-10 cm in diameter, 2 m long;
- drill with a diameter of 10 cm;
- 4 anchor studs;
- crushed stone;
- concrete solution.
Along the perimeter future design Use a drill to make holes 1.5 m deep. Rubble is poured into the hole to a height of no more than 5 cm. Pipes are installed. Anchor bolts are attached to them for the future frame. Fill all voids with concrete mortar.

To build a drainage hole you will need a shovel and crushed stone. In the center of the assembled structure of four piles, a hole 50 cm deep is dug. The void is filled with crushed stone of different fractions.

For wooden flooring required wooden beam 10*5 m, 7.4 m long and boards 4*10 m, 2 m long, 12 pcs. The log is sawn into 4 parts: two parts 1.2 m long, two parts 2 m long and one part 1 m. The prepared base is attached to the piles with anchor bolts. A cross beam is inserted in the center of the frame - this is the demarcation between the shower and the locker room. Boards are attached on top of the constructed base. Try on a shower tray and cut a hole in the base for it.

To build the frame you will need a space of 5*5 cm, the length is calculated in accordance with the selected project. According to the drawings, the timber is fastened into a frame.

A gable roof is erected from 5*5 cm timber. Three logs are made. They are installed on top of the frame. Cover OSB sheets and covered with slate. The roof is ready.

The frame is coated with a moisture-proofing agent. The next step will be cladding the frame. Using a thermal washer and screws, the structure is covered with polycarbonate.


Polycarbonate sheets for showers in the country are cut to the size of the walls using a stationery knife. The cells of the coating material should be located vertically. Polycarbonate is fixed around the perimeter of the structure.

Upon completion of installation, remove the protective film from the polycarbonate. The joints are treated with sealant. Profile plugs are attached to the ends.
Advice! When polycarbonate joints appear on the wall, a profile is used. The seal is ensured by internal silicone.
The next step is to install the water tank. A black plastic or metal tank is installed on the roof.

The shower room for the dacha made of polycarbonate is ready.
Cabin interior
The final stage of shower construction will be the installation of doors and the interior arrangement of the cabin and changing room. The door is assembled from 5*5 cm timber. Hinges and polycarbonate are attached. The finished element is attached to the frame using self-tapping screws.

Finishing work is carried out inside the shower:
- attach a watering can;
- connect the hose;
- install the pallet;
- drain;
- attach the shelf;
- hang a shelf and hooks for clothes;
- lay a rubber mat;
- hang the curtain.

Option interior design shower room with toilet. The delimiter in this case is a moisture-resistant curtain for the bathroom:
When choosing a water tank, you should pay attention to color and material. They are produced from plastic and metal. A metal tank will retain the heat of the water longer. Plastic is lighter, so it will not weigh down the structure.
For winter storage The water from the tank must be drained, all taps must be closed, allowing the water to flow out. This way the pipes and adapters will be preserved and will not burst in the cold.
If the shower room is located on a hill, decorative steps should be installed for easy access.

- a dark-colored tank heats up faster;
- if you cover the tank plastic film, stretched on wooden slats, the water temperature will increase by 10 °C:
- If you attach foil to the north side of the tank, this will create a greenhouse effect; the water will keep warm longer.
Polycarbonate is easy to maintain. It is enough to rinse off areas of contamination with water and wipe with a dry cloth. It is resistant to the use of household chemicals. However, cleaning with abrasive brushes will result in scratches and cracks.
A polycarbonate shower built for a summer house will serve the owner for at least 20 years.

Conclusion
A polycarbonate garden shower with a dressing room is a practical and affordable design. Simplicity of installation makes it easy to build it yourself. In a short time you get a spectacular and functional summer country shower.
Many owners of apartments with small bathrooms prefer to install a more compact shower instead of a bathtub. There is nothing complicated in its design, so those who want to save some money can make such a product themselves. Of the materials suitable for this purpose, the most practical is polycarbonate.
The strengths of polycarbonate and its disadvantages
Polycarbonate is a type of plastic. Available in two versions:
The attractiveness of polycarbonate is due to the following advantages:
- Light weight. This property allows it to be used for the manufacture load-bearing frame even such low-strength material as polypropylene pipes.
- Waterproof. For a shower cabin, this quality is especially important: the material will not be saturated with water, which means the drying time will be only a few minutes.
- Resistance to biological environment. As you know, in the vicinity of water, many materials begin to rot or become moldy. The owner of a polycarbonate shower can rest assured in this regard: no matter how high the humidity, not a single microorganism will be interested in plastic.
- Transparency. Of course, there is no need for absolute transparency in the walls of the shower stall, but for this application matte polycarbonate is produced, which partially transmits light and is invisible. Thanks to this, there is no need to place the light source directly in the cabin - it can be located outside, where there is no risk of contact of electricity with water. Another “plus” of this property appears when installing the cabin on outdoors (country option): in a translucent version, it will be well warmed up inside by the sun. Note that polycarbonate was originally developed as a material for covering greenhouses, so infrared radiation, which carries the bulk of solar heat, is retained by it to a very small extent.
- Flexibility. Possibility to customize the design rounded shape has value not only from a design point of view, but also for practicality reasons. For example, a corner shower cabin will take up the least amount of space in a rounded form, that is, when in plan it looks like a quarter of a circle. It should be taken into account that when bent, the polycarbonate sheet turns into a pre-stressed structure, which makes it rigid. Thus, a cylindrical polycarbonate shower practically does not need a frame - you just need to make it from steel or polypropylene pipe two rings that will hold the plastic sheet folded (installed at the top and bottom). If the polymer is heated to the softening temperature, after cooling it will no longer strive to return to its original shape, so there will be no need for a frame at all.
- Ease of processing. Sheet cutting can be done with a hacksaw or jigsaw; no special equipment is needed for this.
- High aesthetic merits. Unlike many other materials, plastic can easily be colored throughout its entire volume, so that the colored layer cannot be scratched or peeled off. Also, any relief pattern can be reproduced on its surface without difficulty. Manufacturers actively use all this: the buyer has access to material of all imaginable colors and with a very interesting varied texture.
- Low thermal conductivity. All types of plastic do not conduct heat very well. In cellular polycarbonate this ability is especially pronounced - due to the presence of an air gap.
- No harmful emissions. Unlike many other types of plastic, polycarbonate releases almost no dangerous volatile substances even when heated. Of course, if you heat food in a container made of this material, harmful impurities will appear in it; But as a building material, polycarbonate is harmless.
- Low cost. The quality inherent in all polymers, which explains their victorious march around the world.
Polycarbonate is a common material for independent arrangement shower cabin
However, polycarbonate can disappoint in some ways:
- Strength, like any plastic, is relatively low. An accidental impact on the booth with a hard object can most likely lead to a crack in the wall. A light touch will also not go unnoticed: a scratch will remain on the surface of the sheet. Such defects accumulate quite quickly, so polycarbonate does not retain its presentation for long.
- Cellular polycarbonate is more fragile than monolithic polycarbonate.
- IN pure form polycarbonate, like all polymers, is destroyed when exposed to ultraviolet radiation. Only a special one saves him protective film, but it can be easily scratched.
- The material changes greatly in size with temperature changes (in such cases they speak of a high coefficient of thermal expansion). Taking this into account, the sheet is never screwed tightly (the diameter of the mounting hole must be larger than the diameter of the hardware) and a fairly wide gap is always left around it.
Photo gallery: polycarbonate shower cabins
Before you start making the booth, you need to purchase all the necessary materials.
Pallet
Of course, you can make a pallet yourself: build a low brick border, inside which you install drain device(ladder), pourable cement-sand mortar. But it would be much more rational to purchase a ready-made pallet, especially since very cheap acrylic models are sold today. Costs for self-construction, taking into account the need to use high-quality waterproofing, may well turn out to be higher.
The shower tray can be built at the installation site from brick, concrete and other available materials
If acrylic tray Due to its low strength, it is not satisfactory; you can purchase steel or cast iron with an enamel coating.
A steel or cast iron tray coated with enamel is stronger than acrylic
Shower trays can have the most different shapes, but if we are talking about a small bathroom, then it is better to purchase corner option. At the same time, the consumption of polycarbonate will also be reduced, since the cabin will be fenced on both sides with solid walls.
The size of the pallet should be selected taking into account the height and build of the users: most often, products measuring 1x1 m are purchased.
Polycarbonate
Since the cabin will be installed in an apartment and not on the street, there is a need for thermal insulation properties disappears. Therefore, instead of cellular polycarbonate, a less fragile monolithic one can be used. It is also convenient because the cut parts can be of any size, while the dimensions of parts made of cellular polycarbonate have to be made multiples of the size of the honeycomb.
From polycarbonate sheet easy to cut parts of any shape
How much polycarbonate you will need is easy to calculate. We set the height of the cabin: the upper edge of the wall should not reach the ceiling by 10 - 15 cm. All that remains is to subtract the height of the pallet from this value and multiply the resulting value by the length of the edge of the pallet along which the fence must be installed.
To find out the amount of polycarbonate, you need a diagram of the shower stall with dimensions
It is best to buy plastic in sheets measuring 305x205 cm with a thickness of 0.8 to 1 cm. One square. m of such a sheet should weigh from 1.5 kg (with a thickness of 0.8 cm) to 1.7 kg (with a thickness of 1 cm).
Frame
As already mentioned, almost weightless polycarbonate can also be fixed to plastic pipes, But metal carcass will look much more aesthetically pleasing. The most preferred option is an aluminum profile. But it is also the most expensive. A more affordable alternative is galvanized steel. But it must be taken into account that steel frame Compared to aluminum it will be heavier.
You will need several types of profiles:
- U-shaped. Those frame elements that are screwed to the wall are made from it.
The U-shaped profile is used to attach the shower cabin frame to the wall
- H-shaped. Installed at the junction of two sheets of plastic. Inside the profile, the sheets have enough space for thermal expansion, while the joint is sealed.
H-shaped profile is suitable for creating joints between adjacent plastic parts
- Door. The design of this profile allows you to attach hinges to it if the door is swinging, or rollers if it is a sliding door. Note that swing door is more convenient and if space allows, it is better to use this option. If the bathroom is very compact, you will have to equip the cabin sliding door(you can make a sliding one from two halves).
A swing door is more convenient
The profile must be selected so that the width of its groove matches the thickness of the polycarbonate sheet. Ideally, you need to take a piece of plastic to the store and try the profile on it directly.
Video: installing a shower frame
Other materials and tools
To build the cabin, you will need a seal - it is installed on the door so that it closes hermetically - and a door handle.
Also on preparatory stage You need to make sure that you have all the necessary tools:
- hammer drill or impact drill;
- hacksaw or jigsaw;
- tools and materials for plumbing installation: nut or gas key, sealant (FUM tape or sanitary flax);
- roulette;
- level and plumb;
- something for marking: pencil, marker or chalk.
Creation homemade cabin and its simultaneous installation occurs like this:
- Water supply and sewerage are supplied to the place where it will be located.
We determine the location of water supply and sewerage
- The pallet is installed. Usually it has adjustable legs, with the help of which you need to give the product a slight slope towards the drain hole.
- If the pallet is made of acrylic, it is very important to correctly assemble its frame. The fact is that this material is very fragile and if some element in the frame is missing, the pallet can easily be pressed through. If the manufacturer has clearly saved on wall thickness and frame, which is typical for the cheapest models, bricks can be placed under the pallet.
- After installation, you need to fix the drain grate with a siphon in the pan and connect the latter to the sewer.
- The gap between the pallet and the wall is filled with silicone sealant.
The gaps between the walls and the pallet are carefully sealed
- The frame is installed. Using a plumb line, vertical markings are applied to the wall, along which the U-shaped profile is then screwed in with dowels. Next, all other elements are connected to it. They need to be fastened together with short self-tapping screws, which are commonly referred to as “bugs.” Due to high humidity, hardware that has been subjected to phosphating or chemical oxidation should be used - they can be recognized by their black color.
Phosphating or oxidation gives hardware a characteristic black color
- A sealant is inserted into the profiles, and then polycarbonate. The parts need to be cut out after the frame is mounted - according to its actual dimensions. Monolithic polycarbonate It bends well, so adjusting it into already fixed profiles is not difficult. As a last resort, you can dismantle one of the frame strips and return it to its place after installing the plastic sheets.
Polycarbonate sheets have good flexibility, which makes them easy to install in frame profiles
- The door is manufactured and installed. You cannot simply use a fragment of a polycarbonate sheet for this purpose, since such a door will not close tightly. It is necessary to make a frame in the form of a frame.
The shower door must be reinforced with its own frame
- Finally, the mixer is installed, and the holder for the watering can is screwed to the wall.
- The finished shower cabin must be checked for leaks. To do this, you should take a shower, moving quite actively along the tray, and then see if water is leaking somewhere. If cracks are identified, they must be sealed with silicone sealant.
If the quality of installation is considered satisfactory, it is installed in place decorative panel, covering the space under the pallet.
Video: do-it-yourself polycarbonate shower cabin
Making your own shower stall with polycarbonate walls is not at all difficult. And the benefit of such a solution is not only cost savings. By constructing the cabin on his own, a home craftsman can make it as convenient as possible for himself and at the same time choose the preferred design, whereas it is often not possible to find an ideally suitable copy among factory-made models.


