A plasterboard niche on the ceiling serves as a vivid example of the versatility of using gypsum board, which is used both for ceiling structures and for niches with various functionality.
Varieties of drywall niches on the ceiling
A plasterboard ceiling with a built-in niche can be installed in any room.
It looks like a plasterboard niche on the ceiling
Ceiling niches are used to illuminate a zone, hidden curtain rods or for a stretch ceiling. But still, in different rooms, a niche in the ceiling can perform different functions.
Kitchen
With the help of the ceiling niche in the kitchen, you can hide the laid communications, install hidden cornices, and expose spotlights. In some kitchen design projects, a niche can be used as an additional storage space for kitchen items, especially when it comes to small rooms where every square meter counts.
Living room
Thanks to the installation of ceiling niches, in the living room, you can radically change the geometry of the room and thereby implement any design idea.
 Drywall niche project on the ceiling in the living room
However, the main function of ceiling niches is not only a visual effect, but also practicality and convenience. For example, niches can be assembled for lighting in the living room, for installing spotlights and distributing zones in the room. And also LED strips are often mounted in them. A plasterboard niche for curtains can be combined with a box around the perimeter of the room.
Bedroom
Niches in the bedroom are used mainly to emphasize the geometry of the ceiling, in the center of which a stretch ceiling can be installed. Lighting can be built into a niche on the ceiling, installed around the perimeter of the room, hidden illuminated cornices are installed. The ceiling niche not only decorates the room, but also creates additional storage space, allows you to hide a lot of communications.
How to make a drywall box on the ceiling
Plasterboard and profiles for mounting the box in Petrovich - https://goo.gl/v22oWt How to make a box from plasterboard on ...
 Niche design on the ceiling in the bedroom Back to the table of contents
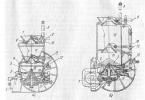
Design features: drawings and calculations
To make a do-it-yourself drywall niche technically correct, aesthetic and convenient, calculations and a preliminary design drawing should be prepared. The drawing of a niche should be made based on its design and purpose. If this design is multifunctional, for example, with built-in lighting and space for a TV, then this design can be called a combined layout. In such drawings, all the features of the frame should be taken into account. If the niche is assembled in the form of a box under a stretch ceiling, then the installation of the canvas is taken into account in the drawings.
 Scheme and drawing of the construction of a niche on the ceiling
In cases where the ceiling niche is used for a cornice and several lamps, then the calculations of the frame do not require additional tweaks. If a niche is being constructed for the cornice, on the frame of which there will be an additional load, then reinforcement in the form of plywood or chipboard sheets can be added.
As for the design drawings, it all depends on the imagination of the master, since the metal profile and drywall sheets allow you to create various designs of any complexity. The video shows the process of installing a plasterboard niche on the ceiling.
Required material and tools
List of materials
- Guide profile.
- Suspended profile.
- Connectors between profiles.
- Single-level connector "Crab".
- Metal suspensions.
- Screws for metal.
- Dowel nails or anchor wedges.
- Insulation.
- Drywall from 9.5 to 12.5 millimeters in size.
List of instruments
- Screwdriver.
- Perforator - allows you to effortlessly make holes in the concrete ceiling for fastening the profile.
- Metal scissors - used to cut a profile.
- Pliers - the tool allows you to connect two profiles without the use of hardware fasteners. The pliers can be replaced with profile screws.
- Painting cord or laser level - both tools are used to mark the frame.
 A design option for a plasterboard ceiling niche in the bedroom
Back to the table of contents
Preparatory work
Before installing a niche, you need to make the layout of the room. First of all, you should decide what the niche is being made for. If its functions are to hide the ceiling cornice, then first of all you need to measure the distance of the niche to the batteries so that the curtains do not touch them later.
 Diagram of a niche for a ceiling cornice
For a niche with lamps along the contour of the room, the desired distance from the wall should be noted. Next, beat off the horizontal stripes on the ceiling with a chopping thread and use a level to draw lines on the walls. The length of the vertical lines will depend on the thickness of the niche. For the lower part of the niche, markings are also made on the wall. They can be applied using a hydro level or a laser level with a horizon function.
It is not recommended to mark a niche from concrete ceiling slabs, as significant differences can be observed, which will affect the evenness of the structure.
If a niche is planned along the contour of the room with the installation of lamps, then wiring must first be carried out in corrugated hoses attached with clamps to the ceiling. The cable outlet for the lampholders must be observed at an equal pitch.
The main stages of work to create a drywall niche
After completing the preparatory work, and in particular the markings for the installation of guides and ceiling profiles, you can proceed with the installation of the frame.
Installation of a metal profile
Stages of assembling a frame from a metal profile for a future niche:

Fastening the sheets of gypsum board and installing the backlight
After the box is assembled, you can proceed with the installation of drywall sheets. First of all, the material should be cut and the side parts of the niche should be sheathed. For this, the gypsum board is attached to the ends of the structure and screwed with self-tapping screws. As for the lower part of the niche, the installation is exactly the same, however, it should be taken into account that after installation it will be necessary to make holes for the reflectors of the luminaires. Further, the wires of the lamps are led out into the holes, after which the process of processing the ends of the box begins.
 Diagram of the device and installation of lighting and drywall fixing
In order to smooth out the protruding edges, you can use a clerical knife, carefully cutting off excess cardboard from the edges of the box.
After all the corners of the niche have been turned and acquired a symmetrical shape, you need to bring the cables through the holes and try to connect the lamps.
After the control check, the luminaires can be connected to the wiring. But you should not finally fix them in the recess, since the box needs to be putty without damaging the external reflectors of the lamps.
Niche finishing
The very first stage of finishing is cutting drywall at the junction with the wall and ceiling, as well as at the joints of the sheets. Further, the entire drywall structure must be primed with an antifungal solution and a roller. After that, at the joints of the drywall with the ceiling and walls, you need to glue the serpyanka. And after pasting all the seams and joints over the serpyanka, you need to apply a layer of putty to the ceiling. And also you need to putty all the places where the screws are screwed.  The next step is to apply the perforated corner to the outer corners of the niche. This is done in order to simplify the finish and avoid cracks. Further, a base putty is applied over the corner. It is better to apply the second layer of putty after the first one has dried, usually after 12 hours. Before application, you should clean the excess mixture beads with a spatula. Then, the base filler can be applied with a wide trowel.
 An example of finishing a plasterboard niche on the ceiling
The last step will be the application of the finishing putty. Before this, the surface must be cleaned of sagging and putty putty in one thin layer. After the putty has dried, the surface must be sanded, primed and glued on the fiberglass, on top of which the finishing putty is applied. After drying, the niche must be re-sanded with a fine-grained sandpaper. Upon completion of all stages of finishing, you can start painting or wallpapering. The luminaires are inserted at the very last stage, when the painting work is finished.
How to make a two-level plasterboard ceiling with your own hands: tips from the masters

Those who want to make a two-level plasterboard ceiling on their own will find a detailed description of this process in this article.
There are quite a few forms of two-level suspended ceilings, but their installation is almost the same. The main difference is the creation of straight or curved structures.
Preparatory work
It is necessary to start the installation process only after all materials and tools have been purchased. You also need to check if it is possible, with the existing ceiling height, to lower it by about 8-10 cm, but not less. It is simply unrealistic to do this in standard apartments. But, there is a way out of this situation - it is necessary to use the base ceiling as the upper tier. It should be perfectly flat, and if there are irregularities on it, then they should be leveled. Only then will it be possible to proceed with the installation of a two-level ceiling.
Design of a two-level plasterboard ceiling
Without a detailed design drawing, it is best not to even start work. In the case of a single-level ceiling, its presence is not necessary, since there are no particularly complex calculations there. But, here it is almost impossible to make a two-level plasterboard ceiling without a drawing. The most optimal solution would be to create a 3D model of the future ceiling. This will help to simplify the work a little and determine the shape of the ceiling.
When the project will fully satisfy all your requests and wishes, then you need to calculate the amount of required materials and start laying the electrical wiring.
Communications
Multi-tiered structures make it possible to insulate the ceiling and improve its sound insulation. But such work should be carried out only after the frame has been installed. If we talk about electrical wiring, ventilation ducts and other communications, then their wiring must be dealt with before work begins on the installation of the ceiling.

The location of the luminaires and their models must be thought out in advance. This also applies to an air conditioner or kitchen hood, in the event that the ceiling will be installed in the kitchen.
The solution to such issues should be dealt with by professionals, because they will definitely be able to make the correct calculations and then do the installation. If there are errors in the calculations, then after the completion of the work, they cannot be corrected.
Sometimes the customer cannot immediately buy the necessary devices that will need to be connected to the network under the false ceiling, for example, lamps. Then you need to rewrite their main parameters, among which are the power and dimensions of the fixing fittings (for built-in luminaires). As soon as these works are completed, it is necessary to sketch the wiring diagram and apply the exact dimensions to it.
Installation process
There are several options for installing a two-level ceiling, and each specialist prefers one or another option. For example, some first completely make the frame of the upper tier, then revet all its visible parts with plasterboard sheets. Upon completion of these works, they proceed to the installation of the lower tier.

Other craftsmen do the opposite, in other words, first the frame of the lower tier is made, and then it is attached to the base ceiling.

To say specifically which of the methods is not better, and its choice depends directly on the design of the future ceiling and also on the area of the second tier. For example, if the area of the lower level is much larger than the area of the upper level, then you should not make a flat frame for the entire ceiling. Firstly, these are the extra costs of the metal profile and fasteners, and secondly, fastening to the base ceiling in such cases is much more reliable.
In the event that the upper level looks like a narrow box running along the perimeter, or there is a protrusion in the center, then the two-level ceiling is best mounted in the first way.
You can learn how to make a flat top-level frame from the article on installing a plasterboard suspended ceiling. We will now take a closer look at the installation of the frame for the lower level.
Installation of the frame for the lower level
- First of all, a design diagram in real size should be applied to the ceiling, horizontal lines should be drawn on the walls, while it is necessary to retreat from the base ceiling to about the depth of the second level.
- Further along these lines, it is necessary to fix the guide profile (PNP 27x28). To create a smooth bend, you need to cut 2 adjacent walls of the profile, and then give the required shape. Then, using each segment, you need to attach the profile to the ceiling.

- Further, under the guide profile, you need to make a markup. A longitudinal ceiling profile (PP 60x27) will be attached to this marking. In this case, you need to ensure that there is a distance of 40 cm between the axes.
- According to the markings, you need to draw perpendicular lines on the wall. These are the projections of the profile axes. It is along these lines that you need to fix the spring hangers and maintain a distance of 60 cm between them. Remember that in no case should you use dowel-nails. For this type of work, it is better to take anchor dowels.
 If a fire breaks out in the house, the plastic dowels will not be able to hold the structure and it will collapse.
 - From the ceiling profile, you need to cut out segments, the length of which corresponds to the depth of the second level. Then, in the same segments, you need to cut off the side shelves, approximately to a height of 3 cm, and leave the base. Further, these jumpers are inserted with the straight side into the upper guide profile and screwed to it. If these are fastenings on a flat area, then you need to observe a step of 60 cm, and 20-30 cm - on curved ones. If you plan to place spotlights for plasterboard ceilings in a vertical wall, then before fixing the jumpers, you must check the diagram.
- It is necessary to form a lower profile on the floor, repeating the figure on the ceiling. Make sure that the profile is facing the wall. To form a bend, you must trim 2 parallel sides, but not adjacent ones.
- Further, the finished structure must be screwed to the jumpers. In this case, the “profile tongue must be applied on the base of the profile.
- It is necessary to cut the drywall strips and screw them to the frame. Their width should correspond to the depth of the second level. Then one side of the cardboard must be moistened with water and left for about an hour, but first, using a special needle roller, you need to make a perforation. This is necessary in order to bend the drywall strip.
- Now it is the turn of the longitudinal profile of the PP, which must be fixed between the guides. This is necessary to secure the second level. Each profile must be measured locally. Before proceeding with the installation, you need to put on "crabs" on the longitudinal PP-profiles, which are necessary to connect them with the transverse ones.

- The transverse profiles must be installed in the legs of the "crabs", then fastened with small self-tapping screws for metal.
- Now it remains only to fix the longitudinal profiles on the suspensions and set them in level.

Installing the top-level framework
After you have completed the previous step, you will already know everything about how to make a two-level plasterboard ceiling.
A flat frame for the upper level needs to be assembled on straight suspensions, and all the nuances of the process are already known to you. It is also necessary to observe a distance of 40 cm between the axes, and fasten the jumpers at the junction of drywall sheets.
Plasterboard cladding
Before proceeding with the cladding, you need to re-check the communication diagram, and if the need arises, then in those places where heavy lamps will be attached, you need to strengthen the structure. After that, the ends of the wires must be lowered, and take care of the heat and sound insulation of the frame. Only after the completion of these works can you start cladding.
And at the end of the article, I would like to note that where the drywall is adjacent to the walls, it is necessary to cut off the factory bevel from it. The same must be done at the junctions to the vertical step of the second level. In such places, the sheet is thinner, and this can lead to problems with the decoration of the ceiling.
Complex forms of plasterboard are necessary not only on the ceiling, sometimes for the uniqueness of the design or for spectacular changes in the layout, you have to think about how to make a round wall. More precisely, arched, since it would be impractical to completely loop the structure. But is drywall able to withstand such tests, and how to get the desired result from straight metal profiles? Let's figure it out.
Before making a round wall, let's find out what it will give.
First of all, perhaps, one should summarize information about such a convenient, but not particularly durable drywall. This composite material is also known as dry plaster, and is actively used for wall decoration, even in rooms with high levels of humidity or flammability using particularly resistant sheets. However, unlike decorative coatings, which are applied with a thickness of several millimeters and immediately represent the finishing option, sheets of two layers of cardboard, between which a frozen layer of gypsum is enclosed, requires finishing.
But if you do not pay attention to the decorative component, drywall is a very valuable development, because you can make a round wall out of it quite quickly, only slightly moistening it. Today, sheets are produced with a thickness of 6, 8, and 9.5 millimeters (the most popular dimensions, but there are also thicker ones), which bend relatively easily, especially the first type, called arched. More massive modifications are necessary in cases where a solid foundation is needed, for example, so that drywall niches are not only decorative.
Hence, we conclude that practically no other material can be used, say, for curved walls or for suspended ceilings in the form of complex shapes (especially in the latter case). Neither plywood nor plastic have the required margin of flexibility and durability. Brick is all the more unsuitable for lightweight structures. As for the roundness of plasterboard walls, it is needed, first of all, in cases where it is required to slightly increase the area of one room by removing the protrusion in it, by reducing the area in the adjacent room, where there will be no corner. In addition, protruding details of the layout are damaged more often than rounded ones.
We make rounded partitions
We already know that you can get rounded partitions with ease, however, observing a certain degree of care, since the material is quite brittle. But what about the frame on which you need to attach the sheets? The wooden beam falls off immediately. But with profiles, it turns out that the desired result is quite achievable. We also need mineral wool, a sufficient number of screws and some tools. In particular: a construction compass and a knife, a hacksaw and a grinder saw, a screwdriver, metal scissors, a square, a needle roller, a pencil.
How to make a round drywall wall - step by step diagram
Step 1: marking the bases
We apply a semicircle to the inner sides of the frames of the partitions to be connected, converging at an angle, so that the flat side of the template is perpendicular to one of the structures, and draw an arc on the floor.
Exactly the same markings should be on the ceiling, but, in the event that drawing on it does not work, we simply fasten the template itself with several screws in the same position in which it lay below.
You can also fix the part cut from the workpiece on top with the same arc, the shape of which our template took.

Step 2: Prepare the guides
It is very important to bend the profile correctly, which, despite being made of metal, can easily take an arched shape. To do this, measure along the back plane of the guide line segments of 5 centimeters, making notes.
Then we draw transverse lines along them, along which we make cuts with a grinder.

With scissors we cut one of the profile sides from the cuts.

Bend the board that remains intact into the arc we need, referring to the line drawn on the floor.

We prepare the exact same profile for the ceiling.
Step 3: making the template
At the first stage of work, we measure out the required bending radius of the wall (the minimum for a nine-millimeter sheet is 50 centimeters), after which we proceed to drawing the template. As a blank, you can use a sheet of plywood or even a piece of drywall, if there is a possibility of such waste.

As a result, a semicircle with the desired radius should be drawn on the sheet, which we cut with a hacksaw, resorting to the help of a construction knife, if it is drywall.


Step 4: Fastening the frame
Make sure that the profiles are strictly vertical. In order not to overshoot the profiles in the process of sheathing the structure, we draw marks on the floor and ceiling at their bases.
Step 5: Installing the outer arc cover
In order for the drywall sheets to bend without cracks and other imperfections, you need to wet them and leave them for 20 minutes to soften a little.

Then we carefully lift the finishing material, which can now tear like ordinary wet cardboard, and apply it to the extreme vertical rack of the frame. We screw it to the first profile, bend it slightly until it touches the second rack, screw it again and repeat the process until the drywall is fixed on all the vertical elements of the frame.
It is better to cut the sheets into strips or use waste, since they are less likely to crack during the bending process.
Step 6: Installing the soundproofing
Since our round gypsum plasterboard walls are still an unfinished structure with only one-sided cladding, we begin to lay soundproofing plates of mineral wool between the profiles.
To do this, we cut them into narrow strips, which must fit tightly between the vertical posts of the frame, partially entering the profiles.
Step 7: Installing the inner arc cover
Plasterboard sheets are laid on the inside of the curved structure in exactly the same way as with the outside, with only one difference - now it is possible to form a bend of the sheathing on the outer covering. We wet the drywall strips, but now we roll a needle roller over them from the side that will be outside. When the desired degree of curvature is obtained on the outer part of the arc, we transfer the sheet to the inside of the frame and fix it with screws.
We cut off the excess with a construction knife or saw in the middle of the extreme profile for joining with the following sheathing elements.
With the second layer we fasten the whole wetted sheets, also cutting them off in the middle of the vertical rack.

Plasterboard sheets (gypsum plasterboard) are considered one of the most versatile and affordable materials for finishing any premises. They can be used for leveling walls, ceilings and floors in any residential and office space, finishing door and window slopes, creating various architectural structures and decorative interior elements in the form of partitions, columns, built-in shelves and niches, arched forms, domed vaults, etc. etc.
Such structures consist of plasterboard sheets, fixed on a profile metal frame of the required shape, followed by their final finishing.
Advantages of drywall
Plasterboard structures used in the interior of the premises have the following advantages:
- provide almost perfectly flat surfaces;
- make it possible to create curved surfaces and individual elements of any shape and complexity;
- have high environmental friendliness and air permeability of the material;
- have excellent warmth and;
- are characterized by sufficient lightness, strength and fire resistance;
- are a convenient basis for final finishing (painting, wallpaper, ceramic tiles);
- have an affordable cost of consumables;
- provide simple and quick installation that does not require special skills and the use of special equipment and tools.
- the need to hide the uneven surface of the ceiling;
- the need to hide various lines of communications running along the ceiling (pipes, cables, ventilation boxes, etc.);
- creation of an original interior of the room.
- single-level;
- combined, which combine structures made of gypsum plasterboard sheets and stretch ceiling elements.


These properties allow the use of gypsum plasterboards as a modern universal finishing material.
The main types of individual structures from gypsum board
Interior decoration of various surfaces and the creation of individual decorative elements in the interior of a room using plasterboard sheets has its own characteristics. Let's consider them in more detail.
Ceiling
Ceiling decoration with gypsum plasterboard is today one of the most popular and frequently used technologies along with stretch ceilings. It is usually used in cases:


The use of plasterboard structures for the ceiling allows you to implement almost any that satisfies the desires of the owner of an apartment or office.

At the same time, the gypsum board ceiling can be finished in any room, including using special brands of drywall (waterproof, fire-resistant) for this.

The main types of plasterboard ceilings are:

The device of a plasterboard ceiling begins with the installation of a supporting frame made of a metal profile, on which sheets of gypsum board are fixed with self-tapping screws. After that, the surface is carefully putty and painted in the desired color.

An additional element that gives a special originality to the plasterboard ceiling is the installation of built-in LED or neon lights. This allows you to achieve, for example, the effect of "starry sky" or "floating" elements on the ceiling, thereby creating a unique interior of the room.
Walls
Plasterboard is often used for interior decoration.

In addition to directly decorative functions, this allows you to create additional heat and sound insulation of walls, as well as hide electrical wiring, pipelines and other communication lines laid along the walls.

At the same time, built-in shelves, niches and other decorative elements can be made in the walls to complement the overall design of the room.

GKL sheets are attached directly to the wall or to a pre-installed frame made of metal profiles or wooden bars. For wall decoration, gypsum plasterboard sheets with a thickness of at least 12.5 mm are used, and in some cases a two-layer installation is used to ensure sufficient structural rigidity.

Can be done in almost any room. It is most effective for exterior walls prone to freezing during the cold season. This allows you to additionally insulate the room and prevent condensation, mold and mildew from appearing on the walls.
Floor
To level the floor surface, the "dry floor" method is used with the use of special sheets of drywall, which have increased strength and wear resistance.

Such sheets are laid in two layers on any prepared base and can be covered on top with any floor covering (linoleum, parquet, laminate, ceramic tiles). The advantage of this method of leveling the floor is the speed and manufacturability of the work carried out.
Plasterboard sheets for the floor can also be used to create various multi-level floor design structures, for example, in the form of hiding heating pipes and other communications laid along the walls.

Additionally, various lighting devices can be built into them, giving a special originality to the interior of the room.
Partitions
The main purpose is the zoning of the interior space into separate parts.

Such plasterboard structures are made of a metal-profile frame rigidly attached to the walls, floor and ceiling and sheathed with plasterboard sheets.

The internal space of partitions is usually filled with some kind of sound insulating material.

Openings in partitions can be made in the form of arched structures or various curved and wavy surfaces, creating a unique interior design of the room.

Also, inside the partitions, built-in shelves and niches can be provided, which perform both decorative and purely practical functions for storing various things.
Built-in shelves and niches
In drywall structures, they can organically fit into the interior of any room and at the same time carry an additional function of placing various objects on them (equipment, books, souvenirs, photographs, etc.).

The shape and configuration of such structures can be very diverse. Often, spotlights are installed inside them, giving originality to the entire interior of the room. The final finish of such a structure depends entirely on its further functional purpose.
Arched structures
Arched structures can be installed almost anywhere in the apartment. Most often they are located in corridors and interior openings.

The shape and size of the arch can be any, but in this case it is necessary to take into account the fact that the higher the height of the arch, the more aesthetically pleasing and beautiful it will look.

Consists, as a rule, of three main elements: two semicircular sheets of gypsum board and a rectangular strip equal to the width of the doorway.

For the device of the arch, a frame made of a metal profile of the desired shape is installed in the upper part of the opening, to which side sheets and a rectangular element from below are attached on both sides.

Before final finishing, the outer edges of the arch are reinforced with a special perforated corner or reinforcing tape.
One of the most effective design tricks is the use of lighting effects. Often it is the light that gives the interior a zest. A backlit plasterboard ceiling is one of the most common options. It is good because, if you wish, you can do it yourself, with your own hands.
Main design differences
The backlighting of the plasterboard ceiling can be hidden and open. Open - spotlights that are fully or partially visible. The hidden one is called so because only its radiation is visible. Therefore, when installing a plasterboard ceiling with hidden illumination, the lower level boxes are made with a shelf on which the lighting fixtures are placed.
This shelf can be open or closed and, depending on this, and the position of the light sources changes the width and brightness of the strip of light on the ceiling.

How the light flux changes depending on the shape of the shelf and the location of the light source
Backlight box design
To make such a box for ceiling lighting, two types of profiles are needed:

In the version shown in the photo above, the shelf does not lean on anything. The rigidity of the gypsum board itself is enough to keep the light backlight. In this case, the weight of the lighting elements must be taken into account. The heaviest are fluorescent lamps, but they have practically not been used recently, since there are other options that are more economical in energy consumption and easier to install (LED strips, duralight).
There is a second construction. Here the extension of the shelf rests on elongated cross members. If the previous construction seems unreliable to you, you can do this. Only in this case, a little more bearing profile will be required. The photo shows an example of organizing a two-level flow from drywall with backlight.

The exact same scheme can be implemented in a single-level version. If your main ceiling is in good condition, you can only make a perimeter box. An example of an assembled framework for lighting is below. It remains to make an inner side, and hem the frame from the bottom.

A backlit plasterboard ceiling does not always have straight lines. They are simply the easiest to implement. But the same patterns are done with curved lines. The result is very beautiful false ceilings.

Only at large distances from the load-bearing walls, it is necessary to additionally fix the load-bearing profile either to the ceiling or to the profiles of the previous level. It is more convenient to do this with suspensions.

Sources of light
When planning to make the illumination of plasterboard ceilings, one must remember that this is not lighting at all, but only a way to decorate the room. The stream of light is diffused. Initially, it is fused onto the ceiling, and then into the room. And it adds almost nothing to the overall illumination of the room. With its help, you can visually "raise" the ceiling, make it one of the components of the interior, but this element cannot be considered lighting. Lighting will have to be taken care of separately: to install built-in lamps, wall or traditional - chandeliers.
Backlighting can be done using different light sources, but recently three types have been used:
- LED
- tapes;
- duralight.
- Neon tubes.
LED strips and duralight
This is a series of LEDs in series. Their peculiarity lies in the fact that they are powered from 12 V or 24 V. This power can be provided using an adapter that converts the voltage of a 220 V household network into a lower one. There are monochrome ribbons (white, red, blue, green) that are designated SMD or universal RGB when marking.
Monochrome always emit one color, the color of universal ones can vary. RGB tapes work only with a controller and a remote control. On command from the control panel, they change the hue (the number of colors can be different - from tens to hundreds), in some models the intensity of the glow can also change.
By the type of execution, LED strips are:
- Regular. They do not have a protective coating and can only be used in dry rooms.
- Waterproof. Their surface is covered with varnish. Can be used for lighting wet rooms - kitchens, bathrooms.
- Moisture resistant. Sealed in a polymer tube (called duralight) or housing. They are rarely used for room illumination, more often in aquariums, swimming pools, etc.
The choice is clear. Select the type of tape depending on the conditions of the room. , and we will talk about the good or bad LEDs in the backlight.
First, about the merits:
- Low power consumption. They are very economical. Considering that this is only decoration, I don't want to spend large sums on its content.
- Do not get warm. Only the power supply can get warm, the LEDs themselves do not heat up. This is important if the ceiling is wooden.
- Long service life. Counts in thousands of hours. Under normal power supply, they burn out very rarely (do not exceed the current for which they are intended).
- Low price. SMD 35 * 28 tape 5 meters long and 120 pcs / m density costs about $ 2-3. Approximately the same should be paid for the adapter. True, these are the prices of Aliexpress. In stores, everything is much more expensive (2-3 times), although you will not go broke either.
- Simple installation. An adhesive composition is applied to the back surface of the tape. Remove the protective layer and stick in the right place. If the surface is rough, you can "shoot" with staples from a construction stapler, but it is better not to punch the tape itself.
Now about the disadvantages. First and foremost: LEDs firmly illuminate all surface flaws. Therefore, the requirements for the quality of the ceiling finish are very high. Second disadvantage: the presence of adapters. They need to be attached somewhere. Probably that's all.
Neon tubes
These are glass tubes filled with a mixture of inert and luminous gases. The brightness of the glow changes when the current strength changes, which is regulated by the convector. These devices are installed every 5 meters, their power consumption is about 100 W, they do not make noise during operation.
Also, a step-up transformer is required for operation: normal voltage is not enough for neon to work. Transformers are installed every 6 meters. But they can hum during work, and also - warm up and electricity, of course, "pull" pretty well. The entire system as a whole consumes a fairly large amount of electricity, which, together with the fragility of the tubes and the rather high complexity of installation, makes it not very attractive compared to LEDs.
But neon cords have recently appeared. They come immediately with a controller and all you need to do is press a button. They are powered by AA batteries. But the power of such illumination for the ceiling is definitely not enough. They can be used in conjunction with LEDs to illuminate interior details.
Installation of ceiling lighting around the perimeter with step-by-step photos
The main ceiling in this version was putty, therefore the first tier was not done. Only the box was attached around the perimeter: the height is already small and 7-8 cm required for organizing the suspended one are critical.

There is a place for the cornice near the window, the width of the box is 60 cm, it is lowered by 12 cm relative to the main ceiling, the height of the side is about 5 cm, the protruding part is 6 cm, the corners are rounded.

The first method was chosen - a step under illumination without a support. Since the backlight is planned from a conventional LED strip, its carrying capacity is more than enough.
First, markings are made on the ceiling. All the specified dimensions are set aside, lines are drawn with the help of a paint cord. Please note that the line on the ceiling is laid at a distance of 54 cm, and not 60 cm, as in the first diagram. It is obtained taking into account the fact that the step is pushed forward by 6 cm.

When drawing rounds, their center is made not in the place where the profile is attached, but taking into account the protruding step: this way the element turns out to be more expressive.

Profile guides are attached along the marked lines (CD or PNP in the marking). Fastened to dowels with a pitch of 50 cm. Drilled immediately through the metal. Having installed the plug, the dowel-nail was twisted.

Where it is necessary to form a rounding, the walls (sidewalls) of the profile are notched, the back remains intact. After that, the profile can be laid out in a circle.
From the front side to the guide profile on the ceiling, we attach a strip of drywall 12 cm wide.This will be the back side of our box. We fix it around the entire perimeter with self-tapping screws with a screw at a distance of about 10 cm.


On the back side of the installed side, we attach vertical posts from the CD profile (ceiling). Their length is small - 9.8 cm (12 cm box height, minus 1 cm for the installation of profiles, and another minus 1.2 cm for the thickness of the gypsum board screwed from below).
In each section, the bottom is trimmed. The side walls are removed so that another guide profile can be screwed on. As a result, its bottom shelf should be flush with the profile bolted to the wall. The installation step of the vertical racks is about 40-50 cm.

We fasten short vertical pieces around the perimeter

The next step: we fasten the PNP profile, which goes along the bottom of the boat. It is also installed on self-tapping screws with a pitch of 10-12 cm.

They connect two guide profiles: the one that is screwed on the wall and the one that is attached to the main side. They are made from a supporting profile with a step of 40-50 cm.

We proceed to the design of the roundings. To make the strip bent along the required trajectory, we take a strip of drywall about 15 cm wide.Cut it in 5 cm increments and break the gypsum. The result is pieces of plaster that stick to the cardboard.

Now we attach such pieces to the profile. For each fragment - one self-tapping screw, approximately in the middle of the width, so as not to burst.

Using the laser level, transfer the height markings to the inner side. If there is no laser level, use a water level and draw a line with a pencil.
Then we take a piece of the bearing profile 9.8 cm long, only we cut it both from above and below. Approximately in the middle of the arc, we wind one edge behind the profile, fasten it with a self-tapping screw.

Then we take a piece of the profile cut into fragments (as they did when forming a circle on the ceiling) and fasten it along the mark.

Finished rounding "from the inside"
Now the extra pieces of plasterboard can be removed. They are cut to the level with the lower edge of the profile, carefully cutting the paper and breaking off small fragments.


The next step in making a backlit plasterboard ceiling is putty. The ceiling and the main side are putty. This is the most convenient moment for this. Later, the hemming from the bottom and the protruding cornice will interfere.


The most convenient way is to cut a square, then cut it off on one side. First we fasten it in straight lines. Then, gradually, in an arc, drawing the required shape of the edge.

First you can draw, then bite off in small pieces along this line. Smooth out irregularities with a wallpaper knife.

No news: for the roundings we cut the sidewalls, bend them with the required diameter and set them in place, fixing them with self-tapping screws.

If you plan to make LED lighting for your plasterboard ceiling, it's time to fix the tape. Then it will be very uncomfortable. It is glued in the right place, if necessary, setting some kind of inclined plane.

Further, a strip of drywall 5 cm wide is attached to the profile. Of the features - fastening in the middle, and not above and below: the height is too small. Bends are also familiar. We cut a strip every 4-5 cm, break the plaster and fix it.


In this version, in order to facilitate the work and give the ceiling a finished look, fillets (ceiling plinth) are glued to the side. Similar ones are glued at the junction of the box and the wall.

Now it remains to putty everything and achieve a flat surface. Almost everything. The backlit plasterboard ceiling is ready, it remains to install the backlight itself. And it can be different.

Another option can be seen in video format, but with a working backlight.
The installation of a bi-level stream is demonstrated in the following video. The steps are shown schematically, but the assembly of the first level is clear. So that might be helpful.
How can you arrange a plasterboard ceiling with lighting (photo)


LED lighting of the plasterboard ceiling is only a spectacular design technique. Lighting needs to be taken care of separately


Ceiling lighting in the bedroom


Influenced by the influences of the familiar "Housing Problem", he built a ledge of plasterboard and columns of stone.
The project was drawn like this. After the arches, this project seemed like child's play :)
![]()
In fact, it turned out to be such a protrusion.
![]()
I made a strobe from the switch box to the ceiling. In this strobe I laid a wire to connect the backlight.
![]()
I marked the axis of the whole structure and on both sides of the axis I marked the outline of the protrusion on the wall and ceiling with a pencil. I built a frame from metal profiles and sheathed it.
The profiles were arranged taking into account the holes for the lamps. Those. the profiles are located between the holes for the luminaires.
![]()
![]()
Putty and cleaned with fine sandpaper 3 times. The flexible corner was not glued to the corner of the ledge.
![]()
I chose the location of the lamps as follows: a large lamp in the center of the ledge and on either side of the large lamp there are two small lamps. In total, 5 spotlights were used in the illumination of the ledge.
We mark the contours of the columns on the wall and fix the artificial stone in staggered stripes on tile adhesive.
![]()
This is how the column turns out. I ordered three square meters of stone. Little remained after the construction of the structure.
![]()
Part of the central column was not filled with artificial stone. This is where the TV mount will be located. At the bottom I made sockets for power.
From the outlet I had to pull "zero" into the ledge to connect the transformer. Again, I additionally shtrobil. I had to tinker with the lighting.
![]()
Matching wallpaper to the stone was not an easy task ...
![]()
Here's what happened as a result.