More recently, the word LED was associated only with indicator devices. Since they were quite expensive and emitted only a few colors, they also shone faintly. With the development of technology, the price of LED products has gradually decreased, and the scope of application has expanded rapidly.
Today they are used in various devices and are used almost everywhere where lighting devices are needed. Headlights and lamps in cars are equipped with LEDs, advertising on billboards is highlighted LED strips. In domestic conditions they are also used no less often.
Headlights - Free your hands
You can place the headlight on your head or attach it to your helmet. For this purpose, special fastening straps supplied with the device are used. This solution will allow you to use both hands, and the direction of the light will correspond to the movement of your head. The headlights are light and do not heat up, which ensures comfort even for many hours. They allow you to adjust the light intensity, degree of scattering and lighting angle. They are especially useful during night work.
Hand Reflectors - Portable Work Lights
Not every flashlight provides enough light for the needs of work on a construction site or in a workshop. Dust and waterproof housing cover the battery, which can generate bright natural light. The absence of power cords increases the comfort and safety of work, and the ability to recharge has a positive effect on the ergonomics of use.
Reasons to use LEDs
Lanterns were not spared either. Thanks to powerful LEDs, it has become possible to assemble a super-powerful and at the same time fairly autonomous flashlight. Such lanterns can emit very strong and bright light long distance or over a large area.
In this article we will tell you about the main advantages of high power LEDs, and we will tell you how to fold LED flashlight with your own hands. If you have already encountered this, then you will be able to supplement your knowledge; for beginners in this area, the article will answer many questions related to LEDs and flashlights with their use.
If you want to save money by using LED, there are some factors to consider. Since sometimes the price of such a lamp can exceed all the savings. If you have to spend a lot of money and time on maintaining light sources, and the total number of them consumes a lot of electricity, then you should consider whether an LED would be a better replacement.
Compared to conventional lamps, LEDs have a number of advantages that elevate them:
- There is no need for maintenance.
- Significant energy savings, sometimes savings up to 10 times.
- High quality luminous flux.
- Very high service life.
Necessary components
If you decide to assemble an LED flashlight with your own hands, for moving in the dark or for working at night, but don’t know where to start? We will help you with this. The first thing you need to do is find the necessary elements for assembly.
Here is a preliminary list of required parts:
- Light-emitting diode
- Winding wire, 20-30 cm.
- The ferrite ring is approximately 1-.1.5 cm in diameter.
- Transistor.
- 1000 ohm resistor.
Of course, this list needs to be supplemented with a battery, but this is an element that can be easily found in any home and does not require special preparation. You should also select a housing or some kind of base on which the entire circuit will be installed. A good case would be an old, non-working flashlight or one that you are going to modify.
How to assemble it yourself
When assembling the circuit, we will need a transformer, but it was not added to the list. We will make it ourselves from a ferrite ring and wire. This is very simple to do, take our ring and start winding the wire forty-five times, this wire will connect to the LED. We take the next wire, wind it thirty times already, and direct it to the base of the transistor.
The resistor used in the circuit should have a resistance of 2000 ohms, only by using such resistance can the circuit work without failure. When testing the circuit, replace resistor R1 with a similar one with adjustable resistance. Turn on the entire circuit and adjust the resistance of this resistor, adjust the voltage to approximately 25mA.
As a result, you will know what resistance should be at this point, and you will be able to select a suitable resistor with the resistance value you need.
If the circuit is drawn up in full accordance with the above requirements, then the flashlight should work immediately. If it doesn't work, then you may have made the following mistake:
- The ends of the winding are connected in reverse.
- The number of turns does not correspond to what is required.
- If the wound turns are less than 15, then current generation in the transformer ceases.
Assembling a 12 volt LED flashlight
If the amount of light from the flashlight is not enough, then you can collect powerful flashlight, powered by a 12 volt battery. This flashlight is still portable, but much larger in size.
To assemble the circuit of such a lantern with our own hands, we will need the following parts:
- Plastic pipe, about 5 cm in diameter and PVC glue.
- Threaded fitting for PVC, two pieces.
- Threaded plug.
- Tumblr.
- Actually the LED lamp itself is designed for 12 volts.
- Battery for powering the LED, 12 volts.
Electrical tape, heat shrink tubing and small clamps to keep the wiring in order.
You can make your own battery from small batteries that are used in radio-controlled toys. You may need 8-12 pieces, depending on their power, to give a total of 12 volts.
Solder two wires to the contacts on the light bulb, the length of each should exceed the length of the battery by several centimeters. Everyone is carefully isolated. When connecting the lamp and battery, install the toggle switch so that it is located at the opposite end from the LED lamp.
At the ends of the wires coming from the lamp and from the battery pack, which we made with our own hands, we install special connectors for easy connection. We assemble the entire circuit and check its functionality.
Assembly diagram
If everything works, then we proceed to creating the case. Having cut the required length of the pipe, we insert our entire structure into it. We carefully secure the battery inside with glue so that it does not damage the light bulb during operation.
We install a fitting at both ends, secure it with glue, this way we will protect the lantern from accidental moisture getting inside. Next, we bring our toggle switch to the opposite edge from the lamp, and also carefully secure it. The rear fitting must completely cover the switch with its walls, and when the plug is screwed in, prevent moisture from entering there.
To use, simply unscrew the cap, turn on the flashlight and screw it back tightly.
Price issue
The most expensive thing you will need is a 12 volt LED lamp. It costs about 4-5 dollars. After rummaging through children's old toys, batteries from a broken car will be free for you.
The toggle switch and pipe can also be found in the garage; cuttings of such pipes are always left after repairs. If there are no pipes and batteries, you can ask friends and neighbors or buy them at the store. If you buy absolutely everything, then such a flashlight can cost you about $10.
Summarize
LED technology is gaining more and more popularity. Having good characteristics, they may soon completely displace all competitors in the field of lighting. And assemble a powerful portable flashlight yourself with LED lamp with your own hands, it will be practically no difficulty for you.
LED light sources are by far the most popular among consumers. LED lights are especially popular. There are different ways to get an LED flashlight: you can buy it in a store or make it yourself.
LED handheld flashlight
Many people who understand at least a little electronics, for various reasons, increasingly prefer to make such lighting devices with their own hands. Therefore, this article will discuss several options for how you can make your own diode hand-held flashlight.
Advantages of LED lamps
Today, LED is considered one of the most profitable efficient light sources. He is capable of creating bright light flow at low power, and also has a lot of other positive technical characteristics.
It’s worth making your own flashlight from diodes for the following reasons:
- individual LEDs are not expensive;
- all aspects of assembly can be easily accomplished with your own hands;
- homemade lighting fixture can run on batteries (two or one);
Note! Due to the low power consumption of LEDs during operation, there are many schemes where only one battery powers the device. If necessary, it can be replaced with a battery of appropriate dimensions.
- Availability simple circuits for assembly.

LEDs and their glow
In addition, the resulting lamp will last much longer than its analogues. In this case, you can choose any color of the glow (white, yellow, green, etc.). Naturally, the most relevant colors here will be yellow and white. But, if you need to make special lighting for some celebration, then you can use LEDs with a more extravagant glow color.
Where can the lamp be used and features
Very often there is a situation when you need light, but there is no way to install a lighting system and stationary lighting fixtures. In such a situation, a portable lamp will come to the rescue. An LED hand-held flashlight, which can be made with one or more batteries, will find wide application in everyday life:
- it can be used for work in the garden;
- illuminate closets and other rooms where there is no lighting;
- use in a garage when inspecting a vehicle in an inspection pit.
Note! If desired, by analogy with a hand-held flashlight, you can make a lamp model that can be easily installed on any surface. In this case, the flashlight will no longer be portable, but a stationary source of light.
To make your own LED flashlight manual type You need to remember, first of all, about the disadvantages of diodes. The truly widespread distribution of LED products is hampered by such shortcomings as the nonlinear current-voltage characteristic or current-voltage characteristic, as well as the presence of an “inconvenient” voltage for power supply. In this regard, everything LED lights contain special voltage converters that operate from inductive energy storage devices or transformers. In this regard, before proceeding self-assembly To create such a lamp with your own hands, you need to choose the necessary diagram.
When planning to make a hand-held flashlight from LEDs, it is imperative to think about its power supply. You can make such a lamp using batteries (two or one).
Let's look at several options for how to make a diode hand-held flashlight.
Circuit with super-bright LED DFL-OSPW5111Р
This circuit will be powered by two, rather than one, batteries. Assembly diagram of this type The lighting device has the following form:
Flashlight assembly diagram
This circuit assumes that the lamp is powered by AA batteries. In this case, the ultra-bright DFL-OSPW5111P LED with a white glow type, having a brightness of 30 Cd and a current consumption of 80 mA, will be taken as a light source.
To make your own mini-flashlight from battery-powered LEDs, you need to stock up on the following materials:
- two batteries. An ordinary “tablet” will be enough, but other types of batteries can be used;
- “pocket” for the power supply;
Note! Best choice there will be a “pocket” for the battery, made on the old motherboard.
- super bright diode;

Super bright diode for flashlight
- a button that will turn on a homemade lamp;
- glue.
The tools you will need in this situation are:
- glue gun;
- solder and soldering iron.
When all the materials and tools are collected, you can start working:
- First, remove the battery pocket from the old motherboard. For this we need a soldering iron;
Note! Soldering the part should be done very carefully so as not to damage the pocket contacts in the process.
- the button to turn on the flashlight should be soldered to the positive pole of the pocket. Only after this will the LED leg be soldered to it;
- the second leg of the diode must be soldered to the negative pole;
- the result will be simple electrical circuit. It will close when the button is pressed, which will cause the light source to glow;
- After assembling the circuit, install the battery and check its functionality.
Ready lantern
If the circuit has been assembled correctly, then when you press the button the LED will light up. After checking, to increase the strength of the circuit, the electrical solders of the contacts can be filled with hot glue. After this, we place the chains in the case (you can use it from an old flashlight) and use it for your health.
The advantage of this assembly method is the small dimensions of the lamp, which can easily fit in your pocket.
Second assembly option
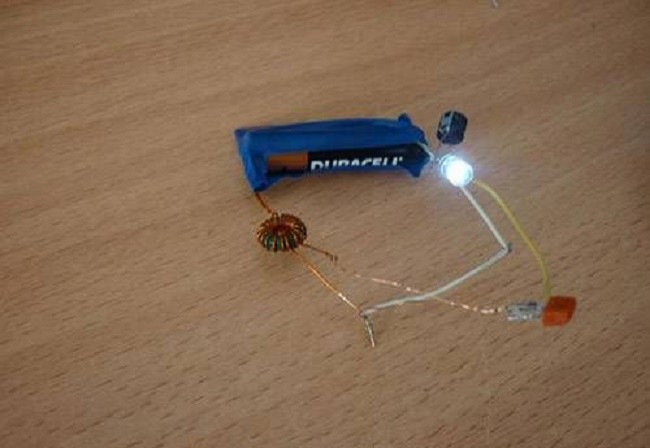
Another way to make a homemade LED flashlight is to use an old lamp in which the bulb has burned out. In this case, you can also power the device with one battery. Here the following diagram will be used for assembly:

Diagram for assembling a flashlight
Assembly according to this scheme proceeds as follows:
- take a ferrite ring (it can be removed from fluorescent lamp) and wind 10 turns of wire around it. The wire should have a cross-section of 0.5-0.3 mm;
- after we have wound 10 turns, we make a tap or loop and wind 10 turns again;

Wrapped Ferrite Ring
- Next, according to the diagram, we connect a transformer, an LED, a battery (one finger-type battery will be enough) and a KT315 transistor. You can also add a capacitor to brighten the glow.
Assembled circuit
If the diode does not light up, then it is necessary to change the polarity of the battery. If it doesn’t help, then the problem was not with the battery and you need to check the correct connection of the transistor and the light source. Now we supplement our diagram with the remaining details. The diagram should now look like this:

Scheme with additions
When capacitor C1 and diode VD1 are included in the circuit, the diode will begin to shine much brighter.

Visualization of the diagram with additions
Now all that remains is to choose a resistor. It's best to put variable resistor at 1.5 kOhm. After this, you need to find the place where the LED will shine brightest. Next, assembling a flashlight with one battery involves the following steps:
- Now we disassemble the old lamp;
- We cut out a circle from a narrow one-sided fiberglass that should correspond to the diameter of the lighting fixture tube;
Note! It is worth selecting all parts of the electrical circuit to match the appropriate diameter of the tube.

Parts of the right size
- Next we mark the board. After this, we cut the foil with a knife and tin the board. To do this, the soldering iron must have a special tip. You can do it yourself by winding a wire 1-1.5 mm wide onto the end of the tool. The end of the wire must be sharpened and tinned. It should look something like this;
![]()
Prepared soldering iron tip
- Solder the parts to the prepared board. It should look like this:
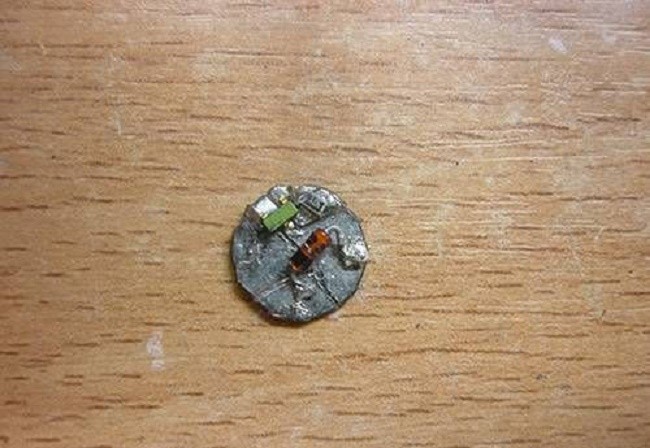
Finished board
- After that, we connect the soldered board to the original circuit and check its functionality.

Checking the functionality of the circuit
After checking, you need to solder all the parts well. It is especially important to solder the LED properly. It is also worth paying attention to the contacts going to one battery. The result should be the following:

Board with soldered LED
Now all that remains is to insert everything into the flashlight. After this, the edges of the board can be varnished.
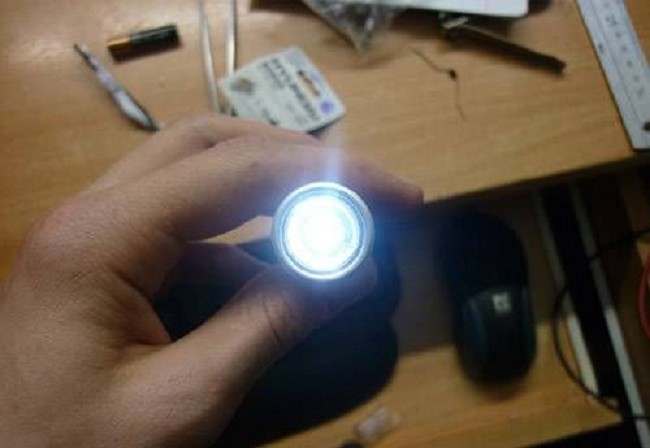
Ready-made LED flashlight
This flashlight can be powered even from one dead battery.
Varieties of assembly schemes
In order to assemble an LED flashlight with your own hands, you can use a wide variety of circuits and assembly options. By choosing the right circuit, you can even make a flashing lighting fixture. In such a situation, a special flashing LED should be used. Such circuits usually include transistors and several diodes, which are connected to various power sources, including batteries.
There are options for assembling a hand-held diode lamp, when you can do without batteries at all. For example, in such a situation you can use the following scheme: