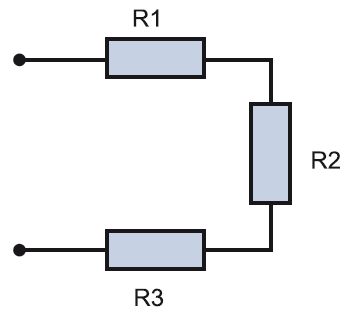
Parallel- with this method, the elements included in the chain are united by two nodes and are not connected to each other. With such a connection of the elements, even if one of the lamps burns out and breaks the circuit, the rest will not go out, since the current will have "detour" paths.
Consistent- all elements of the chain are located one after another and do not have nodes. An example of a serial connection is the well-known Christmas tree garland: a large number of bulbs connected by one wire. If one burns out, the chain will break and all will go out.
There are three main types of wiring... Let's consider them in detail, since the whole scheme depends on the selected type.
1. Star type sometimes called boxless, or European, type of wiring. In short, this type can be displayed as follows: one socket - one cable line to the shield. This means that each socket and lighting point has a separate cable line that goes directly into the apartment panel and ideally has a circuit breaker. What are the advantages and disadvantages of this type of wiring? Plus - first of all, in safety and the ability to control each electrical point. In addition, no junction boxes are required. This type of wiring is done when a smart home system is installed. Minus "stars" - at least three times the expense of wiring and, accordingly, labor costs for its installation. In addition, the dashboard becomes the size of an average wardrobe. It can have 70-100 groups of machines, especially if the facility also has information networks. It is difficult to install such a shield yourself, and it is more expensive than usual.
2. Loop type resembles a "star", but differs from it in economy. It can be depicted as follows: socket - socket - socket - apartment shield or wiring box. Several electrical points are connected in series to one cable, from which the common supply conductor goes either to the apartment panel or to the wiring box.
3. Type of wiring in junction boxes- the most common option. This is how the wiring was done in Soviet times. An economical way that does not require special costs. There is no dashboard in the apartment at all, it is located on the landing. An apartment branch departs from such a common supply "riser". There is a counter and a circuit breaker on it in the dashboard (sometimes - 1, sometimes - 2-3, rarely more). The power cable enters the apartment, then, using junction boxes, into the premises, approaching each point. We can say that from the junction box, the wiring goes to the "star" points.
In their pure form, wiring types are rarely used. Based on available resources and upon request, a mixed type is usually selected. An example of wiring in a separate apartment.

Two types of wire routing: socket - shield ("star") and shield - socket - socket - socket ("loop")
The power cable enters the apartment panel, where there are several groups of circuit breakers and protection devices. In the dashboard, the common cable is split into several zones, for example, in living rooms and separately in the bathroom and kitchen, divided into sockets and lighting. The supply cable for a separate zone enters the room and is distributed in the box by points. Here options are possible: the cable will go to the sockets with a "loop" or a separate wire will be allocated to each point.

Daisy chain and parallel in junction boxes

Professional electricians draw up such schemes taking into account all factors. These are the wishes of the owner of the object, that is, what exactly you want to see in an apartment or house. For example, the owner says that the living room should have two groups of outlets, three in each. Plus two pass-through switches and telephone sockets in the amount of three pieces. The electrician, taking into account these data, according to the rules of electrical work, draws up a diagram that takes into account safety parameters, the procedure for performing work, type of wiring, dimensions of strobes, etc. Such a drawing is a document and is certified by a special organization.

An example of a schematic diagram of the electrical supply of an apartment, drawn up by a professional electrician
Modern firms that provide services for electrical work use computer programs. They are created specifically for engineering and technical workers (ITR) and are unlikely to be useful for a home craftsman.
To independently complete the wiring, you can draw the diagram yourself. This is easy enough. To begin with, an apartment plan is depicted taking into account all sizes. If you do not have the necessary documentation, you can take it from the developer, although it must be kept by the owner of the property.
Then, with the help of special designations, all the desired points are set: lamps, sockets, circuit breakers, etc. We must not be lazy and put generally accepted designations so that other people can understand this scheme. There are frequent cases when, after some time, the author of the scheme cannot figure out the mysterious hieroglyphs that he himself invented. After that, lines are drawn that indicate the wiring. Be sure to indicate on the plan at what distance the cable is from the ceiling or floor, especially if the wiring is of a hidden type.

The following is an example of an electrical diagram of an apartment. Lighting wires, power cables and ground wire are shown in different colors. Conventional icons represent luminaires, sockets, switches and junction boxes. Such a scheme is very clear, and all the necessary calculations can be performed using it. This is necessary in order to know exactly where the wires go in the future. Otherwise, hanging a picture or a shelf, you can hit the drill directly into the cable.

There are standard rules for installation. They are as follows:
1. The wire is laid only along vertical and horizontal lines at right angles. If you want to cheat and save the cable by running it diagonally, it’s better not to do that. In the future, it is very difficult to find this crooked path, and getting into it with a nail is as easy as shelling pears.
2. The distance from the wire to the ceiling or floor should be 15 cm. From corners, door frames and window frames - at least 10 cm. When piping through heating pipes, a gap of at least 3 cm between them and the wiring should be observed.

3. Avoid crossing wires when laying. If this is difficult, then the distance between the cables should be at least 3 mm.
4. For ease of calculation, all sockets and switches must be at the same height. Usually, switches are installed to the left of the door at a height sufficient to touch them with a lowered palm, that is, 80–90 cm. Sockets are mounted at a height of 25–30 cm. and others. It is best if the wire to the switches goes down from the top, and to the sockets from the bottom - this is what most electricians do.
5. The length of the conductor coming out of the electrical point should be 15–20 cm. This is done for the convenience of mounting points with a hidden type of wiring. If it is open, then the length of the conductor can be less: 10-15 cm.
The ends of the conductors of wires that go into electrical points must be insulated with electrical tape. Armed with a drawing, you can begin to install electrical wiring.
Before starting the wiring, you first need to draw up a diagram. If you know how electrical appliances should be located after the completion of electrical work, then the task becomes much easier. The diagram serves to count the elements for work - you calculate the cross-section and length of the wire for a specific route, the number of sockets, various switches / switches, junction boxes, as well as the location of these devices. Electrical wiring in a house or apartment is not complete without the following power units:
- distribution board;
- automatic switches (used for the safety and security of devices);
- counters.
An example of a scheme for a private house
This section describes an example for connecting 1-phase and 3-phase power in a private house, which will allow you to figure out how to take on the installation, and what is needed to develop an electrical circuit diagram. Let's start with single phase. The method of supplying power for a private house (sometimes for apartments) is usually airborne. The phase wire goes from the overhead line to the input electrical panel, into which the working and zero protective wire are also connected.
The power input looks like this: In 95% of cases, an air "message" is used.
As for the meters, today energy supply organizations install them in the lead-in electrical panel on the street (a few years ago, metering devices were installed inside a private house). In addition to the meter, a switch is sometimes mounted in the switchboard.
The cable is laid from the lead-in box to the inner one. From the electrical panel installed inside, the supply of electricity to the building begins. To add network reliability, professionals recommend dividing power consumers into groups:
- Vremyanka, basement, garage - household. premises;
- Lighting;
- Power group (the most demanding devices, for example, a boiler);
- Socket group.
Consumers must be separated in order to carry out the connection and installation of separate protective devices. This is how the scheme of dividing devices into groups looks like:
A prerequisite for drawing up a diagram is the presence of a plan for a private house. Knowing the drawing, you will be able to independently draw up a diagram "with your own hands" and connect devices, while you do not have to resort to the help of professionals. For example, we took a simple scheme:
With the above material in hand, you can start drawing up a schematic diagram. This is already more difficult, since electrical knowledge is needed here. If it is not possible to draw up a diagram on your own, then it is better to ask a friend about it or, in extreme cases, to hire an electrician.
Features of 3-phase power supply
If a 3-phase power supply is supplied to your private house, and not 1-phase, then the combined and working wiring, as well as three phases, are connected from the air support to the input shield. There are not many differences in the circuit for 3-phase power supply:
Preparatory work
The installation of an electrician in an apartment or house must begin with the following operations:
- preparation of walls and ceilings;
- drawing up an electrical as well as a schematic diagram;
- wall markings.
You need to calculate in advance where there will be a place for entering wires or a power cable. The switchboard is also an important point, as it must be protected from weather conditions. Professionals recommend installing the shield in a warm room, not far from the main building, the height from the ground should be 1.5-1.7 meters (so that it is convenient to reach it).
The next step is to draw up a wiring and electrical diagram, according to which you will install lamps, switches / switches, sockets and other electrical appliances with your own hands. Are the equipment layouts ready? Great, you can take on the marking of the wire routes going to this electrical equipment.
Tools for the job
In work, you will need the following tools:
- hammer;
- ordinary screwdrivers;
- indicator screwdriver;
- wall chaser;
- puncher;
- tester;
- pliers.
In addition to the above tools, we will need materials: electrical tape, tags for marking wiring, sockets, wires with different sections, terminal blocks. Seriously you need to approach the choice of an electrical panel, since the reliability of the future electrical network in a private house or apartment depends on it.
Installation must be carried out taking into account the requirements for the location of the devices. We are talking about a bathroom, a bath or even a sauna - they have an overestimated moisture indicator. Switches / switches and sockets should be located outside - in front of these rooms.
Installation of closed and open wiring
Let's say that all the preparatory work has already been completed, so we can start installing the wiring - we already have a schematic diagram and a connection plan in our hands. It is recommended to take a copper wire to connect the network in a private house or in an apartment, the cross-section of which should be in the range of 1.5-2.5 mm. If you need to connect powerful consumers of electricity, then it is worth taking wiring and a larger diameter. Despite the fact that such wires will be more expensive, the reliability and resistance of the network will increase.
There are two types of installation - hidden and open. Of course, we will analyze each of the methods. It is worth choosing an open or hidden option based on the characteristics of the materials from which the walls in your home are made. Other factors also influence the choice, which you will learn about after learning these methods. You can do both wiring methods with your own hands.
Hidden wiring
Choosing hidden wiring is worth it if yours is built from:
- monolithic stones;
- natural or artificial stones;
- bricks.
In such houses, it is necessary to install wiring through grooves (special channels for closed-type wiring). They are cut in advance along the route of connecting the future electrical network, and then they are covered with plaster. In the places where the regulating elements, switches / switches will then be located, it is necessary to prepare recesses 60-70 millimeters in depth. The exact figure is calculated depending on the dimensions of the boxes. They are mounted with their own hands in the recesses. Fixation can be done with a solution.  The photo shows the process of preparing channels for wires. It is worth doing the work with a power tool, as this will significantly save your time.
We disassemble hidden wiring primarily due to the fact that it is more inconvenient than open options and has drawbacks. The main disadvantage is the need to hammer the walls with your own hands if you need to replace or repair the wiring. Aesthetic appearance is one of the main advantages of the closed method, because the electrical wiring is hidden under a layer of putty. If you use electrical appliances correctly, then you will not have to destroy walls.
When installing hidden wiring, it is necessary to make wire connections only in special boxes - branching and junction boxes. Switches and the socket are mounted in fixed places of the marking. It is important for you to ensure that the boxes are accessible after completing the wiring. In the future, you will need to maintain and monitor connections.
Open option
In two cases, open wiring must be carried out in the house:
- Finishing work has already been carried out in the room, and the owners have no desire to destroy the covering for the installation of wiring.
- In a wooden private house. For such buildings, there are no other options - the wiring must be open and securely insulated to reduce the risk of fire to a minimum.
As insulation, cable channels, asbestos gasket, self-extinguishing plastic, corrugated hose or plastic skirting boards are used. The task of these elements is to exclude the contact of wires with a wooden covering. Today it is more profitable and more convenient to use an electric box or corrugated hose. The boxes fit into the design of a private house, so they are placed in living rooms. As for corrugated hoses, they have a less aesthetic appearance - they are installed in utility rooms. 
The sleeve is attached to the ceiling or wall using special elements - usually plastic holders. They are also attached with dowels, screws or self-tapping screws. You need to choose the appropriate fasteners depending on the material from which the coating is made. The box consists of two parts, which are held together by the lock. The lower part is attached to the ceiling or wall, then a wire is put into it, from above it is closed by the upper part. The lock serves as a latching element. The top can be removed with a few strokes if necessary, so you can always check or repair the wiring.
In the places of branching of open-type wiring, it is necessary to install branching connection boxes. As for switches and sockets, their installation is carried out on special “socket boxes”, which are made of plastic or dry wood.
Conclusion
To work with electricity, you need to know safety precautions and basic rules for the operation of electrical equipment. If you do not have this knowledge, then it is better not to risk it - today you can hire professionals quite inexpensively, while you will save your devices and, most importantly, your health. If you are familiar with electrical engineering, then you can start connecting electrical wiring in your home.
Modern human life absolutely cannot be comfortable without electricity. When it is absent, it seems that life has stopped, because any household appliance or electric tool requires a connection to the mains. Sometimes without electricity it will not even be possible to cook food, not to mention the normal lighting of the home. Therefore, if you are thinking of construction, then the wiring diagram in a private house should be a priority issue that should be given special attention. It is necessary to think over and calculate everything to the smallest detail, so that no slightest mistake or inaccuracy in the laying and connection of the electrical network will lead to a breakdown of household appliances in the future, or, even worse, to a fire and fire.
What is the need for a circuit?

The wiring diagram in a private house is a drawing on which all the main power supply units are applied:
- Introductory line, which is carried out by a branch from the main power line to the house itself.
- Installation location of the switchboard.
- Protective devices and electricity meter.
- Places of installation of junction boxes, switches and sockets in rooms and premises.
- Wiring routes from junction boxes to switching devices.
- Places of installation of elements of the lighting network (chandeliers, sconces, lamps).
By the time you do the electrical wiring in the house, it is advisable to already clearly determine where the main household appliances will be located - a refrigerator, an air conditioner, a washing machine, a water heater, a dishwasher. This is necessary in order to immediately mount the sockets next to the equipment, and not then stretch them across the entire carrying room.

If your building belongs to a typical one, which was erected by a construction company (as now they are building whole cottage villages), then you should be provided with a building project and a wiring diagram. In the case when the construction is carried out independently, for each house they develop their own personal scheme. But in both versions, the main purposes of the circuit are the same:
- If you have a ready-made schematic drawing, you can make a list of materials that will be needed to complete the installation of electrical wiring in the house. This will help you save money. That is, having a list in hand, you can go through different retail outlets, calmly decide, choose the highest quality and most suitable electrical goods for the price. You will not buy anything superfluous and at the same time save yourself from the situation when the installation is already being done, but some materials are not enough, and you urgently run to the first store you come across to buy them at any price.
- The wiring diagram will make it possible to determine the maximum load of each electrical unit, which will allow you to correctly select the cross-section of the wires, calculate the total power, select the necessary protective devices and the lead-in cable.
- Also, the diagram will help you competently and rationally plan the sequence of work.
Paperwork

Be prepared for the fact that electrical wiring in a private house will also require your nerves, because in order to obtain permission to perform work you will need:
- Contact the organization who has a power line on the balance sheet from which it is planned to connect the input. They must issue technical specifications (TU) for this connection.
- The next will be an organization or a commercial firm, which, according to the issued technical conditions, will draw up a project.
- Again, the energy supplying organization will need to agree on the project, and write an application for connection (on the main line, this must be done by their electricians).
- The made input line must be tested by a special electrical laboratory, after which a protocol is issued stating that the input has passed the test and is suitable for operation.
- Now the lead-in cable is led into the switchboard and connected to the input of the electricity meter, which must be sealed by the representatives of the power supply. After the meter, do-it-yourself wiring is done in the house, or you can invite specialists, you will no longer need any other organizations.
- The last thing that remains for you is to conclude an agreement with the energy supplying organization for the supply of electricity from their side, and for the timely payment of consumed kilowatt-hours from yours.
Scheduling input

The most important difference between an electrician in an apartment and in a private house is the implementation of the input. In multi-storey buildings, the input comes into the control room, and from there the wiring is already going on to the apartments. And for a private house, it is necessary to perform a layering from a nearby main line. Reliability, quality and safety of power supply depend on how competently and correctly you do it. There are two ways:
- Installation of the air inlet with a cable or insulated wire.
- Laying of underground cable entry.
Before laying an introductory line for a private house, it is very important to think over and plan it so that it is resistant to strong winds, and also does not carry the risk of electric shock to a person in rainy, snowy or wet weather.
Air inlet

Such entry through the air involves pulling a wire or cable from the nearest support of the main power line to housing construction.
I want to warn you right away that the air input will be rational if the distance from the support to the house is less than 20 m.In the case when the span is more than 20 m, you will need to install another additional support, which may be on the territory of your site. This measure is necessary in order to reduce the mechanical stress on the wire. When the span turns out to be very large, there is a possibility that the wire may break under the influence of strong winds or under its own weight.
How to make an air inlet correctly?
- It is necessary to drill a hole in the building wall and insert a piece of metal pipe or a special plastic corrugation into it (the diameter of the hole and pipe will depend on the cross-section of the input wire).
- A bracket with an insulator installed on it is fixed to the wall outside the house.
- Now it is necessary to stretch the steel cable between the two insulators (one on the bracket, the second on the traverse of the support, from which the branches are made).
- The lead-in wire or pole cable is connected to the line wires. Then it is laid along the cable to the house, where it is pulled through the hole made into the building. Every 0.5-0.6 m, it is advisable to fix the wire to the tensioned steel cable with plastic or metal clamps.

That's all, the lead-in cable has entered the building, where it will be fed into the switchboard. As you can see, nothing complicated, but some nuances should be taken into account here:
- It is very important to ensure that there is sufficient tension on the steel cable.
- The wire should be attached to the cable loosely, without tension.
- The distance from the ground to the wire should not be less than 3.5 m.
- The cable and the lead-in wire attached to it along its entire length must not touch any ancillary buildings, trees or tall bushes.
- The place where the wire enters directly into the house must be sealed. After it is pulled into the pipe, all the remaining space must be filled with polyurethane foam. You can also use another option - tamp it tightly with mineral wool made of non-combustible material.
The best option for air entry to a house is a self-supporting insulated wire (self-supporting insulated wire). Firstly, its insulation is made of materials that are suitable for use in conditions of sunlight and precipitation, and also withstand significant temperature fluctuations. Secondly, under the insulating layer, in addition to the aluminum conductors, there is a steel cable. That is, when installing such a wire, there is no need to stretch a separate supporting cable.
If a single-phase voltage (220 V) is needed for private housing construction, then you will need a two-core wire. In the case when a three-phase voltage (380 V) is needed, a four-core wire is required. The minimum cross-section of SIP wires is 16 mm 2.
How the installation of the air input of electricity is carried out can be seen in this video:
Underground input

Laying the lead-in cable in the ground has a number of advantages over the air method:
- Reliability is increased due to the fact that the cable is not exposed to sudden temperature changes, precipitation, strong winds.
- The style and architectural design of the site has a complete look, that is, they are not spoiled by a stretched cable with a fixed wire or additional support. As a rule, it is for this reason that all luxury cottages and country houses have an underground lead-in.
- If this is a country house in which people live only in the summer, and in the winter housing construction is empty, there is a possibility that hooligans or vandals will cut out and steal the air inlet. This is unlikely to occur in underground installations.
- In the event of a short circuit and the occurrence of an electric arc at the underground entrance, there is practically no possibility that property and people may be damaged. And with an air inlet, a fire that has occurred can spread to buildings. So a high fire safety when laying cables in the ground is a very important advantage, especially for houses made of wood.
But not everything is so perfect, the soil is also quite aggressive. The chemical composition of the soil over time can cause corrosive processes, which will render the cable sheath unusable. In this case, the soil itself can sag and swell, shift and freeze. Groundwater, rodents and microorganisms, as well as pressure from the roots of large trees will also have an impact. Therefore, if you decide to bring electricity to the house by an underground method, take care of protecting the cable, lay it in a plastic or metal pipe.

Well, the main disadvantage of the underground input is earthworks. Firstly, they must be coordinated with a bunch of all kinds of organizations, which may have something laid in this land - water, gas or sewer pipes; heating mains; trunk cable power lines; telephone communication lines. Secondly, to lay the cable in the ground, you will need to dig a trench, and this is an additional (and decent) cost. Doing it yourself will take a lot of time and effort. In case you will hire someone to perform earthworks, spend money in terms of money.
In order to better understand the scope of work, we recommend watching the following video:
So before making the electrical wiring in the house, first weigh the pros and cons, take into account the advantages and disadvantages, choose the most suitable option for performing the input. And when you are done with the external power supply, you can safely proceed with the installation of the internal one.
Load calculation

Do-it-yourself installation of electrical wiring in a private house requires preliminary work with your head, that is, mental, namely, you need to calculate what kind of load your home electrical network will have. To make it easier for you, divide all electricity consumers into groups:
- Lighting elements.
- Kitchen appliances (refrigerator, cooker hood, bread maker, electric stove and oven, electric kettle and coffee maker, multicooker and microwave oven, etc.).
- Low-power household appliances and electrical appliances (computer, TV, stereo, etc.).
- Conditioners.
- Electric heating.
- Bathroom equipment (water heater, hairdryer and washing machine).
- Power tools that are used in utility rooms (hammer drill, electric drill, electric lawn mower, pump, etc.).
Add up the powers of all devices. Correct the resulting figure by multiplying by 0.7 (this is the generally accepted coefficient of simultaneous switching on of devices). Please note that the power of each group should not exceed 4.5 kW. Based on the calculated load, decide on the cross-section and brand of wires. Wiring in a private house is done with copper wires. For a hidden gasket, choose brands VVGng, PUNP, VVG, for an open gasket - PUGVP, PUGNP. Wiring made in a private house with such wires will have a decent service life (about 10 years), minimal losses and safe operation.
Distribution board

Normally, the place where the shield can be installed is not standardized in any way. The only condition is that it must be located at least 1 m from the pipelines (meaning any pipes - gas, water, sewer).
In which room it is better to mount the shield is also not specified anywhere. Many people prefer to install it in some utility rooms, where it will be convenient to perform switching, or located at the entrance to the house. In any case, try to follow simple rules:
- This room should not be fire hazardous (such as a boiler room). Do not store gas cylinders and flammable substances near the switchboard.
- It is necessary that the room where the flap is located be dry, that is, it is undesirable to install it next to the bathroom.
- There must be free access to the dashboard, do not arrange a warehouse from the room where it is located.

In the dashboard itself are mounted:
- electricity meter;
- an introductory machine, it is responsible for the power supply of the whole house;
- several machines for connecting outgoing pantographs according to their breakdown into groups;
- residual current device (RCD), which works in tandem with an introductory machine.
The shield can be installed in a niche specially made for it, or simply hung on the wall surface.
If the house is huge on several floors with baths, saunas, garages, then one shield is not enough. In such cases, one introductory panel and additional ones are mounted on each floor.
Internal power supply planning
There are two ways to carry out electrical wiring in a private house - open and hidden. Let's take a quick look at each of them separately.
Open wiring

The open way of laying wires is also called outdoor, and is most often used in wooden houses.
Wires can be laid:
- in special plastic boxes;
- on porcelain insulators using a special cable (the so-called retro style).
The diagram should show which route you are going to route the cables and mark the places where the fixing elements (insulators) will be installed.
For open wiring, special outdoor switching devices (sockets, switches) are used.
Concealed wiring

If the structure is concrete, with many technological voids, a hidden method of laying wires is used. It is more difficult, since first you need to make special grooves in the walls, called grooves, into which the wire or cable will be laid. And after that, the laid conductors will still need to be fixed with alabaster or plaster mortar.
You will also need indoor switches and sockets. Before installing them, holes are made in the walls, the socket boxes are also fixed in them with the help of a solution, and only then the switching devices are mounted.
Do-it-yourself hidden wiring is easy, the only thing that can cause difficulties, take a lot of time and effort is making strobes and holes.

Everything related to electrical work is regulated by the Code of Electrical Installation Rules (PUE). For those who are seriously involved in the installation of electrical wiring, it is useful to get acquainted with this book at your leisure. Here we will give the most basic and important points that must be taken into account before doing the wiring in the house with your own hands:
- All junction boxes, sockets and switches should be easily accessible (not covered with wallpaper, not hidden under drywall sheets, not crammed with bulky furniture that cannot be moved).
- The grounding conductor must be bolted to the appliances.
- The switches are mounted at a height of 60-150 cm from the floor level, the wires are brought to them from top to bottom.
- All wire connections should be made in junction boxes. The connecting nodes must be reliably insulated; it is forbidden to connect copper conductors with aluminum ones.
- The sockets are mounted at a height of 50-80 cm from the floor level. The distance between sockets and gas stoves, pipes, heating radiators should not be less than 50 cm.
- The wires of the electrical wiring should not touch the metal building structures of the building (especially for hidden wiring, be sure to take this point into account when laying wires in the grooves).
- The number of sockets per room is taken into account at the rate of 1 switching device per 6 m 2 of area. The exception is the kitchen, you can mount as many sockets on it as you need to connect all household appliances.
- The horizontal laying of wires is made no closer than 15 cm to the ceiling and floor. The wires are placed vertically at a distance of 10 cm from door and window openings. The wires of the electrical network must not be brought closer to gas pipes closer than 40 cm.
We hope that this whole conversation was not in vain. You will definitely start the installation of external and internal power supply to your home by drawing up a diagram. Think with the whole family where and what kind of equipment you want to place, put everything on paper, draw all the switching devices and wiring routes. This will make it much easier to calculate the amount of materials needed. Then all that remains is to transfer your scheme from paper to real walls and do the installation work.
You have to deal with replacing a switch or connecting an outlet quite often in everyday life, so everyone should have at least minimal skills in servicing a home electrical system.
We will try to figure out how to do the installation of electrical wiring with our own hands, focusing on the norms of the PUE and observing safety precautions. Also in this article we will consider the features of drawing up a project, the rules for entering electricity into a house and the subtleties of a reliable connection of wires.
First of all, you should understand the structure of the electrical network. It consists of electric points connected to each other and to the power line with all sorts of cables and wires, protective devices and circuit breakers, and a ground loop.
Do not confuse wires and cables. The first ones are conductors for internal wiring, which can be single- and multi-core, the second ones consist of several wires, united by a common protective sheath.
When you independently arrange electrical wiring, you need a huge store of knowledge and skills: from calculating the wire cross-section to the skills of twisting wires and installing junction boxes
Cables can be installed in the ground, under water, in concrete structures; they are also used for the device of a home electrical network, if the connection of powerful devices or special protection is required.
Drawing up a project for an intra-apartment or intra-house wiring is a responsible and complex business that requires qualifications. There are many principles and norms for the installation of wires, switches and sockets.
Here are just a few of them:
- it is better to divide the wiring into groups - outlet, lighting, etc., highlighting separate lines for powerful electrical equipment;
- in the drawing, it is necessary to indicate the power points and installation locations of powerful energy consumers (oven, air conditioner, washing machine);
- the location of the sockets - from 0.3 m to 1 m from the floor;
- the optimal mounting height of the switches is 0.8-1 m from the floor;
- more sockets are better - no extension cords are required;
- a separate project - for a low-current system (to protect against interference, the wires are pulled separately from the power lines, with an indentation of at least 0.5 m);
- bathroom switches lead out into the corridor, etc.
It is very important to correctly lay the wiring itself - internal or external (open / closed). We recommend that you familiarize yourself with the private house.
Wiring Installation Instructions
Consider one of the options in which you can do most of the electrical work yourself. For the most difficult questions, you will have to contact the specialists, but you can also pierce the wiring channels or connect sockets with switches yourself.
Stage # 1 - wiring layout
The project has already been drawn up, now with the help of a stepladder, a level (laser or bubble), a construction tape, a marker, we make markings - we draw horizontal and vertical lines right on the plaster / concrete slab where the electric lines will be laid.

In addition to the straight lines of the location of the wires, we mark the places of installation of junction boxes, sockets and switches - we simply draw a circle marker for the specific dimensions of the devices. The quality of the grooving depends on the accuracy of the marking.
You need to start by hitting the horizontal level, which is called the "clean floor level" - that is, the floor with the finished floor covering. It is from him that the distance to sockets and switches is measured.
The power line is laid about 0.3 m from the ceiling; a low-current line can be placed half a meter below. It is not recommended to plan laying near the jambs.

At the time of the beginning of the marking, it should be completely finished with the laying of the screed and "wet" plaster. It is recommended to take into account the special conditions for further installation work: air temperature - from + 10 ° C and above, humidity - maximum 70%
Be sure to mark the places of installation of powerful electrical appliances (preferably with the main characteristics), the width of the strobes, we equip the places of passage through building structures.
By the end of the marking actions, the walls, floors and ceilings in the rooms should turn into a kind of drawings with bright and clear designations.
Stage # 2 - wall chipping
Half of the success of straight gouging is the right tool:
- wall chaser equipped with a vacuum cleaner;
- perforator (it is desirable that the impact energy is at least 15 J), drills, crowns, drills from the same manufacturer;
- grinder, concrete disks;
- chisel;
- hammer.
Hand tools come in handy in hard-to-reach areas and where jewelry precision is needed.
Image gallery

The invited specialist in the process of assembling and connecting the shield will be able to identify errors made during the wiring process, for example, an incorrectly calculated wire cross-section
It is strictly forbidden to carry out electrical work, including preventive maintenance, in apartment buildings with common shields on their own, this is done by specialists from the management company. They also control the operation of metering devices.
Safety measures when installing electrical wiring
To protect yourself and those who may accidentally be nearby, during electrical work, the following rules must be observed:
- Use only equipment that is in good working order - power tools, carriers, extension cords.
- Before starting work, be sure to turn off the power supply using automatic machines and RCDs. In order not to accidentally turn on the voltage on the site, you can hang up a sign or warn your neighbors.
- Use testers and indicator screwdrivers for insurance.
- Make sure that the insulation on the handles of the tool is in order.
- Try not to work alone - you may always need help with work or medical assistance.
Separate rules apply to working with a hammer drill, wall chaser or powerful drill. In addition to protective clothing, gloves (with an insulated handheld) and a mask (respirator) are required. Shoes should fit snugly around the feet and not slip.
The installation of electrical wiring under the ceiling must be done only from the platform: chairs or tables are absolutely not suitable.
Every professional electrician is familiar with the rules of first aid in case of electric shock, but ordinary people, unfortunately, do not always act competently.
Do-it-yourself electrical wiring in the houseResidential electrification is not an easy task. But if you have some knowledge and skills, learn certain rules, then you can easily do the electrical wiring in the house yourself.
In any case, if you do not risk contacting an electrician, the knowledge gained on our website will allow you to control the work of the called master, point out the shortcomings and avoid flaws. As a result, it will save you time and help avoid problems and associated waste.
DIY electrical wiring - basic rules
Before starting work, read the Rules for Electrical Installations (PUE), where the basics of working with the equipment are spelled out. Self-wiring in the house requires the following conditions to be met:
- free access to accounting equipment, distribution boxes, sockets and switches is required;
- they are mounted at a level of 60 - 150 cm from the floor;
- opening doors should not block access;
- the cable is brought in from above;
- the installation height of the sockets varies from 50 to 80 centimeters from the floor. For safety reasons, they should not be placed less than 50 centimeters from electric and gas stoves, heating radiators, pipes. Power supply is carried out from below;
- the number of sockets is determined at the rate of 1 piece per 6m square. This rule does not apply to the kitchen; sockets are installed here according to the number of household appliances. To power the bathroom, it is better to provide a separate transformer located outside this room (to lower the voltage);
- the cable is laid with strict observance of the vertical and horizontal (without bends and diagonals, so as not to damage it during installation and perforation);
- horizontal fit at a distance of 5-10 centimeters from ceilings and cornices and 15 cm from the ceiling and floor. Vertically positioned cables are laid at least 10 cm from the edge of a door or window opening. The distance to the gas pipes should not be less than 40 centimeters;
- the wiring should not come into contact with metal building structures;
- special boxes are used for wiring and connecting cables. The connections must be securely insulated. It is forbidden to connect copper wires with aluminum ones.
Wiring diagrams
Every electrician in a home begins with a detailed plan and diagram. The main thing in the diagram is to indicate the places for installing devices and laying cables, it is also important to accurately determine the location of sockets, switches, lamps and household appliances.
To simplify the wiring, consumers are divided into groups.
The grouping of consumers can be arbitrary. It simplifies wiring, distributes the load and saves materials.
The wiring diagram of a house in a dacha differs from an apartment method of connecting a cable: in a multi-storey one - it starts from a floor board. Electricity in a private house requires connection from an overhead line or from an external distributor.
Determination of current strength
An important point in planning the wiring is the calculation of the current in the electrical network. Knowing this load indicator, you can accurately determine which machine and cable with the appropriate cross section is needed.
Amperage = Total power of household appliances (W) / Mains voltage (V).
For example: eight 60 W lamps, 1600 W electric kettle, 350 W refrigerator, 1200 W electric oven. Mains voltage 220 V. Result: ((8 * 60) + 1600 + 350 + 1200) / 220 = 16.5A.
Typical home consumption does not go beyond 25 Amperes.
Determining the size of the cable section
An equally important task is to determine the cross-section of the cables that will be used for wiring electricity. The safety of your home depends on the correct choice. Inadequacy of the cross-section to the loads will lead to overheating of the cable, which can cause a short circuit and a fire.
You can determine the required cable size using the table.
For example, if the calculated current strength is 16.5A, a closed wiring is planned using copper wires, then a cable of at least 2 square meters is required. mm. For 25 Amperes - 4 mm 2. For different distribution groups, a cable is taken in accordance with the expected load.
In view of the fact that the table indicates extremely accurate values, and in fact there are frequent fluctuations in the current strength, a certain section margin is needed. To determine the length of the cable, you need to measure all the distances with a tape measure and add up to four meters in reserve.
Near the entrance to the apartment, a lighting board is installed, into which the residual current devices are mounted and the wires are connected. Usually, for a network of switches and lighting, it is supposed to install an RCD for 16 A, sockets for 20 A. The electric stove requires a more powerful installation - for 32 A and is connected separately.
Installation of electrical wiring
After all the preliminary calculations, the installation itself will not cause any particular difficulties. The main thing is to adhere to the recommendations and observe safety precautions.
The first stage is marking. Mark the line of the cable with a marker. Next, we mark the location of the lamps, sockets and SCHO (shutdown shield).
At the second stage, we cut the walls, if hidden wiring is needed, or we mount it in an open way. The holes for the equipment are made with a hammer drill using a crown bit. Using a groove cutter (a tool with two parallel diamond discs) or a perforator, they make grooves for a cable with a depth of about 20 mm, where the wires should easily fit in width.
On the ceiling, the cable can be attached to the ceiling and hidden by the decorative ceiling. You can also hide the wiring in the voids of the floors by making I / O holes and tighten it there.
Next, a puncher is used to make holes in the corner of the room for cable entry through the wall. Now you can proceed directly to the installation.
First you need to install the SCHO, inside which the RCD is connected. A ready-to-connect SCHO has zero terminals on top, grounding terminals at the bottom, and there are automatic machines between them.
Then the cable is wound inside and left unconnected because only a certified electrician with the appropriate certificate has the right to install it to the distribution board. To connect the lead-in cable to the SCHO, the blue wiring is attached to zero, and to the upper contact (to the phase) of the RCD - white, to the ground - yellow with a green stripe (colors may differ depending on the manufacturer). The machines are connected from above in series with a white wire jumper or a special factory-made copper bus. Now you can route the wiring.
Open mounting option
Installation of open wiring is carried out in the following sequence:
- According to the marked marks, we fix the boxes or cable channels. We fasten it with self-tapping screws, 5 - 10 cm from the edges in 50 cm increments.
- We install distribution boxes, sockets and switches. Since they are hung on the walls, we apply them to the location, mark the fastening points, drill and fix.
- We lay the cable from the sockets to the SCHO, starting from the connection points using VVG - 3 * 2.5 wires.
- We carry a VVG - 3 * 1.5 cable from the lamps and switches to the junction box.
The wires in the switch boxes are connected by color with clamps (PPE caps) or using WAGO type quick-connect terminals.
VVG cable 3 * 2.5 in SCHO is attached with a phase (brown or red core) to the RCD, zero (blue) is attached at the top, grounding (yellow wiring with a green stripe) is at the bottom. Now the ready circuit is "called" by the tester. If all is well, then we invite an electrician.
Concealed wiring layout
In the hidden version, the installation of wiring differs only in that the wire is laid using special corrugations, which fit into previously prepared grooves, which will allow, if necessary, to replace the wiring without destroying the finish. Socket and junction boxes are installed in the niches made.
Upon completion of all work, the grooves are closed with plaster, you can use a gypsum putty to seal the wiring.
Wiring in a private house
The installation of an electrical cable in a private house will require special safety measures, especially if the house is wooden.
Wiring in such a dwelling is carried out taking into account the following requirements:
- Self-extinguishing wires and cables with excellent insulation are used.
- Distribution and installation boxes must be made of metal.
- All connections are sealed.
- Exposed wiring must not touch walls or ceilings. It can be mounted using porcelain insulators.
- Hidden wiring is carried out through metal (copper) pipes, steel boxes without fail with grounding. When using plastic corrugations and boxes, they are mounted in plaster. This type of installation is safer and more aesthetically pleasing.
An additional step to improve the safety of a wooden dwelling is the installation of an RCD (differential relay) that react to current leakage and short circuit by turning off the machine.
Outcome
Do-it-yourself electrical wiring in the house is not an easy task, but it is quite doable. And if you study this issue well before conducting the electrical wiring, the work process will not cause any particular difficulties, and the result will please you.
Every master can make mistakes, so even if you entrusted the work to a specialist and paid for the service, monitoring his actions will help to avoid further problems. By accepting a job, you will be able to appreciate the quality and know what you are paying for.