Master of Architecture, graduated from Samara State University of Architecture and Civil Engineering. 11 years of experience in design and construction.
Can you imagine regular doors without a handle? It would seem like such a simple design, but in fact it is a very important attribute. Installing the door handle on interior door- This is the task that consumers face when purchasing and installing a new canvas. It is quite possible to solve the problem on your own. It is only important not to make a mistake with the choice of design.
Types of Door Handles
Exist various types handles that are different from each other in color, shape, material, mechanism and installation method. If we take the last feature as the basis for the classification, then there are two types of pens:
- Invoices.
- Mortise.
Installation of first class products is simple and does not cause any serious trouble. They are simply fixed to the surface of the canvas, unlike other types of products. Installation of mortise handles involves pre-drilling a hole in door leaf .
Mortise devices are divided, in turn, into two more types:

When purchasing accessories, pay Special attention on what raw materials it is made from. Products can be made of metal, wood, glass or natural stone. They should be selected according to the color and model of the canvas, as well as the style of the interior.
 For sliding systems Hidden handles can be installed
 It is worth noting that the handles are of a hidden type. They are designed for sliding systems such as sliding doors. When the sashes move, the products do not interfere or damage wallpaper or walls.
Installation height
At what height to mount the handle is not clearly stated anywhere. Behind the scenes it is installed in products made from MDF and timber at a distance of one meter from flooring. It can be lowered or raised a little - it all depends on the taste of the owner of the living space.
 The installation height of the door handle is approximately 1 m
 The installation height of the product is affected by the height of the residents. As practice shows, a handle at a distance of 1 m is best option for adults and children. When installing, also take into account the level of the handles on other doors. Products must be at the same height.
Required Tools
To install the handle, arm yourself with tools, without which it will not be easy to do this:
- a simple pencil;
- square;
- roulette;
- chisel;
- screwdriver;
- drill;
- drill;
- crown.
The crown and screwdriver can be replaced with other available tools, but the quality of the work will suffer and it will take a lot of time.
Before starting installation, read the instructions for the product. It indicates all the dimensions, which will help you choose the right drill bit and crown according to the radius.
Step-by-step installation instructions
If you have not encountered a similar question before, do not be afraid. Even those who are not involved in construction can handle the installation of the handle. You just need to follow the detailed diagram step by step. 
Marking the canvas
 Installation of the handle begins with markings on the doors
 Marking is where the whole process begins. Having calculated at what height the handle will be located, place marks on the door in the places where the holes will be made.
Take advantage with a simple pencil, tape measure and corner and draw a horizontal line on the flat surface of the canvas. Then transfer it to the end and opposite side of the sash.
Place a mark on the end of the product in the center of the drawn line. It points to the place intended for the recess under the tongue. From the edge of the door at a distance of 0.6 cm, draw a point on both surfaces of the door. This place is intended for the handle.
Drilling holes for handle and lock
It doesn’t matter at all in what order you make the holes: first for the handle, and then for the lock, or vice versa. Just remember that things don’t like to be rushed.
For the handle, the opening is drilled with a drill and a crown. To make it smooth and neat, you need to drill from the inside and outside of the door to a depth equal to ½ the thickness of the leaf.
For greater accuracy, craftsmen advise marking this depth on the crown with a felt-tip pen. By adhering to this rule, you will definitely not damage the product. To ensure a straight hole, keep the drill straight and do not allow it to deviate to either side.
 When drilling a hole for the handle, the drill must be held level
 To install a latch into an interior door with your own hands, arm yourself with a drill and a pen. In this case, you need to be extremely careful, since the gap between the pen drill and the end angle is small.
Lock installation
The mechanism must be inserted into the hole drilled under it. Press the overlay to the end of the product and outline it with a pencil on all sides.

Then use a chisel to clear the top layer of the canvas and make a depression the size of the thickness of the overlay. This is done in order to press it into the doors.

The cover is fixed with screws. Recesses for them are made even before the fastening is carried out.
 The lining is fixed with self-tapping screws
 Handle insert
Products with screws located outward do not require disassembly. When installing one component of the structure in place, you must try to get into the latch hole with 2 guides equipped with threads for bolts.
 Door handle installation diagram
 After this, the second component of the device is inserted and tightened with bolts. Screwing must be done evenly in order for the handle to function properly.
Products with hidden screws must be disassembled. There will be instructions and a special key to help you. The handle can be removed without problems by pressing the stopper with a key. The handle is installed in place after the collapsible part is bolted.
Marking the loot
After installing the handle, make a recess in the tray for the tongue. To do this you need to take the measurements correctly. Precisely executed markings guarantee good operation of the lock and the door itself.
To make marks, cover the canvas and mark the distance from the top to the bottom of the tongue on the loot. Use a square to find the middle of the castle and put a “cross” in the loot. At the marking site, we will drill a recess with tools and get rid of excess material with a chisel.
Cutting a groove in the loot
Before screwing the cover, watch how the canvas closes. If there is no friction or other problems, this means that the groove for the tongue was made correctly.
Close the door and try to tug it slightly. If it wobbles, then this indicates the presence of a slight backlash. Don't be alarmed, this is normal. When a counter plate is added to the groove, everything will fall into place.
The answer is attached flush with the loot. Just like when installing a lock, it should be sunk into the hole.
 The strike plate is attached flush with the loot
 Sometimes, after installing the trim, the play does not disappear and the doors continue to wobble. This defect can be corrected by using a screwdriver to bend the tab with a small hole on the answer.
Caring for door hardware
In order for a thing to last for many years, it needs to be looked after. It's the same with fittings. Over the years, it ages and wears out, which negatively affects the product as a whole. To slow down this process, do not forget to take care of the fittings.
To care for your hands you need:
- Wipe them from dust with water by special means for cleaning. Avoid products that contain acids, alkalis or abrasive particles. They can damage the outer coating of the product, leading to rust. After washing, the product should be wiped with a dry cloth.
- Tighten the loose handle. If this is not done, the mechanism will break.
- Protect the product from rough mechanical influences.
In addition to the handle, it also needs your care door lock. Basic care in this case means regular lubrication of the mechanism with special means.. Sometimes sunflower or other vegetable oil is used as a replacement.
Considering that many parts of the mechanism are not easy to reach, a special nozzle in the form of a thin tube is used for lubrication. Often, for these purposes, the cover is removed or the handle is dismantled.
 For lubrication hard to reach places handles use a tube attachment
 Thus, having studied the basic intricacies of installing the handle, you are able to master this task without outside help. The main thing is to believe in yourself and then the reward in the form of quality installed handle won't keep you waiting long.
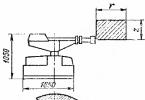
Installing a door handle on an interior door is done with your own hands, since door blocks are not supplied with fittings. To do this, you need to select a tool to perform the required work. Each fitting comes with instructions for use. A convenient installation height for a person from the floor covering and a design diagram are indicated. If there are no instructions on the installation height, one condition is necessary for door handles. A person should not open the door in a bent position (about 1 m from the floor).
Drawing with dimensions for installing door handles
Depending on the wishes of the person, only the installation of the handle of the door opening mechanism or door handles with mechanical or electromechanical lock. The industry produces various systems for locking a home or room. The peculiarity of locks is that millions of structures must be opened with different keys.
Installation work must be performed in a certain sequence:


Step-by-step instructions for installing a door handle
Tools for work:
- screwdriver (drill);
- carpenter's meter, marking pencil;
- set of wood drills, bit for drilling large diameters.
All door handles can be divided into overhead and mortise. Mortise handles can be divided into rotary structures and rotary ones with a lock. To protect the lock from unauthorized opening, it is necessary to create production capacity for the production of locks and keys of various modifications and sizes.

Scheme for mounting a door handle
They must be protected from water, frost and from opening with a master key. Many designs require certain professional skills from the master. It is impossible to install a door handle without special skills and tools. If it is a support one, then it is not connected to the opening mechanisms.
When marking, it is necessary to determine a place that will not interfere with the rotation of the key and will be at the level of the person’s hand.

Installation process of door lock mechanism with handle
Typically they are decorative decoration doors. The rotary knobs are particularly distinguished German manufacturers. The next most difficult installation is considered to be the design of a rotary handle with a lock without a key for locking the doors. Using a simple pencil and tape measure, you need to mark the location of the hole for the handle and lock.

The process of marking a door for installing a handle


Select a metal drill according to the diameter of the rotary rod for metal doors and a wood drill for wooden ones. Using a drill and pen drills, drill a hole for the latch to the depth required for the latch bar to fully fit.
The next task is to accurately drill the hole for the handle. Having removed the latch, drill a signal hole with a small drill. Insert the latch and visually determine the accuracy of the hole in the door leaf and the hole in the latch.

The process of drilling holes for door handles


Once you are sure of the accuracy, make a hole to the required size. Having assembled and secured the handle in the door leaf, we make markings for the hole with a recess. Using the selection method, pre-assembling and disassembling, we bring the size of the loot to the required size. This handle should be the same size as the thickness of the door leaf.

Marking the door for the groove

When marking the installation location of the tongue, use a chisel to hollow out a groove for the strip with screws for fastening and for the latching strip in the door frame. The rotary handle is secured with screws on both sides and is secured with a cotter pin to prevent it from being pulled out.
Installation of mortise locks with handles
Mortise locks with a rotary handle and a lock at the end of the door leaf, special design Lock cylinders are produced by manufacturers of more than a million lock options. The number of such models available is sufficient for metal and wooden doors. DIY installation mortise mechanisms begins with carefully marking the mounting mechanisms on one side of the door.

Door marking diagram for installing a door lock
Using a chisel, cut out a groove in the body of the door leaf according to the dimensions of the locking system mechanism. The mechanism is installed at the level of the end of the canvas and is closed with an overlay strip.
When working you have to use chisels different sizes, periodically sharpening on sharpening machine or a block at a certain angle.
After making sure that the lock structure is completely recessed into the door leaf, we make a signal hole using a drill with a thin drill for a rotary handle, having previously removed the lock from the door. 
We check the accuracy of the hole and drill the door using a crown required size on both sides of the door to the middle of the leaf for the handle. Once the lock and handle are installed, all screws must be tightened. After checking the functionality of the lock without closing the door, you can begin marking the groove for the loot.
In the door frame opposite the lock, make a mark on the frame for the latch. Having opened the door leaf, mark, arrange and secure the door with the groove. 

If the groove is marked incorrectly and the lock tongue does not fit or there is a large gap, it is necessary to dismantle the groove and move the groove using a chisel. The chute pad and the lock bar should fit snugly, but without friction.

Reinstalling the handle
If necessary, unscrew the mounting screws and use a chisel to deepen seat. Or make a cardboard lining according to size and thickness.
Watch the video to see the process of installing a lock on an interior door.
Sold without accessories. You will have to purchase and install the door handle separately. The work is simple. Installation can be done independently; you only need a certain tool.
Products differ in the material of manufacture, design, and working mechanism. The fittings are selected to match the style of the room, taking into account ease of use. By type of fastening there are:
- Invoices. The fittings are simply screwed with self-tapping screws to the surface of the canvas.
- Mortise. They often come complete with a lock or latch. Installation of fittings involves cutting a groove and drilling a through hole in the body.

All mortise models are divided into two types:
- Knobs. The fittings are equipped with a rotating mechanism that moves the latch. Usually the handle itself is made of a spherical or disk shape.

- Push models. The mechanism operates on a similar principle, only the handle must be pressed to activate it. Fittings complete with a lock are in demand for interior and entrance doors.

Push models, in turn, are divided into two types:
- Mechanism with handle and latch assembled. Such models are inexpensive, but not durable. They quickly become loose and fail.

- The handle, latch, screw and the mechanism itself (with a tongue or magnetic) are selected separately depending on preference. Such products are of higher quality and more reliable than the first option.

Common material Metal alloys or aluminum are used for the production of fittings. Overhead models can be made of wood. For expensive paintings, handles are made of stone and glass. The cheapest option is plastic. Metal elements are chrome plated or plated with nickel.
Products vary by type of lock. The simplest locking element the latch protrudes. The lock can be locked with a key on one or both sides. In the first version with inside The room key is replaced by a latch.

Required Tools
To install a handle on an interior door with your own hands, you will need the simplest carpentry tools:
- electric drill;
- crown attachment with a diameter of 50 mm;
- feather drill with a diameter of 20–25 mm;
- pencil;
- screwdriver;
- hammer;
- chisel.
To facilitate installation, a template for installing door handles, sold with the product, will help. If it is not in the package, you can print it from the Internet. The template is a 1:1 scale diagram of the mechanism body. It is applied to the canvas to mark the groove and hole. If you intend to install a large number of handles, a jig for drilling is cut out of wood.

How to install a door handle?
They determine the installation height of handles on interior doors according to their preference, but usually maintain a distance from the floor of 0.9–1 m. The indicator may depend on the height of the people living in the house. To maintain aesthetics, the handles of all blades are placed at the same height.
The installation of door handles on interior doors begins by applying markings, but first the canvas is lightly tapped. Density is determined by sound. Modern doors They often come empty inside. Wooden frame made only around the perimeter and jumpers installed. If the fittings fall into a void, it will be impossible to secure them.

The handle is being installed on a door that has been removed from its hinges. If the canvas cannot be dismantled painlessly, then it is wedged in open state. Each model has its own design features. Therefore, before inserting, it is important to read the attached instructions and take measurements. They will help you select the exact diameter of drill bits.
Latch handle installation
Installation of the latch handle on interior doors begins by selecting a solid location and applying markings. Usually the manufacturer provides a diagram. If it is absent, manual marking is done simultaneously with the insertion:
- First, a mark is placed from the edge of the canvas at a distance of 60 mm. A center line is drawn at the end and the center for the future hole is marked.
- To ensure that the front plate of the latch body is flush with the wood, use a chisel to select a 3 mm deep socket at the end of the door leaf.
- To further install the knob handle, take an electric drill with a crown and drill a through hole in the blade. It is important to be careful to avoid damage decorative covering canvases.
- A hole is drilled from the end of the sash at the marked center with a feather drill. Its depth and diameter are equal to the size of the latch body. You cannot drill deeper, as there is a risk of damaging the panel. The latch is inserted inside and secured with two self-tapping screws.

- To install the knob, it is first disassembled. There is a technological hole on the side, inside of which there is a latch - a tongue. When you press it with a key, the handle can be easily removed.
- The next element is removed decorative overlay. The outer half of the handle is inserted into the door hole, and the inner half is placed on the other side and both elements are tightened with bolts. Now all that remains is to put the decorative trim and the handle itself in place.

- Continuing to install a door handle with a latch involves attaching a strike plate. The flap is completely closed and they try to mark on the lid the place where the locking mechanism tongue fits. Using the markings, a recess is selected with a chisel, a decorative pocket is inserted, and a steel cover plate is fixed on top with self-tapping screws.
Upon completion of work, the functionality of the mechanism is checked.
Installation of handle with lock
Installing a door handle with a lock is complicated by gouging out a large groove in the end of the door for the locking mechanism housing. The work consists of the following actions:
- The lock is applied to the end surface of the canvas. Use a pencil to outline the back of the body. Using an electric drill, holes are drilled according to the markings, placing them as tightly as possible. The remaining jumpers are selected with a chisel. It is better to make a hole with a feather drill, and its diameter should be a couple of millimeters larger than the thickness of the locking mechanism body.
- A lock is inserted inside the groove. At the end of the sash, trace the outline of the front plate with a pencil, and use a chisel to select a recess for it.
- By attaching a lock to the side surface of the canvas, mark the hole for the handles. Below, mark and make a hole for the keyhole.
- The lock is installed inside the groove and secured with self-tapping screws. A metal square is inserted and decorative trims are put on. Handles are placed on the square. Each overlay is fixed to the sash with self-tapping screws or through bolts, which depends on the model.
- With the door leaf closed, the tray is marked for the striker. After cutting out the recesses with a chisel, fix the plate with self-tapping screws.

After installing the lock, check its functionality.
Installation of handles for sliding doors
To insert a handle into a sliding interior door, you only need a drill, a chisel and a screwdriver. You can simplify the task with a router. Typically, sliding door handles are oblong. They consist of a plastic liner onto which a decorative overlay is snapped.
The handle on the compartment door is installed as follows:
- The plastic liner is applied to the side surface of the sash. Trace the outline with a pencil.
- Using a drill and chisel or a router, select a groove. Its depth corresponds to the thickness of the liner. Usually 12–15 mm is sufficient.

- An insert is inserted into the groove and secured with self-tapping screws. The decorative overlay, which acts as a handle, is simply snapped on top.
- A similar action is performed on back side canvases. If the shape of the handle is round, the recess is selected with a feather drill. The fittings may come complete with a lock. To insert it, a groove is selected at the end of the sliding door, and a counter plate is attached to the door.
Mounting a handle with a magnetic lock
To insert a handle into an interior door with a magnetic latch, perform the same steps as when inserting a conventional lock. For smooth clicking, you need to install the strike plate correctly.
At closed door on the boat they try to accurately mark the upper and lower edges of the castle. A counter strip is applied to the marking and a groove for the magnet is marked. A hole is made with a feather drill. A magnet is placed inside the groove. The counter plate is screwed on top with self-tapping screws, without deepening it flush. If the plate is recessed inside the sample, over time the weakened magnet will no longer hold the canvas.

Installation of stationary handles
There are two types of stationary handles, but all of them are easily attached to the door. Overhead models are simply fixed with self-tapping screws to the surface of the canvas. For the through option, the door is drilled. A threaded rod is inserted through the hole and the handles are screwed on both sides.
Every owner can install the fittings on the door leaf. It is important to initially correctly mark and understand the mechanism of the product.
The most common type of lock for doors between rooms is the latch handle. Regardless of the design and shape of the product, installation is very easy. Let's consider the procedure for installing such a handle on an interior door with your own hands.
Latch handle design
Models of this plan consist of two main elements: the product itself and the working mechanism. Both handle parts are cut into the door leaf separately.
Latch models are available with or without a latch. The lock is optional swivel mechanism. If it is not there, the door cannot be locked from the inside with a thumbscrew or a key (there is a keyhole on one side and a locking tab on the other, as in the photo).
Door handles vary in type of construction, but this does not affect the installation process in any way.
Height and distance from the edge of the door
The internal element (latch) is uniform, so it is installed the same for different handles with a latching mechanism. The height from the bottom of the door and the distance from the edge are standard.
For latch handles, there are two options for inserting into the canvas: 60 or 70 millimeters from the edge. The rotary latching mechanism can “move” to the right or left by about 1 cm, and this also needs to be taken into account.
- If the handle has a spherical shape, and the distance from the edge of the door to decorative element the canvas (for example, glazing) exceeds 140 mm, it is better to fix the mechanism 70 mm from the edge. If you install the handle at a distance of 60 mm, when closing the interior door from the inside, you can hit your hand on the door frame.
- When installing a pressure product, the indentation must definitely be 60 mm.
The standard handle installation height (distance from the floor to the center of the latch) is 900–1100 mm. If the door is usually used by one person, optimal height will be located at the level of his belt.
Installation of the product on an interior door is carried out on the right or left side. For round handle models, you only need to reverse the latch design. The tongue should point towards the closing of the interior door. If the device is asymmetrical, the elements simply need to be swapped, focusing on the opening side.
What do we need?
To make the insertion process as simple as possible, prepare the following:
- drill (or screwdriver);
- wood crown (half a centimeter in diameter);
- drill (about 24 mm);
- chisel;
- hammer;
- pencil.
Installation process
Step-by-step instructions for installing the latch include several steps.
Marking
The procedure begins with marking the door leaf.
- Use a pencil to mark the location for drilling. Diagrams are usually included with the product.
- If there are no explanations, you can apply the dimensions yourself. To do this, mark with a pencil a distance of 60 mm from the door edge, the height of the location is from 90 to 1100 mm.
- We mark the central point for drilling on the side edge of the door leaf. Dimensions are drawn along the center line.
Hole preparation
At this stage we do the following:
- Using a chisel, we hollow out a 3 mm recess under the face plate of the latch, corresponding to its width. It is better to mark the center in advance with an awl so that you do not have to apply the markings again.
- Using a half-centimeter crown, we drill a through hole. It is better to do this on both sides of the door leaf so as not to damage the door coating at the exit of the crown.
- Now let's move on to the side edge. Take a wood drill (about 24 mm in diameter). They need to make a hole in the marked center for the latch. You shouldn’t go too deep, otherwise you can make a hole in the canvas all the way to the panel.
Product Installation
At this stage we have two holes ready. Then we proceed in the following order:
- We install a snap mechanism into the side hole and fasten it with self-tapping screws.
- Remove the upper part of the handle. There must be a side hole for this.
- Using the key included in the kit (you can take any other thin flat object), press the tongue inside the hole and lift up the handle itself.
- We remove the decorative trim and find the mounting holes underneath it.
- Install outer part product, and then the inner half.
- We tighten both parts with screws that are included in the kit.
- We put on the decorative trim and the body of the handle-latch. In this case, it is necessary to press on the inner tongue with a key or other suitable object.
- Now the door needs to be closed in order to circle the place where the latch tongue touches the door frame. Using this marking, we hollow out a recess for the entrance of the lock.
- We install a decorative plastic pocket covering the wooden groove.
- We screw a metal plate over the hole under the latch tongue. At this stage, the installation of the handle is completed.
If you don't have a drill, all the holes can be cut with a chisel. However, the process of installing a door handle will require some experience and skill and will take more time.
Video instruction
The following video will help you visualize the process more clearly.
Interior doors are sold without fittings. Therefore, the purchase and installation of door handles is carried out separately. To do this, you can use the services of a carpenter or insert it yourself.
Types of door handles
When choosing accessories, you need to know what types of handles there are and how they differ from each other. The variety offered in stores allows you to match them to the style of the room and ensures ergonomic use. Depending on the installation method, products are divided into two classes:
- invoices;
- mortise
Overlays are attached to the surface and, as a rule, there are no difficulties with them. And mortise ones require preliminary preparation holes in the door leaf.
Mortise products can be of two types:
- Rotary, also called knob handles, which, when the handle is turned, open or close the latch that holds the interior door closed. In most cases, they are made in the shape of a ball or disk.
- Push ones work on the same principle as rotary ones, only the mechanism is activated by pressing the handle. As a rule, they are sold together with a lock or latch, which is where another name for them comes from - push handle latches. Fittings with a push mechanism are widely used for both interior and entrance doors.
Which type of product is best to choose depends only on your preferences. You should also consider the style of the room. Designers advise buying them the same for all doors in one room.
The height at which the door handle should be is not clearly defined by any standards. On average, it is placed at a distance of 1 meter from the floor. This value can fluctuate up or down depending on your preferences. It may also depend on the height of those who will constantly use the door. When installing, you can build on the level at which other handles in the room are located so that their height is the same.
Tools
In order to insert a handle into an interior door, you need to have a certain set of tools. It includes:
- tape measure, square and pencil;
- chisel;
- screwdriver, drill;
- drill, crown.
Using all necessary tools greatly simplifies the work process. It is quite possible to embed the fittings without a screwdriver and a crown, but in this case the work will take much longer.
Installation of fittings is ideally done when the canvas is removed from its hinges. If this cannot be done, then you need to securely fix it in order to carry out the marking and insertion efficiently and evenly.
Before you start cutting, carefully study the instructions for the door handle. All the sizes are listed there, and you will know what diameter of crown and feather you will need for the job.
The instructions below will help you place the handle on the door leaf and avoid mistakes. And for those who are encountering this matter for the first time, it will be useful to watch a video on this topic in order to have a visual idea of the upcoming installation work.

Step-by-step instructions for installing a door handle
- Marking the canvas.
- Drilling holes for handle and lock.
- Lock installation
- Handle insert.
- Marking the loot.
- Cutting a groove in the loot
We will pay special attention to each stage of the work, analyzing it in detail.
Marking the canvas
Installation begins with markings on the door leaf. First you need to decide what height will be chosen for the location of the handle. Using a square, tape measure and pencil, mark the places on the canvas where holes need to be made. To do this, measure the required distance from the floor and draw with a pencil horizontal line first on one side, and then transfer it to the end and the other side.
At the end in the middle of the drawn line we mark the place where the hole will be made for the lock tongue. On the same line on both sides at the same distance from the beginning of the blade - this is usually 60 mm - we mark the places where the handle itself will be inserted.

Drilling holes for handle and lock
Using a drill and a hole saw, we make a hole for the door handle. You need to check on each side of the canvas to a depth of half the thickness of the interior door. For convenience, experts recommend outside crowns make a mark with a marker. First, we drill on one side to the required depth, and then on the other until it is completely drilled. This is done so that the crown does not move to the side and so as not to damage appearance when selecting material for fittings. You need to hold the drill at an angle of 90 degrees and do not allow it to deviate either vertically or horizontally. Using a chisel we smooth out all the unevenness.
We make the hole for the lock using a drill and a pen. The work should be carried out carefully, since the distance between the pen and the corner of the end is not at all large.
Some experts prefer to make a hole for the latch first, and then for the handle. It doesn’t matter in what order you do this.

Lock installation
To install the lock, it must be inserted into the corresponding hole. Place the overlay on top and trace it around the perimeter with a pencil. Now you need to use a chisel to select the material to a depth equal to the width of the overlay in order to recess it into the canvas. For ease of work, you can use several chisels of different widths.
The trim is attached to the door with screws. It is recommended to make holes for them in advance using a thin drill, attaching an overlay and marking the necessary places with a pencil.

Handle insert
There are products in which the screws are on the outside. There is no need to disassemble them. When putting one part in place, you need to get into the holes of the latch with two guides, which have threads for bolts. Then you need to attach the second half and tighten it with bolts. They need to be tightened evenly so that the handle works well and the latch returns easily.
Products in which the screws are hidden must be disassembled. They come with instructions and a key for disassembly. The handle can be easily removed if you find the stopper on it and press it with a key. The collapsible part is bolted, after which the handle is put in place. Do not use force; assembly should be easy if done correctly.

Marking the loot
After installing the handle, you need to make a corresponding hole for the tongue in the tray. Therefore, first of all, it is important to carry out the markings correctly so that the door closes well and the lock fits into the groove without effort or friction.
Close the interior door and mark the top and bottom of the tongue on the door with a pencil. Using a square, we determine the exact middle of the castle and mark this value on the loot. Use a drill and a pen to make a hole and remove excess material with a chisel.
Cutting a groove in the loot
Before screwing the trim, it is important to check how the door closes. This will allow you to be sure that the groove for the tongue is made correctly and there will be no difficulties during operation. When closed, the door should have a slight play, that is, it should wobble a little. This is necessary because the metal thickness of the latch strike plate will be added to the groove.
The strap is fastened flush with the tray. To do this, as when installing a lock, it needs to be sunk into the hole to the required depth.
A slight play may remain even after you have screwed the cover on. This defect can be easily corrected. The strike plate always has a tongue with a small hole for a screwdriver. It is designed specifically to be bent. Using a flathead screwdriver inserted into this tab, you can adjust the doors by bending it slightly.
The entire process described can be clearly seen in the video of fitting fittings into interior doors. Installation of the handle can be considered successful if it turns easily and the latch fits into the groove without friction or effort.