Light sources of new generation - light-emitting diodes - despite still high cost become more and more popular.
Due to their low power consumption, they are successfully used not only in stationary lighting fixtures, but also in stand-alone, battery-powered ones.
In this article we will talk about how you can make an LED flashlight with your own hands and what advantages it will have in comparison with the usual one.
 An LED (foreign name - Light Emitting Diode or LED), like a conventional diode, consists of two semiconductors with electronic and hole conductivity.
But in this case, such materials are used, for which the glow in the pn-junction zone is characteristic.
Generally speaking, LEDs have been used in electronics for a long time.
But before they glowed barely, and therefore were used only as indicators, for example, indicating that the device was turned on.
With the development of technology, LEDs have learned to make much brighter, so they have become full-fledged light sources. At the same time, their cost is constantly decreasing, although, of course, they are still very far from an ordinary light bulb.
But many buyers are willing to overpay, because LEDs have a number of advantages:
- They consume 10-15 times less electricity than incandescent lamps of the same brightness.
- They simply have a huge resource, which is expressed in 50 thousand hours of work. Moreover, manufacturers back up their promises with a warranty period of 2 or even 3 years.
- They emit white light, very similar to natural.
- They are much less afraid of shocks and vibrations than other light sources.
- They have high resistance to voltage drops.
Thanks to all these qualities, LEDs today are confidently replacing other light sources from almost everywhere. They are used in everyday life, and in car headlights, and in advertising, and in portable flashlights, one of which we will now learn how to make.
Required elements for manufacturing
First of all, you need to get all the components that will make up the device.There are not many of them:
- Light-emitting diode.
- Ferrite ring with a diameter of 10 - 15 mm.
- Wire for winding with a diameter of 0.1 and 0.25 mm (pieces of 20 - 30 cm).
- Resistor 1 kOhm.
- NPN transistor.
- Battery.
Well, if you can get the case from a purchased flashlight. If it is not there, any base can be used to fasten the components.
Assembly diagram
If everything is ready, we can start:
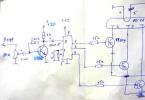
- We make a transformer: a ferrite ring will act as a magnetic circuit of a home-made transformer. First, 45 turns of winding wire with a diameter of 0.25 mm are wound on it, forming a secondary winding. In the future, an LED will be connected to it. Next, from a wire with a diameter of 0.1 mm, you need to make a primary winding with 30 turns, which will be connected to the base of the transistor.
- Resistor selection: The base resistor should be approximately 2 kΩ.
But the value of the second resistor must be selected. It is done like this:
- a tuning (variable) resistor is installed in its place.
- Having connected the flashlight to a new battery, set such a resistance on the variable resistor that a current of 22 - 25 mA flows through the LED.
- Measure the resistance value on a variable resistor and install a constant resistor with the same rating instead.
As you can see, the circuit is extremely simple and the probability of error can be considered minimal.

Do-it-yourself LED flashlight - diagram
If the flashlight still turned out to be inoperative, the reason may be as follows:
- In the manufacture of the windings, the condition of multidirectional currents was not observed. In this case, the generation of current in the secondary winding will not occur. For the circuit to be working, you must either wind the windings in different directions, or swap the conclusions of one of the windings.
- The winding contains too few turns. It should be borne in mind that the required minimum is 15 turns.
If they are present in the winding in a smaller amount, the generation of current will again be impossible.
DIY 12 volt LED flashlight
Those who need not a flashlight, but a whole spotlight in miniature, can assemble a device with a more powerful power source. As the latter, a 12-volt battery will be used. This product will have a slightly larger size, but it will still be easy enough to carry.
To create a high power light source, you need to prepare the following:

- polymer pipe with a diameter of about 50 mm;
- glue for gluing PVC parts;
- a pair of threaded fittings for PVC pipes;
- screw cap;
- toggle switch;
- 12 V LED;
- 12-volt battery;
- auxiliary elements for the installation of electrical wiring - heat shrink tubes, electrical tape, plastic clamps.
As a power source, you can use several batteries from broken radio-controlled toys, which are combined into one battery with a voltage of 12 V. Batteries, depending on their type, will need from 8 to 12.
A 12-volt LED flashlight is assembled like this:
- We solder pieces of wire to the contacts of the LED, which are a couple of centimeters longer than the battery. In this case, it is necessary to ensure reliable isolation of the connections.
- The wires connected to the battery and the LED are equipped with special connectors that allow you to make quick connections.
- When assembling the circuit, the toggle switch is installed so that it is on the opposite side with respect to the LED. The electronic filling is ready, and if the tests have shown that it works properly, you can start manufacturing the case.
The case is made of a polymeric pipe. It is done like this:
- The pipe is cut to the desired length, after which all the electronics are placed inside it.
- We put the battery on glue so that it remains motionless during carrying and manipulating the flashlight. Otherwise, a heavy battery may hit the LED element and disable it.
- Glue the threaded fitting to the pipe at both ends. Glue does not need to be saved - the connection should be tight. Otherwise, water may seep into the housing at this point.
- We fix the toggle switch inside the fitting installed on the side opposite to the LED. We put the switch on the glue, while it should not protrude outward so that the plug can be screwed onto the fitting.
To switch the toggle switch, the plug will need to be unscrewed, then reinstalled. This is somewhat inconvenient, but such a solution ensures complete tightness of the case.
A question of price and quality
Of all the flashlight components, the most expensive is the 12-volt LED. You will have to pay 4 - 5 USD for it.Everything else can be obtained for free: batteries, as already mentioned, are removed from radio-controlled toys, plastic pipes and parts very often remain as waste after installing plumbing or heating in a house.
If absolutely all the components have to be purchased in a store, then the cost of the lighting device will result in about 10 USD.
 A homemade lamp from an LED strip can be built quickly and easily. - see the instructions for making and make your own unique product.
Read about how to properly install the LED strip with your own hands.
Conclusion
A handy flashlight that gives a bright light and at the same time is able to work for a long time without recharging the battery is always needed in the household. As you can see, you can easily make it yourself, which will save you some money. The main thing is to be careful and strictly adhere to all the recommendations set out in the article.


