If you are thinking of renovating an apartment, one of the first questions to ask is the choice of lighting equipment. A great alternative to traditional lamps and fixtures is the LED strip. When installing a tape with LED lamps on the ceiling, not only the look of the room will significantly change, but great opportunities open up in choosing a design solution. In the article, we will acquaint you with how to install the LED strip with your own hands, as well as the advantages of using this lighting equipment and the features of choosing one or another strip.
Duralight (LED strip) is a plastic printed circuit board in which small light bulbs of various shades are mounted, as well as resistors. The latter play the role of resistance. The printed circuit board (circuit board) has a sticky self-adhesive base, so you can use LED strips in many places: at home, in an apartment, in restaurants, hotels, clubs, bars and other commercial buildings. Due to its features, the LED strip can be freely used to illuminate hard-to-reach places.
Important! LED lamps are usually located on the surface of a conductive thread at the same distance.
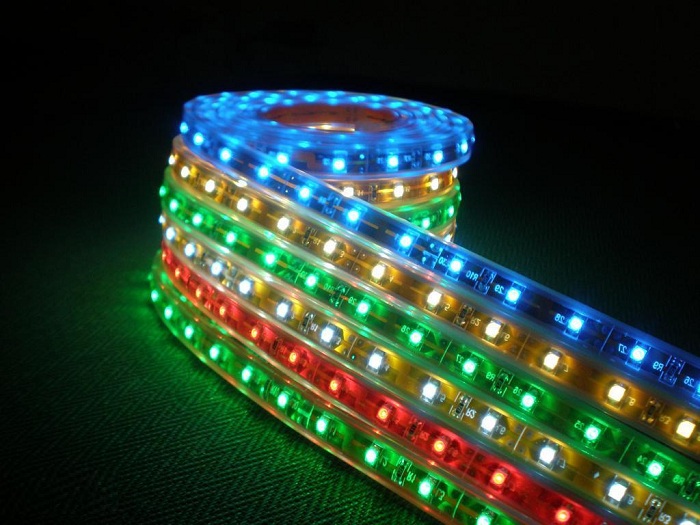
LED strip color options
LEDs have different colors of glow:
- Warm white.
- Cold white.
- Green.
- Blue.
- Yellow.
- Red.
- Multicolor.
Standard sizes of LED strip
- Width 8-10 mm.
- Thickness - 2-3 mm.
- The length of the tape in the coil is 1 or 5 m.

Choosing an LED strip - criteria, properties
When choosing an LED strip, it is advisable to immediately determine your requirements, and for this you need to know what criteria the types of lighting filament presented for sale differ in. This will speed up the process of buying the right version of the lighting fixture in the planned price range.
We list the main distinguishing characteristics:
- Brightness.
- Type (single color or tricolor).
Important! One-color duralights can be green, white, blue, red, yellow. Multi-color - RGB ribbons are able to change the color of the backlight, thanks to a special controller.
The hue of LED lamps depends on the type of crystal embedded inside.
- The number of lamps per meter. The more of them, the brighter the tape, which means that its cost will be higher.
- Base (self-adhesive or not).
- The quality of moisture protection is determined by the IP class.
- Using DIP or SMD. SMD (surface mount) is more commonly used as a cheaper option.
Important! Before purchasing an LED strip, decide on the brightness of the lighting you need, the humidity level of the installation site, as well as the length of the strip you need. When choosing, consider the optimal number of LEDs for the required level of illumination, so as not to overpay for unnecessary brightness.
Advantages of LED strip
Before installing and mounting the LED strip, familiarize yourself with the advantages of lighting equipment. This will make sure you make the right choice.
The main advantages of duralight:
- Low power consumption due to low power.
- Favorable service life, regardless of the type of premises - from 5 to 13 years.
- The possibility of laying along any trajectory is due to the plasticity of the thread.
- The ability to choose the required length of the duralight, since the cutting ratio is 6-10 cm (after 3-5 LEDs).
- Lighting with such a tape has the highest efficiency. LEDs do not generate heat, electricity is only spent on emitting light.
- No flicker.
- Tolerance to voltage drops in the mains, in particular, the tape continues to function at a reduced voltage of up to 130 V.
- No ultraviolet radiation.
- Possibility to choose your own colors.
- Fire safety.
- Environmental friendliness.
- The quality of the glow throughout the entire period of operation remains unchanged.
- Easy installation - thanks to the use of mounting tape or a self-adhesive base.
- Manufacturer's warranty. All LED products have a long-term warranty, which distinguishes them from the usual incandescent or fluorescent fixtures.
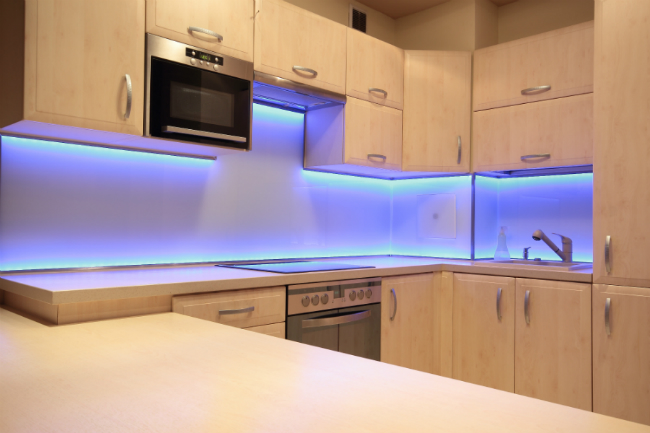
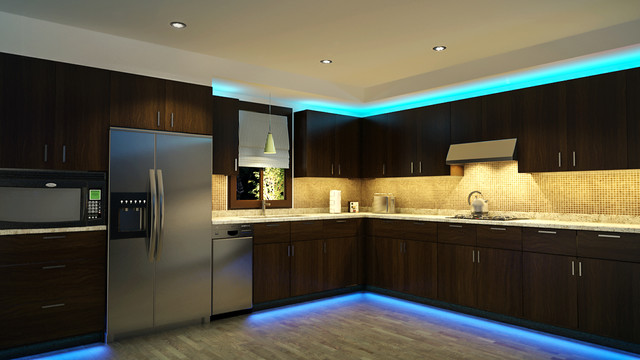
General rules for mounting LED strip
When installing the LED strip, follow some rules and requirements to ensure flawless and long-term lighting performance. Most often, the most advantageous for laying the lighting thread in terms of practicality and design are such places in the premises:
- wall or ceiling niches - special boxes are used for this;
- on the surface of walls and ceilings inside plastic corners;
- behind the ceiling plinth.
The technology of connection and installation in all cases is almost the same. The general rules are as follows:
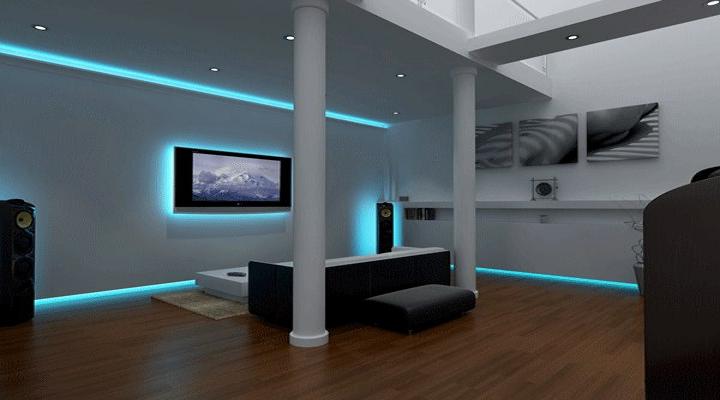
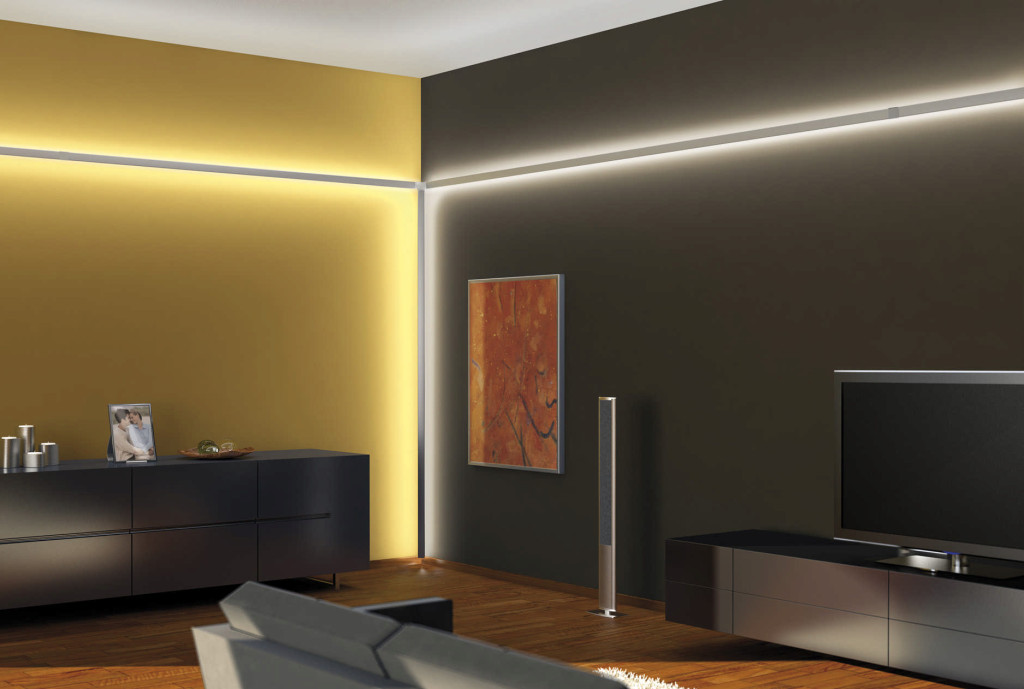
Tips for designing a room with LED lighting
To get a really winning interior result, when laying duralight, consider the following recommendations:
Ways of fastening the LED strip
The LED strip is mounted on the ceiling in the following ways:
- Installation of LED strip in the ceiling plinth. This method has a huge advantage - you do not need to rework the ceiling, since the ceiling plinth itself is mounted at a certain distance (8-10 cm) from the ceiling. After installing the plinth, proceed to gluing the duralight: remove the bottom layer of the tape and stick it on the ceiling plinth, like a regular adhesive tape.
- Installing the tape in a cornice made of drywall. This method is much more complicated, but the ceiling will look much more spectacular.
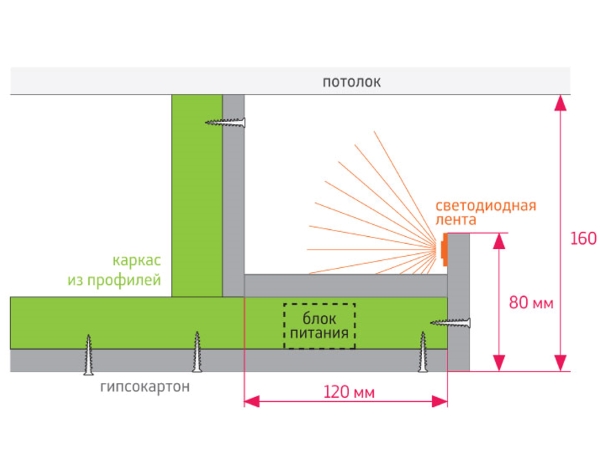
Installation of LED strip on the ceiling
Do-it-yourself installation of the LED strip in sequence:
- Determine the length and type of tape, select the profile.
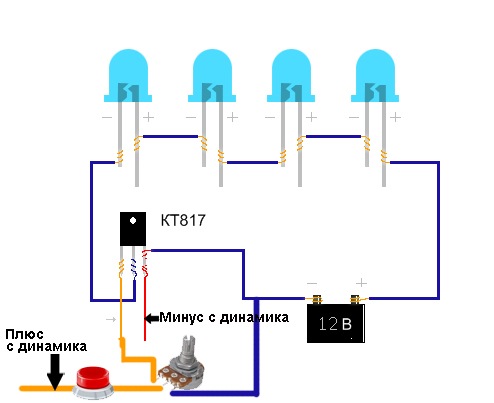
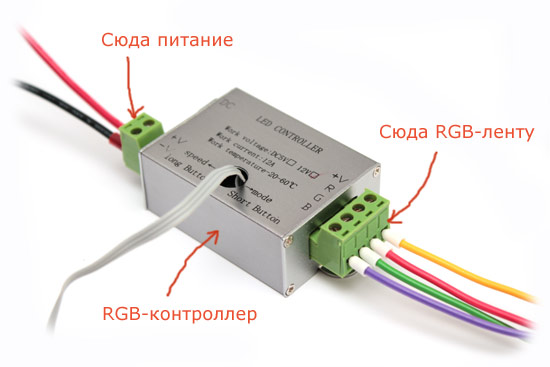
- Get a controller for controlling the color and brightness of the glow. It smoothly switches colors, and adjust the brightness with a dimmer using the remote control.
- To connect duralight, buy connectors. The connectors can be flat or round, depending on the type of LED strip and the manufacturer.
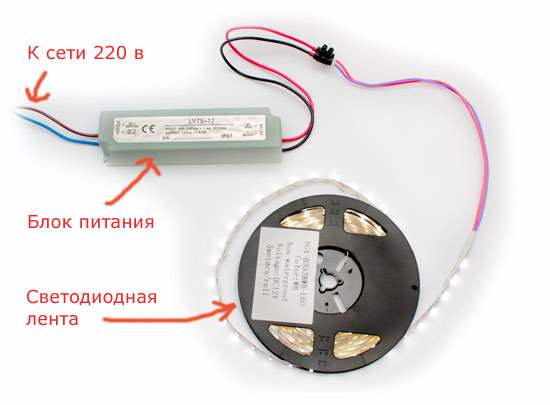
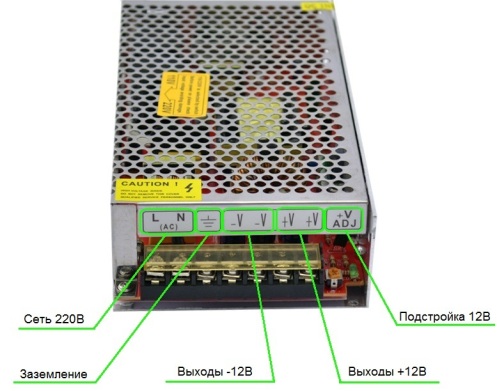
- Choose a power supply that will act as a step-down transformer - it is not included in the kit.
- Assemble the entire system by successively laying and gluing the thread with LEDs.
- Connect the LED strip to the power supply.
Let's dwell on some points in more detail.
Choosing a power supply
Power supplies come in various capacities - from 6 to 400 watts. Energy consumption depends on the quality of the tape, the density of the LEDs. As mentioned earlier, the power of the block should be at least equal to the power consumption of the tape, plus a margin of about 25%.
Important! Consider the calculation of power on an example:
We have a tape with a length of 5 m and a power of 9.4 watts.
To calculate the power of the power supply: 5 m * 9.4 W = 47. Do not forget about the margin: 47 * 1.25 = 58.75 W.
As you can see, we need a power supply of at least 58.75 watts. Can be rounded up to 60W. This is not difficult to find in a radio parts store.
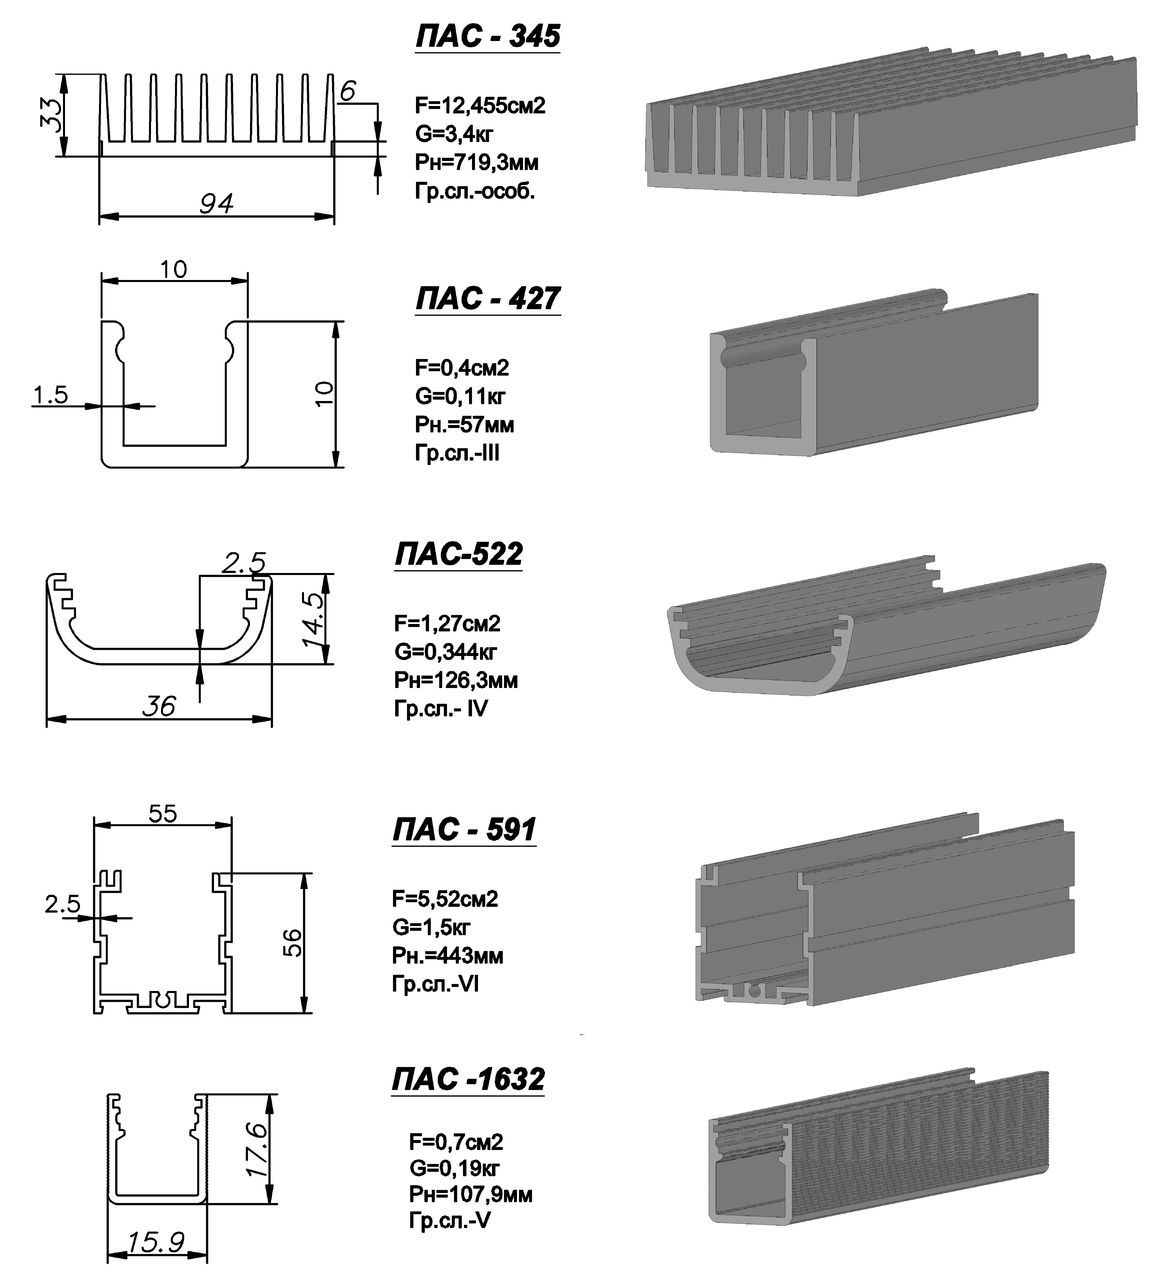
How to choose a profile?
Profiles for mounting lighting equipment differ in material and device. Let's consider the main ones. According to the material of manufacture, they distinguish:
- Aluminum profile. Such a system is versatile and reliable and will be appropriate in the interior of any style. Profiles of this type are used to create the design of the lighting system as quickly and easily as possible.
- plastic profile. The profile box for lighting equipment is often made of durable plastic. It is transparent or matte. The advantage of this profile: elastic, resistant to mechanical stress, temperature extremes and moisture.
Important! The plastic housing is suitable for the installation of lighting structures in public buildings, in the illumination of shop windows, commercial equipment, as well as furniture. Plastic profiles are even used to illuminate ice slides, skating rinks and sculptures.
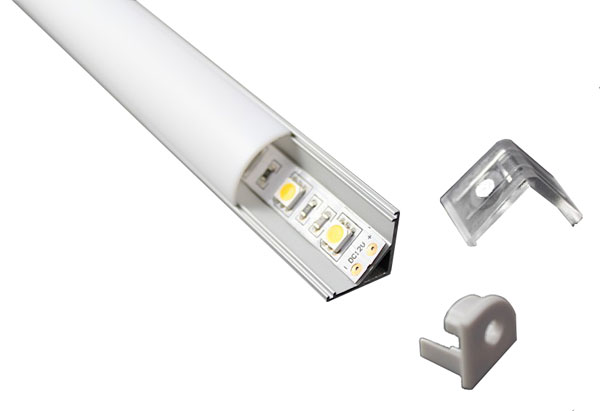
According to the device, the profiles are:
- Angular. In some cases, the standard profile is inappropriate, and then a corner profile is used, which is suitable for illuminating showcases of trading floors, cabinets and is used instead of a ceiling plinth. By choosing this option, show your imagination on the location of the lighting thread. In this case, it is possible to carry out installation even in non-standard places, due to the small dimensions of fasteners, high speed and ease of installation. For example, to illuminate window frames, floors, front door leaf, etc.
- Embedded. The built-in metal profile looks voluminous and has a lot of advantages, in particular, it is resistant to aggressive environmental influences. When installing this type of profile, use special glue or fasteners so that the design is of high quality.
- Mortise. The profile of this design is most often used in the furniture industry to illuminate tables, kitchen sets, cabinets. The aluminum construction is either silver or gold in color. The length of the profile is 1-2 m. Often, the mortise profile is equipped with matte light filters so that the light from the tape is scattered. Such filters give an attractive look to new furniture, and new life to old furniture.
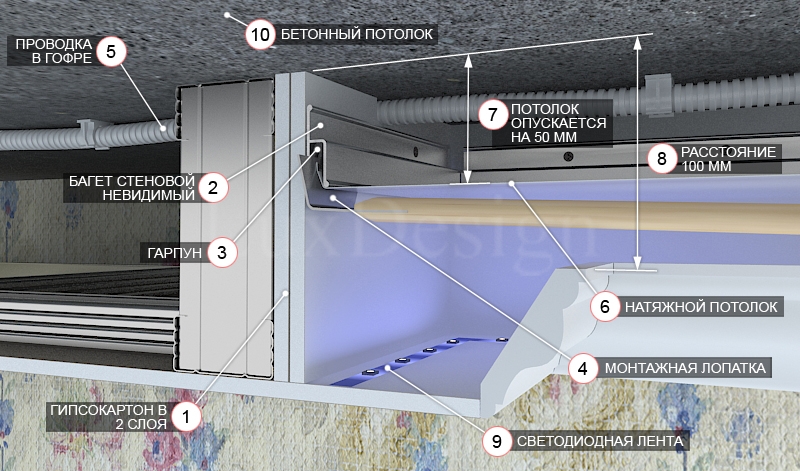
Scheme of mounting the LED strip under the stretch ceiling:
Important! After installing the lighting tape, plug it back into the network and check the quality of work. Only after a positive test result can the fabric of the stretch ceiling itself be assembled.
- Before gluing the LED strip, prepare the mounting surface. It should be smooth and fat free. To do this, treat it with alcohol and a clean rag.
- Mount a powerful duralight (more than 10 W \ m) on a metal profile or on an aluminum substrate.
- For convenience, glue the structure on a 3M layer or glue / sealant.
- When mounting duralight on conductive surfaces, such as metal structures, be sure to isolate the tape by placing it in the frame.
- Avoid damage to the conductive tracks during assembly.
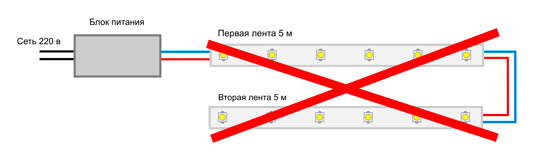
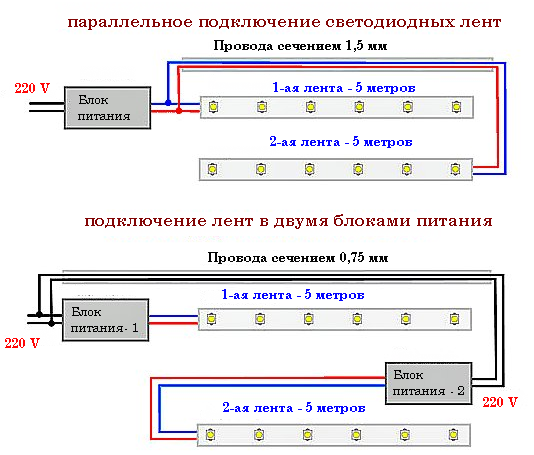
- When connecting large lengths of tape, use a parallel connection. In series, there will be an overload of the conductive tracks, which will lead to burnout.
Important! Before you install the LED strip, not only remember all these rules, but also watch the video tutorials. Especially if you are doing this kind of work for the first time and are not confident in your abilities.