The layout of a house and its architectural model - how do they differ? The first one can be made from available materials: paper, cardboard or wood. It does not necessarily have to repeat the shape of a particular structure. The architecture of the building can be anything, as long as the result of your creativity pleases both you and those around you.
The architectural model is exact copy any building with the repetition of all major and minor features. It is built from expensive materials and can take months of hard work to complete. Therefore, we suggest first building a model of a house from scrap materials. Don't know how? In this article you will find recommendations and detailed instructions on how to make a cardboard and wood model.
Miniature paper house
The model of a paper house, the diagram of which is attached in this article, is a simple construction, although the work on its creation can be an interesting creative process that requires attention and perseverance. You will need thick paper; newspaper or packaging paper will not work.
It is better to take a standard sheet of 29x21 cm. If the contours of your future home do not fit into the size of the sheet, you can glue two together using the “joint to joint” method, overlaying a strip 2 centimeters wide. After the workpiece the right size received, you need to make markings. We propose to build a model of a paper house, which will be rectangular in plan, two-story, with three doors, windows and

Drawing
First of all, we recommend copying our diagram, which you see in the photo, in order to indicate the dimensions of the future building. Then you need to decide what the length and width of the layout will be. Write these numbers on the diagram. Next, determine the height of the first and second floors, as well as the roof. Now you can transfer the resulting drawing to the base sheet using a ruler and pencil, measuring all the parameters of the future house. On next stage it is necessary to draw windows and doors. Their location can be changed as desired, depending on your taste. A paper house model allows you to make design changes at any stage of construction.
Layout assembly
At the next stage, you need to draw all the “wings” that you see in the diagram. They will act as mounting brackets when assembling the layout, supporting the roof and connecting the walls. Next comes the most important part of the work, which requires accuracy and attention. Follow all the lines of the drawing ballpoint pen along the line and with pressure. This is done so that you can bend the paper in the right place.
A paper house layout requires precise fold lines. After all the boundaries have been drawn, you can cut out windows and doors, as well as “wings” with scissors. The next important point: it is necessary to correctly bend the entire structure and glue it in the right places. For this we recommend PVA glue. When the model is dry, you can start painting.

Cardboard house model
Such buildings are made not only from paper. You can also make a model of a house with your own hands from cardboard, a material strong enough to make the building look “real”, with opening doors, windows, floors and ceilings, interior decoration and even inhabitants sitting inside on miniature sofas and chairs.
It all depends on how interested the “builder” is in the final result. He can build any model of a house with his own hands. However, its implementation is a complex creative process that requires accuracy and perseverance. You will need the usual tools: scissors, a retractable stationery knife, an awl, a ruler (preferably metal) and PVA glue.

Corrugation as the main material
It is better to take two types of cardboard for making a model: smooth and three-layer corrugated. The second will go to the floor and ceiling, and the first will go to making a corner for the connection individual parts structures, small parts of external and interior design. A cardboard house model needs a base. This can be a plate glued together from two layers of corrugation or cut from plywood. The base or base of the layout is drawn according to the dimensions of the future house and can be filled with decorative miniature flower beds, garden vases, benches.
Next, you need to draw a diagram of the location of the walls, porch and extensions on the base. After this, you can begin making the main parts: walls with cut out doors and window openings, ceiling and floor of the second floor (if To assemble the structure it is necessary to prepare corners from thin smooth cardboard. The longer the corner, the stronger the connection. Optimally, its length should be at least 70% of the length of the connection. The width of the cardboard corner is 1.5-2, 0 cm
Wooden house model
A do-it-yourself house model from wood can only be made with the participation of adults, since the work involves woodworking machines for home use. They are quite dangerous if there are no working skills. Hand tool wood processing also requires caution when working with it. The blades of knives, planes, files and gravers have sharply sharpened cutting edges.

Blanks
Layouts wooden houses Do-it-yourself projects require care during the work process. Creating them is an exciting creative activity, during which the master can show quick wits and ingenuity. First you need to make a drawing of the future house. Then make a base for the layout. After this, you can start creating parts.
It is better to make walls and floors from thin planks 1.5-2.0 centimeters wide and 5.0-7.0 mm thick. The workpieces are placed on flat surface close to each other and fastened with the same slats, which are applied perpendicularly from above and pressed with some kind of weight. All parts are pre-coated with PVA glue. After the manufactured block has dried, it can be adjusted according to the drawing and joined with other parts.

Finishing
The assembled model must be sanded and polished. This is done manually using glass sandpaper grade 25-N on a fabric base. Then the surfaces are sanded clean with 8-N sandpaper until completely smooth. After processing, the layout can be painted, doors installed, windows inserted and production Finishing work.
A home model created with your own hands, as a rule, has a removable roof. This is necessary in order to have free access to interior spaces, since in a miniature building you will have to install toy furniture and other interior decoration items. The surface of the walls is covered with “wallpaper,” i.e., painted strips of paper. The floor needs to be painted Brown color or cover it with linoleum - it can be made from oilcloth.
Paper modeling can be classified as an activity that never ceases to interest a person. Many orphanages for creativity always organize design clubs, because paper models not only provide an opportunity to get a new interesting figurine or toy, but with their help you can improve your knowledge of physics and mathematics.
Tools for work
To learn how to fold basic paper models, you will need simple devices like scissors, a utility knife, PVA glue and a brush for applying it. Give preference to PVA construction glue - of all varieties, it has the thickest consistency; it does not spoil the paper, making it wet and sticky, like regular glue.
Different models are made up of different types paper - from tissue paper to thick cardboard. Beginners are advised to start with 200 grams per m2 watercolor paper for large elements and drawing paper with a density of 140-160 grams per m2 when developing small parts.
Craftsmen create individual parts, such as masts, railings, small finishing elements, from polymer clay, plaster, plasticine and self-hardening plastic. If you also complement your work with molded parts, stock up on various stacks and molds - like those used in ceramic floristry.
How to make a paper model
The workflow for creating a paper model takes place in several simple steps. Before starting the process, the master decides what kind of figurine he wants to design. In fact, almost any product can be made from paper, but paper modeling often involves the following options:
- geometric figures, polyhedra with convex and concave corners;
- scaled copies of famous buildings;
- luxury car models;
- models military equipment: tanks, armored vehicles, heavy guns;
- vehicles: airplanes, ships and submarines, trains.
Figures of humans, animals, and plants are constructed much less frequently than others. After determining the product category, the main part of the work process begins.
Creating a Layout
Three-dimensional paper models are made from several large and small parts - diagrams of the elements must first be drawn on paper sheets desired color. A person cannot cope here without understanding certain knowledge of geometry and the ability to represent a three-dimensional image.
To make it easier for beginners to learn, many specialized magazines began to publish drawings of ready-made developments for paper models, by gluing them together to create a figurine.
You also need to cut out the layout according to the rules. For example, a solid line along the contour indicates the location of the cut, and a dotted line indicates the fold. But in each diagram the designations are individual, so before cutting you need to read the explanations for the figure.
Assembly
After the drawings of the paper model are ready, the model is glued together and finishing work is carried out, if necessary.
To make the surface of the product look realistic, craftsmen use different coatings: glossy varnishes, matting sprays, craquelure liquids, stains, etc.
Paper car models
Anyone new to paper modeling will enjoy this master class, which contains information on how to design famous model a VAZ 21011 sedan car in just half an hour.
Stock up on thick drawing paper or a coated sheet if the figurine is being created as a gift for a friend.
- On an A4 sheet of paper using a color printer, print out the finished layout of the paper model with your own hands. If you want to enlarge the diagram, make sure that the proportions of length and width are maintained - changing the parameters may interfere correct docking details.

- Have a picture of a real car of that brand in front of you to use the picture as a guide during assembly. Bend the development in the required places.
- Shape the blank into the shape of a car to mark the gluing areas for yourself. Only after this can you sequentially lubricate the white valves with glue and glue them to the necessary parts from the inside, fastening the parts of the machine to each other.
Please note that the tread strips must be glued together to form rings that will be attached to the wheels in order to obtain the most voluminous paper models.
Paper tank models
Designing military equipment from paper is somewhat more difficult than creating civilian vehicles because the guns consist of many small parts that form the body.
To see this, try to create a difficult but very interesting model of the German Panther tank.
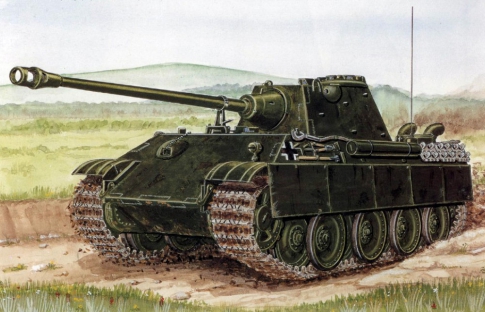
- On a thick A4 sheet, print drawings of the tank components using a color printer. Small parts It is better to cut it out of thin cardboard so as not to bend the narrow curled elements.

- You need to cut out the parts with sharp scissors to make the work easier.

- It is better to glue in blocks - separately connect the body parts, motor system and towers, and then fasten large elements together.

To glue tank parts together in the right order, follow this video tutorial when assembling.
Sometimes the joints are connected with small errors, which is why white paper stripes appear on the model. You can get rid of them using felt-tip pens or pencils of a similar color to the armor.
Paper airplane models
If you already have some skills in building paper figures, you will probably enjoy constructing a paper and cardboard model of the Tu-104 passenger aircraft.

- Print out the airplane drawings on thick paper.

- Glue the elements of the internal frame of the product onto thin cardboard - they are marked with red numbers.

- The parts marked with a cross - frames or frame - are transferred to the cardboard using a compass. In this case, you can calculate the radius of the circle by placing the needle of a compass in the middle of the cross and a pencil on the circle. Patterns of paper frames need to be glued to these cardboard blanks.

- After developing the frame, start creating the fuselage, or body of the aircraft. Please note that, unlike previous products, fuselage sections #1-8 do not have white securing flaps. They are connected to each other with special ribbons, represented on the patterns by the corresponding numbers in blue.

- The frames are glued into the joints between the fuselage sections.

- While the glue in the airplane body is drying, glue the tail parts together.
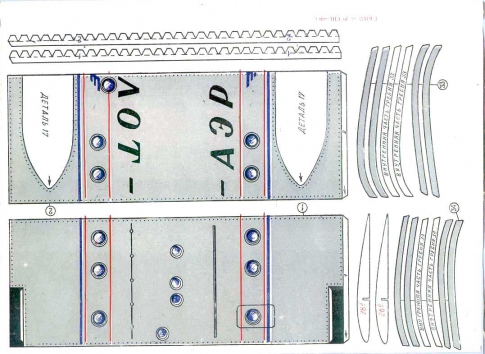
- The engines of the device are assembled like a fuselage.

- Next, the wings are formed using cardboard and paper.

- Connect the parts of the hull, wings, bow and cockpit together.

- Assembly of the chassis takes place in several stages - initially the wheels and their components are formed, after which the chassis is glued to the wings in a specially designated place.

- You can also use the pattern to cut out a wooden chassis - it will be stronger and last longer than paper and cardboard.
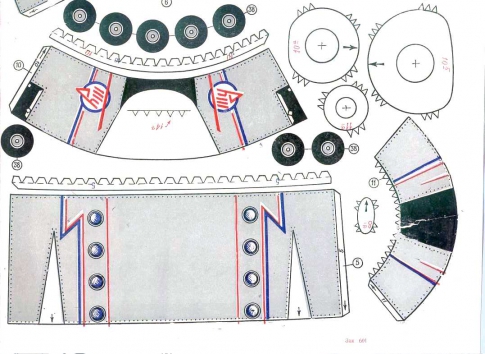
To avoid bends and creases on the body and tail, stuff the parts with cotton wool during assembly. Decorate the plane as desired using decoupage sprays and paints.
More simple model You can make a paper airplane with your own hands, following this video.
Take it for yourself and tell your friends!
Read also on our website:
show more
Despite the fact that the majority computer programs, which are performed in 3D modeling, allow you to imagine quite realistically appearance your future home, designing paper houses is still relevant. After all, not everyone knows these programs. Should you order one from an experienced engineer or designer? computer model expensive. In this case, mastering simple techniques for modeling houses made of paper and cardboard is much faster.
And if you have children from 2 to 10 years old, then this work for them can turn into a fascinating activity. Moreover, the training and developmental effect of this type of activity is difficult to overestimate. This includes accuracy, motor skills, skills in working with tools and, of course, the development of spatial thinking.
Simple layouts of paper houses and patterns for gluing
Making a house model with your own hands is not difficult. The simplest layouts paper houses The easiest way to make it is from the so-called. developments, when all their elements are connected to each other by fold lines and represent a solid element in the form of a diagram.

Also, the development, in addition to the walls, floor and roof, has additional bends for gluing. You can find links to such scans on the Internet. It is enough to print them on a printer or, by measuring the aspect ratio, draw them on sheets of paper or cardboard and obtain a scan diagram for modeling.


You can transfer the resulting scan to colored paper.

You can transfer key points onto it using a needle or awl various elements: windows, doors, additional mounting points architectural elements And so on. You need to cut them out immediately using a stationery knife, placing a piece of thick cardboard or plywood under the sheet with the scan.

Separately, overlay elements are made: window frames, shutters, doors, etc., which you glue onto finished layout last but not least.

The easiest way to make an even bend along the lines is to apply a ruler with a sharp edge to it. By repeating this procedure at all bend points, you will get a development ready for gluing.

You can also make a development by making each structural element separately and connecting them together at the bend points from the inside with tape. This method is especially interesting when you are making a house model from thick, hard cardboard.
You can glue the layout using quick-setting adhesives such as PVA, stationery silicate, glue stick, etc. It can also be produced using double sided tape, sold in construction stores.

We offer a video to help:
Making a layout for a house model with your own hands
Process self-made scans are no less exciting than working with ready-made samples. To do this, you will need almost any program installed on your computer to work with graphic images. CorelDraw or something similar that processes vector images is best. In it, with an increase or decrease in the image size, both the thickness of the lines and the loaded textures change in the same ratio. This allows you to obtain more realistic images. And the library of textures built into its shell is impressive. At the same time, by filling the sweep element with texture, you can get the finished appearance of the main layout elements.

The entire process, including filling parts of the scan with the selected texture, applying visual effects and architectural elements, as well as inserting images from the symbol library, takes from 10 minutes to half an hour, if the house is not very complicated. Print the scan on a color printer and start prototyping.

For testing, you can also use this one we made by copying the image to your computer and enlarging it to the required size.
Making complex designs from paper
The process of manufacturing complex multi-component house models is not much different from that described above. It’s just that similar sweeps are performed for individual elements of composite layouts. A group photo of the assembly of such a layout shows its individual elements and assembly order.

Having mastered the simple technique of paper layout simple houses, you can create entire paper towns with elements landscape design, plants, car models and small architectural forms.

Paper building models round shape The easiest way to do this is to apply the formula for determining the circumference of a circle (2πr) to their calculation, adding to it a strip for gluing.
You can also add realism to your layout by simply lighting the house from the inside.

To do this, you can mark the connection points for the LEDs and the battery on the scanner, and then install them during the process of gluing the layout.

Such a house can also serve as a night lamp, but in this case it is better to use pulse block power supply connected to the electrical network.

Will do Charger For mobile phone. You can also use inexpensive Christmas tree garland:
Simple house layouts without development
These are, first of all, houses assembled with your own hands from paper cylinders. The same layouts are great for various small architectural forms on prefabricated models with landscapes.

But also, using a similar technique, you can create a realistic model that imitates a log house so dear to the heart of any Russian.
To do this, you need to take longer pieces of paper to make tubes, so that after folding its turns resemble tree rings wood cut.

And the junctions of the crowns can be modeled by pressing the ends of the tubes with a solid round object of suitable diameter.

It is easy to assemble a paper frame from such elements. And display the intermediate crowns along the facades, and for a sample you can take a photograph of any real log house.
It is better to make roof coverings for model houses separately, in the form of paper slate sheets, tile flakes or honeycombs of bitumen shingles.
Dear readers, if you have any questions, please ask them using the form below. We will be glad to communicate with you;)
Before you start construction country house, it would not be superfluous to make a model of it in order to visually evaluate the advantages and disadvantages of the future structure. However, you can even make a miniature model of a house without specific purpose, just for collection. The main thing is that you can make it yourself from available materials.
Home design
The first step is to create individual structural elements in a reduced form. For convenience, it is recommended to use figures at a scale of 1:50. On a blank sheet of paper or thick landscape cardboard you need to draw internal parts home, including furniture and household appliances to make it easier to navigate in space. Special attention need to be given to the roof elements.
In order for work to progress quickly and strictly according to plan, it is necessary to prepare in advance home set tools for creativity, which includes:
- ruler;
- pencil;
- PVA glue;
- brush;
It is better to use real drawings as a basis, which include window and door openings, as well as building communications and chimneys. Consider the fact that ventilation ducts must be located in the "body" load-bearing wall. There is nothing difficult about how to make a model of a house with your own hands, if you follow a clear sequence of actions and approach this issue extremely responsibly.
Instructions for use
A house model can be built from any materials that are at hand: paper, cardboard, wood (plywood) or polystyrene foam. There are absolutely no restrictions in this regard. As practice shows, the most durable and geometrically correct models are made from plywood 6-8 mm thick. But for efficient work You will need additional tools: a drill and a jigsaw.


Subscribe to our VKontakte group:
The frame of the house itself is made from a sheet of plywood, interior walls And pitched roof the required configuration. Places of cuts and joints must be finely sanded to smooth out possible irregularities. The foundation is made of wide wooden slats, which are glued to the bottom of the building box. The remaining structural elements are made from individual bars: porch, stairs, etc.
It is important to immediately decide what goal you set for yourself. If you need a regular layout that will allow you to evaluate the convenience of the layout, then it is enough to just make a frame and a roof. Want to beautiful model Houses? Get ready to insert entrance doors, miniature windows, decorate platbands and carry out other decorative works. The architectural image must be complete and not cause contradictions. A photo of your home may end up on the Internet, so it's worth your effort.


Subtleties of technology
The pitched roof is made strictly according to the geometric dimensions of the drawing you took - this way you can avoid gross defects. Stove chimneys and ventilation ducts can be made from separate pieces of wood. The lower part must be cut at an angle so that the base of the part coincides with the slope of the roof, and glued. Drainpipes can be easily soldered from ordinary thin sheet metal. If you want the built house to differ from a simple model, you can additionally glue tiles - it will be beautiful and original.


The idea to build a cottage is simply magnificent, but what will it look like in reality? Yes, you can look at it on a computer monitor and in magazines and catalogs of architects.
It has become very interesting, so I propose to experiment a little and feel like an architect and build a model of a cottage on your own. This, of course, is not as labor-intensive and complicated as with a real cottage, but you will have to put in enough work. But this process will be very useful experience, then it will become clear why.
We need these things:
- pencil,
- marker,
- scissors,
- compass,
- stationery knife,
- protractor,
- ruler,
- thick and regular cardboard,
- paper,
- PVA glue,
- universal polymer glue,
- scotch,
- polystyrene foam ceiling tiles.
Instructions for action
The method for creating a layout is quite simple and interesting. To begin with, we draw a floor plan on cardboard and coat two tiles with polymer glue and place a sheet of paper between them and glue them together, the result is a model of three layers: tile, paper, tile. It turns out to be a very reliable thing.
Having estimated how tall the cottage will be (model size), we cut our tiles into strips the size of the floor. We immediately cut through the windows and doors and make cutouts for the connections. We glue the tiles with polymer glue, this process will go without difficulty, the glue glues without problems. To strengthen the structure, paper strips can be glued to the corners of the tiles. Also, to strengthen the frame of the cottage layout, it is enough to glue the floor onto cardboard. It will be stronger and more stable, which will allow you to easily attach the second floor of the planned cottage.
We do the following for walls that are not at right angles:
- mark the corners, but do not cut all the way;
- carefully cut the foam tile on both sides, being careful not to cut the paper;
- With inside We cut out foam plastic from the bend of the walls to the corner of the wall.
All the manipulations carried out with the blanks for the walls of the cottage model make it possible to bend the foam without difficulty. It is best to do each floor separately and then fasten it together. It is advisable to cut the roof from ceiling tiles and glue with polymer glue. After receiving the result, in the form of a layout, it is enough to paste over the elements of the cottage with colored paper in accordance with the author’s idea.

What was planned
The first step was to determine the scale of the real cottage and determine the size of the layout. It turned out that in three centimeters of the model there will be 1 meter of a real house. We apply a floor plan with the appropriate dimensions onto thick cardboard. It should be noted that these plans will also be used in the construction of the real cottage.
By gluing the tiles, they laid paper and thereby achieved the strength of the future walls of the model. You should be careful with polymer glue, not to overdo it, so as not to crawl out of the edges, and it will be aesthetically pleasing, besides, areas with a thick layer of glue are difficult to cut panels.
The model is not made in full height, but from pieces of foam plastic of the required length. At the joints of one of the pieces, a groove was cut out from below, and the next one was marked with a groove from above and put together, like a construction set. The best option would be to make grooves from the edges and in the middle. For strength, we glue the paper with PVA glue. The strength turned out to be small, and the best option began gluing cardboard the size of the foundation. It is best to glue with polymer glue.
After such strengthening, no mechanical damage is dangerous, even a fall holds the glued parts together. You can even try to throw it, it’s been verified that it won’t fall apart. It is better to immediately cut out all the holes that are planned on the house plan on the details of the layout, and then glue them together. This is much more convenient than cutting through windows and doors finished model cottage type houses.
First floor of the future cottage
We determine the size and, using the experience of creating a foundation, we implement it, using the same method of gluing and joining, for the walls of the first floor. The idea is to have a winter garden, we create the walls in this way - by carefully cutting the foam without touching the paper, we create walls by cutting the foam from the inside to the corner. It so happened that the parts stick to the paper and are very easy and convenient to bend.
Attic
The idea did not quite come true; the attic that was invented did not turn out as desired, so it grew into a full-fledged second floor. When they're over plastic tiles, and had to buy more. These tiles turned out to be of a different quality, much better. There was no characteristic foam structure and it turned out to be more convenient to work with, the only thing that was wrong was the size, they turned out to be much thinner. But there is already glue that simply cannot be replaced, it turned out that everything was glued together thin layer glue and it turned out great. These panels were cut much faster and easier, the granules stayed in a heap.
Created a roof
In order for our roof to hold up and be beautiful, we should place a couple of pieces of foam plastic in the middle of the model and glue another one across them. The roof ridge came out, in the shape of the letter P. We cut out the planes for the roof from cardboard and glue them with tape. For winter garden We also build a roof out of cardboard and place it on thin beams. The roof over the garage is designed to be warm, so it is better to use thick cardboard or foam sheet. It turns out that everything is in accordance with the planned plan of the house, although some details of the cottage had to be replaced, or rather not replaced, but revised Constructive decisions question.
It’s even very good that you decided to make a model of the cottage. Based on the level of creation of the model, some, not immediately obvious, nuances of building a real cottage become clear. The layout makes it possible to analyze whether the rooms are conveniently located, understand which roof is more suitable, and come up with something new, for example, the location of the balcony. In subsequent experiments with design inside and outside the house, the layout will undoubtedly come in handy.
The lesson turned out to be exciting and useful. This, of course, is not a super model developed by architects in a specialized computer program. But the visual aid is very good. Then you can give it to the children Dollhouse, that's who, and they will be satisfied with such a masterpiece.
Windows in a 3-D model of a house