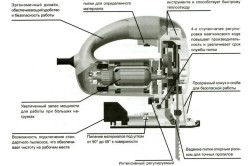
- Device and principle of operation
- Assembly instructions
- How to remake manual jigsaw
- Machine from sewing machine
Tabletop jigsaw machine - equipment for cutting, sawing out figured parts from various materials. Its feature is the ability to make cuts while maintaining the integrity of the outer contour of the workpiece. Depending on which saw is installed on the structure, the machine can process natural wood, its derivatives, plastic bases or metal.
The device is indispensable when performing construction and repair work, production of furniture, souvenirs. Equipment is often purchased for domestic purposes. Sometimes it is irrational to buy a factory unit: you can make a jigsaw yourself. The photo shows the design of the tool.
Device and principle of operation
A stationary factory sample includes a work table for a jigsaw, a unit with a cutting element is fixed on it, an electric drive installed under the table top and a crank mechanism. The tension unit is installed at the top or bottom of the machine. Many models of units allow you to cut material under different angles. This is necessary for making bevel cuts. Often for convenience swivel mechanism, stops, guides, markings are applied. The length of the cut depends on the dimensions of the table; in most models it is 30–40 cm.
The power of an electric jigsaw may be low. For domestic purposes, a 150 W unit is sufficient.
An important element is the crank mechanism. It is responsible for the quality of transmission of engine torque into the translational and reciprocal motion performed by the cutting element in a vertical position.
A standard jigsaw tool is characterized by a vibration frequency of up to 1000 per minute with an amplitude of 3–5 cm. Some samples provide for adjustment of the processing speed of various materials. In most cases, such a tool is equipped with a saw up to 35 cm long, which allows cutting parts up to 10 cm thick.

In order for the cutting element to serve for a long time without breakage or cracks, it is necessary to provide it with optimal tension along its entire length. For this purpose, screw and leaf springs are used. As additional option Factory machines are equipped with an air pump to remove sawdust from the cutting line. A block with drilling machine, however, you must pay extra for each additional node.
Assembly instructions
The jigsaw is made from a refrigerator compressor, conventional drill. The cutting blade can be set in motion using a motor from washing machine. Another option is to use hand jigsaws and old sewing machines. The figure shows a design drawing.

How to remake a manual jigsaw
First of all, the table is made. For this, a sheet of thick plywood or metal is used. Through holes are cut into it for cutting blade, fasteners. Through them, the manual unit placed below is fixed to supporting structure. Next, the jigsaw table is secured to any stable wooden table. Guide rails are added.
If necessary, the machine can be quickly disassembled.

The standard device is equipped with springs that provide the file with the required level of tension. You can’t do without a rocker arm; one of its edges is under spring tension, the second provides attachment to the cutting element of a jigsaw. You can also clamp the blade between two guide rollers.
Before starting work on a homemade jigsaw, be sure to turn off the pendulum stroke.
Sewing machine machine
A jigsaw from a sewing machine contains a saw speed regulator, provided by a speed switch on the equipment.
For manufacturing, the thread weaving mechanism is removed. In most designs it is placed at the bottom. Unscrew the bolts, knock out the cotter pin, remove drive shaft, leading to the thread weaving knot.

Then the upper protective panel opens, the groove along which the needle moved expands to the width of the file. Jigsaw saws are slightly modified: they are cut according to the size of the longest needle that could be installed on the machine. In order not to make an adapter for fixing the cutting element to the seat, grind off the upper incisors and make the lower part of the blade sharp. A cutter is installed in the needle holder. After this, they begin cutting out the blanks.
Cutting small pieces of wood is done with a jigsaw. The device is small in size and usually has an electric drive. Factory models differ in their characteristics and cost. For small volumes of wood processing, it makes sense to make a jigsaw machine yourself, using improvised materials. This requires a few factory parts.
A factory-made jigsaw is reliable device, the operation of which is guaranteed by the manufacturer. Manual models are low cost. Stationary devices are expensive, but provide proper comfort when processing wood. The set of components in the device is largely the same for everyone.
The design consists of the following parts:

The part to be processed is placed on the work table. The size of the workpiece depends on its dimensions. Some models have Rotary table, which makes working with the part easier - visibility improves. The presence of graduations makes it easier to mark the material.
Average characteristics of factory machines:

 Models for specialized purposes may have radically different characteristics. There are no specifications large sizes, for processing small parts. As well as models of large sizes, the industry also produces them for retail sales. But such options will be very expensive.
In the middle class there is high competition for consumers, so the devices will be cheaper. The characteristics are also tailored to the typical tasks of a carpenter. Based on them, you need to make drawings of a jigsaw machine with your own hands. Complex components for it are purchased in the store.
Experts classify jigsaws by type of design. The design features of the mechanism determine the processing capabilities of wooden products.
The classification is carried out depending on the design of the jigsaws.
Device types:
- With lower support.
- Double-support.
- On a pendant.
- With degree scale and stop.
- Universal.
 Models with a lower support have become most widespread. The frame of the desktop factory device has 2 halves - lower and upper. The sawing and chip cleaning model is located on the top of the bed.
The lower frame contains a controller, an electric motor, a final drive, and an on/off button. This machine allows you to work with any materials and any size.
The presence of two supports in a jigsaw is advantageous in that the upper half of the bed has an additional rail. This jigsaw is ideal for cutting small parts. The thickness of the workpieces on both models should not exceed 8 cm. The worktable of such machines, as a rule, can be adjusted in height and angle of inclination.
Suspended devices do not have a fixed frame, but are distinguished by their mobility. The material being processed is set motionless, and the master moves the working module. since the latter is attached to the ceiling, the thickness of the material is not limited. The tool is moved manually, regardless of the bed. This allows you to make patterns of complex shapes.
The presence of a scale of degrees and stops is suitable for those craftsmen who carry out processing according to the drawings. Marking allows you to avoid errors when working. There are universal models of machines on the market that allow you to perform several operations. This machine allows you to perform drilling, cutting, polishing and grinding. The cost of such devices will be much higher, but working with them will be more comfortable. These are industrial specimens.
 The designs and drawings of the homemade jigsaw options presented online are different. This is due to the imagination of the authors and the desire to make a device that will stand out from the rest. Only the concept is the same in most cases - they take a manual jigsaw as a basis and repurpose it.
Home woodworking enthusiasts often look for information on how to make a jigsaw with their own hands without any special skills. You can use a ready-made manual jigsaw as a base. The mechanism does not require careful modification. Factory handheld device- this is the drive. But the crank mechanism will have to be developed independently. Manufacturers are trying to offer consumers platforms for quick remodeling, but personal needs can only be satisfied with their product.
Assembly order:
- A support table is made. A sheet of metal is taken as a material and a hole is made in it. The shape is oblong, 3-4 times wider than the saw blade. Holes for fasteners are made nearby.
- The factory device is fixed at the bottom of the support table. Holes for fasteners are made next to the hole for the saw blade. Countersunk head screws are used as fasteners. This is necessary in order to ensure a perfectly flat plane of the table. Otherwise, the processed products will cling to the caps of the wines, which will cause inconvenience in work.
- The structure is fixed on a wooden table.
The advantage of creating a jigsaw machine with your own hands is that the factory tool can be disconnected at any time. When necessary, you have an ordinary manual jigsaw in your hands. Therefore it is better to purchase manual option a tool that can be used on a homemade machine - it’s cheaper. Stationary devices are expensive.
Comfortable work with wooden products can be achieved by installing guide rails on a homemade support table. Additionally, markings are applied to the table, which makes it easier to measure distances on parts during processing.
Jigsaw manual type as the main device for the machine has disadvantages. The main problem is the file - it is too wide manual models. Because of this delicate work It is difficult to do on wood with it - the curvature of the lines is limited.
The previous design is simple and does not have additional parts that make working with wood easier. The direction of modernization is the possibility of replacing the file with a thin one.
Options for improving the design:
- Build a rocker. The structure will be tensioned by springs on one side. The second side of the rocker is fixed to the file.
- Secure the file between two rollers. They serve as guides for the thin file.
- A stationary factory device is used as a drive for a system of two rocker arms. A file is pulled between the latter. The movement is transmitted from the factory device to the lower beam of the saw.
 Design upon purchase or self-production you have to choose based on personal preferences and desire to tinker with technology. Using guide rollers is a less popular option - its reliability is poor.
Modernization by installing rocker arms is common. It is better that the factory device only serves as a drive for the jigsaw file. To do this, you need to turn off the pendulum stroke in the tool.
The heir to a grandparent's estate often gets an old sewing machine. It has already served its purpose for sewing clothes, since more precise equipment is now being produced. If you don’t have a jigsaw on your household, you don’t have to spend money on buying one. It is made with your own hands from sewing machine.
Procedure:

Now the jigsaw for figured sawing ready for plywood. WITH manual drive It will be more difficult to work because your legs will get tired. An additional disadvantage will be vibrations from force on the tool. The electric drive of the machine, converted into a jigsaw, partially solves the problem of vibrations.
An expensive jigsaw can be replaced with a design self-made. It will not be inferior in quality and functionality if you approach the assembly process responsibly. It is important to make high-quality plywood mechanisms that serve as a support table. It is desirable that the table be able to rotate. For the version with a sewing machine, this will not be possible. If desired, markings are applied to the table to make it easier to measure parts during work.
One of the most convenient stationary machines for figure cutting, it has a very simple design. Craftsmen make such devices from a wide variety of materials and tools. One of the most suitable bases for making a tabletop jigsaw machine is a regular sewing machine. At the same time, the device does not have to be new or have an electric motor. We will tell you in more detail about the principle of operation and the manufacture of a stationary jigsaw later in the article.
The working principle of a jigsaw machine
Before you start studying the manual for assembling your own stationary cutting machine, you should delve into its structure and a little about the history of its origin.First electric jigsaw The new machine was born in 1946, when engineer Albert Kaufmann came up with the idea of replacing the sewing machine needle with a thin file. For its time, the invention was very original and received well-deserved public attention. The production and sale of jigsaw machines was carried out by Scintilla AG until it was purchased by Bosh in 1954. Today, the patents for the invention have long expired and a wide variety of companies have begun to manufacture jigsaws.
Modern stationary jigsaws are functional devices assembled from precise and reliable parts. At first glance, the models on sale may seem incredibly complicated to manufacture, but they are based on the same old principle of operation, albeit with a more optimized mechanism. By assembling a jigsaw from a sewing machine, we are essentially returning to the origins of this invention, partially complementing it with modern technologies.

The design itself, which tensions and drives the saw blade, is quite simple and consists of special frame and crank mechanism. The movable frame consists of upper and lower arms of equal length, attached to the rack. A file is installed on the front side of the frame, and on the opposite side there is a spring that performs tension. The crank mechanism connected to the motor causes the saw to move up and down. A more visual and detailed embodiment of the above process can be seen in the following drawing.

Jigsaw from a sewing machine
The beauty of making a stationary jigsaw from a sewing machine is to minimize precision work. A reliable crank assembly is already connected to a needle mount, which can be easily converted into a file. In fact, in order to requalify the device, it is necessary to install a tension mechanism on the opposite side of the saw blade being installed. We will tell and show you in detail about how to make a jigsaw from a sewing machine.
As clear example, the Soviet electric sewing machine “Tula” will be redesigned. Based on this manual, it will be possible to convert most other old-style models into a machine. If you have a different machine (which is quite likely), the parts and their location may vary. In this case, the main thing is to approach the matter judiciously, with logic and use the advice below according to the circumstances. So, to work you will need:
- Sewing machine
- Nut with bolt (full thread)
- Spring or flexible metal plate (for tension device)
- Metal corners (2 pcs.)
By instruments:
- Drill (with a set of metal drills)
- Grinder (with metal disc)
- Pliers
- Screwdriver


If you use thin files for sawing, up to #2, a standard hole in the top mount will be enough. For wider canvases, it will be necessary to drill a hole of a larger diameter.

The lower mount can be made from a regular bolt. To do this, you will need a drill, a 3-4 mm metal drill, and a tap for cutting threads for this diameter. The resulting design should look like this:

There are 2 types of installation of a sewing machine: above the table and under the table. In the version we are considering, the apparatus is located on top, when the tension mechanism comes from below. The author of the product refused spring method tension in favor of a metal plate cut from a hacksaw blade. A hole drilled in the center of the plate serves as the attachment point for the saw blade. The strip of steel itself is installed in improvised grooves made from corners.


At this stage, the assembly of a homemade jigsaw from a sewing machine is considered complete. The device can cut easily wooden blanks, thickness up to 20 mm. With a more advanced tension system, a good spring, and the presence of a powerful motor, it can easily take higher values. The detailed assembly process, with comments from the author, is presented in the video below.
Remaking the place where the needle is attached to the file
Not everyone and not always has the need to carry out only figured cuts. Much more often, a jigsaw is used to produce controlled straight and straight cuts. round shape. In such cases, a thin file will be too slow, but standard canvas for a jigsaw to cope with the task quite quickly. And everything would be fine, but such a saw will not fit into a standard needle holder. This means that you need to reactivate the logical hemisphere and “pump up” your homemade jigsaw from a sewing machine. By the way, this is quite simple to do.
As an example, let's take a product from the following author, although this problem was also solved at the end of the previous manual. The answer lies in the line seat to tighten the needle. For this purpose, a grinder with a metal disc is used. The shank of the file itself also needs to be sharpened so that it fits into the hole in the fastener element with the bolt. Detailed examples shown in the photo above, below, also in the video.

Other options
If the above products do not suit you for any reason, we recommend that you familiarize yourself with two similar videos. Jigsaws from a sewing machine, assembled by the authors themselves the following materials, have the same basis, but various features implementation. The following videos will be useful as a source of ideas for making your own unique machine.
Save this page on your social media. network and return to it at a convenient time.
Probably in almost every family, inherited from their grandmother, there is an old hand (or foot) sewing machine lying around. No one will sew on it anymore, but it’s a shame to throw it away - it’s a working thing.
It is from such a sewing machine that you can make a manual jigsaw for cutting plywood, balsa and plastic. Additional materials will require a file for figure cutting from a jigsaw (you can buy such a file at a tool store for 15-20 rubles). On average, it takes about 20 minutes to convert an old sewing machine into a manual jigsaw.
Such a jigsaw will be very useful for those who like to make crafts with their own hands, a modeler, or just someone who likes to put their hands on wooden dies and make a necessary and useful thing out of them!
By the way, using the technology described below, you can also make an electric jigsaw. To do this, you just need to take an old electric sewing machine as a basis.
The procedure for re-equipment is as follows:
1.Remove the thread weaving mechanism (it is located at the bottom), you need to unscrew two bolts.
2.Remove the drive shaft of the thread weaving mechanism; to do this, knock out the cotter pin.
3. We unscrew the panel (again a pair of bolts) that covers these mechanisms and, in the place of the hole where the needle goes through, use a file to saw the slot to the size of a jigsaw file.
4.Now you need to prepare the file:
4.1) cut off its top so that the length is like that of a sewing machine needle.
4.2) use a file to grind down the teeth at the top until a solid blade appears to the length of the base of the needle.
4.3) with reverse side We also grind the files down to the thickness of the base of the needle.
4.4) sharpen the lower part of the lance to the point

5. Now insert the file into the needle holder of the sewing machine.
6. By turning the wheel of the sewing machine, we make sure.
- that the file does not touch the foot and the panel.
- that the plywood goes under the saw in the upper position of the mechanism.
- that the broaching mechanism is working, and set the broaching speed convenient for work.
That's the whole change. Now you have a much-needed machine for cutting plywood, plastic and balsa in our DIY business.
See an example of cutting ribs for an aircraft model
Of course, all this can be done with an ordinary hand jigsaw, but it will take much longer. Why waste time when you can save it?
Also interesting:
Small homemade jigsaw - small table jigsaw.
Jigsaw - a tool for the workshop - article about how to use a jigsaw correctly.
Do-it-yourself CNC machine - how to make a multifunctional CNC machine at home.
Valery comments:
This machine was made from a sewing machine and brought to everyone’s attention by an aircraft modeller.
the novel comments:
Making a jigsaw with your own hands
- Types and purpose
- Manufacturing
- The basis of a sewing machine
For a person who is used to on our own cope with everyday problems, a jigsaw is a necessity. Electric jigsaws are also good for those who like to tinker, for those who live in their own home, and for summer residents. You can make a jigsaw with your own hands, since this model differs significantly in better side from hand tools. An electric tool improves the quality of sawn products, and also facilitates and speeds up the work process.

Types and purpose
A jigsaw is a thin saw that additionally has a ski to guide the saw blade along the surface. The jigsaw was invented by Albert Kaufman, who at first simply replaced the needle of a foot- or electric-powered sewing machine with a blade. A modern jigsaw has a simple design in the form of an electric motor that drives the blade simple mechanism. Front, top part The tool has a guide, and the lower one contains a retractable saw blade that makes cuts. An electric jigsaw has a support platform that allows you to focus on the part being cut and work with great precision.

The device of a homemade jigsaw.
A jigsaw can cut through plastic, plywood, copper, brass or steel with equal success. The functions of a jigsaw should allow it to make both straight and curved cuts on various types of materials without disturbing the external contour of the product. The fixed position of the tool allows you to make cuts high precision. Hand jigsaws do not have a tension system and guides, thanks to which a jigsaw has such a smooth and stable move.
A manual jigsaw is inconvenient for cutting out small parts. Since it is quite heavy, you have to hold it with one hand and guide the workpiece with the other. A tabletop jigsaw does not have this drawback, but it is difficult to process large parts with it, and it is quite large in size. It is best to use such a jigsaw as a mini-machine for the production of small workpieces. The simplest desktop jigsaw is easy to make with your own hands.
Return to contents
Manufacturing
Drawing of a thermoelectric jigsaw.
The simplest model is made quite quickly, but its availability is usually sufficient for household needs. A carefully made jigsaw will be no worse than one made in a factory, and in some ways it may be able to surpass it. In order to make a jigsaw, you will need:
- manual jigsaw;
- heating thread;
- screws;
- plywood;
- duralumin pipes up to 12 mm in diameter;
- drill;
- clamp.
For normal operation of a jigsaw, the following parts must be present: a comfortable handle, a switch (a push-button switch is most convenient), a power cord, and a heating filament.

Fundamental electrical diagram starting the electric motor.
The first step is to make a frame from a duralumin pipe, but for the base you can also use textolite of at least 10 mm or thick plywood. The lighter the frame made, the easier the jigsaw will be to use. The frame must have a channel for the power cord. Experts believe that the best frame shape is one in which one of the sides is deviated by 45º.
Then an earring is made from a millimeter-thick copper sheet and attached to the frame with screws in the place where the frame is connected to the handle. The earring, screw and wing nut form a clamp in which the heating filament is fixed. The clamping cheeks are made from a 0.8 mm thick duralumin sheet, and a push-button switch is located between them.
After this, a slot-like hole is cut in the plywood through which the file can pass. It is convenient to make this gap using a drill. Markings are made and holes along it, the transitions between which are smoothed. Instead of plywood, plexiglass, plastic, or metal can be used. The drill is then used to make mounting holes in the plywood and on the base plate itself. Jigsaw on plywood base secured with screws so that the file can pass through the gap. The structure is attached to a table or workbench using a clamp so that the file is directed upward. If the clamp is not suitable, you can use another fastener that is more suitable for the specific case. Although the file in this case remains standard, both hands are freed up, thereby increasing the cutting capabilities, so the design is functional even in this form.
As a heating thread, you can use a nichrome spiral from any heating device, for example, from an iron. It is fixed like a standard saw blade between the ends of the frame with slight tension. To heat the filament, 14 V is supplied, and a rheostat is used to control the voltage. The current is determined by the length and thickness of the nichrome thread; a rheostat helps set the optimal current strength. The current strength affects the temperature to which the filament heats up, if too high material heats up and can catch fire, and if not enough, cutting will be impossible.
An optimally tuned jigsaw, made by yourself, will allow you to cut out shapes with complex shapes.
Return to contents
The basis of a sewing machine
Jigsaw speed regulator.
The advantage of this design is primarily its simplicity, since the drive does not even have a belt drive. This model will cut boards up to 50 mm with ease. The jigsaw will consist of 2 wooden parallel mounted levers, which are mounted on a rigid wooden frame. They are connected at one end by a strong nylon cord, and at the other by a tensioned file. Due to a pair of eccentrics, the file will make reciprocating movements, since this pair of rotating weights is attached to the lower lever, swinging on the axis of a support block with a sliding bearing. It is most convenient to use a working motor from an old sewing machine as a drive. If the weights are eccentrically fixed on the axis, then each revolution of the motor shaft will provide a cycle of reciprocating movement of the saw. By changing the size of the attached weights and the degree of tension of the nylon cord, the stroke of the saw can even be changed. You will need to make:
- sewing machine motor;
- boards;
- steel rod 20 mm in diameter, a threaded bolt works well;
- steel strip for making weights; old watch weights will also work;
- saw blade.
The body parts are made from 2 boards, sawn to size 20x250x800 mm, so that the holes match more accurately, they are first fastened together. When cutting out the outline, all the edges of the parts are rounded, except for those adjacent to the base. The distance from the attachment point to the axis of rotation of this tool is 6 mm greater at the upper arm. This allows you to increase the resource and efficiency of work, since when moving up, the saw moves back, and when moving down, it leans forward. If the inclination is reduced, the tool will cut more slowly, but the accuracy will increase.
The support axis is used to attach loads to it on both sides. Before final tightening the nut, you should make sure that the weights are installed symmetrically, since if the reciprocating movement is uneven, the cuts will be very sloppy. Then the support block is installed on the lower lever; before final fastening, you need to check whether the loads touch the lever during operation. The motor is connected to the jigsaw using a flexible rubber hose of sufficient length.
The upper and lower arms are installed on the frame; saw blade holders are cut out at their ends and secured with pins. The better the tension of the file, the faster, cleaner and smoother the cutting will be. You can use threaded rods, as in branded jigsaws, but tensioning with a nylon cord is also quite effective.
Making a homemade jigsaw
- Jigsaw machine: practical recommendations
- A few words in conclusion
Homemade jigsaw. Sounds unreal. However, professionals have always been valued and in demand. Carpentry can be both your main income and a pleasant hobby. The hands of a carpenter produce wonderful products, unique and inimitable. IN modern world, with its terrible ecology, every person increasingly strives to surround himself with natural, natural materials. Handmade wooden items can become an exclusive, priceless gift.

A jigsaw can cut anything sheet material along and across.
But in order to create all this magic, you will need not only quality wood, but also tools. A wide variety of wood jigsaws are sold in stores, but a real master will not be satisfied with such a tool. Because they are not suitable for performing truly delicate jewelry work. There is only one way out - to make a jigsaw. If you have hands and a bright head on your shoulders, then you can do this task.
There are several options for making such a tool: upgrading a purchased model or making it from improvised means. There are two types of jigsaws for wood: manual and electric. Hand tools are a classic.
Making from a sewing machine
- old-style sewing machine;
- file
Drawing diagram of a homemade jigsaw.
- After unscrewing the bolts, the needle is carefully removed.
- The drive shaft is removed.
- The protective panel is unscrewed.
- The hole for the needle expands to the size of the prepared file.
- The length of the file is trimmed to the size of the needle.
- The top and bottom of the file are ground off.
- The file is inserted in place of the needle.
Materials for tabletop jigsaw:
- You need to make a frame from a duralumin pipe.
- When making it, do not forget about the need for a channel in order to subsequently lay the power cord.
- Making a C-shaped frame from a copper sheet. Next, it is attached with screws to the frame in the place where it connects to the handle of the tool.
- A gap is cut in the plastic. A file passes through it. You will need a drill to cut the hole.
- Mounting holes are drilled on the plastic.
- The jigsaw is attached to a plastic base so that the file passes through the gap.
- The structure is attached to the table using clamps.
Return to contents
The jigsaw consists of a motor and a rocker with a saw.

Motors from washing and sewing machines can be used for the motor. The body is made of plywood. It includes the base itself and the table. The box should be located between the base and the table, and on inside shelf-bracket and intermediate shaft. And on the reverse side there is a disk and a rocking chair.
The eccentric is connected to the rocker using a rod. The rod is made of steel plate. It's all connected with screws. The intermediate shaft should be installed on several bearings; they are covered with a lid to prevent dirt and sawdust from entering. The double-strand pulley is placed on the shaft and secured with screws. The eccentric of the jigsaw is also installed. Four holes are drilled on the eccentric flange. Thanks to this, the stepped screw will change position. Accordingly, the amplitude of the swing will change. A rocker is a wooden rocker in which you need to install a screw. And on the front side of the structure there are metal plates with hinges, with the help of which the files are attached. The file is placed in the slot of the work table and clamped tightly.
Rocker arms oscillate frequently and violently during operation, and the plates are subjected to excessive heavy loads. Therefore, it is necessary to pay due attention correct fastening saws. The plates must be securely fastened in the slots and tightened firmly. But the earrings that hold the files are installed in such a way that the screws do not clamp the halves too tightly.
Main characteristics of household jigsaws.
The axis should get a little freedom. The screw that tightens the rocker arm must have a small gap for the thrust screw. The rocking stand itself can be made from a block. A groove is made on the upper side of the block for the upper rocker arm. The stand can be made from halves or made into composite parts.
These are the homemade items you can make with your own hands. There are different jigsaws for wood, but better than that that you make with your own hands cannot be found. Such a tool will serve you faithfully for many years. This is a real help for the home craftsman. There is so much you can do using this simple unit. But still, this device can be dangerous, so before you start working, you should familiarize yourself with the rules for using the tool.
Return to contents
Safety precautions when working with a jigsaw on wood
- Don't forget about a protective suit, goggles and, of course, a respirator.
- Do not overload the tool, this will cause a drop in speed.
- Do not leave the device plugged in unattended.
- Do not put the jigsaw down until it has come to a complete stop.
- It is forbidden to work with a faulty tool.
- Under no circumstances should the material be held in your hands. It must be securely fastened.
Tips for working with a homemade jigsaw:
- It is necessary to carefully monitor the condition of the files. Dull saw blades do their job poorly and poorly and put a harmful load on the drive.
- If it is necessary to make straight cuts, use files with a wide blade, this gives a perfectly straight cut.
- As a result of pressing on the tool, the blade will overheat and inevitably become dull. You need to work smoothly and carefully.
- When cutting soft metals, wipe the blade with machine oil.
- When working with wood, use maximum speed.
- Keep an eye on the instrument and its technical condition.
Return to contents
A few words in conclusion
Working with wood will bring you a lot of pleasure and joy. Wonderful things are made from this material. You can make wonderful gifts and souvenirs for friends and relatives with your own hands.
If you have never used a jigsaw on wood, then be sure to test your strength. This skill will be useful to everyone home handyman. After all, this tool makes not only various openwork decorative crafts, it is also indispensable during construction and repair work. This universal tool In workshop. A jigsaw effectively cuts not only wood, but also plastic, drywall, laminate, ceramic tile and even metal sheets. Ease of use makes it an optimal cutting tool.
A jigsaw from a sewing machine, or use whatever is at hand and don’t look for anything else
here's something else I dug up -
The idea of making a jigsaw came to me many years ago, but I brought it to life much later - when someone discarded a faulty sewing machine produced by a Podolsk plant fell into my hands.
From the “insides” of the machine, I took only the main shaft and the “needle bar” assembly, and dismantled the remaining parts. I also cut off the front part of the platform, leaving only the thrust bearing under the L-shaped body stand. I sanded down all the ridges on the bottom surface. I drilled holes in the corners of the thrust bearing and through them I attached the inverted machine to the table top of the cabinet from below. By the way, I also used a cabinet from an old foot-operated sewing machine. True, finding such a cabinet is probably more difficult than the machine itself. But it is not difficult to make it from a 20 mm thick chipboard. I closed the lid on top. steel sheet 1.5 mm thick (can also be made of duralumin).
A pulley with a diameter of 80 mm for a V-belt drive was installed on the protruding end of the main shaft (you can also take it from an old foot sewing machine, you just need to bore it for a V-belt). A similar pulley, but with a larger diameter (100 mm), was installed on the electric motor shaft. Electric motor - single-phase (220 B) with a power of 180 W and a speed of 1350 per minute, together with a pulley, used from an old washing machine
The electric motor was mounted on the lower platform of the stand, which was made from fairly strong bakelite plywood 20 mm thick, since there was no floor in the stand itself. In the platform, I previously cut out oblong grooves through the holes in the legs of the electric motor to move the motor in order to tension the drive belt. The sawing unit is difficult to manufacture and requires some experience in working with metal. But it does not require precision (particularly precise) execution, so its parts, right down to the saw, can also be made by yourself.
The sawing unit is shown in the figure. A mandrel with a slot made of a hexagon is put on the needle bar, which is fixed with locking screws. A file is inserted into the slot of the mandrel, onto the shoulders of which a washer with a slot-like hole and a groove is first put on. The washer with its groove rests on the shoulders of the file. Then it is put on union nut and carefully tightened So that the file does not break during operation, a thrust roller assembly is provided. For this, a hole measuring 65 × 13 mm is sawed in the lid. Above this hole, a plate is symmetrically attached to the cover with countersunk screws. Below it, a roller holder is installed. It is fixed with countersunk screws and a plate with two threaded holes A roller made of steel is installed in the slot of the roller holder and fixed with a rivet-axis with a diameter of 3 mm. The plate must be installed flush with the surface of the lid, so you need to select a recess for the plate with a chisel.
The file is made of carbon steel, if there is no purchased one The teeth are cut with a small file and needle files of the same shape as longitudinal hacksaws The teeth must be set, but since they are very small, it is almost impossible to use a special tool for this purpose Therefore, the saw blade must be clamped into small a vice, then with a beard and a hammer, light bending blows should be applied through the tooth. Then the file is turned over and the remaining teeth are bent in the same way. After sharpening, the teeth must be hardened.
It is more convenient and more productive to work with such a stationary jigsaw than with a manual electric jigsaw, especially with small workpieces. And the quality, in my opinion, is much higher.
Diagram and drawings of a jigsaw lobzik_stanok-1.jpeg lobzik_stanok-2.jpg
Attached images
#6 Vasya Nikonenko
- City: Brusiliv
- Name: Vasya Nikonenko
A jigsaw from a sewing machine, or use whatever is at hand and don’t look for anything else
deep in the soul - a tyrant
- City: Novosibirsk (Narodnaya-Ippodromskaya)
- Name: Andrey
A jigsaw from a sewing machine, or use whatever is at hand and don’t look for anything else
#8 Sergey Viktorovich
A jigsaw from a sewing machine, or use whatever is at hand and don’t look for anything else
A jigsaw from a sewing machine, or use whatever is at hand and don’t look for anything else
put the jigsaw upside down
the most reasonable, and compact, plus there is a swing of the file, I adapted my own fiolent, plus, it’s easy to remove for other work. And if you do it, then with a rocker arm under a thin file, then you can cut it out.
#10 Vasya Nikonenko
- City: Brusiliv
- Name: Vasya Nikonenko
A jigsaw from a sewing machine, or use whatever is at hand and don’t look for anything else
Eh Vasya, Vasya. But what about the wood turner?
What about a lathe, a lathe is being built.
You can put a regular jigsaw upside down.
It's possible, but not an option for me
A jigsaw from a sewing machine, or use whatever is at hand and don’t look for anything else
Previously, they used compressors from a refrigerator. The main thing is to disassemble it carefully. But it lags behind in terms of convenience with a manual one. But if you do it manually, it’s better to buy it; it’s very difficult to do it yourself.
You can also make a ribbon, it’s better than a stationary jigsaw.
- City Ufa
- Name: Dmitry
A jigsaw from a sewing machine, or use whatever is at hand and don’t look for anything else
Vasya Nikonenko. Don't take on everything at once. Either you’ll get tired of finishing what you started, or you’ll give it all up. Well, you will have the wrong experience and it will be difficult to work in the future due to the dispersion of energy on unnecessary things.
And anything can be done that does not contradict the laws of physics. The question is whether this should be done
Making a jigsaw with your own hands or how to automate the work process?
Many DIYers at home use a jigsaw. The variety of these instruments is great. There are both hand and power tools to choose from, allowing you to make a variety of crafts. But, if there is no desire or opportunity to buy a jigsaw, then is it possible to make DIY jigsaw. The answer is yes, and in more than one way. In this article we will look at the options homemade jigsaws for home use.
- Making a jigsaw from a sewing machine
- DIY jigsaw from a desk
- Buy or make it yourself?
Making a jigsaw from a sewing machine
Many people inherited hand or foot sewing machines from their grandmother. No one will use them for their intended purpose, but it’s a shame to throw them away. But it can be used to make an excellent hand jigsaw for cutting plywood, plastic and balsa. Additional material For the rework, only a jigsaw file will serve, and the whole job will take no more than twenty minutes. It will be beneficial for all those who like to make things with their own hands. The conversion process is as follows:
- The thread weaving mechanism is removed. It is located at the bottom and can be removed by unscrewing two bolts;
- The cotter pin is knocked out and the drive shaft of the thread weaving mechanism is removed;
- The panel that protects the mechanisms is unscrewed, and the slot in which the needle goes is expanded to the size of a file;
- The file is being prepared. To do this, it is cut so that the length is like that of a needle. Upper teeth they are ground down with a file, and the lower part of the file is ground down to the tip;
- The file is inserted into the needle holder.
Note. If you take an electric machine as a basis, you can make a jigsaw using the same scheme. After this, you need to turn the sewing machine wheel and make sure that the saw does not come into contact with the foot and the panel, that the plywood passes freely, and that the mechanism is working properly. This completes the conversion. Now you have a homemade jigsaw, which is quite suitable for most jobs.
DIY jigsaw from a desk
Another option, how to make a jigsaw with your own hands, is a little more complicated than the previous one, but it is also more practical and convenient. To do this, you will need an electric jigsaw, which will make the work as easy as possible. To build the machine you need: any old desk, a jigsaw (will serve as a power unit), a manual jigsaw and plywood (for making arcs and rods).
Note! Absolutely any model of electric jigsaw can be used as a power unit.
The process begins with the manufacture of a “swing”, which at one end will be connected to the mechanism electric tool, and the other - to hold the file. The jigsaw is fastened with self-tapping screws under the table cover. Made in the lid round hole so that the file moves freely in it and dust and shavings do not get stuck. The swing is installed above the power tool, and a saw is fixed between them.
One end is attached to the jigsaw, and the other is attached to a wheel at the end of the swing. The start pedal operation is very simple. To do this, a product is formed from a metal plate with a hook at one end and a fastener at the other. The hook is placed directly on the start button of the tool, and the other end is attached to a wooden plank that will serve as a pedal.
Buy or make it yourself?
Homemade jigsaws can be made using the most different ways and different in design. The most common is the conversion of an electric saw into a machine for work. This is quite simple to do; its design is similar to that described above. But it is always necessary to take into account what material (thickness, dimensions) will be processed. If these are thick materials, then you need to calculate working space so that they fit there. This point is also important in terms of choosing a file.
Important! If you are counting on large volumes of work, then homemade machine will be ineffective for you.
The designs of homemade machines range from the simplest to the very complex. The advice I would like to give: do not invent overly complex mechanisms, because this will take a lot of your time and require considerable investment, so homemade apparatus loses all meaning. If you need a professional, powerful tool, then it is better to buy it right away. And for simple home crafts and simple tasks, even the simplest machine will be enough.
Modern style in the interior: the personification of convenience, practicality and functionality
The idea of making a jigsaw came to me many years ago, but I brought it to life much later - when someone discarded a faulty sewing machine produced by a Podolsk plant fell into my hands.
From the “insides” of the machine, I took only the main shaft and the “needle bar” assembly, and dismantled the remaining parts. I also cut off the front part of the platform, leaving only the thrust bearing under the L-shaped body stand. I sanded down all the ridges on the bottom surface. I drilled holes in the corners of the thrust bearing and through them I attached the inverted machine to the table top of the cabinet from below. By the way, I also used a cabinet from an old foot-operated sewing machine. True, finding such a cabinet is perhaps more difficult than the machine itself. But it is not difficult to make it from a 20 mm thick chipboard. On top of the lid I covered it with a steel sheet 1.5 mm thick (can also be made of duralumin).
A pulley with a diameter of 80 mm for a V-belt drive was installed on the protruding end of the main shaft (you can also take it from an old foot sewing machine, you just need to bore it for a V-belt). A similar pulley, but with a larger diameter (100 mm), was installed on the electric motor shaft. Electric motor - single-phase (220 B) with a power of 180 W and a speed of 1350 per minute, together with a pulley, used from an old washing machine
The electric motor was mounted on the lower platform of the stand, which was made from fairly strong bakelite plywood 20 mm thick, since there was no floor in the stand itself. In the platform, I previously cut out oblong grooves through the holes in the legs of the electric motor to move the motor in order to tension the drive belt. The sawing unit is difficult to manufacture and requires some experience in working with metal. But it does not require precision (particularly precise) execution, so its parts, right down to the saw, can also be made by yourself.
The sawing unit is shown in the figure. A mandrel with a slot made of a hexagon is put on the needle bar, which is fixed with locking screws. A file is inserted into the slot of the mandrel, onto the shoulders of which a washer with a slot-like hole and a groove is first put on. The washer with its groove rests on the shoulders of the file. Then the union nut is put on and carefully tightened so that during operation the file did not break, a thrust roller assembly is provided. To do this, a hole measuring 65 × 13 mm is sawed in the lid. Above this hole, a plate is symmetrically fastened to the cover with countersunk screws. Below it, a roller holder is installed. It is fixed with countersunk screws and a plate with two threaded holes. A roller made of steel is installed in the slot of the roller holder and secured with a rivet-axis with a diameter of 3 mm. The plate must be installed flush with the surface of the lid, so you need to select a recess for the plate with a chisel.
The file is made of carbon steel, if there is no purchased one The teeth are cut with a small file and needle files of the same shape as longitudinal hacksaws The teeth must be set, but since they are very small, it is almost impossible to use a special tool for this purpose Therefore, the saw blade must be clamped into small a vice, then with a beard and a hammer, light bending blows should be applied through the tooth. Then the file is turned over and the remaining teeth are bent in the same way. After sharpening, the teeth must be hardened.
It is more convenient and more productive to work with such a stationary jigsaw than with a manual electric jigsaw, especially with small workpieces. And the quality, in my opinion, is much higher.
Jigsaw diagram and drawings
The video shows a jigsaw from an old sewing machine in action
Well, another option for creating a jigsaw


