The spirit level, also called the bubble level, is very often used on construction site, as it allows you to quickly determine a deviation of even a small degree from the horizontal or vertical plane. Sometimes these errors can be critical to the result, so this tool indispensable at construction sites.
Spirit level - instrument design
As a rule, such a level looks like a rectangular bar in which one or two (sometimes more) flasks with liquid are built in; in them you can also see a small air bubble, which is an indicator. When this ball occupies a place between two marks on the flask, it means that the surface under study is vertical or horizontal. If there is any risk, then you can estimate the approximate degree of deviation.
Each flask (they are also called a peephole) is filled with a liquid with low viscosity so that the bubble can move easily, and an important requirement is that such a filler does not freeze in the cold. Therefore, the main material for the cones is alcohol; it is also tinted a little to make it easier to observe the measurement. The marks by which readings are taken are also marked on the flask, sometimes not two, but more, for increased accuracy.
A household bubble level rarely has more than two measuring flasks: one for examining the horizontal plane (180 degrees), and a second perpendicular to it for measuring the vertical (90 degrees). You can find a third flask, which is adjusted to 45 degrees and fixed. Professionals use a more fancy instrument, where there are many more bulbs, they duplicate the main ones to reduce the error, or measure other angles (for example, 60 degrees). Moreover, an instrument of any level is accessible to every master; difficulties with how to use a spirit level never arise.
There is an electronic spirit level that has a convenient display that shows the measurement results. This is determined not “by eye”, but with the help of acoustic effects, which makes the numbers more accurate and the error significantly reduced.
In addition to the main structural elements, the body may contain useful additions that often help the builder during work. For example, a ruler located at any end of the level, or a milling surface, so that when installing the tool it is more stable and easier to hold (for example, when measuring vertically). You can also find a notch-bend on one side for sloping surfaces, such as pipes, to make it convenient to measure their location in space.
Bubble Level Settings
Some bubble levels have the ability to adjust. These are two invisible screws on both sides of the flask. In the body underneath there are hidden springs that set the flask to the required level, which you check with your own hands. As practice shows, it is a rare instrument that is truly configured correctly, and many of these “unsuccessful” options do not have the ability to adjust, and those who know how to check the quality often part with the instrument they just purchased. Moreover, even a correctly adjusted level can go astray if it is dropped, due to changes in temperature and humidity, or even simply due to time.
To check the correct location of the flask in the body, place the level on any horizontal surface; if the bubble is in the correct position, turn the instrument 180 degrees so that the ends simply swap places, and place it again on the same surface. Evaluate the location of the bubble again, and if it has not changed, then everything is configured correctly. Moreover, it is not scary if the bubble is not strictly in the center, the main thing is that it does not fall out beyond the lines, and the most important thing is that in these two positions it is in the same error. If, for example, it is not strictly in the center, but slightly shifted towards some risk, then after turning it should also be shifted in the same direction to the same extent.
In cases where such a check shows a different result, tighten the screw on the problem side and carry out the same research again. For a vertical flask, the measurements are similar, the only difference is that you need to rotate the instrument a little differently, first apply one side to the surface, and then the one that was facing you when measuring. That is, rotate the level around its axis relative to the floor. And the results are analyzed in the same way.
How to choose a spirit level?
Since the choice of levels is extremely large, when we go to the store, we begin to gradually eliminate one selection criterion.
How to choose a spirit level - step-by-step diagram
Step 1: Length
First, let's select the length that our tool should be; it should be enough to measure the plane of your construction project in one step. For example, when installing a window 1 m wide, the level should be just about this length. For small jobs, the palm size is suitable. In the case of ceilings and walls, fairly long tools are needed, 2 meters or more. But in case of such a purchase, get ready to diligently protect it from falls, because for such a “shaft” it will be the first and the last. There are even giants (about 4 m), but they are telescopic, i.e. They extend during operation and are stored in a somewhat reduced form, but we suspect the presence of large errors in its operation, since it is desirable to have a solid body.
Step 2: Housing Material and Profile
Next, choose a material, it should be rigid, preferably from some kind of alloy, because plastic is extremely short-lived. Today, there are many light in weight, but strong enough alloys to make the body of the level, and rigidity is achieved by a certain structure of the tool profile. The most common are T and H profiles; the second option is more reliable.
Step 3: Flasks
We have already talked about their structure, all that remains is to show them practical requirements. Firstly, find an indication of the measurement error from the manufacturer, secondly, check the adjustment right in the store and do not forget to do this at the beginning of each cycle. construction work. Pay attention to how sensitive the flask is; to do this, place something thin under the level, the bubble should change its position, and so that it is noticeable to the eye. For professional models, you can even use a sheet of paper for this purpose, since their sensitivity should be quite high. This parameter depends on the curvature of the flask, and therefore on its material and shape. It would also be nice if the marks were applied to the flask from the inside, since on the outside they are quickly erased and the device becomes useless.
Step 4: Assembling the Case
In the end, you should turn your future purchase over in your hands, see how well the body is assembled, and whether it has any distortions or backlashes. Particularly important is the place where the plugs are attached at the edges and the fixation of the flasks. All this must be secured in a clear way, and quite reliably, so that even a hint of shift cannot be observed with light pressure. The flask mount should be accessible for adjustment, and it is better to choose rubber plugs on the body, so it is less likely to be damaged if you are careless.
To indicate the position of the human body in space, the location of its parts relative to each other in anatomy, the concepts of planes and axes are used (Fig. 1). The starting position is considered to be when a person stands, legs together, palms facing forward. Man, like other vertebrates, is built on the principle of bilateral (bilateral) symmetry; his body is divided into two halves - right and left. The border between them is the middle (median) plane, located vertically and oriented from front to back in the sagittal direction (from the Latin sagitta - arrow). This plane is also called sagittal.
Sagittal plane separates the right side of the body (right - dexter) from the left (left - sinister). The vertical plane, oriented perpendicular to the sagittal and separating the front part of the body (anterior) from the back (posterior), is called frontal (from the Latin irons - forehead). This plane in its direction corresponds to the plane of the forehead.
As synonyms for the terms "front" and "rear" when determining position internal organs one can use the terms “abdominal” or “ventral” (ventralis) and “dorsal” or “dorsal” (dorsilis), respectively.
Rice. 1. Axes and planes drawn through the human body (diagram).
1 - vertical (longitudinal) axis;
2 - frontal plane;
3-horizontal plane;
4-transverse axis;
5-sagittal axis;
6-sagittal plane.
Horizontal plane oriented perpendicular to the sagittal and frontal and separates the lower parts of the body (lower - inferior) from the overlying ones (upper - superior).
These three planes: sagittal, frontal and horizontal - can be drawn through any point of the human body. Therefore, the number of planes can be arbitrary. According to the planes, directions (axes) can be identified that allow organs to be oriented relative to the position of the body. Vertical axis(vertical - verticalis) directed along the body standing man. The spinal column and the organs lying along it are located along this axis ( spinal cord, thoracic and abdominal aorta, thoracic duct, esophagus). Vertical axis coincides with the longitudinal axis (longitudinal - longitudinalis), which is also oriented along the human body, regardless of its position in space, or along a limb (leg, arm), or along an organ, long sizes which prevail over other sizes. The frontal (transverse) axis (transverse - transversus, transversalis) coincides in direction with the frontal plane. This axis is oriented from right to left or left to right. The sagittal axis (sagittal - sagittalis) is located in the anteroposterior direction, like the sagittal plane.
To indicate the position of organs and parts of the body they use the following definitions included in the list of anatomical terms:
medial (medialis), if the organ(s) lies closer to the median plane;
lateral (lateral; lateralis), if the organ is located further from the median plane;
intermediate (intermedins), if the organ lies between two adjacent formations;
internal (lying inside; internus) and external (lying outward; externus), when talking about organs located respectively inside, in the body cavity, or outside it;
deep (lying deeper; profundus) and superficial (located on the surface; superficialis) to determine the position of organs lying at different depths.
When describing the top and lower limbs use special terms. To designate the beginning of the limb - the part that is closer to the body, the definition proximal (closest to the body) (proximalis) is used. The part of the limb removed from the body is called distal (distalis). The surface of the upper limb relative to the palm is designated by the term palmar (palmaris or volaris - located on the side of the palm), and the lower limb -
ty relative to the sole - plantar (plantaris). The edge of the forearm from the side of the radius is called radial (radialis), and from the side of the ulna - ulna (ulnaris). On the lower leg, the edge where the fibula is located is called fibularis, and the opposite edge, where the tibia lies, is called tibialis.
To determine the projection of the boundaries of the heart, lungs, liver, pleura and other organs on the surface of the body, vertical lines are conventionally drawn, oriented along the human body. The anterior median line (linea mediana anterior) runs along the front surface of the human body, on the border between the right and left halves. The posterior median line (linea mediana posterior) runs along the spinal column, above the tops of the spinous processes of the vertebrae. Between these two lines on each side, you can draw several more conditional lines through the anatomical formations on the surface of the body. The sternal (periosternal) line (linea sternalis) runs along the edge of the sternum, the midclavicular line (linea medioclaviculdris) passes through the middle of the clavicle. Often this line coincides with the position of the nipple of the mammary gland, for which reason it is also called the nipple line (linea mamillaris). The anterior axillary line (linea axillaris anterior) starts from the fold of the same name (plica axillaris anterior) in the area of the axillary fossa and runs along the body.
The middle axillary line (linea axillaris media) starts from the deepest point of the axillary fossa; posterior axillary line (linea axillaris posterior) - from the fold of the same name (plica axillaris posterior). The scapular line (linea scapularis) runs through the lower angle of the scapula, the paravertebral line (linea paravertebralis) - along the spinal column through the costotransverse joints (transverse processes of the vertebrae).
About laser devices for construction and finishing.
Laser plumb line and level, laser level and rotary laser, laser marker and plotter, laser tape measure and range finder - all these names refer to a modern and effective tool used in laying out land plots, construction of buildings, finishing of premises, installation of communications. These devices allow you to build basic horizontal, vertical or inclined planes directly on the wall, floor, ceiling and control them visually or using special receivers and leveling rods.
LP tasks
A completely smooth laser beam successfully replaces a conventional plumb line, spirit level, metal square, construction string or cord, and even a tape measure, especially at distances of up to 200 meters. How much easier and more accurate is it to build a wall, column, install door frame or a window, when you can visually control the deviation from the vertical using the red line of a laser beam passing along them, precisely tied to the vertical, and using a laser tape measure, which allows you to measure distances to inaccessible areas. LPs allow you to quickly and conveniently check the horizontalness and general level of the foundation and design the slope water pipe or drain, plan slopes land plot, install fences and siding, control the laying of bricks and tiles, mark beacons for installing ceilings and pouring floors, install telescopic gates and roofing, help everyone, without exception, do their work efficiently.
How do medications work?
Many are already familiar with laser pointer, while playing with which children often point the red laser dot at objects. It is this principle that is used by laser devices for horizontal, vertical, inclined plane or points directly on work surface. The pictures will show this most clearly:
.jpg)
.jpg)
A red laser LED is usually installed inside the device, with a power of about one mW and a wavelength of 633 - 670 nm, which belongs to the second class of lasers, which implies the absence additional protection for eyes. The LED is housed in a fairly robust housing and, using electronic circuit interacts with the control panel and receives power. In order to focus the LED radiation into a point or create a line, optical elements are used different forms(cylindrical, conical, etc.)
The laser emitter can be rigidly fixed inside the device or in a free hanging state for self-leveling. Self-leveling LPs use the “pendulum principle” - the emitter is suspended inside the device and, when installed on a surface, it aligns itself relative to the ground level and produces an accurate horizontal, vertical or oblique projection of the beam. To reduce the time it takes to balance the pendulum with the emitter, magnetic pads are often used, formed by magnets built into the bottom of the device. More complex LPs use a system similar to a gyroscope, which electronically controls the emitter servos built into the device, allowing it to balance and even set the required slope.
Devices with a self-balancing emitter are often equipped with an automatic notification function for critical body tilt (usually more than 5% from horizontal), which helps to avoid erroneous projections and measurements. It is enough to simply place the device on a relatively flat surface and turn it on - the device will automatically balance the emitter relative to the horizon within a few seconds and... Let's get to work!
Laser level
Inside laser level(hereinafter referred to as LU), the emitter is fixed relative to the alcohol bubble and can project a point to a remote distance at the same level and in the same vertical plane, simultaneously acting as a level and a stretched string between the level and the projection point. The Stabila 70LJ level with one emitter can be purchased at a price of 2,250 rubles.
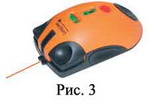
One of the most popular LU models, Stabila 70LJ P+L, is produced by the German company Stabila and has two perpendicularly located emitters, which allows it to be used for a wider range of work (Fig. 1). Another new product is presented at Russian market by the German company Geo-Fennel is a MultiDigitPro goniometer with a built-in laser emitter and a digital goniometer/level, which allows you to simultaneously design a level point, measure the angle and deviation of the measured surface from the horizontal (Fig. 2). Geo-Fennel also produces a pocket laser level/Long Linner cord for fixing shelves, pictures, etc. at the same level. You just need to lean it against the wall and use an LED to project an even line onto it at the angle you want - just turn the device to desired angle(Fig. 3).


Laser plotters of horizontal and vertical planes (hereinafter LPP)
The palm among LPs for finishing is occupied by devices that allow you to build different variants intersecting horizontal and vertical beams at an angle of 90°. The simplest intersection of the vertical and horizontal planes forms a “laser cross” on the working surface with two red line projections. Each BOB model can build:
- from one to four vertical lines (for projecting planes onto 4 walls of the room at once);
- one horizontal line with a scan of up to 360° (to close the horizontal projection of the line on the wall and intersect it with vertical projections);
- projection of a point upward onto the ceiling (upper laser plumb line);
- projection of the point down onto the floor (lower laser plumb)
Laser plane plotter BOIF APL-1
The main producers of BPP in Europe are the companies Geo-Fennel, Stabila (Germany), Agatec (France), Zircon, Trimble (USA). Most LLPs sold in Russia under other brands are either copies of the products of these companies (in a different case or a different color) and are made to order (usually more expensive), or are manufactured in China or Taiwan, often with lower build quality. But in China there are also high-quality devices. It's about about LLP produced at the Beijing Optical-Mechanical Factory (BOIF) - APL-1, offered on the Russian market for a little more than 4,100 rubles. It is made of high-quality plastic and has a rubberized outer case that protects the device in case of falls. LLP can project three lines simultaneously - one horizontal and two vertical lines, projected onto the walls at an angle of 90° relative to the center of the device emitter. This device is used for simultaneous marking of two vertical walls, located at an angle of 90°. The APL-1 is one of the most affordable, and its emitter is covered with a black plastic cover with slots for the beams in the form of a cross, which makes the glass less vulnerable to accidental impacts and falls than in similar devices from the Triax LS series.
The scan of the laser beam projection is limited by the mounting of the pendulum and the emitter lens. This means that the laser plane projected in one direction is limited horizontally by a circle with an angle of 0-90° (depending on the device model) and can be increased by using additional emitters located perpendicular to each other. When turning the device around its axis, it can lead to a shift in the horizon if the LLP is not equipped with a special rotary mount with a dial and a fine-tuning knob, such as the FL-50 Multi-Linner and FL-50 Plus models from the German company Geo-Fennel. By the way, the latter gives a scan with an approximate angle of 270° horizontal line and vertical line, as well as 360° of the second vertical line, located perpendicular to the first, which makes it practically inaccessible to competitors.
Laser square (right angle builder)
The laser square belongs to the category of plane builders with a fixed emitter and projects two lines at an angle of 90° relative to each other onto the floor or wall (working surface). He is good remedy for control of working axes and is widely represented on the Russian market with two models - Square Linner from the German company Geo-Fennel and LT-80 from Triax. Unfortunately, this device cannot replace plastic crosses that allow the seams between tiles to be maintained in the same dimension and are used only to control the working axes (placed for checking and then removed for laying the next tile many times during the work). The LT-80 is too heavy (3.4kg) to be constantly set up, lifted and stowed for inspection, operates with a claimed 4mm at 10m accuracy, and is more than three times more expensive than the Square Linner (claimed 3mm at 10m accuracy). m), which makes the Geo-Fennel device more practical.
Multibeam laser tool
From the name of this group of laser plotters it is clear that these devices project laser dots onto the surface and are designed to mark holes that are perpendicular to each other on several surfaces at once. The most advanced models of this type use a system of five points: two vertical up and down from the device, two horizontal to the right and left and one directly in front of the device, which allows you to mark any frame structure located on the right, left, top, bottom and in front of the device.
Laser point plotter Multi-Pointer
So far, there are three similar devices on the Russian market - RT-7610-5 (Robotoolz), PLS-5 (Pacific Laser System) and Multi-Pointer from Geo-Fennel. According to the stated characteristics, the most accurate is the German Multi-Pointer (Fig. 4), and the multifunctional mount included in its kit (allows you to mount the device to a wall, tripods with a 5/8" or 1/4" screw wooden surfaces on nails or metal using a magnet), bring it forward. It should be noted that with the price of analogues around 12-13 thousand rubles, the price of Multi-Pointer looks more attractive.

Laser level (complete horizontal plane builder)
Laser plotters of a horizontal or vertical plane with a projection radius of 360° are called levels, which have almost completely replaced plane plotters from this segment of laser plotters. After all, a laser builder with a compensator suspended inside can only give a horizontal projection, at the same time, almost any laser level can be used in both horizontal and vertical positions, often work in different modes (point, line and laser segment) and be used with receiver and/or remote control.
Laser level Agatec M-10
One of the latest builders on the Russian market is the builder PLS-360 (Pacific Laser System) with a cost of more than 14 thousand rubles today. Its direct competitor is the M-10 laser level from the French company Agatec. At a cost of less than 9 thousand rubles, this device can:
- used to construct both horizontal and vertical planes;
- work in point, closed line and laser segment mode;
- controlled from the remote control included in the delivery package;
- attach to different surfaces and on a sling using a built-in multifunctional mount;
- define an inclined plane;
The closest analogue of this level is an almost exact replica from the Triax company with the LT-60 model at a price almost 40% higher than the cost of the French Agatec M-10.
How to choose a device
The most widely represented on the Russian market German companies Geo-Fennel, Stabila, the French company Agatec, Beijing Optical-Mechanical Plant, which indicates stable demand and high popularity for the drugs of these manufacturers. When choosing a laser builder, you need to consider the following aspects:
- It is necessary to define as completely and clearly as possible the tasks for which a laser plotter will be needed;
- Our consultants will help you with searching and processing information about devices;
- Visit our showroom and see the device itself;
- Don’t skimp on versatility at the expense of quality work;
- Do not buy devices of poor external design from an unknown seller, you should give preference famous brands equipment;
- Do not overpay extra money for a more expensive European device if there is an analogue produced by a well-known factory in China - this will save you money, allow you to learn how to use the device and be a wonderful gift to your friend when you are planning to buy a more prestigious and advanced model from a European manufacturer.
- Check the error with which the device constructs planes. Very often, especially for laser levels, high accuracy may cause limited functionality;
- Do not forget that devices that work with a receiver have an emitter with a different wavelength, which may cause a lighter beam of radiation.
- Laser ray best seen with special glasses that can be purchased from the laser plotter seller, they will really help you in your work for the small fee that the supplier receives;
- Remember - accuracy is never superfluous! This will help you save time, money and nerves, as well as make a good impression on the customer.


