Have you ever thought about why we wear and store jewelry in the first place, and how to make a jewelry stand with your own hands?

We wear them as a harmonious addition to our outfit mainly for aesthetic purposes. But we also wear them for the purpose of conveying certain information, attracting the attention of others, masking certain defects, to some extent, self-affirmation, internal searches, for introduction into a certain social subgroup, and so on, but very often we don’t think about it.

Among modern representatives of the fair sex, there are women who like to wear flashy jewelry, and there are also those who want to be simpler. There are women who simply adore jewelry, and there are those who do not wear it at all.
Some prefer diamonds and precious metals, stones, while others prefer jewelry. And these women are unlikely to understand each other. But there is one very interesting fact: If previously costume jewelry was associated with counterfeiting and was considered a sign of bad taste or financial deficiency, today this is by no means the case. A striking example of this is the well-known and popular Swarovski jewelry.
But this does not mean that precious jewelry there is no place in our Everyday life. They always had their high-class place among all other decorations and carried spiritual power within them. It’s not for nothing that they are passed down from generation to generation and presented to loved ones. They survived years, and even centuries, thereby preventing the history of jewelry from coming to an end.
The idea of how to make your own jewelry stand is very practical. Regardless of the price, all jewelry needs care and proper storage. No matter how many boxes there are, there are always few of them, because after a certain time the number of our jewelry is replenished. And how do women not store their jewelry? Some even manage to use a regular rake. Here are examples of several items that you may have at hand: an ordinary rake with many hooks, for bracelets you can use ordinary bottles, for earrings - a grater, egg cups, hangers from a set of old cups, a picturesquely decorated branch with a stand and much more. other interesting items.
Is it possible to create something homemade? How to make a jewelry stand with your own hands? I have one fantastic idea. This idea came to me during one of my shopping trips. You have probably also seen in jewelry boutiques beautiful velvet busts and models of hands, which show no less beautiful jewelry. So I, looking for a gift, came across one of the models of hands and stopped. I immediately realized that I wanted to have the same stand to store my jewelry. If you are also interested in this idea, then get started.
You will need:
1 kg of gypsum,
Using a drill and hand saw make a hole in a circle to place the glove in.
Smooth out any uneven surfaces using sanding paper.
Place the glove in the hole, securing the edges with a staple gun.
Now prepare a mixture of water and plaster. Use another glove to see how much plaster you need. Mix water and plaster until you have the consistency of sour cream.
Carefully fill the glove with the mixture so that no bubbles remain in the finger area.
Leave for 48 hours.
And in order to remove the glove, make several cuts on the glove.
Your stand is ready. It's not difficult at all, is it? Have you thought and wondered how to make a jewelry stand with your own hands? Make such a stand and keep your jewelry in perfect order.
Stands cut or burned from plywood are very functional and practical. A similar one can be made from a sheet of thick cardboard.


Unlike jewelry There are many more ways to store jewelry. But among them there are the most original ones that you can easily create with your own hands. In this crash course for fans unusual solutions We have collected 10 of the most interesting, economical and easy to implement.
What will you need? In many cases, these are items that you already have in your home. You may need to purchase some completely inexpensive materials. But you will definitely like the result. On the one hand, you will save a lot of money. On the other hand, you will receive original item, which you won’t find in any friend.
Sounds tempting? In this case, go to our selection of ideas with detailed description, how to make each bijou stand.
__________________________
Special stands and displays for jewelry are no longer uncommon. But even the most simple models they are quite expensive, let alone beautiful ones... If you are not ready to spend money on such options, make it yourself. After all, it’s not difficult at all!
So, what can you make a jewelry stand from?
1. Glasses.

Your most luxurious jewelry requires a worthy setting. For example, like the one in the photo. To make these amazing little boxes you will need a lid from tin can, pieces of fabric the size of the lid + 3 cm, foam rubber, red or brown velvet ribbon, beautiful wine glasses and glue.
Place the lid on the flat side and fill it with foam rubber. Wrap them in fabric, glue the ends of the fabric on the opposite side, and stretch the fabric.
When the glue has dried, frame the edges with corduroy, overlapping it (the point where the ends intersect can be decorated with a rhinestone or a tiny “pearl-like” button). Place decorations on the finished pillow and cover them with glasses. Incredibly elegant!
__________________________
2. Porcelain jar.

At night we take off the jewelry, but don't always put it back in the box. We suggest making a bedside box that will not only save you from the need to make unnecessary movements, but will also decorate your bedroom.
The basis is a simple plain porcelain jar or cup, which can be bought at the nearest supermarket. Clean the surface from dust and dirt, and then apply a design with a thin brush, for example, in the form of feathers. The stylish thing is ready!
__________________________
3. A real tree.

Do you like metal and wooden trees for decorations, but are their prices too high? Make it yourself - and from a real tree. Find a beautiful branch, paint it white, place it in a large beautiful vase and hang decorations. Why not a miracle tree?
__________________________
4. Photo frame.

In order to make this wonderful thing, you will need a metal frame. The older she looks, the better. Also you need soft filling(for example, foam rubber), fabric with a beautiful pattern and furniture stapler or thread (depending on which method of fastening the fabric you choose).
Remove the back panel from the frame (if the frame came with glass or clear plastic, remove it). Wrap it with filler and cover it with fabric. Secure the fabric furniture stapler or sew it on. Insert the finished pillow into the frame and the display for your treasures is ready!
__________________________
5. Handles for kitchen furniture.

Another interesting display for decorations can be made from plywood, a piece of burlap and... kitchen handles from IKEA (it’s better if the handles are different, including voluminous ones). Cover the plywood with burlap, screw on the handles, place your “treasures” and admire them at any time!
__________________________
6. Sewing spools.

Do you love not only beautiful jewelry, but also sewing? Then you probably have a pile of empty wooden spools. You will be surprised, but even they can be used for decorative purposes.
Drill holes in the wall where you want to hang your decorations. To secure the coils, you will need long nails or self-tapping screws (each should be at least a centimeter longer than the coil, and the head should be larger than the hole in the coil).
Secure the coils to the screws, and then screw the screws into the wall. The spools can be used empty, or they can be wrapped with colored braid. Original hooks for beads and chains are ready!
__________________________
7. Buttons.

The hardest thing to keep in order are earrings, but at the same time you want to show them off. We propose to combine beauty and usefulness by making this cute little thing for storing earrings.
You will need something that you probably have plenty of at home - buttons without stems. And also a piece of colored felt and thread.
Sew the buttons onto the felt, but not crosswise, but in successive stitches (thread the thread into adjacent holes so that you end up with a square). Now insert the earrings into the holes - and they will no longer get lost at the bottom of the box!
__________________________
8. Wooden cutting boards.

A place to store jewelry does not have to be turned into something like a museum display case. Approach the matter with humor by using... kitchen utensils for storage.
For example, wooden cutting boards. Unlike ladles, they will fit harmoniously into the interior and add a touch of country.
Here's how to make them:
Drill holes in the board for future hooks. Paint the board white (you can also use bright color, if you want creativity). Once the paint is dry, attach the hooks and hang the board on the wall. Simple and tasteful!
__________________________
9. Kitchen grater.

Any, even the most ordinary little thing can serve to store your treasures - including... a kitchen grater. Paint it a bright color (for example, azure) and hang pendants and earrings.
If the lids are wooden, attach furniture handles on top (using small screws).
__________________________
10. Rails and ladles.

Use the most common one kitchen rail. But hang it above your vanity or dresser. Earrings and rings will fit in ladles and ladles, bracelets and long beads can be hung on hooks and rails. Hang a mirror there too.
We think that now all your jewelry will be stored not only in order, but also in an original way. After all, you probably have your eye on a couple of interesting ideas on this topic. We wish you exciting creativity and excellent result!
Many people work in an office and they often want to put their feet on some kind of stand or elevation so that they can rest a little. But not everyone has such an opportunity, and especially not always. The most ideal option In this case, you can make a small, durable stand yourself at home and bring it to the office so that you can work and relax at the same time.
The video shows the process of creating a very comfortable and height-adjustable footrest
To create a stand you need to prepare:
- board;
- “moment” glue;
- staples;
- screws;
- metal corner;
- cutting board.

First of all, you need to cut out all the necessary parts from the board. These will be two sidewalls that will serve as legs, and three parts that will form the footpad itself.
We make side legs in mirror image, and also attach to them swivel mechanism, which will help you adjust the height of the stand. The details for the site are the same. Don’t forget to make compensation grooves in them; they will prevent the wood from collapsing if the air is too dry and the temperature is too high.
We clean everything with sandpaper.


After all the parts are prepared and cleaned, you can begin assembling the stand.
Assembly is carried out using instant glue, staples and screws.


We coat the board with glue along the very edge and apply it to the side. We fix it with one staple at the edge. Then, using a metal corner, we check whether the board is positioned correctly. We adjust its position if necessary. When everything is set, we fix the board with a second bracket.


In exactly the same way we attach the second side of the board to the second side, as well as the remaining two boards.
Now we make a jumper for the stand from the trimmings of the block; it will give it strength and stability. We mill the jumper, clean it with sandpaper and attach it to the stand. First, apply glue to the ends and place it apart between the sidewalls. After this, we fix each side with two nails and one screw.
If you want to decorate your home with indoor plants, but... free space limited, then you will definitely need DIY flower stand you can make it from wooden planks. Some creative ideas can be used to form original stands using only clay or plastic pots without additional structures. We have already made it with beads, satin ribbons and papers, but artificial flowers cannot fill the air in your room with the freshness and aroma of a flowering plant.
DIY flower stand
A green corner of the house is the dream of every housewife, because it is one of the main ways to create a warm and cozy home atmosphere; it is for this purpose that we also create. The only option for many housewives is to arrange flower pots on the windowsill, but then they will be hidden behind the curtain most of the time, which is why it can be used DIY wooden flower stand. Various stands can be found in stores that sell flower pots, but sometimes they do not meet your requirements at all, and then you decide to make them yourself. Perhaps to implement your creative idea you will need to master new instruments, some of which are even considered masculine. For example, you may need a jigsaw, saw, Grinder. Don't worry, you won't encounter any difficulties when working with these tools, but the results will exceed all your expectations.

DIY flower stands for home can be suspended and floor-mounted, even multi-level. In this case, we will make a hanging multi-level shelf that will decorate your home interior. A wooden shelf will perfectly complement the interior, where natural textures predominate.
Before you start making an accessory for your home, you need to go to a specialized store and purchase wooden boards, but you can also take old shelves, which will get a second life and become a decoration for your home.

To form a hanging multi-level shelf, we will need a thick rope, whose natural color will fit perfectly into the interior, and for fastening suspended structure you need to prepare a metal ring. As for the tools, we will use a drill with a large-diameter drill, a jigsaw or a jigsaw. To process wood, you will definitely need a brush and paint (or varnish). Of course, when we're talking about about indoor plants, we need four ceramic pots, but you can use 2-5 pots for your design.
If you still do not dare to take on such complex tools, then you can create ones that will also decorate your home.

DIY wooden flower stand
We need not only to create a beautiful hanging shelf, but also to solve the issue of the strength of our structure. Therefore, when you consider the master class, how to make a flower stand with your own hands, please note that from the wall of the pot to the edge wooden stand must be at least two centimeters, otherwise the wooden plank may break.
We need to cut out squares or rectangles from the boards, the width of which will be 4-6 cm larger than the pot at its widest part. When the squares are ready, you need to draw a circle in the middle - circle the pot in its widest part, but not in the widest part, otherwise, when we insert the flowerpot into the hole, it will simply fall through. The hole should be slightly smaller than the base of the flowerpot, so the pot will be securely fixed in the wooden shelf. You can measure out the squares after the circle has been drawn in the center. Let us remind you once again that the diameter of the circle should be a couple of centimeters smaller than the diameter of the pot at its widest point.

Next stage, how to make a flower stand with your own hands, it is assumed to be used complex instruments for sawing internal hole. First we will fix the square, and first of all we will make a hole in the very center with a drill. We will need this drilled hole to “penetrate” the center of the circle with a jigsaw for its subsequent cutting. You must work very carefully with a jigsaw so as not to go beyond the outlined boundaries, and it is desirable to get an even, neat circle. Thus, it is necessary to prepare all four blanks. Only when the holes have been cut in the center, it is necessary to drill holes along the edges (in the four corners), into which the ropes will be threaded, which will hold our multi-level design. It should be noted that only those plants that hang down with vines should be placed on such shelves, as in other hanging structures. It is important to first make marks on all the squares in the corners, because on each board they should be located without displacement.

How to make a flower stand with your own hands
Further decoration DIY flower stands, photo which you see in the master class depends on your imagination. If the tree has a beautiful natural texture, then there is no need to hide it, but just highlight it by covering the wood with varnish. However, you can paint the wood any color you want to make the shelves fit into the interior of your home. Can be used to paint wood acrylic paint, for example, dark blue.

In order to give the paint an antique effect, two shades of paint are usually used: the lower one is darker (brown or burgundy), the upper one is light (color sea wave, turquoise, mint, blue). First, the surface is covered with dark paint, wait until it dries and then cover it with transparent varnish. After the varnish has dried, cover the surface with light paint. When dry upper layer, use soft sandpaper to make “scuffs” in the corners. This way, you will artificially create the look of aged furniture, which will give the interior a vintage shine. Crocheted tablecloths and carved photo frames will fit perfectly into such decoration.
Even if you take plants whose branches hang down, you need to measure the height of the bush that rises in the pot in order to know what the distance between the shelves should be. It is advisable to make the same distance between all four shelves, then the whole structure will look neat and stylish.

On next stage will be formed DIY flower stand: You need to cut four pieces of rope of the same size and secure the pieces to a metal ring. Then the ropes must be threaded into the holes made in the first square. You need to tie knots on the ropes under the base, first aligning them so that they are at the same level. Next, you need to fasten all the other square planks step by step, making knots under each, which will be the main fastening. The knots are easy to adjust so that the planks are parallel to each other. The excess part of the rope from below can be cut off.
Note that one such hanging structure can accommodate four plants without taking up space since it can be hung near a window or anywhere on the wall. This solution will be ideal for small apartment, if you are the happy owner summer house, then in the summer months the structure can be hung on the veranda.
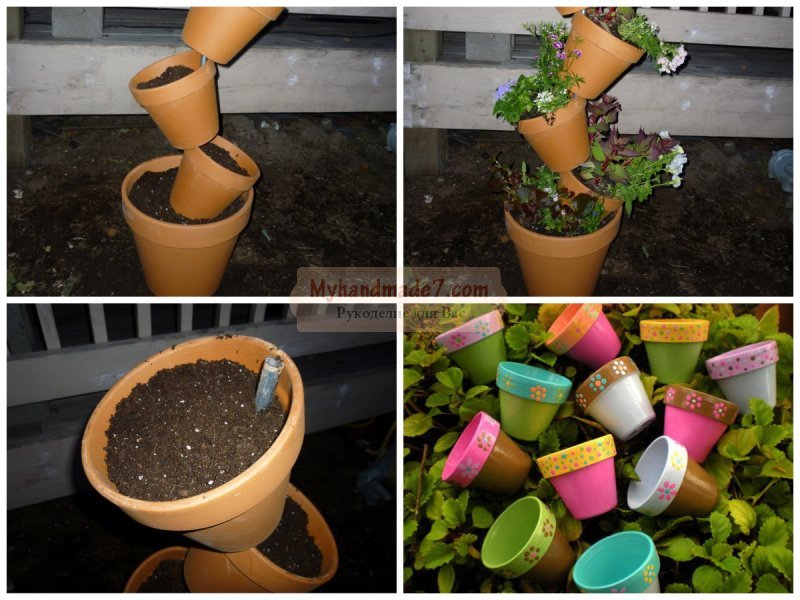
DIY floor flower stand
DIY floor stand for flowers formed from pots different diameters. The largest pot will be at the base, followed upward by four more medium-sized pots, and a small pot will complete the structure. At the base there will be iron reinforcement, onto which the remaining pots will be attached one after another, forming a pyramid. The length of the iron rod will determine the height of your future floor stand. The rod should be thick enough in diameter if you plan to mount large flower pots on it, but you can also make a decorative stand from miniature pots. You can use such a stand for decoration, then you should put sisal in each pot, forming a nest, and in it - a decorated decorative egg.

Pots can be pre-coated with spray paint to give the stand a decorative look: You can make them in one color or create an original color transition. Before painting the flowerpots, they should be coated with several layers of primer. The paint is also applied in several layers after the previous ones have dried.
In four medium-sized pots, holes should be made at an angle: such a hole should pass through the bottom and wall, when you thread the reinforcement into this hole, the pot will be located at an angle. The largest flowerpot will be our base; we need to fix the fittings vertically in it, and then string three inclined containers and the last, smallest one. Flowerpots need to be filled with soil and homemade flowers should be planted. DIY floor flower stand can be located anywhere in your home, and this idea can also be used to form a flower bed in your garden.

DIY flower stands: photo
In the store you can find the most original racks for metal flowers, do it yourself it is quite difficult to perform them, because when working with metal, it is impossible to do without special hacksaws, welding machines and other tools that require special skills to operate.
Beautiful forged racks, despite their popularity, can “heavien” the interior, as designers say. Therefore, if you decide to buy such a stand for indoor plants, evaluate the space of your room, it is advisable to place them in spacious halls, and it is strictly forbidden to use them in cramped small apartments.

You can breathe life into old, seemingly unnecessary things, for example, iron legs from old sewing machine or metal chairs, which have long lost their decorative appearance.


