Over the past 5,000 years, paving methods smooth surfaces bricks have not changed, although now they are used somewhat differently. Now such methods are used to create borders of flower beds and pools. However, most often, brick paving with or without mortar is used to construct paths and platforms.
Brief job description
For paving, they produce a special brick - clinker, which can be different thicknesses, as a rule, thinner than usual, and also different forms and sizes. Similar results can be achieved by paving paths specially designed for this purpose. concrete blocks with standard sizes.
In warm areas, bricks can be laid directly on solid ground, however, to increase the durability of the path, it is better to lay the bricks on a layer of sand and check the horizontal level with a level. Even then, every few years the walkway has to be taken down and the brick laid again.
A more reliable way to lay bricks without mortar is to tamp with a rented vibrator. (described below) which allows you to obtain a paved surface of driveways that can withstand even the weight passenger cars. Flat vibrators can only be used to compact bricks with a thickness of more than 50 mm, and such paths or areas must have boundaries made of bricks laid on concrete (clause 2 below). If the surface is paved by hand, then the border can be made of bricks placed directly into the ground.
A durable surface can be achieved by laying mortar bricks on a concrete slab. The base can be old, such as an existing path or platform, or new, constructed in accordance with the rules for constructing lightweight concrete slabs. In both cases, it is better to do this work in two stages: first, laying the brick on the mortar, then, after the mortar layer has hardened, filling the joints with thick mortar.
DIY cement mortar
Four solution recipes
|
Lime- cement mortar |
Plasticized mortar |
|||
|
Normal solution |
Volumetric ratio |
Volumetric
ratio |
Mortar yield per 50 kg of cement |
|
|
1 part cement 1 part slaked lime 6 parts sand |
1 part cement 5-6 parts of sand with plasticizer |
|||
|
Lasting solution |
1 part cement 0.5 parts slaked lime 4-4.5 parts sand |
1 part cement 3-4 parts of sand with plasticizer |
||
Preparation of the solution
Pour the required amount of sand into a wheelbarrow (or other container), add lime or plasticizer. Make a small depression with a shovel, add cement into it and mix until smooth. Make a hole again, add water and stir until all lumps disappear.
For a kilogram of cement you need approximately half a liter of water. Add water gradually until a solution has the consistency of warm butter. To check the viscosity, make a curved groove in the solution. If its edges do not blur and the solution slides freely from the shovel, then it is ready. If the furrow spreads out, the solution is too wet - add some dry materials. If the solution does not slide off the shovel, it is too dry - add water little by little. 
Types of borders
Flat line

Flat line
The simplest of borders is a straight line of bricks placed vertically with a wide edge to the surface of the masonry. If you lay the bricks with a narrow edge to the surface, they will look more contrasting with the bricks with which the site is paved. However, this requires twice as many bricks.
Smooth curve

Smooth curve
To create a curve, you can purchase bricks in the shape of sectors, but they are expensive. A smooth curve can also be obtained from ordinary brick by laying it as shown in the figure and filling the seams with a durable mortar made according to one of the recipes above.
sawtooth curb

sawtooth curb
A row of bricks laid on edge at a 45-degree angle creates an optical illusion where the curb appears to be made up of a row of triangular bricks. To enhance this illusion, remove the soil to a slightly shallower depth so that the curb is above ground level.
Attention: When laying such a row, the lower ends of the bricks must be firmly held in the concrete, and the upper ends must be installed strictly at the same level.
Wooden border
The formwork for laying concrete fits perfectly into the structure of the brick-paved area. Install it slightly below ground level so that boards and stakes are not visible.

Wooden border
Paving a path without mortar
1. Test installation
Measure and mark the area, as for installing a concrete slab, then calculate required amount paving bricks without mortar .
To estimate the final dimensions so that the soil can be removed, lay a row of bricks along the edge of the site and inside. When marking the site, ensure a 100mm clearance outside the outer boundaries. If you decide to pave with a simple pattern, for example, a rectangular one without dressing, you can save time by laying out only the borders and leaving the middle empty. But the side rows should be laid out completely. 
2. Excavation
Remove the brick you laid out for testing and remove a layer of soil 50mm deeper than the thickness of the brick. The depth is assumed to be the same everywhere, regardless of the terrain, and the walls of the recess should be as vertical as possible. Then, using a trowel, dig a trench around the edges of the paving area so that it is 100mm wider than the bricks and deep enough to lay a 100mm thick layer of concrete on which to lay the frieze bricks, the tops of which should be flush with the rest of the bricks. Place a layer of concrete in the trench general purpose 100mm thick and lay a row of frieze (boundary) bricks while the concrete is pliable. They should form an even vertical wall around the site. Install a board to support the bricks on the site side and fill the trench along the outer boundary two-thirds full with concrete. Lay turf or soil on top and leave for three days to mature. 
3. Construction of a sand cushion
Compact the base soil, lay a bed of sand against sharp-angled grains (which is used to make concrete) and level the sand. The sand level relative to the curb should be such that the bricks laid on it are 10 mm higher than the curb before laying them with a vibrator. If you are going to lay the brick by hand, then after laying it on the sand it should be flush with the curb. When laying the platform, place two parallel bars on the ground and use a rule board to level the sand. For alignment sand base please use the tracks .
4. Laying bricks
Place the first two bricks in the corner of the site. After this, pull the cord to lay the entire row evenly. Continue styling next rows bricks until you reach the edge of the site - there should be a gap of 10 mm between the last row and the curb. 
If tamping with a vibrator is not provided, check with a level that each brick is laid horizontally. Hit the bricks with a mallet and, if necessary, add or remove sand. Then, if there is no vibrator, proceed to the instructions to complete the job (below, after 5 and 6 points).
5. Working with a vibrator
Rent a gas-powered flat vibrator and walk around the site two or three times to firmly set the bricks in the sand. They will drop approximately 10mm and the surface of the site will be level with the curb. Do not walk on bricks before tamping with a vibrator. 
6. Filling joints with sand
Sprinkle the area thin layer sand and make two more passes with the vibrator to fill the seams. Work with an assistant, whom you ask to add sand under the vibrator, since when tamping the sand moves forward from under the vibrator. 
Completing the laying of the platform when working without a vibrator
Filling joints with sand
After laying and leveling all the bricks, sprinkle a bucket of sand with sharp-angled grains on the site. Use your hand or brush to fill the joints between the bricks with sand. (below left). After filling all the seams, carefully sweep away the remaining sand by moving the brush diagonally (below right), so as not to sweep sand out of the joints. It may be necessary to fill the joints with sand twice after the sand shrinks. 
Paving paths with mortar
1. Installing a curb around an existing concrete slab
When paving an existing slab with brick, check its condition and levelness. If you want to build a new concrete pad, make it out of concrete mixture general purpose without formwork, as described above. If the site is at ground level, there is no need to make a border, but if its level is above ground level, you need to hide it with beta and protect the bricks of the outer rows from moisture and wear.
Make a groove around the perimeter of the slab approximately two brick thicknesses wide and of such depth that the brick placed on the end is flush with the surface of the finished site. (When calculating, add a mortar layer thickness of 10 mm to the thickness of the brick.) Wash the curb bricks thoroughly and install them in the groove with a 10 mm gap (for installation with a gap, use your index finger or a piece of wood of appropriate thickness). Press the curb bricks against concrete slab, to do this, fill the groove with concrete and compact it. At the same time, use a level and a ruler to check the height of the bricks above the concrete platform; it, as already mentioned, should be equal to the thickness of the brick plus a layer of mortar 10 mm thick. 
2. Preparation for laying bricks
Lay the bricks dry to check the width and length of the site, leaving 10 mm gaps between them. If necessary, you can slightly reduce or increase the gap so that a whole number of bricks fit in each row. When laying on a solution, you can leave one of the test rows for a sample.
Prepare a strong solution (according to one of the recipes above) in batches of 0.02 cubic meters. m for laying 2 sq. m of brick with a mortar layer thickness of 10 mm. If the total paving area is less than 4 square meters. m, you can prepare a solution for the whole job at once. Otherwise, cook no more than 0.02 cc. m. This amount will be enough for you to work for about an hour, after which the solution will begin to set. Level the mortar and make grooves in it with a notched trowel or the end of a trowel. 
3. Laying bricks
Wet the bricks and lay them along the cord on the mortar with the smooth surface facing up. Lay a complete row and only then begin laying the next one. Press the brick into the mortar with your hand and lightly push it down with the handle of the trowel. Use a level to check the horizontal position when laying each brick. 
4. Filling the seams with mortar
A day, or preferably two to three days after laying the mortar bricks, prepare a rigid mortar to fill the gaps between the bricks. The solution should be drier than the solution that is usually used for brickwork. Mix 1 part cement with three parts sand and add just a little water. A ball of such a solution should be easily destroyed.
Wet the bricks and fill the spaces between the bricks with hard mortar. To work, you can use cutting or jointing, which you need to push the solution tightly into. Fill the joints with mortar until they overflow somewhat. Use a trowel to remove excess mortar, being careful not to leave it on the surface. Embroider the seams, deepening them by 1-2 mm, so that the resulting grooves can drain rainwater. You can use a stiff brush to deepen the area. Wipe off all traces of solution with a damp sponge and spray the area with a spray hose. Leave to soak for a day or two. 
DIY brick path: step-by-step instruction, solution recipes
Brick is traditionally considered building material, used in the construction of building walls, the construction of fences and fences. However, its capabilities are much wider. One popular application is paving paths. For those who are not afraid to try their hand at new types of work, it will be useful to learn how to make a garden path out of brick. Moreover, there is nothing super complicated in independent execution there is no such operation.
Preparation of tools and materials
In order for the work to proceed smoothly, and the result to please you for many years, it is important to have a set on hand the necessary tool. As for materials, they usually take old bricks or those that were left after construction on the site.

Brick Pavement Design
What tools are needed for paving?
To complete the work you will need the following set of tools:
- shovels (scoop and bayonet);
- tamping;
- hammer;
- hacksaw;
- rubber mallet;
- building level;
- rule;
- roulette;
- thin cord;
- metal or wooden stakes.

Laying scheme
To make work easier, the manual rammer can be replaced with an electric or gasoline one. And to cut bricks to the required size, use an angle grinder (grinder).
Materials required for work
The work will require the following list of materials:
- brick;
- sand;
- cement;
- gravel;
- geotextiles.

Old brick paving option
In most cases, leftover stones from construction are used to pave garden paths. Also good at work old brick, obtained by dismantling buildings erected in the first half of the 20th century or even earlier. By the way, it is not necessary to use whole stones. Paths at the dacha made of broken bricks will look good. Elements of different sizes will add a special charm finished product. And if these are old stones that differ in color, then this will make your paths unlike any others.
Sequence of actions during construction
You need to start by planning your future path. If heavy traffic of people is not expected, then a width of 80–100 cm will be sufficient. It is imperative to pay attention to the proximity big trees. The distance to them should be at least 60–70 cm. Otherwise, the powerful roots of a growing tree can destroy the path. It is best to plan future walking routes before the plant is brought to the site. fertile soil. This will reduce the volumes earthworks.

Planning a garden path
Preparing the base for installation
To make work easier, the outline of the future path is marked using stakes and a stretched cord. It is advisable to repeat its shape as accurately as possible. After this, a layer of earth is removed with a shovel within the area limited by the cords. The thickness of the layer to be removed depends on how the bricks will be laid - flat or rubbed - and the thickness of the gravel-sand substrate.
Then a layer of gravel is poured into the prepared bed. It will serve as drainage. After laying and leveling, the gravel is compacted. The next layer is a geotextile fabric. This material will allow water to seep down without problems, and for germinating weeds it will become an insurmountable obstacle.
The next step is installing the curb. It will fix the stones and prevent them from spreading to the side under the influence of mechanical influences and natural precipitation. The functions of a border can be performed by the same brick installed on an edge, or by a traditional curb stone. Temporary sides can become wooden boards, fixed with stakes. Instead, it will be possible to pour a concrete curb later.

Laying a brick underlay
Next, clean sand or a cement-sand mixture is poured over the geotextile. A ratio of 1:5 will be sufficient. The resulting layer is leveled using the rule. This tool will not only make the surface smooth, but also compact it a little.
Laying the final coating
Laying is done using a rubber (rubberized) mallet. Each brick is carefully tapped to the base. During the laying process, continuous control of the plane is carried out. It is important to remember about a slight slope to one of the edges to allow rain and melt water to drain. Adjacent bricks should have a small gap of 1–3 millimeters.
For final fixation of individual elements, the path is covered with a cement-sand mixture and swept with a brush. The mixture gets into the cracks, fills them and fixes the bricks. To be sure, this operation can be repeated several times.

Laying nuances
To prevent water flowing from the surface of the path from forming puddles, a drainage channel is dug along the lower edge. Through it, water will be discharged to a predetermined place.
As you can see, there is nothing complicated in this work. But it’s not for nothing that they say that a professional can handle any job better. Therefore, it is better to entrust the pedestrian recreation area at your dacha to specialists.
A path in the garden and in the country is a trivial attribute. Of course, we want to walk in a comfortable and beautiful path, which we got cheaper. Why not choose brick? Let's resolve the last doubts together and figure out how to properly make paths with your own hands, including from old material.
Harmony of porch and walkway finishingWhy do we choose brick paths?
Certainly, garden paths made of brick attracts us due to its durability, availability, appearance and ease of installation. In this case, the brick comes into direct competition with paving stones and concrete.
However, the decoration of the building and the surrounding landscape may dictate the use of brick to organize paths.
Another case is if the brick was left over from the construction site and it is convenient to use it for paths in the garden. The third option is when you want to arrange paths in your dacha at a cheaper price, and you have old and broken bricks available.
The best choice is clinker or paving bricks. This material looks presentable and lasts a long time. Ceramic masonry bricks have pores and are destroyed by moisture and frost. However, it can also last a long time proper preparation base and special treatment. Sand-lime brick should be considered as a material for organizing temporary coverings.
Various styling options
The way the brick is laid determines both the design and durability of the walkway. It must be selected before work begins, otherwise it is impossible to calculate the quantity and range of material. We offer for your reference several photos that allow you to capture possible options styling
 Curves and steps on brick paths
 Installation of bricks with ligation (bricks are laid offset in adjacent rows) can be carried out both along and across the path. An interesting pattern is made of bricks laid in pairs. It is better to make the border of the flooring with a brick placed on edge. Steps on the path are made by installing bricks on the end.
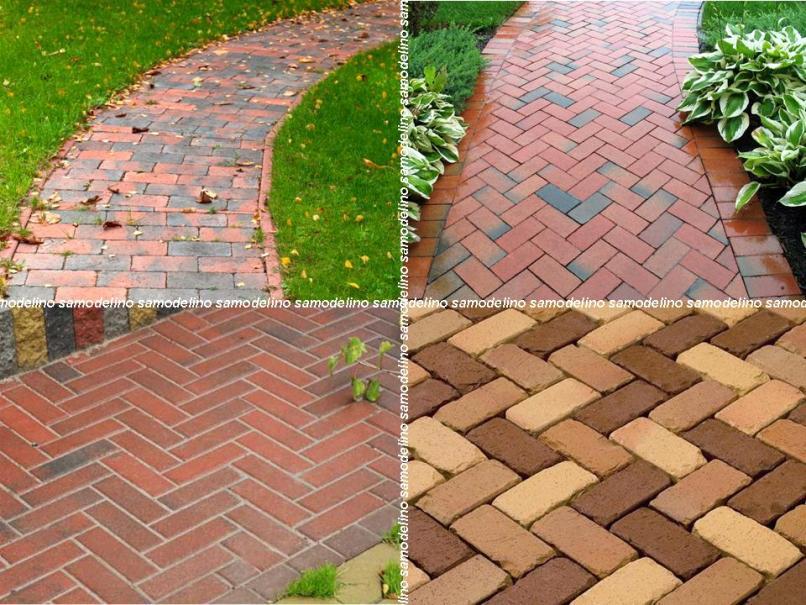 Options for brick coating patterns
 Brick can be laid flat or on its side. In the latter case, the work is more difficult, twice as much material will be required, but the track will last longer. Braided and herringbone installations can be done at an angle of 45 or 90 degrees to the curb. All canvas options can be decorated using material of different shades.
Marking and preparing the base
When starting to paving a brick garden path, you need to stock up on the following tools:  In addition to the basic material you will need:
- sand;
- crushed stone or gravel;
- geotextile;
- boards 20-25cm wide;
- wooden pegs.
When starting to build paths in the yard with your own hands, you should decide on their size and placement. Practice shows that in the garden and dacha, a paving width of 0.8-1 m is sufficient. Paths should not be located closer than 1 m from trees, root system which may be damaged by the coating.
 Scheme for laying a brick path
 It is convenient to mark the contours of the path with pegs and a cord, or sprinkle it with sand. A ditch is dug 20-25cm deep. The bottom of the trench is leveled, compacted and the base is prepared in accordance with the given diagram:
- A leveling layer of sand 20mm thick is poured, which is covered with geotextile. Geofabric will allow water to pass through from the upper layers and will prevent crushed stone from mixing with the soil.
- A board side is installed, which is fastened with nails to pegs driven into the ground. The upper end of the board coincides with the ground level. The distance between the boards is calculated based on the planned number of elements along the width of the path, taking into account curbs and gaps of 2-3mm. It is advisable to install guides on different sides paths with a height difference of 10-15mm to ensure water drainage from the surface.
- Lay, compact and level a layer of crushed stone about 70mm thick.
- Sand 20mm thick is poured on top of the crushed stone and covered with geotextile. The sand will level the crushed stone and the geotextile will not tear.
- Fill, compact and level a mixture of cement and sand in a ratio of 1:5, about 50 mm thick.
It is possible to somewhat simplify the preparation process with some reduction in the quality of the base for the path. In this case, both leveling layers of sand 20mm thick and the middle sheet of geotextile can be eliminated. Instead of a mixture of sand and cement, sand is laid, which is moistened and compacted. Crushed stone can be replaced with gravel.
Brick Laying Guide
 Paving stages brick path
 It is useful to protect ordinary brick from destruction by immersing it in a hydrophobic solution before paving the path. In this case, it makes sense to re-treat the garden path with a water repellent every 4-6 years. As a result of processing, the material does not absorb moisture and becomes frost-resistant. Laying the coating begins with installing the curb. The brick is placed on edge along the board and driven into the sand with a rubber hammer to the level of the top of the guide.
The bricks are laid sequentially in accordance with the planned pattern and driven into the substrate with a mallet. A gap of 2-4mm is left between adjacent elements. The laying plane is controlled by level and rule. After installing the covering, the seams between the bricks are filled with a mixture of cement and sand in a ratio of 1:5 using a brush or broom. The procedure is repeated after the start of use of the track in order to completely fill all the gaps. Upon completion of paving, the boards are pulled out. The resulting void is filled with cement mortar or soil, which must be compacted.
Paving a path from old and broken bricks
 Options for battle tracks
 By by and large, laying old bricks is no different from installing new and beautiful ones. However, compliance with the entire technical process will be unnecessary to preserve waste material. In this case, you will still have to dig a ditch 10cm deep and fill it with 5cm of sand. This will allow you to lay out an even canvas and remove some moisture. A board placed on edge will help make the edge of the path even.
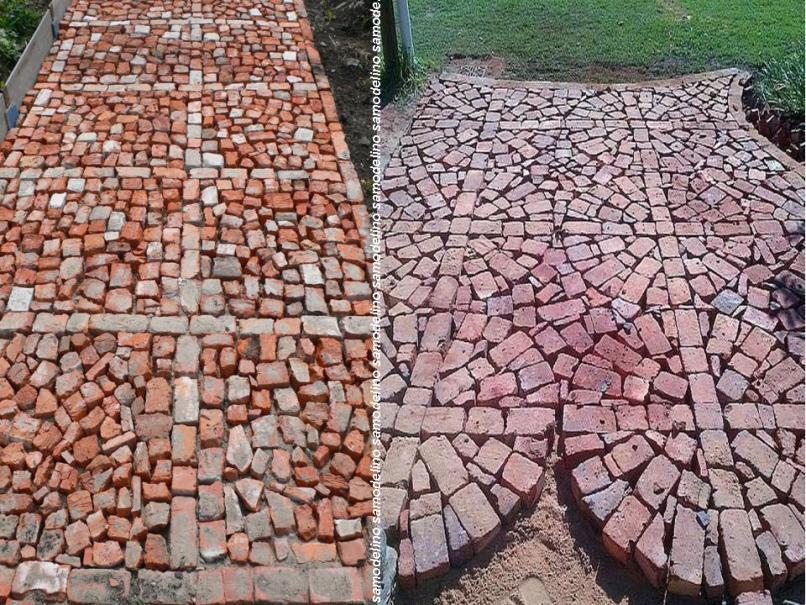 Original patterns from unusable bricks
 Note that the use of combat can be accurate and original. For example, the curb of a path can be laid out in the old fashioned way with bricks placed on edge at an angle of 45 degrees. It is even more effective to organize a pattern from whole and broken bricks.
Of course, you will have to tinker more, but you can get a unique masterpiece from waste material!
Photos of role models
 Possible combinations of brick and stone coverings
 When starting any business, it is always useful to evaluate how others have done it. From the above examples, the logic of combining brick with stone clearly follows. The curb carries the greatest load and therefore it is wise to use a more durable one for this purpose. natural material.
 Colorful brick paved areas
 These shots highlight the potential of brick for paving large areas. In this case, various variations in the shape and color of the coating are possible. The main thing is that the chosen solution fits well into the surrounding landscape. In conclusion, we would like to add that no matter what material you work with, diligence and perseverance will bring the required result.
Let everything work out for you, and we offer a short video to help.
Landscape design, in addition to beauty, should also bring practicality to the site. Paths in the garden are most likely the most practical solution, which can only be. Convenient access to plants, the opportunity to move freely around the garden and admire the surrounding beauty. They can be laid out from different material, but the brick paths add to the atmosphere garden plot special charm.
The most important thing is that such a track has a low cost, and the effect is amazing. Oddly enough, but laying brick paths is quite a popular phenomenon in many European countries.
Like this, this process is not complicated and everything can be done with your own hands.
Which brick to choose for paths
Most likely you will have to lay out a path in your dacha from existing old bricks. Usually, paving is made of red brick (it is the color that gives that very antique atmosphere). You can also use clinker or sand-lime brick. Perhaps there are construction residues lying somewhere on your summer cottage - broken bricks make chic paths.

Necessary tools for laying a path
To work you need a small list of tools and materials:
- Shovel.
- Garden wheelbarrow.
- Level.
- Construction thread.
- Rubber hammer.
- Tamping.
- Cement.
- Sand.
Planning the future garden path and preparing for work
Let's decide what you expect from the future track, what functions it should perform. You need to decide on the width of the future coverage. If walks outside the garden are not planned, then a width of up to 1 m will be quite normal, but if the area allows you to walk around the territory not alone, then you can expand it to 1.5 m, or even more.
Don't forget about the slopes - the water should not stagnate and form puddles, but you shouldn't make the slopes too large. The water should leave gradually, and not run in a stream. It is advisable to organize the collection of water in advance, otherwise it may collect at the curbs and wash them away, which can lead to destruction.
As for the location of the path, you should not lay the path too close to growing trees, otherwise their roots may destroy the covering. Also, there is no need to make sharp turns - they should be smooth.
To mark the future path you need to use metal or wooden pegs, as well as thread. Using a thread, adjust the required height of the brick path. If the landscape of the site has already been formed, then most likely it will be necessary to remove the soil. If the soil has not yet been brought to the site and no plants have been planted, then it is enough to clear the working area of weeds.
Preparing the base
Although the paths are not designed for heavy loads, it is still worth treating them responsibly. The base should consist of the following layers, starting from the bottom:
- gravel layer (acts as drainage);
- sand or sand-cement layer.
Geotextiles allow liquid to pass through from top to bottom, but block any weeds that may try to get out. The ratio of the sand-cement layer is 5 or 4 to 1, respectively. Each layer is carefully compacted. It’s best to use, but if it’s possible, then it’ll do just fine.

How to lay a brick garden path

Brick paving slabs are not so popular for nothing. She has a large number of styling options. And yes, this is a classic! To start laying, you need to decide on a pattern.
It is also advisable to start by installing curbs. Bricks placed at the end or can serve as borders. If the installation of curbs on initial stage causes difficulties (you are afraid not to guess with the size or other options), then you can install them after laying the bricks or install borders only on one side.
The garnet layer is leveled using a level or a flat wooden board, and then laid on it. You should not place the bricks too close to each other - let there be a small distance between them (about 3 mm).

Final stage
After the brick paths have been laid, you need to carry out finishing work. It is necessary to level the bricks where required, fill everything with sand or light grout and rub all the seams between the bricks. This will secure the bricks into the lock, give strength to the paths and prevent destruction.
When dismantling old buildings, secondary construction raw materials are formed, which can be successfully used for construction utility rooms or for landscaping suburban area. When carefully dismantling the brickwork, the structure of the material is preserved. And when you break the walls, you get broken bricks and fragments of different fractions. Regardless of size, all these fragments can be used to improve the garden or summer cottage: filling holes, creating flower beds, making paths.
Advantages, disadvantages and types used

The following speaks in favor of building a walkway from used bricks:
- the opportunity to free the territory from the remains of construction;
- cheapness;
- ease of installation, allowing you to perform necessary work without the involvement of professionals;
- environmental friendliness;
- good drainage properties;
- ease of dismantling if necessary and quick restoration of the surface of the area.
However, with all this, brick is mostly a wall material, which means open air will deteriorate when exposed to moisture and frost. To extend the life of a broken brick walkway, it is recommended:
- if possible, use sand-lime brick;
- treat the stones with a hydrophobic solution or waterproof varnish;
- if used clay brick, then before laying, you should treat the bricks with a hydrophobic solution twice, immersing each fragment in the solution.
The purpose of this treatment is to give the stone frost resistance and moisture resistance. The validity period of the water repellent is 5 years, at the end of this period the treatment must be renewed.
When paving a garden path with your own hands, it is recommended simple ways styling:

- longitudinal layout;
- transverse layout with seams located perpendicular to the direction of the track;
- chaotic layout (in the presence of multi-colored elements) with any method of laying relative to the direction;
- herringbone laying, when the paving elements are located at right angles to each other, with the pattern often oriented along the direction of movement;
- braiding (a pattern imitating weaving is formed by alternating longitudinal and transverse elements);
- alternating horizontal and vertical lines.
Stones are easiest to stack rectangular shape on straight sections and along curbs. On curved sections laying is done using wedge-shaped seams.
If desired, you can create a spectacular pattern from small fragments and whole bricks. If the old bricks used are of different shades, this will also help create an interesting compositional solution for the path.
We plan the location of the path and the work plan
A garden path made of old brick will last a long time if you take into account important points when planning its location:
- Do not place it in the watering area.
- Consider the location of the water supply and electrical cable.
- Take into account the degree of flooding of the area with rain or melt water (when laying a path, it is advisable to choose the driest and highest places).
- Do not lay the path in places where tree roots may eventually destroy it as they grow. Branches should also not interfere with walking along the path.
- Make it wide enough for a garden wheelbarrow to pass.
A DIY brick path will not require much labor with proper planning and good tool handling skills. The work plan should contain the following steps:
- Place a track.
- Prepare the tool.
- Make a basis for brick surface. Build a border.
- Lay out the brick using the chosen method.
- Perform final finishing.
Schematic representation of laying bricks in the garden, methods of paving garden paths from brick, diagram of laying a brick road in section, diagram of laying bricks in the country
Required materials and tools

To build a brick path you will additionally need following materials: boards, sand, crushed stone, cement, brick for edging, geotextiles.
A set of tools that will help you make a path: a cord and pegs for marking, a tape measure, a bucket, a shovel, a tamper, a rubber or rubberized hammer. The tamper can be either manual or electric (gasoline). For trimming sharp edges of bricks or for fitting them to right size You may need a grinder.
Marking
Marking the contours of the future path is carried out using a cord and pegs. If such a path is being built in a country house or in a garden, then a width of 80-100 cm will be sufficient. Turns are made smooth to simplify the passage of a wheelbarrow.
When arranging stakes, it is advisable to reproduce the shape of the path as accurately as possible and increase the number of pegs at turning points. The cord should not sag so that the geometry of the track is not distorted in the future.
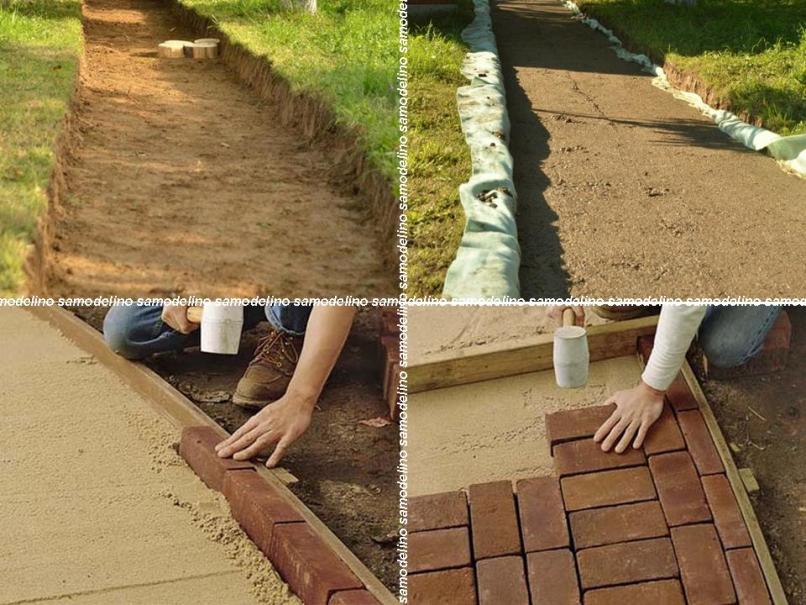
Preparing the base and installing the border
Excavation 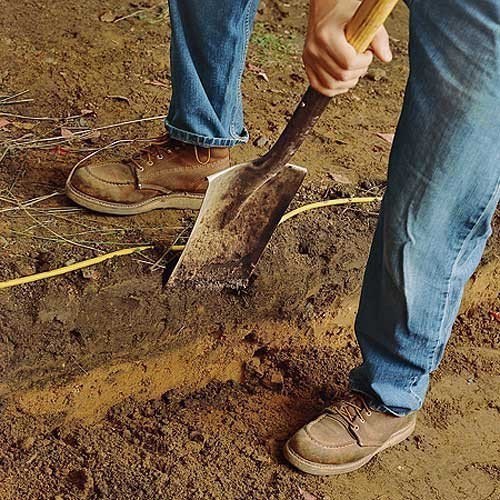 excavation for a brick garden path
  leveling the sand layer
The next stage after marking is done is preparing the base on which the brick mass will be laid. Preparation is carried out according to the following scheme:
- A trench is dug 20-25 cm deep, after which its bottom is leveled and compacted so that there are no holes or bulges.
- Sprinkle with a layer of sand 2-3 cm thick for leveling and cover with geotextile. It will divert water from above into the deeper layers of the base and prevent weeds from germinating. The layer of geotextile is positioned so that it also covers the walls of the groove. Geotextiles serve to increase the strength of the path, giving additional protection from deformations. The cost of this material is low, and its use will not cause a significant increase in costs.
- After this, a temporary edge made of boards is installed. If the path will lie at the same level with the soil, then the upper end of the board should coincide with this level. To drain water from the surface, it is recommended to make a slope; in this case, the sides on opposite sides of the path are made with a difference in height of 10-15 mm.
- A layer of sand 2-3 cm thick is again poured on top of the geotextile, and a ten-centimeter cushion of crushed stone or gravel is placed on top of it. This layer will act as drainage for incoming moisture and will prevent erosion of the base of the path. Sand is necessary to prevent the integrity of the geofabric from being damaged due to the sharp edges of the crushed stone.
- The drainage layer is once again sprinkled with sand and covered with geotextile.
- A mixture of sand and cement in a ratio of 1:5, approximately 50 mm thick, is poured on top, leveled and compacted. The base for laying the brick is ready.
- The perimeter of the trench is decorated with a border. Its presence gives the path a complete look. You can install ready-made border elements or pour the concrete border into the formwork yourself. If you choose a curb made of ready-made concrete or metal elements, then you need to think in advance and deepen the fasteners under the sidewalk. A plastic border does not require foundation preparation or special fasteners.

The curb carries a large load, so it is advisable to use the most durable material for this purpose. But purchasing it will make the structure more expensive, so for a simple country house or garden path you can limit yourself to the remains of bricks.
The brick border is laid along the guide board on cement mortar, or the bricks are driven into sand using rubber mallet. IN decorative styling in this case there is no need (the protruding curb will make it difficult to mow the grass). Therefore, the brick is placed on edge at ground level.
Brick laying

Stones are laid between the prepared borders on the prepared cushion. They are pressed into the sand in accordance with the selected pattern and hammered in with a mallet, controlling the laying plane. If any element is lower than the others, you need to add a little sand or gravel under it. If higher, the layer underneath should be reduced sand cushion. If the sidewalk is more than a meter wide, laying can be done level. To set the level, you need to pull the cord between the pegs on opposite sides of the track.
A small gap is left between adjacent elements. The need to secure the brick masonry mortar No.
When the masonry is completed, the surface of the path is covered with sand or a mixture of cement and sand. This material is rubbed into the seams with a mop or broom and the path is generously spilled with water. After this, you can repeat filling the joints one or more times, alternating with watering.
After a few days, the guides are removed. The resulting voids can be filled with a cement-sand mixture or backfilled with excavated soil.
Conclusion
The benefits of having paved paths on the site are beyond doubt. They provide access to all areas of the dacha even after heavy rain. A dacha equipped with high-quality paths looks organized and well-groomed.
At rational use material and compliance with laying technology, a sidewalk made of old brick can become not only a functional part of the site, but also its spectacular detail. And the financial costs are minimal.
According to the characteristics of the track from wall material concede special materials, intended for paving. But with a well-made foundation and proper care, they will serve the owners of the site for at least ten years.


