You can organize lighting in the interior using a variety of options, in particular, an LED strip. LED strip is considered the most modern element additional or main lighting. Its use implies ample opportunities in the design of the room, as well as big choice glow colors. To implement this light source, it is important to know how to solder the light diode tape... There is both a tape option and separate LED strip strips.
Varieties of LED strips
Subsequent components, such as a power supply, wires for connection, controllers, also depend on the choice. Therefore, before soldering smd LEDs, it is important to decide on the choice of tape. There is the following options which are classified by type:
- LEDs 3528.
- LEDs 5050.
- RGB colored LEDs.

They are also divided into models according to the direction of light.
- With edge glow.
- With a frontal glow.
On protection:
- Leaky, open type- without the use of diode protection.
- With protection: one-sided, two-sided.
What you need to have for soldering
In order to solder the LED strip, you should acquire necessary equipment, consumables and knowledge of how to solder smd. Among the materials, you must have the following:
- It is better to use wires for connection with multi-colored insulation, so that later there will be no confusion. You can determine the cross-section based on the length of the tape and its consumed characteristics, w / meter. A section of 0.2 mm is required per meter of length.
- LED strip of the required length. It is shortened strictly in the places designated for this.
- Surface treatments to improve adhesion of solder and provide protection against impact external environment... For these purposes, the following types of fluxes are suitable: rosin, SCF, LTI.
- Solder is required to connect the pins and wires. Tin-lead solders can be used.
- Silicone is needed for the tightness of the joints, however, only protected LED strips are needed for sealing.
- Heat shrink tubing that shrinks when heated and crimps the junction of the contacts.
As equipment you will need:
- Soldering iron, the power of which is not higher than 40 watts. Soldering temperature should be 260-300 degrees.
- Wire stripping pliers. You can use a regular utility knife instead.
- Building hair dryer or lighter.
What is important to know before soldering
Tapes can have 2 or 4 contact groups. When there are 2 contacts, it is a one-color tape, and there are plus and minus on the contacts. If it has 4 contacts, it is an RGB tape, on which a color change can occur using an intermediate controller G, R, B.
The next step is to select a connection if there are several tapes. A series connection in this case will not be the most suitable way, because a voltage drop is formed along the entire length, which will provoke a reduction in the life of the diodes. Recommended tape parallel connection, in cases where the length is more than 5 meters. If planned, it must be installed before the power supply. Some power supplies have a built-in dimmer.
Soldering preparation
It should be soldered in the same way as other electrical appliances. The main thing is not to overdo it with heating. The process can be divided into several stages:
- The required length of the tape is measured, after which the desired piece is cut off at specially provided places for this. The pitch of such places, on average, is 5 - 10 cm. You can cut it with scissors, trying not to damage the diodes.
- The ends of the wires are stripped 1 mm from the side of the power supply, 2 cm from the side of the tape.
- The surface on which installation is planned is degreased and dried, after which it is removed from the tape protective film and it can be glued.

How does soldering work?
 Soldering an LED is no different from other solders small parts, because you can solder the LED using the same principle. Before you start soldering, you should tin the contacts with rosin and tin. Tinning should not be more than 3-5 seconds, otherwise overheating is possible. When the wires and pads are tinned, use a soldering iron to slightly melt the tin at the end of the wire and pad. Do not solder for more than 5-7 seconds, otherwise overheating may occur. After everything has become a single drop, you should press the wire to the site and hold it until the tin completely solidifies. It is impossible for the tin to hit the adjacent site, as this forms a short circuit. Thus, the wires should be soldered to the remaining pins. When all the wires are connected, you need to check the functionality by connecting it to the power supply. If everything is in order, then the joint is insulated with a heat shrink tube and checked again.
When the protected tape is soldered, the contact area is pre-cleaned from the epoxy or silicone sheath. When the connection is ready, you should put a protective plug on the base. If increased insulation is required, several layers of silicone should be applied.
You should know that:
- High-quality insulation of the area should be carried out, since otherwise it may be necessary to re-solder the connections.
- When 1 pin is soldered, do not immediately start soldering the next. This will provoke overheating, since the circuit has not yet had time to cool down.
- The maximum bending radius of the LED strip should be no more than 2 cm.
- For more convenient soldering, small sleeve tips can be used. This will not only improve contact, but also make the connection more durable.
- In order to know how to evaporate an smd LED, you should heat it from below and on the contacts, while the main thing is not to overheat it. This is due to the fact that if you understand how to solder smd, it becomes clear that it is soldered from below. It is not recommended to solder the LEDs from the tape, as this will void the product warranty.
Output
It is not difficult to figure out how to solder an LED strip. To do this, you should carefully and carefully treat the LED strip and diodes, observing the elementary rules described in the article. The meter of this light source is capable of producing more lumens than the high power lamp provides, but the bulb looks less beautiful.
Video about soldering LED strip
LED strips are a fairly common product among those who use LED sources lighting. Most widespread received with LEDs and. This is based on the fact that they are lightweight and easy to install. They can be used almost anywhere and different sizes... They are easy to cut and connect. We wrote about how to properly cut the LED strip. Today we will look at how to solder an LED strip.
In order to make the correct soldering, it is advisable to use a low-power soldering iron no more than 40 W. It is possible with more power, but in this case, or less, keep the sting on the treated surface or reduce the temperature. Soldering iron - necessary thing on the farm. Currently, temperature-controlled soldering irons are in full swing. The cost does not exceed 500 rubles. Good, with free shipping can be purchased. It is worth stocking up with an additional supporting tool - tweezers or a clamp. Tin well and clean the soldering iron tip. The main rule is not to overheat the tape tracks, as well as the LEDs and s themselves.

In order to achieve satisfactory results, neutral fluxes must be used.

In order to solder two pieces of tape, supply wires of the same size are required. Before starting the operation, the wire must be prepared: the ends are stripped by 2-3 mm, tinned with tin and flux (rosin).
The contacts on the LED strip must also be tinned and only then soldered. You can clean the contact "pennies" on the tape, but this procedure should be done very carefully so as not to damage the conductors.
Consider a soldering technique based on a waterproof LED strip
To solder two pieces of waterproof tape, remove the silicone coating from the tape with a knife or nail. If you use a knife, use it very carefully, because the circuit board can be easily damaged.
Using a soldering iron, rosin and tin, prepare the copper pads for soldering by plating and melting the tin. Do not handle the tape for a long time with a soldering iron tip. Otherwise, screw everything up.
We take two pre-prepared wires, tinned and peeled on one side. It is advisable to take different color conductors. Cutting the wires right away is not worth it. You will still need to hold on to them.

We cut the wires so that no more than 0.5 cm remains. Remove the insulation from the wires. And after that, they should be tinned.
In order to solder the LED strips together, align both pieces of the LED strip and solder the ends. Make sure not to confuse "+" and "-", otherwise you will have to redo everything.
After you have soldered the LED strip, the joint should be closed. This can be done with a heat gun or by putting a heat-shrink tube on the place of the solder.

Video how to solder LED strips
Hello everyone. Today we will solder the wires to the LED strip for the purpose of further connection for our own purposes. This material is not something supernatural and the vast majority are more experienced users can do this procedure without assistance, but our site is designed for different age and professional categories. Therefore, it is possible that this material will be useful to someone. In any case, he has a place on the site, since we will work regularly with LEDs and LED strips. Painfully, this is a convenient and beautiful piece, especially for us - folk craftsmen.
Sometimes conscientious sellers on the radio market sell pieces of LED strip with wires already soldered. But this happens, as a rule, very rarely. In addition, if you buy a five-meter bobbin, then almost certainly you will have to cut it into the pieces you need, and solder wires to each piece. This is what we are going to do now. We will solder to a one-color LED strip. RGB tape deserves a separate consideration in this issue due to the fact that there are some nuances, so we will consider them in the future.
Equipment:
- wires;
- soldering iron, flux, solder;
- LED Strip Light;
- knife;
- heat-shrink tubing;
- lighter, matches.
Safety precautions:
- no need to poke yourself in the eye with a soldering iron;
- do not cut your fingers with a knife, be careful with electricity.
Let's get started gentlemen. We take a piece of LED strip. I think you know that LED strip is waterproof and without moisture protection. The second option is cheaper, but not significantly; at the same time, it loses in its functionality and is more susceptible to technical damage. Therefore, we take the first option.
Now you need to remove the silicone from the tape contacts. I do this with an ordinary table knife. There is no particular difficulty in this procedure. Just do not overdo it - do not cut off something unnecessary, otherwise you will have to shorten your tape by at least three LEDs.

Be careful, very often small pieces of silicone remain on the contacts. This should not be allowed. Otherwise, the soldering will become unbearable and even if you do solder the wires, the soldering will not be particularly strong and reliable. After these procedures, we see approximately the following result.

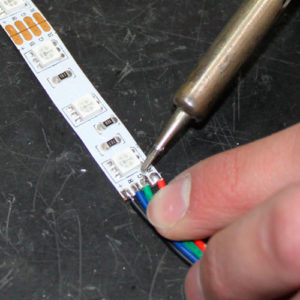
Now we clean the soldering iron, warm it up well and tin the wires. Please note that I make the contacts on the wires as small as possible. This will eliminate the possibility of accidental shorting. I also ask you to pay attention to the fact that on my tape the contacts are already prepared for soldering and tinned, but in most cases you will get just 2 copper contacts, which you will need to tin on the tape as well.

Now we solder our wires to the contacts on the tape. We do it quickly and accurately. It takes me no more than 1 second to solder 1 contact. the fact is that if the tape overheats, the coating collapses on it, revealing a "flexible board" to the light of day, and this will reduce the reliability of your creation. Therefore, I say again - warm up the soldering iron well.

Now it is necessary to properly insulate this matter. I do this in two stages and use two thermotubes for this purpose. different diameters... First, a small one - I put it on the wires and seat it with a lighter.


In the end, it all looks like this.
If it is necessary to make a lighting strip for the kitchen, room or car, then LEDs connected in a special circuit, with insulation, of different lengths, in other words, a tape, can be used for this. Places on such a strip that can be cut are indicated by red arrows. But the cut off parts will have to be connected to a power source, so soldering skills will come in handy in this case. Any low-power device and smd diodes are suitable for this. You will also need other tools, but let's get things in order. First, let's take a look at what it takes to solder LED lighting.
Required set of tools
You will definitely need a soldering iron with a power of no more than 40 W - this is perfect option for working with smd lighting. It is better to use a soldering station: it is more convenient to work with. The sting must first be cleaned and tinned. In addition, you will need:
clamp or tweezers;
With the help of tweezers, it is convenient to hold the smd wires and elements while working. Solder and flux are essential to connect the contacts. It is recommended to use a flux gel. You will need scissors to cut the LED strip.
Another tool you may find useful is a scalpel. It is needed to remove the insulating layer. They can also clean the bare contacts on smd lamps so that the solder fits better on them. Pliers can be used instead of a scalpel. And don't forget the most important thing - the diode strip.
Wires
To connect LEDs, it is best to use thin stranded wires with a diameter of no more than 0.3 mm - they are easier to solder. But any others will do as well. They should be of different colors, for connection to different poles - it is more convenient to work this way. If the length of the LED strip is less than 1 m, then the cross-section of the wires should be from 0.2 square.
Before connecting to smd lamps, each end of the wires is stripped with a scalpel or pliers. After which they must be tinned with tin and rosin. Instead of rosin, a flux is suitable. Before connecting the lighting tape, a heat-shrink tube is put on each contact, which after connection will protect the contacts. So that it firmly tightens the place of the solder, it is heated with a lighter, slightly melted. The main thing is not to damage the LEDs.
Preparation and sealing
Before you start soldering, you need to cut pieces of the cable to the required length. Two supply wires are connected to the lighting tape by soldering. It is better to use thin cables: they must be prepared in advance - remove the insulation (no more than 5 mm) and irradiate with flux and solder. It is also necessary to pre-clean and tin the ends on the smd strip. After that, the LEDs are ready for further action, and you can start the main work - to connect the wires and tape.
For sealing, the contacts are superimposed on the diode tape, on a special pad on it. Then a drop of solder is applied to the heated tip of the soldering iron and transferred to the smd connection. In this case, it is not necessary to strongly add to the contact or hold the sting for a long time.
Everything must be done quickly and accurately, otherwise you can burn the LEDs.
When the first wire is connected, allow time for the solder to cool. After that, you can connect the next wire in the same way, welding a diode tape to it.
Using a soldering iron, you can connect a diode strip, consisting of several pieces, if you need to increase its length. Such an overlap joint is made. The foil on the contact pads of both pieces must be tinned. The platform that will be located on top is tinned from both ends. After that, you can bond with smd elements using the method described above. It is better to use tin-lead solder for it.
The final stage
 At the very end, when all the soldering is completed, it is necessary to insulate all contacts and connections, there should be no bare wires. This should only be done after all adhesion points have completely cooled down. This process usually takes 5 to 15 minutes.
When everything is insulated, the lighting is checked. If all the wires are connected correctly, then after the LEDs are plugged into the socket, a light will appear. If this did not happen, then some stage was done incorrectly - one of the contacts was badly cleaned or sealed. In this case, you can repeat the entire process over again.
When working with high temperatures be sure to be as careful and attentive as possible. Be careful not to hit the tip of the soldering iron - this can cause serious burns. When using a scalpel, you also need to be careful: it is very sharp and it is easy for them to cut yourself. After soldering, the lighting must be checked, that is, it must be connected to the mains. At this moment, you cannot hold on to bare wires - an electric shock is very dangerous.
LED strip is sold, as a rule, in coils of five meters. At one end of the tape (and sometimes two) there are wires to which you can connect the power supply.
Sometimes it becomes necessary to cut the LED strip into pieces, which leaves the pieces of the strip without wires. To be able to use such pieces of tape, you can connect them or solder wires to them.
The best and most reliable connection is soldering. Therefore, we need a soldering iron with a capacity of preferably no more than 25 watts, rosin, solder and copper wires (preferably of different colors).
How to properly solder LED strip?
First you need to strip the ends of the wires from the insulation. For the convenience of coating with solder, it is enough to strip about 5 mm.
Now you need to cover the wire stripped of insulation with solder. To do this, put the wire on the rosin, and touch the copper wire with the tip of the soldering iron. In this case, the rosin penetrates into the twisted wire.
Then, using a soldering iron, cover copper wire solder. The solder should completely cover the wire from all sides and fill all the space between the copper wires.
We cover the second wire with solder in the same way.
We remove excess wire with side cutters so that the wires do not close together during the operation of the LED strip. It is enough to leave 2 mm.
Now you need to solder the contacts on the tape.
We collect a little solder on the tip of the soldering iron, then rosin and immediately, touching one of the contacts of the tape, we make, as it were, rubbing movements.
As soon as you see that the solder is attached to the contact, remove the soldering iron so as not to overheat the LEDs.
Then we remove the excess rosin around the contacts.
If a small drop of solder has not formed on the tape, then we collect a little solder on the tip of the soldering iron. Then we apply the wire we prepared earlier to the contact of the LED strip. With the sharp end of the soldering iron tip we touch the tape contact, and with the flat side of the wire tip.
As soon as the solder on the wire and on the tape is connected in one drop, remove the soldering iron. Solder the second wire in the same way.
If you need to connect several pieces of tape together, you can use single-core wires. You can get them from this, in simple terms, the Internet UTP cable. Inside it are single-core wires, which are fine for us.
First, we clean the copper wires from insulation, then cover them with rosin and solder.
When connecting two pieces of LED strip, arrange them so that the contacts marked with a + (plus) sign are opposite each other, since you need to solder plus to plus, and minus to minus.
We solder the wire to one of the contacts and cut it off, leaving a small piece to connect to another piece of tape. After soldering the second wire, trim both wires.
When soldering the second piece of tape, attach a metal object such as a pair of scissors to the connecting wires to prevent the wires from getting unsoldered from the first tape.
If the tape connected in this way is supposed to be glued to a metal surface, it is necessary to insulate the wires connecting the tape. This can be done with duct tape, glue gun or heat shrink.
We check the performance of our tape.
itemprop = "video">