If you're wondering how to celebrate your child's birthday, you might like the idea of hosting a science show for kids. IN Lately Scientific holidays are becoming increasingly popular. Entertaining experiments and almost all children like experiments. For them it is something magical and incomprehensible, and therefore interesting. The cost of hosting a science show is quite high. But this is not a reason to deny yourself the pleasure of watching the amazed children’s faces. After all, you can get by on our own, I do not resort to the help of animators and holiday agencies.
In this article I have made a selection of simple chemical and physical experiments and experiments that can be carried out without problems at home. Everything you need to carry them out can probably be found in your kitchen or medicine cabinet. You won't need any special skills either. All you need is desire and a good mood.
I tried to collect simple but spectacular experiments that will be interesting to children different ages. For each experiment, I prepared a scientific explanation (it’s not for nothing that I studied to be a chemist!). Whether you explain to your children the essence of what is happening or not is up to you. It all depends on their age and level of training. If the children are small, you can skip the explanation and go straight to the spectacular experience, saying only that they will be able to learn the secrets of such “miracles” when they grow up, go to school and begin to study chemistry and physics. Perhaps this will make them interested in studying in the future.
Although I chose the safest experiments, they still need to be taken very seriously. It is better to perform all manipulations with gloves and a gown, at a safe distance from children. After all, vinegar and potassium permanganate can cause trouble.
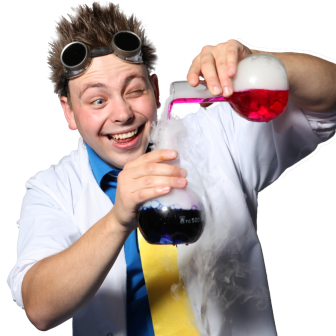
And, of course, when holding a children's science show, you need to take care of the image of a mad scientist. Your artistry and charisma will largely determine the success of the event. Transform from ordinary person It's not at all difficult to become a funny scientific genius - all you have to do is tousle your hair, put on big glasses and white robe, get smeared with soot and make a facial expression appropriate to your new status. This is what a typical mad scientist looks like.


Before putting on a science show on children's party(by the way, this can be not only a birthday, but also any other holiday), all experiments should be done in the absence of children. Rehearse so that there are no unpleasant surprises later. You never know what can go wrong.
Children's experiments can be carried out without a festive occasion - just so that you can spend time with your child in an interesting and useful way.
Choose the experiences you like best and create a holiday script. In order not to overburden children with science, even if it is entertaining, dilute the event with fun games.
Part 1. Chemical show
Attention! When conducting chemical experiments, you should be extremely careful.
Foam fountain
Almost all children love foam - the more, the better. Even kids know how to make it: to do this, you need to pour shampoo into the water and shake it well. Can foam form on its own without shaking and also be colored?
Ask the children what they think foam is. What does it consist of and how can it be obtained. Let them express their guesses.
Then explain that foam is bubbles filled with gas. This means that for its formation you need some substance from which the walls of the bubbles will consist, and a gas that will fill them. For example, soap and air. When soap is added to water and stirred, air enters these bubbles from environment. But gas can be obtained in another way - in the process chemical reaction.
Option 1
- hydroperite tablets;
- potassium permanganate;
- liquid soap;
- water;
- glass vessel with a narrow neck (preferably beautiful);
- cup;
- hammer;
- tray.
Setting up the experiment
- Using a hammer, crush the hydroperite tablets into powder and pour it into the flask.
- Place the flask on a tray.
- Add liquid soap and water.
- Prepare in a glass water solution potassium permanganate and pour it into the flask with hydroperide.
After the solutions of potassium permanganate (potassium permanganate) and hydroperide (hydrogen peroxide) merge, a reaction will begin to occur between them, accompanied by the release of oxygen.
4KMnO 4 + 4H 2 O 2 = 4MnO 2 ¯ + 5O 2 + 2H 2 O + 4KOH
Under the influence of oxygen, the soap present in the flask will begin to foam and lick out of the flask, forming a kind of fountain. Due to potassium permanganate, part of the foam will turn pink.
You can see how this happens in the video.
Important: The glass vessel must have a narrow neck. Do not take the resulting foam into your hands and do not give it to children.
Option 2
Another gas, for example carbon dioxide, is also suitable for foam formation. You can paint the foam any color you want.
To carry out the experiment you will need:
- plastic bottle;
- soda;
- vinegar;
- food coloring;
- liquid soap.
Setting up the experiment
- Pour vinegar into the bottle.
- Add liquid soap and food coloring.
- Add baking soda.
Result and scientific explanation
When soda and vinegar interact, a violent chemical reaction occurs, accompanied by the release of carbon dioxide CO 2 .
Under its influence, the soap will begin to foam and lick out of the bottle. The dye will color the foam in the color you choose.
Fun ball
What's a birthday without balloons? Show the children the balloon and ask how to inflate it. The guys, of course, will answer with their mouths. Explain that the balloon is inflated by the carbon dioxide that we exhale. But there is another way to inflate the balloon.
To carry out the experiment you will need:
- soda;
- vinegar;
- bottle;
- balloon.
Setting up the experiment
- Place a teaspoon of baking soda inside the balloon.
- Pour vinegar into the bottle.
- Place the balloon on the neck of the bottle and pour the baking soda into the bottle.
Result and scientific explanation
As soon as soda and vinegar come into contact, a violent chemical reaction will begin, accompanied by the release of carbon dioxide CO 2. The balloon will begin to inflate before your eyes.
CH 3 -COOH + Na + − → CH 3 -COO − Na + + H 2 O + CO 2
If you take a smiley ball, it will make an even greater impression on the guys. At the end of the experiment, tie a balloon and give it to the birthday person.
Watch the video for a demonstration of the experience.
Chameleon
Can liquids change color? If yes, why and how? Before you try the experiment, be sure to ask your children these questions. Let them think. They will remember how water is colored when you rinse a brush with paint in it. Is it possible to discolor the solution?
To carry out the experiment you will need:
- starch;
- alcohol burner;
- test tube;
- cup;
- water.
Setting up the experiment
- Pour a pinch of starch into a test tube and add water.
- Drop some iodine. The solution will turn blue.
- Light the burner.
- Heat the test tube until the solution becomes colorless.
- Pour cold water into a glass and immerse the test tube in it so that the solution cools and turns blue again.
Result and scientific explanation
When interacting with iodine, a starch solution turns blue, since this produces a dark blue compound I 2 * (C 6 H 10 O 5) n. However, this substance is unstable and, when heated, breaks down again into iodine and starch. When cooled, the reaction goes in the other direction and we again see the solution turning blue. This reaction demonstrates reversibility chemical processes and their dependence on temperature.
I 2 + (C 6 H 10 O 5) n => I 2 *(C 6 H 10 O 5) n
(iodine - yellow) (starch - clear) (dark blue)
Rubber egg
All children know that eggshell very fragile and can break at the slightest blow. It would be nice if the eggs didn’t break! Then you wouldn’t have to worry about getting the eggs home when your mom sends you to the store.
To carry out the experiment you will need:
- vinegar;
- raw egg;
- cup.
Setting up the experiment
- To surprise the children, you need to prepare for this experience in advance. 3 days before the holiday, pour vinegar into a glass and place a raw chicken egg in it. Leave for three days so that the shell has time to completely dissolve.
- Show the children a glass with an egg and invite everyone to say a magic spell together: “Tryn-dyrin, boom-burym!” Egg, become rubber!”
- Remove the egg with a spoon, wipe it with a napkin and demonstrate how it can now become deformed.
Result and scientific explanation
Eggshells are made of calcium carbonate, which dissolves when reacted with vinegar.
CaCO 3 + 2 CH 3 COOH = Ca(CH 3 COO) 2 + H 2 O + CO 2
Due to the presence of a film between the shell and the contents of the egg, it retains its shape. Watch the video to see what an egg looks like after vinegar.
Secret letter
Children love everything mysterious, and therefore this experiment will certainly seem like real magic to them.
Take an ordinary ballpoint pen and write a secret message from aliens on a piece of paper or draw some kind of secret sign that no one except the guys present can know about.
When the children read what is written there, tell them that this is a big secret and the inscription must be destroyed. Moreover, magic water will help you erase the inscription. If you treat the inscription with a solution of potassium permanganate and vinegar, then with hydrogen peroxide, the ink will wash off.
To carry out the experiment you will need:
- potassium permanganate;
- vinegar;
- hydrogen peroxide;
- flask;
- cotton buds;
- ball pen;
- paper;
- water;
- paper towels or napkins;
- iron.
Setting up the experiment
- Draw on a piece of paper ballpoint pen drawing or inscription.
- Pour some potassium permanganate into the test tube and add vinegar.
- Soak a cotton swab in this solution and swipe over the inscription.
- Take another cotton swab, moisten it with water and wash off the resulting stains.
- Blot with a napkin.
- Apply hydrogen peroxide to the inscription and blot it again with a napkin.
- Iron or place under a press.
Result and scientific explanation
After all the manipulations, you will receive a blank sheet of paper, which will greatly surprise the children.
Potassium permanganate is a very strong oxidizing agent, especially if the reaction occurs in an acidic environment:
MnO 4 ˉ+ 8 H + + 5 eˉ = Mn 2+ + 4 H 2 O
A strong acidified solution of potassium permanganate literally burns many organic compounds, turning them into carbon dioxide and water. For creating acidic environment Our experiment uses acetic acid.
The product of the reduction of potassium permanganate is manganese dioxide Mn0 2, which has a brown color and precipitates. To remove it, we use hydrogen peroxide H 2 O 2, which reduces the insoluble compound Mn0 2 to a highly soluble manganese (II) salt.
MnO 2 + H 2 O 2 + 2 H + = O 2 + Mn 2+ + 2 H 2 O.
I suggest you watch how the ink disappears in the video.
The power of thought
Before setting up the experiment, ask the children how to extinguish a candle flame. They, of course, will answer you that you need to blow out the candle. Ask if they believe you can put out a fire with an empty glass by casting a magic spell?
To carry out the experiment you will need:
- vinegar;
- soda;
- glasses;
- candles;
- matches.
Setting up the experiment
- Pour baking soda into a glass and fill it with vinegar.
- Light some candles.
- Bring a glass of soda and vinegar to another glass, tilting it slightly so that the carbon dioxide produced during the chemical reaction flows into empty glass.
- Pass a glass of gas over the candles, as if pouring it on the flame. At the same time, make a mysterious expression on your face and say some incomprehensible spell, for example: “Chickens-borers, moors-pli!” Flame, don’t burn anymore!” Children must think that this is magic. You will reveal the secret after the delight.
Result and scientific explanation
When soda and vinegar interact, carbon dioxide is released, which, unlike oxygen, does not support combustion:
CH 3 -COOH + Na + − → CH 3 -COO − Na + + H 2 O + CO 2
CO 2 is heavier than air, and therefore does not fly up, but settles down. Thanks to this property, we have the opportunity to collect it in an empty glass, and then “pour” it onto the candles, thereby extinguishing their flame.
How this happens, watch the video.
Part 2. Entertaining physical experiments
Genie strongman
This experiment will allow children to look at their usual action from a different perspective. Place an empty wine bottle in front of the children (it is better to remove the label first) and push the cork into it. And then turn the bottle upside down and try to shake the cork out. Of course, you won't succeed. Ask the children: is there any way to get the cork out without breaking the bottle? Let them say what they think about this.
Since nothing can be used to pick up the cork through the neck, there is only one thing left to do - try to push it out from the inside. How to do it? You can call the genie for help!
The gin used in this experiment will be a large plastic bag. To enhance the effect, you can decorate the bag with colored markers - draw eyes, nose, mouth, hands, some patterns.
So, to conduct the experiment you will need:
- empty wine bottle;
- cork;
- plastic bag.
Setting up the experiment
- Twist the bag into a tube and insert it into the bottle so that the handles are on the outside.
- When turning the bottle over, ensure that the cork is on the side of the bag, closer to the neck.
- Inflate the bag.
- Carefully begin to pull the package out of the bottle. The cork will come out along with it.
Result and scientific explanation
As the bag is inflated, it expands inside the bottle, expelling air from it. When we begin to pull out the bag, a vacuum is created inside the bottle, due to which the walls of the bag wrap around the cork and drag it out with them. This is such a strong gin!
To see how this happens, watch the video.
Wrong glass
On the eve of the experiment, ask the children what will happen if you turn a glass of water upside down. They will answer that the water will pour out. Tell them that this only happens with the “right” glasses. And you have the “wrong” glass from which water does not pour out.
To carry out the experiment you will need:
- glasses of water;
- paints (you can do without them, but this makes the experience more spectacular; it’s better to use acrylic paints– they give more saturated colors);
- paper.
Setting up the experiment
- Pour water into glasses.
- Add some color to it.
- Wet the edges of the glasses with water and place a sheet of paper on top of them.
- Press the paper firmly against the glass, holding it with your hand, and turn the glasses upside down.
- Wait a moment until the paper sticks to the glass.
- Slowly remove your hand.
Result and scientific explanation
Surely all children know that we are surrounded by air. Although we cannot see him, he, like everything around him, has weight. We feel the touch of air, for example, when the wind blows on us. There is a lot of air, and therefore it presses on the ground and everything around. This is called atmospheric pressure.
When we apply paper to a wet glass, it sticks to its walls due to the force of surface tension.
In an inverted glass, between its bottom (which is now at the top) and the surface of the water, a space is formed filled with air and water vapor. The force of gravity acts on the water, pulling it down. At the same time, the space between the bottom of the glass and the surface of the water increases. Under conditions of constant temperature, the pressure in it decreases and becomes less than atmospheric. The total pressure of air and water on the paper from the inside is slightly less than the air pressure from the outside. That's why water doesn't pour out of the glass. However, after some time, the glass will lose its magical properties, and the water will still spill out. This is due to the evaporation of water, which increases the pressure inside the glass. When it becomes more atmospheric, the paper will fall off and the water will pour out. But you don’t have to bring it to this point. It will be more interesting this way.
You can watch the progress of the experiment in the video.
Gluttonous bottle
Ask your children if they like to eat. Do they like to eat? glass bottles? No? Don't they eat bottles? But they are wrong. They don’t eat ordinary bottles, but they don’t even mind having a snack with magic bottles.
To carry out the experiment you will need:
- boiled chicken egg;
- bottle (to enhance the effect, the bottle can be painted or embellished in some way, but so that children can see what is happening inside it);
- matches;
- paper.
Setting up the experiment
- Peel the boiled egg from the shell. Who eats eggs in a shell?
- Set fire to a piece of paper.
- Throw the burning paper into the bottle.
- Place the egg on the neck of the bottle.
Result and scientific explanation
When we throw burning paper into a bottle, the air in it heats up and expands. By closing the neck with an egg, we prevent the flow of air, as a result of which the fire goes out. The air in the bottle cools and contracts. A pressure difference is created inside the bottle and outside, due to which the egg is sucked into the bottle.
That's all for now. However, over time I plan to add a few more experiments to the article. At home, you can, for example, conduct experiments with balloons. Therefore, if you are interested in this topic, add the site to your bookmarks or subscribe to the newsletter for updates. When I add something new, I will inform you about it by e-mail. It took me a lot of time to prepare this article, so please respect my work and when copying materials, be sure to include an active hyperlink to this page.
If you have ever conducted home experiments for children and organized a science show, write about your impressions in the comments and attach a photo. It will be interesting!
Children are great people. By their very nature, they are aimed at understanding the world, and until a certain age, the world is ready to give them discoveries almost every day. Children are ready for the most risky experiments in order to answer the questions “How?”, “Why?”, “What will happen?” We, parents, out of fear for their safety and the safety of the objects surrounding our children, try to limit the flight of their imagination, especially if we're talking about about preschoolers and primary schoolchildren aged 7-8 years.
Preserving this curiosity and inquisitiveness is very important; it is this trait that will bring the child both deep knowledge and the ability to implement it. Entertaining experiments will force the child to consciously read physics or chemistry textbooks, in an effort to understand and explain the results of the experiment.
Therefore, responsible parents strive to support children in their desire to discover chemical, physical, biological and other laws themselves. Having caught the demand, stores offer to buy various children's kits to conduct experiments and experiments for children 7-8 years old at home.
You can buy these sets, but many are fun and interesting scientific experiments Children can easily spend time with their parents themselves, creating the necessary sets from improvised materials at home. At home you can do experiments in chemistry, physics, biology. You can do at least 10 experiments with Coca-Cola alone. The main thing is to teach little researchers safety rules.

Most of the experiences and experiments for children that parents can read about and offer to kids for practice are completely safe. But many children at 8, and even more so 10 years old, are already quite free to find videos on the Internet where slightly older children demonstrate their experiments, and not all of them, even with Coca-Cola, are safe for a beginner.
Or maybe your young researcher will decide to conduct chemical experiment own development. Therefore, rule number one, which, first of all, needs to be taught to children is to always coordinate upcoming scientific experiments with an adult.
- Before doing this, carefully read the instructions for the experiment. All sets sold are supplied with them.
- The place for experiments must be carefully chosen and well prepared. Remove all unnecessary items, especially flammable materials and fragile items. There should be enough light, nearby water, and the possibility of ventilation.
- Be careful when handling fire, hot or sharp objects.
- Use separate dishes for experiments. After use, wash and put it away thoroughly.
- Do not put anything in your mouth, taste it or play with the products used or received.
- If your hands get dirty, wash them immediately so as not to rub your face and eyes with dirty hands.
- Do not lean close to the experiment site to avoid splashes, sparks, etc. do not come into contact with skin or eyes.
- At the end of the experiment, we carefully clean everything, wash our hands, and if necessary, ventilate the room.
- Carefully pour used liquids into the sink, turning on cold water so that she dilutes it.
But still simple experiments with fire or chemicals, even something as common at home as vinegar, children should only do it under the supervision of an adult.
Experiments for children! Experiment for children No. 1 – Rainbow water
Boat on a soap engine

You don't have to buy complicated kits for this experience. Enough water, liquid soap and plastic corner. Using scissors, cut out a triangular boat with a slot from a corner or film and round hole in the middle. This is quite feasible for children 7-8 years old. Then we lower the resulting boat into a vessel with water and drop liquid soap into the hole. The ship begins to move quickly through the water. And so on after every drop of soap.
Soda experience

This simple and fun activity will help engage children's attention to physics concepts such as density, volume and weight. He doesn't need it special sets, it is enough to buy several metal cans of soda of the same volume. For example, buy Sprite, Coca-Cola, Pepsi and Fanta, and ask your child the question: “What will happen to them if you put them in water? Will they drown or not?
You can even bet on how the next jar will behave. Then carefully lower the jars into a container of water and observe. Some jars sink to the bottom, while others float in it. Although a child of 7 or even 10 years old does not yet learn physics or chemistry, this visual experience will help to remember that objects with the same volume can have different weights and different densities.
Paper cover

This scientific experiment is like a magic trick. Take a glass of water, pour water into it, press a piece of thick paper on top and carefully turn the glass over. The water doesn't spill out! The paper remains pressed to the glass, as if glued. The explanation for the secret of this experiment is that air presses on the paper.
Homemade rainbow using water and mirror

You can delight your children by making them feel like a wizard by creating your own rainbow. To do this, the child immerses a small mirror in water and directs the light of a flashlight onto it. On White list paper we catch the reflection and there it is - a rainbow!
Rene Descartes' experiment or pipette diver

It is believed that this interesting experiment was first made by the 16th century physicist and mechanic from France, Rene Descartes. We will not repeat his experience exactly, because today there are plastic bottles. In one of them we fill water almost to the very edges and lower the pipette there. We first fill the pipette with a little water, so that when immersed in the bottle it floats, with its upper rubber end slightly protruding from the water.
Close the bottle and squeeze it. The pipette goes to the bottom. Let go of the sides of the bottle and the pipette floats up. When you squeeze the bottle, the pressure of the water in it increases, and it penetrates into the pipette. It becomes heavier and goes to the bottom. The pressure weakens and the air pushes out the water, the pipette becomes lighter again and floats up.
From glass to glass

This experiment can be done even by a 5-year-old child. One glass is filled with water and a strip of fabric is immersed in it, the second edge of which is lowered into the empty glass. It is placed slightly lower than full, and gradually the water flows through the fabric from full to empty.
Coca-Cola experience

The Internet is full of videos where guys have the most different experiences with Coca-Cola. You can find 10 or 20 such experiments. Add sugar, Mentos candies, soda or salt, milk and dry ice to Coca-Cola and look at the result. With a child of 8–10 years old, it is quite possible to create a volcano out of Coca-Cola.
To do this, a tall glass or a small plastic bottle insert it into a dark paper cone that will represent a volcano. We put the volcano in the basin. Fill the vessel halfway with Coca-Cola and throw in the Mentos candies. Then we admire the volcanic eruption from a fountain of foam. The fountain from our volcano will be even higher if we add soda to Coca-Cola instead of candy.
Experiment Naughty ball. Simple experiments with a bottle
Your baby has already grown up. He is over 4 years old. you dealt with him early development and taught the most basic and important skills: walking, dressing, communicating with peers, distinguishing colors and shapes. Now your child is a completely independent, mature person and can not be distracted for 5-10 minutes while completing the task you propose. If you have a question “how to develop a hyperactive child.”
Our answer: Continue to develop perseverance.
If you have already sent your child to kindergarten, then your he/she will receive the knowledge, skills and abilities necessary for entering school. Just don’t rule out home education and development. Your journey together into the land of simple children's tricks, experiences and experiments is only just beginning to unfold. The time has come to become more deeply acquainted with the unknown world around us. Take a different look at the house and the objects in it, the nature outside the window, at things that are already familiar to you. Continue to communicate with your child and spend time together. Organize interesting experiments, experiments and tricks for children at home.
Let's experiment. Let's take simple, familiar objects and see what else they can do. Don’t rush to get the multi-volume “Big Soviet Encyclopedia" It contains a lot of useful and interesting things, but you will need it much later. In this section of the educational website for children, you will find an excellent collection of educational games and entertaining development games. The proposed experiments will interest both boys and girls. And you already have everything you need to organize a “home laboratory”. Look in the kitchen, bathroom and other rooms. Found it?
Then think, what element do you want to study today? What experiments will you conduct in your home laboratory? Choose from the list and get started.
Experiments for children
- Experiments with water/density
- Experiments with sand / sugar / salt / starch
- Experiments with light / mirrors / candle / color
- Experiments with equilibrium / electricity / thermal conductivity
I have something for you interesting offer. I want to give you a gift. Very useful for you, your child and your whole family. They say that best gift- this is a book. And today I want to give you two wonderful collections. This step by step instructions on how to set up your own home laboratory at home. This book contains amazing experiences with water for you. And you will find the answer to the question of how to tame sound. And if there are a lot of sounds in your house, then it’s time for you to master these entertaining experiments.
By using interesting experiments you will introduce your child to the four main elements: water, air, fire and earth (its gifts). Give your child a ton of positive emotions. Teach your child to observe, analyze, draw conclusions, and express his thoughts. Our task is not to raise young chemist or physics. We want to make your child's childhood interesting, happy, fun, and as educational as possible. Prepare him for further education at school. Make sure that this training is easy for him. Arouse interest in learning, develop curiosity and perseverance. It’s interesting to answer a million different questions that pop up in thousands of “PocheMuk”’s heads every day.
Follow our updates
Share your impressions of your joint experiences in the comments.
When choosing a gift for my eleven-year-old nephew, I couldn’t do without a book))). It was decided to search among books aimed at distracting the guy as much as possible from modern gadgets. Since he is very smart and inquisitive, I hope that he will spend his summer holidays not bored without a tablet, but with the help of this book and another gift, but that’s another topic. I settled on “Fun scientific experiments for children. 30 exciting experiments at home”, Egor Belko, Petersburg publishing house.
ISBN 978-5-496-01343-7
Home experiments. There is probably no child who would not be interested and would not want to build an erupting volcano at home or “settle” a cloud in a jar, a rainbow in a glass, push an egg into a bottle or grow a purple daisy. And even more so when everything that is needed for these experiments is at home: on the desktop or in mom’s kitchen, and no special reagents or chemicals are needed. The most “dangerous” means for conducting experiments in this book is perhaps vinegar.
On each spread it is given detailed description experiment: necessary materials, a description of the preparation and progress of the experiment and its scientific explanation, as well as clear and colorful illustrated tips. All experiments are very simple, and everything needed to carry them out can be easily found in every home. From the age of 6-7, I think, you can already give a book to a child for independent study, and before this age you can have a great time with mom, or even better with dad (dads are better able to explain the properties of objects and materials, they somehow it turns out simpler and clearer)))


My daughter is almost 3 years old, but we also love to experiment. For example, we have already done, built an entire installation mountain peak and a volcano erupting in it, and with ice and simply painted with “soda” paints, and then “foamed” the drawing with vinegar or, possibly, a solution of citric acid. The child’s delight is guaranteed, and even if he does not understand the reason for what is happening, he will certainly remember the impressions of what he saw. The goal and task of such activities with a child is to simply and clearly show that any phenomenon in nature or human life has a simple explanation, and we can understand its components; awaken the child’s interest in everything that has a logical scientific explanation, but does not give impetus to curiosity at first sight; teach the child to seek the truth of what is happening; and just to make it clear that from any object or material found in the kitchen, yard or bathroom, you can make something interesting and exciting with your own hands. We have already sent the book to my nephew, but I photographed all the spreads so that I could repeat the experiments with my daughter. There is a lot of information about such things on the Internet now, and if you try, you can compile your own book of “home experiments,” but if you don’t want to spend a lot of time searching or just have a holiday coming up for your beloved children, then this book is worthy of attention.


The experiments at home that we will talk about now are very simple, but extremely entertaining. If your child is just getting acquainted with the nature of various phenomena and processes, such experiences will look like real magic for him. But it’s no secret that it is best to present complex information to children in a playful way - this will help reinforce the material and leave vivid memories that will be useful in further education.
Explosion in calm water
Discussing possible experiments at home, first of all we will talk about how to make such a mini-explosion. You will need a large vessel filled with regular tap water(for example, it could be a three-liter bottle). It is advisable for the liquid to settle in a quiet place for 1-3 days. After this, you should carefully, without touching the vessel itself, drop a few drops of ink into the very middle of the water from a height. They will spread beautifully in the water, as if in slow motion.
A balloon that inflates itself
This is another interesting experiment that can be done at home. You need to pour a teaspoon of ordinary baking soda into the ball itself. Next, you need to take an empty plastic bottle and pour 4 tablespoons of vinegar into it. The ball must be pulled over its neck. As a result, the soda will pour into the vinegar, a reaction will occur with the release of carbon dioxide, and the balloon will inflate.

Volcano
Using the same baking soda and vinegar, you can create a real volcano in your home! You can even use it as a base a plastic cup. Pour 2 tablespoons of soda into the “mouth”, fill it with a quarter glass of heated water and add a little food coloring. dark color. Then all that remains is to add a quarter glass of vinegar and watch the “eruption”.
"Color" magic
At-home experiments you can demonstrate to your child also include unusual changes various substances their colors. A striking example of this is the reaction that occurs when iodine and starch combine. By mixing brown iodine and snow-white starch, you will get a liquid... of a bright blue hue!
Fireworks
What other experiments can you do at home? Chemistry provides a huge field for activity in this regard. For example, you can make bright fireworks right in your room (but preferably in the yard). A little potassium permanganate must be crushed into a fine powder, and then take a similar amount charcoal and grind it too. After thoroughly mixing the coal with manganese, add iron powder. This mixture is poured into a metal cap (an ordinary thimble will do) and kept in the flame of the burner. As soon as the composition heats up, a whole rain of beautiful sparks will begin to scatter around.

Soda rocket
And finally, let’s talk again about chemical experiments at home, which involve the simplest and most accessible reagents - vinegar and sodium bicarbonate. In this case, you will need to take a plastic film cassette, fill it with baking soda, and then quickly pour in 2 teaspoons of vinegar. On next stage you put a lid on a homemade rocket, place it upside down on the ground, stand back and watch it take off.


