Every owner dreams of making his home memorable and beautiful. If the house is no longer new, it is not so simple. One of the possibilities is carved platbands. They will even turn an ordinary “box” into a masterpiece.
Material for platbands
Carved platbands are made mainly from wood coniferous species. The best option— pine, easy to cut, inexpensive, durable due to its high resin content. In principle, you can use any other coniferous board, but it is better not to try with spruce: it is too fibrous and cannot be cut even with the sharpest tool.
You can make carved platbands from hardwood- linden (the softest), poplar, maple, oak, cherry, etc. But you need to be able to work with each species, get your hands on it, and there is no guarantee that you will get something digestible, and hardwood is expensive. That’s why window frames are often made from pine. You just need to pay attention to the quality characteristics.
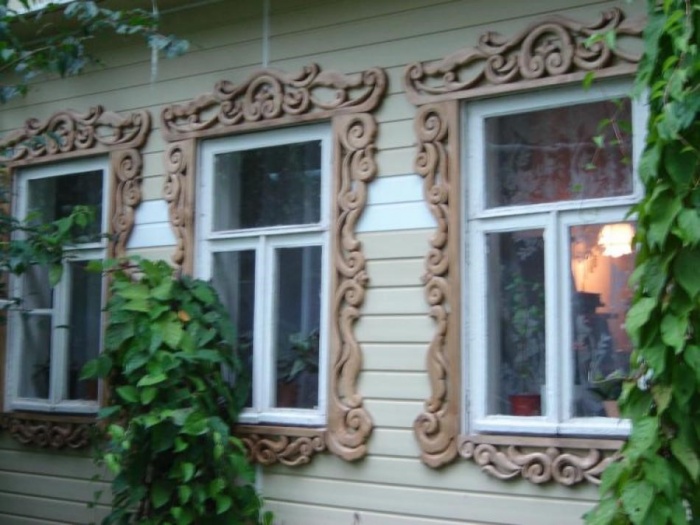
Carved window frames - a way to make your home unique
If you have wood or a board that has been lying around for 3 years or more, you can use it: it is already definitely dry, it just needs processing and calibration. If there is no woodworking equipment at home (thicknesser and circular saw), you will need an edged board. The wood of the first or premium. This means that there should be no knots, chips, or resin pockets on the board. Take chamber-dried wood with a moisture content of no more than 8-12%. This is not sold in the markets; you need to look for it at sawmills and construction stores.
Why kiln drying? Because it is dried in a special chamber, quickly removing moisture. At the same time, some of the boards crack and bend - these are rejected, the rest are sold. If you make carved frames from chamber-dried wood, they will definitely not be damaged or cracked.
Tools
To make carved platbands with your own hands, you will need the following minimum set:
- drill with a set of drills;
- electric jigsaw with soft start and a bunch of different wood saws;
- chisels;
- sandpaper with grains of different sizes;
- flap disc made of sandpaper for wood on a drill.

To reduce the time it takes to create carved patterns and sanding, it is better to have a router and a grinder.
One at a time or in bulk?
Carved platbands usually consist of repeating elements. At least two vertical slats on each window are made identical. And since several windows are usually decorated, a lot of identical elements are required. If you are going to make slotted trims, you naturally want to cut out several pieces at the same time, stacking the boards and somehow securing them.

The desire is understandable, but difficult to implement, and the benefits over time are not as great as it seems. The first difficulty is that home craftsmen usually have jigsaws that are not very powerful. To cut through several boards, you have to move the saw more slowly along the intended pattern. On straight lines the speed is still tolerable, on curves it is low. And the smaller the bend radius, the slower you have to move the file. If you work with one board, there are no such problems. So, in terms of time, if there is any gain, it is very small.
One more thing. Even thick, good, expensive files with large thickness of the processed product are rejected. So, when cutting several boards at the same time, the quality of the slot on the bottom (or two) remains a big question.
The procedure for manufacturing a platband with slotted threads
Using a template, transfer the desired drawing onto the board (read below for where to get it, how to enlarge it, and how to make a template). If necessary, we correct it and draw out the details well. Next, we will describe the procedure step by step.

Removing wood from the slots in the pattern

Since the carving will be viewed from afar, some inaccuracies are not fatal, but it is still worth striving for the ideal.
Making a curly edge
Some platbands have a smooth edge. Then we skip this stage. If the edge is figured, you will have to do some more work with a jigsaw.

If the cut is complex, there may be unattractive places left. This is not scary, we will then process them where necessary - with chisels, the same jigsaw, emery. When you are satisfied with the result, you can move on.
Final revision
Owners of wooden houses probably know everything about how to process wood. But, just in case, let’s repeat the general rules again.

Choice paint and varnish materials very wide. Suitable for any outdoor use. But keep in mind that opaque paints will have to be renewed periodically - once a year for sure. And that means filming old paint, prime, paint again. The situation is simpler with wood oils - they do not form a film on the surface of the wood, but are absorbed into the fibers. The coating also needs to be renewed, but just clean it from dust and cover it with a new layer. And the processing frequency is less. Disadvantages of wood oil - higher price, fewer colors.

How to enlarge a template
Simple carved platbands can be made without templates. There will be several examples in the video - it shows how to draw and cut. But not everyone can draw more or less complex patterns on their own. It takes skill and talent. The easiest way is to find a diagram, print it in the right size, transfer to cardboard and cut out. You will get a template that you can trace.
The second way: copy from a photograph. Not all diagrams can be found. Some, especially the old ones window casings, you won't find it anywhere. If you have at least some drawing ability, you can copy them.

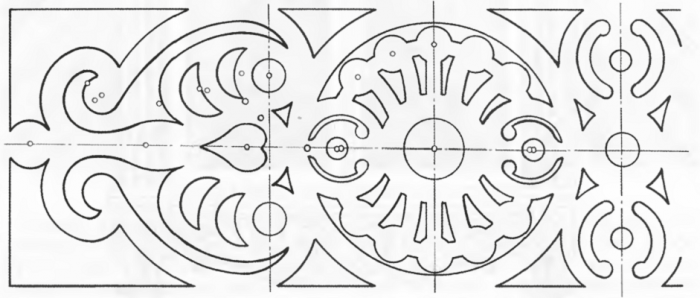
Even such an ornament can be copied... if you have the skill
Questions may arise about how to increase the size of the found diagram or template. There are three options:
- Using any graphic editor. The simplest one - Paint - is available on any computer running Windows (the "Image" tab, the "Resize image" line, select "centimeters" and put in the box desired length(height). The resulting file can be printed. If your printer is small, you may need to split it into multiple pages. They should then be glued together and, based on the resulting drawing, a template should be made.
- Using a photocopy. Copiers have a zoom function.
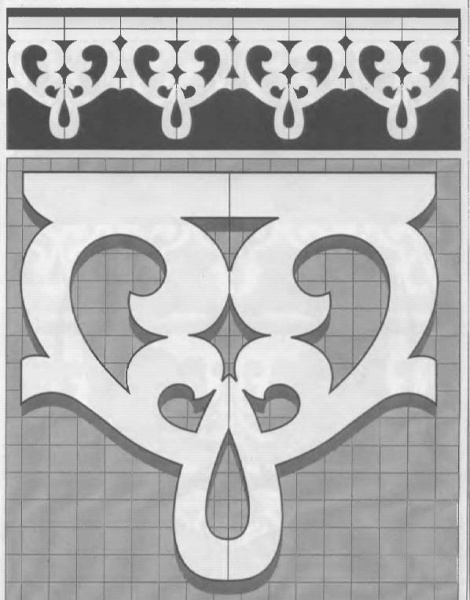
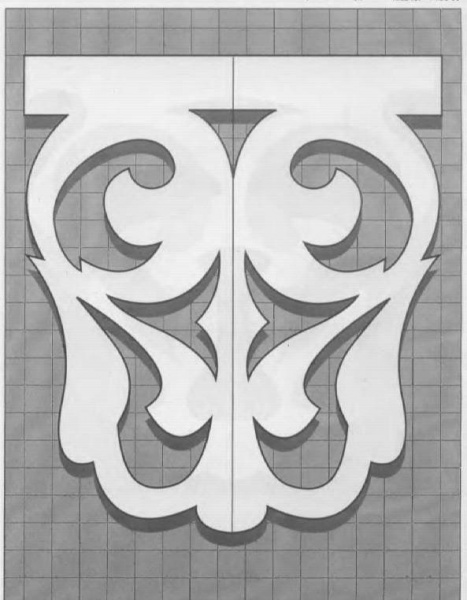
- Taking graph paper, transfer the drawing to the desired scale. To do this, divide the original image into squares with a side of 0.5 or 1 cm (can be printed on a piece of checkered paper). Then we transfer the lines to graph paper, increasing them in the required proportion.
The first two methods are faster. But when scaling, the picture may turn out fuzzy and blurry. You can correct it by hand, or you can draw it in some editor, for example, CorelDRAW. Watch the video to see how to do this. Just an example of drawing a diagram for carving.
Video on the topic
Schemes, templates, patterns


The style is completely different...
October 14, 2016Specialization: master in the construction of plasterboard structures, finishing works and laying floor coverings. Installation of door and window units, finishing of facades, installation of electrical, plumbing and heating - I can give detailed advice on all types of work.
Carved frames for windows in a wooden house have been a traditional way of decorating houses for several centuries; previously, they could even be used to judge the wealth of the owners. Nowadays there are many modern materials, but wood products have not lost their relevance and are still popular.
And if you have a wooden house, then you should definitely decorate the facade with a beautiful frame, I’ll tell you what types it comes in, and you need to choose the option that suits best.
Types of platbands
I will only talk about wooden products, since it is not serious to put on a house made of wood plastic trims, it's like putting cheap stickers on expensive car: although they are beautiful, they will ruin the impression in any case.
There are several product options, I won’t say that any of them are worse or better, each type fits a certain style of structure and it is important to choose best solution in each specific case.
Option 1 - finished products
The industry produces standard platbands, the surface of which can be of different configurations:

| Form | Description |
| Straight planks | The simplest option, which consists of high-quality processed planks with perfectly even corners. Such products are well suited for wooden houses in modern style, the clarity of the lines allows you to highlight the beauty of the wood, and at the same time the frame does not look out-of-date |
| Elements with rounded edges | Such products are often used inside houses and apartments when decorating doorways, but they can also be used outside if they suit the design. In this case, you just need to define optimal width elements to make the platband look its best |
| Semicircular products | This option is distinguished by the fact that it is a convex surface, which is well suited in cases where you need to imitate a log or timber. Products should be selected carefully, since on oval elements all flaws are very visible. Again, this design is more suitable for modern buildings |
| Curly trims | The most interesting of standard options, the surface in this case is not straight, but figured, and the profile can be very different, as well as the width. This is a kind of compromise for those who are not suitable for other products, but they also don’t really like the simplicity of even elements. Another plus is the possibility of making original products to order, their price will be higher, but you will receive a non-standard frame |

As for the work process, it is simple, because you buy ready-made products and can immediately put them to work. The advantage of this option is that the platband can be used both externally and internally, while the rest are intended only for use on facades.
The instructions for carrying out the work look like this:
- First of all, you need to take measurements to determine how many elements and what length you will need. It’s better to write down all the data, especially if there are a lot of windows, as you can mix something up and end up finding that you don’t have enough material or, on the contrary, there is too much of it left;
- When purchasing, keep in mind that products come standard length(usually 2.2 meters), so you need to calculate how many elements are needed, because during work, waste is inevitably generated and sometimes there can be a lot of it. Most often, products made from pine are sold, but if finances allow, look for larch trim, it is much more durable;

When choosing, pay attention to the surface: it should not be damaged, blue or otherwise defective. Also, the material must be dry; if it is wet, the casing will be deformed later.
- The work begins with the preparation of the elements, the dimensions of each are accurately measured again, after which, using a special device called a miter box, the platband is cut at an angle of 45 degrees. This way you will get perfectly matching joints, which will significantly improve the appearance of the frame;

- Next, I recommend applying a protective coating to the platband; it is better to do this before installation, since you can treat the elements from all sides. In addition, you will not be afraid of staining the walls and windows, which is also important. You can use both paint and special compounds that will not hide the structure of the wood, the main thing is that they are weather-resistant;

- The prepared platband can be attached at the place of its installation; this is best done using finishing nails; they are almost invisible and may have different colors to match your coloring. The products are simply positioned and nailed, in order to drive the nail in completely and not damage the wood, use a hammer.

Option 2 - the simplest homemade platbands
If you are looking for inexpensive and authentic framing for your country window or you love simplicity and natural lines, then this type of product will come in handy. Such products are made by hand and can be of the following types:
- The simplest option is an unedged board with one uneven side; the material is cleared of bark, sanded, and unique elements of an unusual shape are obtained. You can make a platband in this way from edged boards, by cutting out irregularities on one side in a random order, you will end up with a very authentic and original design for the window;

- The second option is even simpler: take a board and make a frame with curly ends, they are simply cut as shown in the photo below, and you get a stylish frame. To enhance the effect, you can artificially age the material with sandpaper or burn it with a torch, so the products will look more impressive;

- Another interesting solution– creating a stencil and cutting one side in a certain way. You can create any profile and transfer it to the material, and then cut it out with a jigsaw, everything is very simple, but you will get an original frame for windows.
As for the workflow, it consists of the following actions:

- First you need to find a board of the size and configuration that suits you; the thickness of the elements can be small, and there will be no load on them. Of course, it is best to have processed elements on hand, but a simple board will do; you will have to sand it yourself;
- Manufacturing will not take much effort; you need to either decorate one side or even cut out the curly ends. Then the surface is carefully processed with sandpaper, resulting in perfectly smooth elements;
- As for the decorative coating, it can be paints and varnishes; the surface can first be aged using a plastic or wire brush, which is placed on a drill; it removes the soft layers, leaving textured surface. It is better to apply the protective composition in two layers to ensure maximum reliability;

- Fastening is done using finishing nails, their length and number depend on the thickness and weight of the elements. The main thing is to choose the right color so that the fixation points are not visible at all after the work is completed.

Option 3 – slotted trims
This solution is very different from the two described above, both in appearance and in manufacturing complexity. This option looks much more interesting and original; it is a traditional folk-style solution that will not fit any window.

As for such a platband, I cannot help but note the huge variety of options that you can implement, because you can use ready-made templates, or you can draw your own, your imagination is limited only by the complexity of the work. Too elaborate ornaments are much more difficult to implement, remember this.
Let's figure out how to make such skillful products with your own hands. Don’t be afraid, despite all the seeming pretentiousness, you will cope with the job without much difficulty. The main thing is to have everything you need on hand and be patient; the manufacturing process may not be complicated, but it takes a fair amount of time.
We need the following:
- The board is of the required length and width; it is better to take already processed options to simplify your work;
- A jigsaw - this will be our main working tool, in addition to it, stock up on blades for figured cutting with fine teeth so that the quality of the carving is as high as possible;

- We need a drill with a drill to drill holes into which the jigsaw will be inserted and figure cutting will be carried out. There are no special requirements, the main thing is that the drill is wider than the jigsaw blade;
- To make patterns, we will need either ready-made patterns or homemade options, they must be of the required scale so that you can simply transfer them to the material without unnecessary problems.
The workflow looks like this:
- First of all, you need to prepare workplace, the board should be firmly positioned at a comfortable height so that you do not have to work with a jigsaw with one hand and hold the workpiece with the other. You can use clamps or simply press the element with something heavy, decide for yourself which is better, based on the working conditions;
- Then you need to select a pattern, you can find ready-made options on the Internet, you can draw them on a computer, enlarge them to the desired scale and print them. They can be drawn on paper, or cut out of cardboard - if you will be making a lot of elements, then this option is preferable;

- An important point in the work is transferring the pattern onto the wood; if you have a cut-out pattern, then there is nothing complicated, but if it’s on paper, then you need to decide how to make the marking more conveniently. You can place regular carbon paper under the sheet and simply trace the design - you will get an accurate marking, and if you don’t have carbon paper on hand, you can pierce the paper and then draw the pattern on the wood point by point;
- When the marking is finished, you can start working, all the elements that are located along the edge can be cut out like that, but the patterns inside require a different approach. In the place where it is more convenient for you to start cutting, holes are drilled, after which a jigsaw blade is inserted there and the pattern is cut out, the main thing is to be careful, monitor the accuracy of the lines and, if necessary, correct them;

- When the element is completely cut out, it’s time to bring the platband to perfection. Sandpaper is taken and all the cutouts are sanded, the edges are rounded and the surface is leveled. As a result, you should have a finished element that has no protruding wood fibers;

- Then I recommend applying a protective coating to the platband; it is better to do this before its installation, and not after. Coloring can be either monochromatic or multi-colored to highlight individual parts of the pattern more clearly;
- Fastening can be done using finishing nails or dowels. This option is done like this: take choppers, drill a hole for them in the platband and in the window frame. After this, the dowel is well lubricated with PVA glue, inserted into the frame, and then placed on window frame, as a result, the structure is securely fixed and there are no fastenings at all from the outside.

Option 4 – trims with applied threads
Another traditional solution that has been very popular for centuries. This type of product has whole line differences from the previous one:
- The product consists of two parts: a base in the form of a flat or figured board and carved elements that can be located on the base and on the side of it. This design looks more expressive and voluminous, which is important for those who want to achieve maximum decorative effect;

- Many small elements can be used during production, which simplifies production. You don’t need to cut out the entire casing; you can make a composition from several small parts, and in the end get just an excellent result;
- Can be used different breeds wood, if pine or more is used for the base reliable option, then for overhead elements it is recommended to use apple or cherry. They are easy to process and, with normal processing, last a long time. Modern solution– using plywood for the overlays, this option is good because you can save money, and at the same time cutting will be much easier;
- Another solution is the arrangement of various carved elements in one product, resulting in luxurious openwork frames. The only negative is the complexity of the manufacturing process.

Carved window frames of this type are made in much the same way as the option described above, so I will only touch on the differences in the workflow:
- First, you need to choose the option that you will do, if the base is flat, then just cut the board, if it is carved, do it as usual. The top decor can be cut from boards or plywood of small thickness, this will significantly simplify the work process and speed it up;
If you decide to use plywood, be sure to choose a moisture-resistant option. Regular sheets even with good coverage They will begin to swell and warp within a couple of years.
- All elements are carefully processed with sandpaper, after which they need to be painted. To achieve the greatest decorative effect, it is recommended to paint the base in a contrasting color to make the pattern even more expressive. Paint the parts before assembly, so as not to scorch or paste over the surfaces later, this is very difficult in such elaborate designs;

- Installation of platbands on windows in a wooden house can be done in any way convenient for you. You can use traditional dowels, you can use finishing nails, or you can take the easiest route and use modern adhesive materials. At one time I had to glue the platband on my summer cottage due to the lack of other fasteners, about 10 years have passed, everything is holding up just fine.
Option 5 – carved platbands
Without a doubt, this is the most difficult to implement, but also the most luxurious type of window frames. Currently, two main types of products can be distinguished:
- Made by hand using cutters, these options are the most expensive, because they are made by hand from start to finish. You can make such a platband on your own only if you have some practice; you will have to master wood carving to cope with the work;

- Platbands made on special milling machines look simply great. After all, you can create any pattern or composition on a product, you just need to enter the design into computer program, and she will bring the idea to life. Naturally, only a few people have such equipment at home, but you can order a casing and receive it in a matter of days.

As for the work process, there is no point in talking about manufacturing; carving is the topic of a separate review or even an entire book. Therefore, we will deal with installation, since this is an important part of the work and any mistakes will lead to damage to expensive decor:
- Most often you receive ready-made elements without any coating. Often the wood structure is not closed, and high-strength protective compounds. The so-called yacht varnish is well suited; it is resistant to atmospheric influences and retains strength and reliability for a long time. It is better to carry out the treatment in two layers in order to accurately cover all areas of the surface, pay special attention to the recesses and bends, the composition should get everywhere;
- When the elements have dried, you need to try them on and determine the position of each part. If the structure is assembled, then you can immediately drill holes and insert dowels into them, then lubricate the ends of the fasteners with chalk or something else and carefully place them on the surface; there will be points on it where you need to drill holes. This markup option eliminates miscalculations and errors;
- IN last resort The dowels and holes are coated with wood glue, after which the platband is installed in its place and pressed well. This completes the work.

Conclusion
The video in this article will help you understand some important nuances topics are even better, because it’s worth seeing once rather than reading a sheet of text. Choose the optimal solution and implement it, of course, few people can do wood carving, but the rest of the options can be brought to life without any special skills. If you have questions, write them in the comments under the review.
October 14, 2016If you want to express gratitude, add a clarification or objection, or ask the author something - add a comment or say thank you!
Platbands are special strips for hiding installation seams between window frame and a wall. In addition to their direct purpose, platbands can be used to decorate windows and the facade of a house. To choose the right trims and install them correctly, read our article.
The basic rule when choosing platbands is that their material matches the material of the window. If you have a wooden window, then the frame should be wooden; if it is plastic, then plastic. Although there are exceptions, in the form of a successful combination of platbands and windows made from different materials.
Wooden trims
Wooden trims are made from planks at least 30 centimeters thick. Width wooden platbands may be different, depending on the profile pattern and design. The profile pattern of simple wooden platbands is made using milling machine.
Advantages: affordable price, easy installation.
Disadvantages: poor design, poor resistance to moisture and temperature changes, the need for regular painting or varnishing.
Release form: rounded or beveled planks with a convex pattern, or smooth, 1.5-2 meters long.
Application area: hiding installation seams on wooden windows. Additional protection of seams from environmental factors.
Carved platbands
Carved wooden frames, manufactured manually or using a jigsaw. There are many options for the pattern of platbands: from simple ornaments to sacred symbols that protect the house from evil spirits. Making carved frames yourself is a job that requires carpentry skills. If you want to make platbands with your own hands, but do not have experience, choose a pattern without complex elements.
Advantages: very beautiful appearance, the ability to improve the facade of the house without significant financial investments.
Disadvantages: high price, difficulty in manufacturing, fragility, need for regular painting.
Release form: depending on individual order or design developed by the manufacturer.
Application area: decorating windows and the facade of the house, hiding installation seams. 
Plastic trims
Plastic trim is the general name for planks made of plastic, polyvinyl chloride and foam. Plastic trims are often included with the installed plastic window. Due to the specific nature of the production of this type of platbands, they cannot be made at home. Plastic platbands can have a regular or carved pattern. The planks are installed using special fasteners, liquid nails, glue or double-sided tape.
Advantages: moisture resistance, long-term operation, easy installation.
Disadvantages: fragility of some products, small choice of design when simulating carved frames.
Release form: smooth, carved or with a profile pattern, 1.5-2.5 meters long.
Application area: hiding installation seams on plastic, sometimes wooden windows. Additional protection of assembly seams from environmental factors. 
MDF platbands
Due to poor resistance to moisture, platbands made of fiberboard medium density is recommended for use only for interior window decoration. MDF slats are great for wooden windows, especially if they match the color and texture of the wood. The platbands are fastened with nails, screws or glue.
Advantages: low price, good appearance.
Disadvantages: poor resistance to moisture, inability to use for exterior decoration.
Release form: smooth, rounded or with a profile pattern, 1-3 meters long.
Application area: interior decoration wooden or plastic windows. 
Aluminum trims
Aluminum trims are mainly designed to hide assembly seams when installing windows and stained-glass windows made from the same material. In appearance and design, aluminum trims strongly resemble plastic strips. Aluminum trims are fastened using a special profile or latches.
Advantages: durability, long service life.
Disadvantages: poor combination with windows made of other materials.
Release form: aluminum strips with various types of patterns except carved ones, 1.5-2.5 meters long.
Application area: external and internal finishing of windows and stained glass windows made of aluminum. 
Making platbands with your own hands
You can make platbands yourself only from wood. To do this you will need a special tool and wooden planks.
Simple platbands
To make simple wooden frames you will need:
- Electric jigsaw.
- Planer (simple or electric).
- Sander.
- Milling cutter (manual or machine).
- Fine-grit sandpaper.
- Wooden planks with a section of 30x100 mm.

Manufacturing technology of simple platbands:
- Sand all sides of the wooden planks with a plane.
- Install the profile pattern attachment on a manual or stationary machine.
- Process the front side of the platband using a cutter.
- Perform final sanding of the platbands with sandpaper or a sanding machine.
If you don’t have a milling machine, you can make trims with a smooth surface. To do this, use a plane to bevel the front side of the plank at an angle of 20-30 degrees and sand it with sandpaper.
Carved platbands
If you are planning to make wooden frames with a carved pattern, keep in mind that this is not a quick task and requires “iron” patience. To create carved frames, in addition to the basic tools, you will need a set of special chisels with different shapes blades and manual jigsaw. To make it easier to navigate the large selection of patterns, below are several templates for cutting: 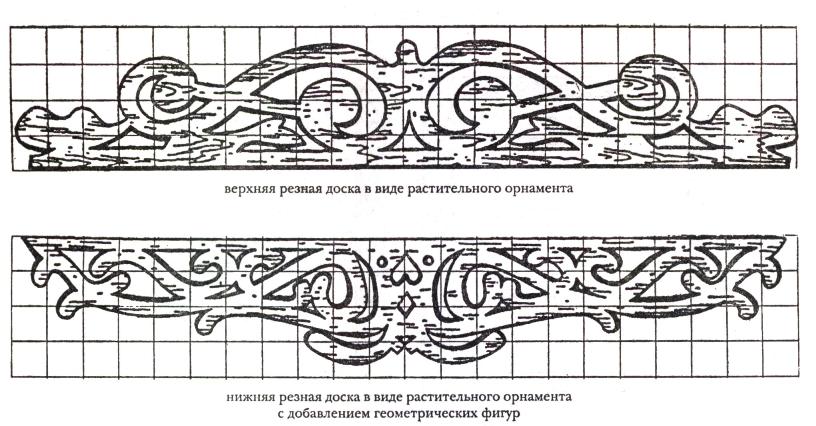


You can make carved platbands in two ways - regular and overhead. IN the usual way, the pattern is cut directly onto the casing itself. In the overlay method, the pattern is made in the form of overlays, at least 10 millimeters thick, after which the overlay is attached to the main casing. For beginners, it is recommended to use the overlay method, since in case of an unsuccessful pattern, the overlay can be replaced with a new element.
The correct choice of wood type for the carved frame is very important. It is easier to carve softwood because it is soft. Platbands made of hard larch will last longer.
If you have not done wood carving, choose a very simple pattern for the first time and, as your skill increases, move on to more complex patterns. 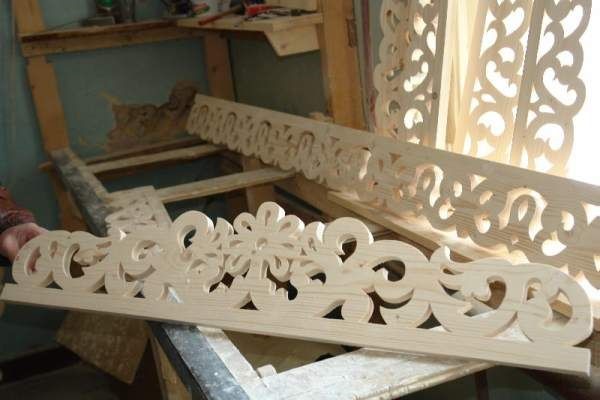
Stages of manufacturing a carved platband using the overhead method:
- Prepare the base for the platband; to do this, use a planer to process the 30-millimeter-thick planks.
- Make overlay strips at least 10 centimeters thick.
- Draw the elements of the future pattern on thick paper or cardboard.
- Cut out the pattern elements with scissors.
- Place the cut out stencil on the overlay and transfer the design onto it.
- Using a drill and jigsaw, make notches according to the markings.
- Finish the edges of the recesses with chisels, round the edges and complete the contours.
- Grind the finished lining element.
- Install the trim on the main trim, securing it with glue or nails.
- Having collected all the overhead elements into one composition, proceed to installing the trim on the window.
Installation of platbands
Installation of wooden platbands

You can install wooden trim on the window using nails, screws or glue. The strips are attached to the sides and top of the frame. In some cases, the casing is also installed on the lower part of the window, if this is provided for by the design.
For beautiful joining of simple platbands, their edges are cut at an angle of 45 degrees. This can be done using a hacksaw and a miter box.
If the window is located deep in the opening, the platbands can be placed on the wall using extensions.
Attaching the platband to the wall depends on the material from which it is made. For a wooden wall, it will be enough to use nails or screws; for a concrete or brick wall, dowel screws.
Installation of carved platbands mainly depends on their design and composition. The carved platbands are joined in such a way as not to disturb the overall pattern.
After installation, the platbands are treated with wood impregnation, then painted or varnished.
Installation of plastic and aluminum trims

Correct installation plastic and aluminum trims, requires the presence of a special installation profile that is attached to the frame. Platbands are installed in a groove located on the profile. In the absence of a profile, the platbands are installed on snap fastenings attached to the frame or wall. In rare cases, plastic trims can be secured with glue, but this type fastening is unreliable.
Using telescopic platbands, fastening is carried out by inserting the edge of the strip into the groove, which is located on the frame.
Foam trims are attached only with glue.
Installation of external frame window openings usually practiced in wooden houses, where you need to cover the gaps between the frame and the wall with something. The issue can be solved in different ways: by nailing planed boards around the perimeter, or by first cutting out the trim for the windows, and only then attaching them to the walls with your own hands. There is a third option - to supply ready-made products purchased in the store. Our task is to explain how to make such cladding yourself.
Types of decorative strips
For the external framing of windows and entrance doors, platbands made from the following materials are used:
- wood, thick plywood;
- metal;
- Styrofoam;
- polyurethane.
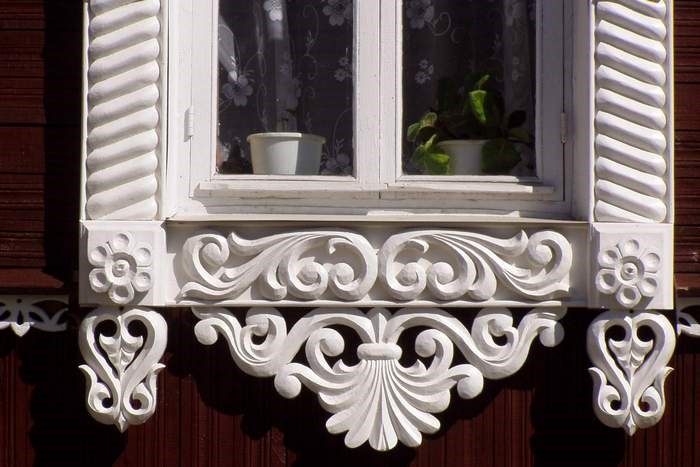
Wood cladding decorating log houses from time immemorial, remains popular to this day. It is performed in two styles - Russian, where beautiful carvings with rich ornaments prevail, and Finnish - more laconic. The latter is distinguished by the straight shapes of the elements and a small hinged visor, as shown in the photo:
Framing in Finnish (left) and Russian style (right)
Reference. The scope of application of wood strips is not limited log houses. Now they can be found on country cottages built from timber and brick, including with plastic windows. As the photo shows, the openwork pattern looks great even on a stone wall.

The main advantage of wood is not ease of processing, although this also matters. Another thing is important here: carved platbands, made according to an individual sketch, will give the facade an exclusive appearance that you will not see anywhere else. This good reason take up self-production, because ordering such products from a specialist will not be cheap. This equally applies to metal flashings - you can also cut them yourself if desired.

Window cladding made of polystyrene foam and plastic – more modern way resolving the issue. And although polymer elements for windows are not exorbitantly priced and are easy to install, they are completely devoid of individuality. The reason is clear - many enterprises have mastered the production of polyurethane decor.

Facade decor made of polyurethane
Cutting out a wooden frame without a stencil
This method is suitable for those who want to decorate door and window openings, but do not have wood carving experience. First you need to select a material - boards 2-4 cm thick, whose width is determined by the selected pattern, and the length - by the size of the window.
Advice. Choose lumber from soft woods - linden, alder or aspen. Cutting a pattern in solid beech or oak is not an easy task. Spruce is too knotty, and pine easily cracks along the grain, so it is not advisable for a beginner to use it.

The window casing consists of 4 main parts shown in the drawing: two side panels, a frieze and a window sill board. The design can be supplemented with a decorative top (otherwise known as a kokoshnik). The elements are joined together at an angle of 45 or 90° - at your discretion.
To make flashings with simple drawing from flowers, proceed in this order:
- Draw a line down the center of the board. Using it as a guide, draw circles along the entire length with a pencil (you can outline a round object of suitable diameter). Using a square, draw lines at 90 and 45° angles through the centers of all circles.
- Take a drill and drill a hole in the center of the circle and two more on each line. Draw petals of future flowers around them.
- Using a jigsaw, cut out each petal and trace the outer contour of the product with a pencil, as shown in the photo. Cut off the excess part and thoroughly clean the resulting ornament. In the same way, make all 4 parts.

Advice. If you are not very good at drawing, use a regular pattern to draw curved lines.

After cutting homemade trims you need to carefully process the outside and inside with a rasp, and then with coarse sandpaper. Final stage– antiseptic coating and painting (or application of yacht waterproof varnish). To better understand the process, watch the video where a little boy does all the work:
Important point. Nothing bad will happen if during the work the board cracks into 2 parts. They can be fastened together with steel plates screwed on the reverse side.
Manufacturing according to template
This technology involves applying a complex pattern to a wooden surface using a stencil, from which the trim is cut out with your own hands. Some samples of templates available for sale are shown in the picture:

Note. You can make an individual stencil yourself by drawing a pattern on a sheet of cardboard, thin plywood or plastic, and then cutting it out with a jigsaw or scissors.

Drilling a workpiece for a jigsaw
There are 2 ways to make wooden window coverings:
- Take the boards and make a slotted pattern, as described in the previous section.
- Cut out complex elements separately, and then attach them to the boards with glue, screws or tenons. This is how patterns with protruding parts are made.

No matter which method you choose, the cutting process is the same. An ornament is applied to the surface with a pencil through a stencil, after which the outer contour of the product is formed with a jigsaw. Where you need to cut out the internal pattern, first drill holes for the jigsaw blade to fit into. To confidently work with thin curved slots, it is better to take a file of small width.

A finished element, which is then attached to the frieze or side framing board
Note. The same technology is used for the manufacture of platbands from sheet metal or corrugated sheets. You just need to choose a different cutting tool.
We bring to your attention another video that tells you how to make a window cladding without using a jigsaw, just using a drill with a core drill:
Installation instructions
There is no special trick to installing platbands with a slotted pattern. The structure can be assembled on a table and then placed on the window as a whole or attached in parts. In a log house, for installation of cladding, it is necessary to prepare areas around the perimeter of the opening, cutting the logs to the width of the board.

Element-by-element assembly using self-tapping screws is carried out in the following order:
- Treat all carved parts with varnish and place them in places on the prepared board to form a pattern.
- If you need to make a large top, then use several boards connected by corners as the base.
- Screw each element to the base by screwing in the screws on the back of the board.
- Install the finished casing flush with the window frame so that it closes the gap, and secure with long screws. For doors that open outward, make an indent of 1-2 cm so that they swing open 90°.

Advice. To prevent the ornamental elements from moving during fastening, carefully pull them to the base with clamps.
How to correctly install carved flashings is shown in the video:
Conclusion
Cute trims with beautiful ornament They look great on any windows, both wooden and plastic. This is not to say that they are difficult to manufacture, but they will take some work. Success largely depends on the quality of the wood and your qualifications. In order to avoid mistakes, beginners are advised to select a simpler design and “practice their hand” on the facades facing back yard. Then you will decorate the front side of the house impeccably.

Design engineer with more than 8 years of experience in construction.
Graduated from Eastern Ukrainian National University them. Vladimir Dal with a degree in Electronics Industry Equipment in 2011.
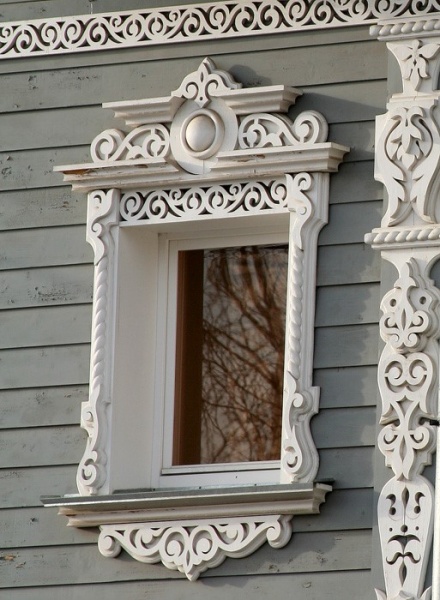
Old Russian architecture is invariably associated with carved window frames. This form of house design is distinguished by its diversity of species. Just a few decades ago, in each region there lived craftsmen with their own style of creation. decorative elements. Today's return to origins is accompanied by a revival of interest in window decoration using carved frames.
Purpose of framing
The word “platband” itself speaks of its location - “on the face”, that is, one of its functions is to decorate the facade of the building. Therefore, people tried to express their individuality through it and decorate their windows with carved frames. In addition to the decorative role, window frames, first of all, perform constructive function, closing the gap between the frame and the opening. This prevents dust from entering the house, protects against precipitation, drafts and extraneous sounds.
In the old days, carved platbands were also attributed magical properties. It was believed that the window frame a certain form The planks protect against the evil eye and serve as a kind of amulet. Therefore, in the bizarre patterns one could see various figures and plants carrying a specific meaning.
IN modern architecture The functional purpose of window frames is as follows:
- Properly selected carved design allows you to visually elongate a low building or expand a narrow wall.
- The opportunity to show individuality and decorate the building in accordance with the spirit of a certain era.
- Allows you to achieve a unified architectural ensemble between all buildings on the site.
- Protection of cracks from penetration of external negative factors (precipitation, noise, dust).
- It is one of the elements of thermal protection of the house.
Note! Sometimes platbands are the only option for framing a window. This mainly concerns wooden log houses when the use of other materials is unacceptable due to loss of harmonious appearance.

Carved finishes, especially those made of wood, have a number of features that should be taken into account during operation:
- Dependence on the influence of atmospheric factors. Moisture and temperature changes invariably cause damage to decoration.
- When selecting a frame, you should take into account the properties of the rock from which the frames are made and take care of high-quality processing. Timely preventive measures extend the service life of window products.
- Difficulties often arise when combining wooden carved elements with modern plastic frames. With this combination, it is preferable to install windows that imitate wood texture.

The meaning of carved elements
The desire to conform to ancient traditions requires knowledge of the meaning various elements carved platbands:
- The sun is usually placed on a kokoshnik. It symbolizes life and energy.
- The personification of wisdom and fertility is contained in the image of a snake.
- A symbol of harmony between spiritual and material aspirations is a cross in a carved frame.
- The feeling of unity with nature is emphasized through vegetation.
- The earrings testify to the hospitality of the owners of the house.
- The connecting element of all times is the silhouette of a bird on the window.


Characteristics of materials and forms
For the production of window frames, natural and artificial materials. Traditionally, carved elements were made from weather-resistant wood. Characteristics of the properties of individual rocks will help determine the most suitable type:
- Larch is minimally susceptible to rotting processes, but is not suitable for the production of carved frames due to its fragility.
- Aspen, alder and linden are the most convenient species for creating openwork decor on windows. However, the pliable and soft wood of carved frames requires special treatment due to its ability to absorb moisture well.
- Window frames made of oak, ash or beech are characterized by resistance to negative atmospheric influences, but the processing of carved elements is burdened with difficulties, overcoming which you will get a durable decor.
- A good choice would be birch or pine wood, which allows you to create neat carved decor. At the same time, the platbands are strong enough for external use.
- Small carved window decorations that are fixed to the main elements can be made from cherry or apple trees.
Advice ! Regularly updating the coating of wooden frames with waterproof paint or varnish will ensure their long service life.
What other materials are used in the production of window coverings and what their features are, we will consider below:
- Laminated MDF allows you to accurately imitate the color of any type of wood, but is intended exclusively for indoor use.
- Plastic windows are harmoniously combined with platbands made of similar material(PVC), which is not subject to rotting, has a wide color palette that is resistant to solar radiation. The color of the trim is selected taking into account the finishing of the house to match or contrast with the facade.
- For windows round shape Products made of polyurethane, characterized by ease and ease of care, are ideal.
- Metal strips are attached for protection assembly seam, connecting them into a single unit with a profile box.
There are two main ways to install platbands:
- The invoice is the most common method when decorating windows. For fixation, special glue or nails are used.
- The telescopic method involves an L-shaped form of manufacturing the platband, which allows you to secure the product by entering into the grooves of the box. Most often used for finishing doorways. Its characteristic difference is the absence of traces of fasteners.


Patterns and types of threads
The carved shapes of the platbands give the window individuality, but to make them, you will definitely need templates. Having wood carving skills allows you to choose a complex ornament. If the ability to work with wood is not enough, it is better to find a light pattern for window trim. We suggest studying:
- variants of single element templates and their general appearance;
- top, bottom and side decoration details.


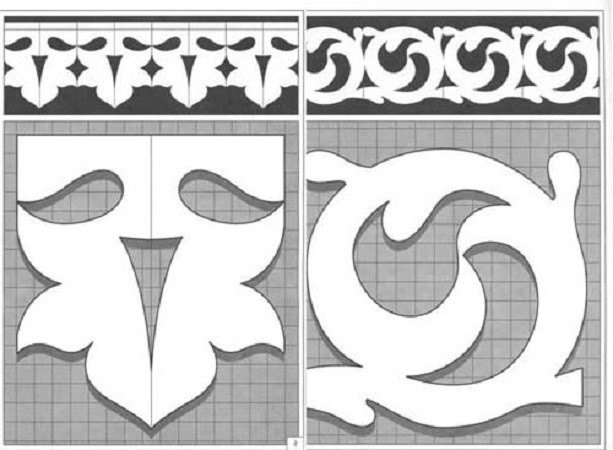
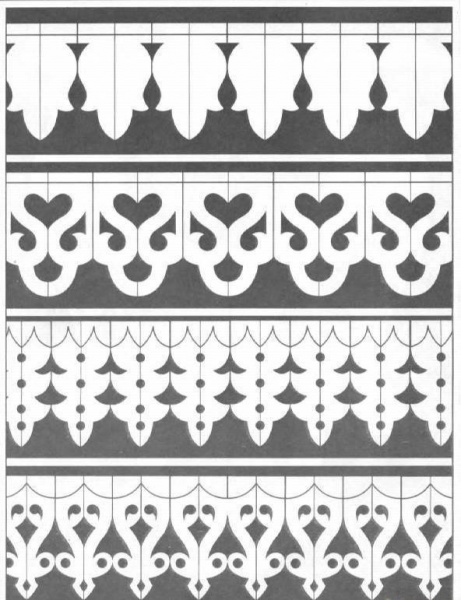


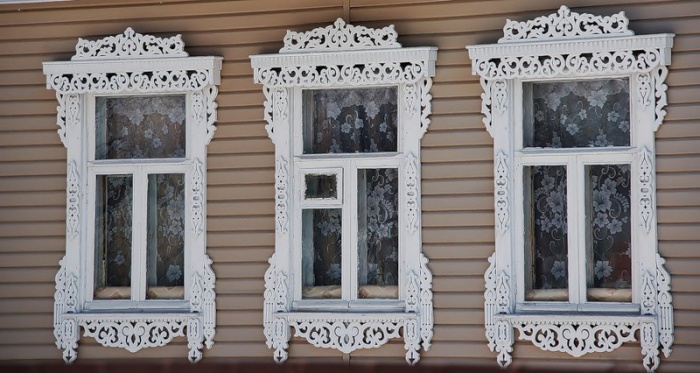
You can copy them completely or add your own details to the pattern. The carved frame design you like or a fragment of it needs to be enlarged to a scale taking into account the size of your window. For the manufacture of carved templates Fibreboard, thick cardboard or paper are used. It is advisable to decorate windows with platbands with the same carvings. Please note that making small carved elements is much more difficult, and they deteriorate faster than others. In this case you will need partial replacement framing.
Warning ! Be sure to take into account the slope at the top of the carved platband. This will prevent snow accumulation and ensure timely drainage of water.
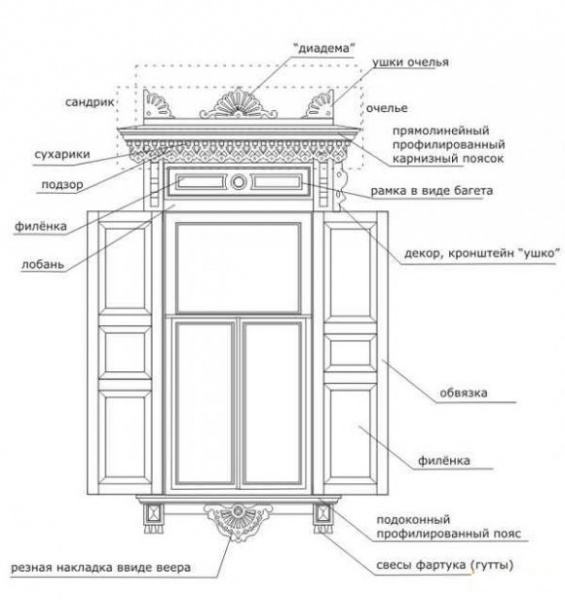
The upper part of the window casing is called a kokoshnik, the lower part is called a towel. Most widespread The carved frames were decorated with outlines of plants, images of animals and geometric shapes.

The key details of the drawing for any window casing are:
- bottom strip or window sill;
- vertical rail;
- top bar.
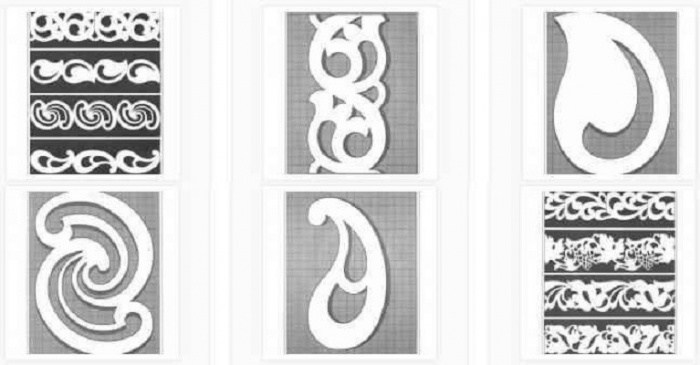
The pattern can also contain all kinds of hangers, flowerpots or a tiara. Detailed description The names of carved decorative elements are presented in the diagram below:
If your windows have different sizes, experts advise making a drawing with an intermediate repeat repeating required amount once. For rapport, you can choose one or two elements that are repeated alternately. An example of such a scheme is shown in the photo below:

There are several ways to make carved wooden frames for windows:
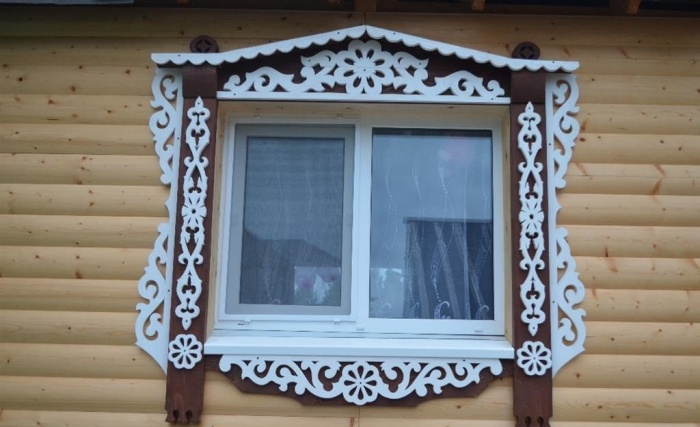
- Carved platbands are characterized by the greatest decorativeness and delicacy. The product is made of light-colored wood or is subsequently coated with white paint. This window design is more dark wall looks sophisticated and elegant, vaguely reminiscent of Vologda lace.
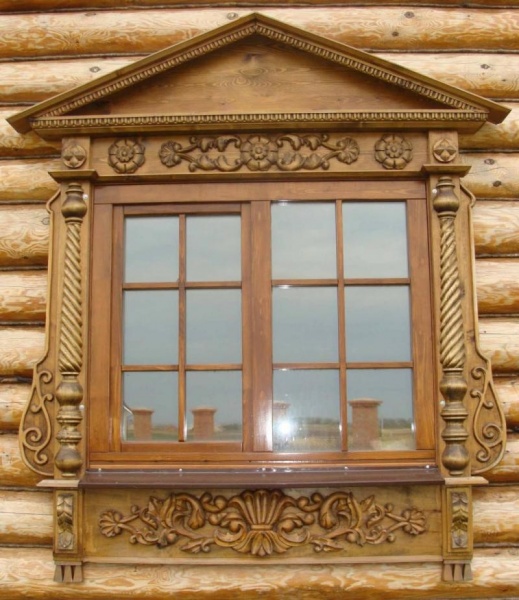
- With overlay carving, separately cut parts are fixed to a continuous board by gluing or nailing. This technique allows you to design a window with simple platband. Protruding elements are often coated with contrasting paint.
Sometimes both types of carving are combined.
Manufacturing process
Having decided on the pattern, material, type of carving and method of fastening the trim, you can proceed directly to the manufacture of carved frames for the windows.
Important ! The design on the workpiece needs to be placed correctly. The placement of elements along the fibers of wooden blanks will prevent cracking of the thread.
It is better to mark the places in the pattern where slits need to be made with color. The work on making platbands consists of the following stages:
- Taking measurements from the window.
- For slotted thread boards are selected from minimum thickness 30 mm, the overhead method allows the use of wood with a thickness of 10 mm. All work is carried out with dry lumber.
- Blanks are cut out.
- To ensure a tight fit of the carved platband from the inside, the wood is selected to a shallow depth (1-2 mm).
- The pattern applied using the template is cut out. Drills are used to form holes various diameters, a jigsaw will be needed to make the cuts. To create a beautiful cut, the jigsaw insertion point is marked with a drilled hole.
- All carved elements of the window casing are cleaned with sanding paper. Wood dust is removed from non-through holes using a vacuum cleaner.

Overhead thread involves fastening finished elements to a wide casing using nails with their heads removed. The strength of the connection will be strengthened by applying glue to the underside of the casing. It is not recommended to use self-tapping screws due to the risk of damaging the carved section of the connection.
Carved platbands are installed on wooden windows using blind or through tenons. The first option features a reliable connection and complex process installation The second method is simpler, but less reliable. Installation of carved elements on plastic window carried out using liquid nails.
Preliminary protective treatment carved trim and regular preventative maintenance will ensure long-term preservation of the attractive appearance of the window.