If you have an old monitor, do not rush to throw it away. Unnecessary monitor can be used as a TV. There is one caveat - the monitor must have built-in speakers. Connecting and using the monitor as a TV will not take much time and effort.
How to make a TV out of a monitor
There are two options for viewing programs on your monitor:
Watching streaming Internet video;
Watching digital terrestrial television.
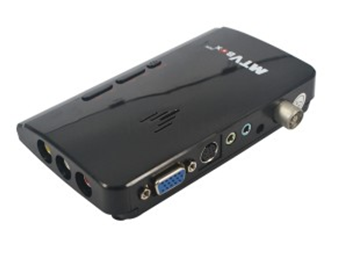
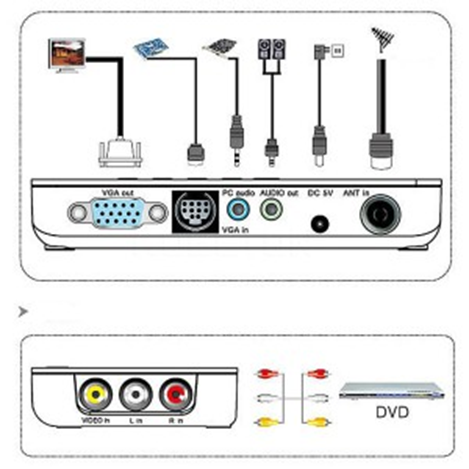
For the first case, you will need a subscription card. There is plenty of this equipment on the market. Also, this set-top box can be used. Connection occurs through the interface HDMI or RCA(tulips). To connect via tulips you will need a converter or HDMI-RCA cable.
Using this attachment you can watch how streaming video via the Internet and digital broadcasting standard DVB-T2. You can buy a set-top box just for watching streaming video; it will be cheaper, but not significantly.
For the second option A regular DVB-T2 set-top box will do. To watch TV channels on the monitor, you just need to connect it. The connection is similar to the previous one. As a rule, these set-top boxes also have HDMI and RCA (tulips) interfaces.
You can connect a set-top box to watch TV to almost any monitor(remember that the monitor must have built-in speakers). If the connection interfaces of the set-top box and the TV are different, then you can always choose an adapter or converter that is suitable in a particular situation.
Using a monitor as a TV is not always advisable, since the converter may cost more than the monitor itself, but if you have a second modern monitor that you do not use, you can use it as a TV. The main problem watching television on a monitor is still presence of built-in speakers in the monitor. In fact, there are very few such models. But if you own just such a monitor, then you can use these instructions to watch television programs on the monitor.
Today you can buy any TV in a store, from a budget one to the most prestigious model, but not everyone can afford it, even if the old TV has died. There is a simple solution: use a computer display. You can buy a new one (in stores it costs less than a TV) or use an unnecessary old one. All that remains is to find out how to make a TV from a monitor.
When monitors with LCD screens came into fashion, the old ones with cathode ray tubes were no longer needed, but prudent owners hid them for the time being - now the moment has come when they can give such an old product a second life. There is a simple answer to the question of how to make a TV from an old monitor: you need to remove the control unit and video card from its depths, and purchase the necessary parts for retrofitting in a special store. The main thing is that there is VGA input- without this important detail It is impossible to use a monitor as a TV, but there are no problems with this, because all old guard monitors have such a port for connecting the system unit.
If you don’t understand anything about circuit diagrams and connection options for television equipment, then you won’t be able to make a TV out of a monitor on your own; this requires certain knowledge and skills.
For the future product you need to purchase the following parts and components:
- The most important functional device any TV is color module: from him reliable operation The quality of the image depends - color or black and white.
- Radio channel TV, its main purpose is to isolate only the necessary ones (video and audio) from all intermediate frequency signals.
- Control block, who is responsible for setting up and controlling the operation of the product manually or remotely.
To make a TV with your own hands, we install new units in the body of the product and connect them with a wire to the necessary modules. Perhaps, to enhance the quality, you will need to solder in several resistors, then carry out a comprehensive check - and you can use the modified device as a TV.
Connecting an LCD Monitor
Today, many users have abandoned a desktop computer and switched to more convenient laptops, so an LCD monitor that is not at all old and functions well is quite useful for using it as a TV.
You will have to spend some time visiting special radio markets where spare units, parts and accessories are sold in order to buy:
- TV tuner;
- splitter and cable for connecting digital TV;
- an antenna and a wire to connect it if you are using a signal from a city television network.
Before you go to the store, you should familiarize yourself with, and. A new product to connect to your home electrical network, will be required two sockets at least one for the tuner, and the second for the monitor itself. We attach the tuner and its power supply to the back, connect the antenna wire, and plug the cord into the outlet to activate the display. That's all the wisdom on how to make a TV out of a monitor with your own hands.
Already in the tuner built-in speaker, so you can get by with its sound, but music lovers should connect external acoustics to expand the range of sound transmission. This could be a home theater with or speakers from. The tuner picks up signals perfectly, but unlike digital TV there is no HD quality - this is the only drawback. All settings on English language, but they are intuitively clear.
We must not forget that LCD products convey a clearer picture, where the image quality is much higher than that of CRT monitors, so various interference will be better visible.
Disadvantages of LCD monitors when watching videos
We explained how to make an LCD monitor into a TV, but you need to take into account the following points:
- signal response time;
- viewing angle;
- contrast and illumination;
- depth of black.
It is typical for a computer display longer response time to the signal and smaller viewing angle, but for a TV this is nonsense, so they are not relevant for computer monitors. In this case, the viewer must sit strictly opposite the new home product, at a right angle - otherwise black spots will appear and the picture will become distorted. High-quality viewing is guaranteed if you look directly at the TV. If the black color depth is insufficient, all impressions will be spoiled, especially in the twilight, and if the contrast on the screen is too high, the viewer will see a flat image.
Like these ones Negative consequences expect you if you use the LCD monitor as another TV, and when connecting, do not take into account the above recommendations.
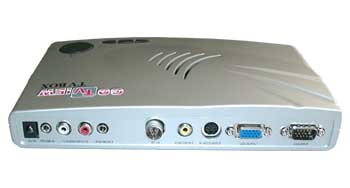
Most manufactured tuners have a VGA input, and monitors have DVI and VGA; we must also take into account their support for such TV parameters as PAL and SECAM.
Connecting a digital receiver
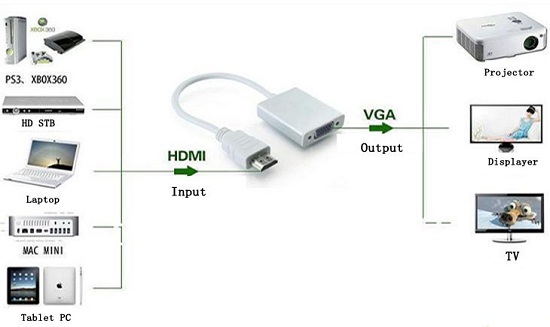
TV receiver DVB-T2 standard can receive any digital programs throughout the Russian Federation, and catches the programs using an ordinary indoor antenna, which can be made from the rest of a coaxial cable. We need to connect the HDMI output of the receiver to the VGA input of the monitor, so we buy a converter or adapter for a stable connection that does not require a separate connection. All that remains is to connect the speakers from the computer to the output of the converter or digital receiver.
Using the converter, you can connect other types of equipment for work and entertainment to the monitor: laptop, game console, HD players, and the like.
Home craftsmen are interested in the money question - the price of a digital receiver starts from a thousand rubles, a converter costs 250 rubles, and the speakers can be taken from a stationary PC, so everything will not cost that much.
Which monitors are better
Foreign experts tested many computer monitors from different manufacturers to reach a verdict on whether they can be used as a TV after modification. In first place is the concern from South Korea Samsung: monitors are quite easy to convert into TVs, they look perfect in a new role - these are mainly models with a 17- and 19-inch screen.
Second place was shared by Sony and LG, which offer users updated monitor samples, their own unique design. You can use products from other manufacturers with less famous names, but the quality will be correspondingly lower.
When we make our own TV from a monitor, experts advise Special attention pay attention to - if it is high, then showing a homemade TV will be excellent.
Symbiosis of PC and TV
In principle, you don’t have to think about how to make a TV from a monitor, but combine the functions of a computer and TV using a special tuner autonomous type or USB. The latter is intended for direct connection to a laptop. Standalone option- this is the latest development, it is installed between both products, which allows you to watch various TV shows in full screen. This symbiosis allows you to calmly work on your laptop and watch programs of interest on TV in a small window.

In addition, they are equipped with various audio outputs and inputs so that you can connect additional home equipment - for example.
To help amateur craftsmen when remaking a monitor, here is the following video:
There are situations when you need another TV, but buying it is impossible for a number of reasons. And here the question often arises - is it possible to connect a monitor like this? If you have an old computer monitor, it can be used as a TV. There are several ways to do this, the simplest of which is to connect a TV tuner, external or internal.
How to use a monitor as a TV?
So, buying and installing a TV tuner is here reliable way to magically transform your computer monitor into a TV. The external tuner is independent device, which connects to the power supply, television antenna, PC unit and monitor.
In other words, the TV tuner is connected to the system unit and the monitor is connected to it. It is controlled using a remote control, as if you were dealing with a regular TV.
If you don't need a system unit, you can simply connect the TV tuner to the monitor directly and use it exclusively as a TV. In this case, you need to get speakers that will be connected to the corresponding connector on the tuner.
Is it possible to make a TV from a monitor in another way?
Another method used experienced users To convert a monitor into a TV, this means installing a decoder in the monitor. Fortunately, modern monitors have an LVDS interface, to which you can connect a special expansion card with a built-in video decoder to turn a regular monitor into an analog or even digital TV.
An analog board costs less than a digital one, but it does not provide all the capabilities that a digital board with a decoder has. After purchasing the board, you can take it along with the monitor to the nearest service center for working with audio and video equipment, where everything will be mounted and configured for you. All that remains is to connect the antenna to the new TV, after which it will be completely ready for use in its new role.
But if you have some radio engineering skills, you can easily install the board yourself. All you need to do is remove the back cover of the monitor, disconnect the cable to the standard expansion card and connect the new card through a similar cable. Write down the matrix markings in advance to make it easier to find the firmware later.
Now you know the answer to the question - can you use a monitor as a TV, and are free to choose the method that is more convenient for you.
I think that for most computer owners, the word “modding” no longer raises questions. Modding is for a computer geek what tuning is for a car driver. Coming from the English modify (modify, change), this concept has grown into a whole direction, with an ever-increasing number of fans. And all thanks to enthusiasts who tried to elevate the boring and nondescript gray boxes that so quickly appeared in our apartments. Moding is plastic surgery for your computer and its peripheral devices. With the help of paint, lighting and some modifications, you can achieve a unique, individual design.
I am not inclined to classify myself as a “modder”, although I visit sites devoted to this topic with great pleasure. In practice, I encountered this completely unexpectedly. But first things first.
Where it all started
It all started with a simple renovation in the kitchen. The TV, which returned to its rightful place after the renovation was completed, ended up right under the ceiling - the fact is that new refrigerator twenty centimeters taller than the old one. As a result, watching the morning news with a cup of tea became very difficult. After a week, this began to irritate not only me, but the whole family.
At the family council, it was decided to retire the “old hard worker” and replace him with a new modern liquid crystal “perfection” with further placement of it on the wall. There is nothing easier - go to the nearest store consumer electronics and select the appropriate instance. But the prices for these TVs are very, very impressive. There are, of course, inexpensive models, but they don’t inspire confidence in me. And those that attract attention are in the price range from 17,000 to 32,000 rubles. If you look closely at technical specifications TVs in this group, there are almost no differences between the matrices of LCD monitors and the matrices of LCD TVs. And often with the same screen resolution (1024x768), they are inferior to them in brightness, contrast and viewing angles. So what's stopping us from combining an inexpensive LCD monitor with an external TV tuner? It’s decided, we’ll assemble the TV with our own hands.
Selection criteria
Here we need to clearly understand what we want to get in the end, and, based on this, draw up a certain list of conditions by which we will select applicants.
We can immediately divide our conditional list into two groups. Group “A” will include mandatory requirements; failure to fulfill at least one will result in rejection of the applicant. In group “B” there will be desirable ones - those that we can, if necessary, compensate on our own. All this, of course, is subjective, and what I have identified for myself may not coincide with the conditions of others.
Monitor (from 9000 to 10500 rub.)
Group A requirements- Appearance or design - it’s up to anyone. But if we want to get a TV, and not the feeling of a monitor operating in “screen saver” mode, then we should pay special attention to this point.
- Viewing angles. A very important parameter, and we are interested in both horizontal and vertical viewing angles. The higher these values, the more comfortable the viewing experience.
- Brightness and contrast reserve. This parameter, like the previous one, will allow you to achieve satisfactory image quality.
- Illumination uniformity. Screen illumination is not always uniform. In many inexpensive models The brightness of the lower part of the screen is noticeable, especially on uniformly dark images. The better this is implemented, the more evenly the light is distributed. The most common backlight is bottom lighting, when the lamp illuminating the matrix is located at the bottom. Another implementation is possible, but it is more relevant to more expensive monitors or widescreen screens.
- Built-in sound system. If you are satisfied with the quality of the sound reproduced by the built-in speakers of the monitor, then the problem of implementing sound for the TV will be solved. Otherwise, in the future you will have to choose an additional sound system, and also look for an additional outlet for it. Powering our TV from three outlets is too much, although this can be easily bypassed if desired.
- Built-in power supply. External unit I'll have to hide it somewhere.
- Monitor stand. Easy to dismantle and non-disturbance design features monitor will preserve the warranty on the device. There are stands that allow you to mount the monitor on the wall. It is also advisable to avoid stands with connectors located on them. But all this is subjective, and everyone will choose what they are looking for.
It is advisable to check all these parameters at a stand, and when purchasing, do not really trust the manufacturer’s technical characteristics - sometimes they are disingenuous.
TV tuner (from 2000 to 3000 rubles)
Group A requirements- Confident, high-quality reception. The resolution of a conventional TV is slightly lower than the resolution of an LCD monitor, and the more noticeable will be the interference associated with a bad antenna cable, unsatisfactory wiring on the panel and uncertain signal reception. If you can try to solve the first two components on your own, then the latter can only be solved by replacing the device.
- Fine tuning. Ability to adjust the channel after automatic tuning.
- Broadcasting system. You need a tuner that automatically adjusts to the broadcast system of the selected television channel, or with the ability to set these values for each channel separately. In accordance with the existing standard in Russia, broadcasting is carried out in the SECAM system, but some regional cable channels use a different encoding for generating color signals.
- Remote control operation. A convenient remote control and the ability to switch from channel to channel with one click of a button, that is, so that when switching to channels from one to nine you don’t have to dial zero at the beginning, and then 1, 2, 3 ... 9. It’s not difficult, but believe me, it’s inconvenient .
- Menu. The more convenient the menu is, the more settings that allow you to make corrections after auto scanning, the easier it is to achieve high-quality picture and sound.
- Russified menu and documentation. Of course, this is an optional requirement, but it allows you to more comfortably navigate the menu and study the documentation.
- Channel preview function. It is very convenient, without flipping through channel after channel, but by looking at the preview window and selecting what you are looking for. As a rule, 9-12 channels are displayed on the screen.
- Return function. Conveniently switch between two channels by pressing just one button. Almost every TV has this feature, and I’m sure many have gotten used to it.
I deliberately do not provide specific numerical values various characteristics, since a discussion on this matter would be inevitable. In addition, for some this may become an unnecessary limitation when choosing devices.
After a short but productive search and comparison, two devices were selected that met my needs. This is BenQ FP591 LCD monitor and GOTVIEW TV tuner - BOX. 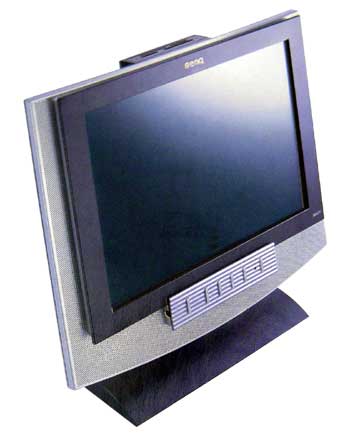
In my opinion, BenQ's designers did a great job - I'm sure no one will remain indifferent when they see this monitor. Plus very decent sound with the SRS function and a built-in card reader. As for the tuner, it is also very good. Model originally designed for Russian market, has very good reception and a convenient settings menu in Russian. 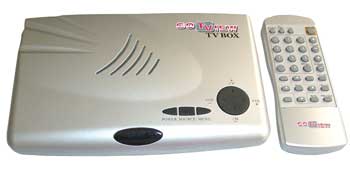
Assembly
Having everything we need in hand, we begin to implement our plans.
The first thing we need to do is check how well all the devices perform their functions. Only after we make sure that our tandem is working can we begin the main part of the work.
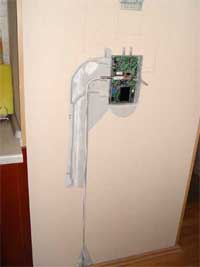
The monitor stand is secured with four screws, which will come in handy later. We unscrew the stand and select a place to mount our LCD panel on the wall. Optimal height fastenings, taking into account vertical viewing angles, approximately 1.5-1.6 m from the floor. We outline the contours of the panel, and also mark the depth of the “pocket” where all the connectors will be located. The two top screws that held our panel on the stand will now hold it on the wall, which means we also mark these places with a pencil. Loops for fastening can either be purchased or made using part of the stand for this purpose (I will not dwell on this, since there is nothing complicated at all).
Next, we estimate and mark the place where we will place the tuner. You need to approach this issue creatively and choose a convenient location for the wires from the tuner connectors. I positioned the device so that the connectors faced to the left - for me it was convenient, although not entirely rational. Given the fact that top cover The tuner will be removed, we make a recess in the wall, approximately 30-35 mm. If the wall is concrete, then you can’t do without a hammer drill. It was somewhat simpler for me - the air duct box is made of plaster, and it lends itself well to a simple chisel (taking this into account, the forces had to be controlled so as not to fall a hole into the shaft).
Next, we carry out preliminary assembly to mark the places where we will hide our numerous wires. Then we make a groove and put everything back in its place, but this time with the laying of the wires. 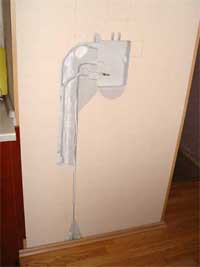
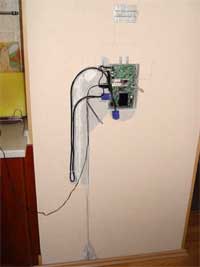
Next is the most inconvenient, but important point. Since all the wires will subsequently be closed, and we will not have the opportunity to change their length, we measure as accurately as possible the length of the remaining uncovered wires that will connect the tuner to the monitor. We assemble the entire system and note the length that allowed us to later assemble everything together without interference. 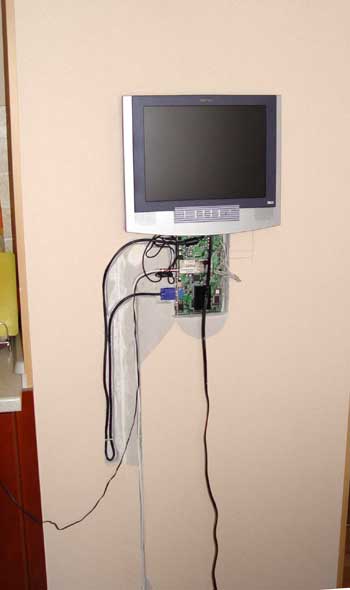
Considering that in the future visible area The tuner and wires will be covered with a layer of mortar and wallpaper; it is necessary to resolve the issue of ventilation and push-button control of the TV tuner.
The issue of ventilation is easily resolved. One option could be a small oblong hole in the air duct shaft, which can be covered with fiberglass or metal mesh. That's exactly what I did. 
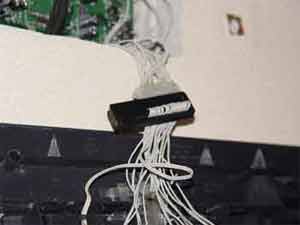
Push-button control of the tuner was implemented as follows. Wires were soldered to the buttons on the device, as well as to the IR receiver and the diode signaling the operation of the device; a regular IDE cable was used for this. Duplicator buttons were placed on the monitor stand, which in turn was decorative panel covering part of the tuner. 
![]()
The panel is attached in the same way as the monitor - using two standard screws on the edges of the stand, which in turn use hinges made from a regular tin can.
Also on the panel were placed: led indicator and IR receiver. To make it easier to dismantle the panel, I connected the wires from the tuner and panel via a standard IDE connector. 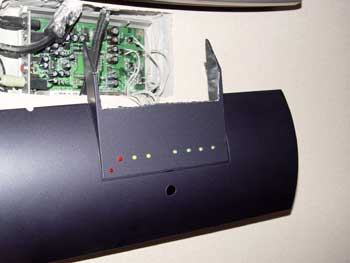
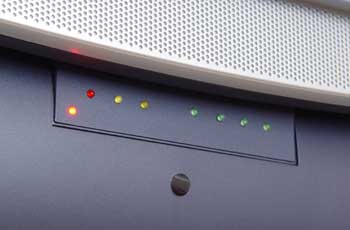
The upper part of the buttons was made of colored diodes from the old hub. In my opinion, it turned out very attractive. But I didn’t backlight these very buttons - the abundance of glowing diodes does not give me pleasant feelings. Very reminiscent of a server rack, although this is a matter of taste. You can duplicate and display all the tuner connectors on the panel. It all depends on whether you want to use them in the future or not. 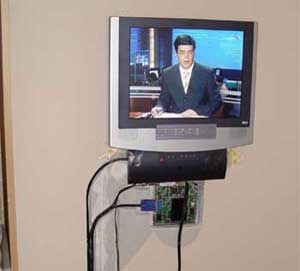
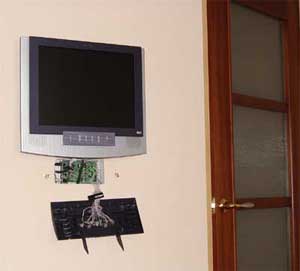
Conclusion
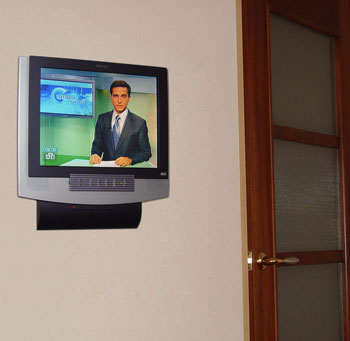
As a result, after finishing painting and plastering works, wallpaper stickers and final installation we get an excellent multifunctional TV, of very decent quality, for a price of 12,500 rubles. Plus a bonus for our efforts in the form of a built-in card reader. 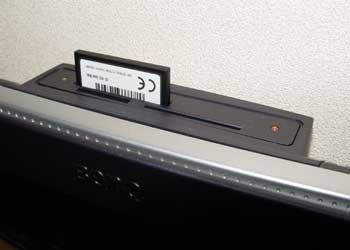
The bonus, although exotic, is very useful. Whatever you say, it’s nice sitting at good table, among friends or family, show on the screen photographs of a recent trip to the sea or to the World Cup. What exactly to show is up to everyone to decide for themselves.
The screens of CRT TVs, in addition to color rendering, which LCDs had never dreamed of, also had an amazing mechanical strength. Such a kinescope could withstand even a hammer blow without destruction.
LCD TV screens are delicate and fragile. Don't believe me? Press your finger on the screen... Replace broken matrix almost impossible. The cost of the operation is comparable to the cost of a new device.
What to do if the matrix is damaged? Don’t rush to throw away your old TV (or monitor). Well, first of all, what’s left is a magnificent light source. Excellent uniformity, wide spectrum, close to natural daylight and high brightness - this is not a complete list of the advantages of a lamp that can be made from a surviving part broken TV. Secondly, if you are smart, you can endow the chandelier with options that are unusual for it and that are pleasant to you.
We disassemble the TV, remove the damaged matrix and turn off the video amplifier. The body of the future chandelier can be painted either in the color of the kitchen or in a special stone color texture paints. Old models (based on fluorescent lamps) it is advisable to provide additional slots in the casing to restore the heat sink, which was designed for vertical operation. Can be inserted into a chandelier LED strip With remote control to create lighting effects, a laser projector aimed at the ceiling and an MP3 player with a remote control.
Of course, the Mz3 player/FM receiver mode indicator spoils it a little appearance, but how it increases functionality...
Your TV will still serve in its new quality, but no one (except my friends) has a chandelier like this.... Know-how, however...
What happened in the end:
— A very bright chandelier with a uniform glow, close to sunlight, with a remote control (TV on/off). If the chandelier is left on, it works like a regular lamp with a switch. Switching off can be used for special cases when only backlighting is needed.
— Special effects on LED  backlight are installed using a separate remote control. I recommend taking a radio remote control.
— The third remote control controls the radio/Mp3 device (mode, station selection, volume) or Mp3 player (volume, rewind, equalizer, repeat, etc.). True, in order to change the Mp3 repertoire (flash drive) you will need to take a ladder...