Often after completing repairs and purchasing new ones lighting fixtures the question arises about mounting the chandelier on concrete ceiling. Reliability is of particular importance, since accidental falling of the lamp can cause injury to people. But also sloppy established base lamps spoil the impression of the renovation. To avoid unpleasant effects, hang the chandelier correctly depending on the design.
Different types of mounting ceiling lights
With a large assortment of electricians, it’s easy to make a choice, but there are nuances here too:
- the chandelier may have a special ring for hanging on a hook;
- the decorative base is attached to the mounting plate;
- some lamps are installed on the ceiling.
In each case, mounting a chandelier on a concrete ceiling is done differently. The only common set of tools needed for work is:
- perforator;
- drills of the required diameter;
- dowels, anchor bolts with or without hooks.
If the design of the chandelier involves the use of a mounting strip, then you should check its availability in the product kit directly in the store. The part is supplied with the lamp.

When purchasing a chandelier with a hook mount, purchase the appropriate fasteners here. The lightweight model (3-4 kg) is suspended from a dowel-shaped base. Heavy ones require special anchors with a spacer hook with a diameter of at least 10 mm. This is the only way a chandelier on a concrete ceiling will be safe.
Before installing the lamp, disconnect the power cable. You can check whether current is flowing to one of the protruding wires using an indicator screwdriver. Touch the tip of the device to each end of the cable. When power is supplied, the red LED in the screwdriver handle will light up.
Remove shades, decorative pendants and other fragile parts of the structure from the chandelier frame.
Be sure to delete energy-saving lamps: They contain mercury vapor.
Mounting a chandelier on a hook
In some apartments it was installed during the construction of the building, but more often you have to do it yourself. Before fixing the lighting fixture to the ceiling, measure the depth of the decorative base cap. The hanging element must be completely hidden.

Select the diameter of the drill so that the dowel and anchor fit into drilled hole very tight. The screwed-in fastener slightly expands the plastic or metal capsule, and installed element holds securely. If you choose a hook with a dowel, then screw its screw part into the plastic capsule until it stops. When installing the anchor bolt, fully tighten the nut at the base.
Check the reliability of fastening with a weight corresponding to the weight of the lamp. If the chandelier is small, then it is better to apply force to the fastener by pulling down and trying to swing it in the socket. A check performed before hanging the chandelier prevents unpleasant surprises during operation.
Place a loop on the attached hook at the end of the lamp stem. Using plastic electrical blocks, connect the power cable and the chandelier wires. Please note that the ground connection is usually yellow-green, striped, and the “phase” and “neutral” ends are solid colors. After connecting, check that the connection is correct by screwing in regular places lamp and pressing the switch. If the device does not work, the ground may be reversed on one of the working ends.

Having eliminated the malfunction, hide the wires and suspension hook inside the decorative cap and fix it on the rod.
Mounting on mounting plate
Remove the fastening part from the packaging and before hanging the chandelier on the ceiling, install the screws for fastening the decorative base so that they match the cutouts. Move the bolts in the grooves, adjusting the distance to the holes in the cap. Tighten the screws to the desired position.
Installation is done as follows:
- Level the surface for installing the bracket. Press the plank to the ceiling and mark the locations of the dowels.
- Make holes. The diameter of the drill corresponds to the size of the plastic dowel. Insert the capsules into the holes.
- Press the plank to the ceiling and screw in the screws. Tighten the bolts so that the bracket does not move when force is applied to it.
- Connect the lamp to the cable. Check the functionality of the device.
- Place the decorative chandelier base onto the mounting strip. Place the screws into the holes. Attach the nuts and tighten them.

After hanging the chandelier on the ceiling, install lampshades and other decorative elements in their original places. Wipe shiny parts with a damp cloth to remove lime dust.
How to attach a lamp directly to the ceiling
Some types of chandeliers do not come with any fastening parts. In this case, they are attached directly to concrete base ceiling or wall. Usually there are several holes in the body of a decorative rosette. If fastening is done using dowels, the algorithm of actions is as follows:
- mark the location of the cutouts in the ceiling;
- drill into the concrete and insert dowels into the recesses;
- connect the chandelier to the network;
- align the holes on the decorative base and in the ceiling;
- screw the screws into the plastic sockets.
 Often such chandeliers have no heavy weight. Therefore, fastening with self-tapping screws is considered reliable.
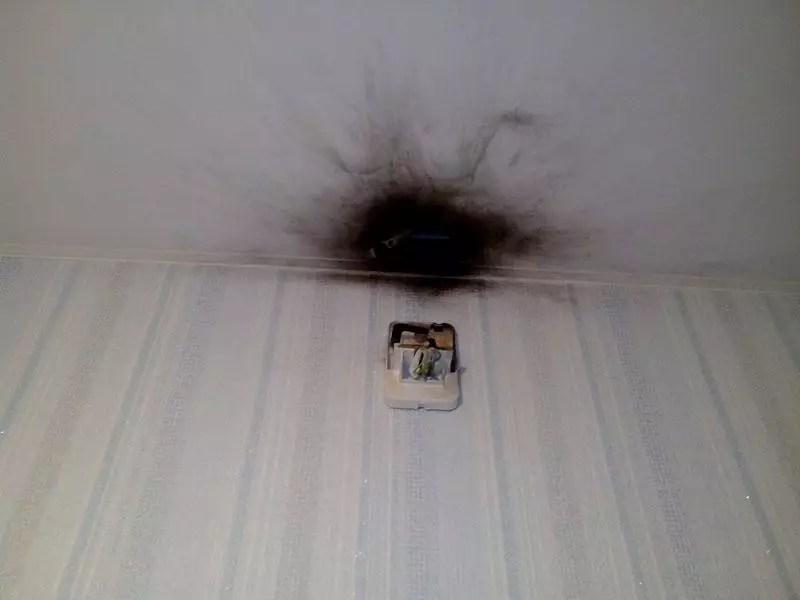
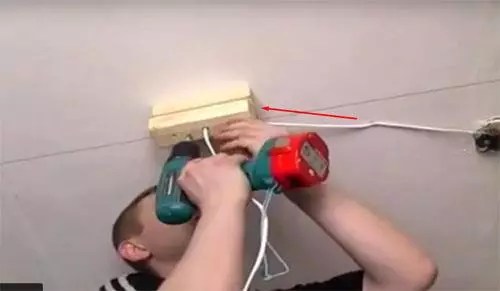
Sometimes, after purchasing an apartment, you discover a hole in the ceiling left by previous residents. If it is difficult to hang a chandelier on a hook here, you have to putty the hole, drill a new mounting hole for the anchor, and waste extra time. A short video clearly demonstrates how to attach a lighting device in such a difficult case (C.1).
Sometimes the number of ends on the power cable and on the lamp does not match. This occurs in devices with the ability to light only part of the lamps.
Homes with older electrical systems do not have a ground wire. Sometimes it happens that the power cable has three cores, but the chandelier has only two connecting ends.
If the difficulty lies in the absence of grounding, then identify the wire on the power cable that is a phase (the indicator on the screwdriver will light up), turn off the current, connect this wire to one end of the lamp, and attach the second to the remaining one on the power cable. After turning on, the chandelier should work. If the lamps do not light, then the last wire attached is the ground wire. Disconnect it and attach it to the other free end of the power cable.
 When there are only two wire outlets on the ceiling, and there is a grounding connection on the lamp, it is identified by its two-color color. It is usually clearly visible on a new device. If the chandelier is old and the markings are unclear, identify and connect the phase before installation. After this, experimentally find out which of the wires is “zero” and which is “ground”, as indicated above. But often no problems arise, and you can see the markings even on an old electrical appliance.
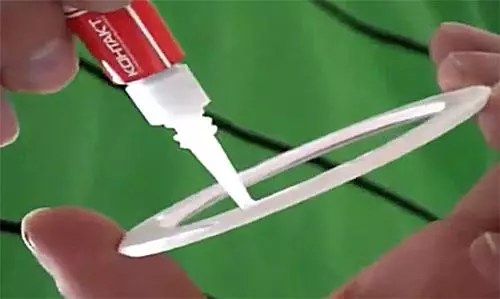
If there is a function to turn on only some lamps, a situation arises when the number of ends on it is more than two or three. In this case, use a plastic connection block. Fix wires of the same color in its sockets on one side. Make a jumper from a piece of wire, placing it on the opposite one, as shown in the photo. Connect “zero” to the end (red), connect wires of a different color (white) in pairs or several pieces in a socket. In this case there are only two phases, for different buttons on the switch. Each is connected to a separate group of white wires. When you press one button, only part of the lamps lights up, when you turn on another, all the horns work.
You can hang a chandelier on a hook or on a mounting plate yourself, without the help of specialists. It is important to attach fastener so that it does not jump out of the hole in the concrete. To do this, select the correct drill diameter.
Laziness made a man out of a monkey. Tired of climbing a palm tree for a banana, the monkey picked up a stick. The hostess was tired of always painting and greasing the cracks in the ceiling - she ordered it. No hassle - beautiful, smooth, hygienic. There is only one small but pressing question left: how to hang it on a suspended ceiling? On the one hand, it seems like you shouldn’t fool yourself; it’s easier to invite specially trained people for such work. But on the other hand, how can you find out whether they did everything correctly and whether, God forbid, any troubles will happen after such an installation? After reading this material, you will be able not only to control employees, but also install the lighting fixture yourself.
Requirements for a chandelier for a stretch ceiling:
- the flow of light should be directed downwards or to the side, but not upwards;
- it is desirable that the lampshades have a closed shape;
- the distance from the lampshade to the ceiling must be sufficient to prevent heating of the material;
- at standard height The tension structure in the room already lowers the ceiling; there is no need to install a bulky chandelier;
- the lighting fixture must have a long suspension, sufficient to be secured to the base behind the stretched canvas.
Ceiling chandeliers for suspended ceilings can be equipped with different types. When choosing one type or another, take into account the features of the PVC contract:
| Lamp type | Description |
| Incandescent lamp | Behind the cheapness of these devices lies high consumption electricity and high temperature effects on surrounding objects. Such lamps are least suitable for synthetic ceilings. Minimum distance from the lamp to the PVC surface - 40 cm, and only on condition that the device is not more powerful than 60 W. The solution may be to install reflectors between the film and the lamp, but does it make sense to fence such a structure if there are other options? |
| An excellent option for a chandelier under a suspended ceiling. These devices are characterized by high efficiency and for a long time services. Such devices heat up very little and pose a danger to PVC film. Lighting can be warm or cool shade, depending on your preferences. | |
| Halogen | Halogen lamps heat up slightly, but with prolonged use this heat is enough to deform the stretched material. A 40 W lamp should not be closer to the ceiling than 40 cm. |
Designer advice! A chandelier in a contrasting color looks best on a suspended ceiling. On black - white or silver, on light, respectively, dark metal.

Basic requirements for mounting a chandelier
Attaching the chandelier to suspended ceiling It must be not only durable, but also aesthetically pleasing. Suspended devices mounted on a hook or mounting strip are suitable for suspended ceilings. Overhead chandeliers that are attached tightly to the ceiling on an overhead panel are not suitable.
Important! The height of the chandelier suspension should be sufficient, taking into account the distance between the base and the stretched material.
As an option, you can consider placing the hook for fastening below PVC level film, but then this moment must be foreseen in advance, even before the stretching procedure.

A little about the correct location of a chandelier for suspended ceilings
The height of the chandelier depends on several factors:
- ceiling height;
- ceiling covering;
- purpose of the room.
How to hang a chandelier on a suspended ceiling living rooms? There must be at least two meters from the floor to the bottom of the device. This way you will eliminate the danger of accidentally touching it when moving around the room. But it is better if this distance is greater, especially when the ceilings in the room are low.

Compact height devices are also suitable for hallways. This design will not interfere with opening doors. In addition, keep in mind that in the corridor people often raise their hands to remove their hats, straighten their hair, or close their umbrellas. So, the higher the lamp is located, the better.
Compact placement is also relevant. There is a risk here of not only touching the structure with your hands, but also accidentally getting hit by a stream of water from the shower.

If the ceilings in the room are higher than 3 meters, you are in luck: you can choose any shape and place it anywhere, even above. For example, it is logical to hang the lamp not in the center of the room, but above lunch group. Moreover, for working area is being organized .

Advice! Classic ceiling lamps have a suspension in the form of a chain. You can adjust its length by removing and adding links.
Most complex issue, how to attach a chandelier to a suspended ceiling at the location of the “second light”. The location feature requires powerful luminous flux, capable of spreading over two or even three floors. In this case, take a closer look at designs with several tiers or a cascade of lamps.

For your information! Electrical installation rules recommend selecting hooks for lighting fixtures that can withstand five times the weight of the chandelier for at least 10 minutes. After removing the excess load, there should be no damage left on the fastening.
Thus, the choice of chandelier must meet not only design requirements, but also safety and ease of use rules.
Tools for work
The main tool in this matter is your confidence in your own capabilities. Self-installation chandeliers for a suspended ceiling is not so much a complicated matter as it is troublesome and requires extreme care. And there are tools for work in almost every home:
Drill
Anchors
Wood block
Self-tapping screws
Screwdriver
Indicator screwdriver
Insulating tape
Pliers
Terminals
Basis for mounting the chandelier
Between concrete or wooden ceiling and tension PVC material there is a distance. It may be different, depending on the characteristics of the room. If the ceilings initially have a defect, but with the help tension structure it's easy to fix. It turns out that in order to secure the chandelier, the empty space needs to be filled with something, to create a rigid base.

If the distance is large, a thick block cannot be used; you will have to make a frame. In this case, the perforation area of the film must be reinforced with a gasket; it will additionally protect the PVC from the temperature effects of the lamp. Such gaskets are made in the form of rings, internal and external. They are hidden behind the decorative frame of the wiring and are completely invisible.

Options for installing a chandelier on a suspended ceiling with your own hands
If you decide to start installing a lamp, take care to prepare the base in advance. After the ceiling is stretched, you will not have the opportunity to mount a stand or do any wiring. Usually the master asks in advance where you plan to hang the chandelier. You can prepare the base yourself and lead the wires to the right place in advance.
There are several ways to attach a chandelier. Let's briefly look at the main ones.
With a hook
A hook is the most familiar and common way to hang a chandelier. The only thing you have to do is adjust the length of the hook to the height of the tension fabric. If the hook was installed previously, most likely it will have to be replaced, since the suspended ceiling will “steal” at least 3–5 centimeters.

For fastening, a hole is drilled in the concrete ceiling, a dowel is inserted and a hook with a threaded leg is screwed into it. If the distance between the canvas and the ceiling is too large, a block is attached to the ceiling and a hook is screwed into this base.
Advice! After installing the stretch ceiling, all wiring will be hidden from your eyes. For your own peace of mind, place it in a protective case.
When attaching the chandelier to the hook, make sure that the decorative cup fits snugly to the ceiling panel

Using a mounting plate
Fastening with a strip is found on modern models lamps. The bar itself is a metal plate with holes for fasteners. This plank is attached to the prepared base directly through the ceiling sheet. You only need to cut a small hole for the wiring.

Important! When screwing the bar to the block, be careful not to damage the wiring cord.
To make work easier and not damage the lighting fixture, it is disassembled before installation. It is necessary to remove shades, lamps and hanging decorative elements.
Using a cross bar
Mounting on a cross-shaped bar is not much different from hanging on a regular bar. Cross-shaped fasteners are usually used for heavy chandeliers. The only nuance is in preparing the base. For obvious reasons, the block is not suitable in this case.

A hole for electrical wiring should be drilled in this platform. Metal “legs” are used to adjust the platform to the height of the canvas.
How to choose dowels for mounting a chandelier
For interior work use plastic dowels. Considering the possible external temperature effect of the lighting device, it is preferable to use nylon-polyamide inserts.
If the ceiling in the room is concrete, spacers will be required. In cases where the ceilings are multilayer structures with voids, it is better to use dowels.
The thickness of the element depends on the expected load. Suspended structure tends to pull the dowel out of the wall, so it is important that it has spacer tendrils and notches that additionally hold it in the thickness of the material.

To more securely secure the element in the hole, you can use construction adhesive; lubricate the dowel with it before driving it in. Do not try to screw in a screw that is thicker; it may split the liner. It is considered correct to use screws for spacer inserts.
Advice! A chandelier weighing 5÷10 kilograms is secured with an impact dowel with a diameter of 8 mm and a length of 80 mm. To complete the task you will need at least 4 dowels.
Master class for DIYers: how to fix a lamp on a suspended ceiling
And now directly about how to fix the chandelier on a stretch ceiling. As already mentioned, it is necessary to follow a clear algorithm of actions and be puzzled in advance by the location of the lighting fixture and the preparation of the base.
We offer you a small master class on how to attach a chandelier to a suspended ceiling:
| Photo | Description of work |
 | The first step will be marking the location of the lamp and pulling the cord to indicate the height of the canvas. The cord is pulled from the frame through the entire room. |
 | A block is attached to the main ceiling at the location of the chandelier. To do this, holes are drilled in the ceiling, dowels are inserted and the base is screwed with self-tapping screws. |
 | There can be several bars, depending on the height to which the fasteners need to be raised, or you can use metal “legs” that are easily adjustable in height. It is important to thoroughly sand the surface of the block that will come into contact with the canvas. |
 | The wiring is passed under the bar or between two elements. This way she won’t be pulled in case of an unforeseen situation. |
 | To accurately bring the base surface to a dense level, backing elements are used. Afterwards the PVC material is stretched. |
 | Special glue for PVC is applied to the thermal ring for the hole. |
 | Next, you should feel the base with your hands and glue the ring in the center directly to the canvas. It will take time for the glue to dry. |
 | A canvas is cut out in the inner part of the ring. Extreme care must be taken not to damage the wiring. Afterwards, the wire for connection is released into the hole. |
 | Feel the location of the bar and place the mounting strip correctly. |
 | Screw the mounting plate using self-tapping screws. Don't forget to insert the studs first. |
 | Position the chandelier so that the pins fit into the designated holes. Secure the lamp with decorative bolts. |
How to decorate the mounting location of a lamp
If you remember to use a thermal ring, the place where the chandelier is attached will already look neat. A small hole will be hidden behind the base of the lighting fixture. But if the interior design requires the creation of some kind of additional element, use lightweight polyurethane sockets. They imitate
No matter how beautiful the ceiling in your apartment looks, the right way gives it a finished look installed chandelier. When buying a new lamp, many people think about how to hang it on a concrete ceiling. Floors from durable concrete make it difficult to install hooks, and for this reason people turn to a specialist for help rather than trying to do the job themselves. And the designs of lighting devices today have become more complicated. In fact, there is nothing complicated about attaching a chandelier to a concrete ceiling. It is important to follow the sequence of simple steps and not forget about safety precautions. You can verify this by reading our article.
LET'S DEAL WITH THE WIRES FIRST
In houses old building and the wiring is old, without modern color coding. In modern requirements of PUE (Electrical Installation Rules), individual cable cores have various colors, by which you can immediately determine their purpose. Color coding Modern chandeliers also have standard wires. In the factory version, they are assembled on a block, and their connection is specified in the accompanying passport.
Phase wire is usually designated black, white or brown- here manufacturers do not have a uniform standard. Neutral (zero) has a blue or blue color. The grounding conductor is commonly identified yellow braids with green stripe.
Before starting work on installing the chandelier, you need to understand the purpose of all the wires in the ceiling wiring and inside the lamp. If everything is new, then the connection will occur without problems - we simply connect the wires with the same markings on the block.

IF THERE IS NO MARKING
If we can’t figure out the purpose of the wires by color, we’ll do it with the help of instruments. This is easy to do, the main thing is to comply with electrical safety standards. To do this, we need a phase indicator - a device that shows the presence of phase voltage at the ends of the wire. In a simplified version, it looks like a regular screwdriver, but consists of a plastic body, a conductive rod and a signal LED. At the end of the probe (as the device is popularly called) there is a metal terminal. It’s easy to determine the presence of voltage: we take the probe with our thumb and middle finger, like a fountain pen, and press the end terminal with our index finger. We touch the bare wires with a metal tip - the indicator on the phase wire will light up. It is recommended to carry out this test with one hand, without touching the wires with the other, otherwise you may accidentally get “the most vivid impressions of your life.”
WE CONTINUE TO WORK AS A SAMPLE
To carry out work, the room must be completely de-energized. Carefully remove the old lamp and check that there is no voltage on all wires one by one. We separate all the wiring strands to the sides so that they do not touch. We turn on the current supply and the chandelier switch again. We use the indicator to identify the phase wire and mark the neutral conductor in a way that we understand. It may happen that you find three wires coming out of the ceiling. This means that the chandelier was connected using a two-stage circuit. In this case, you need to turn on both keys and find one neutral and two phase wires, accurately marking them. After disconnecting one key, make sure that the phase has disappeared on one wire. Then unplug the second key and make sure there is no voltage on the second wire either. In this case, you can connect the chandelier using the existing two-stage wiring diagram.
WE MAKE A CHANDELIER CALL
Testing the chandelier wires is done in doubtful cases, and for this it is better to use a regular multimeter. With a metal chandelier body, one of the three wires can be grounding. To find it, we place one of the probes on the metal of the case, and with the second we touch the exposed part of the wires. The sound of the multimeter will indicate the ground wire. The neutral wire (neutral) can be easily determined by the test sound if one probe is pressed to the side contact of any chandelier socket, and with the other we touch the unidentified wires in turn. Thus, the remaining wires will be phase wires.
If you have a multi-arm chandelier with a two-stage connection scheme, then one or more sockets can be connected to each phase wire. To accurately determine their relationship with the switch key, connect the multimeter probe to one of the phase wires and sequentially touch the central contacts inside the sockets. Based on the sound signal, we determine the actual connection.
If the purchased lamp has several switching stages, and you have only one phase wire in the wiring, then you will have to connect all the sockets to it. To do this, we will connect all the phase wires of the chandelier together on one block.

EXPERT ADVICE
Often found in old houses aluminum wires. But wires made of copper and aluminum cannot be connected to each other by twisting. They quickly form a corrosive layer, and the contact density is disrupted. This will lead to heating and melting of the insulation - a short circuit. Copper and aluminum wires are connected only using a special WAGO terminal with insulating paste.

WE WILL PREPARE EVERYTHING NECESSARY FOR INSTALLATION
Prepare a stable stepladder, indicator and multimeter in advance. All electrical installation tools: screwdrivers, pliers, knife and hammer must have insulated handles. To drill holes in a concrete ceiling, you will need a hammer drill or impact drill. The fasteners used are expansion anchors, self-tapping screws and dowels. To connect the contacts we will use screw or spring express terminals, electrical tape or PPE type caps.

ATTACHING THE CHANDELIER TO THE HOOK
Weighty chandeliers on a long rod have a special loop for hanging on a hook, which, after installation, is covered with a decorative cap. If there is no hook on your ceiling, you will have to install it yourself. To do this, it is better to use an expansion anchor that can withstand heavy loads. The anchor is driven into the drilled hole until it stops, and then the hook is screwed in.
When installing a chandelier, it is better to remove all light bulbs and fragile parts. Having hung the case on a fixed hook, we connect the wires to the block. All wires must be carefully laid inside the decorative bowl and secured with minimum clearance at the ceiling. The bowl is usually secured to the stem with a gasket or a small screw. After this, we screw in the light bulbs, put on the shades, apply mains voltage and use the switch to check the operation of the chandelier.

INSTALLING THE CHANDELIER ON THE MOUNTING BAR
Most ceiling-mounted fixtures are mounted on a mounting strip or decorative bracket. The installation of such a chandelier consists of two stages: installing the strip on the ceiling and then attaching the chandelier itself to it. If there is an old hook in this place, it needs to be unscrewed or cut off. We first apply the plank to the ceiling to indicate the mounting coordinates. We drill the ceiling for dowels to the required depth. You need to pay attention to the density of the dowels in the holes and, if necessary, seal them with a cement-adhesive mixture. Having installed the bar using self-tapping screws, then we fasten the lamp to the bar using standard screws. We check the operation of the chandelier with a switch and admire the result of our work. After all, it’s not the gods who burn the pots! And there is nothing difficult in this work for your skillful hands.
One of mandatory elements any repairs related to the ceiling surface - installation of lighting fixtures. IN Lately Spots of various configurations have become most popular, but for the most part their main function is additional lighting. The role of the main one is rightly assumed by classic chandeliers. Purchasing them in a store does not solve all the issues - you still have to figure out how to hang a chandelier on a concrete ceiling correctly if you have to deal with a clean ceiling base. We offer you a detailed instructional article with 51 photos and 2 videos that will help you with this.

Surface analysis, drawing up a work plan

To begin with, take a good look around. What way chandelier installation most suitable for you? Let us remind you that this can be done through:
- anchor hook;
- mounting plate;
- clamping suspension.


Of course, work with anchor hook It's always the easiest. But only if it is already installed, as is often the case in old apartment buildings. In this case, you can safely mount a heavy and massive chandelier on it.

If there is no hook, then first inspect the slab where you plan to fix it. For hollow concrete foundations perfect option - clamping suspension. And although it does not provide that reliable fastening, like the same anchor hook, will cope with a fairly large chandelier weighing no more than 7 kg without any problems.


Mounting strip, which is often called an invoice among craftsmen, is the third option on how to properly hang a chandelier on a base ceiling. It can be used most often when the use of the two options discussed above is not possible. Most modern chandeliers include everything necessary to fix the lighting fixture in this way. So why not take advantage of this?

Required materials and tools

- hammer drill with drill;
- set of wrenches;
- knife with a sharpened blade;
- screwdriver;
- polyurethane foam for sealing wiring;
- pencil;
- dowels;
- anchor bolts;
- terminal connectors.

- hook;
- overhead strip included in the kit;
- hanging hanging hook.


Installing an anchor hook

As noted above, this is the simplest and reliable way hang the chandelier on a concrete ceiling base. In many old houses it is already prudently installed in advance, so the whole process takes a modest amount of time and does not cause any difficulties even for an unprepared person.

If the hook needs to be installed, then the operation algorithm will be as follows:
- select a fixation point on a concrete base;
- drill a hole of the required depth and diameter in the concrete base - take into account the size of the decorative cap of the lighting fixture;
- insert the anchor hook into the concrete base and tighten it with a wrench.

Installation of a clamping suspension


This option is relevant primarily for hollow concrete structures, as it provides good bearing capacity even with bulky light sources. The clamping suspension is reliable design, consisting of a spacer rod and a suspension bar with all necessary holes for fastening.


The correct sequence of operations when working with the gimbal:
- the prepared spacer rod is inserted into the hole in the concrete base;
- the hanging strip is placed inside the concrete slab;
- the spacer rod is threaded through one of the holes on the plank: if you want to reduce the distance from the ceiling to the hook, then choose one of the end holes.


Installation of trim strip

In terms of reliability, this installation method is in no way inferior to the two discussed above. Due to the fact that a newly purchased chandelier always includes there is an option such a bar, it is also noticeably lighter - there is no need to waste time on a tedious search for the necessary materials.
May be in the form:
- crosses;
- narrow plate.


To the concrete ceiling surface the overhead strip is secured with dowels and anchor bolts. Most often there are pairs of them - either 2 or 4.
Installation and connection of the chandelier

The main condition that requires strict execution is to comply with electrical safety precautions. To do this, pay attention to the following recommendations:
- turn off the electricity supply at the distribution panel;
- check the wiring location with a conventional tester;
- seal the wiring input: for this you can use polyurethane foam with active resistance
- fire or non-flammable mineral wool;
- do not allow connections between copper and aluminum wires twisting method.


If you are dealing with a metal hook, then you can reliably protect yourself from short circuit will help him insulation. To do this, use regular insulating tape or a rubber cover. Both can be easily found at any hardware store.


It is also necessary to take into account some electrical features of old houses - they do not have grounding. In order to correctly hang a chandelier in such conditions, you first need to determine the phase on one of the wires of the power cable and connect it to the end of the lighting device, and the second to the one remaining on the power cable. If the lamp still does not work, then that same second wire is grounding. In this case, it must be disconnected and secured to the other free end of the power cable.


Algorithm for direct installation of a chandelier on a concrete ceiling:
- remove all decorative elements from it to avoid damage and possible fall when fixing it on the ceiling;
- on a pre-grounded hook and loop at the end of the chandelier output rod;
- connect the mounting ends of the chandelier to the power cable;
- if the fastening method you have chosen is invoice mounting plate, then after the previous point, place the cap on the plate so that it fits onto the desired holes, and use the nuts to securely fasten it;
- fix the decorative cap so that it completely covers the installation hole in the ceiling;
- Check the correct operation of the lighting fixture.


All stages of installing a chandelier on a concrete ceiling in one video
Conclusion
After carefully studying the proposed article-instructions, you will quickly understand how easy and, most importantly, correctly to hang a chandelier on a concrete ceiling, without spending a lot of precious time on it. Compared to other conditions for installing lighting fixtures - for example, on stretch fabrics- a clean base requires a simplified algorithm of actions (read about how to attach a chandelier to a suspended ceiling if it is already stretched). In fact, the most difficult thing is not to make a mistake when directly connecting the light source to the electrical wiring. Only a serious attitude towards electrical safety issues and scrupulous adherence to the proposed work plan will help you easily overcome this stage and after some time enjoy the spectacular lighting on your concrete ceiling.


A chandelier is not only a source of light, but also an effective design technique. The truth is like this decorative element has its own installation features, which directly depend on the design of the chandelier itself. At first glance, it may seem that hanging a chandelier is very simple, but in fact there are many nuances in this procedure that are very important to take into account.
Methods for attaching chandeliers
On a hanging hook
How to hang a chandelier on the ceiling? Such mounts are often mounted directly into the ceiling during the construction or renovation stage of the premises. Before installing a chandelier for suspended ceilings, you must make sure that the hook will support its weight. To do this, hang a load from it, equal in mass to the lamp, or simply pull it. Once you are confident that this fastening is secure, you can begin installing the chandelier.
To install a hook, you need to drill a hole in the ceiling, screw an anchor or a self-tapping screw into it in the form of a hook. The first type of fastening is used for concrete floors, the second - for wooden floors. After this, the anchor or self-tapping screw must be wrapped in two layers of insulating tape. The chandelier is hung on a special ring.
On the bar
In this case, the chandelier is not hung from a hook, but directly from a bar that is fixed to the ceiling. To install it, you need to mark the place where you want it. Then holes are drilled in the ceiling into which dowels are driven. They must coincide with the holes on the mounting strip, which is secured with screws. The lamp, in turn, is attached to the bar. It is mounted so that the element covering the wires and the mounting point fits tightly to the ceiling.
How to hang a chandelier on the ceiling
The installation of a chandelier on a suspended ceiling must be done very carefully, since the canvas is sensitive to various types of mechanical damage. Therefore, everything must be done very carefully (more details: "").
There are several ways to install a chandelier on suspended ceiling:

To create a durable ceiling mount, special plastic rings are used. Their size depends on the type and size of the chandelier itself. This ring is glued to the stretched fabric. After this, according to him internal diameter cut a hole for the wiring and hook.
How to hang a chandelier on a gypsum board ceiling? Everything is quite simple. It is better to mount hanging ceiling chandeliers using special fastenings - butterfly dowels. When a self-tapping screw is screwed into them, the dowel unfolds in the hole and is able to hold quite a large weight. On the gypsum plasterboard itself, the places for attaching the chandeliers are marked in advance with precise indications of the points for drilling. The holes are made 3-4 mm larger than the diameter of the dowel.

What to do if the chandelier is heavy
The method of attaching a large and heavy chandelier depends on the material of the ceiling itself.
Concrete floor
How to hang a chandelier on a concrete ceiling? The surface is drilled with a hammer drill, how to hang a chandelier on a concrete ceiling using conventional drill it won’t work (read: “How to hang a chandelier on a concrete ceiling - mounting options and rules”). An anchor spacer hook is inserted into the resulting hole. It is fixed all the way, and it is necessary to put a coupling on the end of the threaded part. Thanks to this, it is possible to create a strong and reliable mount for the chandelier, regardless of its weight.
If the ceiling is made of plasterboard, then the lamp is fixed to the base base.

For this you will need:
- collet anchor;
- eye nut;
- threaded rod, diameter 10 mm.
How to attach a Chinese chandelier
In order to hang a Chinese chandelier, you do not need to use mounting hooks. The entire set of fasteners is already included with the lighting fixture.
A bracket is applied to the place marked on the ceiling. Using a drill or hammer drill, make a hole into which dowels are then inserted. And with the help of self-tapping screws the bracket is fixed to the ceiling.

How to hang a chandelier from the ceiling? The above bracket has a special mount, from which the chandelier is suspended by means of a decorative plate.


