Chandeliers with radio controlled LEDs (with remote control) are an improved version of the classic ceiling lighting fixture that is triggered by a switch. Therefore, their design does not provide for complex elements, but there is an additional control unit. And it is quite possible to do the repair yourself.
Design and basics of operation
Chandeliers with a control panel exist in different versions: only with LEDs; combined option (diodes and halogen lamps). But the most commonly used models of the second group. The design of such chandeliers is based on the use of three main components: a radio control unit with a remote control; block of LED emitters; block with halogen lamps.
Separately, power is provided for the last two nodes: power supplies that provide a decrease in the mains voltage of 220V to the desired level (12/24V).
The main elements of the chandelier with PU
The principle of operation is based on the transmission and analysis of the signal from the remote control to the radio control unit. The last of these elements analyzes the received pulses and, depending on the type of signal, applies voltage to the corresponding relay.
And this element, in turn, supplies power to the driver of the desired unit: with diodes or halogen lamps. Range of signal transmission from the control panel: 30-100 m. Its power is provided by batteries.
 Everything is quite clear here: a radio-controlled unit and several units with different types of lamps, each of which has a transformer.
Determination of the degree of damage to the lighting device
Repair of a chandelier with a remote control is carried out only after the cause of the breakdown has been determined. If the device stops shining, you need to inspect the entire structure for deformations of the elements, blackening of the insulation. Incandescent filament lamps are checked for performance quite simply - just inspect the channel filament, if it is not damaged, replacement is not required. LEDs are checked with a tester.
But before dismantling the chandelier, it is necessary to assess the condition of the switch. The phase is checked, this is done after the power is turned off. If current is coming to the circuit breaker, the outgoing terminals should be checked with the load applied. It is also necessary to inspect the wiring, which will require dismantling the chandelier. Lead wires are usually covered by a lighting fixture housing or a decorative plate.
If there is no deformation of the insulating material and blackening, then you need to look for the cause of the breakdown further. For reliability, it is better to check whether current is supplied to the terminals using a tester.
Checking the radio-controlled unit and remote control
If the lighting device with the control panel does not turn on, there can be two reasons: the radio signal transmission system is faulty or one of the elements of the controller board is out of order.
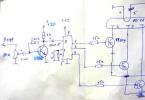
The design of the remote control is quite simple: a microcircuit and two transistors, a push-button sector. The most common causes of malfunctions are batteries and buttons.
To determine if the controller is operational, you need to connect the LED chandelier with the control panel directly to the switch, bypassing the radio control unit. If the device turns on, then the faulty controller needs to be repaired.

Controller and control panel
To do all the work with your own hands, you need to disassemble this assembly and inspect for deformations of the board elements.
However, the most common malfunction is the soldering areas of the relay, which gradually lose their functionality, resulting in a decrease in contact density. You can just replace the module. If you have the skills, then the repair is done by yourself, for this you need to remove the relay and solder a new element.
Why do the lights flicker?
Not always the failure of a chandelier with LEDs is caused by a faulty wiring or controller circuit board. Sometimes the light source, when turned on, starts to “blink” without visible problems inside the structure.
There can be two reasons for this phenomenon:
- Connecting the lighting fixture through a backlit switch. In this case, when the power is turned off, the network remains not completely open. It means that the backlight emitter closes it through itself. As a result, the LEDs will blink. Repair in this case will not have to be done, but only the switch changes.
- The blinking effect is caused by the characteristics of the emitters. It's about the pulse of light. High-quality LEDs are characterized by the almost complete absence of such a phenomenon. Cheap analogues with a high degree of probability will "blink". To make repairs with your own hands, you need to dismantle the lighting fixture and disassemble the power supply for the LED emitters. The least expensive way to solve the problem is to install an additional capacitor.
In order not to have to repair the chandelier in the future, in this case it is recommended to initially pay attention to high-quality light-emitting diodes.
Checking lamps: diode and halogen
You can determine the degree of health of the lamps using a multimeter. In this case, it is necessary to measure the resistance of the filament body with your own hands. Sometimes a visual inspection is sufficient. The fact is that lamps with an incandescent filament are checked for operability quite easily - by assessing the condition of the filament body.
Remote control light fixture repairs will need to be done more frequently unless a tissue or lint-free material is used to replace the halogen light source, which will cause the bulb to burn out quickly.
The main problem of the LED block is the serial connection of all emitters. If one of them burns out, the chandelier will go out.
It is usually recommended to change all the diodes at once, since after several emitters burn out, the glow intensity of the rest will be noticeably lower. Repair of a lighting device with a control panel in this case will be quite expensive, since light emitting diodes are offered at a high price.
How to avoid frequent burnout of lamps?
The reasons for the failure of different types of light sources can be different. A common negative factor for all lamps is the inrush current when power is applied. In the case of halogen versions, the filament simply becomes thinner over time under such operating conditions. And the next time you turn on the lighting device with the control panel, the lamps burn out.
 Another reason is direct contact with the bulb when installing or replacing the light source. If the repair of the chandelier will be done by hand, then it is recommended to unscrew the halogen bulbs with gloves made of lint-free material. You can use a napkin.
The fact is that halogen lamps get very hot during operation. And the particles or substances remaining on the surface burn out, which leads to a redistribution of temperatures on the surface of the flask. As a result, the light source will quickly burn out.
LED emitters last much longer, however, and these lighting elements are adversely affected by the inrush current when turned on. To a greater extent, this applies to cheap lamps, where low-quality materials and elements are often used. The blame for the rapid failure of such emitters lies with the ballast converter.


