In order to avoid problems such as a reduced visibility range at night, as well as an increase in danger for drivers driving in the oncoming lane, you need to properly adjust your car's headlights.
Universal instructions for adjusting headlights
This can be done manually, with the help of car service specialists, or by using necessary equipment. If you want to save money, but carry out this procedure correctly, then do it yourself The headlights are adjusted in four stages:
- make markings on the wall;
- mark the lamps;
- adjust low beam;
- adjust the high beam.
When to adjust headlights
Every driver should know when to adjust their headlights. Therefore, if you are not one of them, then let us briefly remind you about this. This procedure is performed in one of the following cases:
- When replacing lamps in a headlight. This applies to devices with both single and separate optics.
- When replacing one or both headlights. This may be caused by its failure, an accident, or the owner’s desire to install a more powerful or technologically advanced lighting device.
- In case you feel that you have become uncomfortable driving with the existing light and need to make adjustments.
- In the case when, when driving in the dark, drivers of oncoming cars flash at you high beam, thereby signaling that you are blinding them.
- During installation fog lights. As a rule, only the PTF is adjusted.
- After performing work related to changing the stiffness of the suspension.
- When replacing wheels or tires with similar products with different diameters.
- In preparation for undergoing routine maintenance.
- Before traveling long distances.
Monitor the light emitted by your vehicle's headlights and adjust it if necessary. Remember that an incorrectly set light causes discomfort and a threat not only to you, but also to drivers of oncoming cars.
Two universal ways to adjust headlights
Before you start adjusting the headlights, you should check the following parameters auto:
- The difference in tire volumes.
- The condition of the springs in the suspension.
- Complete distribution of all possible loads.
- Tire pressure level.
If there are malfunctions here, then the lighting angle will be incorrect, which, in turn, will certainly affect the quality of the adjustment itself. Naturally, to adjust the light correctly, you will need meet some important conditions. The first of these is the presence of a vertical, flat wall with sufficient space for a car - a length of at least 7.5 meters.
For direct marking, you can use either chalk or duct tape. Since each car has its own dimensions, the markings for it are purely individual. However, there are several standard values, which can be used for almost all cars.
The first way to adjust headlights
We find a flat area, the side of which should rest against the wall. The wall, in turn, must be without protrusions, corners, various irregularities and strictly vertical. We drive close to the wall and mark the center of the car, as well as the central axis of the lamps.
To correctly mark the wall, you need to mark the distance from the floor to the lamp and from the marked lamp to the center of the car. Then you should draw another line on the wall, located 5 cm below the first. Further we move 7.5 meters away from the wall and draw a horizontal line on the wall that will connect the central points on both lamps.
Then we draw vertical lines through the central points of the headlights. Another vertical line should be drawn through the center point of the machine. This line should be 7.62 cm lower than the one that connects the center of our headlights.
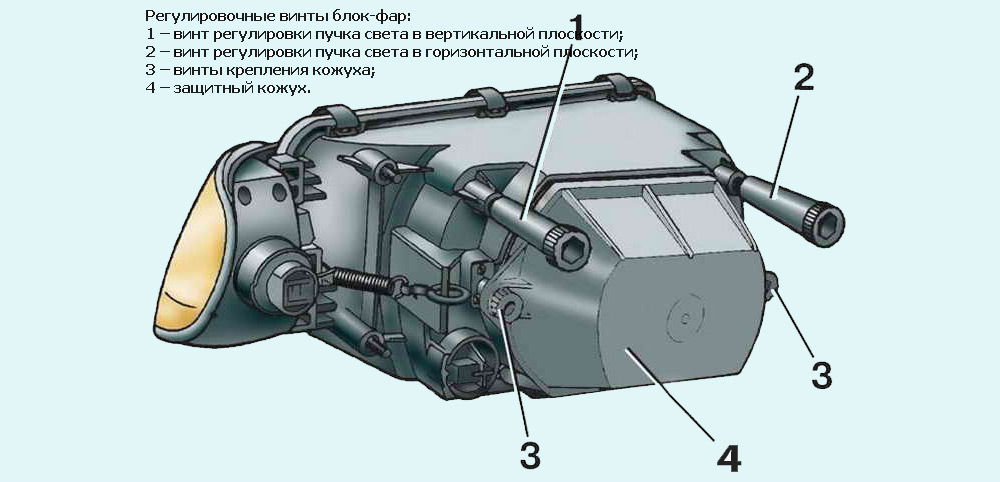
Adjusting screws for adjusting the headlight beam
Having made the marking, we turn on the low beam and make a direct adjustment, at which the angle of inclination of the lamps completely coincides with the horizontal line. And the place where the light begins to rise upward must necessarily coincide with the intersecting drawn lines.
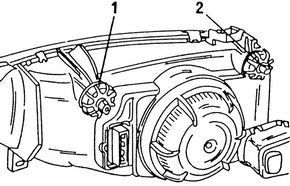
As a result, to get the desired beam of light, you should tighten the adjusting screws, which are located under the hood of the car on the back of the headlight.
Perfect the right option is when the light is slightly below the center mark of the headlights.
If the car has a combined high and low beam, then only the high beam can be adjusted, and the low beam will be adjusted automatically.
If your car has a separate high and low beam system, then each beam of light will have to be adjusted in turn. And the wall markings will also be slightly different - the low beam is adjusted according to the method described above. And the high beam must be placed so that it exactly falls on the central markings of the headlights. In this case, it is better to use special equipment, without which ideal adjustment will not be possible in this version.
The second way to adjust the headlights
You will need the same flat wall as in the first case, but the machine must be placed at a greater distance - 10 meters. To make adjustments as accurately as possible, you should prepare the car in advance: pump up the tires, fill a full tank of gas, put behind the wheel a person who is the closest weight to the driver.

How to adjust headlights without instruments
On the wall we mark the places that correspond to the center of the lamps, as well as at the distance at which they are located in reality. We connect these two points horizontally, then draw two more horizontal lines:
- 12 cm lower;
- 22 cm higher.
Having completed the marking, we set the lighting width control to zero. The upper limit of the light spot of the main headlights should be the second line, and the third line will be the upper limit of the fog lamps.
But the intersection of all light streams should be at the intersection of our lines numbered 2 and 3 - below the center of the lamps by 12 and 22 centimeters, respectively. The driver should also ensure that the additional screw was in intact condition, and if there is a hydraulic corrector, it must be adjusted according to the received load - the position of the car with one driver, without passengers.
PTF adjustment
Adjusting the fog lights, although slightly, still differs from the method described above. Before adjusting the PTF, you need provide the machine with additional load 70 kilograms - anything will do and fit in your car.
We also fill the tank full and place the car so that it is located on the most flat horizontal surface, 10 meters from the light of the resulting screen. However, many experienced drivers claim that 5 meters is enough.

Fog lamp adjustment diagram
We draw lines on the wall, meaning with their edges important points. The bottom line is the size from the ground to the fog lights, the top line is the same, only twice the distance.
We also mark the distance to the center of the car, looking at it directly to the centers of both fog lights. The result should be a lined screen surface with two points at the center of the lamps, and there will also be restrictions on the lower and upper boundaries of the light.
After drawing the lines, we install the car at a distance of 10 meters from the wall and, using a screwdriver and adjusting screws on the headlights, focus the beam of light from the lamps at those points where the centers of the headlights intersect.
Adjusting lensed headlights
Before adjusting lensed headlights, you need to know that there are two types of them - adjustable and non-adjustable. The latter are quite cheap, and we do not recommend using such lighting devices. One example of such a headlight is produced under the Depo brand. Some headlights are equipped with automatic control. However, it often fails, so this is also not the best option.
To adjust lensed headlights, there are also special regulators, as on regular ones. lighting fixtures. In this case, it is impossible to give unambiguous recommendations, since in different cars and even in different headlights, adjustment occurs using different means. As a rule, adjusting bolts or handles are used for this. But after reading general instructions by adjusting the headlights, you will be able to cope with the task.
Adjusting the headlights with the device
![]()
Adjusting the headlights according to the device
At service stations, headlights are usually adjusted using special devices. Their purchase is not practical for the average car owner, since such a device costs a lot, and it does not have to be used very often. Therefore, knowledge of how to adjust headlights with a device will only be useful to you in order to check whether the service station worker is acting correctly.
The verification algorithm will be as follows:
- Align the longitudinal axis of the device with the vehicle. It’s not a fact that the car drove strictly perpendicular to the pit. This is the basic condition. To perform this, the device has a mirror in its upper part with a horizontal line applied to it. Using it, you can easily align the device so that it stands strictly perpendicular to the body and headlights.
- Place the device strictly horizontally. Typically, the design of its body provides a level with an air bubble for these purposes. This is a simple but reliable tool that allows you to achieve the desired results.
- Setting the adjustment angle. On various devices he can exhibit various methods(one such option is a swivel caster). The angle value “0” means that the headlights will shine strictly straight in the direction of the vehicle. The angle can vary by tenths of a degree. You can find the angle at which you need to set the headlight in the reference literature for your car.
- The axis of the adjusting device and the axis of the headlight must coincide.
Remember not to “raise” the headlight beams too much. Indeed, in this case the meaning luminous flux may decrease by 20...30%, which is a significant indicator. In addition, this will blind drivers coming towards you.
Headlights are essential element car, without which its operation is strictly prohibited. Every vehicle owner must keep them in optimal condition, because... they directly affect safety traffic. To answer the question of how to adjust the headlights yourself (low or high beam), read the instructions below, otherwise take your car to a service center for correction.
When do you need to adjust your headlights?
One of the indicators that you need to adjust your headlights is the corresponding signals from oncoming traffic. If drivers begin to honk at you frequently for no apparent reason, then it’s time to pay attention to the operation of your headlights. In addition, you will have to adjust the headlights if the light spot illuminates not the road in front of you, but the space and curbs. It is advisable to carry out such adjustments before the start of each season and after repairing those parts related to the front suspension.
How should the headlights shine?
Before you adjust and adjust the low beam headlights so that the light beam is directed in the desired direction, find out how these devices are generally supposed to work. Headlights that are adjusted correctly and correctly should shine so that the horizontal line of their glow coincides with the horizontal line previously drawn on the wall. That is, the point where the beam of light is eliminated upward should be at the intersection of the lines that are marked on the wall.
How to adjust headlights
Whether lens or xenon lamps, they must be adjusted so that while driving you do not have problems with the range and accuracy of the illumination. If the direction of the light is incorrect, and visibility and visibility are insufficient, this can lead to an accident. An adjustment process such as adjusting car headlights requires a lot of responsibility, and if you are not confident in yourself, then it is better to contact a specialist. Service centers have special optical stands for this. If you decide to adjust the car lights yourself, then familiarize yourself with the main steps:
- Carrying out markings according to certain patterns on any wall.
- Marking the position of the lamps.
- Performing the lighting settings itself.
Low beam
It is somewhat difficult to adjust the direction and tilt of the light beam, as well as the reflector of the nearby lamps of a VAZ, Gazelle and other cars, so follow the instructions strictly. Please note that the rules for adjusting such devices in Russia are regulated by GOST 8769-75. As for the process itself, first install the machine 5 meters from the wall. If xenon lamps are installed, increase the distance to 10 m. The tire pressure must correspond to the parameters specified in technical specifications auto. Then:
- Open the hood, look at the label on the light housing. There should be an image in the form of a profile of the headlight, which is tilted at a certain angle. If there is no sticker, then take the data from the technical documentation of the machine.
- Draw on the wall the projection of the center of the var, the vertical axis of the vehicle. You can use chalk, duct tape, or laser level.
- The marks must be made at the same distance from the ground as the centers of the instruments are located from it. Connect all the points with a line parallel to the surface.
- Take the distance from the wall to the car and multiply it by the slope parameter that was indicated on the label. For example, 500 (cm) X 0.01 (one percent) = 5 cm. Step back this amount down from the points that are projected from the center of the lamps, put new marks, and then connect with a line.
- Turn on the low beam. If the left edges of the semicircles touch the bottom line, and the right edges touch the top, then everything is in order, but if this is not the case, then open the hood and adjust the instruments using the screws. Move the rays vertically and horizontally to achieve the result.
High beam
Manual headlight adjustment high beam may only be required if the devices were installed separately. If the lamps are combined, then the adjustment must be made according to the low beam. As for separate models, the process of adjusting them is the same as described in previous section- starting from marking the corresponding points on the wall and making parallel markings for this type of headlights.
Fog
To keep your steering wheel confident while driving, start setting up the fog lights. Their main purpose is to illuminate the road in front of the car at a distance of 15 m and the side of the road. As in the described instructions, mark the projection points of the middle of these lamps on the wall, connect them with lines parallel to the floor. Then draw a second marking and turn on the headlights. If the top edge of both light spots touches the second (bottom) line, and their centers are 120 mm apart, then everything is fine.

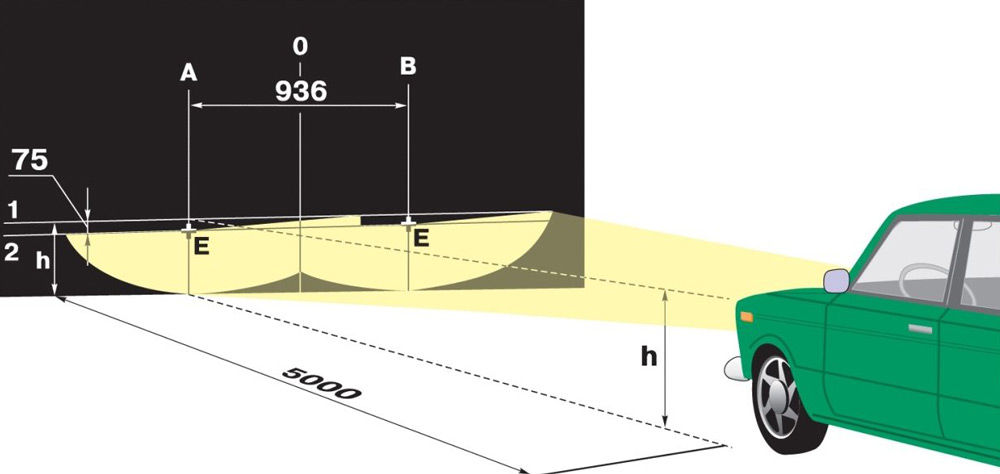
Headlight adjustment diagram
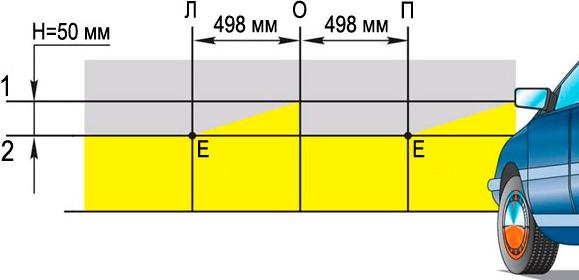
To solve the problem, how to adjust car lights, place the unloaded machine on a level horizontal platform in front of a wall/low fence. Draw a vertical line “0” on a kind of screen, then draw two more lines from it (symmetrical) “L” and “R” - they should coincide with the centers of both headlights. To further solve the problem of how to adjust both headlights, use the following diagram:
- If you have completed the previous steps, then draw a horizontal line “1” at a height that corresponds to the distance of the centers of the lamps from the ground, and 5 cm below it - the same second line.
- Cover each lamp, checking the position of the light border in relation to the diagram on the screen.
- The light border should pass along horizontal line“2”, and the inclined segments begin at points “E” at the intersection of line “2” with “L” and “P”.
Price for headlight adjustment
To find out how much it costs to adjust your headlights, check out offers 3-4 or more service centers, because The cost of the process can vary greatly. This approach will help you save money. The price may depend on the experience, professionalism of the workers, and the location of the service. When planning to compare prices in Moscow, use the following table:
Video
According to GOST 8769-75 (external lighting devices for cars, buses, trolleybuses, tractors, trailers and semi-trailers, quantity, location, color, visibility angles).
A low beam headlight is a light device designed to illuminate the road ahead of a vehicle when passing an oncoming vehicle, as well as when driving along city streets.
Requirements for low beam headlights.
1.1.1. Each vehicle, except trailers and semi-trailers, must be equipped with two low beam headlights.
1.1.2. The location of the low beam headlights on the vehicle must correspond to that shown in Fig. 1.
1.1.3. Low beam headlights must emit White light. It is permissible to use headlights with selective yellow light.
1.1.4. Low beam headlamps installed on vehicles the design of which will begin after January 1, 1986 must be visible in vertical and horizontal planes within the viewing angles shown in Fig. 1a
1.1.5 For motor vehicles, the vertical direction of the low beam beams, measured under static conditions and under all load conditions defined in Annex 3, shall remain between minus 0.5 and minus 2.5% without manual adjustment. In the case of an "empty vehicle" this vertical direction should initially be adjusted from minus 1 to minus 1.5%. For each type of vehicle, the manufacturer must indicate this initial direction on a plate affixed to each vehicle.
If the specified vertical direction is ensured by means of a device adjusting the position of the headlamp relative to the vehicle, then in the event of failure of this device it must be impossible for the beam to return to a position lower than that at which the failure occurred of this device. This condition should be provided automatically.
The use of manual adjustment devices of continuous or step-by-step action is permitted if an initial position is provided that ensures the initial adjustment of the headlights in the vertical direction specified in paragraph 1.1.5 using conventional adjusting screws. These manual adjustment devices must be operated from the driver's seat.
On adjusting devices continuous action there should be control points indicating the main loading conditions.
1.1.6 Step control devices shall have a number of steps such that, starting from an initial vertical direction value of between 1 and 1.5 %, it can provide all values between 0.5 and 2.5 % for all load conditions specified in Appendix 3. The load conditions for each stage must be clearly indicated near the control actuator.
1.1.7 According to UNECE Regulation 112 (high and low beam headlights
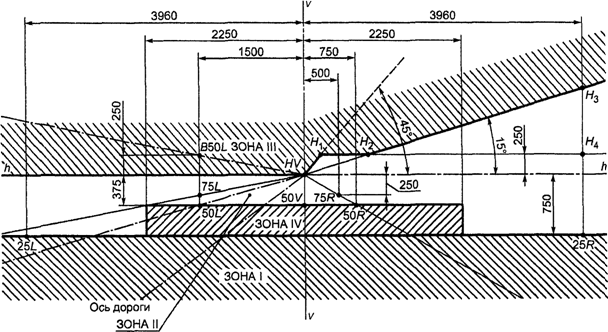
car lights, technical conditions), the light characteristics of headlights should be assessed by illumination at control points on a vertical measuring screen located at a distance of 25 m from their light center (the point of intersection of the reflector axis with outer surface diffuser). Low beam control points are shown in Fig. 2
There is also UNECE Rule No. 98 (Uniform Rules,
concerning the approval of headlights of motor vehicles with gas-discharge light sources).
The illumination at the control points of the measuring screen (Fig. 2) must correspond to the values in Table 2.
Entering the road to evening time, you will probably see at least one car with incorrectly adjusted headlights. Remember those unpleasant sensations when you have to squint your eyes and endure pain while your eyes try to adapt to an unexpected beam bright light- and think about how you would like to create such a nuisance for others. If not, then you will need to find out how to adjust to achieve them correct location that does not create interference for other road users. You need to do this procedure at least a couple of times a year, and if the right approach it takes no more than 15–20 minutes of time.
Preparing for work
You can start regulating only after purchasing everything you need, as well as checking the condition of the car. You will need:
- Long ruler (preferably at least 30 cm);
- A marker or any other device that draws on any surface;
- A piece of cardboard, plywood or other material that can completely cover one headlight.
If you have or will always adjust headlights in a certain place, you can apply permanent markings, for which it is better to replace the marker with permanent paint.
Don't forget to check the condition of your car - the correctness of the regulation process always depends on this. The main thing to pay attention to is that it should maintain constant ground clearance and not create distortions in a certain direction. The electrics responsible for transmitting energy to the headlights must also be in good working order, otherwise their light may be too dim. The last item on the list is the lamps, their fastenings and adjusting screws; if they are damaged, it will not be possible to change the position of the lighting system normally.
Take care of own safety- it is advisable that the engine and generator are turned off and power is supplied to the headlights. In addition, be sure to use gloves that will protect you from hypothermia of your hands, burns from hot engine components, and from dirt getting on your skin. Finally, study the position of the adjustment screws in advance and consider how to access them without exposing yourself to undue danger.
Adjustment process
There is a lot of debate among drivers regarding which method to use when setting the correct headlight position. It must be said right away that if we are not talking about outright errors in calculations, all methods can be considered correct. The point is that not absolute values are used, but relative values, and in fact you can park the car on at different distances from the plane, not forgetting to make the required adjustments.
Let's consider a typical case that is relevant for most. We open the hood and look at the surface of the headlights, which should be equipped with a white or yellow sticker with a pictogram depicting an inclined beam of light emitted by the headlight. It should indicate the standard angle of inclination - in this case we will take it equal to 1.0%. If the sticker is missing or too worn out, you should find the required number in the instruction manual.
We find a flat wall and drive the car close, trying to ensure that its nose is set at an angle of 90 degrees relative to the plane. Now you need to put two points on the wall corresponding to the central points of the headlights, and also draw a line exactly along the vertical axis of the car - for this you can look at the location of the emblem. We connect two points with a line, passing it through vertical axis. If you are not confident in your artistic abilities, it is better to use building level to make it strictly parallel to the ground. The preparation should be completed by setting the hydraulic corrector to the zero position.
Now we move the car to a distance of 5 meters (more if desired, which is recommended for owners of cars with other powerful light sources). On the wall we place a second line, which should be 500*1.0%=500*0.01=5 centimeters below the first. If you choose a different distance or the inscription on the sticker contains a different angle, you should substitute these numbers into the specified calculation. Turn on the headlights and look at the result obtained - with low beam, the upper boundary of the light beam should pass along the line drawn below, and the rays illuminating the side of the road should not rise above the line corresponding to the centers of the headlights. If the headlight height is incorrect or they deviate to the side, turn the side and center adjustment screws accordingly.
If you want to adjust the light at the same time, you need to draw another line - this time 22 centimeters below the second one. The upper boundary of the fog light beam cannot be located above this third line. If your car has separate high beam headlights, you should adjust them individually - to do this, mark their position on the wall and again draw a line through the centers of the lighting equipment. Above it you need to place another line, spaced 5 centimeters. Upper limit of the light beam high beam headlights should be in contact with it, but not rise even higher.
Easy or difficult?
Practice shows that in the first 1–2 times, car owners go through real tests that take away from them more than an hour. Over time, skill comes, allowing you to significantly reduce the time required for adjustment, but the process still requires maximum concentration. In addition, the driver faces the danger of breaking the adjusting screws, seriously damaging the headlights. If this doesn’t scare you, you should perform the procedure yourself. Otherwise, you can use a professional service, which will be relatively inexpensive.


