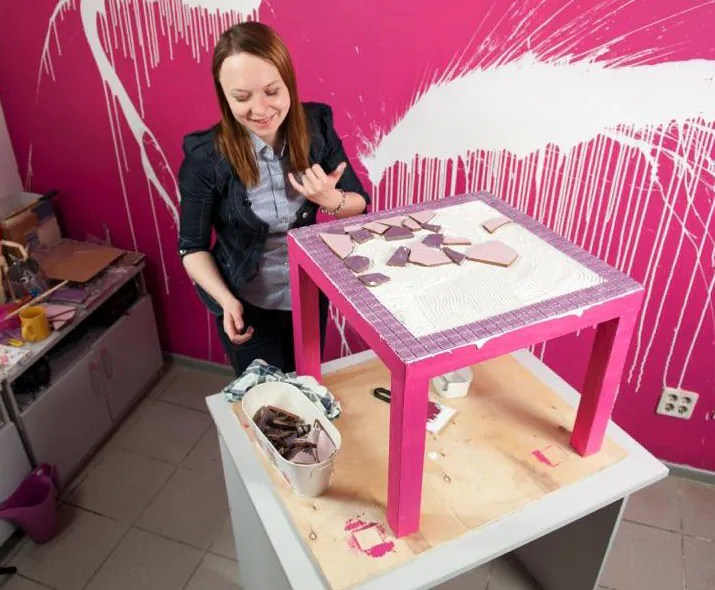
This master class is from a craftswoman under the nickname greenfasol will tell you how to make a chic gift for yourself and your loved ones in the form of a large massive tabletop. Need leftover ceramic tiles.
The design, table size, color scheme and height can be any, but the principle of making such a thing is the same.
From necessary tools You need to prepare a jigsaw, tile cutter, wire cutters, and sandpaper.
1. We are looking for a ready-made piece or cutting out a suitable piece of chipboard, thick plywood, an old table top... The main thing is that the angles are strictly 90, we check against the construction corner.
The size of this table is 125 x 85 cm.
Clean the base from dust, then prime it well with PVA glue diluted with water 1:3, let dry. If the glue is liquid (and now the manufacturer makes just that, ehhh)), then you can dilute it a little, to the point of “thick water”.

2. We outline the future pattern. When making calculations, do not forget to add a gap of 2-3 mm to the grout. This table has a simple geometric design, but what if you want a sea of flowers? Then draw and transfer to the base.
3. Cut the tiles. A lot at once, so as not to be distracted. These squares are approximately 8 x 8 cm.
4. We begin gluing, strictly observing right angles and aligning the edge of the tile with the edge of the base; you can use the ruler as a “border”.

5. First, we tile the entire edge of the future tabletop, then fill the middle.


6. Grind the surface with a soft spatula, pressing the grout into the tile joints. After 5-10 minutes, remove excess solution with a soft, dry cloth. Just dry and soft, and not with a damp sponge, as many advise...

If something doesn’t suit me, I do it like this. In this case, the edge of the tile protruded above the general plane, so I had to redo it. Make sure that the entire tile is evenly “sunk”, without blockages or protrusions.

This problem (surface unevenness) is especially relevant if the tiles different thicknesses. For beginners, I advise you to look for ceramics of the same thickness.
7. Sand the edge of the table top, soak it with PVA glue, and paint it to match acrylic paint. In the photo the edge has not yet been painted, but it will definitely be - I will choose chocolate color, or coffee with milk)


Tabletops decorated with mosaics by other artists:


Table tops with mosaic tiles for a round table

Mosaic is an interesting and original design move, diluting the interior with symmetrical patterns.
This finishing method can be used in the bathroom, kitchen and even in the dining area of the house.
Mosaic will look great not only on the walls or floor, but also on the countertop. In this instruction we will tell you how to make a mosaic table with your own hands.
Such a table will look great at home or in the garden, creating an interesting accent and emphasizing the subtle taste of the owner. Besides the cost homemade table much lower than purchased.
Tools
- Transparent glue. Needed to give additional strength to the finished mosaic pattern and fix the corners. The glue should be moderately thick to prevent it from spreading over the surface.
- Ruler. A forty-centimeter thick frost is necessary for marking tabletops. The main guiding elements of the drawing are then laid out along these lines. To mark large countertops, you can use a regular tape measure.
- A simple pencil. Needed for drawing marking lines. A soft stylus is best suited for these purposes. It will require frequent sharpening, but will leave clearer marks on the surface.
- Rubber spatula. Used to distribute grout evenly over the entire surface. A rubber spatula will not damage mosaic tiles and will not leave scratches.
- Foam sponge. Helps remove excess grout and clean the surface mosaic panel. You can replace it with a regular rag, but it’s more convenient to work with a sponge.
Materials
If you do not have experience laying out a table with mosaics, it is better to choose a model with a square top. It is easiest to place a symmetrical pattern on it.

We will also need waterproof chipboard; we will use it as a basis for the future painting. Of course, you can glue the mosaic directly onto the table, but its surface may not be smooth enough for good adhesion to the tile.

And finally the mosaic itself. IN classic version individual pieces are applied to the glue one by one, but it is much more convenient to work with tiles already assembled into a square on a self-adhesive base. They can be glued as a whole array, or they can be separated in small pieces.

Assembly
- We mark the chipboard panel using a ruler and pencil. The marking lines will help us not to get lost when drawing up the drawing and will indicate the direction for the main parts of the pattern. Divide the model into equal sectors, maintaining symmetry.
- Secure the chipboard panel to the table top with glue. Glue the panel thoroughly, it should fit snugly to the tabletop.
- Separate the mosaic tiles from the overall array without removing protective film from the adhesive side. Repeat the selected pattern by placing it on the marked panel. Lay out the mosaic carefully, remembering to maintain symmetry. At this stage you can experiment, but by the time you put it on the glue you should be absolutely sure of the design.
- Having achieved the desired pattern, begin to carefully lay out the tiles. Do not disassemble the design completely, carefully remove one tile and place it on the glue. Then repeat the procedure with the adjacent one and so on until you reach the end of the pattern. This is the easiest way not to spoil the composition. Refer to the drawn lines and try to make the seams as narrow as possible.
- When drawing up the drawing, do not forget to glue unreliable seams and corner elements. The panel may fall apart in these places, so be careful Special attention gluing quality. The glue should not stand out much or create sagging.
- After waiting for the glue to dry, apply grout to the mosaic. This final stage, after which the mosaic will be firmly fixed on the countertop. The grout must be distributed evenly over the entire surface using a rubber spatula.
- Remove excess grout with a damp sponge. It is better to do this immediately after application, without waiting for the solution to harden.
Labor and cost
One square meter self-adhesive mosaics cost about 5,000 rubles. The price depends on the supplier and manufacturer. An already sized chipboard panel will cost 100 rubles. Transparent glue within 200 rubles. 250 grams of mosaic grout cost 230 rubles.
Marking the panel and applying mosaics to the surface is a rather painstaking process. Without experience, you can spend three to four hours on this. Subsequent treatment with glue and grout should not cause any particular difficulties and will take a total of about an hour.
In this article News portal The “site” would like to invite you to make a table with your own hands, the tabletop of which will be decorated with mosaics.
Making a mosaic table can be in an inexpensive way recovery old furniture, as well as a simple and cheap activity that you can do in free time.
 To create a table you will need following materials, which you can easily buy at any craft store:
- old tabletop (suitable old table);
- small tiles (as an alternative, you can use broken plates);
- grout for tile joints;
- glue on cement based;
- rubber gloves to protect your hands .
Table preparation
 In order to properly adhere the tiles to your future table, you must make sure that the tabletop is completely clean of any dirt that may have accumulated on the table.
Use a soft sponge and some warm, soapy water to thoroughly clean the countertop, then dry thoroughly. If necessary, sand the surface.
Before you start gluing the tiles, you should think carefully about where you are going to place the tiles. You may want to create some kind of pattern or even a design.
Application of tiles
you can use small tiles, or you can beat the big one.
 To glue the tiles to the countertop, you will need to use a cement-based adhesive. Don't forget to wear rubber gloves to avoid getting glue on your hands.
 Once all the tiles are glued to the countertop, you will need to use a soft tile grout to seal any gaps between the tiles. You can apply the grout with a spatula or with your hands wearing rubber gloves.
 After applying grout, wipe off excess as quickly as possible. Do not wait for the solution to dry as it will be very difficult to remove.
 Your mosaic table is ready.
 Do you want to be original? Then instead of tiles, try using tin beer bottle caps or wine corks. In a word, any materials and your imagination are suitable for decorating a table.

Adriatica (Natural Mosaic, China)
Even at the stage of choosing the material, I decided not to make the countertop from laminated chipboard, since it has an unusual shape and in some places it turns out to be quite wide. Artificial stone looks beautiful, but is very expensive, plus you can’t put hot things on it, it’s easy to scratch with a knife. It also looks good, but they shouldn’t be difficult to veneer curved shapes. So I decided to make a mosaic countertop with my own hands. I came across a Chinese mosaic from natural stone Adriatica Natural Mosaic. The size of each element is 25x25 mm, so it is convenient for it to form the end of a tabletop 5 cm thick.
Quick navigation through the article
Base


Essentially it is extruded polystyrene foam, reinforced with fiberglass on one or both sides and covered with a cement layer. This material is used to make benches in Turkish saunas. In terms of price, it is much more expensive than ordinary polystyrene foam, but it seems to me that for such a task it is worth the money. Instead of panels, you can use thin DSP, but they are heavy, and it is no longer possible to achieve a tabletop thickness of 5 cm.
Mosaic laying and grouting

I calculated everything in advance down to the millimeter, and began laying it: first on the countertop, then on the ends.
The mosaic was trimmed using a grinder with a disc on the tiles. In my case, I can’t do without an angle grinder. Even if you cut the sheet into separate strips and increase the size of each seam by fractions of a millimeter, you still won’t be able to make a beautiful connection on the window sill, since the slopes are not at a right angle.


Expenses
The total length of the tabletop (and table) is 5.3 m, area 3.5 m².
- Plywood 12 mm (2 sheets) - 1000 rub.
- Dulux Golden Teak stain (0.75 l) - 700 rub.
- Wedi building panel 2500x600x30 mm (2 pcs) - 4600 rub.
- Litoacryl Plus glue 5 kg (2 buckets) - 3260 rub.
- Mosaic made of natural stone M068-25T (3.5 m²) - 11,400 rub.
- Epoxy grout Mapei Kerapoxy Design No. 734 3 kg (3 pcs) - 6900 rub.
- Colored metallized additive MapeGlitter No. 214 (6 pcs) - 3160 rub.

Total: 31020 rubles. I couldn’t find countertops of similar sizes made of artificial stone cheaper than 42 thousand rubles. I made the base in 1 day, laid the mosaic in 2 days and did the grout in 3 evenings. Plus 1 day preparatory work(marking for trimming, holes for hob and a sink). I think it's a good alternative. Once a quarter I recommend polishing the countertop with Mellerud marble polish.
DIY mosaic tabletop - stylish solution for kitchen and bathroom. In addition, you can make a custom table for the living room, veranda or balcony. Let's take a closer look at how to bring such an idea to life.
Stylish and original solution
Features of tile countertops
Mosaic is a type of miniature tile. The sizes of fragments are often set within 1.5-2.5 cm. Their shape can be square, round, or arbitrary in more complex compositions.
If you decide to make a mosaic table with your own hands, keep in mind that despite its apparent simplicity, installation requires skill.
Individual fragments are fastened into larger format modules. Mesh and paper base are used as connecting material.
Features of mosaic countertops - strength and visual perception. It is decorative and stylish design in the bathroom or other room. Using individual fragments, a pattern is laid out or an entire drawing is created. Please note that the weight of such a tabletop will be considerable, so make sure you have a strong and stable base.

The mosaic surface combines durability and decorativeness
Execution options
The first thing you pay attention to is the specific accommodation area. The most popular are:
- separate mosaic surface;
- transition between furniture;
- table like a coffee table.
All DIY options will be an excellent addition to the interior of the living room or veranda. In the kitchen, mosaic countertops in the set are well combined with the same apron. Play around with the window sill in a similar way by adding it to work area. There are more options in the bathroom, for example, linking a washbasin with a screen, or hiding a washing machine in a niche with a countertop.

The most popular mosaic finishing options
The following is used as a basis:
- moisture-resistant drywall;
- plywood, as well as other wood material with water-repellent impregnation;
- concrete;
- dense polyurethane.
Necessary materials
- sandpaper;
- putty;
- primer;
- antiseptic.
To keep the mosaic securely on the table, use special adhesive mixtures. It is generally recommended to use plastic compounds white. Regular tile adhesive will also work, but only for opaque ceramics. For glass mosaic white or required transparent composition, also carefully prepare the surface so that base defects do not show through the cladding.

White or transparent tile adhesive is used with mosaics.
IN last resort grout is used. In the case of mosaics, this is of particular importance, since it helps to emphasize a pattern consisting of small fragments. For mosaics, use white mixtures, as well as colored ones to match the coating. Transparent epoxy or sodium mastics are also popular. This finish looks especially impressive with the addition of sparkles in combination with a glass base.
Surface preparation
To ensure that the mosaic lays neatly without effort, the base is cleaned and leveled using putty. Before further processing, remove dust and degrease the surface. Be sure to apply antiseptic impregnation to avoid the appearance of fungus and mold in the future. Coat the countertop with primer.
Also, to make work easier, attach a mesh with 1x1 cm cells to the surface. This will simplify marking and also improve the quality of adhesion.
Laying mosaics and auxiliary finishing
To make your bathroom countertop look neat, before you start facing works evaluate the future result by laying out the mosaic elements “dry”. So you will choose best option drawing and notice the remaining problem areas.

Applying mosaics on paper
Start laying from the nearest edge. If you do not need to trim the elements, start installing the cladding from a more convenient position - from the far edge. As an alternative, step back the required distance from the wall and start laying entire fragments. The remains are applied last, and all unevenness will later be hidden by the wall plinth. If you are planning a complex pattern with transitions around the perimeter, it is better to tile the tabletop from the central point.
Installation is carried out as follows: first, glue is applied to the base small area, enough minimum thickness, so level the surface almost to perfection. Depending on the type of mosaic, installation is carried out using:
- Grids. It is laid with a grid on the glue and leveled strictly according to the level.
- Papers. Mosaic is attached front side down, and after installation is completed upper layer soaks and removes.
Maintain the evenness of the coating and make identical seams over the entire area. Trimmed mosaic fragments are formed using wire cutters. An aluminum or PVC edge, if used, is also attached to the glue. At the end, the seams are sealed with grout. To protect against moisture, use epoxy mixtures and latex mastics. Such a countertop for a bathroom or kitchen will become a real highlight of the interior.


