We present to your attention an interesting idea for making a barbecue from car disk. The author of the idea claims that the use of the disk is justified by the fact that it is ideal because it has thick metal walls. Thanks to this, the grill will not quickly burn out from hot coals.
So, to make a barbecue from a car disk, we will need:
- car disk;
- square grid 40 by 40 cm;
- three metal rods with an 8 thread at the end;
- square metal sheet measuring 250 by 250 mm and 4-5 mm thick;
- welding machine.


First of all with outside disk, we must weld a metal disk so that hot corners do not fall through the large holes in the disk.


Let's move on to next stage. At this step, lightly tighten the nuts to weld them at the locations of the grill legs. The author claims that it is important to lightly tighten the nuts, and not tighten them completely, in order to get removable legs without welding the rods to the structure.


The grill is almost ready. All that remains is to prepare the grid. To do this, put the grid on the disk, take a marker, and trace the excess part with a grinder.


Our grill is ready. The corners must be placed in the disc. The holes that remain after welding the metal plate will help blow out the coals. Finally, the grill can be used without a grid, placing skewers with meat on it, or as an apparatus for making a barbecue. In this case, you can put the cut out mesh in the rim of the disc and enjoy a delicious barbecue.
The barbecues made from car wheels have a number of distinctive features before other types of homemade barbecues:
- Availability and low price material. If you already have a car, then getting an old wheel rim will not be difficult. If you are not a car owner, then any auto repair shop will give you a pair of unusable wheels for a small price or even free of charge.
- Great strength– the thickness of the metal increases the resistance to scratches and dents on the disc, which extends its service life.
- Fast production– assembling a device for preparing barbecue or other types of fried meat will take literally a couple of hours.
- Heat resistance– the metal from which the future barbecue of disks will consist holds heat well, not inferior to barbecues of famous brands.
- Versatility– a barbecue made from wheel rims can easily be turned into a camp stove or kitchen. This will significantly expand the range of dishes that can be cooked on it.
Coal or firewood is loaded at the bottom of the structure, barbecue grates or skewers are loaded at the top. If a dish is prepared in its own container (for example, pilaf or ukha), then the dishes are placed on a grate or wheel (provided that the diameter allows it to be placed). The heat from burning wood or smoldering coal warms the air inside the chamber, which makes cooking conditions as close as possible to conventional barbecues.
If you want to use a barbecue made from wheel rims as a smokehouse, then the upper air outlets are closed, and instead of firewood or coal, wood chips or sawdust are used.Forms of execution
 The barbecue, made from a wheel disk, has several varieties adapted for different types cooking:
- Simple barbecue– coal or firewood is placed in the wheel, and skewers are placed on top. The simplest option, requiring a minimum of additional preparations.
- Double barbecue— made of two wheels. This design is higher than the previous one. It can be used for stewing dishes, is suitable as an oven and has the ability to install a cauldron for pilaf.
- Closed oven – closed design can be used as a smokehouse. The smoke collects inside the device and comes out in portions through small holes.
DIY barbecue made from wheel rims
You can build a barbecue with your own hands from one disk from a car wheel. This will turn out quite simply and quickly, but such a grill will have low efficiency.
Therefore, first we will consider a device assembled from two disks. The sequence of steps for making a barbecue from two rims is as follows:
- Connect two drives together. To do this, you can use a grinder or, if you know how to use it, electric arc welding. Excess metal is removed from the touching edges so that the discs fit into each other better. This way the oven will have a common internal space.
- To prevent smoke from coming out everywhere, arc welding independently or with the help of a specialist who knows how to handle it, we seal the cracks and joints of the two disks. Without proper experience, you can burn through metal.
- The lower plane will play the role of a grate. To do this, you need to make a hole where the ash will be poured. It will also serve as a ash pit, which supplies the oxygen necessary for combustion.
- A cauldron can be placed on the upper surface. If you cut out the plane well so that it can be removed and put on, then you can also put skewers or a grill in its place.
Making a simple barbecue from car disks
- A plane is cut out on one side of the disk using a grinder. The resulting design resembles a small pot with holes in the bottom.
- If the holes are too large or their number is large, you need to install a second grate. This way the coals will not fall out of the grill, and the draft will be less.
- Three or four pieces of metal rod or pipe 45-50 cm long are used as legs.
- The resulting sections of pipe or metal rod are welded to the bottom of the grill. For greater stability, you can also make additional holes for bolts.
Smokehouse made from car disks
 To make a smokehouse from car rims You will need at least two disks.
- Two disks are connected to each other, as in the method described above (see brazier of two disks)
- Then you need to make a hole to remove the smoke. The upper plane of the disk is quite suitable for this. It must be carefully cut off so that you can then put it on top and use it as, for example, a hob.
- The legs need to be welded to the bottom surface for greater stability.
- In the middle of the cylinder formed by connecting the disks, a rectangle is cut out using a grinder. Then bolts are welded to the separated rectangle, and nuts are welded next to the cut edge. This creates a door that opens and closes.
Carrying handles
- To make carrying handles, wire with a diameter of 8-10 millimeters is suitable.
- To give the wire the desired shape, a vice and a hammer are useful.
- Using nuts, the wire is attached to the body.
Base for barbecue without welding
- Bars measuring 100x100 mm are connected and cut to form a square.
- Using a drill or drilling machine, holes are drilled in the corners.
- Threaded rods are passed through the holes, then the base is ground.
- Gaskets and washers are placed on the threaded rods, and excess parts of the rods are removed using a grinder.
- Prepare an installation hole and, if necessary, wheels.
- The base is covered with impregnation.
Assembling a finished barbecue from disks
- Using bolts with a smooth head, the stand is attached directly to the grill.
- The bolt heads should touch the center rim.
- It is better to install a plug between the stand and the grill to prevent ash from getting inside the stand. Both the plug and the stand (at least its upper part) must be coated with heat-resistant paint.
- Using flanges, the stand is attached to the base and barbecue. It is also better to paint the flanges.
Final preparations
- Since the structure is quite heavy, it is quite difficult to move it, especially when it is already cooling down after cooking. To do this, it is better to attach wheels to the base.
- A carabiner can be attached to the handles for hanging auxiliary tools.
- For the grill you will need two grates: the lower one is compact and narrow to hold the coal on it, and the upper one is wider to hold the food. You can also place coal on the bottom surface, but this is not suitable for all materials.
Detailed video on this topic
Painting
 It is better to coat all parts in two layers of heat-resistant spray paint (or any other heat-resistant paint). There are three main types of fire retardant dyes:
- Organosilicon- withstands up to 600 degrees. Despite the heat resistance, they are more suitable for painting parts that are not in direct contact with the flame.
- Acrylic- have good contact with the metal and adhere to it. Withstands surface temperatures up to 900 degrees, suitable for application to surfaces in contact with flames or heated to high temperatures. Most convenient in aerosol form.
- Dry mixes— silicone-based paints. Difficult to apply, more suitable for industry.
Let's look at the process of painting with acrylic dye:
- clean the grill from rust or other deposits on the surface (for example, soot);
- shake the paint can for about two minutes;
- from a distance of approximately 20 cm, spray paint onto the surface in one or several layers (each layer dries for approximately 30 minutes);
- after completely dry paint, heat the grill for a quarter of an hour.
Some tips:
- It is better to paint the grill when there is no wind.
- Mainly to be painted outer side barbecue
- It is better to wash and dry the surface after cleaning.
Made barbecue, oven, barbecue. a smokehouse made from car disks is an example of how waste materials can be reused for useful and desired design. These wheel rims are quite simple to make; you can make them yourself in the garage or in a home workshop. Although the design is simple, this product can be used for many tasks.
How to make a grill from rims
For self-assembly For this design of car disks, we think in advance what the layout of our product will be. Let's prepare consumables V the right amount, as well as a list of tools. To do a quality job, you need to be able to use a grinder to cut metal and a welding machine.

A simple option - a grill for skewers


More complex grill models with grill grates

How does a barbecue oven work:
Below we put firewood or cooked coals. A grill is placed on top or skewers are placed. We can also place the dishes on the wire rack or directly on the wheel, if the size is suitable. Thanks to the heat that rises, you can cook food in the same way as a regular barbecue. If we want to smoke food, then we close the exit at the top, make sure that the wood chips smolder - smoke should form. In each case, an individual design is thought out, depending on the needs of the owners. However, when assembling the device, the basic design principle is the same, regardless of the model.


Smoking chamber made from car wheels
A barbecue made from disks will be more profitable if it is adapted for various tasks. For those who prefer homemade balyk and sausages, we recommend a smokehouse, which will serve as a device made of disks. Such useful thing made using a minimum of two units of material.
The work is based on the principle in which two disks are connected to form a solid hollow structure. Top part is modified to make it convenient to fry kebabs - as in the previous model. However, in order to preserve the smoke, a lid and a smoke exhaust system should be installed. The partition with holes can be left, which will be easier. In this case, the device can act as a hob.

To secure the door, we weld a nut onto it so that they are symmetrical with respect to the weld seam. One bolt at a time is also fixed to the grill by welding in such a way that the door nuts are placed on them. After this, the grill is ready! Now you can enjoy the cooking process and the dishes themselves.
Ideas on how to create a grill, barbecue, oven with your own hands from car wheels

Possibility to adjust the height of the cauldron on the stand above the disk.

Grill grate with forging elements

disc grill on legs.

Brazier from a wheel disk and a spit.

Hanging original grill.

The wheel rim for the barbecue was taken from a truck.
When I purchased my SUV, I discovered that there was a “dead” spare tire in the trunk (they forgot to tell me about it before purchasing). I didn't know what to do with it, so I left it lying in the trunk until one day it occurred to me interesting idea- make a barbecue out of it. I didn't know how to weld metal, so I had to develop creativity However, any components used for assembly had to be made to withstand heat (i.e. no nickel or galvanized coatings).
Here is a list of tools and materials that I personally used, but this project can easily be adapted to suit individual preferences. The base can be made from wooden pallet or other wood lumber, and if you have no desire to make it at all, then the grill can be filled with concrete and the height can be adjusted using a piece of pipe required length. In general, there are many options.
Tools:
- Sander.
- Miter saw.
- Electric drill.
- Planer (optional).
Material:
- Wheel rim
- High temperature paint – 2 cans
- Bars 100x100x2500mm
- M16 bolts – 4 pieces
- Set screw for wood M12 – 4 pieces
- Steel pipe diameter 48 mm – 450 mm long
- Threaded rods M12 – 2 pieces
- Grill grate ( various sizes) – 1 or 2 pieces
- Wheels – 4 pieces
The hardest part of the job


Without a doubt, this is the most unpleasant part of the job - removing the rubber from the rim. After watching a few videos and trying to do everything according to theory, I ended up just taking an electric hacksaw, cutting the bead of the tire, and then somehow removing it using a pin and a long screwdriver.
After freeing the wheel from the rubber, I took it to a local sandblaster, where they allowed me to process it myself. It took about 11 minutes in time and cost less than 600 rubles (800 rubles if the work is done by a master).
Details and painting


I purchased all the necessary components from a local hardware store. I bought the pipe and cut it there. The pipe flange that will be installed on wooden base, there will be no need to modify it, since here we will use set screws required diameter. But the flange that will attach the disk to the pipe should have holes of a slightly larger diameter (they will have to be drilled) so that bolts with a wider head will fit into it.
Next comes painting. Personally, I used a special high-temperature paint, Rustoleum High Heat. Application of the coating follows the same principle as with any other spray paint. I painted all the parts in two layers. I wrapped paper around the wheel bearings before painting to prevent them from getting clogged with enamel.
Preparing the foundation


The disk itself is quite heavy, so the base should also be quite massive. I wanted to make it the same weight as the disk, but I needed to keep it compact, so I decided to use 100x100mm bars. I cut them with a saw so that the base ended up square.
I then drilled holes into the ends of the bars using a wood guide plate with pre-drilled slots. Ideally I would like to use drilling machine so that the holes were exactly the same, but since I didn’t have one, I took a regular drill. I then pushed threaded rods through the holes and then sanded the finished base.
Then I put gaskets on the threaded rods, screwed the washers on top and cut off all the excess with a grinder. After that I drilled (and sanded) holes for the set screws on the top and for the wheels on the bottom.
In the end, all that remains is to cover the base with impregnation and a layer of protective varnish.
Connecting the disk, pipe and base


To attach the pipe flange to the disk, I used bolts with a smooth head (as wide a diameter as possible). You need to make sure that the bolt heads touch the central rim of the disk. It may seem that this mount is quite weak, but once I tightened the nuts, it became clear that the design does not allow any play. I closed the hole in the pipe with a special sized plug to prevent ash from getting inside. I also treated the plug with high-temperature paint.
The pipe is screwed into the flange at one end, and into the base flange at the other. The base flange is secured with bolts and washers. I also covered them with paint.
Final chords

I used the valve hole on the disc to attach a hook in it, and then attached a carabiner to it - you can hang various things on it auxiliary tools(tweezers, brush, spatula).
Finding grates of the appropriate size turned out to be problematic, but I searched on the Internet and found necessary options. One grille should be small enough to fit inside and hold charcoal, and the other is wide enough to fit on top and hold food. In principle, one grate may be enough, since the coal can be placed directly on the metal of the disk (only if it is stainless steel or regular steel, and not zinc or galvanized metal), but I thought that the coals could fall out through the holes at the bottom and damage the wooden base.
Conclusion


I liked both the functionality and appearance the resulting grill. As someone who has not yet learned how to weld metal (but would very much like to), I strived to create enough reliable design using improvised means, and I think I succeeded. Also, if you remove the wheels and turn the grill upside down, you can get a pretty stylish table.
I hope you enjoyed my tutorial and find it useful!
Self-assembly of a barbecue from car wheel rims is a very cheap way to purchase a useful and functional item needed for garden plot. It's no secret that in summer season Residents of megacities vacationing outside the city find themselves in an environment devoid of their usual comfort. Instead of convenient stoves and multicookers, you have to adapt to electric stoves with 1-2 burners. In the event of a sudden power outage in a holiday village, a primitive period begins. The problem of the inconvenience of cooking over a fire can be solved with the help of an ingenious device developed by folk craftsmen.
It is very easy for car owners to get 1-2 rims. While these parts don't get replaced as often as tires or tubes, you can still find some barbecue material lying around in your garage. Unnecessary rims are thrown into landfills or handed over to scrap metal collection points. A lightweight structure on a metal site can be purchased for a purely symbolic amount. 
In addition to the disks themselves, you will need:

For coloring portable version You also need to choose heat-resistant paint. Painting will give the design aesthetic appearance and will protect from exposure to precipitation when stored outdoors.
The easiest way to make a barbecue from rims is to lay the part with the open side up. The standard holes in the cap will serve as a grate for the fuel placed inside. This design can be supplemented with handles and taken with you on picnics: it is lightweight and takes up virtually no space in the trunk, but can reliably prevent forest fires by preventing coals from scattering and limiting the fire to the diameter of the rim. Here is a video instruction on how to quickly do this and what you need to pay attention to when working:
How to make a Finnish hearth from car rims?
A distinctive feature of this type of stove is open hearth, installed in the center of the table. It doesn't take a lot of time or materials to make it. A round metal firebox can be successfully replaced by a wheel rim raised to the desired height. The base for it can be made of stone, cinder block or bricks, not forgetting to leave free space for air flow into the firebox.
Place the disk from the machine on the prepared base and cover it around the circumference with wild stones or bricks, leaving a small hole at the very bottom for ventilation. The height of the masonry should be such as to completely hide the base and the metal hearth. You can improve the design a little by welding a pin with a hook on the side for hanging a kettle or pot. 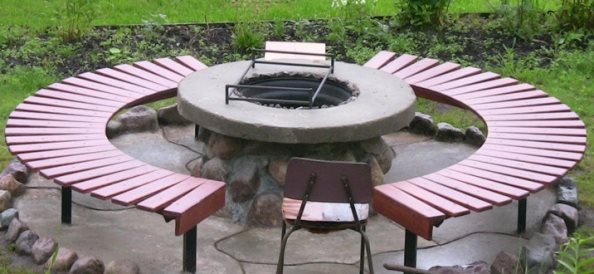
You need to lay a tabletop on the resulting low column with a recess on top round shape. It could be a dream big tree, a specially made slab from artificial stone, a sheet of thick metal or other available item. There should be a hole in the center of the tabletop, the diameter of which corresponds to the size of the wheel rim. 
This barbecue made from car wheels is stationary. You can arrange circular seating around it. To protect from rain, it is best to erect a light canopy, and if desired, the master can build a warm gazebo.
Portable barbecue of complex design made from car disks
A metal barbecue made from car wheels, made by a craftsman with imagination, can serve as a source of pride for him. Despite the simplicity of its design, such an oven is a multifunctional device: it is both a grill or barbecue and convenient stand for a cauldron, and decoration of a recreation area in the garden. In the photo you can see the design of the miracle stove forged elements, and the fire-breathing Darth Vader. 
Such a fireplace is not very heavy, so it can be installed in any convenient location on the site or take it with you into nature. A special feature of the design is the use of 2 identical disks from the wheels of a passenger car. The material must first be prepared for work: cut out or cut out the middle of one of them so that only the rim remains.
Install the disks from the car in this order:
- place the whole one at the bottom, placing it with the cap down;
- Place the one from which the central part was removed on top.
The upper part of the structure must be positioned so that the rib remaining after removing the hood is located on top, creating a partial overlap of the furnace roof. It is on this that you can lay a grill grate or place a cauldron and a kettle. The sides from the top of the rim will hold the cauldron in the desired position. 
Weld the upper and lower parts of the grill along the circumference. So that when using the product you do not have to remove the dishes placed above the fire each time, you need to cut out a door in the side of the oven. Mark and cut out a rectangle convenient size in such a way that there is a threshold about 10 cm high above the grate (the bottom of the firebox). This will allow the coals not to fall out when the door is opened.  Other hole parameters can be arbitrary. In principle, everything can be seen in the photos provided.
 The cut piece must be equipped with loops on one side and a latch on the opposite side. For these purposes, you can use ordinary metal fittings (latches, hooks, door hinges etc.). Attach small parts possible using welding machine or bolts and nuts.
In order to raise the barbecue to a height convenient for cooking, you need to weld 3-4 legs from the bottom from sections of angle or corrugated pipe. It is most convenient to place these parts inside the rim, the slope of the walls of which will give the structure grace and stability, ensuring the divergence of the lower part of the supports. If desired, the master can solve the problem in another way, by welding a single leg in the center of the structure and complementing it with a wide and heavy base.
Here's another idea on how you can do everything without welding:
After burning off the remains old paint and applying a heat-resistant coating, the barbecue can be considered ready for use. If desired, you can supplement the design with supports for placing skewers over the neck of the grill, handles for easy carrying and other necessary little things.
Self-made hearths of different types will simplify the process of cooking over an open fire. Each option can become the heart of a friendly company both in nature, in the garden, and in the gazebo. The relatively safe design of portable models requires their installation on non-combustible materials if the floor in the recreation area is wooden. Especially for this purpose, you can lay out the fireplace area with bricks or paving slabs.


