If you are constantly dealing with sharpening hard workpieces, then the surface of the drill will very quickly become unusable. It will become dull, it will be very hot and, as a result, will lose its former strength. All this is a consequence of "letting go" of the metal. That is why such a tool needs periodic sharpening with special devices.
How to make homemade tools for sharpening drills, what templates exist for this and what needs to be prepared for work, you will learn from our article.
Drill sharpening features
 Drills are inexpensive tools, especially when it comes to those that are widely used for domestic needs. However, if there is a possibility, then after dulling it is better to sharpen the tools than to buy new ones.
There are factory-made sharpening devices, but when you buy them, you will spend a lot of money, and this will not make up for the savings when you refuse to purchase new tools. That is why many craftsmen collect machine tools for DIY sharpening.
 It is worth noting that bluntness concerns drills for metal, since wood tools are practically not susceptible to this, with the exception of cases of use at high speeds with a resinous workpiece. Also cannot be sharpened victorious tips for stone or concrete.
But many people sharpen metal drills with all the additional devices with their own hands, but the accuracy of such work is far from always ideal, so it is advisable to use at least a minimum of mechanics.
How to make a tool for sharpening drills with your own hands: a training video
 To make such a device yourself, you need a control tool (template). Whichever way the drill is sharpened, the accuracy is checked with a special template.
Simple drills for ferrous metal have an edge angle of 115 to 120 degrees. If the metal is different, then the sharpening angles will also differ:

 You can prepare immediately multiple templates depending on the listed values and, in accordance with them, sharpen with your own hands. The same drill can be used for different types of workpieces, you just need to change the angles of the top of the workplace.
A simple but very convenient drag device is bushings of different sizes that are attached to the base. You can make them yourself, based on special drawings. Remember that the tool in the sleeve must not wobble and the drilling quality may deteriorate even if the error is only one degree.
 You can make a large clip based on aluminum or copper tubes, depending on the typical parameters of the drills, or you can take a block of soft material and make many holes in it. It is very important to put a handy tool in the sharpener, thanks to which it will be possible to move the sharpening device at the right angle and hold the stop.
The listed devices for sharpening have been manufactured for many decades in a row and are still in demand. To assemble a sharpening machine with your own hands, you can take an oak block instead of a corner.
The simplest sharpening machine can be assembled by simply placing a workbench or table in front of the side of the emery. Even such a simple device ensures high quality and accuracy of work.
Features of sharpening on a simple device
 On the Internet you can find finished drawings devices for sharpening drills, or sketch them yourself, but for this you need to understand the principle of working with a drill.
During work Absolutely forbidden allow the drill to move around its axis. If it rotates at least a millimeter, it will be damaged, and you will have to grind a short distance to re-process.
After finishing work, the drill should cool down, also measure with templates. Edges should be perfectly symmetrical down to tenths of a millimeter. This is especially important if the drill has a minimum diameter.
Sharpening can be accompanied by the following errors:

 How from improvised means with your own hands assemble a twist drill grinder for metal?
For the basis of the device, you can take any grinding machine that is able to work properly, there is no axle runout, and it keeps the revolutions under load.
The task looks like this:
- the handcuff is obliged to stand strictly horizontally on one axis with the rotation of the emery;
- the structure must be safe, reliable and durable;
- it should be possible to sharpen both manually and semiautomatically;
- the shape of the tool should facilitate the free lowering of the drill shank to the desired angle.
 No specific details are required for the manufacture of this device; every home craftsman has almost everything you need. Workpieces are processed grinder, welding or sharpener.
For the semi-automatic mode, a swinging stop is assumed, so a loop connection must be made. Match exactly for lack of backlash bolt, bracket and tube holes.
The site must move along the vertical axis so that you can change the angle of sharpening of the drill. This axis can be fixed, and the handlebar must swing, while resting on the horizontal axis, which, when sharpened, provides the desired articulation.
 Base plate is made of metal 4 mm thick, and the main parts of the structure should have a thickness of 3 mm, respectively. This ensures its high strength. The handrail is rigidly connected to the emery body. It is impossible to attach it to the protective casing, therefore, screw the bracket using the metal "cheek".
Then screw the guide plate itself for drills with a thickness of 5 mm to the base plate. In it, to fix the drill during processing, it is sawn triangular groove.
The design has a rotation angle of 90 degrees, which makes it possible to ensure different methods... Starting from the Leontief method and ending with a clamp at a certain angle and the creation of an acute angle of the edge thanks to the curvature of the emery.
 The drill during processing will not only stand firmly in the groove, it can also be fed along the groove to the abrasive, and the sharpening angle will not deviate at the same time. Due to the partial excess of the plane of the base plate over the axis of movement of the disk, it is possible to achieve the desired shape of the sharpening of the nape of the edge.
Before performing work, the drill should press against the plate and set the cutting edge parallel to it. The adjustment is over and you can bring the tool to the emery. Sharpening should be done slowly and carefully, carefully following the angle.
Thanks to such a homemade tool, high precision sharpening and almost no template needed. True, it will take time to install the machine and adjust the angle, but then you sharpen drills quickly in the right amount.
But if you need to sharpen a drill equipped with a carbide nozzle, you can attach a swinging plate to a fixed angle. For this, several washers are placed under the axle nut.
Using an emery wheel in a homemade sharpening tool
 For general-purpose grinding work, white corundum-based circles are mainly used. They are used for sharpening shovels, axes, knives and metal blanks.
For the purpose of machining carbide drills or high-speed metals, you need to take abrasive green wheels based on silicon carbide with the marking 64C. But for household needs, a circle grain size of 25N is enough.
 Sharpening drills requires a finer fraction in the area from 8H to 16H... Remember that silicon carbide emery stones get very hot during operation, so the drill cannot be kept in contact with such an abrasive for a long time. Let the metal cool down after 2-3 sets and chill it in soda water.
Edge quality depends on direction rotation of the abrasive... Its working surface must run into the cut (go from top to bottom).
Peripheral emery surface during processing must be flat. It can be adjusted with an elbor-based attachment. If the disc has a small diameter, pliers can be used to hold the CBN cutter.
So, we looked at how at home you can assemble and use devices of varying complexity for the purpose of sharpening drills and more. You can choose the appropriate option depending on your household needs.


No matter how high-quality and expensive the drill is, its service life is not infinite. However, it makes no sense to buy new components every time. You just need to figure out how to sharpen a drill to save yourself unnecessary expenses. To do this, you can use an electric grinder or, if not available, an abrasive bar. You also need to know that twist and winder drills are sharpened in a slightly different sequence.
General information about self-sharpening drills
There are usually no problems with sharpening wood drills - they serve perfectly, retaining their original characteristics for many months and even years. With drills for metal or concrete, the situation is completely different - they must be sharp, you cannot use blunt components to create holes in solid materials.
You can understand that it's time to sharpen the drill by the appearance of a characteristic sharp squeak during the drilling process. It is not recommended to use blunt products for work, and for the reason that in such conditions much more heat will be generated, and this will contribute to even faster wear of the drill.
Studying information on how to sharpen a drill, you need to learn to understand not only the features of such work, but also to know what equipment is used for this. The best option is a special machine.

In the absence of an industrial unit, you can use a home-made power station with an abrasive stone.
When choosing a sharpening technology, one must take into account the shape that must be given to the back wall of the product. You can make one- and two-plane shapes, as well as helical, cylindrical and conical.
The drills are sharpened along the back edges. It is important that both feathers of the product are sharpened the same. It is extremely difficult to do this manually. In addition, creating the desired shape and clearance angle by hand is also very difficult.
For work you will need:
- An electric sharpener or a special machine equipped with a diamond stone.
- Screwdrivers.
- Spanners.
- Wooden plank.
- Cooling water.
A diamond stone machine is an expensive piece of equipment, and not everyone has access to such units. For home use, you can assemble a homemade electric grinder. An ordinary square board is suitable as a basis. An engine with a power of 100-300 W and a rotational speed of 1500 rpm is installed on it. An abrasive wheel is attached to the motor shaft. Such an easy-to-assemble device will allow you to sharpen the drill without any problems.
Back to the table of contents
Self-sharpening process of the spiral type drill

Earlier it was noted that sharpening is one-plane and two-plane. For drills with a single-plane sharpening, the back wall looks like one plane. The slope can be 28-30 °. To sharpen such a drill, you simply need to attach it to the abrasive wheel so that the cutting part runs parallel to it, and then start the sharpening procedure. This simplest method is suitable for products with a diameter of less than 3 mm.
For drills with a diameter greater than 3 mm, it is better to use the conical sharpening method. It is quite difficult to do it manually without the appropriate skills, but if desired, it can be done. Take the drill with your left hand to the minimum possible distance to the intake cone. With the right hand, the product is taken by the tail. The back wall and the cutting edge press the sharpened product against the abrasive stone. A tapered surface is created at the back by lightly swinging the left hand. In the process of sharpening, the drill does not need to be torn off the stone, the movements should be smooth and relatively slow. The second nib is sharpened in the same order.
In the process of sharpening, try to repeat as much as possible the original shape of the back of the product to maintain the necessary clearance angles. This method is suitable for drills up to 1 cm in diameter. The point of this procedure is to increase the slope of the cutting edge and decrease the rake angle. This increases the resistance of the product to chipping, which makes it possible to increase its service life. The width of the cross section is reduced, making drilling much easier.

When working with drills with a small clearance angle, additional sharpening of the flank surface is performed. This will make it less likely to rub the hole in the material during the drilling process.
In production, after sharpening, fine-tuning is usually performed, which allows you to remove small notches and smooth the surface. Finishing increases the wear resistance of the drill. If there is such a possibility, it is recommended to do this processing without fail. It is carried out using round grinding stones made of silicon carbide on a bakelite bond.
Back to the table of contents
Step-by-step instructions for sharpening a victorious drill
The service life of victorious drills is also not eternal. After some time, such products also require sharpening. A dull drill will heat up too much during operation, make an unpleasant squealing sound and generally reduce the quality of drilling. For self-sharpening, the same machine is suitable as in the previous instructions. Plain water is great for cooling. It is important to take into account the fact that sharpening of a victorious product can only be performed using a diamond stone, simple emery stones are not suitable for this.
Before starting work, make sure that it can be done, for this measure the height of the cutting part of the product: if the soldering height is about 1 cm, you can start sharpening.
The harder the metal is, the slower the processing should be. The drill is sharpened with short strokes of the diamond stone. As a rule, it takes a little time to sharpen, because in essence, this procedure is reduced to a slight trimming of the edges. Control each stage of the work, it is important not to remove excess from the working victorious part of the product.

The sharpening process for brazed drills is practically the same as for small diameter drills, i.e. the sharpening of the rear part is made flat. The drill is grinded down to the soldering.
It is also recommended to grind the front surface. If the soldering of the product is grinded directly to the surface of the drill, you cannot do without sharpening. Without it, the service life of the product itself and the quality of work will significantly decrease. The front surface is sharpened so that the center of the soldering becomes less thick.
When performing each stage of work, you need to ensure that the cutting sides of the product are of the same size. If this is not possible, the offset center will lead to a decrease in quality and a violation of the geometry of future holes.
Regardless of the unit used for sharpening, it is necessary to monitor the ratio of the rear and front angles of the cutting edge in relation to rotation. Another rule, especially relevant for sharpening drills for concrete: the higher the hardness of the material, the higher the sharpening angle should be. In the case of the winner, it should be 170 °.
The drill must not overheat. This can lead to cracking and peeling of the carbide inserts. To prevent this, the drill needs to be cooled with liquid from time to time. Ordinary water is suitable for cooling.
Sharpening a drill at home is easy if you know how. The main difficulty in this business is to maintain the correct angles. After all, at home, as a rule, there are no special mandrels and conductors. There is only a sharpening machine. At least, we will proceed from such conditions.
We only have an electric sharpening machine. But the fact that it exists does not mean that it is possible to sharpen drills on it. It is necessary that the grinding disc has the correct shape - that is, the shape of a cylinder with an even, not rounded edge. Raised edges with chipped edges may result in improper sharpening
If the disc is very worn out, it is better to replace it with a new one or correct it with a special Elborov "pencil", if there is one on the farm. It is very good if the disc is balanced, does not give beats and vibrations (in fact, this is a mandatory norm). Only the peripheral surface of the disk is involved in the work, not its ends.
It is tempting to take advantage of the flat side of the disc. But after several sharpenings it will lose its shape and it will be much more difficult to fix the stone after that.
Sharpening a concrete drill
The hammer drill bit as a cutting part has a hard alloy plate inserted into a slot at the working end and fixed with solder. A normally sharpened drill has clear cutting edges with a sharpening angle of about 90 0 and an angle between the edges at the tip of 130–140 0.
With standard sharpening, the leading edge of the cutting edge (directed in the direction of rotation) is inclined to the drill axis at an angle of 30 0, and the rear one at an angle of 60 0. When sharpening manually, without special devices, you can focus on the whole, unworn part of the edges and reproduce their angles of inclination.
Sharpening process
We start sharpening from the front edges. We set the drill near the peripheral surface of the stone so that the cutting edge is parallel to the axis of the sharpener and directed upwards, and the edge is parallel to the surface, and for a short time we slightly press the drill against the sharpener. A clearly distinguishable mark remains on the metal, which indicates whether its position has been correctly chosen. The plane of the test section should coincide with the plane of the face, and the spot of the section should be located in the center of its unworn part, without significant displacement. Having found the correct position empirically, we remember it and proceed to sharpening.
Parallelism is not difficult to achieve if you bring the cutting edge to the surface of the stone and orient yourself according to the gap remaining before contact.
Do not try to sharpen the edge straight away. Remember that you still have to grind off the back edge, and then the edge will "fall into place".
First, the front edges are sharpened one after the other. Then you need to check their symmetry. This is done visually, in the light, by placing the drill head near the edge of an object. The edge should be flat or concave, but symmetrical. A special test template can be made. In case of asymmetry, a shorter edge is additionally grinded.
After that, in the same way, one by one, the rear edges of the edges are grinded, followed by a check for symmetry. The symmetry of the location of the edges is also checked when viewed from the end, along the axis of the drill. If sharpened correctly, they are parallel, and between them there is a bridge with a length of about 0.2–3 mm, depending on the diameter.
If, as a result of processing, the cutting edges do not become sharp, and there are visible fillets or cavities on them, the entire sharpening cycle must be repeated.

Supplements
When sharpening, it is important not to overheat the tool. To cool it, it is periodically dipped in water. Keep a container of water near the machine. Do not press the drill against the sharpener for a long time. It is better to work with short touches, about 2 – 4 s, intermittently for the same time. In this case, the excess heat has time to be removed by the drill body and the risk of overheating of the edge is reduced.
To work on soft materials without impact, for example on brick or tile, the cutting edges are brought to zero, without a bridge, and the angle of their sharpening is reduced to 30–35 0.
How to hold the drill while machining
Since, according to the terms of the problem, we do not have devices for precise positioning of drills, all hope is on our own hands. There are a few simple tricks for getting a firm hand.
It is best if, when sharpening the drill, it can be supported by a handcuff - a special "table" fixed in front of the sharpener. If, with direct support on the handcuff, it is not possible to achieve the desired position, you can hold the workpiece in your hands, but be sure to lean:
- fingers on the handcuff;
- with a wrist or a hand on a workbench, on a knee, on any stable and conveniently located object;
- elbow or forearm on a workbench or knee.
In the most extreme case, you can simply press your elbows to the sides, forming a triangle with your arms and body. But in any case, you need to find an opportunity to hold the tool as hard as possible with minimum effort.
When fixing the drill during operation, you should remember its position not only visually, but also by sensations in the hands. Muscle, kinesthetic memory may be more accurate than visual control.
Drill sharpening for metal
When sharpening drills for metal, only the rear surfaces of the cutting edges are grinded. These surfaces have a rounded shape (with a drill diameter less than 3 mm - flat) with a decrease relative to the edge about 10 0. The cutting edges converge to the tip of the drill at an angle of 116 - 120 0 (sharpening angle). For brass, copper, soft bronze, this angle is increased to 125–130 0, for aluminum - up to 140 0.
Sharpening
When sharpening, the drill is held with both hands. One near the sharpener, the other by the shank. The fingers of the hand closest to the sharpener (leading) rest on the handcuff. If not, you need to find any support, as described above.
The drill is located at an angle to the working surface of the grindstone: 60 0 horizontally (half the angle at the top) and about 10 0 vertically. The sharpened cutting edge is directed upwards and is located horizontally, parallel to the axis of the stone. Position selection can be done with the machine turned off, by the shape of the gaps between the edge and the sharpener when viewed from above, and between the sharpener and the back surface when viewed from the side. For a more accurate setting of the sharpening angle, a clearly visible line at the desired angle can be drawn on the handguard.
When sharpening, the drill is pressed against the sharpener by the cutting edge, and then, without changing the pressure and the horizontal angle, it is tilted down with the shank until the back surface is completely processed. In this case, the position of the leading hand does not change. After 1 - 3 such passes, the drill is rotated around the longitudinal axis by 180 0, and the operation is repeated for the second edge. The tool can be turned only with fingers, without changing the position of the hands.
After sharpening, you need to check the symmetry of the edges - the equality of their lengths and angles of inclination to the drill axis. If one of the edges is shorter, it will need to be sharpened again. The equality of the angles is checked visually - for the light or using a simple template, the length of the edges can be measured with a caliper.
Additional processing
With proper sharpening, the cutting edges do not converge at the top, a short bridge remains between them. To reduce the resistance to entry into the material, the lintel is grinded with a corner of a sharpening stone or a diamond file. Seam is performed on both sides, symmetrically, at an acute angle to the drill axis, and the edge of the groove formed in this case is located at an angle of 30 0 to the cutting edge. The purpose of this operation is to shorten the jumper, but not completely grind it off! Without it, the drill will not center when entering.
The bulkhead is ground on drills with a diameter of more than 3 mm. But in practice, for simple work without high loads, the lintel, as a rule, is not grinded even with a diameter of 10 mm or more.

Sharpening check
After sharpening, you need to check the tool in operation and, if necessary, correct. Several signs indicate sharpening errors.
- Poor alignment at the entrance, beats are noticeable during operation - asymmetric sharpening of edges or lintels.
- During operation, a squealing of metal is heard, the drill is very hot, the shavings look like small grains - a large angle of sharpening of the edge, insufficient lowering of the back surface (blunt edges).
- Increased torque, chipping quickly forms on the cutting edges - sharpening angle too small (excessively sharp edges).
Signs of correct sharpening:
- accurate centering at the entrance, stable operation, no beats;
- the entry into the material is easy, the chips come out in the form of identical "spirals" from both grooves;
- the drill temperature is low.
Drill sharpening for wood
There are several types of drills for drilling wood and wood-based materials. Here we will consider the most universal and widespread - spiral.
Features of wood drilling
The twist drill for wood differs little in design from its counterpart for metal. Even the cutting part can be the same. But wood has a fibrous structure. When drilling it, the cutters in different directions interact with the material in different ways. The consequence of this can be scuffing and chipping on the surface of the workpiece. To avoid this and get a neat even hole, use a special drill sharpening, with a center and cutters.
The center is the first to come into contact with the material - a narrow spike located along the axis of the drill. Deeper, he centers the tool, keeps it from lateral displacements. Then the undercutters come into play - side cutters protruding above the cutting edges. They cut off wood fibers along the contour of the hole and prevent flakes from spreading beyond its limits. The contoured, virtually insulated material is removed with the main blades.
Working part geometry
The angles of inclination of the centering faces to the drill axis are 10 0, the slope of the inner edges of the cutters is 30 0, the outer edges of the cutters coincide with the lateral surface of the drill. The angle of depression of the flank surface of the cutting edges is 25 0. The height of the center and scorers above the cutting edges depends on the drill diameter, but the scorers are always lower.
For example, a drill with a diameter of 10 mm should have a center bar with a height of 3.5–4.5 mm, and a scorer should have a height of 1 mm. Center base width is about 1.5 mm. For the recommended parameters for different diameters, see tables 1 and 2 of Appendix 1 to GOST 22053-76.
What to sharpen
To perform such a complex sharpening, a stone of a special shape is needed. If you have a "pencil" for dressing abrasive discs, you can give a standard grinding disc a trapezoidal profile (grind one edge onto a cone) and assign this stone to sharpen only wood drills.
You can also use the disc for the "grinder" by installing it on the grinder. An adapter can be ordered for different bore diameters. Another option is to use a grinder. But it must be securely fastened.
Sharpening is a familiar job
The process of sharpening a drill for wood itself is basically no different from sharpening other drills. The same techniques are used to select the desired angles, fix the tool, and control symmetry. If you just need to sharpen a dull drill, then there should be no big difficulties with good equipment. If you need to make a drill for wood from a standard one, then you should first practice on old drills, which are not a pity for training.
Self-sharpening drills for metal
The arsenal of any master, both a beginner and an experienced professional, includes drills. The sharpness of the cutting part decreases over time, and the drill wears out and becomes dull. When it is required to make holes in metal products, it becomes obvious that using such a tool is not only inconvenient, but even dangerous. Therefore, it is so important to restore the geometry of the drill bit in time and understand how to sharpen a drill for metal at home.
In order for the cutting devices to function well, each master is obliged to study the information on the correct sharpening of the drill. The work of this cutting tool consists in rotary movements with axial feed. With its help, it is possible to drill both through holes in metal and existing ones. The diameter and depth of the holes can vary greatly depending on the size of the drill itself and its angle of inclination.
Drill types:
Flat. With their help, you can make deep holes of large diameter.
Spiral.

Center. Used to center elements. Ring.

Absolutely all devices become dull over time and lose their sharpness, which interferes with work. But how can a beginner or an inexperienced master understand that it is already necessary to sharpen? Consider a number of signs that indicate that the drill should be sharpened urgently:
The appearance of an unpleasant hum and a sharp squeak indicates that the cutting device is worn out.
The edges heat up quickly while the drill is in operation, there is no heat dissipation from the cutting angle. The corner, in turn, becomes dull, losing sharpness and becoming rounded. Then the edges and edges are abraded, which contributes to overheating of the tool.
The holes in the metal become not deep enough, indistinct, and their quality decreases. The metal shavings do not come out correctly.
Equipment
Sharpening must be carried out on specialized equipment in compliance with safety precautions. In order not to harm yourself, you should remember a few nuances:
Eye protection. The presence of a container with a liquid for cooling the tool.
It is simply necessary to learn how to work in grinding units, because this work should be carried out regularly. The video below shows the correct use of such equipment. For household purposes, you can use simple machines:
- Grinding stone device.
- Electric grinder.
- Electric drill. Bulgarian. It is used if there are no strict requirements for the sharpening angle.
- Sharpening attachment for a drill.
All these machines are distinguished by high productivity, sharpening accuracy and simple application technology. They are easy to use and equipped with a comfortable control system, thanks to which you can monitor the sharpening speed. Affordable price and small dimensions are considered additional advantages.
Features of sharpening spiral drills
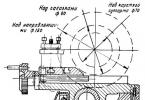
After you have determined that the drill is worn out and needs to be sharpened quickly, squeaks and gets very hot, you need to purchase a set of special tools. You can learn how to properly sharpen a drill for metal at home from the video of the master class below. In addition, it is important to familiarize yourself with the parameters that directly affect the sharpening process, because control of the angle by eye is not allowed: The rake angle between the drill and the cutting part at the base. The desired incline of the cutting angle is 20 degrees. The clearance angle is similar to the front angle, but at the rear. The back angle is 10 degrees. The angle at the top of the fixture. It is the same in all drills, it has a constant value of 118 degrees.
Drill sharpening types:
- Conical. Designed for drills with a diameter of 3 mm. In this case, the product must be held with two hands (one for the working cutting part, and the other for the tail), pressed against the working grinding surface, accompanied by a slight rocking of the tool. The movement should be smooth and not very fast, the drill is sharpened inseparably from the stone on the machine.
- One-plane. This is one of the types of manual sharpening, suitable for drills with a diameter of up to 3 mm, the rear angle of inclination when sharpening can be from 28 to 30 degrees. The drill must be positioned against the wheel of the sharpener, making sure that the cutting side is parallel to the wheel.
- Manual way of sharpening. To do the work yourself, using emery tools, you should follow the instructions.
Method 1: We take the drill with our left hand on the working side, and with our right hand we grab the tail. So it is more convenient to sharpen the tool in a simplified form. We press the back part of the gimbal to the working surface of the grinder, gently swing the hand with smooth and slow movements, while swinging the drill. Movements should be soft and continuous away from the cutting edge, the gimbal must not be torn off the stone on the machine. The back of the end should be tapered. We perform similar actions with the second tooth. In the process of work, one should not forget about cooling the tool by placing the drill periodically in a container with cold liquid (water, oil solution or a mixture of water and soda).
Method 2: We take the drill in the same way as in the first sharpening method. Press the bit from the side of the cutting edge to the plane of the grinding wheel and slowly rotate it in a circle around its axis. The movements should also be continuous, without looking up from the grinder. We get the tail of a tapered shape. In this case, the symmetry of the edges relative to the central axis of rotation should be visible. They need to be of the same length and level. In some cases, after the drills have been sharpened, it is necessary to fine-tune them. This will allow you to remove any jags and irregularities, as well as make all edges as smooth and uniform as possible by sharpening the drill.
Tips for beginners
If you are sharpening metal gimbals for the first time, you should be aware of some important points:
- If you have poor eyesight, experts recommend wearing glasses with high diopters and installing bright lights in the work area. There is also a special sharpening machine for the visually impaired.
Watch the video:
Drill sharpening for metal can be carried out without contacting the master. It is well known that the drilling tool becomes dull during operation. The more it is used, the sooner it deforms.
How to determine if a tool is dull
Many people do not pay attention to the signs indicating the need to sharpen the drill with their own hands. They use the tool until it completely breaks down, and then buy another. This is most often due to a lack of understanding of how to properly sharpen a drill for metal. It must be remembered that sharpening can be done with your own hands, in a domestic environment. You will need special tools.
It is possible to make a hole in steel if the tool is well sharpened. If, when drilling, the area where the drilling attachment touches the part creaks, then the tool is dull. It will start scrolling, rubbing against steel. In addition, the heat dissipation will increase significantly.
Specialists usually use small tools with a radius of less than eight millimeters. For sharpening blunt drills at home, you can use:
- sharpening device with an abrasive wheel;
- grinder;
- electric drill with the corresponding attachment.
You can use any other apparatus on which you can put a special stone and ensure its twisting. The rotation speed must exceed eight hundred revolutions per minute.
Preparation
Before you start sharpening, put on glasses, gloves, prepare a container with liquid. The smallest particles and sparks will fly from the sharpener in different directions. If you do not cover your hands, head, they can injure the skin. In particular, the organs of vision will be severely damaged. At best, you will get off with minor eye problems, at worst, you will go blind.
A container with water is designed to cool the tool. When sharpening, it will heat up from friction against the rotating abrasive surface. If the tool is not cooled, it will overheat and break.

Sharpening procedure
How to sharpen a drill bit for metal? It's not too difficult. It is required to strictly follow the algorithm by which the procedure is performed. First of all, decide what type of drill sharpening to choose. The choice depends on the shape that the cutting parts of the tool should have.
To make sure that the fixture is sharpened correctly, look at it. If you did everything correctly, then:
- the cutting parts are of the same length relative to the axis of the drill;
- the tapering angles of the elements do not differ from each other.
Drill sharpening should start at the base of the tool at the back. It is necessary not to deviate from the angle set at the beginning. If you've never done anything like this before, you may need to repeat sharpening a couple of times. At the end of each sharpening, inspect the tool carefully. The procedure must be repeated until the rear part becomes tapered (when viewed from the left / right).

If you are sharpening in one plane, then the back base is machined at an angle of twenty-eight to thirty degrees. This is a simple method that is used for tools with small thickness (radius no more than one and a half millimeters).
The attachment must be applied at a specific sharpening angle to the abrasive element. Do not allow the tool to overturn, move. This will provoke scattering of cutting parts, especially when the metal is of poor quality.
Cutting elements of tools with a large radius must be sharpened conically. This method is more difficult than the previous one. If you are unsure if you are following the correct procedure, practice on the parts you don't need before you start sharpening.
How to sharpen the drill conically correctly? With your left hand, grasp the main section, and with your right hand, the tail section. The base should be near the intake cone. Otherwise, the sharpening will not work properly. Swing the tool with your right hand. A cone-shaped base will form at the back. A similar procedure should be carried out for another part of the instrument. Make sure that the pen does not move away from the abrasive element for a second.
Peculiarities
How to sharpen a metal drill correctly? Ensure that the back of the drill is retained in its original shape. Such a technique will allow you to accurately maintain the set sharpening angles of the drill. Conically, you will be able to sharpen with your own hands tools with a radius of up to five millimeters. How do I sharpen larger drills? Sharpen the main parts of each nib separately.
When sharpening, the front and rear angles of the tool decrease, the angle of the cutting edge increases. This provides an extension of the operational period, a decrease in the width of the transverse edge.
When using a tapered sharpening method, the nib becomes stronger. In production conditions, fine-tuning is often carried out, which makes it possible to eliminate the smallest irregularities that remain after sharpening the drill for metal with your own hands.

Applying an angle template
How to sharpen the drill yourself? It was written above. To eliminate errors, you need to check the correctness of sharpening with a special device - a template.
The template can be made from a sheet of metal (copper, aluminum, steel), having a thickness of about one millimeter. It is advisable to use steel sheets, because they last longer than others. Using the template, calculate the angle of sharpening of the drill for wood / metal at the point, the size of the cutting parts, the angle between the bridge and the edge. Instead of the clearance angle, which is difficult to calculate, it is necessary to measure the taper angle.
If the lengths of the cutting parts and their angle of inclination to the tool axis are uneven, the load will not be distributed correctly. As a result, the operating period will be shortened due to wear of the cutting parts, which are constantly in a state of overload.
 Differences in the load on the parts of the tool provoke runout when machining the part. Because of this, the radius of the hole is larger than necessary. The easiest way to determine the correctness of sharpening is by trying to make a hole with a drilling device. If the chips fly out unevenly, it means that the sharpening of the drill for wood / metal was carried out incorrectly.
Sharpening device
The sharpening unit can be made with your own hands. It contains a large base and a small part with holes for drilling attachments of various sizes. The device cannot be designed for sharpening any one tool. It must provide the ability to machine tools with different diameters and lengths.
The base of the device, by means of which the twist drills are sharpened, can be made of cut strips 3-4 centimeters thick. A wooden plank with a side bevel at an angle of 27 degrees must be attached to them at an angle of 32 degrees. This bar is intended for the correct orientation of the holder with the drill relative to the grinding element. The holder can be made from a bar that has a bevel at an angle of 62 degrees.

You already know how to sharpen a wood / metal drill. It's not too difficult. You will need to show concentration, be patient and persistent, accurate. Only in this case will you be able to maintain the required angle of sharpening of the drill for metal. If in doubt about your own abilities, contact a qualified technician. However, remember about one of the main advantages of sharpening with your own hands - saving money. The master will not sharpen your instrument for free. The exception is when the specialist is your friend. You can also watch a video of sharpening drills for metal. Currently, on the Internet, you can easily find and download similar videos that explain the process of sharpening a drilling device.