Construction tools for performing measuring operations have undergone significant changes in recent years. Traditional levels and slats are fading into the background, giving way to more functional and technologically advanced electronic analogues. Optical and laser instruments for determining the position of construction objects provide high-precision results, while also performing complex mathematical calculations based on the data obtained. And it is quite logical that as the devices become more complex, questions arise about how to work with the level? Educational program for beginners, presented below, will allow you to master the basic rules for using such devices. Despite their physical ergonomics, the process of operation involves performing a number of procedures, on which the correctness of the result will depend.
Device of optical levels
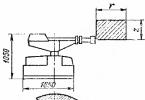
The basis of the device is formed by a tribrach - this is a metal circle, the position of which is fixed by three supports with regulatory elements. Lifting screws allow the structure to be optimally positioned on the site, minimizing the risk of deviations. The device also includes a horizontal dial, a telescope, levels cylindrical and a compensator in the form of a magnetic or air damper. with a level of this type? Initially, the adjustment is made using the above-mentioned screws, and the measurement itself is carried out through a telescope. Depending on the configuration, optical devices may have several lenses in the set, allowing you to perform measurements in different conditions. To correct the clarity of the device, the head part with optics also includes adjusting screws, which reduce the risk of a large error. Using such equipment, you can determine the height of the structure, differences in the position of individual objects, fix angles of inclination, etc.
Laser level device
Models of this kind do not include a telescope, which saves the user from independently determining geometric parameters object. The working basis is a laser emitter that projects a beam onto the target area. The design also provides for the presence of control fittings, but in this case the margin of error is eliminated, since most models, regardless of position, can automatically adjust the beam direction angle relative to the horizontal.

How does a laser level work? The device prepared for the operation is oriented with optics towards the object, as a result of which a point is reflected on the surface, by which the height can be estimated and measurements can be taken. Such equipment is good because it reduces the risk of error due to the human factor. Its advantages also include a wide range of additional options related to the processing of received information.
Features of rotary models
These are the most technologically advanced devices designed for marking on a construction site. Key Feature Such models have a rotating detector containing two lasers. They can move at speeds of about 600 rpm, projecting a beam over a 360° range. How to work with a rotary type level? The technique for handling such devices generally corresponds to standard laser devices, and the difference lies only in the organization of the final markings. That is, if the beam in conventional models provides information about one characteristic, after which it needs to be moved, then the rotary technique allows complex calculations to be carried out from one position. This approach is especially effective when installing windows, performing surface finishing, and in other operations where it is necessary to obtain data about the position of different objects within the same room or construction site. But in open areas there may be restrictions associated with reaching the target object.

Before you begin the main work activities, you should consider measures to ensure the safety of the device. First of all, the case must be protected from water, dirt, dust and physical shock. As a rule, the design of construction levels has multi-level dust and waterproof insulation, but this may not be enough. For example, even models with a protection class higher than IP54 cannot be used in heavy rain without an additional shell. The same applies to the threat of direct sunlight. Temporary overheating of the equipment may not damage it, but it will certainly affect the accuracy of the measurements.
How to work with a level if it is frosty or hot outside and surface cover will not help? Initially, you should make sure that the device is, in principle, suitable for use in a particular temperature conditions. As a rule, models from major manufacturers can be used in the average range of -10 to 25 °C. But even in this case, it is necessary to adhere to certain operating rules. For example, optical models are sensitive to temperature changes. After taking the measurement, the device should be brought into a warm room and warmed up in the supplied case for 30 minutes.
What will you need for the job?
A tripod should be used to ensure the correct position of the device. You can do without it in a room with a flat base, but if it comes to working on a construction site on bare ground, then adjustable equipment will not be superfluous. But also indoors without special load-bearing devices It will be inconvenient to work with the device. For such purposes, ergonomic holders are provided. They can be attached to walls, floor coverings and even to the ceiling.

A special rail will also be required. Its scale will allow you to mark divisions on the target surface, along which the required readings will be recorded. How to work with a level and staff? Traditional methods It is assumed that two people will participate in the process - one is directly responsible for recording the data, and the second holds the staff. However, the latest models of laser electronic devices automatically process the data, taking into account special bar codes of the strips. In this case, the user only needs to activate the corresponding function and set the scale position correctly.
Operation of optical instruments
As already mentioned, work begins with setting up the telescope. The main task at this stage is to achieve extreme clarity of the image of the object. Adjustment is made using screws, and correctness is assessed by looking through the eyepiece.

Further work, unlike laser models, is carried out by two people. One worker sets the staff perpendicular to the ground, and the second takes readings using the image of an optical level. How to work with it so that the correctness of the data does not decrease during the operation? Firstly, much will depend on the reliability of the position of the device. That's why Special attention Initially, the focus is on the stability of fixation of the legs. Secondly, professional surveyors use spirit levels. These are devices with bubble levels, thanks to which both the position of the tripod and the position of the level are adjusted. When the device is ready for use, the pipe sight is aimed at the divisions of the staff. Then all that remains is to record the readings in the technical journal.
How to work with a laser type level?
The device is also fixed using a tripod or special holders. After making sure that the installation is secure, you can begin work activities. After pressing a special button, a beam is sent to the target surface. Lines can be projected horizontally or vertically, and some models also provide the possibility of cross-radiation. After this, the device automatically takes readings from the prepared staff with divisions. If you plan to mark over long distances, then you cannot do without a special receiver that will separately record the position of the beam. a level supplemented with such a device? Basic operations are also taken over by automation. The operator only needs to monitor the readings on the display of the receiver, which can record the position of points at distances of the order of 80-100 m. At the moment the beam is registered, the device will give an appropriate signal and display the received information on the screen, which is recorded in the log.

Instrument Maintenance
Optical devices require the most maintenance. Therefore, after each use, it is necessary to wipe the eyepieces, lenses and surfaces of the telescope. The slightest contamination can affect the accuracy of the data reflection. For example, the Control company has a wide range of devices of this type, and also recommends regular verification. In reviews of this product, there is often criticism that notes that clarity does not work on the Sokia level. The reasons for the decrease in image quality of models in this series may include dust in the optics and structural defects. For example, if the same lenses were not installed tightly. In this case, verification procedures should be carried out using White list paper It is located at a predetermined distance near the marking strip. Correction of the optical equipment is carried out until the measurement results coincide with the previously known actual data.
The level is the main tool in the work of surveyors, builders, designers, and topographers. In the most general sense, this is a device that determines the difference in heights on the ground. The level is also indispensable for craftsmen. It will come in handy when laying a foundation; it can be used when leveling a site and filling a parking space. However, despite such a simple principle and clear tasks, few know what kind of device it is and how to use the level correctly. And some home craftsmen prefer their own eyes to modern optical or laser technology. After reading our review, both amateurs and professionals will be able to take a fresh look at the level as an extremely useful device for solving many seemingly simple, but very important tasks.
Read in the article
Leveling and leveling - what is it?
Level is technical device, with the help of which surveyors and builders take measurements of elevation points on a plane. Its main task is to build a stable horizontal line, relative to which any deviations will become noticeable.

If you look through the eyepiece modern device, it is clear that, in addition to bringing the object closer, the level superimposes a system of thin lines on its image, called the reticle or reticle. This grid creates a pattern on top of the object from vertical and horizontal stripes, which a person is guided by.

Leveling is the process of geodetic surveys using a level. In other words, this is the determination of the difference in heights of two or many points on the earth’s surface relative to a conventional level (for example, ocean level, river level, etc.) or elevation.

Laser level models can draw such lines directly on the object. In laser devices, lines are drawn 360° in several planes at once.
Types of levels and where they are used
Options for using the level:


Some readers ignorant of construction may ask the question of how a level differs from a laser level. Levels - more universal tools, which can not only project a point, but also perform circular leveling at an angle to a given plane. However, in some laser models, when tilted, it begins to squeak unpleasantly, swearing that the plane is broken, however, this does not prevent the level from doing its job adequately. Such self-leveling laser levels will become best choice for a person who is engaged in laying slabs and inclined structures. Today, two types of these devices can be distinguished: optical and laser. Let's look at how to use each type of level.
How optical and laser levels work
Optical or prism levels are most often used by professionals. They are a device that consists of a main unit and a stand (trigger). Let's consider what elements it consists of.

The main part of the device is an optical tube with a lens system. They are capable of zooming in on objects with twenty times or more magnification. In optical levels, all actions are carried out manually: fixing the position, leveling, adjusting the focus of the eyepiece, adjusting the position of the telescope. Devices for determining the level are built into the tool body. We will talk more about working with the device in the next section of our article. Optical instruments are divided into three groups according to their accuracy class. This marking is used as a basis for production and determination of the accuracy class:
- Technical devices. They are marked N-10, N-12, etc.
- Precision devices. They are marked from N-3 to N-9.
- Particularly precise devices. They are marked from H-0.5 to H-2.5.
The numbers in the markings indicate measurement errors in mm/km. Therefore, even Technical equipment will give a deviation of approximately 1 cm per 1 km distance to the object. This will be sufficient to properly plan most construction jobs.
optical level

If we talk about more modern laser models, the main element in devices of this type is the emitter. The light beam that the device creates can build a projection on a plane. Depending on the model, the device can project a laser beam horizontally and vertically, around the perimeter, or form intersecting lines in 360°.
By purpose and design features laser levels can be:
- Rotational. Such devices are equipped with special servomotors. The laser head rotates at 600 rpm. Due to this, it becomes possible to project rays at 360°. If necessary, the speed can be changed to achieve greater clarity of the rays. This type of level will be indispensable when performing external or internal work, as well as during installation.
- Projective. The device can project lines into several planes simultaneously. Due to the fact that such a beam is poorly visible when daylight, then such models are more often used indoors. The projection range of such devices usually does not exceed 35 meters.
- Pointed. Its peculiarity is that only points are projected onto the surface. In this case, the laser moves in the vertical and horizontal plane, which facilitates measurements and helps align surfaces on the ceiling and walls.
- Linear. They are somewhat reminiscent of a regular flashlight. When it is turned on, a clearly visible beam line appears, according to which you can quickly and easily make marks.
- Combined. Such devices can build up to six types of lines: vertical, inclined, down, up, right and left. The laser operates both linearly and pointwise.
- Planar. They are also called plane builders. It is used by professional surveyors in their work. Using this device, you can determine the zenith and nadir points on the surface, design lines diagonally, vertically, horizontally, and also determine the difference in heights of various objects.
laser level
Advantages and disadvantages of optical and laser devices
Among the main advantages of optical levels are their autonomy, reasonable price and high quality measurements. To operate the device, you do not need batteries or a power outlet. On the other hand, you won’t be able to take measurements alone. To operate this type of level, two people are required. One fixes a special ruler for the level with a 10 mm division scale printed on it, while his partner produces everything necessary measurements, while recording in parallel necessary information in a notebook.

Working with a level in this category is not particularly difficult, since the device is not picky about weather conditions; usually such devices are made of durable materials and are moisture and dust protected. The main thing is to understand how to use the level and staff.
Important! Each optical device has a passport. It must indicate the date of the last verification. Such devices are checked at least once every three years in special licensed workshops.
As for laser devices, they are more suitable for household work. What is a laser level, and how does it differ from an optical level? They do not require the participation of third parties, they are universal and easy to use. The only drawback is the need to connect to the mains electricity or use batteries. In this case, the built-in automatic shutdown feature can be useful. It is programmed by the user for a certain period of time, after which the device turns off.
Step-by-step photo instructions for leveling with an optical device
For correct installation and the settings of the optical level we will need: the level itself, a tripod and a measuring rod.
How to set up a tripod
The main task when installing a tripod is to maintain the correct horizontal base.
| Illustration | Description of action |
 | We take out the tripod, fold back the clips, and extend the tripod legs to the height we need. Each of the three legs, thanks to special sliding sliders, extends and is tightly fixed at the required height, and the difference can be either significant or insignificant. We fix the height by clamping the clips. |
 | In order for the tripod to be fixed as rigidly as possible in the ground, we need to press a special footrest with our foot. |
 | We take the level out of the box, place it on a tripod and fix it to the base using a special fastening screw. |
This design allows you to install the level on a tripod evenly, firmly and steadily even on a bumpy surface.
Installation and adjustment of the level
| Illustration | Description of action |
 | To level the level, we rotate it so that two lifting screws are to the right and left of the device, and the third is located on the front of it. |
 | By rotating the two side screws in opposite directions, we ensure that the air “bubble” is located on the central axis of the level mark. |
 | Now we begin to rotate the screw located on the front of the level and move the air bubble already in the vertical level of the device. When setting up each subsequent bubble level, pay attention to how the previous one behaves. |
Important! After installing the bubble at the “zero point,” you need to rotate the level 180° and check whether the bubble remains in place or has moved. If it has moved, it can be adjusted with a hex wrench and two screws on the level (point in the manual), and only after that can measurements be taken.
Setting the device focus
Before you start working with the device, you must correctly focus the optics. Each person adjusts it to their own vision. The stages are as follows:
| Illustration | Description of action |
 | We ask your partner to stand with the staff on the first measured point. When taking measurements, the staff must be kept strictly vertical. To do this, we focus on the bubble level that comes with the level. |
 | And now, using the collimator, which is located in the upper part of the level, we aim at it. |
Measuring and recording values
When the device is installed accurately enough, focused and leveled, you can proceed to measuring data and recording it.
| Illustration | Description of action |
 | We adjust the level until we can clearly see the checkers. We look at where the horizontal strip of threads is depicted on the rail. This is our first countdown on the staff. |
 | We record the data. |
 | After this, we measure the next point according to the same principle as the first. We record data and compare indicators. Thus, we know exactly which point is higher and which is lower and by how much. |
Important! If the level needs to be installed strictly above a certain point, then after all the settings it is centered. To do this, hang a plumb line from the fixing screw, after which the level begins to move along the head of the tripod until the plumb line is clearly above the given point. When centering is completed, the level is again secured with the fixing screw.
How to use an optical level for a base device
Let's say we need to prepare and level the base on small area. First of all, we determine the average elevation mark on the site. To do this, all obtained values (except for the finished floor mark) must be summed and divided by 20. Let’s assume the average value is 1.7 m.
| Illustration | Description of action |
 | The first stage is applying markings in the form of a grid. |
 | For this we use special wooden structures. |
 | For each point, using a level and a staff, the elevation was determined. |
The next stage is digging a pit. In our case, the minimum height was 1.55 m, the maximum was 1.7 m. The finished floor level was 1.25 m. Based on the data obtained, we determine required thickness layer of backfill under our base: it will be 1.7 − 1.25 = 0.45 m.
How to use an optical level when building a foundation
The algorithm of actions is almost identical to preparing the foundation, with the only difference that in this case it is already ready, if only it needs to be leveled. So, the sequence of work:
- Install the level so that you can clearly see each corner of the foundation in relative narrow field vision (90° or less). This will help get rid of errors associated with turning the level at large angles. To minimize error, position the level as low as possible.
- With an assistant holding the staff, shoot external corners a, b, c, d and write down their height. In our example, the highest angle is b.
- From the height of the highest corner, subtract the heights of the remaining corners and write down the difference - this will be the thickness of the spacers.
- Using shims, bring the corners to the level of a high angle with a tolerance of ±1.5 mm.
- Pull the string between the corners. With the cord stretched horizontally, place steel shims between the joist and the foundation under all joists, beams and point loads.
- To roughly fit the harness to the cord, place pads in the right places.
Mistakes that are made when using an optical level
For beginners starting to work with a level for the first time, it is important to take into account some features:
- It is important to ensure the safety of the device. Although it is protected by various types of coatings, it is sensitive to shocks and shocks. In order to completely eliminate instrument errors, you should make sure that everything fasteners and the parts were in working order and functioned properly.
- Don't miss the chance to use additional tripods and mounts. This will allow you to preserve the device even in the event of a sudden gust of wind.
- You should not completely trust the data provided in the instructions. It is worth checking the capabilities of the device yourself. If you are not buying a new device, it is better to have it verified at a specialized institution.
- Do not forget that when working with a level, you definitely need a partner.
- And when installing the rail, it must be positioned exactly on the surface to avoid distortions. Even if it is a ravine or hole, the ruler should rest against the bottom.
- Do not allow the device to overheat. This may affect the accuracy of measurements.
How to work with a laser level. Educational program for beginners
Why do you need a laser level? It is extremely difficult to list all the tasks of the device in one article. Let's talk about how it can be used and what its features are.
Design and principle of operation of a three-dimensional laser level
Main advantage laser tool consists of directly projecting a line or point onto the surface of the ceiling or wall, which can be seen on a measuring ruler or rod. This allows you to immediately begin leveling work and simultaneously monitor the result.
Let's look at the design and operating principle of a two-dimensional laser level.
| Illustration | Description of action |
 | A household level is most often a compact device. In our case, the Fukuda 3D (Firecore 3D) model has only one toggle switch on the body, which allows you to turn the device on or off. |
 | Includes: swivel base, plastic target, and carrying bag. |
 | The device runs on batteries. The battery compartment holds 4 batteries. |
 | At the base, the device has a ¼-inch mount for attaching to the base; any tripod, for example, a camera tripod, is suitable for these purposes. |
 | The kit includes an adapter, which is also a rotating base, it already has a 5/8-inch thread, which is suitable for specialized geodetic tripods or rods. |
How to use a laser level when installing a floorA laser level is an indispensable device when installing floor joists. After turning on the device, it will immediately draw a zero level around the perimeter. Provided that the device is installed perfectly level, your task is simply to make marks around the perimeter.  You can measure any size in planes. After laying the logs, the level will help control the quality of the work.
How to check the error of a laser levelThere are many ways to check the accuracy of a laser level. The simplest is checking in a small room, which you can easily measure yourself to clarify the calculations. We install the laser level exactly in the middle between two walls located approximately 20 m from each other. Turn on laser level and mark on the wall the point indicated by the laser cross. We rotate the laser plane builder 180° and mark a point on the opposite wall, placing it at the intersection of the vertical and horizontal planes. 
We measure the distance between points a1 and a2, also between currents b1 and b2. We subtract the resulting distance from the other (a1 and a2) - (b1 and b2), compare the resulting value with the declared accuracy, if the resulting value does not exceed the stated accuracy in the instructions, then your laser level shows horizontal plane Right. For more information on how to properly work with a laser level and calculate its error, watch this video: How rotating laser levels are used in open areasRotary laser levels are one of the few that, due to the high-speed rotation of the laser head, can project a bright beam that is noticeable even in bright sunshine. It is this, along with optical ones, that is most often used by professionals when working on open construction sites.  The peculiarity of the operation of such levels is that they can work perfectly both on a 360° plane, that is, covering everything around them, and pointwise. For example, the scanning function allows you to select only the area where you need to level doorway or window. When using this function, the level displays the laser beam only in a certain location (the coverage angle is set in the settings). conclusionsIf you don’t know how to choose the right laser level, then it is important to remember that the characteristics of each individual device, and therefore the price, directly depend on the tasks that you set for yourself. Sufficient for household needs home appliance with a range from 10 to 40 meters. This will be enough to carry out necessary work both indoors and at or in the country. If you have questions that you would like to ask the author of this article, leave them in the comments and also share your experience with the device. |


To learn how to use a level, you do not have to graduate from surveyor courses or a geological institute. Just read this article carefully, watch the video inserts and experiment with the device, and you will be able to make high-precision measurements no worse than a qualified engineer.
Ground leveling methods
Levels are a large group of devices that are used to determine and record the exact height position of various objects. Moreover, objects can be completely arbitrary points and sections of the earth’s surface, and not specific landmarks.
The task of any leveling is to measure the difference in heights between the marks (levels) of the future building (structure). In practice, the magnitude of such an excess and its proper measurement depends overall quality construction. For example, from the planned “zero” level of the first floor of a house, the depth of the foundation, drainage groundwater, drainage system design, view, etc.
Existing leveling techniques are quite diverse:
- Hydrostatic method based on the property of the same position of liquid in communicating vessels. Possesses high accuracy and allows for non-line-of-sight measurements between individual points. Hydrostatic measurements involve the need to lay and fill long hoses and tubes with liquid, which is not always convenient;
- Barometric method - used when planning and marking out extensive architectural complexes, requires high-precision barometers, special computer programs. In personal residential construction, barometric measurements are not used;
- Trigonometric measurements using are good because they do not require assistants with additional slats. Theodolite measurements are carried out both in horizontal and vertical angles, however, this device is more difficult to master than an ordinary level, and the cost of a theodolite is several times higher;
- Geometric measurements of elevation angles using standard levels are performed only in one plane and require the installation of auxiliary marks (the same slats), their movement from place to place and entries in the measurement log
The simplicity and reliability of measurements with an ordinary level, its good compatibility with the needs of private and residential construction make it most popular in the design and planning of many works - from pouring the foundation to checking the accuracy of a gable roof.
Typical device and classification of modern levels
The design of the level is simple. The main optical-mechanical unit with a built-in lens system is located on a durable tripod. This unit must ensure strict horizontality of the sighting beam, with minimum deviation. Lenses can produce both direct and reverse (inverted) images. In the latter case, the measuring rods should also be turned upside down when installed on the ground.
Level sensors are built into the upper part of the body of each level. Robust and accurate installation of the device on the ground determines the quality of all subsequent measurements. An experienced operator constantly checks the readings of these sensors, adjusting them if necessary using the tilt handles of the optical-mechanical unit. This allows you to notice in time the random deviation of the device from the exact position on the ground and not repeat the measurements again.
Before using a level and a staff, it is necessary to describe the main types of instruments for geometric measurements of excess height. The simplest and most economical levels are those with cylindrical levels (one or several), which are located directly on the sighting pipe. Significantly more expensive and significantly more accurate are meters with automatic compensation for installation “flaws”; they are convenient when working on problematic soils - crushed stone, sand, etc. Levels with electronic system measurements are used in the professional design of large objects and are quite difficult to set up and operate.
By class measuring accuracy Leveling devices are divided into three main groups:
- Technical instruments, marking N-10, N-12, etc.;
- Precision instruments, markings from N-3 to N-9;
- Especially precision instruments, marking from N-05 to N-2.5.
The numbers in the name indicate the average measurement error in millimeters per kilometer. That is, even a technical level gives a deviation of about 1 cm per 1 kilometer of distance to the object - this is more than enough for accurate design and competent planning of the vast majority construction work
.
How to use a level - step-by-step instructions for beginners
The practical application of an ordinary level is described by the following sequence of measuring actions:
How to use a level - step by step diagram
Step 1: Set up a tripod
The mounting screws on all three legs of the tripod must be loosened, after which each support is extended to the required length (this length may vary, because the level often has to be installed on rough terrain). Upper part The tripod should be set to a horizontal position, after which the fixing screws on all three supports are tightened. Most devices are equipped with smooth adjusting mounts on each “tripod leg”; they are used to fine-tune the horizontality of the upper platform.
Step 2: Installation of the level
The leveling pipe itself is installed on a tripod using several mounting screws, after which you have to work with the level sensors. By rotating the adjusting screws, it is necessary to achieve an accurate, central position of the bubble levels relative to the lines marked on them. For convenience, first place the bubble in one “window”, without paying attention to the other. Then they set up the second level, already tracking the position of the first, observing how it changes as it is installed. By gradually adjusting the position of the device, we achieve its exact horizontal position on the installation site.
When the device is installed horizontally accurately, leveled and focused, we begin engineering surveys. Two slats should be placed in front and behind our device. The front one will show the value of the measured height, the back one will serve for calibrating the values. First, the level is aimed at the black side of the rear staff; after focusing, the value is recorded along the middle and rangefinder lines. Then they focus on the front (main) staff, and the average value on its red side is recorded. This method is called centerline leveling, is characterized by high accuracy of results and convenience of repeated measurements.
A level is a device for determining height differences, checking the evenness of a surface by determining the excess of one point over another with a horizontal beam. Levels are divided into optical, digital and laser.
How to use an optical level?
An optical level kit consists of a tripod, a staff with divisions in millimeters on one side and centimeters on the other, as well as the level itself.
- 1 step. First you need to choose a place to install the level. The most convenient location is considered to be in the center of the measured area. A tripod is installed at the selected location. To achieve a level horizontal position, it is necessary to loosen the clamps of the tripod legs, set the tripod platform (head) to the required height and tighten the screws.
- Step 2. The level is installed and secured with a screw on a tripod. By rotating the leveling screws, using a level, the horizontal position of the device is achieved.
- Step 3. All that remains is to focus. To do this, the telescope must be aimed at the staff and rotating the focusing screw to obtain the sharpest image possible; the eyepiece ring adjusts the focusing of the reticle. If it is necessary to measure the distance from one point to another or to remove the axes of a building, then centering is carried out. To do this, the level is installed above the point, and a plumb line is suspended from the deadbolt. The level is moved along the head of the tripod, while the plumb line must be above the point, then the device is fixed.
- Step 4 After installing and configuring the device, you can proceed to research. The leveling rod is installed at the starting point (or altitude reference point), and a reading is taken along the middle thread of the leveling thread grid. The count is recorded in the field journal. Next, the staff is transferred to the point being measured, and the procedure for taking and recording the reading is repeated. The difference between the readings of the initial and measured points will constitute the excess.
How to use a laser level?
Before starting work, you must check the operation of the device. To do this, you need to charge the battery or insert batteries and turn on the level. If the beam shines brightly and clearly, then the device is ready for use.
For achievement High Quality When marking, the following rules for positioning the device must be observed:
- The projection of a line or plane must occur continuously. There should be no obstacles in the path of the beam.
- The distance from the level to the object should not exceed the maximum allowable for the selected model. As the distance increases, the marking error increases. But the use of a special receiver allows you to increase the range of use of the device up to 2 times.
- The laser beam is dangerous for the eyes of animals and people, so before carrying out work it is necessary to warn others and, if possible, isolate animals from the work site.
Setting up a laser level depends on the selected model; it is important to remember that disabling unused functions allows you to save battery power and increase the operating time of the device. Basic settings:
- To achieve an accurate result, the device must be placed on flat surface using a tripod, while the level must be in a stable position. Some models are designed to be mounted to the ceiling or wall; in this case, it is important to prevent the device from moving or shaking.
- Before starting work, it is necessary to level the device horizontally by rotating the screws. Many modern models have a self-leveling function. Such devices do not allow the device to be positioned incorrectly and sound an alarm when an error occurs.
- Depending on the task, you need to adjust the visibility of the vertical and horizontal axis. In some models, it is also possible to select the “line” or “dot” mode and adjust them.
- In rotary levels, you can adjust the beam rotation speed or angle to set the working sector.
- If necessary, measurements on long distances a receiver should be used laser beam, which needs to be secured to the staff and placed on the point being measured.
Using a laser level in construction or repair allows you to perform a large number of tasks. Methods of use depend on the specific goals set, for example:
Using a laser level when working on the floor:
- To determine the evenness of poured concrete. To do this, the rail must be placed against the wall anywhere in the room and marked where the red beam is located on it. After this, make several more such measurements in different points rooms and compare deviations of indicators.
- For decorative styling floor tiles. To do this, you need to tilt the device and transfer the beam to the floor, while fixing the level. The most popular method is when the rays intersect at right angles, which allows you to carefully lay out the tiles. The presence of clamps included in the laser level allows you to project a perpendicular intersection onto any surface.
Using a laser level for wall work:
- To level the walls To do this, you need to direct the beam along the surface and measure the deviations.
- Sticking ceramic tiles and wallpaper The use of marking walls with a laser level allows you to lay out tiles or paste wallpaper quickly and perfectly evenly. Either one vertical beam is used for wallpaper or the intersection of two beams for tiles. To save power, usually only the first row is glued along the rays, the rest are aligned along the first, sometimes performing a control alignment with a level.
- Installation of equipment, cornices, shelves and other household uses of the level. Laser levels have replaced pencils, tape measures and bubble levels. Projecting rays onto the wall allows you to quickly and without hassle deal with a large number of everyday issues.
Finally
The level is an indispensable device both at construction sites and in everyday life. You can buy a laser or optical level in our online store. We also provide training on the use of professional geodetic and construction equipment. Contact our specialists and we will answer all your questions.