Construction of the attic individual house- a fairly common occurrence. This construction method allows you to reduce the cost per square meter and create a rather interesting room in the under-roof space. In order to properly install an attic floor, you need to study the basic requirements for it and choose the right type of roof and its slope.
What is an attic
According to regulatory documents, the attic floor is the volume under the roof that is used to accommodate residential and utility rooms. In this case, the height of the external walls should be no more than 1.5 m in the general case, otherwise the space will be considered a full-fledged residential floor.
A do-it-yourself attic is beneficial both during the construction and operation of a private house. In the first case, costs are reduced due to the fact that the height of the vertical enclosing structures is reduced. The roof takes on this function without ceasing to fulfill its original purpose.
An attic is an under-roof space that can be converted into a separate room for living.
During operation, cost reduction may include the following:
- The heated volume of premises is reduced, as a result, there is a reduction in heating costs, which are an impressive item of utility costs.
- After completion of construction, the house must be measured by specialists from BTI, after which a passport of the object is issued. It is based on the area values given in it that taxes are calculated and utilities are paid (subject to connection to centralized systems and the absence of metering devices, which is now practically unheard of). The area of the marsard floor is included in the area of the entire house with coefficients of 0.7 or 0.8 depending on the height of the outer wall and the angle of the roof, which allows significant savings throughout the entire life of the facility.
Preparatory stage
Construction should begin with the development of a project or diagrams on which it will be drawn future design. Most often, the roof that is used for the attic floor is a gable roof, but it is also possible to use a four-slope hip roof. The gable design makes it possible to provide full-fledged windows in the gables.

In the case of using a hip for lighting rooms, it is possible to install only attic window openings. This option may become more labor-intensive in terms of installing roof elements and developing interior interiors. Reduced costs with hip roof achieved due to the absence of gables (savings will be especially noticeable in brick house, where the cost of materials and the work itself for installing wall fences is quite high).
Do-it-yourself attic construction begins with determining the geometric dimensions and shapes of the roof. We have already talked about choosing the type of rafter system for a house (gable, hip), after which you will need to decide whether the slope will be straight or broken. The broken design has such disadvantages as increased cost and labor intensity. Its use is justified by the need to increase the height of the room by changing the angle of the roof.
At the design stage, the optimal roof slope is determined. Its choice depends on ergonomic considerations and the roofing material used, which imposes restrictions.
Before making an attic, it is also necessary to calculate all its load-bearing elements for strength and bending, select the composition of the roof pie, perform thermal calculations and decide on materials. More on this below.
Main load-bearing elements
The design includes the following components:
- Rafter legs, which transfer the load from the weight of the roofing and the wall to the walls of the house. The section is selected depending on the angle of inclination, span, pitch and design load. A professional can perform detailed calculations correctly. For private construction, you can use approximate values, but it is best to provide a small margin.
- Narozhniki- This rafter legs, which on one or both sides rest on obliques. The cross section is calculated in the same way as for rafters.
- Sloping legs- a structure that is used in a hip roof. This element serves as a support for the narodniks. The cross-section is taken depending on the load and span; in any case, it should be larger than that of the rafter legs.
- Mauerlat- an element that serves as a support for the footrails and transfers the load from the roof to the walls, distributing it evenly. It would be correct to choose a section with dimensions of 100 by 100 or 150 by 150, depending on the complexity of the object. Installation of the Mauerlat is not carried out during the construction of frame and wooden houses, since in this case its role is played by the upper crown of the walls or trim.
- Rigel- a beam, which also serves as a support for the rafters, but in the upper part. The crossbar is installed at the ridge of the roof or at a break in the slope, in the case of a broken structure. The cross-section should be taken depending on the conditions; the recommended value is 200 by 200 mm.
- Struts, racks, contractions – additional elements for unfastening elements. Used to reduce cross-section load-bearing structures. Their cross section is most often chosen constructively. It is important to consider the convenience of making connections.
Mansard roof It must be built with your own hands, starting with the selection of sections of all elements of the roof frame. The material for manufacturing is selected taking into account the following conditions:
- the wood must be coniferous species(pine, spruce, larch);
- material grade – first or second;
- humidity no more than 15%.
Be sure to treat all boards and bars with antiseptic compounds before starting construction.
Thermal calculations

To keep the house warm, you will need to select the thickness of the insulation. Most often, mineral wool is used for attic spaces (more often in slabs than in mats). It is also possible to use polyurethane foam, polystyrene foam, extruded polystyrene foam and ecowool. Having determined what to make the thermal insulation layer from, select its thickness. It is important to consider the height of the rafters. It should always be equal to or greater than the thickness of the thermal insulation. For mineral wool you will also need to provide ventilation gap 50 mm thick between the top surface of the heat insulator and the roofing. If the cross-section of the rafters is small, then in order to fulfill this requirement, a counter-lattice is installed.
Before you build an attic roof with your own hands, you can calculate it using heating engineering manually, guided by the joint venture " Thermal protection buildings." But it’s better to turn to special programs for help. To correctly calculate the thickness in the Teremok program (freely available on the Internet), you need to know the thermal conductivity of the insulation and the area where the house is being built, the program will find the rest itself.

A do-it-yourself mansard roof is different from a regular one pitched roof only by the presence of thermal insulation. More layers are also added to the cake to protect the insulation. Below step-by-step instruction will allow you to correctly install the elements of the attic roof.
The procedure is as follows:
- fastening the Mauerlat to the wall;
- installation of rafters and systems of struts and racks;
- installation of waterproofing and wind protection;
- sheathing;
- roof covering;
- insulation;
- bottom trim.
Assembling the roof frame
Installation begins with the Mauerlat. It is laid on the inner grant of the outer wall. Fastening depends on the material of the load-bearing walls, but in general it can be done in several ways:
- on staples;
- on stilettos;
- on the anchor.


For fragile house wall materials, such as aerated concrete and foam concrete, trimming is carried out monolithic belt which will prevent the walls from collapsing. For wooden and frame houses Mauerlat is not provided.
Next, you need to install the crossbars, if provided. After being laid support structures, lay out the rafter legs. The fastening of the rafters to the mauerlat can be rigid and hinged. It is better to do it using cutting and fixing metal corners on both sides.

This is a fairly old album, so all the drawings in it use nails as fasteners. It is better to replace them with studs. The design of the roof of the house in this regulatory document shown in great detail, so it is recommended that you familiarize yourself with it before starting work.
Before you begin installing insulation in the house, it is necessary to ensure its protection from negative influences environment. To do this, spread a moisture- and wind-proof membrane over the surface and secure the sheathing. After this, the roofing covering is installed, taking into account the recommendations for the selected material. For example, bituminous shingles require a continuous sheathing, which is most often made of moisture-resistant plywood.

Installation of thermal insulation
To insulate a house, you need to install insulation without gaps or cracks. For mineral wool, it will be easier to install if the clear distance between the rafters is 580 or 1180 mm. This will allow the material to be laid with a slight spacer, which will prevent cracks from occurring.
When using expanded polystyrene, the distance between the slabs and rafters is filled with sealant or polyurethane foam.
After laying the insulation, you need to attach a vapor barrier to it from below. After this, the lower sheathing and ceiling lining are installed. For an attic, it is best to cover the frame with two layers of 12.5 mm thick plasterboard followed by finishing.
Arranging an attic in a private house allows you to increase the usable area. To do this, a roof is erected, the design of which can be different. Therefore, before construction, it is important to design, which involves taking into account all the features of the roof.
Characteristics of types of mansard roofs
A standard gable roof is easy to erect and does not require much time.
Pointed options are less popular than standard ones. This is due to the fact that such structures have a slope angle of 60° and are suitable for narrow houses, the width of which does not exceed 6 m. The construction of a pointed roof will require more materials than for a standard roof. At the same time, the ceiling height in the attic is much higher, which is not always convenient.
Pointed roofs are impressive in appearance, but impractical in operation.
To erect a gable mansard roof, a hanging type rafter system is required, where the frame beams rest on each other at the roof ridge and are fixed to the load-bearing walls of the building. At the same time, there are no central supports that can be used when constructing a roof with a regular attic rather than an attic. Before construction, you need to create an individual drawing of the future rafter system, indicating the location of each element. This process is best carried out with the help of professionals in this matter.
The hanging rafter system lacks a central support
It is worth considering that effective area the future attic depends on the angle of inclination and parameters of the building. The greater the width of the house, the higher the slope of the slopes is required to ensure an attic ceiling height of 2.2 m, which is the minimum for the highest point of the roof.
Before construction, it is worth determining the purpose of the attic and the required usable volume of the room.
The main features of a gable mansard roof are expressed as follows:
- the standard version of the gable roof allows you to get more usable space than the gabled type;
- construction according to a drawing with ready-made dimensions of elements is easy to carry out independently;
- Any roof covering is suitable for a gable roof, for example, metal tiles or soft roofing;
- The roofing pie includes a vapor barrier, rafters, insulation, waterproofing, and roofing.
Roofing pie requires the use of high-quality materials for comfort in the attic
Video: erection of rafters for a gable mansard roof
Single pitch attic roof
One of simple types mansard roofs are pitched, having only one inclined plane. To equip a living space under such a roof, you need a rafter system, the parameters of which should ensure comfortable operation of the attic. During design and construction, the roof slope is placed on the leeward side, and the optimal angle of inclination is 40°. Construction costs are significantly less than for a gable structure.
Shed roof easy to build and looks very impressive
The main feature of a single-pitched attic roof is that on the side of the slope the load on the load-bearing wall is greater than on the other. Therefore, during construction, it is important to maintain an inclination angle of at least 40° and further strengthen the rafters. This will avoid snow drifts and reduce the load on the coating. For determining exact angle take into account the type of roofing, snow load, and building parameters.
A simple drawing and minimal calculation will ensure the creation of a comfortable attic
You can calculate the slope angle depending on the intended roof covering. For a soft roof, a slope of 5° is recommended, for corrugated sheeting - 8°, for metal tiles - 30°. When calculating the slope, the formulas L bc = L сд *tgA and L c = L bc / sinA are used, in which: L bc is the length of the walls, measured between the rafters and the ridge, L сд is the length of the walls of the building, Lc is the length of the beams (rafter legs ), A is the accepted angle of inclination of the slope, according to the selected material. The values of tangent tgA and sine sinA are calculated using Bradis tables.
Shed roofs are best suited for warm climates
When calculating, the following features are taken into account:
- if the slope is less than 30° and the span is up to 4.6 m, then the rafter legs rest on the mauerlat;
- with a span of 4.6–16 m, additional supports are installed, and on the highest wall a beam made of timber with a section of 10x15 cm is laid;
- if the span is 6–15 m, then an additional floor is laid in the center, parallel to the walls;
- if the building length is more than 15 m, the installation of two vertical supports, and the racks under one rafter are connected with a jumper. The step between the beds should not be more than 6 m.
Many roofing indicators depend on the building parameters
Video: erecting a pitched roof of a house
Attic with hipped roof
Thanks to the construction of a hipped roof, it is possible to obtain a spacious and comfortable attic. Several types of structures are called four-slope, among which the most common is. This design has rectangular slopes along the length of each side of the house, consisting of two planes. This option allows you to get a spacious attic without significant construction costs.
A broken mansard roof can be equipped with a “cuckoo” with a window
The slope of the upper slopes can be 20–30°, and the angle of the lower ones is often 60–80°. These parameters are suitable for buildings with a width of no more than 6 m. The frame of the structure consists of trusses that require reinforcement of the rafters with racks. In places where the side slopes are broken, stretch marks are installed.
A sloping roof is a gable roof, but is ideal for creating a spacious attic
The Danish roof is a type of hip roof and differs from the classic hip roof in that it has gables in the upper part. Thanks to this, the attic can be equipped with vertical windows and prevent leaks through the cracks in the area of these openings.
Straight rafters rest on a ridge, the length of which depends on the parameters of the building
It is best to entrust the calculation of a hipped roof, as well as drawing up a drawing, to a professional. Only after these stages is the construction of the structure taking into account the location of each element.
Video: features of the construction of a hipped roof
Hip roof with attic
Classical hip roof assumes the presence of four slopes, two of which are located at the ends of the building and have a triangular shape. The other two slopes are trapezoidal in shape. All surfaces are connected at the ridge of the roof. The calculation of such a design is complex and requires professionalism and knowledge of the intricacies of design.
The classic hip roof is practical to use and beautiful in appearance
The highest ceiling height in the attic under such a roof is in the middle of the room. The corner space is not the most functional, but often serves to place low pieces of furniture and things. In this case, the rafters of long slopes are arranged in the same way as for a gable roof. The ridge does not run along the entire length of the building, since slopes are installed at the ends.
Rafter system hip roof is simple, but requires accurate calculation of the parameters of each element
The classic hip roof is characterized by the fact that it does not have gables, like a gable roof. Thanks to this, wind resistance and snow load significantly lower than when there are only two slopes. To achieve a spectacular appearance and functionality, a hip roof can be equipped with bay windows, a balcony, and additional overhangs, but the arrangement of each element is calculated individually, taking into account the parameters of the building and the climatic features of the region.
Windows located under a ledge with a roof are reliably protected from leaks
Arranging windows not on ledges, but on the roof is optimal only for regions with low rainfall and a warm climate. When there is a heavy snow load, windows are exposed to precipitation and cracks and leaks appear. And also, the construction of a hip roof is more expensive than a simple gable roof.
Video: step-by-step construction of a hip mansard roof
Half hip roof
The half-hip roof has shortened end slopes that match the gables. Short hips do not reduce the height of the ceiling in the attic and therefore the room is more convenient for use.
A half-hip roof is more complex to design than a hip roof
The design of a half-hip roof involves a more complex rafter system than for the hip version. In this case, the rafters can be layered or hanging. In the first case, the rafter legs rest on the ridge beam, the inner load-bearing walls houses and mauerlat, and hanging ones are fixed only to the mauerlat and ridge. The cross-section, length and number of rafters are determined depending on the size of the roof. The optimal distance between the rafters is 50–60 cm, but it all depends on the weight of the roofing material and climatic factors.
The overhang can have different lengths depending on the functions assigned to it, for example, as a veranda canopy
The construction of a half-hip roof for an attic is characterized by high consumption of building materials, complexity of calculations and the need for professional skills. It is worth considering that the end walls are erected depending on the shape of the future half-hip roof and the size of the hips, as well as the angle of inclination.
Video: features of a half-hip roof
Multi-gable attic roof
A multi-gable roof is a complex of several angular projections that form internal corners roofs. This option is suitable for large buildings, since a multi-gable roof is quite voluminous and requires stable load-bearing walls. The complexity of the design is complemented by the fact that an attic will be built under the roof, requiring a ceiling height of 2.2 m and a large usable volume of space.
A multi-gable roof with an attic is a complex element that requires professional design
A large number of protrusions requires the construction of a rafter system, the weight of which is significantly greater than that of a gable or hip one. Therefore, load-bearing walls must be as strong as possible, and the load calculation is carried out after accurately calculating the weight of roofing materials, rafters, and insulation, taking into account the roof area.
The multi-gable rafter system is very complex both in design and construction
One of the main difficulties of constructing a multi-gable roof is that it is necessary to carefully waterproof and strengthen the internal corners and roof valleys. This will ensure the strength, tightness and durability of the structure.
Video: creating a multi-gable roof valley
Hip roof of a house with an attic
For square-shaped houses, a hip roof shape is suitable, under which it is easy to arrange an attic. The design has 4 or more slopes of equal size. The design of a hip roof is carried out with the obligatory intervention of professional craftsmen, since the structure is very complex and requires extremely accurate calculations of the roof’s weight, resistance to wind, and resistance to snow loads.
Hip roofs are varied, but difficult to construct independently
Complexity hip roof depends on the number of stingrays. The more such elements, the more complex the rafter system installed under each slope. The highest ceiling height in the attic is in the middle of the room, and at the edges the space is not actively used due to the low ceiling.
The attic under the hip roof has a small area
The design of the hipped hipped roof contains 4 main rafter legs, supplemented by trusses. The presence of several inclined slopes reduces the roof's resistance to wind and minimizes snow load. To calculate the length of the rafters, you need to determine the center at which the ends of the rafter legs will connect. The distance between the extensions, racks and other parts is calculated individually.
Video: features of a hip roof using a model as an example
Attic under an asymmetrical roof
Gable roofs are symmetrical because they have two identical slopes. If we lengthen one of roofing surfaces, you get an asymmetrical roof, under which it is easy to equip an attic. In this way, you can combine structures that are easy to build, giving the house original look and arranging a functional attic.
When creating an asymmetrical roof, it is important to accurately calculate the load and make it uniform on each load-bearing wall
Asymmetrical designs, despite their simplicity, require accurate calculation of parameters. It is important to ensure a uniform load on each load-bearing wall, because one slope is longer than the other and, accordingly, has more weight. The central rib or ridge can be located either in the middle or be shifted to any side.
Asymmetrical roofing is suitable for buildings up to 3 floors high
During construction asymmetrical roof It is worth considering that the usable space of the attic on one side will be larger than on the other. Therefore, it is necessary to create in advance not only a drawing of the roof, but also a design of the attic with the location of the functional areas.
Mansard roofs: features of installation and selection of materials
Residential and functional attic must be carefully protected from moisture, cold and wind. Therefore, during construction, a roofing pie is constructed, which includes several layers that provide an optimal atmosphere in the attic.
A roofing pie is required for both the attic and a warm attic.
When constructing a roof for a residential attic space The following features should be taken into account:
- selection of materials High Quality- the key to the durability and comfort of the attic;
- windows should be protected as much as possible from rain, wind and snow, since these openings are a vulnerable area of the roof;
- all wooden elements of the roof must be treated with an antiseptic or a means to protect the wood from moisture;
- roof ventilation is ensured using a ventilated ridge, a ventilation gap between the waterproofing and the roofing;
- the use of lightweight roofing materials, for example, corrugated sheets and metal tiles, will reduce the load on the foundation and walls of the building.
Main stages of work
There are no universal instructions for building an attic roof, but there is a certain sequence of work. This allows for the phased construction of a roof with an attic and takes into account some important points.
The roofing pie is created in stages using quality materials
The main actions are as follows:
- During the design process, the parameters of the roof and each of its elements are calculated, for example, the cross-section of the rafters is calculated, depending on their length and angle of inclination. A drawing is created that shows the location of each element.
- After design, they begin preparing and cutting the rafters, installing rafter legs and additional elements.
- To attach the rafters, you need a Mauerlat, which is made from timber. The rafter legs are fixed to it.
- After creating the frame, they lay it on it waterproofing film, strengthen it with brackets and fix it with lathing slats.
- The roof covering is installed on top of the sheathing. In the valleys or under soft roof continuous sheathing is required.
- From the inside, insulation, for example, mineral wool slabs, is laid between the rafters. Then a vapor barrier film is attached to the rafters, taking into account that there must be a gap of 5 cm between the insulation and the vapor barrier for ventilation. If such a gap is not provided, you need to build up the rafters with additional boards.
- After installing the vapor barrier, you can carry out finishing attics.
Photo gallery: mansard roof options
 Unusual architectural solutions can only be accomplished professional craftsmen
  A half-hip roof may have windows protected by projections
  Original roof requires a careful approach and competent calculation of parameters
  The hip hip roof consists of two triangular and two trapezoidal slopes
  The broken shape of the roof makes the attic spacious and the house beautiful
  The half-hip design is suitable for a house of any number of floors
  The multi-tongue version is difficult to construct, but has a solid appearance
  Gable roof simple and easy to use
  Hip roof simple type has slopes connected in the middle
Features of the operation of attic roofs
The roof must reliably protect not only the attic, but the entire house as a whole. Therefore, for construction you need to choose high-quality materials that do not require careful maintenance. When operating, you should also follow these rules:
- Do not clear the roof of snow with sharp or very heavy tools, as this can lead to damage to the coating and leaks;
- external holes in the roof are promptly sealed with materials that provide waterproofing;
- roofs of any type must be equipped drainage systems for quick removal of moisture;
- the interior decoration of the attic roof can be as light and simple as possible, which will ensure quick repair in case of leaks.
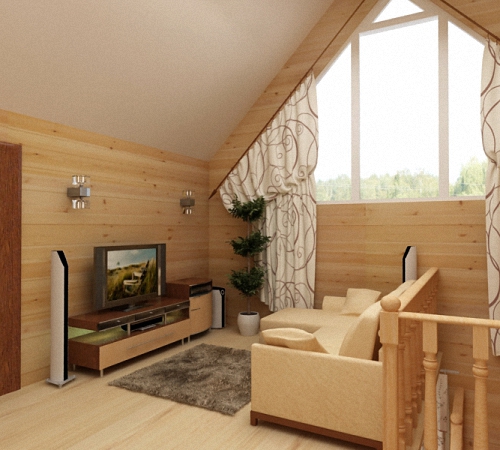
You can use the attic space more rationally if you equip it living rooms which are called attic.
The attic floor can occupy the entire area of the house or only part of it (or garage). Sometimes the attic floor serves as a replacement for the second floor.
What is an attic floor?
To put it simply - living room(s) in the attic (i.e. an attic-type room)
According to construction terminology- attic (or attic floor) is a living space located on top floor a house that has an attic roof (i.e. the facade of the attic is partially or completely limited by the roof surfaces).
The difference between the attic and the second floor - comparative characteristics
If you try to compare which is better, the attic or the second floor, you will get something like the following picture.
| Parameter | Attic | Second floor |
|---|---|---|
| Price | Below. The amount of savings depends on the type of attic | Higher |
| Duration of work | Lower compared to building a floor | High |
| Height of vertical walls | Up to 1.5 m.p. | Over 1.5 m.p. | Below | Higher |
| Air volume | Lower due to sloping walls | Higher |
| Square | The usable area is smaller due to the “dead” zones where the roof meets the wall | Higher |
| Room layout | The layout of the attic floor is carried out taking into account the presence of blind areas | Free |
| Land area | Doesn't change | Doesn't change |
| Illumination | Better, more light penetrates due to sloping windows | Depends on the number and location of windows. In addition, the deep slope of the window blocks 2/3 of sunlight |
| Glazing area | 25% less than when using vertical windows | Minimum 1:8 to the surface area of the walls (depending on location) |
| Window | Sloping attic | Vertical |
| Temperature | At correct execution all stages of work are almost the same | |
| Heat loss | Higher | Below |
| The need for thermal insulation material | Below | Higher. The ceiling above the floor needs to be insulated |
| Aesthetics of the structure | A house with an attic floor looks more elegant and unusual | Typical design |
However, it is worth noting that there are cases when it is impossible to build an attic floor. For example:
- load-bearing walls and foundation may not withstand additional load;
- the walls are made of porous materials that can collapse.
- small house dimensions. With a mandatory height of 2.3 m (according to sanitary standards, SNiP is limited to 1.5 m) it is difficult to equip a full-fledged living space with a small surface area. If the width of the house is less than 5 m.p. There is no point in building an attic. The resulting area will be insignificant, but the costs will be high.
Is the attic considered the second floor?
According to urban planning standards, the addition of an attic does not affect the number of storeys of the building. Those., a private house, in which the second attic floor is arranged, is considered (is) a one-story house.
Documentation regulating the calculation and construction of the second floor of the attic type.
The superstructure of the attic floor is regulated by the provisions of the following regulatory documents:
- SNiP 2.08.01-89 “Residential buildings”;
- SNiP II-3-79 “Construction Heat Engineering” (standardizes the arrangement of enclosing structures, including roofs);
- SNiP 23-05-95 “Natural and artificial lighting”;
- SNiP 21-01-97 “Fire safety of buildings and structures”;
- SNiP 2.01.07-85 “Loads and impacts”;
- sanitary and hygienic standards.
Types and types of attic floors - dimensions and dimensions of the attic
The height of the attic floor determines its type (type):
- full floor. vertical wall above 1.5 m;
- attic. The height of the smaller wall ranges from 0.8 to 1.5 m;
- semi-attic. The height of the wall is less than 0.8 m.
 Depending on the needs of the residents, rooms on the attic floors can be arranged for various functional purposes.
But most often there are bedrooms and lounges.
If the requirement for a building height of 2.3 m is met, then according to the standards prescribed in SNiP, the area of the attic floor cannot be less than 16 sq. m. In this case, the bedroom must be at least 7 square meters.
If the height of the walls of the attic floor exceeds 2.3 m, then the construction of a bedroom of a smaller area is allowed. The justification for reducing the area is the large total cubic capacity (volume) of the room.
Armed with this theory, you can begin to build an attic floor with your own hands. Construction is not a troublesome task if you have detailed step-by-step instructions.
Construction of the attic floor (attic)
 Before starting construction, you need to create a project for the attic floor. You can do the project yourself or turn to professionals.
Note that building an attic with your own hands is within the capabilities of anyone. But it is quite difficult to take into account all the determining factors and calculate loads without special knowledge.
First, let's find out what affects the attic project.
Choosing the appearance of the attic roof is quite difficult, because... This is influenced by a number of factors:
- visual effect. First of all, subjective sensations are taken into account. The final choice may fall on another model, but the starting point is here;
- living space. The rafter system of a gable roof “steals” the area and creates “dead” zones, but the hip roof allows you to use almost the entire space of the attic superstructure;
- financial opportunities. A pitched roof is the cheapest option;
- roofing material. Some types of roofing material can be used if a certain roof slope is maintained. For example, for tiles the angle should be at least 25°, and for PK-100 corrugated sheeting (wave height 100 mm) 3-4° is sufficient;
- general architecture of the building;
- wind and snow load. The snow should slide off the roof;
- condition of load-bearing walls and foundation. The condition of load-bearing walls can be judged after a visual inspection. The presence of cracks indicates a problem. The use of porous material in the construction of a house reduces the ability of the wall to withstand the load created by the attic. It is difficult to judge the foundation. But knowing its type and what materials and technology were used in its construction, you can calculate what load it can withstand;
- arrangement of internal communications and ease of connection to them;
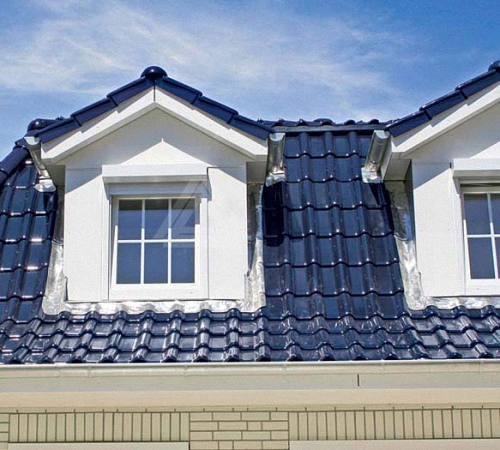
- choice of windows. Installation of special roof windows (tilted windows - sliding, turning, sliding) is carried out directly in rafter part. They are more expensive, but they allow you to provide better ventilation. to install vertical windows you need to build walls or gables. The surface area of light-transmitting structures must be at least 12.5%;
- selection of materials for construction. The cheapest and most popular option for performing the work is to use wood. Technology frame construction quite simple. It is a mistake to think that erecting a wooden attic floor is unacceptable. According to SNiP 21-01-97, the use of wooden structures in the construction of an attic floor is allowed if the wood is properly processed and the building height is up to 75 m.
- complexity of calculations. During construction pitched roof loads on load-bearing walls are distributed unevenly. Ignoring this fact will lead to subsidence of the walls and destruction of the foundation.
The main shapes of roofs are shown in the figure.

Nuance. The smaller the angle where the roof meets the wall, the more usable area you will have.
Some projects of houses with an attic floor are presented in the photo.

Before starting work, you must have a drawing, sketch, diagram or drawing with all dimensions.
The drawings of houses with an attic presented below will give you an idea of what needs to be put on the diagrams.


Calculation of the area of the attic floor
The ability to use the attic for living space is calculated using the formula
АхВ + 0.7хС
A- total area of premises whose height exceeds 2.5 m;
IN- total area of premises, the height of which ranges from 1.1 to 2.5 m;
WITH- the total area of premises, the height of which ranges from 0.8 m to 1.1 m.
0,7 - correction factor. It says that theoretically this area can be used, but with significant restrictions.
You can reduce the amount of unused square meters by raising the walls to a height of more than a meter. This is achieved through the construction of attic walls. The attic walls of the attic floor are a superstructure over the load-bearing walls.

Material prepared for the website www.site
Construction of the attic floor (attic)
Next, we move directly to construction work or reconstruction (conversion of the attic into an attic floor). For those who want to convert the attic into an attic, they need to dismantle the old covering.
Then the rafter system is installed, for which you will need:
- log (diameter at least 180 mm) or timber (preferably laminated veneer lumber, dimensions 80x80 or 100x100);
- board (40x1500) for sheathing;
- hardware, burnt wire, anchors or fittings. In order to fulfill reliable fastening all elements;
- floor beams. The finishing floor will be laid over them;
- finished staircase to the attic floor. It can be located outside the attic or inside. Outdoor placement creates inconvenience when using it in the cold season and in the rain. The interior steals the usable space of the lower floor. A spiral staircase can be a compromise. Even at the most small room a compact folding or retractable ladder is installed.
- roofing material;
- protective films;
- thermal insulation material;
- material for finishing walls and ceilings.

Attic floor rafter system - device technology
The construction of the rafter system begins with the installation of the Mauerlat, then the rafter legs are assembled and installed. It is easier to collect them on the ground. Installation begins with two opposite legs. Then a rope is stretched between them. It regulates the accuracy of installation.

After installing the frame of the rafter system, the legs are fastened together. That is, the sheathing is filled. The sheathing pitch depends on the type of roofing material.
The process of building an attic floor - video
The frame is ready. A correctly executed roofing cake has the appearance shown in the figure.

Windows on the attic floor
Dormer windows are installed between the rafters. To make the fastening more reliable, horizontal beams made of timber are installed at the location of the window (at the top and bottom of the rafter system).
Insulation of the attic floor
It is necessary to take care of energy saving. Absence air gap created by the attic increases heat loss through the attic roof.
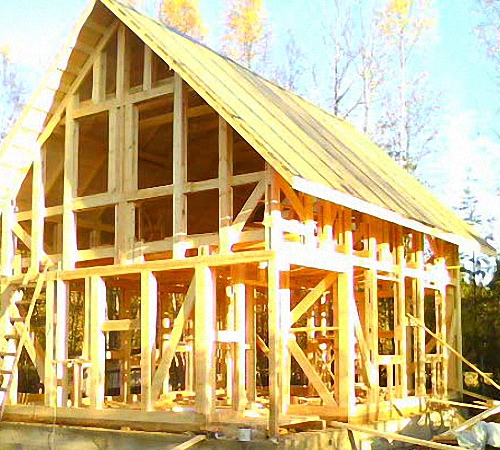
The modern mansard roof is a great opportunity without unnecessary hassle significantly expand the living space of your home. But if you involve builders in the work, it can cost a pretty penny. It is quite understandable that each of us has thought about the question of whether it is possible to do everything on our own without experience. We assure you that a do-it-yourself attic roof is more than possible. We offer you comprehensive instructions.
Currently the best option – broken attic. It is quite spacious and can really become a full-fledged living space with a large area. Naturally, for this you need to make accurate calculations.
Construction of an attic roof will require you to consider many factors before. Let's list the main ones.
Video about the attic roof of a house with your own hands
It is quite clear that the smaller the angle of inclination, the more usable space there will be in your attic. But it is not always necessary to strive for the most flat placement. Let's list some features of the choice:
- If your house is located in an area with a temperate climate, where the weather is often windy and snow is rare, then you can safely make a roof with a slight slope;
- If snowfalls and downpours are a frequent occurrence in your area, a flat roof should be abandoned;
- Do not forget that you need to take care of high-quality heat, sound and waterproofing. The attic is a living space like the rest of the rooms in your house;
- The best materials for roofing are tiles or slate. Many people mistakenly install a metal covering, but with the arrival of cold weather they are faced with problems of heat conservation in the attic. Please note that materials must be fireproof and moisture resistant. The roof always consists of wooden elements. For better preservation, it is recommended to treat all such surfaces with an antifungal solution;
- An external staircase for the attic will significantly save space in the house. An internal staircase is a much more convenient option, but it also takes up a lot of space. It’s great if you take care of installing a ceiling ladder. It takes up practically no space. Alternatively, you can install spiral staircase, but its convenience is often questioned.

An external staircase for the attic will significantly save space in the house
- To get started you will need wooden beams 10x10 cm in cross section. They are applied on top of the waterproofing. The best material for it is roofing felt or roofing felt, which is sold in rolls. Working with them is quite convenient and you don’t need any additional skills. If your ceiling is also made of wood, then additional beam There is no need to lay it under the main beams.
- The next step is to install the racks on the beams. The same timber with a section of 10x10 cm will suit you. These racks are a kind of skeleton of the walls of your attic. In order for them to fully perform their functions, they must be placed no further than two meters from each other. Make sure each one is perfectly level. We recommend checking each one with a level and, if necessary, filing in the right places. When the racks are installed, they must be sheathed on both sides. For inside An excellent option is plasterboard or ordinary plywood, for the exterior - slab. It is important not to forget at this stage to lay the insulation between the racks. Each rack is separately secured with spikes and brackets. To prevent them from tilting, we recommend using temporary braces to secure them properly.
- Next, lay the top beam. Its cross-section should be the same as in the previous paragraphs. You can secure it in any way that is convenient for you. But make sure that the beams are held tightly and firmly.

Each rack is separately secured with spikes and brackets
- Now you need to install the Mauerlat. This is a kind of support for the rafter leg, which is located at the bottom of the structure. For the Mauerlat you will need a beam with a section of 40x40 cm or a board with the same thickness. Thanks to the Mauerlat, high strength of fastening of the roof rafters to the walls will be ensured. It allows you to redirect the weight of the roof directly onto the walls. It is not necessary to take a section larger than 40 cm. All the same, the Mauerlat lies directly on the wall and the load on it is relatively small. Just be sure to put waterproofing underneath it, otherwise it will start to rot over time.
- A well-fixed Mauerlat protects your roof from the effects of wind, snow in winter and other loads. Therefore, make sure that it is secured carefully. For this you can use wire with a diameter of up to 5 mm. It is best to choose annealed wire, which is specifically intended for tying. To make the walls more durable, the wire is embedded directly into them.
- Now you need to install the rafter legs. Make markings on the rafter frame and mauerlat in the places where the rafters will be installed. Usually the step is 1-1.2 m. For rafters you a board will do with a cross section of 4-5 cm and a width of 15 cm. Choose only perfectly flat boards. It’s better to overpay a little money for them, but be sure that a residential attic with your own hands will not cause your attic roof to collapse.

For rafters, you will need a board with a cross section of 4-5 cm and a width of 15 cm
- The rafter legs should rest on the ridge beam. If your attic has large area, then the weight of its roof will be large. Therefore, the beam is a mandatory structural element. It is not needed only if the rafter length is less than eight meters. In this case, you can get by with regular stretch marks.
- Installation of fillies. Produce it according to the same scheme as the rafters. To simplify the process, start with the two outermost ones, stretch the twine between them and align with it when installing the next ones.
- Now you need to nail the hem board to the fillies. It will become an obstacle to wind and almost any precipitation.
- Before you make a mansard roof, you must think about where the windows will be installed. Remember that their area should occupy at least 12-13% of the area of the side walls. Where you decide to install windows, you need to strengthen the rafters. To do this, install cross bars. They will take on the role of the lower and upper parts of the opening, where the window frame will be installed and fastened.

Before you make a mansard roof, you must think about where the windows will be installed
When the previous ten points are completed, you need to carefully double-check everything that has been done. Already at this stage you will understand how to make a roof with an attic without any problems, but you should always play it safe. Especially if you are doing this for the first time.
Carefully go through all the rafters and beams with a level, check whether they really hold tightly and reliably, whether there is insulation everywhere, and whether problem areas need to be improved. It would be better if you ask one of the more experienced builders to evaluate with a trained eye whether everything is really done as it should be. Remember that the roof of your home must be safe and strong. But if everything is fine and the structure holds securely, you can proceed to further work:
- You have already created the roof skeleton. Now you need to nail the furring slats to the rafters. The step depends on what roofing material you choose for your roof.
- When the sheathing is installed, you need to install a water barrier on it. In most cases, regular plastic film is best suited for this. It is inexpensive, effectively protects the attic from moisture getting inside and is easily attached using construction staples. The main thing to remember is that the layers of film must be laid from bottom to top with the layers overlapping each other.
- A thermal insulation layer must be placed on top of the film. One of the best materials which serves for these purposes is mineral wool. It is lightweight, retains heat well and is completely safe for your health, unlike many other thermal insulation materials. In addition, it effectively prevents the spread of rodents in your home.

A thermal insulation layer must be placed on top of the film.
- When you reach the roof, follow the same procedure as in the case of plastic film. The roofing ball also lies from bottom to top, and the elements overlap each other. Make sure that in those places where there is a break in the roof, the upper ball of the roof protrudes above the lower one. It is very important. Otherwise, with the slightest rain, your roof will leak and the structure will gradually rot.
- The ridge must be installed in such a way that its design completely eliminates the possibility of precipitation getting under the roof of your roof.
Completion of installation
The main part of the work has come to an end. It is recommended to make attic roofs multi-layered so that they provide better heat, sound and waterproofing of the entire attic. Do not forget also that the attic must “breathe”. Modern windows and doors are an integral element of any such roof.
If you have not completely decided on the installation of the stairs, then it is better to install an external one first. It will be cheaper and easier this way. In any case, if you feel that this option is not suitable for you, you can make a staircase indoors at any time, sacrificing space in the house.
Video about a gable roof
Now you know how to build an attic roof according to all the rules and without resorting to the help of an expensive team of builders. Be patient, select high-quality materials and tools, and then follow our instructions. Good luck!
Construction of an attic is a very important process that is performed both at the design stage of the entire house and after its construction. This premises provides its owners with additional square meters living space. Let's look at the features of the attic construction below.
Construction of an attic: project and its development
The attic is a rather difficult part of the building to construct. It is preferable to design it at the stage of building the house itself. Because building a residential attic on a finished building is not always possible. First of all, due to the fact that the attic space has considerable weight, and therefore loads the foundation.

The construction of an attic consists of a certain kind of stages, such as:
- attic construction drawings;
- dismantling old roofing materials, if the attic is being built on an already completed building;
- strengthening the walls on the upper floor, strengthening the foundation, if necessary;
- walling attic room;
- construction of the roof, its insulation, waterproofing and finishing;
- installation of window structures;
- interior finishing works.
Compliance with everyone technological nuances in the construction of an attic, will allow you to get a reliable and durable building.
The first and most important stage is drawing up a project for the attic space. At this stage, you should take into account such features as the size of the room, the material used in its construction, the roof and the level of its slope and many other nuances.
There are three ways to design an attic. The first is the most budgetary, drawing up the project manually. However, to carry out this operation it is necessary minimal experience design. The second way is to use ready-made design documentation; however, it is not a fact that someone else’s attic design will be completely suitable for your home, so you will still have to make some adjustments to it. The third way is to contact specialized organizations that, in the shortest possible time, will help you draw up an attic project that is ideal for your home.
In progress independent design The wall loads on the building, its appearance and the finishing materials used both inside and outside the building should be taken into account. In addition, it is imperative to take into account the load from the building on the foundation; it may need to be strengthened. If the attic is too heavy, there is a risk of deformation or cracks in the house.
Experts will help you choose the optimal building materials, which, on the one hand, will ensure the attic's durability in operation, and on the other hand, will help reduce its load on the base of the entire building.
In addition, after drawing up the project, it should be agreed upon with special government agencies. If you have a competent project, this process It will go by pretty quickly.

Do-it-yourself attic construction in the house
We invite you to familiarize yourself with the option of building an attic in an already built and commissioned residential building. In this case, the first step is to dismantle the old roof. Thus, it will be possible to expand the under-roof space and increase the safety of the building under construction.
To dismantle the roof, it is not necessary to hire specialists; all work can be done with your own hands. To do this, you must first get rid of the external roofing finishing material. Next, you need to completely remove the sheathing and rafter system.
After this, it is necessary to strengthen the walls on the adjacent floor, since the attic will exert a certain pressure on them. The design features of the attic exert pressure not only on the surface of the base of the building, but also on its walls. Therefore, first of all, before constructing an attic, it is necessary to strengthen the walls close to it. To do this, you should use special calculations, according to which this process is carried out and the strength level of old walls is determined.
The next stage is insulation and waterproofing of the attic floor, which is also the ceiling on the previous floor. With the help of these actions it will be possible to ensure a healthy atmosphere in the room. To insulate the attic, you can use various thermal insulation materials in the form of polystyrene foam, mineral wool, etc.
Construction of the attic photo:

Next follows the process of erecting walls in the attic. The walls are made in accordance with the project developed in advance. Most often, wood or timber is used to build walls. To insulate the attic, it is recommended to use mineral wool or expanded polystyrene. Choosing material for external and interior decoration walls, try to give preference to materials with high level fire safety.
The next process is the construction of the roof. In this case, the calculation correct angle The slope of the roof is very important. Since a roof that is too flat will negatively affect the ease of use of the attic space. Please note that the roof must be properly waterproofed, since if there is the slightest leak on its surface, moisture enters the attic.
In addition, the shape of the roof should be as simple as possible; the presence of broken and shaped elements will only complicate the process of their construction. Also important is the issue of insulating the attic space. For these purposes, various types are used Construction Materials. When choosing insulation for the attic, try to give preference to materials that do not absorb moisture and are resistant to frost, temperature changes and rodents. In addition, the thermal insulation material should not allow heat to escape from the room.
It is best to focus on conducting internal thermal insulation works. To create it, follow a number of steps:
- install finishing in the form of plasterboard or plywood base;
- form a vapor barrier layer; special films are used for these purposes;
- lay thermal insulation material - perfect solution- mineral wool;
- ensure proper waterproofing of the roof using a special type of membrane;
- lay external finishing roofing material.
To erect a roof, you will also need to install a rafter system and install sheathing, the installation step of which depends on the type of roofing material. After the roof installation is completed, windows should be installed.
In order to ensure quality lighting In the room, several windows should be installed in it, the size of which directly depends on the size of the attic itself. The window in the attic ceiling must be of high quality. It must be resistant to precipitation, wind, and temperature changes. In addition, with the help of window structures, high-quality ventilation of the attic is ensured.
Further actions for the construction of the attic are related to the internal finishing works, heating organization, decoration and design of the premises. Strict adherence to all recommendations for attic construction will help ensure long-term operation of this room.
Frame attic construction technology
A frame attic is an excellent solution for any home, garage and even bathhouse. Among the advantages of frame-type attics, we note:
- lightness of the structure, so it does not load the main building, there is no need for additional strengthening of the walls and foundation;
- affordable cost of the attic - in comparison with its stone options;
- high level of thermal insulation and sound insulation;
- the possibility of constructing an attic of almost any shape and configuration;
- ease of implementation construction work, since the materials for the construction are quite light and special equipment is not required to lift them to the surface of the house.
Construction frame attic allows you to get finished building with excellent heat and sound insulation properties. In addition, the roof will remain completely intact, and the usable area of the room will increase significantly.

A simpler process is to build an attic on a building that has not yet been erected. The construction of an attic on an already finished house requires the dismantling of the old one roofing. Work should begin by studying the characteristics of the soil on the site and determining load-bearing capacity foundation. If the foundation is not able to support the attic, then a series of works will be required to strengthen it.
Next, you should inspect the walls of the house for their susceptibility to additional loads. In this case, if necessary, it is necessary to strengthen the walls. After this, the old roof is dismantled and the ceiling is strengthened.
Construction wooden attic consists of the following stages:
- production of frame system;
- installation of walls;
- insulation of attic walls;
- installation work related to the installation of the roof;
- finishing the attic with roofing materials and insulating the roof;
- interior decoration of the attic.
In addition, the construction of an attic involves the installation of window and door designs, manufacturing and installation of stairs, etc.
In order to construct an attic from timber, you should prepare edged board, plywood, screws and the timber itself. The frame structure should be of a height convenient for the average person to move around. The optimal height of the attic is at least two meters. The height of the ridge zone should be about 350 cm.
The easiest way is to assemble the frame on the ground and then lift it onto the roof. The top beam or frame frame will act as a hearth in the attic. For fixation frame structure special boards or plywood are used on the surface of the house. In this way it is possible to obtain a special platform. The knots and quality of fastening depend on the material from which the attic walls are made. Self-tapping screws are used to connect the timber at the top of the structure. After making the frame walls, the roof should be thermally insulated and waterproofed. After this, the external and interior lining walls, windows and doors are installed, interior finishing work is carried out.
When planning an attic you should carefully analyze general state main building. The attic can be one room or will consist of several rooms. At the design stage, you should also take into account the design and shape of the windows, as well as their location.
The attic should be constructed from light, but at the same time durable materials. Since the materials should easily rise to the roof and place minimal load on the base of the building.
The most optimal materials for constructing an attic are wood or steel profiles. An attic made of stone or concrete will load the main building. Roof finishing materials should also be light, but at the same time durable and reliable. Preferably used for roofing bitumen shingles or piece metal. We recommend using plasterboard for interior wall decoration and leveling.
Since the attic is located above the main building, it is in greater contact with cold air. Therefore, proper thermal insulation of this room should be ensured. Heated air in the room should not penetrate through the insulation. In addition, in order to prevent moisture from entering the room, it is necessary to ensure its waterproofing.

In relation to design features attic, it consists of a rafter system, which is installed in increments of sixty centimeters. To fill the gaps between the rafter system, it is recommended to install thermal insulation materials, such as mineral wool, inside them. It is possible to lay the insulation in one, two or even three layers. To calculate the total thickness thermal insulation material, the overall heat loss coefficient in the room should be taken into account. To protect the roof from inside the room, a vapor barrier should be installed. Next, you should finish the roof using plasterboard, lining or finishing panels.
Do not forget to leave a ventilation gap, the main function of which will be to get rid of excess moisture in the under-roof space. The width of this gap directly depends on the type of roofing material. WITH outside thermal insulation material should be installed with vapor-permeable wind protection.
Excellent vapor barrier material is a film made of polyethylene, glassine or roofing felt. The insulation is laid with an overlap of 15 cm. Construction tape is used to seal the seams. Please note that foil waterproofing is laid with a foil covering inside the room. Thus, the foil will reflect the heat that comes from the room.
Construction of the attic video:


