Elena Belega
Sundial- the most reliable, because they never run ahead and are not late. Therefore, they were probably built by the Egyptians, Chinese, Babylonians, Greeks, Indians, and Peruvian Incas. Want to try? Making such a clock can also be a wonderful lesson in mathematics and astronomy for your children. The simplest equatorial sundial can be made from scrap materials and placed in the garden or on the balcony. These watches are called equatorial because the plane of their dial is parallel to the plane of the earth's equator.
1. Let's determine the direction to the north in the most ancient and accurate way. To do this, we fix a vertical pin (gnomon) on a horizontal surface. A couple of hours before solar noon, mark the position of the shadow from the gnomon with a dot and draw a circle with a center at the place where the gnomon is fixed and a radius equal to length shadows from it at the initial moment of observation.
2. Let's follow the shadow: it will decrease, move away from the circle we drew, but at some point it will begin to grow and cross it again. Let's fix this touch of the shadow with the second point and connect it to the first. Divide the resulting segment in half. A straight line passing through the center of the circle and the middle of the segment will give us the noon line. This line is the exact north-south direction.
3. Now let's mark the dial. For equatorial watches, this is as easy as shelling pears: divide the circle into 24 equal parts of 15° (24h x 15° = 360°) and mark the hours.
4. It's time to make the body. Thick cardboard, a piece of plywood, or a thin board (we used polystyrene foam) are suitable for this. It is necessary to fix the gnomon perpendicular to the surface and place the dial on it.
5. All that remains is to correctly orient the resulting structure. To do this, the following conditions must be met: a) the dial line “6-18” must be located strictly horizontally; b) the line “12-24” must coincide with the north-south direction, which we have already found (see 1); c) the plane of the clock dial should be tilted to the north so that the angle between the gnomon of the clock and the horizon plane is equal to the geographic latitude of your area (for Moscow this is approximately 55.5°). The clock is ready!
They display true solar time and their readings will match yours wristwatch, if you take into account the summer time in force in our country and maternity time. In winter, a clock of this design, unfortunately, will not work: the sun in our latitudes is too low above the horizon, and the gnomon will not provide shade.
Hello, dear readers KARTONKINO.ru! Spring... Somewhere it is already in full swing, somewhere they are just waiting for its arrival, in a month or two, but everywhere the sun shines brighter and longer. And we have a great opportunity to put sunlight to work by making DIY sundial. Of course, they will not replace traditional - mechanical and electronic - watches, but this homemade product is very entertaining, and for representatives of the younger generation - also educational, because the model of the sundial that we will make is the most effective one, and its manufacturing will require certain knowledge in the field of astronomy and trigonometry.
There are many varieties of this ancient device for measuring time. But among all the variety of sundials ever used, the following types are distinguished as the main or classic ones:
— equatorial(in such a sundial, the plane of the frame (dial) is parallel to the equator, and the gnomon (the part that casts the shadow), usually a metal rod, is parallel to the earth’s axis);

Equatorial sundial on the banks of the Thames (London, England)
— horizontal(the plane of the frame is parallel to the horizon plane, and the gnomon has the shape of a triangle, one of the sides of which is inclined to the plane of the frame at an angle equal to the latitude of the place where the clock is installed);

Horizontal sundial (Limassol, Cyprus)
— vertical(as the name suggests, the dial of such a watch is placed in a vertical plane, usually on the walls of buildings).

Wall sundial (Ely Cathedral, England)
We will make an equatorial type sundial, as it is the easiest to make. Due to the fact that the dial is installed parallel to the equator, and the sun moves almost uniformly across the celestial sphere, the shadow of the gnomon will shift by an angle of 15° every hour. Therefore, the hour divisions on the dial are applied in the same way as in a regular watch, only the marks needed are not 12, but 24. It is clear that top part The dial is unlikely to be useful, except for residents of the Arctic, when the polar day comes and the sun will shine around the clock.
There is no need to draw the dial yourself, you can use ready-made templates- round or square (whichever you prefer):
Our task comes down to correctly orienting the sundial in space. The angle of inclination of the dial relative to horizontal plane is defined like this:
α=90°-φ ,
where φ is geographical latitude. You can find out the latitude of your place of residence on a map or on Wikipedia.
And knowing the necessary angles, it is very simple to make an inclined stand for our sundial from cardboard or paper and then stick a printed dial on it or prepare a scan of the watch case with a printed image of the dial in a graphics editor.

We know the dimensions of the dial template. The side of the case is a right triangle. Thus, we know the length of the hypotenuse C and the angles of the triangle, and the lengths of the legs A and B are calculated by trigonometric formulas:
A=C×sinα
B=C×cosα
All that remains is to draw the development according to the obtained dimensions, it is possible even without the side walls.
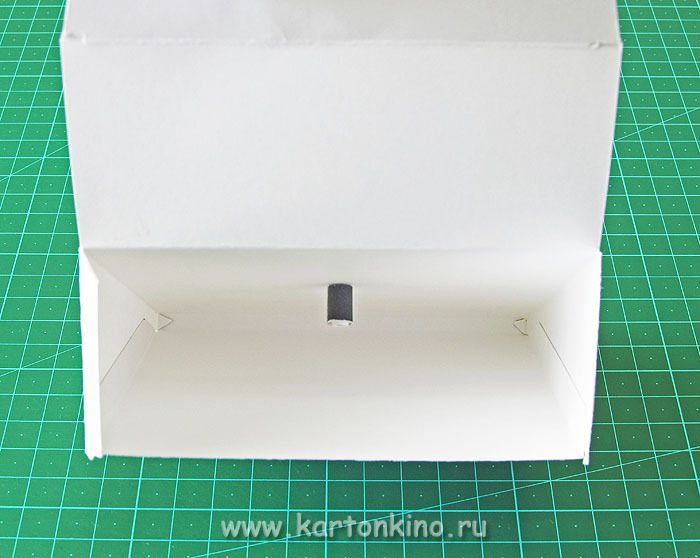
I made a case with an opening back cover (I’ll explain why below):


No matter what you do, you still end up with a box.
Well, now you need to install a gnomon in the center of the dial. To do this, you can use any rod of suitable size (for example, a plastic straw from a juice bag). You can also make it from cardboard or paper:
— cut out a rectangular strip 60 mm wide (we determine the length empirically, by eye, so that when rolled up, you get a dense tube with a diameter of about 5-6 mm with a small hole);

— glue double-sided tape to one edge and roll up the tube;


— cut out another rectangular strip 15-20 mm wide and also roll it into a tube with a diameter that matches the diameter of the hole in the first tube;

- cut off part of the first tube at a distance of 10 mm from the edge (this will be something like a nut)


and connect the parts;

- fix the gnomon on the dial, fixing it with reverse side“nut” (this is where the opening lid comes in handy).

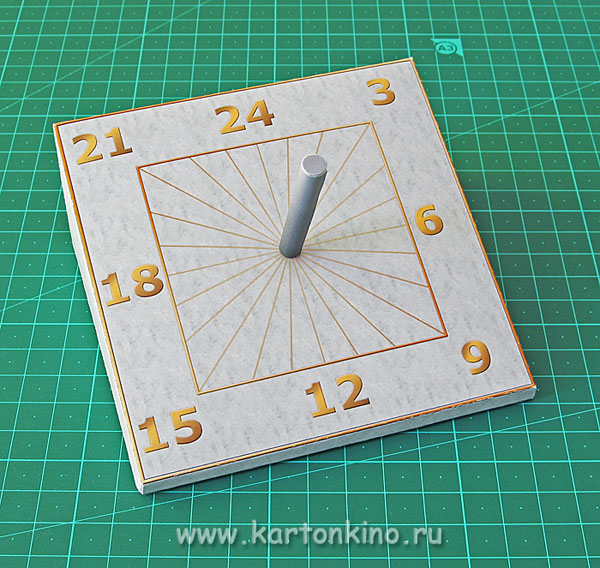
The sundial is ready. Now, for them to work correctly, you need to place them in a sunny place (on a windowsill, on a balcony, etc.) so that the gnomon “looks” north (we determine the direction using a compass).
Of course, you should not expect an exact coincidence of the readings of such a sundial with the readings of ordinary watches. Firstly, sundials that show true solar time do not take into account the standard time in a particular area. Secondly, we should not forget that the magnetic and geographic poles of the Earth have a discrepancy, and the fact that we oriented the watch along the magnetic pole will also introduce some error.
And finally, the main point that you also have to take into account is that the equatorial clock only works during the period between the days of the spring and autumn equinox. The rest of the time, the upper surface of the frame will be in the shadow. But the day spring equinox in the northern hemisphere soon, so the wait won't be long. There is just enough time to make a sundial with your own hands and set it up to work.
Successful experiments to you!
Did you like the article? There is still a lot of interesting things ahead - subscribe to updates and receive announcements directly to your email!
By the way, a new master class on making a sundial is already ready. This time we are talking about a horizontal type pocket watch model.

See you again in KARTONKINO!
IN Lately owners of suburban areas are increasingly seeking to decorate their garden areas somehow unusual and original, using those structural elements, thanks to which the site will become truly exquisite and unique. If we're talking about about a European garden, here it is a sundial that will fill the territory with a special philosophy. Today we will find out, but first we will deal with some important points.
Interesting fact! Did you know that garden labyrinth Is it possible to do it yourself? If you want to know more, read.
Brief historical excursion
Sundials gained particular popularity in the 17th-18th centuries and were used mainly in gardens. classic style- first in, and soon in. They first gained popularity as part of palace ensembles, but their mass distribution is associated with the transformation of watches into an independent element ornamental gardens, which, by the way, were performed in a wide variety of styles.

It is often said that Europe is not a suitable place to create a sundial on a site, they say, this is just another attempt to stand out among other summer residents, and an unsuccessful one. And they say this because our climate is not suitable for this, since there are many cloudy days. You will be surprised, but all this is just another misconception! For example, in England, with its frequent fogs, rare classical gardens do without this decorative element.
Video - Making a sundial
On the role of the element in the landscape
Usually the sundial is located in the center of the flower bed and is the dominant element, as it is located on a pedestal or other elevated surface. Also note that the pedestal is important element of this composition, which is sometimes made in the form of a column.

Sundials are designed to attract attention, for this reason their size is directly related to the size of a particular area. If the area is small, then it is advisable to install the clock on a path, next to a lawn or a small but bright flower bed. But in a landscape or forest garden it is better to surround them with flowers so that they, invisible from afar, suddenly appear before your eyes when approaching. In addition, in small gardens, sundials are often installed in the form of decorative figurines.

Thanks to the huge variety of materials and shapes used to create a clock, you can get a design that takes into account the characteristics of the garden where it is created. So, if the garden is in an avant-garde style, but when creating a sundial, the most insignificant details should be taken into account. Here the clock can become part of a recreation area, a playground or even a gazebo. Moreover, they can effectively decorate a garden pond or fountain.

There is a concept of “live clock”. This is another option how to make a sundial with your own hands, but using flowering living plants, which will serve as material for the formation of the dial and hands.

Sundial design
Any sundial is based on two elements:
- cadran is a flat surface on which is applied appropriate markup(clock face);
- The gnomon is a rod that is attached to this surface.

Any material that is resistant to atmospheric factors can be used to make watches. It could be stone, cement, iron, wood, plastic or even gravel. It is advisable that the dial be light (this may be white marble, limestone, etc.): this way the shadow from the gnomon will be more noticeable. And the gnomon itself, by the way, can be made from long nails, plastic pins or knitting needles.
Note! The length of the pointer should slightly exceed the circumference of the dial.
Such watches can decorate and enliven any landscape. Especially if live plants not exceeding 50 centimeters in height were used for it. For example, calendula flowers bloom at about six o'clock in the morning and close at four in the evening (even if the day is cloudy).
Main types of watches
Historically, there are three types of sundials. Let's get acquainted with each of them.
- Vertical elements are installed mainly on the walls of buildings, pillars or fences. The frame in them “looks” exclusively to the south, at an acute angle (or at an angle of 90 degrees) relative to the noon line. It is also important that the gnomon is located slightly above the core of the dial - it should be deflected to the south, approximately 90 degrees from the vertical line (the geographic latitude of the region is subtracted).
- A distinctive feature of horizontal clocks is that they are able to show time all year round, although their indicators in winter and autumn are not entirely reliable. In such designs, the gnomon is located at an angle relative to the horizontal, equal to the geographic latitude of a particular region. A horizontal clock can be installed in the middle of a lawn, flower bed or garden pond. In addition, stones or stumps can be used for digital divisions.
- Equatorial clocks have one significant drawback: they accurately show time only during certain periods of the year. For example, for the northern regions the “exact” period is the period of time between March 22 and September 22. But if you consider that the summer season lasts from late spring to early autumn, this will be quite enough.


Now let's talk about the features of the installation process itself. In principle, it is already shown in the image below, but the dial in this case was actually made for solar time, that is, for those regions where noon occurs exactly at twelve o'clock, in fact, as it should be.

But, unfortunately, in different places noon comes at different time- far from 12 o'clock. Therefore, if your plans include seeing local time on the dial, then it (the dial) will have to be slightly modernized. To do this, the numbers on it must be shifted around the axis so that the shortest shadow (namely, it will be observed at noon) moves exactly along the noon line (north/south).
But the procedure for finding the noon line is a separate story, but you need to know about it before how to make a sundial with your own hands. So, a compass is unlikely to help in this case, since the magnetic and geographic poles of the planet do not coincide: for St. Petersburg this is, for example, about 8 degrees - that is, the “gap” is on average 30 minutes, which is not so little . The most primitive way is the following: take plywood sheet, insert a screw or nail into it at an angle of 90 degrees, then place the plywood on a horizontal surface and note the movement of the shadow from the pin every fifteen minutes. After this, connecting all the points with a line in 3 hours, determine the smallest shadow - it will be that same noon line.
Note! Another practical advice, which will help you in manufacturing according to the instructions presented below: before you start using stone or metal, it is advisable to practice with plywood. If you mess it up, nothing bad will happen, but you will gain practical experience.
And last important point. If we are talking about a really good equatorial sundial with a flat frame, then it should have two dials at once - on the lower and on the upper planes. The first one will work from autumn to spring period, the second - from spring to autumn. Although, as noted above, this does not play a special role for a dacha plot, since people live on it mainly in summer time, therefore, one dial is enough.

Before starting work, you should decide on the location. It is advisable to install them on a flower bed or lawn, where sunlight will be available throughout the day. What is typical is that the clock can be placed on both a flat and an inclined surface (although in the second option it should be remembered that in order to obtain a shadow of the same length throughout the day, the required angle of inclination must be correctly determined). To calculate it, a special formula is used: 90 degrees are taken and the latitude of the region where your location is located is subtracted from it. country cottage area. But in the case of a flat surface, the length of the shadow falling from the gnomon will change throughout the day.

Of course, a shadow of constant length will look more impressive, although this is not important for the simple reason that the length of the shadow from the gnomon can be increased mentally.
Video - Sundial in the landscape
Once you've chosen your location, you can start creating your watch face. Its shape, let’s say right away, can be different, but in most cases preference is given to the good old classics - a circle or a square - since these are the easiest shapes to recreate. And if you don't know how to make a sundial with your own hands and from what, we answer: for this the most different materials. Among them we highlight:
- stone;
- driftwood of unusual shapes;
- coniferous perennial plants;
- bright flowering plants etc.
All this can be used to form hour divisions on the frame. But how to divide the area into these divisions? Take a watch (electronic or mechanical - it doesn’t matter) and, based on its readings, every hour mark the position of the shadow cast by the gnomon during the day.

It is advisable to do this on the day that is characterized by the longest duration. Mark each number with a peg - this way you will get different angular readings between the marks.
Note! If we talk about the gnomon itself, then it is - main element structure, since the shadow cast by it is a kind of clock hand indicating the exact time.
The final stage will be the design of the watch. First, think about how you will arrange the hour markers so that the crops planted next to each number are provided with everything necessary for normal development and growth. To do this, for example, you can indicate even numbers on the outer circle of the frame, and odd numbers on the inner circle. The diameter of these circles should be approximately 4 meters and 1.5 meters, respectively. It is also important that the plants used for the composition do not grow higher than 50 centimeters, otherwise the shadow of the gnomon will cover them.

Now - straight to work!
Instructions for making a sundial
The simplest clock design is horizontal, so you can even make it together with your child.

In fact, they can even be created on earth. To do this, draw smooth circle, in the center of which stick a stick - it will serve as a gnomon for you. Draw a straight line north from the center of the circle - this will be noon according to astronomical time. After this, divide the circle into twenty-four equal sectors. Tilt the stick in the north direction at an angle corresponding to the latitude of your particular area. As a result, each sector will correspond to 15 degrees.

Note! Such a sundial will not show the same time as an ordinary clock. After all, solar time, as you know, is not the same as the time of earthly time zones.
Now let's look at how to make a sundial with your own hands, but of a portable type. This will require a small cardboard box(necessarily flat), which can be glued with paper to match the color of the wood for effect.
If we are talking about suburban area, then you can use an even round cut of wood or a flat boulder, and install it at the intersection garden paths. Draw a dial on the surface rectangular shape(if the surface is round, then draw a circle). Draw a line in the center and cut it to secure the gnomon. The main part of the structure is ready!
Now make the gnomon itself, for which you will need to determine the latitude of the area where you live. To make it, you can use either plastic or thick cardboard. To set your watch correctly, take a compass. Point the sharp part of the gnomon to the south, while the north direction will correspond to noon. Insert the gnomon into the slot, seal the joints with glue.

To create divisions, mark the location of the falling shadow every hour. If you divide the surface into twenty-four parts, the clock will show solar time. That's all, good luck with your work!

The sundial is one of the most ancient devices created by man. Several hundred years later, this invention has not lost its functionality.
You can do it with your children at home, on the street, in the school yard. The sundial will become beautiful. In addition, knowledge of their manufacturing technology will be useful for those who like to travel.
Read also:
Historical reference
The first mention of a sundial was found in the area Ancient Egypt. Another 1300 BC people used such watches. They were also used in China and Greece. From there, sundial technology spread throughout the world.
They gained great popularity in the 18th century - at that time they were used as decorative element V landscape gardens and palace ensembles.

Principle of operation
Clock operation based on the relationship of elements: the base (cadran), dial and gnomon.
The base can be installed under different angles, in connection with this they distinguish different kinds hours.
The gnomon is an element that casts a shadow on the dial; it is a kind of similarity to the hand of an ordinary watch.
Types of sundials
Highlight three main types of sundials:
1. Equatorial clock. Their base is located parallel to the equator. A gnomon is a rod located parallel to the earth's axis. For their correct installation you need to know the latitude of the location.
2.Vertical clock. The frame plane is located vertically, usually on the wall of a building.
3. Horizontal clock. The base is located parallel to the horizon line. The gnomon is created in the form of a triangle, with an angle corresponding to the latitude of the location.
Creation of an equatorial sundial
The base of the watch is located parallel to the equator. The sun moves evenly, so in an hour the shadow will shift by 15. Note that this dial should have not 12 divisions, but 24. Thus, to make a dial, it is enough to divide the base into 24 sectors of 15 each.
If the clock is supposed to be placed in a garden or any other open area, then it is advisable to use durable materials for manufacturing.
As a basis Stone, iron, wood, plastic are suitable.
Gomon can be made from a long nail or knitting needles.
Next step - correctly determine the angle of the dial. It is defined as the difference between 90 and the geographic latitude of the location.
It is necessary to install the frame with the dial in a lighted place, attach the gnomon - and the clock is ready.

How to place the dial correctly
A regular sundial works correctly if noon occurs at 12:00 as intended.
Noon occurs at different times in different areas, so it is important to take this factor into account. In order for the watch to show local time, you must move the numbers on the dial around its axis, so that the shortest midday shadow moves in the north-south direction.
How to find out this direction? You need to take a sheet of plywood, attach a nail to it at a right angle and place the sheet in the sun. Next, you need to note the movement of the shadow of the nail every 15 minutes for 3 hours. Then determine the smallest shadow. It will be the noon line.
Polar clock
An unusual type of sundial. The dial in this case resembles a scale, the divisions are located in the west-east direction. The dial layout itself can be found on the Internet.
The most important - place the frame correctly. It should be located at an angle corresponding to the geographic latitude of the location, in the direction of the polar star.
Note that the simplest sundial shows solar time, which may differ from real time.
On the eve of summer, sun, summer season, gardening and all sorts of things I want to offer you step by step instructions How to make a horizontal type sundial on your site. Finding out the time by them is sometimes even more convenient than by mobile phone(because I don’t always have my phone with me; my hands are dirty; the sun shines off the screen).
The basis of the sundial is the gnomon. This is a stick, the shadow of which will show us time. The more accurately we orient this stick parallel to the Earth’s rotation axis (how to do this - see points 1, 2, 3 below), the more accurate the device will be. Any straight stick, similar in size to the handle of a shovel, will work as a gnomon (you can use the handle itself if you have an unnecessary one lying around).
We find a place where there are not many people and dogs running around, and where you often pass. The main thing is that it is illuminated by the sun most of the day. To do this, find the south (either navigate using Google Earth, or turn your face to the sun around 12–13 o’clock) and look for a place on the site with the southern half of the sky as free as possible (from roofs, trees, etc.).
Points 1 and 2 are devoted to finding the exact direction to the North. Yes, you can also use a compass for this, but we must remember that magnetic declination (that is, the deviation of the compass readings from the real direction to the geographic North) in our country can reach 10, 20 or more degrees. In addition, you can catch a local magnetic anomaly. Therefore, the method of determining North by the sun is more accurate and reliable.
1. By the time of true noon (solar climax, also mistakenly called “zenith”), we prepare a plumb line (for example, we hang a pebble/piece of iron on a rope and make sure that it all does not dangle in the wind) and a horizontal platform on which the shadow of the rope is visible. I will describe methods for calculating the time of true noon for your area below.
2. At the moment of true noon (it would be a good idea to synchronize the time with the Internet in advance, for example using the time.is service, or the ClockSync Android application), we mark the direction of the solar shadow of the plumb line, for example, using several pebbles, which we place along the shadow. This is the exact north-south direction (meridian direction).
3. We calculate the tangent of the angle to the horizontal at which the gnomon (that is, our stick) should stand. To do this, find out the latitude of the place, enter it into the calculator and press tan. For example, if the latitude is 56 degrees, then tan(56) = 1.483.
We multiply this number, for example, by half a meter (50 cm), we get 74 cm. We stick a stick into the ground, in the direction strictly north (we found it out in the last point by plumb line), from this place we place a pebble 50 cm from the place where the stick is stuck, and tilt the stick so that it passes over the pebble at a height of 74 cm. In Figure 3 (and 3a for greater clarity) I showed a plumb line that descends from the gnomon and falls on the meridian line (the length of this plumb line in our example = 74 cm) . Instead of a plumb line, you can “shoot” with your eye, but it won’t be as accurate. And in this position we begin to drive the stick, checking/adjusting from time to time so that it passes over our “half-meter” stone at a given height. As soon as the stick holds tightly, we can congratulate ourselves - the most important part of the work is done: we have oriented our gnomon parallel to the earth's axis. And, by the way, at the same time, he points to the North Star with good accuracy (you can check it at night by “shooting” your eye along the stick).
4 and 5. The following positions of the hour markers, made by timer. It should be noted that although the figure shows 12 o'clock for the noon marker, in reality the civil time for it will be different. To avoid thinking about this, the easiest way is to mark the dial by approaching the gnomon at 13:00, 14:00 and so on, and simply mark the direction of the shadow. And the next day, from morning to noon, mark the remaining hour markers.
The hour markers themselves can be anything you want: you can hammer in tablets with numbers, you can line them with stones.
Calculating true noon time
Let me list exactly what things happen at the moment of true noon:
* the sun is exactly in the South (for our northern latitudes);
* horizontal shadows from vertical objects fall exactly to the North;
* the sun is at the highest point of its daily course;
* this is the moment - with good accuracy the midpoint between sunrise and sunset on this day.
Each meridian has its own moment of true noon. So, say, in comparison with the center of Moscow, true noon in the east of the city occurs about 1 minute earlier, and in the west - a minute later. Here is the annual noon time chart for the center of Moscow (for the UTC+3 time zone, in which Moscow has been permanently located since October 2014):
That is, on the Moscow meridian you can simply use this graph. The graph will have exactly the same shape in your location, only it needs to be shifted according to vertical axis by the amount (D–37.6)/15 hours, where D is your geographic longitude. For example, let’s take Perm, its longitude is 56.2 degrees, substitute it into the formula: (56.2–37.6)/15 = 1.24 hours = 1 hour 14.5 minutes. That is, in Perm, true noon occurs 01h14.5m earlier than in Moscow, and according to Moscow time, 01h14.5m must be subtracted from the above schedule. For example, for May 22, we get 12h26.5m minus 01h14.5m = 11:12 Moscow time, add 2 hours (the difference in the time zones of Perm and Moscow), we get 13:12. Let's remember this time to compare with the next method.
The second method is to find your locality on a weather website that shows sunrise and sunset times. For example, for the case of Perm, we open the Yandex weather site yandex.ru/pogoda/perm and see there Sunrise: 04:37 Sunset: 21:47, we find the arithmetic mean of these two times (04:37 + 21:47) / 2 = 13:12 . Same time as we got above.
The third method is the use of calculation programs. You can choose a program to suit your taste, I use my Day–night (at the link daybit.ru/video/video-i-soft.html you will find a video on its use, and the program itself), and it gives the time of noon for Perm = 13:11:45.
Notes
1. The above graph for Moscow is a consequence of the so-called Equation of Time - the difference between mean solar time and true solar time. It should be noted that the readings of your sundial will change with the same amplitude as in this graph. That is, up to plus or minus a quarter of an hour throughout the year. However, if you look closely, you can see that during the summer time, which is the most interesting for us, the fluctuations are not so great, and fit within plus or minus 5–6 minutes. Sometimes, when they want to get minute accuracy, a correction schedule is specially drawn up for sundials throughout the year.
From this graph, for example, it is clear that if you set your sundial in mid-June, then by mid-September it will be 5 minutes faster.
2. Why shouldn't you just use a vertical stick? Why bother with its inclination and its parallelism to the Earth's rotation axis? The fact is that a clock made using a vertical stick will sooner or later begin to show a noticeably incorrect time. So, a clock made for a vertical stick in June will go wrong by 1 hour in the mornings and evenings in September. More details here sundial-ru.livejournal.com/2337.html
3. If you want, you can immediately calculate the dial for your area using, say, the Shadows shadowspro.com program, take the angles from this calculation and immediately measure them on the ground, instead of running around all day and marking the sun's shadow.


