All things have a service life, which directly depends on how this or that thing was used. Bathroom plumbing is no exception. Unfortunately, both the bathtub and the toilet can become unusable. But there is no need to despair. It is possible to change the toilet yourself at home if you follow all the rules and instructions.

When is replacement needed?
If they appear with the toilet various kinds problems, this does not mean that it is necessary to change it. There are cases when it is enough to simply repair an element or simply replace it. This can happen for various reasons. So, for example, if there is a leak at the junction of the hose and the toilet, you just need to turn off the water, disconnect the hose and lubricate it silicone sealant. This will fix the leak. Or, if the tank does not hold water and it constantly flows, then you need to open the lid and replace the drain system. These simple measures can extend the life of the toilet for a long time without extra costs to replace it.


Sometimes it happens that more serious problems arise that cannot be repaired. In this case, you will have to buy and install a new toilet. The materials from which toilets are made are most often very fragile and cannot withstand shock or temperature changes. If cracks or chips appear on the toilet, this can lead to its destruction. It needs to be replaced as soon as possible.


It happens that it comes out of the toilet bad smell. This can be either a smell from the sewer itself, or if dirt has started to get into the cracks. Sanitaryware has a porous structure; microbes enter through chips. The only solution to this problem is replacement. Bathroom renovations can also be a reason to buy new plumbing fixtures. If you plan to produce major renovation in an apartment, it is best to buy and install new equipment, and not just replace the floor and wall coverings. You can do this yourself if you carefully study and follow all the instructions.


Before installing a new toilet, you must dismantle the old one, which most often already has an ugly appearance, is cracked in some places or covered with a thick coating. If the house is old and renovations were done many years ago, then remove old toilet, without breaking it, it’s unlikely to work, since its base is firmly concreted into the floor. This method of cementing the floor and attaching the toilet to this place was very popular in Soviet times, when it was customary to do everything with high quality and for a long time.


If you want to move the updated toilet to another place, you may have to modify the water pipe and sewer system to connect them to the bathroom. The water supply must be closed, the water must be completely drained, and only then dismantling can begin. When purchasing new plumbing fixtures, you must take into account the features of the bathroom, as well as the type of toilet itself.
Construction device
Today, stores offer a wide range of plumbing products, looking at which your eyes simply run wild. Therefore, before making a rash purchase, you need to figure out which toilet is suitable for a particular bathroom.
There are the following main types of structures:
- floor;
- hanging.


Floor options more common because they are classic. Their selection is quite wide.
They can be divided into several types.
- Monoblock. The bowl and tank are connected together;
- Compact The parts are separated and connected during installation;
- Co hidden system plum. This is the most modern type, the tank is located behind a false wall, which gives a neat look to the bathroom and hides all communications.


As for wall-hung toilets, they are not installed on the floor, but are attached to the wall. This is a new, more modern type, which has a number of undeniable features. This toilet is more compact; there is free space under it, which is always in short supply. Also, when purchasing and installing a new toilet, you need to decide on the direction of drainage.
There are three varieties.
- With vertical outlet. The vertical outlet is an outdated model, and is practically not used these days, since the sewage system must pass under the floor, and in modern houses Such a structure has not been built for a long time.
- With oblique release. Oblique bends can be found in modern panel houses. The neck of such toilets is located at an angle of 45 degrees and is usually connected to the sewer using a tee.
- With horizontal outlet. Toilets with horizontal outlet have become very popular in last decades. The sewage system runs behind the wall, and the connection to the bathroom is made parallel to the floor using a corrugated pipe or cuff.


It is worth paying attention to the material from which the toilet is made.
Most often, the following materials are used to make toilets:
- earthenware is an inexpensive and fragile material that can last up to 15 years, but towards the end of its service life it may become covered with small cracks;
- Porcelain is quite strong, but the price is correspondingly higher. Its service life is up to 30 years;
- cast iron and steel. Structures made from these materials are very strong and durable.
- Acrylic is lightweight and durable, but does not withstand sudden temperature changes and shocks.


When choosing a place for a new toilet in the bathroom, you should consider following rules which are mandatory:
- there must be a distance of at least 60 cm from the structure to the door;
- there must be at least 20 cm between the structure and the side wall.

If you follow these standards, then after installation the toilet will be located in the most comfortable place, and there will be no problems with its operation. You can install a toilet yourself, even without experienced plumbers, if you follow all the instructions and stock up on the necessary tools.
Must have:
- perforator;
- screwdriver;
- adjustable wrench;
- grinder;
- hammer;
- gun with sealant;
- putty knife;
- level;
- eye and skin protection.

Also, the following will definitely come in handy Additional materials, How:
- FUM tape;
- sealant;
- corrugated pipe;
- mounting kit;
- water pipe;
- tap.


When installing the toilet, be sure to correctly install all the gaskets, rubber bands, rim, and also assemble it clearly according to the instructions. drain mechanism. In the future, this will help to avoid problems during use of the structure. It is also better to assemble the insides of the toilet according to the instructions. We are talking about a water flushing system. In some models, everything is assembled from the beginning, in others you will have to work hard on your own.


So, having decided on suitable design bathroom, having purchased it and prepared everything you need, you can begin to dismantle the old device.
Dismantling
Dismantling an old device is often quite challenging task. So, for example, in the Khrushchev building, remove old unit, preserving its integrity is almost impossible due to the fact that it is walled up in floor tiles using a thick layer of cement. When removing such a bathroom, you must be extremely careful not to damage cast iron pipe sewerage. Before starting work, you need to prepare an empty bucket, rags to collect water, because it will flow out of the old toilet, make necessary calculations and measure everything.

Dismantling of the old structure occurs according to the following scheme:
- turn off the water supply and drain the water from the tank;
- disconnect the tank;
- remove the connection between the bowl and the sewer;
- remove all water from the bowl;
- unscrew the bolts along the edges of the toilet base;
- remove silicone from under the base;
- remove the bowl.

If we're talking about about dismantling a toilet installed in Soviet times, it will be easier to split it and remove it in parts. It is necessary to hit with a hammer at the junction of the bowl and the pipe, but be very careful, as you can damage the old cast iron pipe. If this happens, it will need to be replaced.
How to install it yourself?
After the old toilet has been removed, it is necessary to general cleaning premises so that no debris or dust remains. Or, if repairs are planned, then carry out all the work to replace the flooring and wall cladding. Once everything is done, you can begin installing new plumbing equipment. It is highly recommended to install plumbing fixtures after the renovation is completed, as they are most often made of fragile materials that can be damaged.


In order to replace floor standing toilet, need to:
- decide on its location, place the bowl in the most optimal location, try everything on;
- After making sure that this location is convenient, you need to outline the base of the bowl with a construction pencil and highlight the holes for fastening;
- remove the toilet, then drill holes and insert dowels into them;
- install the corrugated tube in sewer hole, it is necessary to treat the joint with sealant;
- place the new bathroom strictly in the marked place, screw in the bolts to secure it to the floor;
- make a connection to the sewer;
- install a toilet cistern;
- connect the structure to the water supply.


Be sure to check the structure for leaks. Provided that they are not present, the installation was successful, you can safely use the toilet. If the decision was made to install a wall-mounted toilet, then in this case there will be more work. Needs to be repaired flooring, and install a false wall and repair it.
Replacement must be performed in the following sequence:
- mark the installation location, install sewerage and water supply;
- try on the frame for mounting the structure;
- mark mounting locations on the wall and floor;
- use a hammer drill to make holes, install the frame (or installation);
- install cistern and connect the water supply;
- install sheets of drywall so that an imitation of walls is obtained;
- finish the resulting false wall;
- install the bowl, connect it to the sewer using a corrugated pipe, thoroughly coat everything with sealant;
- connect the drain tank.


Although installing a wall-mounted toilet is more labor intensive, the end result will be excellent. The bathroom will look stylish, modern and expensive
Changing a toilet yourself without the help of professional plumbers can be quite difficult if you have no experience in this field. But if you study all the instructions and recommendations, you can avoid common mistakes and successfully install the toilet.
Experts pay attention to some points.
- to avoid stagnation in the sewer pipe, it is necessary that there be a slope of 3–5 cm in the direction of the riser;
- If the bathroom has a bidet, then it is best to install the new wall-mounted toilet flush with it. This will look most advantageous;
- in case of replacement of sewer pipes, it is necessary to equip inspection hatches. They should be located in places that are easy to reach. It is extremely important to take this into account so that in an emergency there is free access to them;

- If the apartment has old cast iron pipes, then it is advisable to replace them with plastic ones. This will significantly facilitate the installation of a new toilet;
- The most difficult process is the process of removing the old toilet, since it is at this stage that problems can arise, for example, rusty metal parts that cannot be unscrewed, or the base of the toilet is firmly cemented, which causes great difficulties;
- When installing a wall-hung toilet, it is better to install it together, since it will be necessary to simultaneously hold the bowl and secure it to the wall. It is almost impossible to do this alone.


You can install a new bathroom yourself, even without experience in this field. After all, if you resort to the help of professional plumbers, then the cost of their work will not be cheap. The first step is to choose a suitable toilet, taking into account individual characteristics premises and personal desires of the owner. Modern stores offer a wide range of these goods from economy class to exclusive. Can be selected as the most common plumbing design with a separate bowl and drain barrel, or opt for modern wall-mounted toilets, which look profitable and impressive, and also save space in bathrooms.
Plumbing fixtures usually last a long time. A toilet can last a quarter of a century, or even more. However, the moment when it needs to be changed still comes. What to do - contact the utility company or install a new one yourself? Many people prefer the second option, especially when the cost of the service seems prohibitively high. Replacing a toilet in an apartment with your own hands is a completely doable task. How to do this will be discussed in our article.
What will be required of you?
If this is not the first time you are making repairs and construction works This is nothing new to you; you can handle replacing plumbing equipment without any difficulties. You must have some skills:
- be able to work with a hammer drill;
- pour screeds;
- glue tiles.
All this, of course, can be learned in the process, but it will take time, and the result may not be exactly what you expect.
Where to begin?
Of course, first you need to decide what exactly you will bet. In any case, you must first buy new plumbing, and only then remove the old one. You will have to install it quickly because plumbing equipment needed constantly.
Choosing plumbing equipment
You will have less hassle if you choose a toilet that is exactly the same shape and size as the one you have. To an inexperienced person, it may seem that all the pots are very similar, only slightly different in shape and color.
But it's not that simple. Toilets also have much more significant differences. For example, according to the method of connection to the sewer. The shape and direction of the outlet neck depend on this. On sale you can find several options:
- with an oblique outlet at an angle of 45º;
- with direct outlet at an angle of 90º;
- with vertical outlet to the floor.
Important! Last type in modern apartments It’s rare, but if you live in an old Soviet house and haven’t changed the plumbing, you probably have exactly this one. So you definitely need to pay attention to this. You won’t find a toilet with a vertical outlet in the store; they stopped making them a long time ago, so you’ll have to choose another option.
Installation method
Plumbing equipment for toilets also differs in the method of fastening. It could be:
- floor;
- hanging.
In the first case, the pot is installed on the floor, in the second, it is suspended from one of the walls, preferably a load-bearing one. In this case, the shape of the outlet neck does not play any role. But they are presented different requirements to the quality of surfaces. 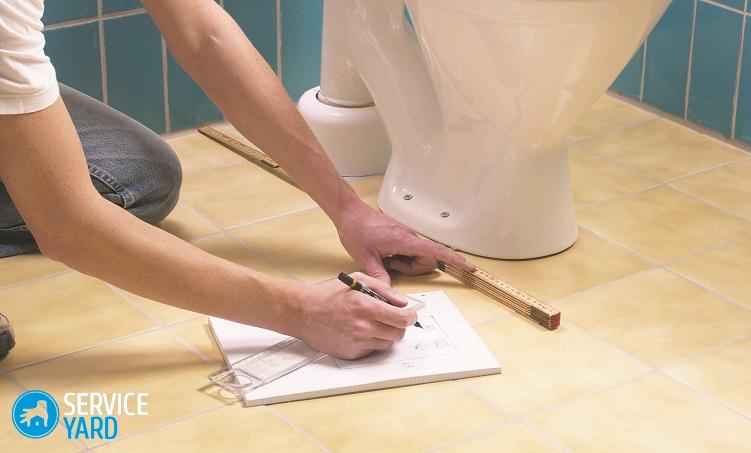
Dimensions
If you decide to choose a different model than the one you had, pay attention to its dimensions. They largely depend on the area of the room. Please note that the toilet should stand:
- no closer than 60 cm from the door;
- no closer than 20 cm from the wall.
Important! As for the distance to the door, everything is clear here - if the gap is smaller, only Small child. Moving it closer to the wall also makes no sense; it will be inconvenient to both install and use. Therefore for small bathroom Do not choose a pot that is too large.
Another calculation
Despite the fact that the toilets seem similar to each other, like twins, they still have different dimensions. For a large bathroom this makes no difference, but what if the toilet room is tiny, and even the door opens inwards? The answer is simple - choose a pot of a size that fits perfectly into the room. For this:
- Open the door.
- Using a tape measure, measure the distance from the edge of the door to the wall of the sewer cup closest to it.
- Subtract 15 cm from the result.
- Choose a toilet whose length does not exceed the result obtained.
Double or single?
Once you get to the plumbing store, you will be surprised by another circumstance that you had not thought about before. The seller may tell you that there are two types of toilets:
- with double flush;
- with single flush.
Important! It is possible that the consultant will offer you the first option, explaining that it is more reliable, more modern and generally better. Don't rush to get money. A dual flush toilet is more expensive, but it does not have any other advantages. It is mounted in the same way as the one with a single one.
What tools are needed?
Before you change the toilet yourself, it is useful to take care of the tools and materials. Much of what you will need can be purchased at a plumbing supply store. Some you may already have:
- perforator;
- hammer drill;
- Pobedit drills for working on concrete;
- spanners;
- pipe adjustable wrench;
- Swedish key;
- hammer;
- Screwdriver Set;
- sewer pipes;
- silicone sealant;
- glue-cement.
Important! A hammer drill and an impact drill serve the same purpose, so you need one or the other. Concerning wrenches, then they will be needed to connect water hoses and assemble locking fittings. Pay attention to the diameter of the drill - it must match the size of the dowels.
Sewer pipes
When purchasing a new toilet, take care of the pipes with which you will connect it to general sewerage. Pipes are:
- steel;
- propylene;
- made of metal-plastic.
Important! Steel ones are more reliable and durable, but their counterparts made of propylene and metal-plastic are much easier to work with, and this is very important for installing a toilet on your own.

What else should you pay attention to when purchasing?
The toilet should sit firmly on the floor so that there are no gaps. Accordingly, its bottom should be as smooth and flat as possible.
Pay attention to what kind of glass you have sewer riser– the shape of the outlet neck will depend on this. He can be:
- mounted as an intermediate insert;
- come out directly from the floor.
What is the difference?
- In the first case, it will be much easier to install a toilet with an oblique neck - it comes out at exactly the same angle as the insert. In this case, a toilet with a straight neck can only be installed experienced specialist, it is better for a modest amateur not to take risks at all.
- If sewer outlet comes out directly from the floor, a neck that comes out at a right angle is suitable. However, in this case, installing an oblique release will not be particularly difficult, so this option is more universal. An overly hasty owner who ran to the store without bothering to look at the tap would be better off opting for a model with an oblique neck.
Decide whether you are going to replace only the toilet or the tank too. The fact is that the cistern has a hole through which water flows. Look where it is:
- at the bottom;
- at the top of one of the walls.
If you are not going to change everything at once and are not planning a major repair, see how convenient it will be to connect the tank to the model you have chosen. It's better if you don't have to connect too long a pipe.
Important! You can buy a set of toilet and cistern, where all the outlets correspond to each other.
Dismantling the toilet
Before you replace the toilet with your own hands, you will, of course, have to get rid of the old one. The method of dismantling largely depends on what kind of pot you have - floor-standing or hanging.
Floor standing toilet
First, you need to turn off the water that flows into the drain tank, otherwise troubles cannot be avoided. This is easy to do - there is a valve on the water pipe that needs to be closed. Drain the water from the tank and check whether you have closed the correct valve. If you did everything correctly, no water will flow.
- Disconnect the line leading from the tank to the toilet - this is best done with an adjustable plumber's wrench, but if you don't have one, a wrench of the right size will do.
- Remove any remaining water from the tank.
- If you cannot drain the remaining water, blot it with a soft cloth.
- Unscrew the fixing bolts screwed into the bottom of the tank.
- Remove the tank.
Further actions depend on the method of connecting the neck and sewer pipe:
- using a cuff and sealant;
- using cement mortar.
Important! In modern houses, the first option is almost always used, when the outlet and sewer pipe are connected rubber cuff, and sealant is used as a seal. A neck rigidly set on cement can only be found in old dwellings.
If you have a cuff, the steps will be as follows:
- Cut the sealant.
- Remove it through the sewer hole.
Joint covered with cement
In this case, a sharp knife will not help you. To disconnect the pot from the sewer pipe you need:
- hammer;
- bit;
- broom;
- scoop;
- plastic bag.
WITH cement screed you have to deal with it in the most brutal way.

Now all you have to do is remove the toilet itself. Looking under your feet, you will see that it is attached to the floor with bolts, sometimes with decorative caps. You should proceed like this:
- Remove the decorative caps.
- Unscrew the bolts with a screwdriver.
- Tidy up the place where the pot stood.
- Clean the connection between the toilet and the pipe.
Important! If you are changing plumbing fixtures in old apartment, it is best to replace the tee with two bends of 100 mm and 75 mm - in Khrushchev it is most often cast iron, it is most reasonable to replace it with plastic.
Wall hung toilet
A wall-hung toilet is attached to the wall. Accordingly, you will have to remove it a little differently from the floor one - but this is also done quite quickly. As in the previous case, the water supply to the tank must be shut off, and then:
- First, loosen the fixing bolts, but do not remove them completely yet.
- Separate the tank and toilet.
- Disconnect the toilet from the sewer.
- Unscrew the fasteners completely.
Preparing the floor and communications
For the toilet to fit like a glove, the floor must be level and strong. The pot is attached using special toilet dowels, which must be held firmly and reliably, that is, the base for them must be strong. A layer of mortar on the floor gives these qualities. It dries for quite a long time - about seven days.
As for communications, they are prepared for replacing a toilet in an apartment with their own hands as follows:
- Clear the place where you will connect the drain from salts and other formations, otherwise the corrugation will not be able to be attached tightly enough.
- Place a tap at the connection point of the cistern - it is needed to wash and repair a toilet that is turned off when the pipe supplying water to the cistern is closed.
Toilet installation
The installation itself will not take very long if you have prepared everything properly:
- If necessary, install a new tee. It may happen that it becomes difficult, then it is enough to simply moisten it with shampoo, plumbing cleaner, etc.
- Attach the toilet bowl with corrugation or corners to the outlet from the riser.
- Check how the door opens. Pay attention to whether there is enough space for the person sitting on the toilet, whether the potty fits into the space - in a word, take care of comfort.
- Circle the area where the bottom is located with a pencil.
- Mark the places where the dowels will be placed.
- Drill holes for dowels 10-12 mm.
- Insert the dowels.
- Connect the toilet to the riser.
- Check that the mounting holes on the toilet match the ones you made on the floor.
- Tilt the toilet to the side
- Apply silicone sealant along the line you marked on the floor.
- Put the toilet back in place.
- Gently press the toilet with the bolts.
- Place decorative caps.
Wall-hung toilet
The principle of installing a wall-hung toilet is approximately the same. True, it is best to attach it with an assistant, who at the right time can support a rather heavy object in the right position.
Important! The wall needs to be strengthened before installing the plumbing. Of course plaster partition It’s not suitable for this - it simply won’t withstand such weight.
The operating procedure is exactly the same:
- Connect to the outlet.
- Check the distance and how convenient it is to use the potty.
- Circle a spot on the wall.
- Mark points for dowels.
- Drill holes and insert dowels.
- Connect the toilet to the sewer.
- Check the holes.
- Apply a layer of sealant.
- Put the pot in place and adjust the position.
- Finish fastening.
The last stage is the drain tank
Replacing a toilet in an apartment with your own hands is almost complete - all that remains is to connect the tank. Compared to what you have already done, this is a mere trifle, but the work still needs to be done carefully and diligently. Your tank is already assembled. Further:
- Place the tank on the toilet, installing as you go rubber gaskets.
- Tighten the first bolt until the tank is skewed.
- Align it by pressing firmly but gently with your hand on the lid.
- Tighten the remaining bolts.
- Connect the tank to the water supply using a good hose
- Open the tap and wait until the tank is filled.
- Check the drain.
- If water oozes out, remove the corrugation or corners, wipe dry, apply sealant and reinstall.
Important! You should not use a rubber hose with a metal braid - the braid rusts and the rubber wears out. The best hose is made of metal.
Video material
Replacing a toilet is required when the old product becomes unusable. More often, dismantling an old toilet and installing a new one is in demand in older buildings, where all communications need to be updated. Replacing the toilet tank and other parts yourself is not difficult. However, it requires basic skills in working with tools (a hammer drill, a drill, etc.) and the ability to fill and lay tiles. Read how to install a toilet in a private house with your own hands and watch the video tutorial below.
Removing an old toilet
Dismantling and installing a toilet in a private house or apartment is a familiar task for plumbers, but for ordinary people this procedure can become a real problem.
The question often arises of how to remove a toilet that is out of order. Toilet removal includes:
- Turning off the water.
- Disconnecting the water supply from the toilet cold water. Dismantling of the flexible connection is carried out using an adjustable wrench. If it’s made of metal: cut off a piece of pipe and unscrew it, attach flexible liner.
- Dismantling the old device: free the old product from the fasteners (unscrew the screws, knock down the cement).
- Then you need to drain the toilet by tilting it back a little.
- Disconnect the device from the corrugation and bell, for which the latter is cut down to required sizes, and install a new corrugation.
In general, this dismantling of the toilet can be considered complete. Dismantling an old toilet is not so easy, since not every product can be easily removed. It happens that the device is already wobbly and can be removed by simply disconnecting it from the sewer riser and from the water supply. But in “Khrushchev” buildings everything is often much more complicated.
Plumbing fixtures often end up embedded in the floor. And it is almost impossible to get it out of there intact, so first they break it. This is how a toilet is replaced in a Khrushchev-era apartment. Many homeowners still do the same. Therefore, the question often arises: how to change a toilet with your own hands?
Replacing a toilet with your own hands requires certain steps and caution. Dismantling a toilet that has served its useful life involves removing the cast iron tee. The latter is equipped with two outlets: 10 cm each for the device itself, 7.5 cm each for other sewer pipes. Since it will be fulfilled complete replacement pipes to plastic ones, then a 5 cm bend will be necessary so as not to install the reduction in a metal tee.
Dismantling the tee is advisable due to its large dimensions. After all plastic product much more compact. Dismantling of the existing tee is carried out with the utmost care, careful loosening and so as not to cause harm to another tee located in the sewer riser. Now you know how to dismantle the toilet or change the product yourself.
Please note: not every leak of the device requires its replacement; often it is enough to change only the corrugation or the tank.
Replacement of individual equipment
Before you remove the old toilet and replace it, check that it may not require complete dismantling. Sometimes it is enough to change only a few failed elements: change the drain, corrugated pipes, tank or fittings.
Let's look at how to install a flush cistern on a toilet if it needs to be replaced:
- First, the water supply is turned off.
- Then the water is drained from the tank.
- After this, unscrew the hose from the valve or tank, and then remove the mounting bolts of the toilet tank.
- We dismantle the old tank.
- The installation site of the new drain tank is thoroughly cleaned of any traces of rust.
- Now the new tank is bolted to the toilet shelf and sealed with gaskets.
- When the replacement of the old toilet cistern is completed, fittings are installed in it, which is also sealed.
- IN last resort A flexible hose is screwed to the float valve and the water supply is turned on.
5 simple steps how to change the corrugation on a toilet:
- First of all, you need to pump out the water from the pipe, lifting it slightly towards the drain.
- Then you need to remove the old corrugation by removing the dried sealant, cement and the old outlet in the socket with a chisel.
- After this, you need to thoroughly clean the sewer pipe and outlet from any dirt and debris.
- Wipe the inner edges of the bell with a dry, clean cloth and apply a sealing solution.
- Then we apply sealant to one edge of the corrugation and install it all the way into the sewer socket. We put the other edge on the toilet flush and seal all the connections.
That's all the subtleties of installing a corrugated pipe on a toilet. If desired, everyone can independently replace it, putting a little effort and diligence into this matter.
Watch a video tutorial on how to replace the fittings in the cistern:
Preparatory work for installation
Regardless of what will cover the floor (tiles or regular screed), you need to wait time for the mixture to dry on the floor surface. This will take about a week. This is due to the fact that the toilet is fixed using fasteners and dowels, which require a reliable and solid base. In this situation, the hardened solution will act as a similar base.
Next, you should prepare those participating in the communication installation process. The area where the drain will be connected must be cleared in advance. various contaminants and salt deposits. Otherwise, it will not be possible to connect the toilet to the sewer riser as needed. That is, the corner or corrugation in the outlet cup will not fit tightly, and a leak will definitely appear.
A tap should also be installed at the connection point of the drain tank so that it is possible to carry out repair and cleaning work without completely turning off the water.
DIY toilet installation
Installing, replacing or assembling a toilet yourself consists of the following steps.
- Before installing the toilet, installation is carried out plastic tee into the sewer riser outlet. This action should not cause difficulties if the outlet glass has been thoroughly cleaned. If the tee is fitted too tightly, it is recommended to lubricate it with any detergent.
- Next comes installing the toilet in its original position and connecting it using corners or a corrugated hose to the riser outlet. At this stage, it is necessary to evaluate how well it will fit into the bathroom in this position: is there enough space to open the door inside, will it be comfortable for a person sitting. This position is outlined with a pencil or marker. Having marked the points of attachment of the product to the floor surface, the toilet bowl is removed.
- At the designated points, drill holes for toilet mounting dowels. Usually their sizes are 10-12 mm. It often happens that the kit does not contain a 12 mm drill (the dowels are exactly 12 mm), then you should, without hesitation, boldly change the dowel to 10 mm. A drill with a diameter of 10 mm is used. A 12 mm dowel bolt is also suitable for smaller volumes of parts.
- Having placed the dowels in the holes, connect the device to the riser. Make a slight tilt of the toilet to the side. Silicone sealant is applied along the previously drawn line, and the installation of the toilet is completed by placing it back.
- The installed plumbing fixtures are pressed very carefully with bolts to prevent pinching. After this, the bolts are covered with decorative caps.
- Then the tank is attached to the toilet. The tank itself does not require assembly, since this has already been done at the factory. At the same time, do not forget to use the rubber gaskets included in the kit.
- Tighten the clamping bolts in the toilet one by one. The first is clamped so much that a clear distortion of the tank is felt. Next, press with your hand from above and align, tightening the second bolt.
- To connect the tank to the water supply, use a high-quality hose. It is not recommended to choose for these purposes rubber products with a metal shell. Rust can corrode the casing, causing the hose to break in this place. It is most advisable to purchase reliable metal plastic or products in metal corrugation.
- After connecting the device to the water supply, unscrew the tap and wait until the tank is filled. Control the drain.
- When the drain connections are moistened, the hose or corners are removed and wiped dry. After treating them with silicone, they are put on again.
At this point, the installation or assembly of the toilet with your own hands is considered complete.
Replacing a toilet is not the most difficult moment during renovation, so it is quite possible to cope with this work yourself. In this article we will describe the entire process in detail and also post a video for clarity.
Plumbing equipment has long ago become an integral part of any comfortable home. But as you know, “nothing lasts forever,” and sooner or later your toilet will require replacement. In this case, you can contact your management organization and, having prepared the money, wait for the plumber to arrive, hoping for loyalty to folk wisdom “ you can't drink experience away».
You can go the other way and find scammers based on an ad, risking getting caught by unscrupulous performers who are trying to get as much as possible more money in a minimum amount of time, without bothering yourself too much. But if you have minimal experience working with a drill and a wrench, it is worth trying to replace the toilet with your own hands.
Of course, if your old toilet is thirty years old, it is connected metal pipe with tank top position, and replacing it requires welding work with insertion of a new water inlet into the riser ( vertical pipe, supplying water to the floors) at a lower altitude - you still have to turn to professionals. Replacing a “compact” toilet (in which the tank is mounted directly on the toilet) with a similar new one is quite within the capabilities of anyone who has read this article and read the instructions included with the new kit.

First of all, of course, you need to choose and purchase a new set of toilet bowl, tank and drain fittings. Toilet fasteners, as well as drain fittings, are usually included in the kit - this is worth checking when purchasing and purchasing additionally if necessary. In addition, you will need:
- plastic corrugation;
- flexible water line - you can estimate its length by looking at the old one (usually a “nut-nut” line with a 1/2-inch thread is used);
- rubber gasket in the shape of the toilet base or silicone sealant.
If the old toilet bowl is quite modern and was attached to the floor with standard fasteners (screws), you can try to select a new bowl with the same distance between the mounting holes, so as not to drill the floor again - this is especially true when it is laid on the floor ceramic tile, which you are not going to change.
Most modern “compacts”, except for the cheapest models, have a bottom water supply - this means that water enters the tank through a hole in the bottom, rather than being poured in from above with an irritating gurgle. It's better to choose this one.
Other delights, for example, the shape of a special sill in the bowl ( so-called anti-burst) or a microlift that lowers the seat smoothly and without knocking, you can choose according to your taste and budget. You just need to pay attention to which outlet the old toilet has - straight or oblique, and purchase a new unit of a similar type.
Required materials and tools
After purchasing the “compact” itself and the materials necessary for the work, you can begin preparatory work.

You will need the following tools:
- a set of wrenches (you can get by with a pair of adjustable wrenches);
- a hammer drill or electric drill with impact mode (if you can’t use the old holes for attaching the toilet to the floor) and two drills - a special one for tiles and a carbide one for concrete;
- water container - a bucket or basin and a rag;
- It won’t hurt to disinfect the old toilet with bleach or a special product;
- Replacing a toilet bowl with your own hands must be done with gloves, and when drilling holes, with safety glasses.
Removing an old toilet
Before dismantling the old toilet, it is necessary to turn off the water supply to the tank using the tap located in front of the flexible connection. If this tap does not hold water, you need to turn off the valve at the water supply to the apartment.
It is worth noting that in old houses the pipe could not be drained directly from the riser. In this case, if the tap malfunctions, you will have to shut off the entire riser in the basement, leaving the neighbors above and below without water - this cannot be done without the help of employees of the housing maintenance company.
After closing the valve, before connecting the tank, you must remember to drain the water from the tank. Then you can disable flexible hose, disconnecting it from the fitting of the closed tap. A container placed under the connection to be disassembled will come in handy here, since some water inevitably remains in the liner.

The water supply is disconnected, you can begin to dismantle the old toilet bowl itself. To do this, you need to remove the plastic plugs covering the screws that secure it to the floor and unscrew these screws. If you have an old house, and the toilet is built into the floor and filled with mortar - it will have to be broken. Read more about the correct one at the link.
The main thing is not to inadvertently damage the cast iron tee, which is integral part sewer riser, replacing it is a very labor-intensive task, which it will no longer be possible to cope with on your own. Next, tilting the toilet towards the apartment’s sewer pipe, you need to drain the water from the siphon built into the toilet (an elbow with water that prevents the penetration of odor from sewer system into the room). After this, you can disconnect the old toilet by removing the corrugation from the tee.

It is better to cover the hole in the sewer pipe with a rag or plastic bottle suitable diameter. The dismantling is completed, you can proceed to the main thing - installing a new unit!
Installing a new toilet with your own hands
The installation site must be cleaned. New toilet it is necessary to install it in place taking into account the length of the corrugation and make markings, circling the base and marking the locations of the holes for fastening. To prevent ceramic floor tiles from bursting, the holes in it must be drilled in non-impact mode with a special drill, then replaced with a carbide drill, switch the drill to impact mode and continue drilling in the floor slab.

Insert into the holes plastic stoppers(dowels) into which screws will then be screwed. It is also necessary to clean the neck of the sewer pipe. Installing the drain fittings into the cistern and connecting the cistern to a new toilet is quite simple if you read the instructions included with the kit. Usually the drainage apparatus is already mounted in the tank, and the installer only has to screw the tank to the bowl using special gaskets. The corrugation is inserted at one end into the sewer pipe, and at the other end it is placed over the toilet outlet.
Sometimes you can find advice that replacing a toilet is done using corrugated sealant, although due to its design with external and internal membranes this is not necessary.

It is better to install the toilet on a rubber gasket according to the shape of the base, this will prevent dirt from getting under it. If there is no gasket, you can use silicone sealant, applying it in a thick layer along the inner perimeter of the marking under the base. The toilet bowl is secured with screws screwed into plastic plugs. It is important to tighten the screws sufficiently, but not to over-tighten, otherwise you may crack the fragile earthenware of the bowl.
Do not install the “compact” with the tank close to the wall of the room - this will complicate further maintenance, may lead to leakage at the junction of the tank and the bowl if it is slightly displaced, and will also cause condensation to accumulate at the point where the tank comes into contact with the wall of the restroom. Once the toilet has been secured, you can begin connecting the water supply to the tank. The nuts of the flexible connection are equipped with gaskets made of plumbing rubber or silicone, so additional wrapping threaded connections FUM tape or special thread is not required. The pipe for the water supply system to the tank is usually made of plastic, so you screw the liner nut on by hand; you can only lightly tighten it with a wrench, being careful not to damage it.

Many modern eyeliners are equipped with a special plastic key that is placed on the tube and makes tightening easier. The toilet seat is installed last, this should not cause any difficulties.
Then, without putting the lid on the tank, you should perform a test run of the unit with filling the tank and draining water, check the connections for leaks, and check the drain fittings of the tank for correct adjustment. Leaks are easy to detect, if you place old dry newspaper on the floor under the joints in advance. The drain fittings must ensure that the tank is completely filled without overflowing.

Connecting the toilet to the water supply
If necessary, its simple adjustment is carried out, the principle of which can be understood even without instructions. Once the connections and fittings have been checked, you can install the tank lid and enjoy the work done.
Replacing a toilet - cost of work
If, after studying our instructions, you do not want to encounter problems self-replacement, then you need to use the services of a professional plumber. The price for the work, depending on the city of your residence, will range from 750 to 1500 rubles.
Also, most large stores offer a turnkey service, i.e. delivery, dismantling, installation and removal of the old toilet. Usually it costs 2500 rubles.
As you can see, in general, replacing a toilet with your own hands is not at all difficult. It is quite possible that you will do this work better than wage-earners, and at the same time save your family budget.
You may need to install or replace a toilet under a variety of circumstances: moving, renovation, or unexpected breakdown. If you don’t have time to wait for a plumber or want to save money, then it’s quite possible to do it yourself.
Tools and accessories
Before replacing the toilet, you need to make sure that everything you need is at hand.
- Toilet with cistern. It is better to opt for monoblocks, in which the toilet itself is attached to the cistern. They are well adjusted to each other, there is no need to worry about leaks. Rubber compressor– trapezoid – between the cistern and the toilet is included in the kit. If the tank and toilet are purchased separately, then you definitely need to buy it. Bolts for screwing the toilet to the floor are also often included in the kit; if they are not available, then select fasteners of a suitable diameter, usually 10 cm long.
- Hoses and pipes. You will need a flexible hose in a metal braid of sufficient length to connect the tank to the water supply, as well as a corrugated pipe to connect the toilet to the sewer. They need to be paired with rubber gaskets and a sealing collar for the corrugated pipe. Flexible pipes allow you to slightly vary the installation location of the toilet and make this work easier, although water supply and drainage can also be done using polypropylene pipes, .
- Thin piece of thick rubber 1-2 mm thick for the backing under the toilet to prevent cracking of the tiles on the floor.
- Tool: hammer drill with 10 mm concrete drill, keys, screwdriver, pliers. If the pipes are metal, then you will need a grinder or a hacksaw.

Preparation: removing the old toilet
Before work, remember to turn off the cold water supply and empty the drain tank. The water supply pipe and the sewer pipe are disconnected.
The old toilet is unscrewed from the floor. If the joint has been coated with cement or glue, you need to clean it off as much as possible with a screwdriver or chisel. If the toilet is very firmly glued to the base, you may need to carefully break it with a sledgehammer. To completely remove all the water from the toilet siphon, the device is tilted back.
If others are planned renovation work in the toilet, then the toilet is installed after their completion. When replacing only this device, you still need to try to level the floor underneath it using rubber pads or cement mortar.

Installing a toilet
First you need to mark the installation location. Most toilets come with a paper template that makes this easy to do. If it doesn’t exist, then you can simply make it yourself, and drill holes along it and insert dowels into them. A thin layer of rubber is placed under the base of the toilet, the toilet itself is placed and the hex head screws are tightened. It is important not to overtighten them so that the tiles do not crack. The toilet must stand firmly, without swaying or moving. The joint between the toilet and the floor is sealed with silicone sealant to prevent water and dust from entering it.

The joints between the toilet and the sewer pipe with the corrugation are coated with sealant, then gaskets moistened with water are placed, and the pipe is attached to them. The end of the pipe can be connected to the toilet outlet pipe even before installing the device, this will facilitate further work in a cramped room. You can connect the toilet to the sewer inlet using only a cuff, if you place it close to the wall.
Toilet models come in 3 types of arrangement drain pipe: parallel to the floor, at an angle of 30-40 degrees and into the floor. The latter are rare and are installed mainly in private homes. When choosing a toilet, you need to take into account what type of connection the sewer pipe is designed for, then installing the toilet will be easy.

When the toilet is securely fixed, you can install it on it. A rubber trapezoid is placed on the platform at the rear, and the tank itself is bolted together using rubber washers. First, the bolts are inserted inside the tank, and then pass through the holes in the toilet and tightened with nuts from below. The drain hole of the tank must exactly coincide with the hole in the toilet.
The internal structure of the tank differs various models, and when assembling it, you need to follow the manufacturer's instructions. Finally, using a flexible hose with nuts at the ends, water is connected from water pipe to the tank fitting. The connections are glued with sealant or FUM tape, tightened with a wrench and checked for leaks.
After installation, it is necessary to carry out several test flushes to ensure that no water is leaking.
Advice. If you plan to replace the toilet in an old house, then make sure that the water in the apartment can be turned off. Otherwise, you will have to wait for help from a plumber and turn off the water in the basement.
How to install wall hung toilet, .


