Sheet length from 550 to 8000 mm
Weight - 4.75 kg/m2
2. Sheathing, hydro- and vapor barrier
As lathing for metal tiles profiles made of galvanized steel produced by INSI (PSh-28-0.7, PSh-28-1.0, PSh-61-1.5) or wood (boards 25x100, 32x100 or timber 50x50) are used, which are attached to rafters from bottom to top (from eaves to ridge) with a pitch corresponding to the pitch of the metal tiles. The vapor barrier film is installed on the side of the warm room. Waterproofing is mounted on rafter structures.

Superdiffusion membranes are laid on the insulation without a gap, paying attention to the location of the side that should be adjacent to the insulation. Anti-condensation films must be installed with a gap between the film and the insulation. It is necessary to strictly follow the film manufacturer’s recommendations for its use and installation method. When installing a cold attic, it is possible not to install waterproofing, as long as proper ventilation of the under-roof space is guaranteed.

Roofing films are laid along the rafters, from bottom to top across the slope, parallel to the cornice. The joint of the film is made along the width of the slope, with an overlap of at least 100 mm. Along the length of the panel, the films are joined on the rafters with an overlap of 100 mm. The permissible sag of the film between the rafters is 2 cm. Maximum distance when installing films between rafter structures 1.2 m. When installed using wooden sheathing An anti-condensation film is installed under the counter-lattice to improve ventilation between the tile sheet and the film.

3. Cornice
The cornice is attached before installation metal tile sheets along the bottom edge of the slope. If an organized drainage system is provided, gutter holders are installed before installing the cornice. In this case, the cornice must be mounted so that its end ends in the first third of the gutter from the wall.

The cornice is aligned along the bottom edge of the slope using laces. Attaches to sheathing using self-drilling flat head screws. The joint of the cornices is carried out with an overlap of 50-100 mm.
Hemming the roof eaves can be done in a variety of ways. For filing they use: corrugated sheets, metal siding, façade panel. There are two options for arranging materials: along or perpendicular to the wall.
4. Installation of metal tile sheets
Styling metal tile sheets produce from right to left. Installation begins with the installation of the first two sheets. First metal tile sheet It is attached with a self-tapping screw in the lower right corner so that the lower edge of the sheet is along the edge of the sheathing. Second metal tile sheet is placed on top, closing the capillary groove. The edges of the sheets are aligned with the cornice and the plane of the slope gable. After alignment, the sheets are secured. Next, proceed to the installation of subsequent metal tile sheets.
If the length of the slope is more than 6 m, it is recommended to make it composite, due to the inconvenience of transporting and installing the sheets. When installing a composite slope, metal tile sheets are mounted from bottom to top, from right to left, according to the diagram. During this installation, it is important to align the capillary grooves of the lower and upper sheets. Otherwise, a gap will form between sheets of metal tiles. All sheets are laid with an overlap along a length of 200 mm. For proper organization overlap, the length of the bottom sheet of metal tiles must satisfy the formula:
Ln.l.=0.2+b*Nsh
b - tile pitch size; Nш - number of tile steps along the slope
For example, sheets with a length of 3.0 are subject to this formula; 3.4; 3.8; 4.2; 4.6; 5.0 m.
For installation of metal tiles roofing screws 4.8x35 or 4.8x20 mm are used. Metal tile sheets are fastened in the lower deflection of the profile (Fig. 12), screws are located on the sheets in a checkerboard pattern, near the edge of the slope (cornice, ridge, pediment, valley) in every wave. The longitudinal joint of the sheets is fastened with screws or rivets. In cases where the roof slope is less than 14°, it is necessary to seal the longitudinal and transverse joints of the sheets.
Fastening metal tiles to the upper deflection of the wave is strictly prohibited!
Fastening metal tiles with nails or self-tapping screws without sealing gaskets is strictly prohibited!
Hammering roofing screws with a hammer is strictly prohibited!
By metal tiles you need to walk carefully, in shoes with soft soles and step only into the lower deflection of the wave in the areas of the sheathing.


Self-drilling screw with sealing gasket is installed in the deflection waves of metal tiles under the transverse wave (at the bottom of the wave), perpendicular to the sheets. The screw is tightened until the gasket is straightened in horizontal line. Excessive twisting leads to bending of the gasket and its separation from the plane of the sheet.
5. Endova
The sheathing at the joints of the slopes is made continuous at a distance of 400...500 mm from the middle. Lower valley attached to the sheathing using clamps. Metal tile sheets laid in such a way that at least 100 mm remains from the edge of the sheet to the bottom of the valley.
Upper valley installed after laying the metal tile sheets and fastened with roofing screws every 200...300 mm to the top of the metal tile wave. Self-tapping screws should not violate the integrity of the lower valley.
6. Pediment
Gable is attached in such a way as to cover the upper deflection of the metal tile wave. In Fig. Figure 13 shows the lining of the roof overhang protruding from the gable side wall profile S-13 located across the roof slope. C-13, in this case, is ordered in advance or cut on site according to the size of the stem.

7. Horse
Docked ridge elements with an overlap of 100 mm. The ridge is attached with roofing screws 4.8 x 80 mm to the sheathing, to the top of every second wave. The flat ridge is attached with roofing screws 4.8 x 80 to the sheathing or 4.8 x 35 to sheets of metal tiles, to the top of every second wave.
A polyurethane foam seal is placed between the ridge and the metal tile. The ends of the shaped ridge are closed with a decorative cap.
To ventilate the under-roof space, a ridge fan is used, which is attached to the ridge with roofing screws. The joint is treated with sealant.

8. Wall profile
Where the roof meets the wall, pipes and dormer windows, a wall profile is installed. The profile is applied to sheets of metal tiles and attached to the wall.

Brick protruding from the roof rectangular pipes framed in the following way:
Step 1 - Installing the lower pipe apron
First you need to prepare the junction of the lower apron to the side surfaces of the pipe. To do this, using the apron elements as a template, mark cutting lines on the pipe. Then, using a coal cutting machine (grinder), a groove is made in the brick walls of the pipe. Having cleared the groove and the surface of the sheathing from brick dust, they begin the installation of the elements of the lower apron, having previously trimmed each element and bent it along the slope of the roof. When installing the apron, the bent upper edge is inserted into the groove, vertical wall is pressed tightly against the surface of the pipe, and in this position the element is fixed with roofing screws with a sealing gasket to the sheathing. The first element is mounted to the bottom edge of the pipe, then the two side ones and finally the element to the top edge. The overlap of the upper elements on the lower ones must be at least 150 mm. After fixing all the elements to the sheathing, the edge of the apron inserted into the groove is coated silicone sealant. Attention! For better adhesion, the groove needs to be washed with water.
step 2 - Installation of the bottom sheet from the pipe to the cornice

At this stage, a flat (galvanized or painted) sheet is installed. The length of the sheet must correspond to the distance from the bottom edge of the pipe to the cornice or the nearest valley, the width is not less than the width of the lower element of the apron (including side bends). One edge of the sheet is placed under the lower element of the apron, and the other is brought out from above, onto the cornice or valley. After fixing the flat sheet to the sheathing, bends are made on its sides using hand tools.
step 3 - Laying sheets of metal tiles along the bottom and sides of the pipe

step 4 - Installing the wall profile
After installing the sheets of metal tiles around the pipe, finishing the pipe with a wall profile begins. The installation procedure is similar to the elements of the lower apron. First, a wall profile is installed to the bottom edge of the pipe, with preliminary cutting to its width, according to the drawing. Fastening to the pipe is carried out using dowel-nails, and the profile is attached to the metal tile using roofing screws in the upper part of the wave.

step 5 - Installing a wall profile on the sides of the pipe
It is necessary to process two wall profiles according to side size pipes and install them on the side faces.

step 6 - Installing the wall profile on the top edge of the pipe
Install the wall profile on the upper edge of the pipe, while cutting the vertical parts protruding beyond the contour of the pipe from below and bending them onto the side edges of the pipe, securing them with dowel nails.

Step 7 - Installing the top sheet of metal tiles
Install the top sheet of metal tiles on top of the wall profiles and sheets of metal tiles laid earlier, leaving a gap of at least 100 mm between the lower edge of the metal tile sheet and the pipe. Place a polyurethane foam seal under the metal tiles. Place sealant in the small gap created at the junction of the wall profile and the top and side sheets of metal tiles.

The wall profile is also used for internal roof fractures. A cornice element is used on the external fracture of the roof.

If you plan to cover the pipe with a profiled sheet, then after framing the pipe, a frame from a hat profile is mounted, a profiled sheet is attached to it, and the corners are formed with an outer corner 50x50.
The chimney is attached to the pipe with dowels and nails before installing the corrugated sheet.

Metal tile installation video
9. Drainage system
The drainage system is used in industrial, residential and public buildings for organized drainage of water from roofs.
A drainage system with a pipe diameter of 150mm will allow you to drain rainwater with 117 square meters of slope. The number of pipes on building facades will be significantly reduced. Gutter holders are mounted at a distance of no further than 0.7 m, pipe holders - no further than 2 m from each other.
A drainage system with a pipe diameter of 100 mm will allow rainwater to be drained from 52 square meters of slope. Gutter holders are mounted at a distance of no further than 0.9 m from each other (calculated distance - 0.75 m), pipe holders - no further than 3 m from each other (for example, 3 holders are required for a pipe 5 m long, for a pipe 3 m long two are enough.
If there is a threat of freezing of the drainage system, it is recommended to use heating systems for gutters and pipes.
With a catchment area of less than 30 sq.m per drainpipe, gutters can be installed with a zero slope, with larger area In the catchment area, the slope of the gutters can be up to 2%.
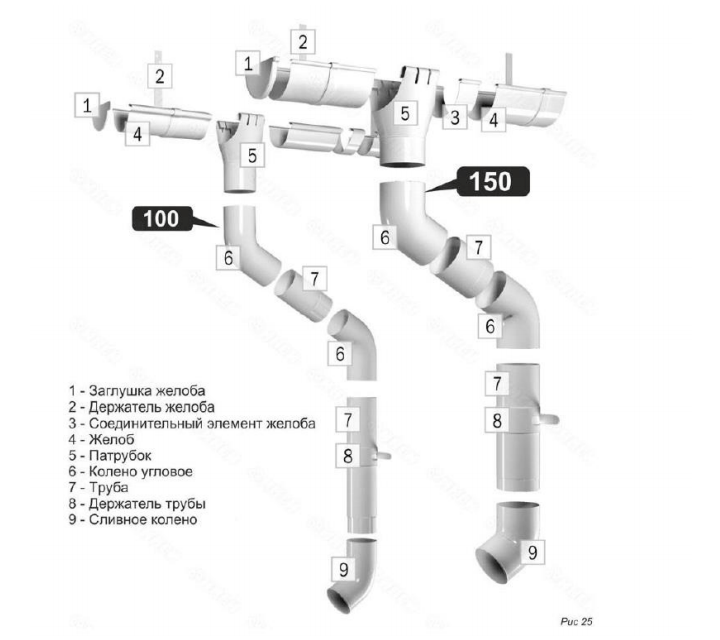
10. Installation of the drainage system:
step 1 - Calculation of the number of gutter holders.
Divide the total length of the gutter by the selected holder spacing (no more than 900 mm, recommended gutter holder spacing is 750 mm) (see Fig. 26). The resulting number of segments +1 is the number of gutter holders.

step 2 -Marking for gutter holders.
On the bottom sheathing, mark the installation locations of the gutter holders with the spacing selected in the previous step.
step 3 -Selecting the gutter slope.
Select the amount of gutter lowering (h) based on the aesthetic perception of the gutter line. The gutter line should go down smoothly, without causing a visual sensation of strong curvature of the edge of the slope or the facing of the eaves overhang. Recommended slope (i) gutter is 1%, that is, from 1 cm to 1 m. The difference in the heights of the upper and lower points of the gutter (h) can be calculated as:
h= L x i
where L is the length of the gutter;
i - gutter slope
Step 4 - Determining where the gutter holders bend.
Number the holders from the beginning of the gutter to the downspout. Mark the bend location on the first holder, thus determining the initial (upper) position of the gutter. When marking, it must be taken into account that the edge of the gutter is 2 -2.5 cm lower relative to the roof slope line (see Fig. 27).

Fold the holders in ascending order of numbers and mark the folding points, as shown in Fig. 28.

Step 5 - Attaching the gutter holders.
Aligning the bend with the edge of the sheathing, attach the gutter holders to the sheathing with self-drilling galvanized screws 4.8x22 with a flat head, 3 each. per holder. When using 50x50 beams as sheathing, a double beam must be installed to securely fasten the holders.
Step 6 - Creating a Slope
To create a slope, bend the first and last holder and pull the cord between them. Bend the remaining holders so that they touch the cord (Fig. 29).

step 7 - Installation of the pipe
In the gutter, at a distance of 150 mm from the bottom edge, cut a hole with a diameter of 100 mm for the pipe. Insert the pipe into the hole (Fig. 30). Place the front edge of the pipe under the outer bend of the gutter. Bend the flange of the pipe onto the rear edge of the gutter and secure with two 4.2x16 self-tapping screws.
Step 8 - Installing the Gutter
Install gutter plugs at the ends (Fig. 31).

Step 9 - Installing the Gutter.
Insert the gutter into the holders, placing the rear edge of the gutter into the holder's protrusion.
step 10 -Gutter connection.
Install the gutter connecting element at the junction of the gutters (Fig. 32).
Step 11 - Installation of the corner elbow.
Use a corner elbow to create a transition to the wall of the building. The length of the connecting pipe is determined by location (Fig. 33).

Step 12 - Installation of the pipe.
The pipe is secured to the wall using pipe holders. The pipe is measured, if necessary extended at the installation site of the pipe holder, and secured with a lock (Fig. 34).

Step 13 - Installation of the drain elbow.
The drain elbow completes the drainpipe and serves to drain water from the foundation of the building. The bottom of the drain elbow should be located at a height of 300 mm from the blind area of the building (Fig. 35).
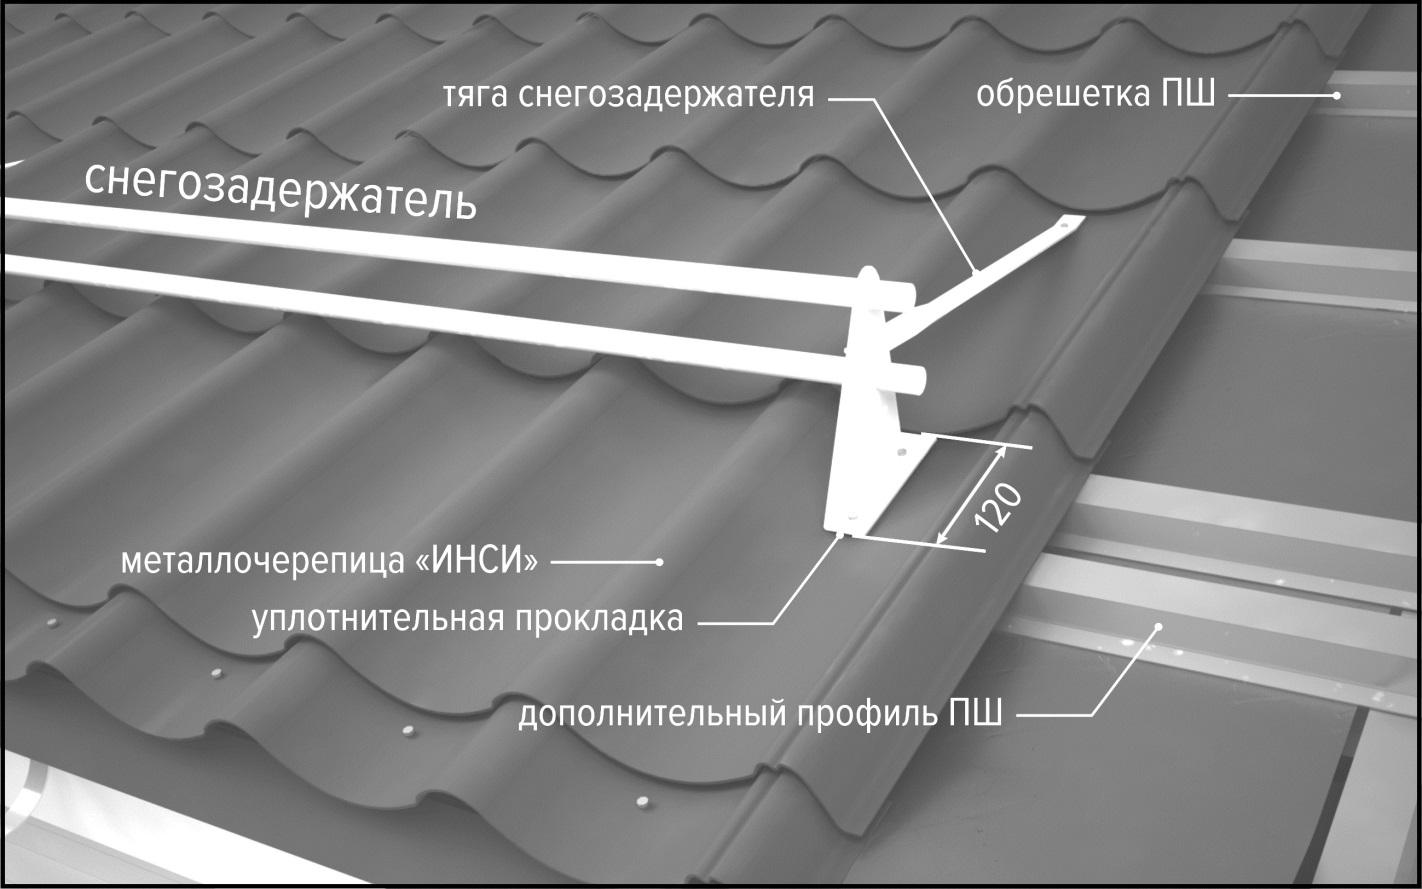
11. Snow guard and roof fencing
For safe movement on the roof, roof railings are installed at the eaves level, starting from the second line of sheathing.
The fence is made depending on the roof slope and the type of tiles. Fastening is carried out to the sheathing profile through a sheet of metal tiles and a rubber sealing gasket in the place where the wave deflects using self-drilling galvanized bolts 5.5x25 mm for metal sheathing and 5.5x60 mm for wooden sheathing. It is prohibited to attach a roof fence to one sheet of metal tile. The fencing sections are bolted to each other.

To prevent large masses of snow from falling off, snow guards are installed. The design of the snow retainer consists of brackets and pipes. The brackets are installed in the deflection of the wave and are attached through the metal tile and rubber sealing gasket to the roof sheathing. At the installation sites for fastening the bracket, an additional sheathing profile is pre-installed at a distance of 120 mm (along the axes of the sheathing profiles). Snow guards are installed above the roof railing. In the absence of a roof fence, snow retainers are installed no lower than the third row of sheathing. When the length of the slope is more than 10 meters, it is recommended to install two rows of snow guards. In areas with a large amount of snowfall, it is necessary to install a bracket rod. The snow retainer rod is attached at one end to the bracket, at the other end to another sheathing profile through a sealing gasket and a sheet of metal tiles (see Fig. 38).
It is prohibited to attach the snow retention bracket to one sheet of metal tile!

The installation step of snow retention brackets depends on the snow area of construction, roof structure, fastening element. Recommendations have been developed for calculating the installation pitch of brackets. The calculation was made based on the use of self-tapping screws with a diameter of 4.8 mm. The immersion depth of the screws is shown in Fig. 39.

snow guards are available in formatHTMLthis instruction.
12. Accessories

Weather vanes, decorative spiers, and chimneys are installed on the roof as accessories. Installation of all accessories is carried out in accordance with SNiP standards.
For arranging exits from the roof of antennas, masts and ventilation pipes round section with a diameter of up to 330 mm (with a temperature outer surface up to 130°) Master Flash roofing seals are used.
13. Processing of wooden structures
Wooden structures used for roofing require antiseptic and fire retardant (fireproof) treatment. Processing can be carried out both before construction of structures (processing of individual boards and bars) and after (processing of rafters and sheathing). Treatment is carried out using various methods (immersion in a container with a solution, brush application, spray application.
14. Tools

- Screwdriver with 6 mm hex bit.
- Electric nibbler or nibbler.
- Manual roofing shears.
- Mallets (wooden, rubber).
- Hacksaw, jigsaw, hammer (used when constructing rafters and sheathing).
- Angle grinder (“grinder”), hammer drill, drill, gun for pressing out sealant (used when installing a wall profile).
- Level, level, plumb line, measuring tools and devices.
15. Attention!
The use of polyurethane foam as ridge or valley seals is strictly prohibited!
All products produced by the INSI facade and roofing plant are designed for use on pitched roofs according to these installation instructions. The INSI plant is not responsible for damages or losses that may arise when using INSI products to perform functions that are not inherent to them.
Metal tiles are becoming more and more popular every day. This is an excellent roofing material with an optimal ratio performance characteristics and cost. Metal tiles are suitable for finishing roofs of almost any complexity. At the same time, you can cope with the tasks of installing the material yourself.
Metal tiles are produced in the form of galvanized sheet material made from steel. The sheet consists of several layers that perform important protective or decorative functions.

- Zinc layer. It is the basis for applying subsequent layers. Additionally prevents the development of corrosion.
- Passivating layer. Prevents the accumulation of static electricity.
- Primer layer. Provides the highest quality adhesion of previous and subsequent layers of metal tile sheets.
- Polymer layer. Protects the material from adverse external influences and gives it the required appearance. The coating can be matte or glossy. There are many color variations available, which allows you to choose a roofing material that fully satisfies the owner’s needs.
Metal tiles have many advantages over other popular roofing materials, namely:
- light weight. There are many excellent roofing materials available on the market today, but the use of many of them is limited precisely because heavy weight. Modern houses They are increasingly being built from “light” building materials and they absolutely do not need additional load. Metal tiles weigh little, so they can be safely used even for roofing houses built on weak foundations;
- many color variations. It is unlikely that you will find another roofing material presented in such a variety color solutions, like metal tiles;

- good technical characteristics. Metal tiles are resistant to atmospheric and other adverse influences. Installation of sheets can be carried out at any time of the year;

- relatively affordable price. Metal tiles are noticeably more expensive than other coatings with similar parameters. Natural tiles it costs much more, although its properties are practically no different from those of modern high-quality steel sheets.
Metal tiles look great on the roofs of almost any building. It is best suited for large and solid houses and cottages, but if desired, you can develop great project roofs even for a small country house.
Video - DIY metal tile installation instructions

Before you begin arranging the sheathing and directly fastening the sheets of metal tiles, you must definitely think about reliable and high-quality waterproofing. Thanks to the moisture-proofing material, the possibility of condensation on the internal surfaces elements of the roofing system, which will contribute to a significant increase in their service life.

The most popular waterproofing option is polyethylene film. This affordable material flawlessly copes with all the tasks assigned to it.
Waterproofing should be laid on the rafters under the counterbeam. Individual pieces of film are laid with an overlap of about 15-17 cm. The sag of the film between the rafters can be no more than 1.5-2 cm. To secure the film, use galvanized nails or a staple gun with metal staples. Cover the waterproofing joints with adhesive tape. It is desirable that it be metallized.

The technology for installing a metal roof requires mandatory installation of insulation. It is most convenient to use slabs mineral wool. The material is laid between the rafter legs. The construction stapler you already know is perfect for fixing the slabs.
Sheathing device

The metal tiles will be installed on a supporting structure known as sheathing. The system frame is assembled from wooden planks about 100 mm wide and 25-30 mm thick. All wooden elements must be treated with an antiseptic. Otherwise, the wood will rot in a fairly short time.

The lathing is attached in the interval between laying the waterproofing and installing the insulation. The task comes down to attaching wooden boards or bars to the rafters. Start fastening from the ridge roofing structure, gradually moving vertically down to the cornice. Fix the sheathing elements in a horizontal position. Use nails of the appropriate length. As a rule, boards are mounted as a continuous sheet.
Laying roofing material

Laying metal tiles should begin from the bottom corner of the roof slope. It is best to start working from the lower left corner. In this case, each subsequent sheet will overlap the previous one. If you start installing the covering from the right corner, the next sheet of metal tiles will have to be placed under the already laid material. It is not advisable to do this, because... With such installation there is a high probability of damage to the roofing.

Laying of metal tiles should be carried out parallel to the cornice. Do not forget to leave an overhang behind the eaves of about 4 cm. There is a technology according to which sheets of metal tiles can be laid vertically. But in the absence of proper experience in carrying out roofing works It is better to abandon this method, opting for a more traditional and simple horizontal installation.

When laying, you will need to turn the corners slightly clockwise. This is done so that the right corners of the elements laid in one row are located in a single straight line.
To secure adjacent sheets, 1 self-tapping screw is used. This preliminary fastening is placed at the top of the sheet. After this, you need to align the elements of the system and perform their final fixation.
Place the longest sheets of metal tiles in the bottom row. With this option, installation is greatly facilitated, and the finished coating takes on a more solid and attractive appearance.

Approximately 7-8 self-tapping screws are required for 1 m2 of coating. You need to fasten the sheets in transverse waves, screwing in self-tapping screws in increments of 35 cm. You can also install self-tapping screws in longitudinal waves. With this method, it is necessary to fasten through the wave, placing self-tapping screws in the upper ridges.
An electric screwdriver is best suited for tightening screws. An electric drill will also work. The main thing is that it has the function of slow and smooth rotation of the cartridge. To achieve greater fastening accuracy, it is recommended to core the hole in advance.

The covering sheets must be secured in the lower crest of the wave, where the material is pressed against the sheathing. This will create the most reliable fastening and not deform the material.
The bottom sheets of metal tiles must be attached to the first lathing in each wave, without gaps. This area will be subject to the most powerful wind loads, so the fastening must be as reliable as possible so that the sheets do not blow off at the first strong gust of wind.

Attach to other battens using minimum distance from below to the step. This is where the sheet material has the highest rigidity. In addition, with this arrangement the screws will be almost invisible.
In places where they overlap, sheets of metal tiles must be secured through the wave. If you wish, you can record each wave. This will ensure the highest quality fit of the upper sheet elements.

For fastening roofing materials, galvanized self-tapping screws made of alloy steel are best suited. Stainless steel self-tapping screws with a seal have also proven themselves to be excellent. Such fasteners can have a wide variety of colors, which will allow you to create the optimal color combination self-tapping screws and base coating.

Self-tapping screws are screwed strictly perpendicular to the sheathing elements. Deviations are not allowed. Sheets of metal tiles should be pulled as tightly as possible to the sheathing. Any distortion of the screws can lead to the appearance of through holes in the sheets. If the roof will be exposed to prolonged exposure to an acidic or alkaline environment, self-tapping screws with plastic caps should be used to fix the metal tiles.


Check the screws 3-4 months after completion of the roofing work. Under the influence of wind loads, fastenings usually weaken. Tighten any loose screws.

Thus, in self-installation There is nothing complicated about metal tiles. Follow the instructions, adhere to the recommendations received and everything will work out.
Good luck!
Video - DIY metal tile installation instructions
How to work with metal tiles correctly? This important question is asked by almost every developer who has chosen this modern, durable and very practical material for his roof.
We will tell you in detail how to properly install metal tiles, following all the recommendations of its manufacturers. We will also tell you which one wiring diagrams will be more effective, and which tile installation scheme is more effective.
In addition to all this, you will be able to learn how a roofing “pie” is made and what tools and materials you will need in construction and many other aspects. We really hope that the instructions for installation work with metal tiles will be necessary not only for the ordinary developer, but also professional builder, regardless of the scale of your roof construction.
Installation technology
Brief information about the roofing “pie”:
At the beginning installation work with metal tiles (you can download the training video file or just watch it a little lower), remember some basic concepts and diagrams of the construction of roofing “pies”. It deserves this name because of the decent number of layers that perform their special functions.
It is these components, with the correct and rational selection necessary materials will provide you with a reliable and durable roof over your head.
It doesn’t matter at all who will do the work, you yourself or a specially hired team of qualified workers, you must clearly understand that the roof is a very a complex system with many nuances and details, and here it is necessary to follow all recommendations from manufacturers and general construction standards for the installation of metal tiles quite strictly.
As an owner, you are simply obliged to constantly keep the installation of metal tiles under your the strictest control(you can download the training video file or just watch it here), because Negative consequences Poor quality work may not be immediately apparent.
For example, if the vapor or waterproofing components are poorly installed, the vapor can condense into a liquid and your roof will simply slowly rot. Remember that for a good and durable installation you must take into account all the requirements for the installation of metal tiles.
Installation of main roof elements
- Rafter systems.
- Counterrail.
- Waterproofing film.
- Beam for vertical sheathing.
- The first beam for horizontal sheathing.
- Beam for horizontal sheathing.
- Additional sheathing.
- Wind board.
- Gutter bracket.
- Plank for cornices.
- Metal tiles.
- Roof ridge.
- Ridge seal.
- Dormer window.
- Special thermal insulation.
- Film for vapor barrier.
- Lining for the attic.
Step-by-step installation instructions (Monterrey or equivalent)
Tools and special equipment
 Working with Monterrey tiles or its analogues must begin with special preparation of tools. This will be useful to you:
- Tools for cutting sheet metal tiles.
- A screwdriver (preferably one that runs on a battery).
- Small hammer.
- Rail. Preferably straight and long. You will use it as a rule.
- Markers.
To cut metal tiles, it is recommended to use a special tool.
1. scissors for cutting metal (electric or manual).
2. hacksaws or electric reciprocating saws with matching fabric.
3. electric cutting shears.
4. Jigsaws.
5. Circular Saw with teeth from pobedit..
After completion of work, it is necessary to carefully remove metal shavings and sawdust. This is done specifically so that when they rust, they cannot spoil the anti-corrosion coating that is applied to the metal tiles.
Attention! You cannot cut metal tiles using tools with an abrasive wheel. For example, using a grinder. Otherwise, when exposed high temperature On metal tiles, not only the protective polymer layer can be destroyed, but also the special anti-corrosion zinc coating.
Because of this, very rapid corrosion will start on the tiles and rust stains will appear in your roof.
Installation step by step:
 1.
The initial step is that the rafters for the metal tiles should be in the range of 550-900 mm.
1.
The initial step is that the rafters for the metal tiles should be in the range of 550-900 mm.
Remember that after you purchase insulation boards, the pitch of the rafters will depend on the width of the boards. In the future, the insulation must be inserted directly between the rafters in the roof. As the main material for the rafter system, you can choose a block with dimensions of 150 by 50 mm.
After installing the rafters, it is necessary to perform a control measurement of the slope. You also need to check the flatness and squareness of the entire structure. For these purposes, you need to measure the diagonal dimensions in the slopes.
If you have a slight deviation of no more than 10 mm, then you can hide them yourself using special components.
 2.
Please note that if you use metal tiles for your roof, then the mandatory slope for the slope must correspond to an angle of 14°.
2.
Please note that if you use metal tiles for your roof, then the mandatory slope for the slope must correspond to an angle of 14°.
The length of the sheet is determined by the main size - this will be the length of the slope. It is measured from the beginning of the ridge to the end of the cornice, while taking into account the cornice overhang. The overhang size is at least 40 mm.
If you are going to make a roof slope of more than 6 meters, then you will need to break the sheets into several pieces. These pieces will overlap.
You need to overlap about 15 cm. If you use long sheets in the installation, you will have fewer joints, but it will be more difficult to lay them.
 3.
As a result of daily temperature fluctuations, condensation can accumulate on the lower surfaces of the tiles. Condensation can also give warm air, which goes from the house itself into the space under the roof.
3.
As a result of daily temperature fluctuations, condensation can accumulate on the lower surfaces of the tiles. Condensation can also give warm air, which goes from the house itself into the space under the roof.
Because of excess moisture, excessive saturation of the insulation with water occurs and, as a result, its properties sharply become worse. In the future, your roof may freeze completely and form ice on the shingles themselves. The rafters can rot and mold can grow inside the room.
In order for you to avoid all the negative aspects when installing metal tiles, you will need insulation of the correct thickness.
In addition to all this, the technologies used in the installation of metal roofing require protection for insulation and the use of waterproofing and vapor barriers.
A space of about 40 mm in thickness will be quite sufficient for good ventilation. You can leave a small gap on the eaves overhang, and the rubber seal needs to clear small holes.
 4.
Roll out the waterproofing strictly horizontally over the entire surface of the rafters. Start from the edge of the cornice, while adding 20 mm.
4.
Roll out the waterproofing strictly horizontally over the entire surface of the rafters. Start from the edge of the cornice, while adding 20 mm.
A small overlap is required between adjacent panels. Optimal size the overlap is 15 cm.
The film of the brands “Yutafol” and “Yutakon” is located with the side with the colored stripe on the edge, outward. You cannot turn the film over without permission.
You can find a huge number of different types of films in markets and construction stores, but to make the right choice you better ask the manager for advice.
 5.
Along with installing waterproofing, you can install roofing coverings on the outside and heat-insulating materials on the inside.
5.
Along with installing waterproofing, you can install roofing coverings on the outside and heat-insulating materials on the inside.
It will be better if you install thermal insulation tiles between the rafters themselves.
In this case, you need to leave small space at 20 mm.
Otherwise, the entire film will lose its properties. If you purchased Tyvek or Yutavek film, then you do not need to make a gap.
 6.
Secure the para-insulation to the inside of the rafter using a stapler.
6.
Secure the para-insulation to the inside of the rafter using a stapler.
The most popular vapor barriers are “Yutafol H Silver” and “Yutafol H 110”.
It is better to lay the paraisolation sheets overlapping.
Use adhesive tape to connect.
After you have completed all the work, you can begin cladding.
 7.
Make the sheathing from timber that has been treated with an antiseptic. First, you will need to nail the beams on top of the waterproofing film, and then attach the boards for the sheathing.
7.
Make the sheathing from timber that has been treated with an antiseptic. First, you will need to nail the beams on top of the waterproofing film, and then attach the boards for the sheathing.
The sheathing boards that you will lay first must be used an order of magnitude thicker than all the others. They should be 10 - 15 mm thicker. After this, you must maintain an even distance between the sheathing bars.
When you are working with a high-quality material such as Monterrey tiles, you can attach a second beam if the space from the bottom edge is 300 mm. Take measurements to the middle of the next board.
For MP Maxi materials, the indentation can be no more than 350 mm.
The distance between the axis in the remaining beams can range from 32mm to 100mm with Monterey tiles and 350mm with Supermonterey tiles and 400mm with Maxi.
You can work with slightly longer sheathing boards if the pitch is 1000 mm.
Perform continuous sheathing near the chimney and dormer window. You can nail separate boards on both sides of the ridge, but you will need to raise the end strips above the level of the regular sheathing. To a height no greater than the profile of the tile itself.
 8.
Before installing the tiles, you will need to secure the bottom strip near the valley at the internal joint at the slope. Fastening can be done using a simple self-tapping screw.
8.
Before installing the tiles, you will need to secure the bottom strip near the valley at the internal joint at the slope. Fastening can be done using a simple self-tapping screw.
If you need to join the planks, make a small overlap of 100 - 150 mm. After this, you will need to mark and trim the tile sheets. Correct installation tiles (photo on the left) must be done from the bottom and up.
You will need to install the valley strip on top at the very joint of the sheets.
Attention! The junction point is the most vulnerable spot on the roof. In order to prevent the repair of metal tiles and the entire roofing system, you are strongly recommended to approach issues related to installation work with particular care
 9.
In order to ensure tightness in the junction of the tiles to the chimney or walls on the slopes, you can make an apron from the inside. For its construction, you can take the lower beams of the junction. Lean the block against the wall and mark the block on the brick. You can then punch the hole using the grinder on the line you marked. Then you need to remove the dust from the wall and wash it with water if possible.
9.
In order to ensure tightness in the junction of the tiles to the chimney or walls on the slopes, you can make an apron from the inside. For its construction, you can take the lower beams of the junction. Lean the block against the wall and mark the block on the brick. You can then punch the hole using the grinder on the line you marked. Then you need to remove the dust from the wall and wash it with water if possible.
It is better to start installing the internal apron from the pipe walls, which are located on the underside of the slope. Cut the block a little in the right place and fasten it with a self-tapping screw.
Using this algorithm, you can mount an apron around the entire pipe.
When joining the planks, you can make a small protrusion of 150 mm. After you insert the edge of the apron into the groove, you will need to cover it with silicone-based sealant.
Then you will need to place a flat sheet under the bottom edge of the inner apron. This sheet is called a tie.
He will provide good stock for water. You can choose the direction of the tie and direct it either down or into the valley. Along the very edge of the tie you will need to make a small border. It can be done using a regular hammer and pliers.
The tile sheet must be mounted on top of the apron or tie. Once all the roofing around the chimney has been laid, you can begin work on the outer flashing. When working with it, you can use the upper abutment strips.
The installation of the upper strips can be done in the same way as the lower ones, only you do not need to insert the upper edge into the groove, but attach it to the wall itself.
Attention: When you move on a metal tile roof, you must strictly follow the rules of personal safety.
It is necessary to wear soft and comfortable shoes. It is worth stepping only into the natural troughs of the waves. You should also use the installer's belt and fasten yourself with a safety cord.
 10.
Attach the gutter holder to the lowest beam in the sheathing. Their installation method and step depends on what type of drainage system you will use.
10.
Attach the gutter holder to the lowest beam in the sheathing. Their installation method and step depends on what type of drainage system you will use.
This is precisely what the operating instructions are for. It is worth paying attention to the edges of the gutters. The edges should be slightly below the edge of the shingles themselves.
The indentation can be about 25 - 30 mm. This is to prevent your gutter from being damaged by snow coming off your roof during the winter.
 11.
If your drainage system has a rectangular cross-section, then the gutters simply need to be inserted and secured in the holders.
11.
If your drainage system has a rectangular cross-section, then the gutters simply need to be inserted and secured in the holders.
The eaves strips are attached to the sheathing on the roof, with the bottom edges of the strips overlapping the edges of the gutters. The waterproofing film is placed above the eaves itself (to drain condensation).

If you are installing a gutter with round sections, then it is worth placing the rear edge of the protrusion itself for fixation. The installation of the cornice strips is carried out using the technology described above.
Installation of gutters with round it is necessary to insert its rear edge into the fixed protrusion of the holder.
The cornice strips are installed slightly higher than marked.
The under-roofing film is installed above the eaves strips.
Instructions for making roof windows
 12.
It is worth making a small indent and considering roofing options using roof windows. The number of your windows that is needed for the desired level of light in the attic can be easily determined using the ratio useful areas glass and areas of the room itself.
12.
It is worth making a small indent and considering roofing options using roof windows. The number of your windows that is needed for the desired level of light in the attic can be easily determined using the ratio useful areas glass and areas of the room itself.
It's better to start at 1:8 and work your way up to 1:12. If your attic area is about 100 m2, then the total area of all windows can be about 10 m2.
 It is recommended to install roof windows at a height of about 90-110 cm above floor level. It is worth considering that several small windows will give your attic more sunlight than one huge window.
In addition to all this, you can install entire groups of roof windows - horizontal, vertical or combined. Usually, windows are installed on the sheathing itself, but it is worth attaching them directly to the rafters using self-tapping screws.
The openings for the window itself must exceed it general dimensions approximately 40-60 mm horizontally and 45 mm vertically. Usually, installing windows in the attic will not cause you any difficulties.
 13.
The first sheets are aligned along the edge of the roof end and secured on top with a self-tapping screw. It is worth making a canopy at the eaves of about 40 mm.
13.
The first sheets are aligned along the edge of the roof end and secured on top with a self-tapping screw. It is worth making a canopy at the eaves of about 40 mm.
Connect the sheets with self-tapping screws at the top to avoid overlaps. You should not tightly fix them to the sheathing bars. It’s better to let them move freely relative to the screw. (Fig. B).
Next comes the third sheet of tile, which is laid according to the technology of the second. Next, you need to align all three sheets relative to the cornice and place them parallel. If you need to join sheets lengthwise, then you should lay them in the order shown in Figure B.
 14.
The lower part of the sheets is attached to self-tapping screws in the base of the tile wave.
14.
The lower part of the sheets is attached to self-tapping screws in the base of the tile wave.
The fastening step is through one wave. The next row of screws must be arranged in a checkerboard pattern.
You need to alternate through one wave.
The side overlap of the sheet must be fastened with a self-tapping screw along each ridge.
For installation work, you can spend about 6 - 8 screws per square meter.
 15.
At the end of the roof, install end bars with an overlap of 50 mm.
15.
At the end of the roof, install end bars with an overlap of 50 mm.
They should be secured with self-tapping screws almost every 550 - 600 mm.
At the very top of the head, you are better off using self-tapping screws about 80 mm long. If necessary, feel free to trim the planks.
 16.
You can use flat or completely round skate bars.
16.
You can use flat or completely round skate bars.
The first step to installing a bar for round skates is to install plugs on it.
The shape is selected individually for each roof. Flat skates do not require plugs at all.
 17.
You can put a shaped seal under your ridge, but clear out all the holes for ventilation in advance.
17.
You can put a shaped seal under your ridge, but clear out all the holes for ventilation in advance.
Flat or round skates can be installed on the already laid compactor.
Self-tapping screws for the ridge are about 80 mm long and are located through one wave.
The overlap between the ridge panels is about 100 mm.
Antenna output installation
 18.
Before installation itself, it is necessary to cut off the entire upper part of the antenna output and leave the diameter slightly smaller than the diameter of the antenna post.
18.
Before installation itself, it is necessary to cut off the entire upper part of the antenna output and leave the diameter slightly smaller than the diameter of the antenna post.
Then the antenna output is installed on the rack using a mallet, thereby ensuring that the contours of the roof are repeated.
The joints should be coated with silicone glue and everything should be attached with self-tapping screws.
Installation work with the ventilation element
 19.
At the very beginning, you need to mark and cut a neat hole in the shingles.
19.
At the very beginning, you need to mark and cut a neat hole in the shingles.
Insert the ventilation into the passage, carefully level the level and fasten it with a self-tapping screw.
If you are making an exhaust hood from the house, then use a regular pipe, which you will attach to the roof pie with regular tape.
Installation of stairs
20. To install the ladder, use a bracket (4 pieces per section). Place them on staircase racks and secure them with self-tapping screws. To the very roof surface It is better to fasten into the deflections of the tile waves.

In the place where the brackets border, you can seal it. Your staircase should be chosen according to the number of slopes on the roof in small sections. The section that will be from the very top must be fastened using a special bracket.
Installation and installation of roof railings
 21.
To ensure complete safety in the maintenance of your roof at the eaves level, you need to install the grille vertically.
21.
To ensure complete safety in the maintenance of your roof at the eaves level, you need to install the grille vertically.
In these cases, the sheathing must be done in a continuous layer. Supports for fences are installed in the deflections of the waves of the tiles themselves.
Fastens the bracket through a special rubber gasket; use only screws coated with a layer of zinc. The support pitch is approximately 900 mm.
Adjust your supports to the roof slopes and secure them carefully.
Then you need to hang special roof railings on the supports that you have installed. In the places where the sections of the fence and supports meet, you need to drill holes in (12 mm at the top of the crossbar and 10 mm at the bottom of the crossbar), through these holes you will connect your sections to the supports.
You will need to cover all the holes at the top of the crossbars with polyethylene plugs. After the entire assembly is completed, you need to seal all joints.
Installation and installation of transition bridges
 22.
For comfortable control and maintenance of chimneys, television antennas and many other elements on the roof, special bridges for transitions have long been provided.
22.
For comfortable control and maintenance of chimneys, television antennas and many other elements on the roof, special bridges for transitions have long been provided.
These elements are best mounted on a continuous layer of sheathing. All support brackets for the bridge are fastened using technology with fastening the support fence.
The inclination of the platforms is adjusted by selecting the number of holes in the mounting brackets. It is better to fix these platforms using M8x20 bolts. It’s better not to regret it and place a couple of bolts on each side of the platform.
Installing snow guards on a metal roof
 23.
In order to protect yourself from snow slides, such as small avalanches, you can install simple and convenient snow retainers. The sheathing bars must be solid underneath.
23.
In order to protect yourself from snow slides, such as small avalanches, you can install simple and convenient snow retainers. The sheathing bars must be solid underneath.
The bracket pitch is about 1000mm. The brackets at the end are installed at a distance of 500 mm from the end of the snow guards.
Installation and assembly of snow guards should be performed at a distance of 350 mm from the edges of the roof eaves.
 If your roof has a slope of more than 8 meters, then you will need an intermediate barrier made of snow retainers. Remember that installing snow guards above the windows is mandatory.
In terms of savings, you can cheat and use a metal tile strip as a snow retainer. This strip can be easily attached to the bottom of the wave using ordinary self-tapping screws.
Proper roof grounding
In order to protect your roof from a lightning strike, you need to perform lightning protection.

You can use different lightning rods. Mesh, rod or cable. Your choice must be correct and based on many factors.
The pictures show classic options protection, where 1 – lightning rod, 2 – lowering, 3 – grounding circuits, 4 – current conductor.
Special features of installation work with other types:


As can be seen from the pictures (to enlarge, you need to click), installation work with “Cascade” metal tiles is carried out on the sheathing with steps different from those of “Monterey” or “Elite” tiles.
All these differences are caused by different profile sizes.
Installation work with Andalusia tiles with special Z-shaped locks also has its quirks. Special perforation is made in the lock part of this type of tile. This greatly simplifies the placement and fastening of tile sheets on the roof. The fastenings remain hidden.
Thanks to this trick, the entire roof looks monolithic.
How to cover a roof - video instructions
When purchasing materials, check with suppliers for details important points, regarding installation technologies for this type of product.
Only by strictly following all these rules will you have a durable and beautiful roof over your head.
A reliable roof, which has high-quality waterproofing and insulation along the slopes, is the dream of any dacha owner or country house. Today, such a dream is easily achievable if it is fulfilled.
Before making metal tiles with your own hands, you will need to think about the issue of removing old roof, which may lack waterproofing. In this case, everything will depend on the technology used to manufacture roofing pie, and his condition.
List of items you will need to install a new roof on your home:
- hacksaw for metal;
- anti-condensation films;
- waterproofing;
- galvanized nails;
- self-tapping screws;
- sealing tape.
The process of performing control measurements yourself
After the installation of the rafters is completed, you will need to re-measure the dimensions of the roof slopes. This is due to the fact that during construction any deviations could easily arise. It is worth paying attention to the rectangularity of the roof, because additional elements can hide only small defects (no more than 10 mm).

It is worth knowing that when covering a roof with metal tiles, cutting sheets should be done exclusively using a hacksaw, a hand-held power saw, or special scissors.
It is worth noting that technology that includes waterproofing can only be used if the roof slope is at least 14 degrees.
The choice of type of snow guards for the roof will depend on what material the roof is made of and how much snow falls in a particular region. The main size that will determine the length of the sheets is the length of the slope. This is the distance from the roof ridge to the eaves, which must be set taking into account the overhang of the sheet from the eaves (up to 40 mm).
In the case where the slope is longer than 7 m, the sheets will need to be divided into two or more fragments, which are overlapped (at least 150 mm). Minus long sheets, which have fewer joints, is that they are very inconvenient to work with.
It is worth knowing that when cutting sheets, you need to do it exclusively with a hacksaw, a hand-held power saw, or special scissors. All places where bare metal remains must be treated with a special paint that protects the steel from corrosion. At the same time, it is not at all recommended to use a popular grinder with an installed abrasive wheel in order to cut sheets. Its use is not justified.
How to install the sheathing yourself
The space under the roof must have good ventilation, therefore, sheathing and counter-lattice will be needed. Anti-condensation films will need to be placed between the rafters and metal sheets. The waterproofing should be laid parallel to the eaves.

For soft roof from roll materials continuous sheathing is required.
The material should sag slightly between the rafters. A small slack in tension (1-2 cm) will be enough. Along the rafters on top of it you will need to nail small bars with a cross-section of 40x25 mm. This will be the counter-lattice, on top of which you will need to fasten the flat bars of the sheathing. The distance is equal to the wave pitch of the metal tile. The board that will go onto the cornice will need to be chosen 10-15 cm thicker than the rest.
It is worth noting that the sheathing bars and all other wooden elements must be treated with an antiseptic. It is able to protect them from insects and rot.
The installation of a metal tile roof must necessarily include the use special materials for waterproofing. There are 2 types of waterproofing, therefore, it is important not to make a mistake here. The first is intended to protect the insulation and rafters from any penetration of moisture vapor from inside the room. The second waterproofing is waterproofing films that protect against wind, moisture and condensation. They must be installed exclusively on top of the insulation. They allow water vapor to pass through, so it does not accumulate in the insulation. The slope of the slopes prevents moisture that flows from the metal tiles from remaining on the film for a long time.
Do-it-yourself installation of the valley and cornice strips
Installing the right metal roof requires protection not only from condensation that forms on back side metal sheets, but also from precipitation. They can pose a danger to the bottom edge of the sheathing, so a cornice strip may be needed here. It consists of a number of boards that are nailed to the sheathing, overlapping each other. In order to do the installation yourself, you should install galvanized nails in increments of no more than 30 cm.

Scheme of a valley roof.
Valleys should be used when the slopes are adjacent to each other. The bottom edge of the valley should be laid on top of the completed cornice strip. It is necessary to use a porous seal to get rid of the gap between the roof covering and the bottom valley strip.
A valley overlay can give the roof structure a complete look; it must be installed after installing the sheets. It is fixed at the top of the wave, the step being 30-50 cm.
Install end strip necessary using self-tapping screws. In this case, the step between them should be no more than 40 cm. The planks themselves must be mounted overlapping (10 cm) along the length.
How to install a metal roof with your own hands
Installation of the coating should begin from the end of one of the slopes after the preparatory work has been completed, which includes laying anti-condensation film and installing the sheathing.
If installation starts from the left end, the second sheet must be installed under the last wave of the first. When work starts from the right end of the roof, new leaf must be laid on top of the last wave of the previous one. In case there is hip roof, installation will need to start from the middle of the slope, after which the installation is carried out evenly in both directions.
Each of the sheets has a capillary groove, which is located along its edge. This groove should be covered by the edge of the next sheet. The covering sheets must be aligned along the eaves strip.

The screws used to secure the sheets must be in the deflection of the wave.
The obvious fact is that it is not difficult, but there are some nuances that you need to know about. For example, the screws used to secure the sheets must be in the deflection of the wave. It is necessary to use only those self-tapping screws that have a special sealing washer. In this case, they will need to be screwed in strictly perpendicular to the sheathing material. The average consumption of self-tapping screws is not high at all. It is up to 8 pieces per 1 sq. m.
If you screw in the screws at an angle, they will not be able to press the sealing washer tightly, therefore, a potential leak will appear in the roof.
An important issue is the movement on the roof during construction or repair work. It is worth noting that movements around finished roof It is recommended to avoid it altogether, but if all existing rules are followed, it may cause only minimal problems.
It is recommended to use shoes that have soft soles. It is allowed to step only on the deflection of the wave and only in the place where the sheathing will be located under the metal layer. Under no circumstances should you step on the crest of a wave.
DIY ridge installation to ensure good ventilation
A correctly installed skate is the key to good, high-quality ventilation space under the roof.
This element must be given Special attention while installing a metal tile roof with your own hands.

The sheets of covering should not converge towards each other, and there should be enough space between their edges under the ridge strip. The skate should be fixed using self-tapping screws that are screwed into the top of every second wave. You will need to cover the edges of the sheets with sealing tape.
If you need to make a semicircular ridge on a hip roof, it would be best to use special elements such as Y-shaped overlays.
Even if the person carrying out the repair work knows about it, he may make a mistake when making a joint with such a vertical surface as a pipe or wall. In such cases, the contact area will be isolated using a junction strip and a self-adhesive seal. Additional sealing can be easily created using sealant.
The lower junction strips must be installed in a groove prepared on the surface (pipe or wall). To do this, you should perform a groove, after which you will need to remove dust and wash the groove. The abutment strip is trimmed, installed and fixed using self-tapping screws.
After the work is completed, you will have an internal apron, but you will also need to organize water drainage. To do this, use a flat sheet of metal, the edges of which will form the sides.
In addition to the internal apron, you can also use an external one, which is created from the upper abutment strips. Installing it is almost the same as the internal one, with the exception of gating. The edges of the planks are simply secured to the wall.
Some difficulties may arise when working on broken roofs. Such elements can be internal and external. In the first case, an abutment strip is used, which is installed together with the seal. If we're talking about about an external break, you will need to use a cornice strip.
Do-it-yourself installation of a drainage system and snow guards
Systems should be used rectangular section. The gutters need to be mounted below the edge of the roof by 2-3 cm. The lower edge of the eaves strip should cover part of the gutter, and the waterproofing film should be placed on top of it.
Snow guards are installed on mounting strip using self-tapping screws that reach the sheathing. They screw up every second wave.


