What could be more pleasant in the evening than to curl up in a soft bean bag chair and watch your favorite TV series? Children love them no less than adults: the kids seem to play on the floor, but they also seem to play on the chair! It’s good that sewing such a practical piece of furniture is not at all difficult, especially if you have sewing machine.
To create a bean bag chair with your own hands you will need:
- graph paper;
- two types of fabric - thick and beautiful (for the outer cover), another one (any) - for interior decoration, 3 m each;
- two zippers;
- strong thread;
- filler (sintepon, stuffing from old pillows, toys, polystyrene granules, foam balls, etc.).

Let's start sewing a bean bag chair with our own hands step by step instructions and the diagram:
1. Using graph paper, transfer the design from the pattern onto the fabric.


2. Cut out the parts for the exterior and interior decoration of the bean bag chair.
3. Sew the wedges together, sew a zipper on the side to one.
4. Sew the bottom, top and the first and last wedges for the outer and inner fabric.0
5. Fill the bean bag chair with filling and fasten the zipper. In the future, it will be very convenient to wash the outer cover.
And here is another option for a bean bag chair:

You can easily sew these bean bag chairs with your own hands:


If necessary furniture In a small apartment there is no place to put it, you can make portable chairs with your own hands. You can place it in any corner of the room, and if it gets in the way while cleaning, you can lift it onto the sofa. Such furniture is made not only because ordinary furniture simply does not fit in a small apartment. They started making it because it is convenient and practical, frameless.
How to sew a bean bag chair with your own hands
Modern furniture without a frame is fashionable and comfortable. Children especially love it, as it is easy to move, rearrange and even fall on it. The frameless chair easily adapts to any body shape, which is why it is also popular with the adult population.
In the store you can choose various types bean bag chair, also available in different colors. If you have a sewing machine in your home, then it will be much cheaper and more fun to sew such a piece of furniture with your own hands. You need endurance, patience and imagination. The work can be done in a day if you have all the necessary materials.
What is a bean bag chair?
This is a piece of furniture without a frame, having unique properties. The bag can serve as a pouf, chair or bed, the main thing is that it takes the shape of any body that sits on it. Frameless furniture can be made in the most unusual shapes.
Making a chair with your own hands
Even a novice seamstress can do this at home. Let's look at the design of this furniture in more detail. It consists of two parts:
- outer case;
- inner case.
The outer cover must be made of thick fabric, suitable:
- jeans;
- raincoat fabric;
- curtain;
- upholstery;
- leatherette
 Must be in a case there must be lightning so that when it gets dirty it can be painlessly removed and washed. And be sure to sew a handle on the cover to make it convenient to carry the chair bag around the apartment.
The inner cover can be sewn from lining fabric or regular calico can be used. But experts recommend using waterproof fabric for the inner cover - this will protect the filling from getting wet. Of course, it can be dried, but this work is very painstaking. The filler can be polystyrene foam in the form of small balls, or polystyrene. It is different:
- long service life;
- does not absorb moisture;
- does not cause allergies;
- mold does not form;
- bacteria are not bred;
- the material is very light.
During long-term operation such furniture, the material may become confused. To give the chair original appearance, you need to make the inner cover with a small zipper. Through it you can add more balls and fluff up those that have become squashed.
Let's consider the stages of making a bag, the dimensions of which are finished form will be 120x90 cm. Will be required following materials for bean bag chair:
- fabric for the inner cover – 3 m;
- fabric for the outer cover – 3 m;
- zipper 100 cm;
- zipper 40 cm;
- filler – 300 l.
If you do not consider yourself an experienced seamstress, then the pattern needs to be made on paper, and then transfer all the details onto the fabric. To each part you need to add 1.5 cm on each side - this will be seam allowances. If, as a result of cutting, you find that the fabric is loose, then the edges of the cuts must be processed with a zigzag stitch.
 The chair pattern consists of 6 wedges of equal size. The top and bottom of the chair are hexagons, only different sizes. The product is cut out for the bottom bigger size, for the top - a smaller product. It turns out that a DIY bean bag pattern requires eight parts for each cover, plus a handle.
Let's start assembling.
For sewing outer cover we put two wedges together, right sides facing each other, baste, stitch on a machine. Iron the finished seam to one side. We apply the next wedge - baste, stitch, iron. We do this with all wedges. When you need to make the last seam connecting the six wedges into one fabric, you will need to insert a zipper into it. To do this, you only need to baste 15 cm above and below. You need to insert and baste a zipper in the middle. We stitch using a machine.
The top is attached to the finished side surface of the chair - basted and then stitched. You need to remember to insert the edges of the handle so that you can baste together with them, and then stitch them. You also need to attach the bottom of the chair. This is how we got an outer cover, since its zipper is larger, as much as 100 cm.
Inner case it is sewn similarly to the outer one, but the zipper in it will be only 40 cm. To do this, you will need to stitch 45 cm at the top and bottom, and insert a zipper in the middle.
The finished inner case needs to be stuffed with polystyrene balls. This is a very responsible job, you need to do it yourself, without children and very carefully. If suddenly the balls get into the respiratory tract, the consequences will be very serious. For safety, you need to wear a protective mask, which can be bought at any pharmacy.
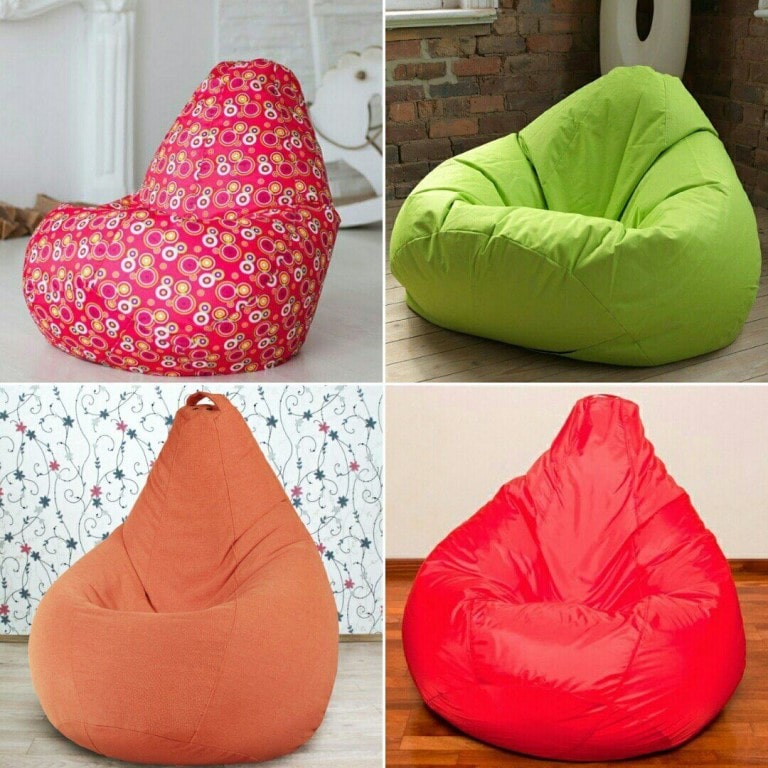
 We fill the cover with balls to 2/3 of the total volume, then the chair will be soft. You shouldn’t experiment and fill the bag to capacity – it’s been tested, nothing good will come of it. Next, the zipper is fastened and a beautiful outer cover is put on. Job is done. The result will please you as soon as you sit down on this handmade product. The shape of the manufactured chair resembles the shape of a drop, which is why the chair is called that.
Types of chairs
IN Lately the product has become very popular, so manufacturers offer many forms. Patterns for each option are individual; samples can be found on the Internet. Let's take a closer look at some forms of chairs. The drop-shaped bean bag chair was discussed in more detail above.
Bucket-shaped bean bag chair
The pattern is made individually, consists of two circles and a rectangle, in which a semicircular notch is made on long side. Suggested sizes:
- diameter of the large circle is 80 cm;
- diameter of the small circle is 70 cm;
- chair back 110 cm;
- The rectangular piece has a length of 260 cm.
You will need the same fabrics for sewing, plus zippers and filling. Cut out the parts from the fabric and sew them together. This must be done for the inner cover and for the outer one. Fill the inner cover with foam and close the zipper. Insert it into a beautiful case, straighten it and also fasten the zipper. Photo of a bean bag chair is ready.
Beanbag in the shape of a large soccer ball
 Here the parts have the shape of an equilateral hexagon, the length of one side of which is 22 cm. There should be 20 hexagons. To make the chair fun, you can take parts of different colors.
Having prepared all the parts, you need to start sewing them together using a special pattern.
The same chair can be sewn from blanks resembling the shape of a pentagon, with a side length of 34 cm. There should be 12 blanks. During the cutting process, you need to take into account the fact that the part already comes with seam allowance. In order to properly sew such a chair, you need to follow the pattern.
Only external, beautiful covers will be so complex. The inner ones are sewn in the form of a regular bag, in a fast way. In order not to make a mistake with the size of the inner cover, sew the outer one first. Don't forget to insert zippers into the outer and inner covers while sewing.
As you can see, the work is not difficult, the main thing is to make the pattern correctly and transfer it to the fabric. Cut required quantity parts, slowly sweeping everything away and stitching on a typewriter. Without being greedy, buy the correct filler and fill the resulting case. Sit on a new chair and enjoy the comfort, praising yourself for the work done.


Conclusion
You can relax in a frameless chair for less time, but more effectively. Doctors recommend this chair for people who have problems with the spine, as well as for pregnant women who have swollen legs or lower back pain. The filler is a completely harmless material that not only does not get wet, but also has heat-insulating properties. This must be taken into account if there are children in the family.
Well, anyway, the price for such a device made me overly pleased (the most simple model about 5000 rubles), and also the fact that the choice didn’t really correspond to what I wanted.. I decided to make it myself;) After digging around, I again found an approximate pattern on the net.. I don’t claim authorship.. Yes, I did it a little wrong.
Materials:
1m of black dermantine-180r
2m of white dermantine-280r*2=560
3m Chintz - nothing (old sheets)
Threads - I don’t remember, they were lying around for a long time take a 12p spool
Zipper 2 pcs. 50 cm-25 rubles 1 piece, the second is nothing (old)
Construction tape roll-45r
Filler:
2 foam plastic slabs 5 cm (90 * 2 = 180) and 4 fragments approximately equal to 5 cm (210)
Calculation: 180+560+180+210+25+45+12~1212r
The material was purchased at a hardware store (dermantin in two colors) I started making the pattern
big soccer ball
I apologize for the quality of the photo... Sonya was covered up literally a week later... and apparently this was a wake-up call, I photographed my cell phone very poorly.
I’ll tell you right now that I’m not a tailor;)
Then I started combining...if you have never sewn a ball yourself in your life, make a model using paper and a stapler (I did this myself). According to the advice of people on the net... it’s very difficult to sew a ball for the first time... well, it’s not the gods who burn the pots :)
I think it’s clear what’s what. I reinforce the seam with high-quality tape;) So to speak, high-tech, rustic bottling. In the original products, the seam is double and the threads are of better quality.
The ball I liked had 12 pentagons (black) and 20 pentagons (white)
Connected triple blanks in this form
This will be half of the ball. The second must be assembled in a mirror manner. This is why you need to train on cats... in the sense of creating a paper model
I’m breaking polystyrene in a bag, I couldn’t buy it already crushed, for some reason it wasn’t everywhere, summer is the time for repairs.
The outer cover is already ready before filling. The inner bag for the filler was created parallel to the outer one with identical dimensions (also a ball). It must be taken into account that if the outer cover slides, then it is advisable to make the inner one braking. Accordingly, if the outer one is fleecy, the inner one slides. This should be done for for your convenience in the same polystyrene filling.
I filled the inner bag halfway with fragments of polystyrene foam and carefully loaded it through the hole with a zipper into the outer case, there I already loaded the second half of the foam plastic. Keep in mind that at home you don’t just need to break the foam plastic... the whole room will be like New Year’s, you will be tortured by vacuuming (although you will have to do it anyway)
This is roughly what happened.
Oh yes .. one more nuance .. in the “original” beanbag chairs there are holes for ventilation (sharp release of excess air in the event of someone or something falling on it) They are typical for products made of leather and dermantine, as well as materials with poor permeability air. I didn’t foresee them and the result was not long in coming (my brother arrived ;))
Fortunately, I still had some leftover material and the chair I loved was brought back to life.
But I think such flaws still need to be taken into account.
Over the past year, a sheet of polystyrene foam 10 cm thick was purchased to replenish the sagging internal filler.
Preparing for work.
Before moving on to the process of making the chair itself, let's understand its features. The chair itself consists of two parts: an outer cover and an inner one.
The outer cover should be equipped with a long zipper and, preferably, a small handle for carrying the bag around the apartment. It is also worth considering that you should give preference to dense and wear-resistant materials. It is best to make a cover from raincoat fabric, for example, Dyuspo 240, it is easy to wipe off if it gets dirty or a drink is spilled.
The inner case will be filled with small beads of polystyrene foam or simply polystyrene. You can use lining material, for example, Taffeta 140. Also, do not forget about a small zipper for filling the bag and subsequent stuffing in case the balls wrinkle (after some time).
The dimensions of the future bag are 120 x 90 cm.
Materials for work:
- fabric for the inner cover - 3 m;
- fabric for the outer cover - 3 m;
- zipper 100 cm;
- zipper 40 cm;
- filler - 300 l.
Before you make a bag chair with your own hands, you need to carefully re-take all the details of the chair pattern using graph paper. But it is possible to do without it, and use chalk or soap to transfer the details directly onto the fabric.
Pattern:
Stages of work.
After the pattern is transferred to the fabric, you need to mark the seam allowances. They should be at least 1.5 cm to avoid unraveling of the seams. If the fabric is loose, then it is better to process the edges of the cuts with a zigzag stitch.
Wedges for the chair need to be cut in the amount of 6 pieces for each cover. Hexagon for the top and bottom - 1 piece for each case.
Approximate location of the pattern on the fabric:

We begin assembling the parts of the outer cover.
1. We put the first two wedges together so that the front side is on the inside. Taking into account sewing in a 100 cm zipper, we sew 15 cm from the bottom and top.

2.Then we baste the zipper and sew it on using a machine.

3. Attach the next wedge and iron the seam to one side. We do the same with the rest of the parts of the chair base. For fixing seam allowances on front side cover we make a line at a distance of 1 cm from the seam. The stitch is best done using maximum size machine stitches (4 - 5). Then we sew on the base and bottom of the chair.

Let's move on to sewing the inner cover. The sewing process is similar to sewing an outer cover, with the exception of sewing in a 40 cm zipper. To do this, you need to stitch 45 cm at the top and bottom. This is how big the bag is.

After the inner cover is ready, we move on to stuffing it with polystyrene balls. Be extremely careful with this material, as its entry into the respiratory tract can have serious consequences. Do not neglect to use a protective mask from the pharmacy. We fill the cover to about 2/3 of the total volume of the bag to make the chair soft.
- do not use too large foam balls, as they will wrinkle very quickly and the chair will need to be stuffed very often;
- The use of cheap foam chips is also undesirable, since it is a product of recycling waste packaging foam. It’s better not to risk your chair acquiring an unpleasant odor;
- Use whatman paper rolled into a tube to work with polystyrene. This way you can avoid the balls sticking to your hands and surrounding objects.
Sorry for the bad photos, this is my first master class! I hope you liked it :) Add me to your circle and follow new master classes in your news feed! The next master class is sewing a backpack for replacement shoes.
I will be very grateful to you for pressing the "like" button. This is very important for me, I will know that my efforts were not in vain. Wish you luck.
Ho-ho! Dreams tend to come true, especially if you really want to make them come true. For many years now, Kostya and I have been eyeing a bean bag chair, or as it is also called: a bean chair, a pear chair, a frameless chair, Big Ben, a cushion chair, etc. And somehow we still couldn’t get this desired thing: either there was a catastrophic lack of space in the previous apartment, there was no renovation to accommodate such beauty, or we simply couldn’t find polystyrene foam anywhere (those same foam balls that are used to fill bag chair).
While hatching the idea of creating a bean bag chair with our own hands, we managed to accumulate enough information about how and what to sew it from, what to stuff it with, and how to choose the size. In addition, we found a beautiful natural fabric for the outer cover and an ugly, but knitted fabric for the inner cover. And we also discovered that granulated polystyrene foam went on permanent sale to the Epicenter retail chain. And when we found time and Kostya accidentally drifted into the nearest “Epicenter”, from where he carried 200 liters of white balls, it became clear that we would sew a bean bag chair very urgently. And so it happened.
So, how we made a bean bag chair with our own hands.
We needed:
- Fabric for the inner cover (2.5 m x 1.4 m). It should be a good stretch fabric. We took an old knitted sheet.
- Fabric for outer cover (2.5 m x 1.4 m). Any dense, non-stretchy fabric (cotton, velor, furniture fabric, even leatherette) will do. Our fabric is thick cotton and felt very nice and soft on the finished chair.
- Expanded polystyrene 200-300 l. These are the kind of balls that we used to break up unnecessary packaging foam into when we were kids :) construction stores This happiness is sold in large bags. It is better to take smaller balls, they are less likely to bunch up. In Kyiv, as I already wrote, we found suitable polystyrene foam for stuffing a bean bag chair with your own hands at Epicenter (200 l - 95 UAH), Leroy Merlin also has expanded polystyrene, but not always in larger granules (300 l - 120 UAH). We bought 1 bag of 200 liters, although the recommendations said that we would need 300-400 liters. When we filled the bean bag chair and began testing it, we came to the conclusion that it was just enough for us, since a soft bag takes the shape of the body better than an elastic one. This chair provides great rest for your back, and for a pregnant belly it’s an irreplaceable thing :)

- 2 zippers. For the inner cover – 50 cm, for the outer cover – 100 cm.
- Strong threads
- Paper for large patterns. We took craft. You can take old wallpaper.
- 2 Velcro strips, 10 cm long. They will be needed to connect the inner and outer covers.
- Sewing machine. In my opinion, it is impossible to sew all this manually...
Stages of work:
1. Create a pattern. A standard bean bag chair consists of 6 wedges and 2 round or hexagonal parts (the upper one is small, the lower one is large), and a handle is also attached on top. There are quite a lot of different patterns for frameless chairs on the Internet, but the meaning is the same. Appearance the bean bag chair does not change much depending on whether there is a circle or a hexagon at the bottom; the width of the wedges will be 40 or 50 cm. Of course, the main dimensions greatly influence the size of the finished product, but I mean that the type of wedges and the bottom does not radically affect what your chair will ultimately look like.
We found and finalized the pattern for a medium bean chair (120 x 90 cm). I think that standard width quite enough. If you only increase the height of the wedges to about 140 cm, then the length of the headrest will increase, that is, the chair will be suitable for a taller person.

Bean bag chair patterns
To transfer the wedge pattern to a large sheet, you need to draw the middle of the wedge - the axis, put marks on it at a distance of every 10 cm and measure the widths indicated on our pattern, and then connect them into one line. This will be the side bend of the wedge. Then we fold the pattern along the axis and draw the second half of the wedge symmetrically. There is a deflection at the bottom of the pattern. We measure the specified deflection size from the height of the axis. Then we apply a ruler to the two lower edges of the pattern and bend it to the indicated deflection mark and draw a deflection under the ruler. Cut out the finished pattern.

How to draw a deflection on a wedge pattern
In order to draw a circle, take a non-stretch thread and tie a loop at one end (we will thread a pencil into it). Using a ruler, measure the length of the radius of the circle from pencil to finger. We press one end of the thread to the center of the circle, thread a pencil through the second and draw a circle. Cut it out.

How to draw a bottom pattern for a bean bag chair
To build a hexagon, you need to draw a rectangle, and then place the hexagon in it according to the specified dimensions. Cut out the part.
Don't forget about the rectangle pattern for the handle.

Patterns for a frameless chair
2. Now we place the patterns on the fabric, as in the picture. This is needed for more rational use material. For the same purpose, the round part is cut into 4 parts. Before sewing a bean bag chair, they need to be sewn into a full circle. When cutting the fabric for the inner cover, we did not divide the bottom piece, since the old sheet was big size, and it was enough for us to place all the patterns in full size.

Placing bean bag chair patterns on fabric
3. Cut out all the parts, not forgetting the seam allowances (1-1.5 cm).
4. First we sew the inner cover. We sew the wedges together and sew a 50 cm zipper into the last seam.

This is what the outer case looks like without the bottom and top
5. Sew on the bottom. For convenience, it is worth connecting the wedges and the bottom with pins.
6. Then sew on the hexagon top. Don’t forget to sew 2 Velcro onto this part.
7. We sew the outer cover in the same way. On inside we sew 2 Velcro on the hexagon, and on its outer side we sew the handle of the bean bag chair (first we fold the rectangle in half with the wrong side up, sew along the edge, turn it inside out, and then sew it to the hexagon).

Finished inner and outer covers
8. When the 2 cases are ready, it's time to stuff the inner case with polystyrene foam balls. To do this, I advise you to go out into the entrance or at least into the corridor, since the balls tend to crumble and scatter into different sides. Have a vacuum cleaner or broom and dustpan on hand. The bag of balls needs to be cut into top corner very little. Otherwise, by cutting off the entire top of the bag, you risk spilling a lot of balls past the cover. This means that it will take a long, long time to clean them up. Insert the opening of the bag into the cover of the bean bag chair and, shaking the bag slightly, slowly pour out the contents. This action is best done together. After filling the chair, fasten the clasp.
9. Slide the inner case with the balls into the outer one, secure the upper parts of both cases together with Velcro. Fasten the zipper and enjoy your big bean bag chair, which you made with your own hands :)

Velcro for connecting two covers

Kostya holds the bean chair by the handle
All three of us spent the whole day testing this miracle of comfort and opened additional functionality Big Ben. In addition to the fact that this chair and bed is 2 in 1, it has a very good streamlining of the body, which allows pregnant women to finally rest their belly in a comfortable position.

A bean bag chair is a child's joy :)
In addition, Ksenia appreciated the bob and began to use it almost as a trampoline, slide and sofa at the same time. It is noteworthy that it is quite difficult for her to get out of the arms of the chair, which means she strains her muscles and this is very useful. It’s very funny to watch how a baby stuck in a sack flounders, turns over, pushes away and squeals with delight. In addition, you can still feel the lumpy texture of the balls through the covers, and this is a wonderful massage for small children’s feet.

Evening family reading
By the evening, it was discovered that the enveloping effect of the chair helps to lull the obstinate baby to sleep :) A couple of episodes of the cartoon, a comfortable position in the chair next to the mother and the baby is sleeping. Another property of the chair will please those who love warmth. It's very warm. As you know, polystyrene foam is an excellent insulator, and the foam balls, which cover the body from all sides, warm you so much that you won’t freeze, even if you really want to. You just need to remember to take a cozy blanket with you.
Like this new item We recently got an interior design. We immediately appreciated its merits and made it our home; sometimes we even argue about who will sit on it. If you have any questions while creating a bean bag chair with your own hands, write to us and we will definitely answer them.
We wish you inspiration to create wonderful cozy things!
P.S. After 5 months of active use.


