The desire to watch something interesting in the evening remained in our minds. If before everything large families gathered in front of their neighbors' TV, because they were not so common, then today everything has changed and there can be one in each room. The TVs themselves also changed their form factor. If earlier it was a huge box that required an impressive stand, now these are thin and light solutions that have migrated to other planes. That is why it is worth knowing how to make a TV mount on the wall with your own hands.
Understanding the brackets
Back panel modern TVs It is plastic, so it is not possible to hang it on screws or hooks, so special fastenings were developed - brackets. Brackets have several main classifications, which are divided, for example, according to the location of their installation:
- for the wall;
- for the ceiling;
- bracket-stand;
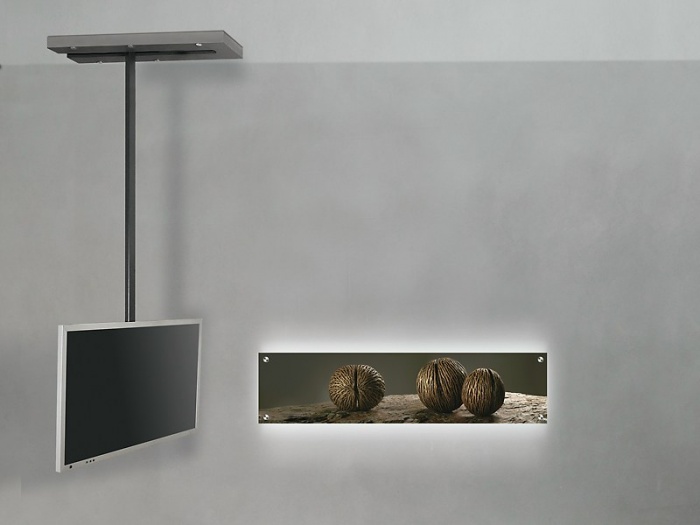
A ceiling mount for a TV is often used in cases where it is located in the transition area between two rooms, but they do not have a clear partition. This, for example, could be the kitchen and dining room. Its advantage is the possibility of adjustment, as well as the minimum occupied space. Such a device requires special care when performing installation work, because you can pay with expensive plasma. Mounting the TV to the wall using a bracket is more common. Such brackets are used not only at home, but also in offices, hotels and performance halls. The stand bracket is a more specific solution. They are not suitable for every interior; they are often used to visually delimit the area of a room.
In addition to location, brackets also differ in some ways design features. There are fixed options. They represent a durable finished design, which is installed in its place, and the TV is attached to it. However, it is not possible to change the angle of its inclination or rotation. Such a bracket will be needed if there are no plans to rearrange the room and the TV is always watched from the same distance and location. This, for example, could be a bedroom or living room. These brackets can support more weight than others.

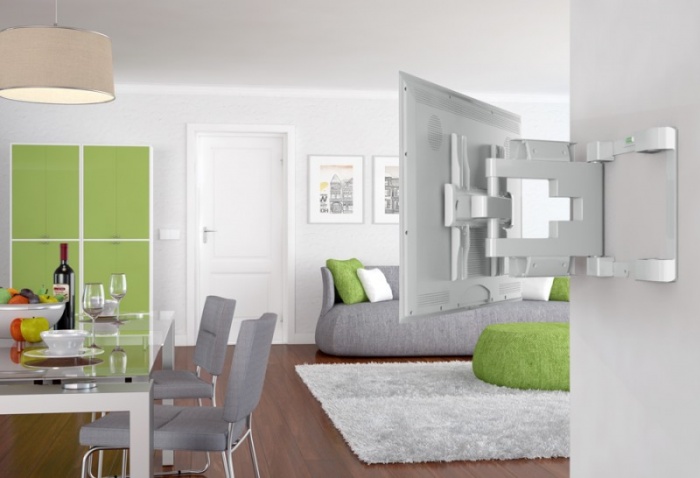
There are situations when you need to change the angle of the TV. This may be due to viewers of different ages or heights. Then a tilt bracket is perfect. Visually, it is similar to a fixed bracket, but it has a separate module that can change the angle of inclination in vertical plane. There is also a swivel TV mount. They are often used for desktop monitors in order to select the required position for a specific user. They consist of a base that is attached to the wall and several levers. The most technical is the bracket, which is capable of changing the angle of rotation and tilt. These are suitable, for example, for kitchens where the hostess is constantly moving.
Choosing the best option
To decide which mount in the best possible way is right for you, you need to answer a few questions for yourself:
- where the installation will take place;
- what is the maximum position from the wall that is permissible;
- where is the socket located?
- what type of TV mount does the TV have?
- what is offered specifically for my model;
- what is the cord plug for the TV;
- what is the weight of the TV;
- what will be the load-bearing base;
- Is a rotation angle required?
Depending on which characteristics of the bracket you put a plus sign in front of, you will need to choose a fixed module or one of the movable options. Also, before purchasing a holder, it is worth looking at how many mounting holes there are on the back of the TV. Typically, mounting systems are made according to the VESA standard. They have a stated hole spacing that varies depending on the screen diagonal. The number of holes also varies. There may be 4, 2, 6 or even 8. At the first inspection, they can be difficult to identify, because from the factory they come with screws already screwed in and may be under a sticker or soft material resin-like.
Note! According to the VESA standard, the distance between the bolts on the bracket can be 75, 100, 200, 300 and 400 mm. IN non-standard solutions You will need a bracket with a different fastening system.
Mounting the wall bracket

The TV wall mount has the easiest approach to installation. This bracket is very easy to attach without outside help. Before you prepare the tools to fix the bracket, you need to think carefully about the location of the TV. It is necessary to take into account factors of sanitary and hygienic standards. The head should not be raised too high when viewing, as this impairs blood flow and can subsequently affect vision. This also applies to a large head tilt. It is better to attach a fixed bracket to the wall at the user’s eye level. It is also important to consider the location of light sources and windows in the room. If the TV bracket is opposite the windows, then seeing anything there during the day will be problematic. The lamps should also be kept to the side, otherwise they will have to be constantly monitored. To work you will need:
- bracket;
- hammer drill or drill;
- dowels and screws;
- level;
- screwdriver or wrench;
- roulette;
- marking tool.
In addition to choosing a place for the bracket, you should decide on the quality and material from which the wall is made. Mounting the TV on plasterboard wall has some nuances. If for regular wall plastic dowels and screws are purchased for the bracket, which can withstand total weight TV, then for drywall the approach is a little more complicated. For the latter there are special brackets with a large number of holes for mounting. You will also need to pick up the so-called “butterflies”. These are special dowels that, when screwed in with a self-tapping screw or bolt, are compressed and secured to the back of the drywall sheet.
Note! If you plan to hang the TV on drywall, then it is worth considering that the thickness must be at least 12 mm or you will have to look for another option. It is also important to calculate the weight correctly. It should not be more than 5 kg per hole. You also need to get to frame profile, because the sheet itself may crumble and repairs will have to be made.

If you have already installed something in your apartment and know that the walls are old and crumble when exposed, then for the bracket you will need dowels of a larger diameter than recommended and the screws should be such that they will be able to compress the dowel walls in the hole. If this is not provided for, then at one point you may see your TV on the floor. Now the process is in order:
- Using a tape measure, measure the distance from the floor to the height of the TV mount. For convenience, you can use a level to draw a light reference line.
- The bracket is tried on in place. In this case, you can position it along the line by passing it into the lower holes. The level sets the correct vertical and horizontal position of the bracket.
- Using a pencil or other marking tool marks are made for future holes.
- Use a hammer drill or a drill to drill holes for the bracket. In this case, you should not move the tool from side to side. This may result in a broken drill bit or increase the diameter of the hole, which is not good.
- Using available means, the remaining chips from the stone are cleaned from the hole.
- Dowels are inserted into the holes for the bracket.
- When supporting the bracket, it should be attached to several bolts to keep it in place. After this, a full tightening is performed.
- The bar that will hold the TV is removed from the bracket and screwed onto it.
- After this, the TV is mounted in its place.
If the bracket is rigidly mounted and cannot be rotated, then before hanging the TV, you should raise it to the level of the bracket and connect all the required wires, since this will be impossible to do later.
Note! Mounting the TV to the ceiling and floor is practically no different from this option. It’s just that the work is being done on a different plane. Additional effort may be required when laying wires. But often manufacturers provide the opportunity to hide them in the pipe of the bracket itself. Therefore, before attaching the TV to the bracket, be sure to route all the required wires.
DIY bracket
If you don’t think it’s necessary to buy an expensive holder or the mounting method of your particular option is not suitable for the VESA system, then you can make a wall mount for your TV yourself. For this you will need, for example, an aluminum corner. You can use metal or wooden slats.

WITH reverse side TV is measured between the upper and lower mounting holes. Another 2 cm should be added to this number so that the holes are not flush against the edge of the corner. Four identical elements are cut. Holes are drilled in two of them in accordance with how they are on the TV cover. The other two will be on the wall. In order for them to interact with each other, you will need to drill holes so that they coincide in the corners that will be on the TV with those that will be on the wall.
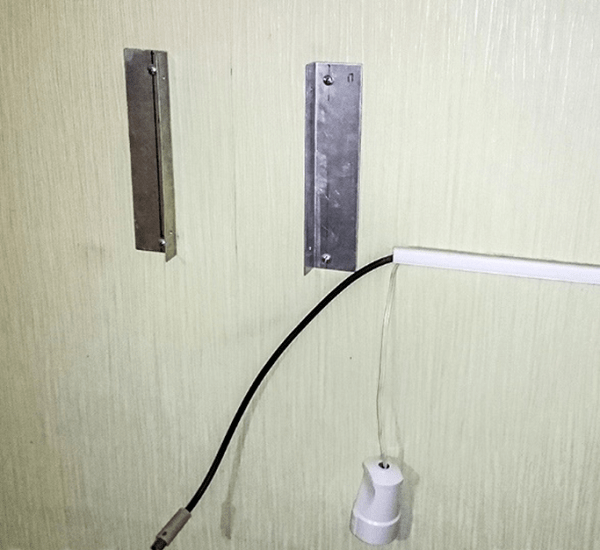
Two corners are mounted on the TV, and the other two on the wall. The distance between the latter should be such that those mounted on the TV fit between them. To carry out the procedure, you will need two more people who will hold the TV suspended while the third can fasten the corners together.

Conclusion
As you can see, there are different module options for mounting the TV on the wall, ceiling or floor. It is better to purchase exactly the one recommended by the manufacturer. This should be done because some companies may void the warranty due to improper installation. If this does not concern you, then you can make it yourself.
Brackets are simple devices used for mounting televisions, as well as other household appliances. They are very popular as they can significantly save space in the room. Basically, stands are used in the kitchen to place small TVs. When watching a movie, the bracket will be invisible due to the equipment installed on it.
There are many types of fastenings. Tilt and swivel brackets are convenient for plasma technologies, they allow you to adjust the position for more comfortable viewing.
Fixed fasteners are in most intimate contact with the wall, so they are ideal option if you plan to install a very large TV.
Both of the above options are mounted on the wall, which is why they are called wall brackets. In addition to them, there are also ceiling fasteners. This design has the ability to change position by tilting and rotating. This design is also very convenient for placing a TV, but it can only be used in rooms with a high ceiling.
Any type of bracket can be purchased both in household and hardware store. They are affordable in price. But it is still possible to invent a TV bracket with your own hands. This process is very painstaking and takes a lot of time. Also, if you have a non-standard TV, you can order fasteners for it from a specially trained person (master), according to the size.
So how to make a TV bracket with your own hands? Before starting work, prepare a fastening drawing. It can be made to order, drawn by yourself or produced in computer program. The main thing is to imagine what it is and what elements it consists of. In terms of the quantity and cost of materials, homemade fasteners will halve the cost of a purchased bracket. But if it is assembled incorrectly, it can cause costs due to damaged household appliances. Therefore, during its production you should be extremely careful, and after work, check it for reliability, using unbreakable elements.

Brackets for LCD TVs
Several bars are used for the main material, their length is selected according to the width of the TV. Using a puncher, holes are created in the material. The distance between them should be the same size. The first bar is attached to the TV and serves to attach it to source material. It is attached using bolts. The procedure should be done very carefully so as not to damage the surface of the household appliance. The second material is intended for fixing on the wall. It is also attached using bolts and must be in careful contact with the wall. The TV is connected to the wall using a third bar, which also adjusts the angle of inclination. All three materials should be tightly connected to each other and form a lock.
When fastening, it should be taken into account that the distance of the fastener from the floor must be more than one meter. The distance from the sofa to the TV should be approximately three times its diagonal. To ensure that the brightness of the image is not affected, the angle between the fastener and the screen should be either acute or straight, that is, not exceed 90 degrees.

Brackets for mounting plasma TV
The bracket should only be installed on a clean wall that does not have unnecessary bumps or holes. Do not install it near windows and doors. Also, do not install in places exposed to sunlight, which will reduce image quality and can damage household appliances.
The most durable material should be chosen. Any Appliances may become hot when viewed, and therefore there is a risk of fire or ignition. In addition to the TV, you can use fasteners to install other household appliances, such as a microwave oven, toaster, speakers and much more. For kitchen TVs, for convenience, fasteners are made, right in kitchen corner. It is important to maintain the correct angle when installing.
The DIY TV bracket must be securely located in the wall surface. For greater reliability, household appliances are secured using belts or thick thread.
Here's a video on how to make a TV bracket with your own hands:
The advent of flat-panel LCD TVs has made it possible to optimally use living space. If in a room the TV can be placed on a bedside table, then in the kitchen, in most cases, wall mounting is suitable, which will save a lot of space. When buying a TV, you can ask whether the model you like can be wall-mounted. If you don't want to leaf through the instructions, you can just look at the back cover, on which you will most likely see four threaded holes metallic color. Of course, we can’t screw the TV directly to the wall; we will need a bracket for installation.
If you want to be able to turn the TV around and change its angle, then you can buy TV wall swivel bracket. This is especially true for models with small angle review. Manufacturers have produced a myriad of brackets for every taste and color, the cost of which is sometimes comparable to the price of the TV itself.
If you are not going to periodically rotate the TV, you can make a fairly simple fixed DIY wall bracket.
To mount our 24-inch TV (screen diagonal 61 cm) we needed 4 aluminum corners and a bicycle spoke. You can also take steel corners, but there is almost no load on them, and aluminum is easier to process. I won’t write down the dimensions, the most important thing is that the holes match and it is advisable to do everything level.
Two corners are attached to the TV, each with two M4 screws.

The other two corners are attached to the wall with screws. First, we drill the corners, and then mark the wall, tracing the holes in the corners with a pencil.

Distance between wall corners It should be a couple of millimeters smaller so that the corners screwed to the TV wrap around the outside. 
In each of the four aluminum profiles In the upper part, one hole was drilled, in a plane perpendicular to the holes made earlier. Now let's attach the TV to the wall. The corners screwed to the wall fit between the corners attached to the TV, and we thread a bicycle spoke into the holes drilled at the top. With its help, the corners are fixed to each other. As a result, the TV hangs on a spoke, and the corners that fit each other fix the structure in other directions. To remove the TV from the wall, simply pull out the spoke and the corners unhook.
Photo for clarity - not yet screwed on corners with a protruding knitting needle. 
The bicycle spoke has a diameter of 2 mm, but thanks to heat treatment it can easily withstand the weight of the TV. A regular wire for fastening will not work, because... it's soft. For heavier TVs, use thicker studs.
When attaching corners to the wall, it is preferable to use plastic dowels. Before installation, make sure that the wall can support the weight of the TV. In addition, ventilation must be provided, and there should be no heating devices under the TV. If these rules are violated, the TV will overheat, which will lead to its premature failure.
The antenna cable and power cord can be laid in a cable channel matched to the tone of the wall. In some cases, a regular socket can be replaced with a less bulky plug. In order not to remove the TV from the wall every time I replaced the flash drive, I used a USB extension cable.
By the way, in one of our rooms we have the same a homemade bracket attaches a monitor to the wall.

Over the past twenty years, television sets have evolved from large, clunky boxes into stylish canvases, and it's hard to imagine modern interior apartments without a plasma panel or LCD TV. If earlier to install a TV you had to allocate a special place in the room, buy a huge cabinet or stand on casters, now it is enough to buy a bracket for mounting on the wall and hang the TV in a place convenient for you. But when hanging a TV on the wall, you need to follow a number of certain rules, which you can read in our article.
We spend almost all of our time watching TV. free time. Therefore, it is very important to hang the TV correctly so as not to experience problems with vision and headaches from prolonged viewing.
There are a number of recommendations for correct installation TV:

- The center of the TV screen should be at eye level of the viewer.
- The deviation of the viewing angle in relation to the screen should be no more than ten degrees, in one direction or another.
- It is not recommended to install the TV under the ceiling for viewing in a lying position.
In addition to the correct position of the TV, it is very important to look at the screen from the optimal distance. Below is a table with the recommended TV viewing distance depending on the screen diagonal: 
Bracket selection
Types of brackets
Having decided on the location, you need to choose the right bracket on which you will mount the TV. Mounts for flat TVs are:

- Oblique. For ease of viewing, the TV mounted on such a bracket can be tilted up or down.

- Pan-tilt. This type of bracket allows you not only to tilt the TV, but also to rotate it in the desired direction.

- Fixed. The cheapest and simplest type of mounting, without the ability to adjust the position of the TV.

- Movable. Brackets of this type allow you to give the TV almost any position. The only disadvantage of such brackets is the price.

- Ceiling. As the name suggests, these brackets are designed to mount a TV on the ceiling.
Size compatibility and VESA standards
To choose a bracket for your TV, you need to know exactly the screen diagonal size, which is usually indicated in inches. Bracket manufacturers indicate compatibility with the TV based on the minimum and maximum size. For example, if the packaging indicates that the bracket is designed for TVs from 30 to 60 inches, then buy it only if the size of your panel is within these limits.
Many manufacturers of brackets and TVs cooperate with the Video and Electronic Standards Association - VESA. According to the standards of this organization, types of fastenings on brackets and their sizes are made.
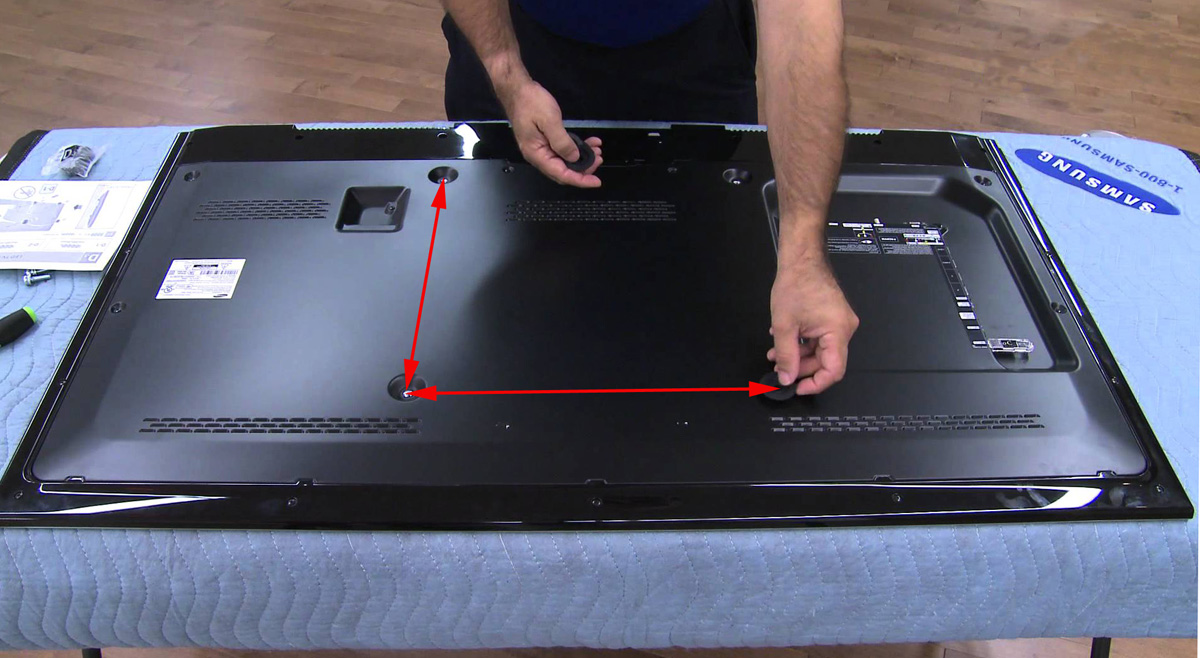 Holes located according to VESA standards
 On TVs that are manufactured according to VESA standards, back wall You can find four holes for the mounting bolts. These holes are intended for fastening the holding part of the bracket. The hole spacing is standard and will fit most brackets. Therefore, before you buy a TV mount, find out which VESA standards it is compatible with and buy a mount with the same VESA standards.
TV weight
When choosing a TV bracket, do not forget to look at technical passport product, what weight it is designed for. Do not buy a bracket if your TV's weight matches the maximum weight it can support. Otherwise, during further use, this may lead to the mount breaking and the TV falling. It’s better to pay more, but buy a bracket with a 30-50 percent safety margin, so you can be sure that your TV will not fall or break.
 Fastening bolts
 Also please note Special attention on the fastening bolts, if there are any appearance or the alloy from which they are made does not inspire confidence in you, then it is better to replace them with new ones. A flat-screen TV is an expensive thing, so it’s better to play it safe in small things than to buy a new panel.
How to choose a TV bracket, see also in the video:
Installing a TV on the wall
After purchasing the bracket, all you have to do is install it on the wall and attach the TV to it. To do this, you can contact a specialist or do the installation yourself. For self-installation you will need the following tools:
- Hammer.
- A drill bit for a hammer drill with a diameter suitable for dowel screws.
- Screwdriver Set.
- Level.
- Yardstick.
- Pencil.

After making sure that you have all the tools and fasteners, do the following:
- Using a pencil, level and tape measure, mark the holes for the dowel screws. Be sure to check the level position of the marks in relation to each other, because even a slight misalignment of the bracket can, over time, lead to the TV falling.
- Drill holes using a hammer drill.
- Place the main part of the bracket on the wall and screw it with dowel screws.
- Install the bracket guides onto the TV using a screwdriver and bolts.
- Place the TV with the guides installed on it in the grooves on the main part of the bracket. There are models of non-separable brackets. In this case, the entire bracket is installed on the TV, and the entire structure is placed on dowels. At large size TV, this process Installations are best done with a partner.
- Connect the power cord and TV cable to the TV.
 Work with a partner
 As you can see, the process of installing a TV is simple, but depending on the material from which the walls are made, it may be necessary to use a different mounting method:
 Dowel “butterfly”
 - Plasterboard walls. Installation can become significantly more complicated if you are planning to hang the TV on a partition made of plasterboard. With this installation option, you will have to find an internal metallic profile partition and attach the bracket to it using butterfly dowels.
 Screw for fastening
 - Wooden walls. Wood is slightly inferior in strength to brick or concrete, but for attaching the bracket to wooden wall, it is better to use simple long self-tapping screws instead of dowels. For a plywood wall, you can also use butterfly dowels.
 Through-hole bolts
 - Walls made of fragile materials. If your house is built of plaster, wood concrete or low-quality cinder block, then in this case, install the bracket using through fasteners. For through fastening, a hole is made through the wall and instead of dowel screws, bolts with nuts and wide washers are used.
How to hang a TV on the wall, see also in the video:
How to make a bracket with your own hands
A simple fixed bracket for a TV is quite possible to make with your own hands. We present you several options for homemade brackets.
Fixed mounting rail bracket
To make it you will need:
- Rail for attaching wall kitchen cabinets
- Drill.
- Dowels.
- Screws.
- Bolts.
- Roulette.
- Level.
- Hacksaw for metal.
- Screwdriver.
 Mounting rail
 Sequence of work:
- Measure the length of the rail along the holes in the TV and cut it to the desired size.
- If the factory holes on the rail do not match the holes on the TV, then drill additional ones.
- According to the dimensions of the already made rail, cut a second one for mounting on the wall.
- Attach the first rail to the TV by screwing it in place.
- Make markings on the wall for the holes for the dowel screws.
- Drill holes with a drill or hammer drill.
- Install the rail on the wall.
- Insert the bar located on the TV into the groove of the rail installed on the wall.
For more reliable fastening TV, you can additionally install a second pair of slats.
Budget bracket made of wooden planks
It is worth mentioning right away that this type The mount is designed only for small TVs.
To do wooden bracket you need to find:
- A wooden plank with a cross section of 3-10 centimeters.
- Hanging hooks – 4 pieces.
- Self-tapping screws with a ring-shaped head – 4 pieces.
- Bolts for attaching the bar to the TV – 4 pieces.
- Hacksaw.
- Drill.
- Roulette.
- Pencil.
Sequence of work:
- Cut the strip into two lengths along the length of the TV.
- Tighten two screws with a ring head from the end of the planks. Do not place the screws too close to the edge of the TV, otherwise the slats may crack.
- Drill holes in the slats and install them on the TV.
- Make marks on the wall according to the location of the rings on the slats.
- Drill holes according to the marks and screw in the hanging hooks.
- Mount the TV on the wall by inserting the rings into the hooks.
 Bracket made of wooden planks
 If you want the TV to have a downward slope, then make the bottom bar 1-1.5 centimeters thinner than the top.
Metal movable bracket
It is practically impossible to make a full-fledged movable bracket at home, but it is possible to make an imitation of it. You need to find the following tools and materials:
- Square metal pipe cross section 20x20 millimeters.
- Corners of 25 millimeters - 4 pieces.
- Two metal square slabs 200x200 millimeters.
- Bolts.
- Nuts and washers.
- Dowels.
- Hacksaw for metal.
- Drill.
- Set of drills for metal.
- Spray gun or brush.
- Black paint for painting metal products.
Work order:
- Take a metal plate and drill four holes for dowels in the corners.
- On the second metal plate, make holes corresponding to the holes located on the back of the TV.
- Cut the pipe into three lengths. The first is for wall mounting the bracket, the second is for connecting parts, the third is for mounting the TV. The sizes of the sections depend on the bracket design you choose.
- Paint all manufactured parts with paint.
- After the paint has dried, screw two corners in the center of the fastening plates. The distance between the corners should allow the square pipe to move freely. Please note that the corners should be positioned horizontally on a wall plate mount, and vertically on a TV mount.
- Secure the pipe sections between the corners with bolts, after making holes in them with a drill.
- Secure the pipe sections between the corners with a bolt, placing washers between the pipe and the corners.
- Place the central piece of pipe from below between the pipes of the fastenings and connect them with long bolts.
- Secure the slabs with tightened pipes to the wall with dowels and bolts, then attach the bracket to the TV.
- Set the inclination angle and tighten the nuts.
 Homemade bracket from square pipes
 In conclusion, it must be said that even the most sophisticated homemade brackets will not replace factory-made products in terms of strength and reliability.
We hope that after reading our article, you received a lot useful information and now you can confidently install the TV on the bracket with your own hands!


