Oak board table. Moreover, the table is not simple, but glowing in the dark. Let's take a closer look at the manufacturing procedure for this undoubtedly interesting product.
A form is made of fiberboard (a round base and a side glued around the periphery), you can use any other material that is available.
A bunch of oak pieces of wood are sawn, about the same thickness. Their sizes can be arbitrary, but the shape is approximately square. 
The scraps are laid out in a mold, first in a circle, and then evenly fill the inner space. 
After completely laying out the entire surface of the future table, all the cracks are filled with epoxy, but not to the full depth, about 5 mm remained not filled. After the resin has dried, the surface is sanded in one level. For grinding, a grinder with a flap wheel was used. 
Then the epoxy is mixed with a phosphor (BLO-7D phosphor is better to take about 50 microns, you need 300 grams, ordered on the Internet) (Alternatively, you can order a phosphor on Aliexpress) and the slots are poured from above. After drying, we sand again, varnish and ready - you can remove the countertop from the mold. 
It turns out like this (in the light)

From the presented master class, you will learn how to make a luminous table yourself, which costs a lot of money in furniture stores, and thanks to this information you will make it just for mere pennies. Today, it is becoming more and more fashionable to make furniture with your own hands, as well as various interior delights, that is, people are looking for uniqueness in the things that surround them, someone needs it for self-realization and gaining self-confidence, and someone just loves to do this business ...
And so to make a luminous table, you will need old and eaten boards by the bark beetle. It is the old and rotten ones, eaten by worms and other bugs, that is needed in order to fill these cavities with a special luminous solution. Now let's take a closer look at everything and analyze what the author needed.
Materials (edit)
- board (old and eaten by bark beetle)
- epoxy resin
- metal legs
- metal plate 2 pcs
- wood glue
- nuts
- bolts
Instruments
- jigsaw
- drill
- brush
- clamp
- ruler
- screwdriver
- mixing container
The process of creating a glowing table.
And since it was already mentioned above, the author took old and rotten boards eaten by pests, it is clear that he did not buy them on the construction market 😉 The master went through the boards well with a plane and coarse sandpaper. Then the author selected and sawed the boards he needed so that they became the same size.  The resulting boards should then be connected into a single tabletop, the master does this action as follows, he smears the side parts of the boards with carpentry glue, and then pulled them off with clamps and left them to dry.
  Then, after the countertop is dry and ready, it should be blown out with compressed air, namely all cracks and wormholes, so that there is no trash and possible pests left in them.
  After that, you should go over the surface with sandpaper, you need to do everything very carefully, because the board is very delicate. And so the surface of the countertop is prepared and it's time to prepare the glowing solution and fill the cavities of the table with it.
Solution preparation: this will require epoxy resin, a hardener and phosphor powder, then it will glow. Everyone chooses the proportions of the mixture himself, you can check the glow as follows, give a bright flash to the mixture and turn off the light to see how the solution glows. Further, the author fills in the cavities, having previously placed waxed paper under the countertop, because the passages can be through.  After carrying out this operation, the master left the countertop to dry. And then he processed the edge of the table with a hand router.
  Due to the fact that the board is rather weak in terms of density and integrity, the author screws such nuts on the back of the tabletop.
  Smears glue metal plate and glues.
  And in this way he screws the legs to the table. Well, here's the actual table is ready.
  Such a table will fit into any even the most sophisticated and expensive interior, and the cost of this table itself is absolutely penny, but in stores such tables cost about $ 1000, just imagine 😉 So take this material into account, and so as not to lose contact with us and our website join our group
Children's play with sand contributes to the development of visual and tactile perception, fine motor skills, imagination and artistic and aesthetic taste. For such activities, you can make a do-it-yourself table for painting with sand.
What do you need to make a sand painting table?
The materials and tools needed to make a DIY glowing table are inexpensive.
Necessary materials
- Boards.
- Plywood sheet 10 mm thick or furniture board.
- Shtapik.
- Plexiglass.
- Ribbon with bulbs.
- Fork
- Switch.
- Nails.
- Self-tapping screws.
- Water based varnish.
Required tools
- Thicknesser for processing boards.
- A hacksaw for cutting boards and plywood.
- Allen key for driving screws or hammer when using nails.
How to make a sand painting table?
The sand table is made in stages. Since the presence of light is the main advantage of such a table, great attention should be paid to the installation of bulbs. Other stages of construction are also important.
Stage 1: selection of acrylic, glass
The format of acrylic or glass should be matched to the parameters of the inside of the table.
For the safety of children, it is better to use acrylic. In order for the light to be evenly diffused, it is better to use a white or beige material with a thickness of 5 mm or more. You can buy thicker transparent acrylic, but in this case, the interior of the table will be visible and the light will be too bright. The disadvantage of acrylic coating is its high cost.

A cheaper option is glass. It should be thick enough, preferably white. Suitable glasses can be found in advertising workshops. If the material is transparent, you can stick a white protective film on top. It will help create the right light intensity and keep children safe if the glass breaks.
Step 2: Measure seven times - cut once
If the glass or acrylic sheet is irregular in shape, it is recommended to cut off the excess with a cutting knife using a ruler. You should not rush to perform this operation, as the knife may jump off the cut line.
Acrylic can be purchased in any size, and then cut the boards and plywood with a hacksaw to match the size of the coating. First, it is necessary to process the boards on a thicknessing machine in order for their surface to become smooth.

The plywood base of the table must be cut, taking into account the format of the acrylic and the thickness of the side boards. For a more accurate execution of the operation, you can use a paper blank. The plywood should cover the sides of the table, but not protrude beyond them.
Boards can also be trimmed as needed. Their height and width are selected so that there are no protruding or uneven table edges. The length of the boards should not be less than the parameters of the bottom plywood sheet so that the sand does not spill out. It is also recommended to make their height the same.
Stage 3: trimming corners and trying on acrylic
All surfaces must be smooth so that children do not get hurt. Sharp corners should also be avoided for safety reasons.
After determining the parameters of all components, you can start assembling the table. Boards can be connected with screws or nails. The result should be a box-like structure.

To install acrylic or glass, beads from glazing beads must be attached to the top of the resulting box. Their size is selected based on the internal parameters of the table. It is also better to nail the bars with small nails.
After that, you need to check whether the acrylic coating fits into the frame prepared for it. If not, you can trim it. Before installing the backlight, the cover should not be installed.
Stage 4: electrical
Self-adhesive LED strip, which can be of different colors, sizes and configurations, is best suited for making a backlit table. It is charged from a 12 volt power supply unit. You can independently attach a switch and a plug for mains power to the tape.

The brightest light will come from white bulbs. Due to this, the contours of the image created with the help of sand will be clearly visible. The darker the light, the worse the drawing will be.
Stage 5: lighting installation
In the bottom of the table, you need to drill a hole through which the wire is passed. At the end of the plug, which remains inside the box, several knots are tied so that it does not fall through.
Before fixing the LED strip inside the box, lay it out inside to make sure that its length matches the dimensions of the sides of the box. Otherwise, it can be cut off. It is better to stick the tape from the end that is closer to the connection cable, so as not to make a new hole in the table body. For reliability, you can additionally secure the LEDs with double-sided tape at the folds and corners.

For testing, the tape should be connected to a power source before installing the glass.
After that, the acrylic must be glued to the beams from the glazing beads. You can fix it with self-tapping screws, carefully calculating the dimensions of the holes for them, since if they are not larger than the fasteners, the acrylic coating may crack.
If you can't buy LEDs, you can use a New Year's garland with small bulbs, having previously cut it to take into account the size of the table. You can secure it with small pieces of duct tape.
This kind of lighting will be more interesting for children, as the color of the bulbs will change. It is better that this change occurs slowly, which will help to relax and stimulate the creative activity of children. Flickering bright colors will tire them out.
Finally
A table made in this way will not take up much space. It will be useful not only for drawing with sand, but also for copying images or drawings. It is important to keep the acrylic clean and to be safe when working with it to make drawing enjoyable.
- Tool
- Materials (edit)
- Features of assembling pine board countertops
- Video for step-by-step table assembly
Furniture models emitting a glow always attract us with their unusual appearance. A self-assembled glowing table can become a decoration in a living room, in a kitchen or in a summer cottage. In this guide, we will explain how to make a luminous wood table with fluorescent spots in the top.
To "make" the table glow, we need to acquire the appropriate tools and materials.
We purchase or rent the following power tool.
- An electric drill, with which we make holes for the cotter pins. Using abrasive wheels, we create decorative indentations in the body of the wood with a drill.
- A grinder, with which we bring the surface of the countertop to a perfectly even state.
- Hammer.
- A set of clamps, which you will need to tie the boards.
- A plane required for pre-processing wood.
- Jigsaw, needed for cutting the ends of the table top.
- A gas burner with which we will burn cavities in a tree.
- Accompanying tools (screwdrivers, chisels, saw, tape measure, construction knife, etc.).
Materials (edit)
To make a glowing wood table with your own hands, we select the materials you need for this:
- 4 cypress or pine boards measuring 1500 x 150 x 40 mm. We will need this wood to make a tabletop that will emit a glow;
- metal legs;
- epoxy resin in two plastic bottles with a volume of 118 ml;
- plastic cups - 6 pcs.;
- fluorescent powder for creating a light background - 100 g;
- Scotch;
- plywood or plastic sheet - 600 x 1500 mm.
Step-by-step instructions for assembling the glowing table
- We connect the boards with cotter pins and glue them together. We tighten the shield with clamps until the glue hardens completely.
- We process the side edges of the tabletop with a plane and grind.
- Cut the ends of the table with a jigsaw under one level. Then we grind them.
- The cypress tree has resin chambers in its structure. We clean them with a semicircular chisel, without disturbing the natural shape.
- We clean the cavities with a vacuum cleaner and dry them with a hairdryer.
- Preparing an epoxy filler. Mix resin and hardener in disposable plastic cups. We also add a phosphor there (we use 10 g of powder per 100 g of resin).
- To avoid resin leakage, glue the table with tape around the perimeter, put pieces of plywood or plastic underneath.
- Fill all cavities and cracks in the countertop with a fluorescent mixture. We leave the wood material alone for a day. During this time, the solution will finally solidify.
- We process the entire surface with a grinder until a perfectly smooth plane is obtained.
- We cover the table top with 3 layers of furniture varnish.
- We form a support frame from a board with a width of 50 mm or more.
- We attach the tabletop to the frame and install the legs. As a result, we get an original glowing table made of wood with our own hands.
Labor and material costs
Let's calculate the cost of a 600 x 1400 mm luminous cypress table. We will take the average prices for materials from the data of online stores.
- 4 cypress boards 1500 x 150 x 40 mm will cost 1000 rubles.
- Epoxy resin Gold Glass, 1.35 kg - 2200 rubles.
- Phosphor powder, 200 g - 800 rubles
- Metal legs - 600 rubles
- Fastening accessories - 200 rubles.
Total costs will be 4800 rubles. (as of the publication date of the article).
As practice has shown, we spent no more than 16 hours to make this table.
You can also assemble an LED table with your own hands. The invention of micro-bulbs provides great opportunities for the design of furniture. Unlike fluorescent countertops, this type of furniture assumes a transparent table surface. How to make an LED table is a topic for a separate article. In it, we will tell you what needs to be purchased from the materials, which equipment is better to use and how to make the table backlight with LED strip.
- Like
You can make a table for the home from the following materials:
- natural wood;
- plywood;
- laminated chipboard.
Each has its own merits and demerits. You can make an original table out of wood by decorating it with carvings. Give an unusual shape to the legs and table top. But the cost and weight of the structure will be great. Plywood is the cheapest material from the above, less durable and more fragile. The material must be additionally coated with varnish or paint, and therefore the product will look less aesthetically pleasing than a similar one made of wood or chipboard.
A product made of chipboard is considered optimal in terms of price and quality. The ease of processing of the material allows you to embody almost any idea of the table. Since chipboard is often made into furniture in factories, you can use material from finished products. Many owners have wardrobes that they no longer use. The side walls of the wardrobe can be used as countertops and racks. The thickness of the slab must be at least 16 mm. If the table comes with drawers, you need to purchase fiberboard. This material is used for the manufacture of the bottom to facilitate the structure.
For chipboard, it is necessary to purchase a matching edge for the ends. When buying a material, you can order a cut according to the required parameters and gluing the edge (specialists use professional equipment).
Required tools
To make a children's desk with your own hands, you will need the following tools:
- self-tapping screws;
- PVA glue;
- sandpaper;
- jigsaw;
- drill;
- screwdriver or screwdriver;
- dowels;
- a milling machine, if a curly tabletop is planned;
- square, tape measure and pencil;
- decorative screw caps;
- fittings for boxes.
If the table does not have drawers, then the last point is not taken into account. If you plan to manufacture them, you will need handles and roller mechanisms.
Stages of work
To make a table for a student with your own hands, you must have a drawing. You can compose it yourself or find a ready-made one. If you plan to buy chipboard, it is worth ordering cutting the material according to the drawing, as well as gluing the edge. In a carpentry workshop, such services are cheap and the quality of work is high.
When calculating the height of the supports, it is necessary to take into account the fact that the child is growing. Therefore, they should be made standard, and for convenience, a chair with an adjustable seat height should be used.
The step-by-step instruction assumes the following actions:
- On the chipboard, a marking of all parts is made, which are then cut out with a jigsaw. Choose a thin saw and use high RPM to avoid chipping.
- Making the base of a figured shape involves the use of a milling machine. Secure the table top so that it does not move. Use a hand router to give the base the required shape.
- Sand all edges with sandpaper.
- When all elements, including shelves and drawers, have been cut, proceed to edge gluing. To do this, you need a hair dryer or iron, cotton cloth and a respirator. Work must be carried out outdoors or in a well-ventilated area, as PVC emits harmful substances when heated. Sizing is done as follows:
- the tape is applied to the end of the chipboard and heated;
- the glue dissolves quickly, so you need to move the iron or hair dryer quickly;
- after heating, the edge is pressed with a rag to the chipboard and smoothed;
- go to the next section and repeat the steps;
- instead of a rag, you can use a hard roller.
Assembling the table
- When all the elements of the table are ready, assembly begins. First, the frame is assembled. The tabletop is connected to the racks using confirmations, self-tapping screws or dowels. In the first two cases, a hole is made with a thin drill at the junction of the base with the side elements. Then, with a larger diameter drill, make a recess for the screw, the head of which should be slightly recessed into the surface or be at the same level with it.
- If the table top will be mounted on dowels, the hole diameter should be made to fit the fastener. It should fit snugly into the opening and provide high-quality adhesion of parts. Before joining the racks with the countertop, the grooves are coated with PVA glue. Allow the glue to dry after assembly.
- The next are the drawers of the table. The connection is made using confirmations or self-tapping screws. The bottom is nailed down with small nails.
- Before installing the guides, you should carefully measure everything and mark the position of the boxes using a level. One element of the roller mechanism is fixed with self-tapping screws in the table niche, and the second is screwed to the bottom of the drawer. If the load on the guides will be large, then you need to choose metal products. But for a children's table, plastic slats are suitable.
- Handles are installed. The joints are masked with stickers to match the chipboard color or decorative buttons.
Wood table option
Thus, you can make a simple desk with drawers from laminated chipboard. Making from wood involves the following steps:
- The table top is assembled from several boards, which are pre-cut to length. The wood should be sanded with sandpaper. Edges should be carefully trimmed to avoid gaps. If a grooved board is used, the table top will be solid. In this case, the extreme element is cut off with a jigsaw.
- You can give the base any shape. To do this, you need to use a milling machine or plane.
- You can connect the boards to each other using the thorn-groove method or using dowels. To provide greater strength to the base of the table, the joints are coated with PVA glue.
- Then the legs are made. If they are in the form of pillars, they can be carved.
- If you plan to install boxes, a box is made on one side. To facilitate the construction, plywood is used for the sides and bottom. The front wall is made of wood.
- After the manufacture of all the elements, the table is assembled. Fixation of parts is carried out on self-tapping screws or confirmations. The worktop should be installed with dowels or screws.
- The last stage is painting work. The wood is sanded, cleaned of dust and varnished. If the base has irregularities, you can successfully beat them by making a glowing table. You can make the indentations yourself with a chisel. To make a countertop glowing in the dark, you need to:
- mix epoxy resin and fluorescent powder in a ratio of 10: 1;
- fill in all the recesses and let dry;
- cover the wood with clear varnish.
- Before applying the protective layer, the material can be stained. To preserve the structure of the wood, it is advisable to choose clear varnishes. For these purposes, a shipboard is perfect, since it is highly resistant to mechanical stress.
Making a table with your own hands, you can embody any idea, make the workplace for a child original and unique.
Wood is the best material for making garden furniture
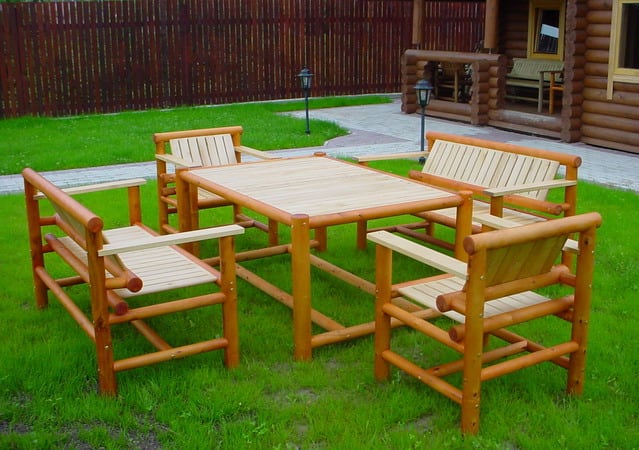
Garden furniture for the street, made of wood, is the most popular among summer residents. However, not all types of wood are suitable for this purpose. For example, experts advise to abandon pine materials, due to the fact that this raw material is very delicate and sensitive to external factors. It is better to choose furniture made of oak, ash or hornbeam - their wood is hard, durable and easy to maintain.
In addition, a distinctive feature of wooden furniture is that it is an absolutely environmentally friendly product that amazes with its beauty and variety of textures. Furniture for the garden is made of wood quickly enough, the main thing for these purposes is to use high-quality material.


The dining table will harmoniously fit into the overall design of the suburban area. In the garden, it will show itself perfectly both in brown and in brighter colors. In addition to a large table, the set should include comfortable chairs, sitting in which you will feel quite comfortable.
To make the seats comfortable, it is worth tying them up with removable pillows. It is also good when the chair can be folded. When not in use, they take up less space and can be easily hidden in a garage or basement in winter.


The easiest way to make furniture is from a ready-made material. Disassembled boards are easier to process, soak and prepare for painting. You just have to collect all the parts into a single structure, according to the drawing.
There are many ways to make garden furniture. The Internet will help you choose the option that suits you best, where in its vastness you can easily find exactly what you need. Stylish chairs, beautiful tables, comfortable sun loungers, swings, armchairs - this is just a small list of what you can do with your own hands. Of course, for this you need some carpentry skills and a good tool, as well as fresh ideas in your head.


How to choose the right style
The most fashionable sets of garden furniture are those made in a modern or French style, hi-tech, country and minimalism styles are also quite popular. Country music is characterized by an uneven, rough structure. Often they combine wood and cast iron, finished with metal-plastic.
In romantic gardens, wrought iron furniture of the French style is appropriate. If you want to introduce a subtle note of Provence or shabby chic into a green corner, it is best to put bleached rattan furniture.


Comfortable furniture is one of the staples in any green space. It can be a companion for morning coffee or barbecue lunch. Daily outdoor recreation, especially on sunny days, is a balm not only for the body, but also for the soul!

Leisure furniture
Garden dining furniture is not everything. To fully enjoy a pleasant stay among the blooming greenery, you also need to buy a complete set of furniture. The sets include a sofa, two armchairs or chairs, plus a low coffee table. The most fashionable are rattan designs covered with large pillows.
The soft accessories are mostly covered in cotton. Highly resilient polyurethane foam is located under the fabric of the fluffy coating. Armchairs, sofas and chairs are often cubic in shape, making them voluminous and very comfortable.


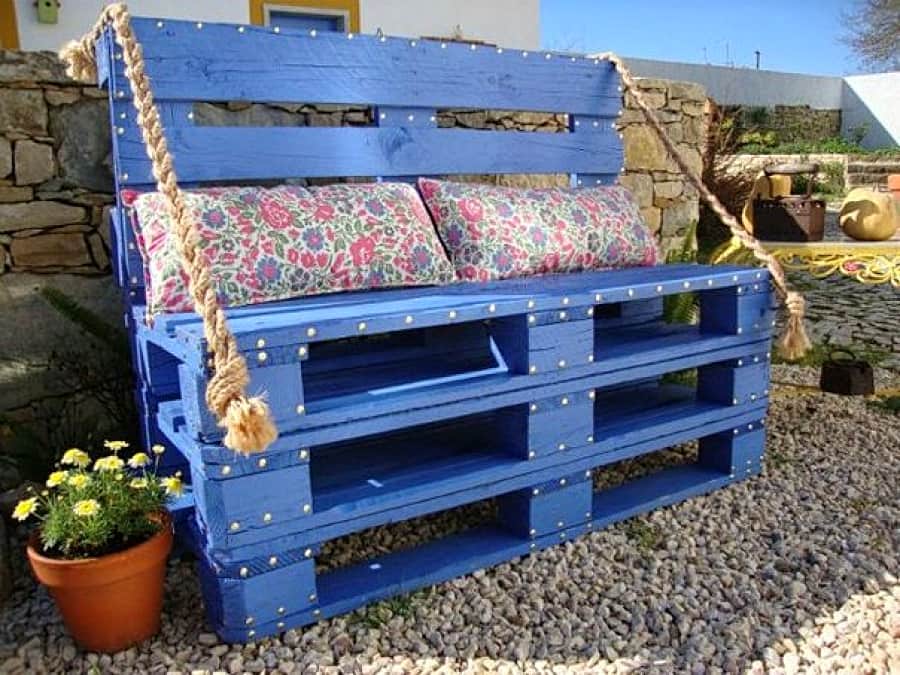
Garden set made of pallets (pallets)
Also quite popular is wooden furniture made from pallets. It is very easy to knock down such structures, paint and soak. Pillows can also be sewn on your own or purchased from a garden supply store.
It is quite simple to produce furniture from wooden pallets (pallets), and most importantly quickly. Only 2-3 pallets will be enough to fold one by one to get a coffee table. Impact-resistant glass with machined edges is set on top of the table. That's it - the coffee table is ready, all that remains is to make the chairs. You can also make them from the same material, only here carpentry skills will come in handy. Using a hacksaw or chainsaw, cut the pallet into two parts, one of which will function as a seat, the other as a backrest.


The presence of a sofa, an armchair or a pallet lounger in the garden will emphasize the individuality of the landscape design of your site, create a cozy atmosphere, make it truly extraordinary and worthy of attention.


If you have a large number of pallets (the material can be purchased for a small amount in hardware stores), you can organize a full-fledged resting place from them, where you can relax with a large company. In this case, the construction of a gazebo or an open terrace can be completely abandoned.
Construction pallets (pallets) can be used both painted and unpainted. Their design feature allows you to store something useful between the rows of boards. Also, this space can be occupied by drawers, equipping them with a special mechanism and beautiful handles.


Do-it-yourself Lumobeton
It is quite easy to "prepare" the material, having at your disposal a few necessary tools. Lumobeton production technology is similar to the production of other finishing tiles. The main thing is to follow the elementary instructions: follow all the processes step by step and mix the components in the right proportions to obtain the correct mass.
Necessary equipment for the manufacture of decorative tiles:
- Electric mixer.
- Vibrating table.
- Matrices.
To start the production of Lumobeton, you do not need a large area, all the tools can be placed on 20 m2.
Lumobeton contains:
- Quartz sand.
- Dyes.
- Gypsum G16.
- Luminescent pigment.
After mixing all the necessary components in the desired ratio in a mixer, pour the resulting homogeneous mass into silicone molds. 
The next step is to place the molds on a vibrating table for 3 - 5 minutes.  After - we put the molds in a dry place with a temperature of 25 - 30 ° C and hold the blanks for 5 - 8 hours.
After the expiration of time, we take out the resulting tiles from the forms.  This concludes the production of decorative stones. Congratulations to yourself - there are now glowing bricks in your arsenal!
Lumobeton manufacturing technology is not complicated, but it requires care and patience. But, at the end of the process, you can completely transform the design of your walls without spending a lot of money on the purchase of material, but getting it for a few pennies. And it looks really cool!
Do-it-yourself business board for his son
In fact, boy and girl toys up to three years old are no different. All young children want to twist, move, turn on or disassemble something. You can only win back on the color palette and the general theme of the board.
For example, a board - a business board for girls usually contains elements of clothing, made in bright colors. For boys, the business board can be designed in the form of a boat with a compass and a steering wheel or a roadway with a real traffic light. It's good if you manage to make opening windows, behind which you can hide developing elements.

For more information about how the filling of a self-made business board can be, see the article: "How to make a developing board with locks for your baby."
The idea of teaching children using ordinary household items was first voiced by Montessori. Her idea that a child can get all the necessary skills on his own if he is immersed in a properly organized environment, is still supported and used by many parents and teachers for the development of babies.
How to make a business board - step by step instructions
To understand that creating a business board is a fairly simple matter, detailed photo instructions will help.
For the board, we need a base (in our case plywood) 70 cm long and half a meter wide and various elements - a roller, a mirror, wheels, a roller, etc. (see photo).
How to prepare a base with doors

DIY lacing
Hooks and a lace are useful for making a lacing-sneaker. We draw a sneaker and paint it with bright colors. In the places where the hooks will be, we drill holes.
We twist the hooks, the sharp ends protruding from the other side, cut off with a grinder or hammer.
It remains to lace up your sneaker and the toy is ready.
Busyboard with a roller
Place a roller at the top of the board. It will be secured with the same hooks used to make the lacing and a threaded knitting needle.
Having put on the necessary elements (balls, roller and rubber wheels), we fix the ends of the knitting needle with screws and glue.
Methods for the development of children:
- Gyenesh logic blocks
- Fold Nikitin's square
- Educational games for boys 3 years
To complete the work on the business board, it remains to fasten the rest of the elements and fasteners for the wall.
A business board is an ideal toy for children 1-2 years old. In addition to the undoubted benefits for fine motor skills and the acquisition of skills necessary for a year-old, another advantage is its availability. After all, materials for making a board can be found in any home, and it takes very little time to create it.
Making the main New Year's symbol
It is impossible to imagine this winter holiday without an elegant Christmas tree, which is installed in the largest room in the house. If this is not possible, or people deliberately refuse to use a living tree, then you can create it with your own hands from ordinary Christmas tree garlands, placing them on an empty wall.
The garland must be attached to the wall with transparent tape, creating the outline of the Christmas tree. Christmas stars or snowflakes should be cut out of white paper and glued on a stylized Christmas tree in any order. To give such a wall installation a completely festive look, you can lay out gifts under the tree below and put New Year's figures of Santa Claus and Snow Maiden.
Note: 30 inexpensive, but original and pleasant gifts for the New Year from AliExpress
You can make spectacular Christmas decorations for your home using dry tree branches. They need to be wrapped tightly with twine at the base, installed in a suitable container and hung with garlands. Thus, in a large room, you can create a whole winter forest by installing such a New Year's installation in a corner, on a bedside table or on a windowsill.
The children's room is decorated in the same way. Children will love the luminous composition of trees and a fairy house, which will act as a magic night light. Also in the nursery, you can make the same Christmas tree on the wall, using multi-colored paper, tinsel, garlands and unbreakable Christmas tree decorations to decorate it.
Christmas trees can be made from any materials, if you put in a little imagination and effort for this. The photo shows how impressively small multi-colored Christmas trees made of fabric in pots look.
To make them you will need:
- salty dough;
- any dense fabric;
- thin wooden or plastic sticks for the base;
- any filler;
- small pots or plastic jars from small-sized packaged products that will need to be painted with a matching acrylic paint.
For salty dough, you need to take equal parts of salt and flour, mix everything, dilute a little with water and knead a tight dough. Cut out two halves from the fabric in the form of a silhouette of a Christmas tree, sew by hand or on a typewriter, turn out, fill with filler, insert a stick into the resulting figure and sew up the bottom. Put salted dough in a pot and insert the finished Christmas tree into it.
Interesting: DIY Christmas crafts for 2019 All sorts of pigs
Such handicrafts can be placed on all windowsills in the house, creating New Year's compositions from a multi-colored rag forest, candles, Christmas tree decorations, spruce or pine cones, painted with white, gold or silver paint.
The pictures show step by step how to decorate a house for the New Year using lamps in the form of a Christmas tree. For this you will need:
- cardboard;
- colored decorative mesh, which often remains after bouquets from flower shops;
- PVA glue;
- New Year's LED garlands;
- buttons and beads;
- silk ribbons;
- small bells.
A cone of a suitable size should be made of cardboard. Wind strips of decorative mesh on it in a spiral, moistening them in a wide cup with glue. When the workpiece dries up, take out the cardboard, insert the LED garland inside and decorate the resulting Christmas tree-shaped nightlight with beads, buttons and rhinestones.
Such a Christmas tree can be placed in different places in the house:
- on the windowsill in the dining room;
- on the refrigerator in the kitchen;
- in the nursery;
- by the bed in the bedroom.
Hand-made symbols of the upcoming holiday will bring warmth, comfort and joy to the house. Such trees can be an alternative to the traditional forest beauty, or a spectacular addition to it.
Note: How to celebrate the New Year 2019 so that it is successful
Having decorated the hall for the upcoming holiday, you should pay attention to other rooms in the house.
Hallway decoration
To create uniformity in the living space, at least a small symbolism of the upcoming holiday should be introduced into each room. We should not forget about the hallway, from which every house begins. Usually it does not differ in a large area, therefore, the space of the entrance doors is most often used to decorate it, which is decorated with a New Year's wreath of fir branches and Christmas tree decorations.
The photo shows step-by-step instructions for making such jewelry.
For this, a ring made of thick cardboard is used, onto which you can screw ornaments imitating spruce branches with toys. You can also use thick and stiff wire, which is folded into a ring and then natural spruce branches are attached to it using threads. The resulting wreath is decorated with ribbons, fir cones and Christmas balls. When creating a cardboard or wire frame, you should not forget to make a ring on which the jewelry will be hung on the door.
You can also use a variety of garlands and pendants to decorate your living quarters, which you do not have to buy. They can be made with your own hands from plain paper and even old newspapers.
This photo shows what an interesting wreath can be made from ordinary old newspapers rolled up in a cone. The newspapers themselves can be painted white, gold, or silver using inexpensive aerosol paints. When the composition is dry, its center should be decorated with a bunch of glass balls.
Wreaths can be made from any material:
- strips of green felt in different shades;
- wine corks;
- silk ribbons gathered in intricately folded buds;
- old newspapers and even plastic bottles.
You can use any available means as a material for New Year's decor, showing imagination. So, for example, from the bottoms of half-liter plastic bottles and an inexpensive LED garland, you can make beautiful glowing snowflakes, from which you can also make a wreath on the door or on the wall.
To do this, you need to cut out the bottoms, paint them with white paint with a pattern of snowflakes and fasten the two halves above each light bulb using metal staples, Moment glue or thin wire.
Kitchen decoration
Before the holiday, you can not only decorate the hall and the hallway with the nursery. An element of festive decoration should also be introduced into the kitchen space by creating an installation of mugs in the shape of a Christmas tree on a free wall.
This is a room in which all family members are during the day, so it just needs to be dressed up for the New Year. It should be borne in mind that due to the limited space and functionality of the room itself, a real Christmas tree cannot be put here.
In the kitchen, you can decorate the windowsill by placing small Christmas trees in pots made by yourself, or by hanging paper garlands and homemade toys on the cabinets. If you correctly select the color scheme of such decorations to the style of the kitchen, then you can create a spectacular and original decor for such a room using your own Christmas tree decorations.
On a note!
On the window, you can make a spectacular composition of pictures cut out of white paper.
You can use white paper with an adhesive back to create these themed pictures on the windows. Stencils can be found on the internet.
A garland of spruce or pine cones collected on twine will look great on a working apron. On the dining table or on the refrigerator, you can put a vase with a New Year's composition. It can contain, along with the usual decorations, edible things (sweets, cheese curds, cookies). You can bake curly shortbread cookies, which will always be a pleasure to treat yourself to during the day.
To bake it you will need:
- 150 g butter or butter margarine;
- a glass of sugar;
- 3 eggs;
- 400 g flour;
- cinnamon;
- nutmeg;
- orange peel;
- raisins and nuts.
If desired, sugar can be replaced with honey. Knead the shortbread dough from the named ingredients, wrap it in foil and keep it in the refrigerator for half an hour. After that, roll out in a layer of 3-4 cm and cut out using special molds that are in every house. So you can make snowmen, bears, hearts, Christmas trees, Santa Claus or other figures.
Cookies should be baked in an oven preheated to 180 ° C for 40-60 minutes, making sure they do not burn. These edible toys can be hung on the Christmas tree with silk ribbons or twine. To do this, a special hole should be made even in raw blanks.
Nursery decoration
It is imperative to dress up the space of the children's room, creating an atmosphere of a magical winter fairy tale for the child. For this, different vertical surfaces are used:
- walls;
- interior doors;
- window.
A Christmas tree made of garlands will look great on the door of the nursery from the inside. Such an installation will additionally act as a night light in the evening.
Children's windows and window sills are decorated in the same way as in the kitchen - with the help of stencils and small Christmas trees made from natural and scrap materials. If the installation is illuminated with garlands, the child will look at it for hours and plunge into the atmosphere of a magical winter fairy tale.
What if you need another bed, but you are experiencing some financial difficulties, due to which the purchase of a new piece of furniture is postponed indefinitely? In this article, we will tell you how to make a do-it-yourself bed with boxes from pallets, which will be an excellent alternative to factory products.
- The simplest design
- Bed with box under the mattress
- Compact bed
- Bed lighting
- Backlighting materials
- Step-by-step instruction
- Multi-storey bed option
- Installation on casters
- Surface treatment
Pallets are an excellent base for your own beds. From a financial point of view, this option is quite profitable, since ready-made frames in stores are very expensive. It should be noted that today you can buy new beds for making, or you can find used products. In the second case, the cost of the source material can be symbolic.
So, let's look at several options for creating beds from boards and pallets.
The simplest design
A pallet bed, in its simple design, can consist of several identical ready-made blocks that are carefully fastened to each other. You only need to buy a mattress of the appropriate size separately. Such a bed can be designed for one or two berths. From timber and pallets, you can create a headboard that will coincide in width with the main berth.
Bed with box under the mattress
You can make a bed from pallets and solid wood by mounting a special box to accommodate the mattress of the required size. To do this, turn the wooden pallet upside down and cut out the middle support.
Then we fix the cut out part between the two side ones so that the letter "P" is formed. The same must be done with the second pallet. After preparing both halves of our bed frame, they need to be connected with a bar or boards. The finished box should be placed on two pallets connected to each other.
Compact bed
For the manufacture of a single bed or a baby bed, two pallets must be installed and connected to each other. You can paint the structure with paint, leatherette or fabric. After that, you will need to place a mattress on top of the appropriate size and cover it with the selected bedding.
Bed lighting
To give the bed a more original look, you can equip additional lighting. We will now tell you how to do it.
Backlighting materials
To create a highlight, you need a small list of materials, including:
- extension cord for two sockets;
- duralight (glowing cord sold in stores with lighting equipment);
- fastenings for the strip;
- self-tapping screws.
It is necessary to install the glowing cord correctly so that the backlight looks as attractive as possible.
Step-by-step instruction
- Connect the plugs to the duralight and insert all contacts deep into the channels through which the wiring runs.
- Put a special cap on the free end of the glowing cord.
- Attach an electric cable to each of the two pieces of duralight (185 cm each).
- Test how the bands work by plugging them into the network.
- Fasten the duralight around the perimeter of the bed frame, keeping a distance of about 25 cm.
- Secure the cord to the anchorages.
- Check how the backlight works by connecting the duralight strips to the network.
- Replace the mattress.
Multi-storey bed option
Many people who want to make a bed from solid wood and pallets with their own hands choose drawings of a one-story product. At the same time, nothing prevents you from creating a "multi-storey" bed, which will be complemented by comfortable shelves for placing books and other useful things.
Installation on casters
A practical and original option is to install a pallet bed on castors. With their help, you can easily move the sleeping place within the room. Keep in mind that the bed is quite heavy, so look for heavy duty castors to withstand heavy loads.
Surface treatment
In order to extend the life of the bed and give it a complete look, the product can be varnished or painted. It is better to apply the compounds in two or three coats. You can choose any color scheme taking into account the surrounding interior.
Some people choose the natural color of the wood, refusing to paint the pallets. Remember that only completely new pallets can not be washed or painted, since you do not know what goods were transported on pallets. Perhaps in the future, the organic matter contained in the wood will begin to decompose and smell unpleasant. To avoid this, the wood should be treated with disinfecting compounds.
Now you know how to assemble a pallet bed with your own hands, so you can go for pallets and stock up on the right tools. Find the best option, come up with a unique design and get to work.
We all know perfectly well that shashel, termites, bark beetles and other "lovers" of wooden food are one of the main destroyers of roofs, furniture, wooden floors, etc.
If you find the right approach to spoiled material and process it a little, you can get a great original glowing table, which, for example, on some sites costs about 780-800 dollars. Therefore, let's get started.
1. To make such a table, try to choose the boards most damaged by bark beetles. But, most importantly, do not forget to treat all material with chemical or heat treatment. Otherwise, the bugs will not stop, and will continue to do their gnawing business. Fig. 1

2. After that, cut the board from all sides. And then cut into pieces. Which will be equal to the length of the table. Rice. 2

3. If you want a wide tabletop, then here you have to splice several boards together. This procedure is carried out with wood glue and spikes. The glue must be applied along the entire length of the board. After you have done this, pull the planks together with clamps and let them dry. Rice. 3

4. All the passages along which the woodworms moved, must be processed by removing dust and rot (for this it is recommended to simply blow out with compressed air). Rice. 4

5. Next, you need to grind the surface of the countertop itself to such a state that it is smooth and even.
6. The next step is to prepare the countertop for epoxy resin casting. Be sure to put waxed paper under the underside of the countertop itself, and make a special plexiglass side on the sides. This procedure is mandatory, since the bugs can make through moves.
7. Next, you need to prepare the resin for pouring. To do this, it is tedious to measure out a certain amount of resin and hardener. In the epoxy resin, you need to add phosphor powder (it is he who provides the glow in the dark). As for the amount of phosphor itself, there are no definite proportions. It is necessary, so to speak, to guess. After the resin and phosphor have already been mixed, you need to act on the resin with a flash, and then in a dark room look at the very density of the glow. If everything is pleasant and suitable - add a hardener. Rice. 5

8. Now fill all holes with epoxy. Due to its viscosity, it will not spread over the table, therefore it is recommended to level it with a ruler immediately after pouring.
9. Already after the resin has hardened, irregularities will remain on the surface anyway. To do this, simply sand down all defects well. Initially, use coarse sandpaper, and then go to fine grain (anywhere from 80 to 400).
10. The edge of the table is best machined with a hand router. Rice. 6

11. Well, the most crucial moment is the finishing of your table. Open the tabletop with varnish, and when it dries, sand it with fine sandpaper (grit 1200). This procedure must be carried out a couple of times for the table to shine well.
12. Due to the fact that the wood was used spoiled, rotten, so that the legs were securely fixed, we use sheet material. To do this, you need to drill special holes for nuts on the back side of the countertop, then apply glue to the plates and stick to the countertop. Rice. 7