What a wide variety of shoes in stores and markets! The female half cannot resist buying new shoes to go with a new dress. For men there is a choice of practical shoes and there are a lot of them too. How much inconvenience do shoes cause in the hallway? Where should I store all this at home?
The solution can be found in a furniture store, namely, buy a shoe rack or make it yourself.
Some people have a small apartment and a narrow small hallway, while others have a spacious house. Some live with adult children and grandchildren, while others live alone. Hallways, like families, are different, so standard pieces of furniture do not always suit a specific room. Convenient shoe rack, created with your own hands, will help solve the problem of choice.

With it, your hallway will be transformed into a stylish and comfortable one. business card Houses.
How to choose the right thing? First, let's get acquainted with the types of furniture such as shoe racks.
- Shoe wardrobe.

It is very convenient in small rooms, as the doors move apart and can be combined with the main wardrobe for clothes.
- Showcase-rack with doors.

You can place shelves along the entire wall, any size of shelves, but the disadvantage of such a shoe rack is instability.
- Slim-format cabinet.
This cabinet has hinged doors at an angle of 45-90 degrees. And the name speaks for itself. This type of furniture is “thin”; shoes will be located at a slope.

Tall over-the-knee shoes may become deformed on such shelves.
- Galoshnitsa.

More suitable for a balcony. Shoes dry quickly on such shelves, but they are inconvenient to store.
- Rack.

It is the simplest design, but unstable and unaesthetic for the hallway.
- Cabinet-cabinet.

The most common and practical shoe rack.
Advantages:
- With tenacity;
- M multifunctionality;
- Compactness;
- E aesthetic.

A closed shoe rack is suitable for people with pets. It will help protect your shoes from any damage from pets.
For the cabinet you can make folding, sliding or regular doors. So it will take up little space. A shoe rack made from laminated chipboard will be durable and will not fail for a long time.

Wooden models are easy to make with your own hands, which saves the family budget.
Shelves and drawers in the closet can be made to suit any type and size of shoes. And on top there is the opportunity to make a table or cover it with fabric, a shoe rack with a seat in the hallway will come out.

The seat replaces an ottoman or stool for convenient changing of clothes.
Types of materials that can be used for shoe racks:

Metal and wood make the cabinet heavier; shoes in plastic will not breathe. MDF is a good choice, but not cheap. Most suitable material for storing shoes- Chipboard. Does not weigh down the shoe rack and is easy to assemble.

Today it is the most popular material in the shoe furniture segment.
And so, let's focus on a cabinet cabinet made of chipboard.The tools we need are:

Preparation of parts

Instructions for assembling a shoe rack with your own hands

Thickness of the chipboard + Width of the planned shelf + Half the thickness of the chipboard.
For example, a part is 12mm, shelf width is 300. It turns out: 12+300+6=318mm.
We do this from the right and left edges. Transfer the drawing directly to inside Chipboard and sign each detail where it will be located. Then you won’t confuse anything during assembly.

When marking the holes for the height and width of the shelves, you need to take into account the back part, since on this side the entire view of the cabinet is located in the same plane.
- Inside, the shelves will be supported by shelf holders. You need to drill holes for them. To calculate correct location These holes must be subtracted from the height of the rack for each thickness of the partition and divided by the number of shelves.

To the result obtained, add the thickness of the shelf and half the diameter of the shelf holder.
For example, the height of the rack is 600 mm. Two shelves are planned. Shelf thickness 12 mm. The diameter of the shelf support is 5mm.
The calculation procedure will be as follows:
600-12=588
588/2=294
294+12+2=308
Therefore, you will need to measure 308 mm from the top.

After the holes are drilled, you can install the shelf supports by filling them with glue and hammering them in with a hammer.

Assembling a shoe rack according to a drawing with your own hands
When all the holes are made, you can begin assembling the confirmat. We attach the middle posts to the bottom part, then the outer ones. Make sure there are no protrusions at the corner joints.We attach the lids to the corners, put the shelves on the holders and install the finished drawers on the guides.

We attach furniture handles to the doors in any location. They can also be attached to awnings, or you can install sliding ones.
Decorating a homemade shoe rack can be varied.


Hand-made furniture always distinguishes the interior from other apartments where there are typical chests of drawers and wardrobes.
VIDEO: DIY shoe cabinet.
What will you do with shoes in the hallway when their chaotic placement is simply annoying when entering the front door? That's right, you need it DIY shoe rack! Of course, you will have to show a little imagination, stock up on some materials for work, and also pick up necessary tool, but the result will clearly satisfy you.
It's a funny thing, but this project is highly customizable to your design and needs. You can make this shoe rack to fit perfectly to the size of your shoes and the place where you intend to put them.
Materials
To build a shelf for shoes you need:
- a large piece of thick plywood;
- self-tapping screws;
- 4 furniture casters;
- drill;
- roulette;
- file
We measure and decide
We start by studying the dimensions of the area where the shelf will be placed and determining how long it will be. We measure the longest pair of shoes to get the depth. A tape measure and pencil are simply irreplaceable at this stage.

Cut and sand
After all planned measurements have been carried out. With the length and depth carefully marked on our sheet of plywood we proceed to cut out the two boards. We used circular saw, but in general you can just use a file here. Then sand the uneven edges using sandpaper.


Inner size
Next, we measure the height of the boots and by adding a few centimeters we transfer these dimensions to wooden rounds. Cut off four equal parts. After the tallest rounds are ready, we begin to work on the inside of the shoe rack. We would like shoes, sneakers, and sandals to fit inside the shelf. Thus, by measuring a pair of high-heeled shoes and booties, we obtained the required height and determined the length of the inner shelf. It will be placed inside, between a pair of high boots at either end.

Cut parts
We cut the shelves to a certain length and the dowels to a certain height. You can see everything we got in the photo below. What you get depends only on the desired length and height of your shelf. And of course from imagination.

Drill and screw in screws
We pre-drill holes at each end of the dowels and at the four corners of each board. It is necessary to drill, because without preliminary holes you run a very high risk of splitting the wood when you screw in the self-tapping screw.

Then we screwed self-tapping screws into the boards and dowels. We start the connection from the inside and end with the highest dowels and long boards.

Here it is, an almost finished shelf. All that remains is to screw on the wheels as desired, or you can leave it like that. We thoroughly sand all uneven places and also remove burrs.

Our four wheels are bolted on. For each wheel, you need to drill four holes for the bolts in the bottom board. We tighten the nuts of the bolts using a suitable wrench.

Finished shelf
Did you tighten the wheels? All that remains is to install it in its rightful place and fill it with shoes! You can, of course, also cover the top board with a soft backing, which will turn the shelf into a comfortable bench, but this is a solution for aesthetes.
Leaving the wood on top will make the shelf more versatile. This way you can always place your shoes there, or use it as a stand for a bag of groceries. Or maybe paint it? In general, it's up to you!

What a shelf, you can make a whole closet with your own hands. If you know how!
Find out how to save money and make an original shoe stand with your own hands here!Ideas, useful tips, manufacturing instructions.
- 1 Making a stylish shoe stand with your own hands
- 2 Types and purpose homemade shelves for the hallway
- 3 Materials and tools for making shelves
- 4 How to make a shelf with your own hands
- 5 Wooden shoe rack
- 5.1 What will you need?
- 5.2 Assembly of the structure
- 5.3 Practical shoe rack made of chipboard
- 5.4 Beautiful shelf for laminate shoes
- 6 From profile
- 6.1 Step-by-step instruction
- 6.2 Simple shoe rack made from boxes
- 6.3 Corner stand under shoes
- 6.4 Construction connection
- 6.5 Decorative elements
- 6.6 Making a carousel shelf
- 6.7 How to do
- 7 Interesting ideas
- 8 Photo gallery
A beautiful shoe rack can become not only a place to store shoes, but also a full-fledged element of the hallway interior. The choice of options in stores is extensive, but the prices are often overpriced. To make a spacious and compact shoe rack that fits perfectly into the look of the corridor, you need to put in a little effort and imagination. Let's consider options for making shoe racks from available materials with your own hands.

Types and purposes of homemade shelves for the hallway
Before installation, be sure to measure the space where you plan to place the shoe rack. For small hallway ideal option there will be a narrow (20-30 cm) and high shelf, in more spacious room A closed cabinet with a width of 60-90 cm will look good.
Should the shelf be closed? If you want the hallway to look more aesthetically pleasing, this is a good option. Do not forget to regularly ventilate closed shoe racks, otherwise you will not be able to avoid unpleasant odors. This problem can also be solved by installing a lamp inside for drying and disinfecting shoes.

The advantages of homemade shoe shelves are obvious:
- you can use eco-friendly materials;
- the cost of a homemade shoe rack is several times less than in a store;
- You can make a shelf for a hallway with a non-standard layout.
The design of a shoe rack directly depends on its purpose and the number of residents. Here are some popular and practical options:
|
Shoe shelf design |
Description |
|
Classical |
This type of shoe rack is popular because of its simple and convenient installation. It can have a regular rectangular or asymmetrical design. |
|
Hanging |
The shelf is attached to the wall using slats, straps or cables. Conveniently folds when necessary (for example, if you need to carry furniture into a narrow corridor). |
|
Corner |
Fastening is carried out on adjacent walls. Great space saver. |
|
Floor |
The support in this design is on the floor. Suitable for spacious hallways, but can also have compact dimensions if the sections are distributed not in width, but in height. |
|
Closed |
This option looks more aesthetically pleasing. Doors can be made of plywood or frosted glass. |
|
Cassette |
Shoes will be stored vertically here; there are 2 or more drawers on the door cassette type which extend when opened. Good for small corridor(width 20-25 cm). |
There are many options for making shelves. The interior can be decorated with shelves made of metal, in particular aluminum; processed clay shelves, dense oak, and glossy plastic look very beautiful. The material of manufacture can be anything, as can the configuration of the elements. Based on the type of installation, shoe racks can be divided into several types.
Materials and tools for making shelves
From the selected material for manufacturing shoe shelf depends on its service life and ease of use. For example, it’s easier to make a shelf out of a cardboard box, but it won’t last long. But as a temporary option it will work great.  When choosing wood as a material, you should take care final processing wood varnish or paint to make it attractive appearance preserved for a long time. There is no universal set of tools, due to the peculiarities of installation and material. But you will probably need the following tools:
- electric drill;
- glue;
- a simple pencil;
- sandpaper;
- fastening fittings;
- screwdriver;
- wood hacksaw;
You will also need varnish or paint, the color of which is selected to match general interior hallway
How to make a shelf with your own hands
Before starting work, it is worth drawing an approximate layout of the future product, where you also need to indicate the dimensions. After this, they begin marking on the material, where they indicate the location of the fasteners (if any), the required length and width. Here are a few useful recommendations:
- When creating a simple shelf for shoes, you can do without using metal fittings - all elements are fastened with self-tapping screws.
- The doors are easy to install if you use awnings.
- Materials should be treated with varnish or painting before assembly. If you do this after, the layer will be uneven, and the procedure itself will be problematic. The process of assembling a shelf for shoes depends not only on the design, but also on the complexity of processing the material, and the features of working with it.

Wooden shoe rack
First of all, the shoe rack should have small dimensions, but at the same time contain sufficient quantity pairs of shoes. This is its integral feature. There are many materials from which this structure can be constructed, but the main one is wood. Unlike chipboard and MDF, it will not unstick or swell when exposed to moisture. To do this, the wood should be varnished or painted.

What will you need?
Basic kit for making: wood, glue, screws, glazing beads, varnish or paint. Tools you will need: saw, screwdriver or screwdriver, hammer, sandpaper, drill. Beads, screws, and drills are selected in accordance with the size of the structure. Self-tapping screws need to be small, but capable of being firmly fixed in the structure. It must be remembered that wood can crack or split if the size of the screws is chosen incorrectly.

Assembly of the structure
A depth of 35 centimeters will be sufficient. This distance is enough to accommodate almost any shoe. This will be the length of the sides of the structure. You need to saw off 6 elements of 35 cm each. You can determine who in the family has the most big size shoes, and measure the distance along it, leaving 1 cm in reserve. Then you need to distribute 4 bars on one of the elements and make a cut to the depth of the bars. The bars must be spaced evenly.
Each shelf should be able to accommodate 3 pairs of shoes, so its length must be determined based on the 3 largest pairs of shoes in the family. 4 pieces of this length will go on each shelf. To connect the elements, it is necessary to cut out recesses. These places must be secured with self-tapping screws. For a more aesthetic appearance, you can drill holes and use glazing beads and glue that will hold the shoes without any problems. This operation is similar for each shelf. After this, sand the tops of the side panels with sandpaper.
Any height can be set, but a reasonable limit is no higher than 80 cm. High shoes should fit in one of the compartments of the structure. The distance between the shelves (between the floor and the first shelf) should be 30 cm. All connections are made in the same way.

Practical shoe rack made of chipboard
To make a simple shelf for shoes from chipboard, you need to take two sheets of canvas (the dimensions are determined based on the space in the hallway). You will need a sheet of fiberboard for the back wall. The assembly algorithm is simple:
- We attach the bottom and the shelves themselves to the two side walls. For the screeds, use a drill (8 mm drill); at the end, use a drill with a diameter of 5 mm.
- The folding element is secured with medium-sized self-tapping screws;
- Top part fastened with 4*30 self-tapping screws;
- The shelves are mounted inside;
- Fasten back wall products.
- This is a budget and uncomplicated option that can be used in any hallway layout.

Beautiful laminate shoe rack
If after renovating your apartment there is unused laminate, you can use it to make a stylish and compact shelf that will fit seamlessly into any design. For production you will need laminate sheets, the number of which depends on the tier and metal pipes with slots. They can be made using a metal grinder. If desired, the structure can be made to any height; for safety, the edges of the tubes are sealed with plugs.
 From profile
An interesting option are shelves for shoes made of profile and tempered glass (or wood). For manufacturing you will need the following tools:
- glass cutter;
- jigsaw;
- Bulgarian;
- level;
- electric drill for metal;
- screwdriver
You can use a regular colored profile or a galvanized one; the second option will be more reliable, as it is resistant to moisture.

Step-by-step instruction
- The profile is attached to the wall with one self-tapping screw;
- Using a level, check the horizontalness of the markings;
- Screw in the remaining screws;
- The frame is assembled;
- Already cut shelves are attached to the frame.
- This option will look good in a Hi-Teck design.
 Simple shoe rack made from boxes
The presented design can withstand heavy weight, despite the fact that the cardboard is enough flexible material. To make it, it is advisable to use boxes from household appliances. Depending on the height and width, take required amount boxes The structure is attached with glue, tape, a stapler or another method. The finished shelf can be decorated as your imagination dictates. There is one drawback - this shelf is only suitable for summer shoes.
 Corner shoe stand
The most suitable material for creating corner wooden shelf for shoes - larch. It tolerates dampness well and is easy to use.
First, we decide on the size and design of the shelf, draw a diagram and calculate the required amount of material.
For creating corner shelf necessary following materials and tools:
- two boards up to 2 m long (the ends of the boards can be rounded or cut with a wave);
- shelves cut from the same board (in this case, the shelves can be cut different sizes and forms);
- jigsaw for cutting;
- plane and sandpaper for leveling;
- corners and screws for connecting parts;
- level to check the accuracy of the design;
- antiseptic;
- varnish or paint.
The boards must be sanded and treated with an antiseptic, varnished or painted. Varnish is chosen if you want to emphasize the naturalness and structure of the wood, paint - if you prefer rich colors and if you decide to use special design techniques with a play of color.
 Construction connection
To create a lightweight structure, the two main boards are not attached to each other: they are installed at an angle and connected using shelves. First, the lower shelf is attached, then the upper one, the structure is installed vertically and its evenness and stability are checked. Then the remaining shelves are installed.
The space between the shelves must be sufficient, otherwise there will be a feeling of crampedness and congestion.

Decorative elements
To further decorate the shelf, you can use thin decorative slats cut out yourself. Or purchase a decorative wooden lattice partition, and after sawing it, decorate the shelf by adding carved stops.
Using decoupage or aging techniques in painting will also add a fresh touch to the interior of the hallway. Bright color solutions may be relevant to complement the interior.

Making a carousel shelf
The carousel shelf takes up little space and at the same time can accommodate many pairs of shoes. To make it you will need: fiberboard, metal pins and screws.

How to do
Blanks in the form of circles and quadrangles are cut from fiberboard. Using a compass and a strip, markings are made for the pins.
Discs for stands are fixed with discs of smaller diameter, which are placed on required height.
Prepare the bottom, on which quadrangular blanks are installed, attached with a corner. The bottom circle is conventionally divided into 3-4 parts (space for 3-4 pairs of shoes on the “floor”).

Interesting ideas
To make a shoe shelf, you can use your imagination and then the most unexpected solutions come to mind. Here are a few ideas that will be of interest not only to independent use, but also as a gift for loved ones.

On video: DIY shoe rack from an old closet
Shoes need to be stored somewhere, but is it worth spending money on purchasing an expensive shoe rack? If you wish, you can make your own shelf from any available materials - laminate, and even pipes and boxes. This does not require special carpentry skills.
We will briefly tell you... You will find lists of materials and tools, diagrams, drawings and photographs. It's time to take on your entryway!
The choice of materials and tools will vary depending on the design of the future shelf. Therefore, developing a single standard is problematic. The most technically difficult solution is considered to be the “slim” solution.
The difficulty of such cabinets lies in the installation large quantity various accessories. All other shelves are much simpler, so when compiling a list of necessary things, we will proceed from the most complex circuits. You will need the following tools:
- screwdriver;
- electric drill;
- hacksaw for wood (or metal);
- chisel;
- ruler;
- Sander;
- pencil.
DIY wooden shoe rack
How to make a shoe rack with your own hands
Before you start self-production shelves for shoes, you need to decide on the design of the future product, its dimensions and functionality. You can create shoe shelves from anything - profiles, wood, slats, laminate, metal and even cardboard. The most popular (in terms of design) are rotating, round and angular models.
In some cases you may need to drill and sand (metal, wood). In some places we will make do with simple gluing and cutting (cardboard boxes). And some varieties will seem exotic to you.
For those who have an old unnecessary closet, the process of making a shoe rack can be incredibly simple, just watch the following video:
You can build a modular shelf with your own hands from plywood, and not just a shelf for shoes. This shelf will be attached to the hallway wall and will not take up much space, and the drawings for its manufacture are quite primitive. In addition to sheets of plywood, you will need:
- drill;
- jigsaw;
- hammer;
- perforator;
- glue;
- pins.
Plywood is cut into identical rectangles (for example, 20x30 cm). The parts are carefully polished, after which the assembly process begins. Sheets of plywood form U-shaped structures that are “nested” into each other, forming something like a labyrinth.
You can hang any number of similar blocks in the hallway. Fastening is carried out using wooden pins and holes drilled in plywood.
Plywood shoe rack

Made of wood
The easiest way is to make a shoe rack with your own hands from store-bought items, rather than from “raw” wood. But since you have decided to start this business from scratch, prepare the following materials and tools:
- sandpaper;
- plane;
- metal corners;
- wood glue;
- screwdriver (can be replaced with a screwdriver);
- saw;
- self-tapping screws;
- varnish (or paint);
- pencil and tape measure.
We will use as material wooden board. The width of the workpiece is 25-35 centimeters, the thickness is a couple of centimeters. The manufacturing process looks like this:
- Vertical side walls are cut out (80-90 centimeters each).
- The support bars and crossbars are being prepared.
- Four fragments of 60-70 centimeters are cut out (these are shoe shelves).
- All workpieces are processed with sandpaper.
- The bars are attached to the side walls using self-tapping screws.
- Metal corners are attached to the rear ends of the product.
- Shelves are laid on fixed beams.
- After assembly, the product is varnished (if desired, with paint of any color).
A DIY wooden shoe rack can also become a comfortable ottoman. In the following video you will learn how this is possible:
From chipboard
Making your own shoe racks from chipboard is in many ways similar to the previous options. In addition to a screwdriver, drill and other standard tools, you will need:
- mounting knife;
- hex wrench;
- square;
- edge tape;
- plugs;
- screws;
- confirmations.
The shelf can be made, or it can be made with rounded or straight ends. IN general outline the process looks like this:
- The sidewalls are marked and cut out.
- With help grinder We get rid of chips and irregularities.
- Take a hot iron and cover the edges with special tape.
- Trim off the excess edge tape with a knife.
- We process the corners with fine-grained sandpaper.
- We make cuts (if the plan requires it) and assemble the product.
The following video will tell you how to create a shoe rack with your own hands from chipboard and pipes:
From laminate
You can create a minimalist and stylish shelf for shoes and regular laminate. To do this, you will need laminate sheets (the quantity depends on the level of the shelf) and metal tubes with slots. The slots can be made with a grinder (using metal circles), and plastic plugs can be placed at the ends.
If desired, you can create frame structure up to the ceiling, but then you'll have to think about it additional fastenings to Wall.
The number of sections is limited only by your imagination and the size of the hallway.
Photo of laminate shoe racks

From slats
Not a bad solution for country house slats can serve. Having stocked up with the necessary amount of this material and a minimum set of tools (hammer, nails, screwdriver), you can assemble a shoe rack with your own hands from slats with two or three tiers in a short period of time. Let's list the advantages of such a shelf:
- ease;
- budget;
- good ventilation;
- practicality.
Shoe rack made of slats

From profile
You can also assemble a shoe rack with your own hands - from a profile, also using tempered glass as materials. From the tools you need:
- Bulgarian;
- glass cutter;
- electric drill (with metal drills);
- jigsaw;
- building level;
- screwdriver
For your purposes, you can use a galvanized profile or a regular multi-colored one. The first will be more moisture resistant, the second will fit better into the chosen interior. A similar structure is mounted on the wall:
- The profile is applied to the wall and secured with one self-tapping screw.
- After this, take a level and check the horizontalness of the markings.
- The remaining screws are screwed in.
- The frame is mounted.
- Previously prepared glass shelves are installed.
Shoe rack in loft style

From boxes
Most a budget option- a shelf for shoes, assembled with your own hands from cardboard or cardboard boxes. It takes up little space and looks beautiful in a small hallway. Work procedure: do-it-yourself shoe rack made of cardboard
- The contours of the blanks are drawn on the box with a pencil.
- The blanks are cut out using a cardboard knife.
- Rectangles are folded into special boxes.
- The blanks are placed on top of each other, forming grooves for shoes.
- Fastening is carried out with staples.
- The shelf is mounted on the hallway wall and covered with decorative film.
Cardboard shoe rack
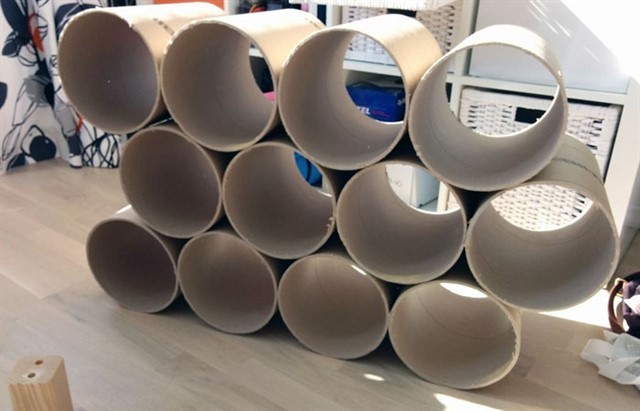
From pipes
To make this shelf, you can take water pipes plastic pipes- for example, those from which risers are installed in bathrooms. The tools you will need are a hacksaw. The procedure for assembling a shoe rack with your own hands from pipes is as follows:
- Sawing PVC pipes into equal segments - these will be the “boxes” of our shelf.
- Sand the edges with sandpaper.
- We cover the sections with decorative film.
- We fasten the sections together plastic holders on both sides. The diameter of the pipes and the shape of the structure may vary. New cells can be easily integrated into the circuit if desired.
Pipe shoe rack

We do not suggest doing metalwork or going to a blacksmith. It’s quite easy to make a primitive metal shoe rack with your own hands - to do this you need to get an old, out-of-use stepladder. Procedure:
- A fragment of a stepladder is cut out, consisting of several “steps”.
- The edges are sanded.
- The fragment is fixed on the hallway wall.
- Plastic hooks are attached to the crossbars - shoes will hang on them.
Homemade shoe rack made of metal materials

Corner
For the simplest corner shelf for shoes with your own hands, you will need MDF sheets, a jigsaw, a drill, drills and screws. It is advisable to have a pencil, a building level and a jar acrylic paint. The actions are:
- Two identical rectangles and several triangles are cut out (their number depends on the tiers).
- The rectangles are fastened with self-tapping screws, forming a corner structure.
- The same self-tapping screws are used to mount the corner shelves inside.
- The shelf is covered with acrylic.
- Now we put the shelf in the corner of the hallway and secure it with dowels to be sure.

Round
To make a round shoe rack with your own hands, you will again need a jigsaw and MDF sheets. The shoe rack will have two tiers, so we will need to cut out three “round pieces”, the radius of which will correspond to the largest shoe size of your household. Further actions:
- Having dealt with the round blanks, you need to cut out rectangular ones (4 pieces).
- Grooves are cut in the middle of the rectangular blanks.
- Rectangles are inserted into each other, forming crosses.
- Using a screwdriver, the crosspieces are attached to round workpieces.
- The ends are sanded and covered with film.
Photo round shelf for shoes

Find out how to save money and make an original shoe stand with your own hands here!Ideas, useful tips, manufacturing instructions.
Making a stylish shoe stand with your own hands
A beautiful shoe rack can become not only a place to store shoes, but also a full-fledged element of the hallway interior. The choice of options in stores is extensive, but the prices are often overpriced. To make a spacious and compact shoe rack that fits perfectly into the look of the corridor, you need to put in a little effort and imagination. Let's consider options for making shoe racks from available materials with your own hands.

Types and purposes of homemade shelves for the hallway
Before installation, be sure to measure the space where you plan to place the shoe rack. For a small hallway, the ideal option would be a narrow (20-30 cm) and high shelf; in a larger room, a closed cabinet with a width of 60-90 cm would look good.
Should the shelf be closed? If you want your hallway to look more aesthetically pleasing, this is a good option. Do not forget to regularly ventilate closed shoe racks, otherwise you will not avoid unpleasant odors. This problem can also be solved by installing a lamp inside for drying and disinfecting shoes.

The advantages of homemade shoe shelves are obvious:
- you can use eco-friendly materials;
- the cost of a homemade shoe rack is several times less than in a store;
- You can make a shelf for a hallway with a non-standard layout.
The design of a shoe rack directly depends on its purpose and the number of residents. Here are some popular and practical options:
| Shoe shelf design | Description |
| Classical | Shoe shelves of this type are popular due to their simple and convenient installation. It can have a regular rectangular or asymmetrical design. |
| Hanging | The shelf is attached to the wall using slats, straps or cables. Conveniently folds when necessary (for example, if you need to carry furniture into a narrow corridor). |
| Corner | Fastening is carried out on adjacent walls. Great space saver. |
| Floor | The support in this design is on the floor. Suitable for spacious hallways, but can also have compact dimensions if the sections are distributed not in width, but in height. |
| Closed | This option looks more aesthetically pleasing. Doors can be made of plywood or frosted glass. |
| Cassette | Shoes will be stored vertically here; there are 2 or more cassette-type drawers on the door, which slide out when opened. Well suited for a small corridor (width 20-25 cm). |
There are many options for making shelves. The interior can be decorated with shelves made of metal, in particular aluminum; processed clay shelves, dense oak, and glossy plastic look very beautiful. The material of manufacture can be anything, as can the configuration of the elements. Based on the type of installation, shoe racks can be divided into several types.
Materials and tools for making shelves
The selected material for making a shoe rack determines its service life and ease of use. For example, it’s easier to make a shelf out of a cardboard box, but it won’t last long. But as a temporary option it will work great.  When choosing wood as a material, you should take care of the final treatment of the wood with varnish or paint so that the attractive appearance is preserved for a long time. There is no universal set of tools, due to the peculiarities of installation and material. But you will probably need the following tools:
- electric drill;
- glue;
- a simple pencil;
- sandpaper;
- fastening fittings;
- screwdriver;
- wood hacksaw;
You will also need varnish or paint, the color of which matches the overall interior of the hallway.
How to make a shelf with your own hands
Before starting work, it is worth drawing an approximate layout of the future product, where you also need to indicate the dimensions. After this, they begin marking on the material, where they indicate the location of the fasteners (if any), the required length and width. Here are some useful tips:
- When creating a simple shelf for shoes, you can do without using metal fittings - all elements are fastened with self-tapping screws.
- The doors are easy to install if you use awnings.
- Materials should be treated with varnish or painting before assembly. If you do this after, the layer will be uneven, and the procedure itself will be problematic. The process of assembling a shelf for shoes depends not only on the design, but also on the complexity of processing the material, and the features of working with it.

Wooden shoe rack
First of all, a shoe rack should have small dimensions, but at the same time accommodate a sufficient number of pairs of shoes. This is its integral feature. There are many materials from which this structure can be constructed, but the main one is wood. Unlike chipboard and MDF, it will not unstick or swell when exposed to moisture. To do this, the wood should be varnished or painted.

What will you need?
Basic kit for making: wood, glue, screws, glazing beads, varnish or paint. Tools you will need: saw, screwdriver or screwdriver, hammer, sandpaper, drill. Beads, screws, and drills are selected in accordance with the size of the structure. Self-tapping screws need to be small, but capable of being firmly fixed in the structure. It must be remembered that wood can crack or split if the size of the screws is chosen incorrectly.

Assembly of the structure
A depth of 35 centimeters will be sufficient. This distance is enough to accommodate almost any shoe. This will be the length of the sides of the structure. You need to saw off 6 elements of 35 cm each. You can determine who in the family has the largest shoe size and measure the distance along it, leaving 1 cm in reserve. Then you need to distribute 4 bars on one of the elements and make a cut to the depth of the bars. The bars must be spaced evenly.
Each shelf should be able to accommodate 3 pairs of shoes, so its length must be determined based on the 3 largest pairs of shoes in the family. 4 pieces of this length will go on each shelf. To connect the elements, it is necessary to cut out recesses. These places must be secured with self-tapping screws. For a more aesthetic appearance, you can drill holes and use glazing beads and glue that will hold the shoes without any problems. This operation is similar for each shelf. After this, sand the tops of the side panels with sandpaper.
Any height can be set, but a reasonable limit is no higher than 80 cm. High shoes should fit in one of the compartments of the structure. The distance between the shelves (between the floor and the first shelf) should be 30 cm. All connections are made in the same way.

Practical shoe rack made of chipboard
To make a simple shelf for shoes from chipboard, you need to take two sheets of canvas (the dimensions are determined based on the space in the hallway). You will need a sheet of fiberboard for the back wall. The assembly algorithm is simple:
- We attach the bottom and the shelves themselves to the two side walls. For the screeds, use a drill (8 mm drill); at the end, use a drill with a diameter of 5 mm.
- The folding element is secured with medium-sized self-tapping screws;
- The upper part is attached to 4*30 self-tapping screws;
- The shelves are mounted inside;
- Secure the back wall of the product.
- This is a budget and uncomplicated option that can be used in any hallway layout.

Beautiful laminate shoe rack
If after renovating your apartment there is unused laminate, you can use it to make a stylish and compact shelf that will fit seamlessly into any design. For manufacturing, you will need laminate sheets, the number of which depends on the tiers, and metal pipes with slots. They can be made using a metal grinder. If desired, the structure can be made to any height; for safety, the edges of the tubes are sealed with plugs.
 From profile
An interesting option are shelves for shoes made of profiles and tempered glass (or wood). For manufacturing you will need the following tools:
- glass cutter;
- jigsaw;
- Bulgarian;
- level;
- electric drill for metal;
- screwdriver
You can use a regular colored profile or a galvanized one; the second option will be more reliable, as it is resistant to moisture.

Step-by-step instruction
- The profile is attached to the wall with one self-tapping screw;
- Using a level, check the horizontalness of the markings;
- Screw in the remaining screws;
- The frame is assembled;
- Already cut shelves are attached to the frame.
- This option will look good in a Hi-Teck design.
 Simple shoe rack made from boxes
The presented design is able to withstand a lot of weight, despite the fact that cardboard is a fairly flexible material. To make it, it is advisable to use boxes from household appliances. Depending on the height and width, take the required number of boxes. The structure is attached with glue, tape, a stapler or another method. The finished shelf can be decorated as your imagination dictates. There is one drawback - this shelf is only suitable for summer shoes.
 Corner shoe stand
The most suitable material for creating a corner wooden shoe rack is larch. It tolerates dampness well and is easy to use.
First, we decide on the size and design of the shelf, draw a diagram and calculate the required amount of material.
To create a corner shelf you need the following materials and tools:
- two boards up to 2 m long (the ends of the boards can be rounded or cut with a wave);
- shelves cut from the same board (the shelves can be cut into different sizes and shapes);
- jigsaw for cutting;
- plane and sandpaper for leveling;
- corners and screws for connecting parts;
- level to check the accuracy of the design;
- antiseptic;
- varnish or paint.
The boards must be sanded and treated with an antiseptic, varnished or painted. Varnish is chosen if you want to emphasize the naturalness and structure of the wood, paint - if you prefer rich colors and if you decide to use special design techniques with a play on color.
 Construction connection
To create a lightweight structure, the two main boards are not attached to each other: they are installed at an angle and connected using shelves. First, the lower shelf is attached, then the upper one, the structure is installed vertically and its evenness and stability are checked. Then the remaining shelves are installed.
The space between the shelves must be sufficient, otherwise there will be a feeling of crampedness and congestion.

Decorative elements
To further decorate the shelf, you can use thin decorative slats cut out yourself. Or purchase a decorative wooden lattice partition, and after sawing it, decorate the shelf by adding carved stops.
Using decoupage or aging techniques in painting will also add a fresh touch to the interior of the hallway. Bright colors can be relevant to complement the interior.
How to do
Blanks in the form of circles and quadrangles are cut from fiberboard. Using a compass and a strip, markings are made for the pins.
Discs for stands are fixed with discs of smaller diameter, which are placed at the desired height.
Prepare the bottom, on which quadrangular blanks are installed, attached with a corner. The bottom circle is conventionally divided into 3-4 parts (space for 3-4 pairs of shoes on the “floor”).

To make a shoe shelf, you can use your imagination and then the most unexpected solutions come to mind. Here are a few ideas that will be interesting not only for independent use, but also as a gift for loved ones.

On video: DIY shoe rack from an old closet
Photo gallery
The photo gallery presents original solutions shoe shelf.


