By controlling the microclimate of personal space, we create conditions that are optimal for rest, work, and study. Installing a split system will allow you to set a favorable level of temperature and moisture in the simplest way. Agree, in the summer there are many days that need to be regulated by climatic parameters.
After reading the article we have proposed, you will learn all the details and subtleties of the work on the installation of air conditioning equipment. Carefully selected and systematized information will be useful both for independent home craftsmen and for customers of installers' services for checking the proper performance.
We have a detailed description of the installation process, the nuances of the location and fastening of the blocks are listed. The materials required for the installation and connection of the units are listed. Photo and video applications are valuable additions to the text, making information easier to understand.
Studying information on how to properly install a split system in a private house or apartment, you first need to choose the location of its parts.
To do this, it is necessary to take into account the direction of distribution of the flow of cold / hot air in the room, taking into account the basic technical requirements specified by the manufacturer of the equipment in the instructions.
The most common options for the location of the indoor unit of the split system are above the bed / sofa. Outdoor - usually taken out into the street and installed on an area near a window or on balcony slabs
There are certain rules that must be taken into account when choosing a point for placing blocks:
- the distance between the unit and the ceiling should be at least 15-20 cm, although some manufacturers indicate 20-30 cm in the instructions;
- from the side to the wall - not less than 30 cm;
- to an obstacle that will impede the flow of outgoing air or dissipate it - at least 150 cm.
For the outer part of the split system, the location is chosen based on the bearing capacity of the walls. Installation is possible near the window, on the slabs enclosing the loggia, or on the wall next to the balcony.
For those who live on the lower floors, the installation of the block is carried out above the window - as far as possible from passers-by.

Based on the technical requirements for the wall of the ventilation facade used as a platform for fixing the outdoor unit of the split system - the possible load capacity should be 2.5 times the mass of the installation unit
For a multi-storey building, especially if the apartment is on the top floor, you will need to involve high-rise specialists or determine the installation point in the utmost proximity to the window, which will provide easy access during installation.
Determining the distance between blocks
Often the choice of the location of the equipment is governed by the minimum and maximum distance between its parts. These indicators are mainly indicated by the manufacturer and depend on the model range and characteristics.
Sometimes firms do not indicate the minimum length of the circuit between two units, so the installation can be carried out arbitrarily.

The minimum distance between the blocks of the Daikin split system is 1.5-2.5 m, Panasonic is up to 3 m.However, if the blocks are located one meter from each other, the length of the route must be at least 5 m (its surplus is folded into a ring and hidden behind the block)
It is a little easier to deal with the maximum possible distance between the two units. The standard indicator is 5 m. An increase in the length of the route is also possible, but in this case it is necessary to count on additional costs due to the need to refuel with freon.
Preparation for work
The decision to start installing a split system independently comes, as a rule, after clarifying the prices from specialists. The incredibly high sums for the execution of a work that takes 3 hours are justified by the presence of expensive tools and their wear and tear during operation. This is what makes up the bulk of the payment for the services of the master.

If the prices from the installers of split systems are too high, it is worth doing the installation with your own hands, having thoroughly studied the technology of this type of work
If you look at the recommendations of equipment manufacturers, then often the instructions indicate that the preparatory work can be done on your own, but for the installation of pipelines, connection to the electrical network, and the vacuuming process, it is advisable to invite specialists with the appropriate tools.
Hardware Installation Tools
It is possible to carry out an independent installation of the cooling unit, because most of the tools are in the home craftsman's suitcase. An exception may be a vacuum pump, but it is not necessary to buy it - it will be possible to make such a unit from old parts.
Some teams of foremen do not even use this equipment when laying a route up to 6 m long.

If during the self-installation of the air conditioner it was not possible to find a vacuum pump, an alternative option could be a powerful compressor from an old refrigerator or an aquarium blower
During the installation process, an important aspect is the observance of the horizontal arrangement of block systems. In connection with these requirements, each stage of the work must be accompanied by a control check at the building level.
If a tool is not available, it can be rented from a hardware store.
It will be necessary to prepare the following equipment in advance:
- Perforator. It is used to make holes in the facade, through which the route will be laid, generalizing the external and internal blocks.
- Drill with a set of drills. Used for mounting fasteners.
- Pipe cutter for cutting copper pipes.
- A device for deburring after pipe cutting. You can use a reamer, file and sandpaper.
- Copper pipe beater.
Some people think that using a reamer does not make sense, especially if a new one does not leave burrs and dents, but in vain.
Only after the performed manipulations with the beveler, the edge of the flared tube can be pressed as tightly as possible with the nut, and accordingly, the leakage of freon is unlikely.

The work of the device for expanding copper pipes is performed by deforming the tube according to the selected template, as a result of which a cone is formed. At the same time, the original wall thickness and circular cross-section are preserved.
According to the technical installation rules, a vacuum pump is required - the air conditioning system is sealed with this particular equipment. After filling the route with refrigerant, the evacuation process is carried out.
Acquisition of the necessary materials
A lot of components will be required, but all of them are easily available in any specialized store. Do not forget that the materials should be of the highest quality and be selected exclusively for a device that is functionally aimed at the cold.
It is necessary to purchase a wire for supplying power and connecting the units. The required parameters are always indicated in the passport or in the equipment installation instructions.
As standard, this is a 4-core power cable with a cross-sectional area of 2 mm 2 or 2.5 mm 2. The length is selected based on the distance of the track, taking into account a small margin.
You will also need to prepare seamless thick-walled soft copper pipes for cooling appliances. Pipes are selected with smaller and larger diameters. More specific specifications are listed in the user manual.
The length is equal to the length of the route plus an additional margin of up to 30 cm. During the transportation of the tubes, their edges must be muffled to protect them from dust settling inside the product.

Pipes are selected exclusively for the cooling system, their soft copper alloy lends itself well to expanding and ensures proper tightness
Foam rubber insulation is used to insulate pipes. It is sold in segments of 2 m. To carry out thermal insulation measures, a length equal to the length of the route is required. Synthetic insulation is used on two pipe diameters.
As a drainage tube, experts recommend installing a corrugated hose equipped with a plastic spiral inside. You can also use an alternative piece - a polypropylene tube. Its length is equal to the length of the track with an allowance of 80 cm.
You will also need two L-type brackets to secure the unit from the outside. The appropriate size of the parts is determined by its dimensions, and the safety factor for the bearing load must exceed its weight by 5 times. Such an increase in the maximum allowable stress of the part is required to compensate for the loads of wind and snow.
It is better to buy these components in a company that sells spare parts for household split systems.

After purchasing the bracket for attaching the outdoor unit of the air conditioner, you cannot make additional holes in it, because this significantly reduces the safety factor of the part
The following are used as fastening parts: anchors, dowels and bolts. Their number, type and parameters are selected based on the type of brackets and a mounting plate intended for the indoor unit.
The type of walls where the outer part of the system is to be mounted also matters. To camouflage the laid communication line, you will need a plastic box of standard dimensions 60 * 80 cm.
Split system installation procedure
It is quite a real task to independently install the air conditioning system, however, there are many nuances in the work and they relate to certain models, so the installation process may have some differences. To study all the requirements, you first need to read the instructions for the purchased equipment model.
Stage # 1 - installation of outdoor and indoor units
The first to be installed is the indoor unit. Having decided on its location, the site is marked on the wall for the mounting card. After drilling the backlashes, plastic plugs for the dowels are inserted, the card is hung and fixed with dowels.

The most careful fastening should be done at the bottom of the plate, because in this area there are latches that hold the block
After installing the cassette, using the building level, the exposure of the strict horizontal placement of the future block is measured. In case of any discrepancy, it will be necessary to redo all the work performed.
At this stage, preparatory work is to be done for laying the tracks. First, the lines of its location are calculated. Then a hole is drilled in the facade wall, taking into account the required slope of more than 1/100.
Also, a hole with a diameter of 5 cm is drilled with a slope, while the angle of inclination can be increased in comparison with the track. Thus, the condensate formed will better leave the system.
When choosing a back-to-back mounting scheme for the units, it is required to check the hole for placing the power cable. To do this, check the location of the power ports on the units.
And now it's the turn of the outdoor unit installation. If we are talking about a multi-storey building, then you will need special equipment for high-altitude work.
As in the first case, the block must be strictly horizontal, therefore, at the markup stage, a level is also used.

When placing the outdoor unit, it is necessary to take into account the limitation regarding its slope - the maximum allowable slope angle is 45 °
At the time of installation of the fasteners, each existing hole must be filled with anchor bolts (standard diameter 10 * 100 mm), regardless of their number. After that, the outdoor unit is exposed and is also fixed with fasteners.
Stage # 2 - laying a communication line
With the help of an electric wire and two copper pipes, the connection of the outdoor and indoor units is carried out. Additionally, a drainage system will be laid through the wall, which is responsible for the removal of condensate. These elements must be correctly selected, connected, laid down and secured.
First, prepare the copper tubes by cutting to the desired length with a pipe cutter and reamer the edges from burrs and dents after the cutting procedure.
It is not recommended to use other tools such as a file. After its application, metal shavings enter the tube, which will circulate through the system and ultimately lead to compressor failure.

To pass copper pipes through the wall, their edges must be insulated with a plug to protect against dust
Thermal insulation of pipes is carried out by putting on them polyurethane foam hoses. Foam rubber cannot be chosen as a seal - it has a short operational life. After completing the thermal insulation measures, all joining areas of the material are tightly glued with metallized tape.
Now it was the turn to lay the drainage and the cable. For each wire, you need to put on a special tip. They are installed on conductors cleared of insulating material and crimped with pliers.
The finished cable is connected to the air conditioner according to the diagram given in the manual for the device.

On both blocks, in the area slightly above the ports, there is a removable plate for connecting copper pipes. Under it are the electrical connectors for the cable.
The drainage tube is connected to a special outlet on the unit inside the room and out through a hole in the wall. The tube must be long enough and end at least 60 cm from the wall.
According to the rules, it is laid at an angle towards the outside. Fixing with clamps every meter of length is required to eliminate sagging to prevent the accumulation of condensation.
Stage # 3 - connecting system blocks
Communications through the wall are connected to the appropriate ports. It is important to remember that the total length of the drainage pipeline cannot be more than 20 m. Copper pipes are laid in a loop method to trap oil, which is contained in a small amount of freon.
Drainage can be diverted in two ways: take it to the sewer or to the street. The first method is technically correct, however, due to the complexity of reproduction, it has not become widespread.

When laying the drainage pipe, it is better to avoid sharp turns, and sagging is also not allowed - condensation will accumulate in these areas
At the bottom of the indoor unit of the system there is a tube with a plastic tip. A corrugated hose is put on it and tightened at the junction with a clamp.
A similar procedure is followed for the outside of the device, but many people ignore it. If a plastic pipe is used instead of a hose, an appropriate adapter is selected. With its help, the output of the block and the tube are connected.
To connect copper pipes, you first need to lay them along the wall using a pipe bender. If such a tool is not available, then we suggest that you familiarize yourself with the article, which describes in detail how to bend a pipe without special equipment. Read more.
The pipes must be given the necessary slope without kinks and sharp creases. First of all, they are connected to the unit indoors. For this, the nuts are loosened at the corresponding ports.
When untwisted, the characteristic hiss of nitrogen escaping will be heard. It is pumped in at the time of production to eliminate oxidation of parts. After lowering it, it is necessary to remove the plugs and unscrew the nut completely. Next, the rolling procedure is carried out.

During the flaring process, the pipe is held down with the hole to prevent metal chips from entering the system
The edges of the pipes are leveled in a section of 5 cm. Then, flaring is carried out to ensure the connection of the inlet and outlet of the blocks. This will create a closed circulation system. The correctness of the installation plays an important role in obtaining the properties of maximum tightness during the movement of freon.
The flared end of the pipe is connected to the required outlet and secured with a nut. It is forbidden to use any additional devices - sealants, gaskets, etc. The copper pipes used provide the necessary sealing.

When connecting copper pipes, it is necessary to apply an effort of 60 kg, only then the copper will solidly crimp the fitting, and the contact will be hermetically sealed
Do the same for all four ports. After connection, the last stage of the installation of the air conditioning system follows - the elimination of air and moisture, as well as possible argon residues that could accumulate during the installation process.
Stage # 4 - evacuation of the system
During the installation work, air enters the air conditioner tubes and if it is not removed, it will end up in the air conditioning system. The result is an increased load on the compressor, respectively, its rapid heating.
Also, water particles have a negative effect on all parts. Freon contains a share of lubricating oil, its hygroscopic consistency becomes less effective in contact with water. As a result, component wear will accelerate.
To remove air, two methods can be used: a vacuum pump or a small amount of freon liquid that comes down from a block located outside. In the manufacture of the outdoor unit, manufacturers with a small surplus.

The "zilch" method is repeated several times, while the second attempt is made with the upper valve. If the length of the track is 2-3 m - the procedure is carried out 3 times, with a four-meter track - 2 times
An alternative to an expensive vacuum pump is to release excess Freon from the outdoor unit system. To do this, unscrew the plugs on its valves. It is necessary to work with the lower port of a larger diameter. There is a hexagonal connector under its cover. Based on its parameters, the appropriate key is selected.
Using a suitable wrench, rotate the valve by 90 ° and after a second return it to its previous position. Thus, a small amount of freon enters the system and an increased pressure is created. With a second pressing of a finger on the spool located on the same port, excess freon and gases are released from the system.
After complete removal of air, the outlet of the spool is twisted with a plug, and the valves are fully opened and freon enters the split system. To check the tightness of the joints, they are coated with soapy foam.
It is worth remembering that with independent, minor factors do not exist. And everything that was done incorrectly, for example, rolling pipes without stripping the border, or an insufficiently fixed connection, as a result, leads to rapid wear of the components of the cooling system. Therefore, during the installation process, you need to be extremely careful with all the details.
If you have the necessary experience or knowledge in the installation of split systems, please share it with our readers. Perhaps you know some of the subtleties that we did not mention in this article? Leave your comments, ask questions in the block below.
Climate technology and, in particular, split systems, which are habitually called air conditioners, help to survive the summer heat and stuffiness. The equipment is not cheap, but worst of all, it costs a little less to install it than the equipment. Therefore, many people think about self-installation. Do-it-yourself installation of the air conditioner is possible, but there are many little things and features, ignorance of which leads to rapid wear of the equipment. Detailed step-by-step instructions will help you get it right.
Seat selection
Do-it-yourself air conditioner installation begins with determining the location of the equipment. Since split systems consist of two or more blocks, you will have to choose a place for both. In this case, it is necessary to take into account how the cold air will spread in the house or apartment, and also take into account the technical requirements.
Let's start with the technical requirements. When choosing the location of the indoor unit, we take into account the following requirements:
- from the block to the ceiling - at least 15 cm (for some manufacturers, at least 20-30 cm);
- to the side wall - at least 30 cm;
- up to an obstacle against which the flow of cold air will break - at least 150 cm.

The outdoor unit is usually placed near a window or on an open balcony, if there is one. On a glazed balcony / loggia, it can be installed on a fence (if it has sufficient bearing capacity) or next to it on the wall. If you live on the first or second floor of a high-rise building, they try to put the outdoor block above the level of the window - away from passers-by. On higher floors, it can be placed under a window or to the side.
If the installation of an air conditioner with your own hands is planned in a private house, a place is usually chosen based on the bearing capacity of the walls. If you have a ventilated facade, you can use a special mount or hang the unit on the plinth, if there is one.
When choosing the location of the split-system blocks, you must also remember that in most cases the minimum and maximum distance between the blocks is normalized. Specific figures depend on the manufacturer. For example, the minimum distance could be 1.5m, 2.5m (different Daikin models) and even 3m (Panasonic). For some manufacturers, the minimum length is not regulated, that is, it can be any. In this case, you can install back-to-back blocks. Installers call this method of installation "sandwich".

The situation with the maximum distance between the two blocks is a little simpler. It is usually 6 meters. There may be more, but then additional refueling of the system with freon will be required, and this is an additional cost, and considerable. Therefore, they are trying to invest in the required 6 meters.
What is required for self-installation
You probably know how much it costs to install an air conditioner by specialists. When asked where these prices come from, because the work only takes 3 hours, they answer that the equipment is very expensive and its depreciation makes up a significant part of the cost. This may be true, but most of this equipment may already be on the farm. An exception is a vacuum pump, but many crews do without it, since a normal one really costs a lot, and a bad one is of no use.

Equipment
So, to install the air conditioner with your own hands, you will need the following equipment:

For an ideal installation, a vacuum pump is needed, but usually there is nowhere to take it and on routes up to 6 meters they do without it.
Materials (edit)
To connect and install two blocks of split systems, you will need the following consumables:

This is all that is needed to install the air conditioner with your own hands.
Installation procedure and features of work
There is nothing super-complicated in self-installation of a split system, but there are a lot of nuances that can affect the durability and quality of the equipment. First of all, before starting work, you should carefully read the installation and operating instructions that come with the equipment. You compensate for the time spent by knowing exactly what and how to do with your air conditioner, because there are some nuances.

Getting started - assembling blocks
Before starting all work, it is worth looking for hidden wiring or heating pipes in the proposed installation site. Getting into them while working is very sad. Next comes the actual installation of the air conditioner with your own hands. You need to start with the installation of the indoor unit. At the selected place we place a plate for fastening it. The block should hang strictly horizontally without the slightest deviation. Therefore, we carefully approach the marking and fastening.
We apply the plate, set it on a level, mark the places for the fasteners. We drill holes, insert plastic plugs under the dowels, hang the plate and fix it with dowels. We especially carefully fasten the lower part of the plate - there are latches that hold the block, therefore they must be rigidly fixed. No backlash. Then we check the horizontal position again.

Having estimated where the track will be located (it should go at an inclination of at least 1 cm per meter - for normal drainage laying), we begin to drill a hole in the outer wall. The hole is also drilled with a slope - again, so that the condensate flows out normally (the angle may be greater than that of the track).
The minimum hole diameter is 5 cm.If there is no drill of this size, you can make several holes of a smaller diameter, not pull out the general bundle of communications, but separately each tube / cable. In any case, it is best to drill two holes - one for the copper and electrical cable, the other for the drain tube. It must be laid lower than the rest - so that it does not flow into communications in an emergency.

If two units are mounted "back to back", the hole must be strictly aligned (measure on your own unit where the connection ports are)
Then we install the brackets for the outdoor unit. If we are talking about a high-rise building, you will need climbing equipment and skills to work at height. This block should also hang strictly horizontally, so when marking holes, we also use a level. When installing the brackets, we install the fasteners in each hole, no matter how many of them there are - this is a prerequisite. Standard fasteners - anchor 10 * 100 mm. More is possible, less is highly undesirable.

After the brackets are fixed, the outdoor unit is exposed. We also fix the block in all the mounts that are. This is the only way to ensure that it will stand in place under any conditions.
Laying of communications
Two blocks are connected by an electric wire, two copper pipes. Also, a drainage tube is led out through the wall. All these communications must be correctly selected, connected, laid and secured.

Copper tubes
We start with copper pipes. One of a larger diameter, the other of a smaller one. The dimensions are indicated in the instructions for the air conditioner. We cut off a piece of the required length with a pipe cutter, process the edges from the burr with a special tool, straightening and leveling the cut. It is undesirable to use a regular saw, as well as a file for deburring - there will be sawdust inside the pipe, which will enter the system and quickly destroy the compressor.
Heat-insulating tubes are put on the prepared pipes. Moreover, the thermal insulation must be continuous and pass inside the wall as well. The joints of the pieces of thermal insulation must be glued with metallized tape, achieving a very tight fit of the edges. The quality of thermal insulation is important, since condensation will form on the non-insulated sections of the pipes, and it can drain inside the wall, causing frozen streaks, destroying the wall.

Copper pipes wrapped in thermal insulation must be passed through a hole in the wall. Before this, it is imperative that the edge that will be inserted into the wall is carefully sealed so that dust does not get inside the pipe (or it is better to securely plug both ends immediately after cutting and leave the plugs before starting the connection). This is a very important point, as dust will quickly destroy the compressor.
Cable and drainage
The situation is simpler with an electric cable. Each wire is terminated with special terminals, installing them on conductors stripped of insulation and crimping with pliers. The prepared cable is connected according to the diagram, which is in the instructions.
On the indoor and outdoor unit, above the copper pipe ports, there is a removable plate, under which are the cable connectors. Before starting the independent installation of the split system, remove the plates, consider what and where you will need to connect - then it will be easier to work. Especially with an external unit.

The connection of the drain tube is generally simple: it is connected to the corresponding outlet on the indoor unit and out through the wall. The length of this tube should be such that it ends at a distance of 60-80 cm from the wall. The drainage pipe must be laid with a slope towards the outside. The slope is at least 1 cm per meter long. More is possible, less is not.
The tube should be fixed every meter so that no sagging occurs in it. Condensation then accumulates in them, which may end up on your floor or furniture. When passing the pipe through a hole in the wall, it is also better to drown it with something.

Indoors, pipes and cables are usually wrapped with metallized tape in a single bundle. Then they are fixed to the wall in several places, a plastic box is attached on top. Usually it is taken in white or a color that matches the finish.
If you wish, you can hide all the tubes in the wall - grind the track in the wall, put it there and, after checking the functionality, brick it up. But this is a rather risky option, since in order to repair something you will need to dismantle the wall.
Connecting blocks
Here, in general, there are no special secrets. We connect the communications stretched through the hole in the wall to the corresponding connectors. There are no problems with connecting the cable - connect wires of the same color to the terminals that are already connected to them. In this case, you definitely can't go wrong.
If the height difference in the installation of the blocks exceeds 5 meters, it is necessary to make a loop to catch the oil (we put copper pipes in this way) dissolved in freon. If the drop is lower, we do not make any loops.

Drainage
There are two ways to drain the drainage from the split system - into the sewer or just outside, outside the window. The second method is more common in our country, although it is not very correct.

Connecting the drain tube is also straightforward. A corrugated hose can be easily pulled onto the outlet of the drainage system of the indoor unit (a tube with a plastic tip at the bottom of the unit). To keep it securely, you can tighten the connection with a clamp.
The same is the case with the drainage from the outdoor unit. Exit it at the bottom. Often they leave everything as it is, and the water just drips down, but it is probably better to also put on a drain hose and remove moisture from the walls.

Drainage of the outdoor unit
If you use not a hose, but a polymer pipe, you will need to select an adapter that will allow you to connect the outlet of the air conditioner and the tube. You will have to watch on the spot, because situations are different.
When laying the drainage pipe, it is better to avoid sharp turns and certainly not sagging - condensation will accumulate in these places, which is not good at all. As has been said more than once, the pipe is laid out with a bias. The optimum is 3 mm per 1 meter, the minimum is 1 mm per meter. Throughout its length, it is fixed to the wall, at least every meter.
Freon circulation system
It is somewhat more difficult to connect copper pipes. They are carefully laid out on the walls, avoiding bends and creases. For bending, it is better to use a pipe bender, but a spring one can be dispensed with. In this case, too, sharp turns should be avoided, but in order not to bend the tubes.

The ports on the outdoor unit look like this. On the inside, it is the same.
From the beginning, we connect the tubes to the indoor unit. We twist the nuts on it from the ports. A hiss is heard as the nuts are loosened. It comes out with nitrogen. This is normal - nitrogen is pumped in at the plant so that the insides do not oxidize. When the hissing stops, take out the plugs, remove the nut, put it on the tube, and then start rolling.
Rolling
First remove the plugs from the pipes and check the edge. It should be smooth, round, and free of burrs. If the section is not round when cutting, use a calibrator. It is a small device that can be found in the forehead shop. It is inserted into the pipe, scrolled, leveling the section.
The edges of the tubes are carefully aligned for 5 cm, after the edges are expanded so that they can be connected to the inlet / outlet of the blocks, creating a closed system. The correctness of this part of the installation is very important, since the freon circulation system must be sealed. Then it will take a long time to refuel the air conditioner.

When expanding the pipe, keep the hole down. Again, so that copper particles do not get inside, but spill out onto the floor. In the holder, it is clamped so that it sticks out 2 mm outward. That's right, no more, no less. We clamp the tube, put the flaring cone, twist it, applying solid efforts (the tube is thick-walled). The flaring is complete when the cone does not go any further. We repeat the operation on the other side, then on the other tube.

If you have not rolled pipes before, it is better to practice on unnecessary pieces. The edge should be flat, with a clear, continuous border.
Port connection
We connect the flared edge of the pipe with the corresponding outlet, tighten the nut. It is not necessary to use any additional gaskets, sealants and the like (prohibited). For this, they take special pipes made of high-quality copper so that they provide sealing without additional means.

You need to make a serious effort - about 60-70 kg. Only in this case will the copper flatten, squeeze the fitting, and the connection will become practically monolithic and precisely hermetically sealed.
The same operation is repeated with all four outputs.
Vacuuming - why and how to do it
The last stage, which ends with the installation of the air conditioner with your own hands - the removal of air and moisture, argon residues from the system. During installation, humid air from the room or from the street fills the copper pipes. If not removed, it will enter the system. As a result, the compressor will work with a higher load, it will heat up more.

The presence of moisture also negatively affects the performance of the system. The fact is that the freon used to fill the air conditioners contains a certain amount of oil for lubricating the elements from the inside. This oil is hygroscopic, but when saturated with water, it lubricates the insides less efficiently, and this leads to their premature wear.
It follows from all this that the system will work without removing air, but not for very long and with possible shutdown due to overheating (if there is such an automation).
There are two ways to remove air from the system: using a vacuum pump or a certain amount of freon released from the outdoor unit (it is refueled at the factory and has some excess freon - just in case).
Zilch method
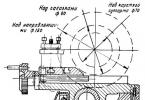
On the ports of the external unit, unscrew the valve plugs (in the photo they are indicated by arrows).

The operations will be carried out with the lower port (larger diameter), which sticks out perpendicular to the body. Under the cover there is a socket for a hexagon, we select a suitable wrench in size.

Under the cover there is a valve with a hexagon socket
Next, with this key, turn the valve 90 ° for one second, return it to its previous position. We let some freon into the system, there was an overpressure there. We press with our finger on the spool, which is located on the same port. With this we release a mixture of freon and gases located there. We press literally for seconds. Part of the mixture should remain so as not to start a new portion of air inside.
You can repeat 2-3 times, no more, the second time you can turn the valve located above. With a track of 2-3 meters - it is possible 3 times, with a length of 4 meters - only two. There will not be enough freon reserves for more.
When the air is practically removed, we screw the plug on the outlet with the valve (filling), open the control valves (under the hexagon) completely, launching the freon into the system. We coat all joints with soapy foam to make sure that they are sealed. You can run.
Vacuum pump
This operation requires a vacuum pump, a high pressure tube, a group of two pressure gauges - high and low pressure.
Without opening the valves on the control valves, we connect the hose from the vacuum pump to the inlet with the spool and turn on the equipment. It should work for 15-30 minutes. During this time, all air, vapors, nitrogen residues are drawn out.
Then the pump is turned off, the pump valve is closed but not disconnected and left for another 15-20 minutes. All this time it is necessary to observe the readings of the manometers. If the system is hermetically sealed, there is no pressure change, the gauge arrows froze in place. If the arrows change their position, there is a leak somewhere and it must be eliminated. You can find it with the help of soap foam and tighten the connection (usually the problem is in the place where copper pipes are connected to the outputs of the blocks).

If everything is fine, without disconnecting the pump hose, fully open the valve located below. Some sounds are heard inside the system - freon fills the system. Now, wearing gloves, quickly twist the vacuum pump hose - a certain amount of ice freon can escape from the valve, and you don't need frostbite. Now we completely unscrew the valve at the top (where the thinner tube is connected).
Why in this order? Because when filling with freon, the system is under pressure, which quickly closes the filling port when the pump is disconnected. That's all, the installation of the air conditioner with your own hands is completed, you can turn it on.
For the sake of fairness, it must be said that such an operation - evacuation - is carried out only in Russia and neighboring countries. In the same Israel, where air conditioners operate all year round, they do nothing of the kind. Why is a question for thought.
Installation of an air conditioner requires experience in such work, as well as theoretical training. In most cases, a malfunction of this system occurs due to non-compliance with the installation and connection rules.
Self-installation of the air conditioner
Before installing the air conditioner, you should know the sequence of steps:
- Choosing a place for installation.
- Hang the inner and then the outer block.
- Laying of communications.
- Configuring the correct operation of the system.
What you need for self-installation of the air conditioner
In order to do all the work yourself, you need a set of tools. For installation you will need:
- Rotary hammer with high power. With its help, through holes are made that allow you to pass pipes and cables for connecting the outdoor and indoor units.
- Pipe cutter. It is useful for cutting copper pipes. You will also need a file with which to remove burrs on the pipes.
- A pipe bender or spring to shape the pipes into the required shape.
- Drills and drills of different diameters.
- Flare tool and calibrator.
- A wall chaser that comes in handy when laying a groove in the wall. It can be replaced with a hammer or sledgehammer, but this will make the work much more difficult and time-consuming.
- Screwdrivers, hexagons, level, hammer and other tools that may come in handy along the way.
- Building level.

What can be useful for installing an air conditioner
In addition to tools, materials will also be required:
- Copper seamless pipes, which are necessary for the refrigeration and air conditioning system. Usually the length of the pipe is equal to the length of the route in the wall plus 30-40 cm. The diameter will depend on the requirements of the air conditioner manufacturer.
- Electric cable - its quantity is usually indicated in the instructions for the device, but it is better to take with a margin.
- Drainage pipe - this will require a special or water-polypropylene pipe. Its length should be 80 cm longer than the track.
- Pipe insulation - a rubber sleeve is best.
- Plastic box - you need it to hide the track in the wall.
- Fasteners for the outdoor unit - ready-made corners and brackets are usually bought.
- Bolts, fasteners.
How to independently install an air conditioner in an apartment
First you need to decide on the installation site and its method. Air conditioners are installed in the apartments, the external and internal blocks of which are connected by a pipe, in which there are wires and freon.
Important! It is better to install the air conditioner on your own in spring or summer.
To install correctly, first you should study the instructions. There are indicated the necessary materials that will be required in the process of work. It is better to purchase them in advance.
The sequence of actions will also be indicated there, in almost all cases they are identical:
- The location of the block, route and all other devices are marked on the wall.

System attachment track
- It is necessary to mark the places of passage of the wiring in the wall. This can be done using a special device.
- Next, the plate of the indoor unit is attached. It should be horizontal (the building level will help to align). Then the plate itself is applied and the places for drilling holes are marked. After that, they are drilled and fasteners are inserted there.
- Then the plate is put in place and carefully secured.
- An outdoor unit is installed in the same way.
- The evenness of the installation is checked and everything is neatly fixed.
- Using a puncher, a through hole is made through which communications will pass.
After these steps, a track is laid in the wall.
Important! The number of fasteners should be equal to the number of holes in the block. Otherwise, the structure may not support its weight.
How to install an external unit
All work begins with the installation of the condenser, suitable brackets are selected that will support the weight of the air conditioner. It is better to attach them to the wall itself, and not to the insulation or cladding of the room.

Fastening the system to the facade of a high-rise building
To protect the system from adverse environmental influences, it is torn up with a visor.
The drain pipe from the outdoor unit must be discharged into the drain.
How to install the indoor unit
The distance between the two units must be proportional to the power of the system. The smaller it is, the better the system works.
It is for this reason that the indoor unit is installed on the same wall as the outdoor unit. If this is not possible, then the closest place is chosen.
It is important to consider that:
- Air conditioners cannot be installed above the bed.
- The distance to the ceiling must be at least 10 cm.
- Cannot be placed over windows and radiators, as well as in an unventilated room.
- Do not place the air conditioner close to furniture.
You should provide free access to the device, this will improve its performance and allow it to be cleaned in a timely manner.
The installation of the indoor unit is almost the same as the external one. First, you need to choose a place, then attach the brackets, and on them, the evaporator. The only difference is that before installing the indoor unit, you need to drill a hole for the freon tube.
After installing the entire system, the two units are connected, and the air conditioner is connected to the network.
How to connect blocks
Air conditioner units must be connected with copper pipes (2 pieces) and cable. They can be laid on the wall and hidden in a special box, or in a strobe. In this case, you will need to make a groove. But first you need to drill a hole in the wall, which is done after installing the fasteners. Then the connection of blocks begins, this will require:
- Pipes with larger and smaller diameters, on which thermal insulation is put on.
- Then they are pushed through a hole in the wall and bent with a pipe bender.
- On both sides of the pipes, special tips are put on to protect them.
- The wire is also led into the hole and connected according to the instructions. Each block has terminal blocks to which wires will be connected according to their colors.
- Then a drain pipe is connected to a specific outlet of the indoor unit. Its second end is displayed on the street.
- The drain must be carefully fixed to prevent it from sagging.

Connecting system blocks
If the installation of a plastic box is required, then all communications should be tied into a bundle. This can be done with screeds or metallized tape.
How to connect the air conditioner to the mains
At the final stage of the installation, copper pipes are connected to the power grid according to the scheme. With the latter, things are much simpler, there is an output at the bottom of the indoor unit, and it is there that the drainage is inserted.
After that, you need to connect the copper pipes. You need to start work from the indoor unit. On its side wall there are two ports, one with large fittings and the other small. You can start with anyone.
The whole process of work is as follows:
- The nuts must be removed from the connection points of the copper pipes.
- Then the plugs are removed and the edges are checked for evenness.
- Union nuts are put on the pipes. It is important not to mix up the thread direction.
- The ends of the pipes are flared and clamped in the holder.
- The roller is installed and the screw is tightened.
- Rolling should be finished after the cylinder stops lowering.
- The flared edge is led to the outlet of the indoor unit and is connected using a union nut.
- The external unit is connected in the same way.

Do-it-yourself air conditioner connection
The wiring diagram for connecting an air conditioner at home can only be single-phase. This can be done through an outlet or with a wire running to the electrical panel.
Using an outlet
First, lay the cable from the evaporator to the outdoor unit. For this:
- A wire is laid to connect the blocks.
- A line is laid to the switchboard. This includes a cable and an overload breaker.
- If the devices have an average power, then they can be connected without such a line. This is done directly into the outlet.
Important! The air conditioner can operate at different capacities, therefore, a circuit breaker should be installed on the connection line and near the outlet.
How to choose an outlet
It must meet the following requirements:
- Have a reliable ground connection.
- Comply with the parameters of the air conditioner manufacturer.
- All wires must be copper.
- The socket must be connected to the panel through a circuit breaker.

A / C system socket
With a separate cable
This method is considered the most reliable and safest, especially if you install a shutdown protection device that protects the system from voltage surges.
Requirements for such a connection:
- Mandatory presence of a device or circuit breaker.
- All components must be copper.
- The diameter of the wires must correspond to the size specified by the manufacturer.
- A separate ground must be created for the entire line.
Then all the cables are laid, and the operation of all components of the system is checked.
Height from air conditioner to ceiling
The most optimal height at which the air conditioner is hung is 10 cm from the ceiling. This will ensure the correct flow of cold air will flow overhead. In this case, there will be enough space for air circulation. However, for more powerful air conditioners, this distance can be increased by 5-10 cm.

Distance is calculated from the baseboard
How to install a mobile air conditioner
A mobile air conditioner is much easier to install than any other. But here, too, some work skills are required. The following set of tools is also required:
- Dense plastic (thickness 10-12 mm). It will be needed to create a barrier between cool indoor air and warm outside.
- Saw for plastic.
- Masking tape or tape with which the sheet is fixed.
- Polyurethane foam or any seal that will provide water and air tightness.

Mobile device installation option
It is best to place the mobile air conditioner near the window, while avoiding kinks on the air outlet hose. The installation sequence is as follows:
- All necessary measurements and the diameter of the air outlet are made.
- A hole is cut for it. It should be 3-4 cm less than the pipe itself. This will help fix it tightly.
- Plexiglas is being sealed. This can be done with tape, sealant, or foam.
- You need to open the window frame and fix the plexiglass insert there. This can be done using the same tape or sealant.
- After that, you can install the candy bar itself. For this, a place for its installation is selected, a drainage hose is inserted into the air outlet, and it is inserted into the exhaust hole of the monoblock. The other end of the hose is led out into the street.
- After 2-3 hours you can.
Installing an air conditioner without a vacuum pump
If the length of the route is less than 5 meters, then the air conditioner can be installed without a vacuum pump. This will require:
- Unscrew all port plugs.
- Next, a hex key is taken, which is selected according to the size of the lower port.
- Then the key is inserted into the port and rotated 90 degrees. At this time, freon comes out, which, together with air and freon, creates excess pressure.
- There is a spool on the port, which is compressed for a while. At this time, a mixture of gases is exhausted, which carries air and argon.
- Then we repeat the previous steps. If the track is 4 meters, then this will be enough, if 3 - then it should be repeated again.
- A plug is screwed onto the outlet with the spool.
- With the help of a hexagon, the lower and upper port is opened, where the freon is admitted.
- The system is ready for use.
Installing an air conditioner on high floors
Installation of an air conditioner on the top floors of a house can be done on the roof. The distance between the blocks will be approximately 15-20 meters. This can be done using a crane and a sliding ladder.
If this option is not suitable, then the installation of the system can be done on the balcony or under a canopy. In this case, the following points must be taken into account:
- The walls where the system is to be installed must be strong and withstand a lot of weight.
- Do not install on aerated concrete walls.
- Do not attach the system to a ventilated façade as this will result in noise and vibration.
- Everything should be installed evenly and without distortions.
- The distance between the outdoor unit and the wall must be at least 10 cm.
- Do not install the air conditioner on a glazed balcony, as this will impair its performance.
- Be sure to install a visor above the external unit, which will preserve the integrity of the system.
Installation requirements for air conditioners
for the air conditioner to be of maximum benefit, you must follow some rules:
- Choose exactly the model that matches the parameters of the room (size, availability of equipment, etc.).
- Correct installation.
- Compliance with the rules of operation and prevention.
The air conditioner has two units, each of which has certain functions. The outer is the condenser and the inner is the evaporator. They are connected using wires, tubes in which freon functions.
It is very important to choose the right place to install the system. In this case, one should take into account the weight of the unit, free access to it, etc.

Install the air conditioner closer to the window
The outdoor unit must be located on a solid wall that can support over 60 kg. Do not install on aerated concrete. The outdoor unit must be protected from environmental influences. This can be done using fences and awnings.
When installing the indoor unit, consider:
- The distance from the outdoor to the indoor unit should be minimal. This will allow for higher efficiency.
- The evaporator must not be obstructed by curtains, furniture, etc.
- There must be a distance of at least 3 meters between the furniture and the indoor unit.
- The system must not be installed over batteries.
- Provide free access.
- The distance from the unit to the ceiling must be at least 10 cm.
It is necessary to ensure the tightness and reliability of the fastening of the air conditioner. If a line is used to connect the blocks, then vacuumization of the connections will be required.
What is the maximum length of the air conditioner line
As it is already known, the larger the track, the lower the power of the entire system. The passport for the air conditioner indicates the maximum distance of the track. Typically, the vertical distance is 7 meters and the horizontal distance is 15 meters.
How to hide the air conditioner in the interior
Usually, the air conditioner is installed during the renovation, so it is better to choose an option that will fit into the interior without fail. If this fails, you can try:
- Paint the air conditioner the same color as the wall.
- Place it above the front door.
- Purchase a built-in split system that can be hidden in a stretch ceiling.
- The floor-standing air conditioner can be hidden in decorative panels.
- Place the air conditioner in a shelf or cabinet with free air circulation.
- You can make a niche for the block.
In this case, everyone decides which option will be more convenient. In any case, it is not worthwhile to greatly obstruct the passage to the fan, as this can lead to overheating and quick breakdown.

You can hide the air conditioner under the ceiling
In the hot season, air conditioning is a must. It is very important to install it correctly, otherwise the entire system will not be able to function and will quickly fail. If you do the installation yourself, then you should follow all the rules, and before that, study the manufacturer's instructions for installation. This will help you get the job done quickly and easily.
In the past few decades, household air conditioners have firmly entered our lives and have become common household appliances, as it used to be with other household appliances - refrigerators, food processors, etc. The air conditioner belongs to complex technical devices, the installation of which is usually entrusted to specialists. However, in some cases, when the services of specialized organizations are not available, and the owner of the home has sufficient skills, the installation of this unit can be done independently.
Varieties of household air conditioners
The whole variety of air conditioning systems can be divided into two main types - monoblocks and split systems.
The main distinguishing feature of monoblocks is the assembly of all units and assemblies in a single body... These systems include:
- Window air conditioners, in which there is a separation of the units inside the housing, while the compressor unit is located on the back side and must go outside the room.
Installing a window air conditioner reduces the area of the window
- Cases of floor-standing or mobile air conditioners are equipped with wheels for free movement inside the room. Such systems have an air duct that is led outside, outside the room.
Floor standing air conditioners can be moved indoors
The advantages of monoblocks are directly related to the features of their design:
- Cheapness combined with a long service life.
- Simplicity of design and operation.
- These systems achieve the highest possible efficiency.
- Fast air cooling.
- Most modern systems are equipped with remote control panels.
Such systems are not devoid of a number of design flaws:
- The number of possible installation options is limited (either in a window opening, or in a place from which it is possible to bring out the duct sleeve).
- High noise level.
- The need to change the geometry of the window and fasten complex suspension units in the case of installing a window air conditioner, which entails additional costs.
- In the case of installation in a window opening, the illumination of the room is reduced.
The design feature of split systems is the division of air conditioning units into two units, one of which is a compressor, which is taken out into the street. Unlike monoblocks, split systems have more varieties, but only some of them are used in residential premises:
- The most widely used wall devices are when a hairdryer or indoor unit is attached to the wall of the dwelling, and the compressor in the outdoor unit is brought out to the facade. Inverter and non-inverter models are distinguished as one of the types of such systems. In the first, the alternating current is converted into direct current, which makes it possible to adjust the compressor speed.
Split system hair dryer can be installed anywhere on the wall of the house
- Floor-ceiling systems are used less often. Their highlight is the ability to install a hair dryer either under the ceiling or on the floor. Accordingly, the air flows in the first case will spread from top to bottom, and in the second - from the floor up.
Indoor block of floor and ceiling split system
- Another type is multisplit systems. Their design provides for the presence of one outdoor unit with a compressor and several indoor units that are installed in different rooms of a house or apartment.
The multisplit system is optimal when it is necessary to air conditioning several rooms
The indisputable advantages of split systems include:
- Low noise level.
- Air purification function from bacteria and dust.
- The presence of a heating function in the cold season.
This is interesting: quite often the heating function is provided by manufacturers in modern monoblock systems, both window and mobile.
- The compact size of the indoor unit, which can be mounted in any room size.
- In many modern systems there is a function of dehumidification and humidification of air, which allows you to create a comfortable microclimate in the room.
Disadvantages of split systems:
- Their cost is higher compared to monoblock models.
- The need to carry out a large amount of specialized work, including facade, both during installation and when the need for repair and preventive maintenance arises.
Methods for installing air conditioners in an apartment
- Monoblock models of window air conditioners are now being purchased less and less. The reason for this is a significant increase in the percentage of installation of plastic and other windows with standard double-glazed windows in dwellings. It becomes difficult to change the geometry of the window opening, because such air conditioners are installed directly into the window unit so that the rear part with the compressor is outside the room. Such a system can be installed both in the lower part of the window, in which case it rests on the window sill, and in the upper one, using brackets to the ceiling or wall.
- Mobile attachment systems are not required. The place of their installation is selected based on the possibility of removing the soft corrugated duct pipe outside the room. The technical solution to this problem is left to the discretion of the buyer.
- Installation options for split systems are more diverse. This is due to the numerous options for the interposition of the indoor and outdoor units and depends both on the wishes of the owner regarding the place of fastening of the indoor unit, and on the technical ability to fix both the outdoor and indoor units in a specific place. Of no small importance is the possibility of laying communications between the blocks. The optimal solution is usually based on a scheme in which the distance between the external and internal units is minimal. This solution allows you to minimize the amount of work associated with laying communications and allows you to save energy by reducing the heating that occurs during the circulation of the refrigerant.
Photo: the most commonly used layouts of the external and internal blocks of the split system
Cooking tools
If the decision to install the split system on your own is finally made, first of all, you should check the availability of the necessary tools and consumables. For the complete work you will need:
- Perforator with a drill with a cross section of 40–45 mm and a length of at least 800 mm.
- A set of victorious drills with a diameter of 6–12 mm.
- Screwdriver with a set of bits.
- Metal scissors and reamer.
- Ruler, pencil and building level.
- Adjustable wrench.
- Vinyl insulation, masking tape and plastic bags.
- Brackets for fixing the outdoor unit, bolts with dowels 120 mm long.
When deciding on self-installation, it is worth considering the degree of accessibility to the installation site of the outdoor unit. If it will be mounted at a considerable height, you will have to include in the cost of renting an aerial platform.
How to install a split system with your own hands
- At the first stage, a split-system hair dryer is installed, that is, an indoor unit. The perforated steel panel on which it is mounted is removed from the back wall and attached to the wall where it will be installed. It is very important to make accurate leveling, after which the holes for the fasteners are marked. The presence of slopes is not allowed, as this will entail the pouring of condensate from the body onto the floor of the room. Another important point is that the distance to the ceiling should be left at least 7 cm. Holes are drilled in the wall with a puncher, after which the plate is fastened with self-tapping screws and plastic dowels. Usually, dowels with a cross section of 8 mm and a length of at least 32 mm are used. After attaching the hair dryer unit to the latches, the horizontal accuracy of the fastening is checked again using a level.
The hair dryer is hung on a steel figured plate
- The next step is to prepare the communication channels. If a hidden gasket is to be used, you will have to make grooves using a hammer drill. However, such a solution entails the production of cosmetic repairs in the room. Therefore, at present, most often communications are hidden using a plastic box of a suitable section. With the help of a perforator and a drill, a hole is made in the outer wall for leading to the outdoor unit of the power and control cables, PVC tubes for draining condensate and tubes of the freon circuit. Marking is done using a ruler and a level. An important point: in order to ensure the drainage of condensate, the outlet must be slightly tilted towards the street. When drilling, it is worth using a vacuum cleaner and fixing a plastic bag directly under the hole with masking tape in order to avoid significant contamination on furniture and walls. If the length of the drill is not enough, drilling is done from both sides. In modern houses, wall thickness rarely exceeds 1 m.
The hole is drilled with a slope towards the street
- After that, the most difficult stage begins - the installation of the street block. Since the compressor is located in this unit, it weighs more than 20 kg, while the installation is often carried out at a considerable height. Therefore, do not forget about safety measures, in particular, use safety equipment. Most often, the outdoor unit is wall-mounted using L-shaped brackets. First, the location of the brackets on the wall is marked and holes are drilled. Then it is fastened with bolts and nuts using washers. The external block of the split system is bolted onto the brackets, while thick rubber gaskets are mounted under the legs to reduce vibration and noise.
The outdoor unit is mounted on L-shaped brackets
- As a possible option, the installation of the outdoor unit on the roof of the building or directly on the ground is used. In this case, U-shaped brackets or frame metal stands are used. Such a solution can significantly increase the length of communications and is used when it is impossible to mount the unit on the wall, for example, when the strength of the wall surface materials is insufficient.
- The next stage is the most crucial. In the course of it, communication is made between the external and internal units. First, the plastic protective cover on the outdoor unit is removed and, in accordance with the manufacturer's diagram, the power and control cables from the indoor unit are connected to the terminals using bolts. Then the length of the freon line is measured and the copper pipes are cut with a margin of 10 cm. The ends of the pipes are rolled and the chamfer is removed with a reamer. The copper pipeline is connected first to the external block, then to the hair dryer with an adjustable wrench using union nuts screwed onto the fittings in both blocks. Before the copper pipes are passed through the hole in the wall, vinyl thermal insulation is put on them, the ends are insulated with tape so that debris does not get inside. The drainage drain tube is also being installed; it is made of a corrugated PVC plastic pipe, which is attached to the block with plastic clamps.
- The last stage is the introduction of freon into the refrigeration circuit. First, the gas is removed from the circuit by opening the valve, followed by evacuation. The refrigerant is in the outdoor unit of the air conditioner. The valves, with the help of which the freon is introduced into the system, are located in the same place. If the length of the contour is equal to or less than the data specified in the data sheet, the introduction of an additional volume is not required. Experienced craftsmen, before this operation, evacuate the circuit using a special pump with pressure gauges that allow you to control the pressure loss. These actions allow not only to check the tightness of the system, but also contribute to the maximum removal of moisture and air from the system, which reduces the load on the compressor.
- At the end of the work, the assembled split system is checked in all operating modes. There must be no vibration and the fans on the indoor and outdoor units must be rotating. There should be no foreign odors, the drainage should remove moisture. Of course, the air conditioner must fulfill its functions of both cooling and heating.
Before introducing freon into the system, professionals perform a vacuum circuit
Video: installation of a split system without using an aerial platform
It is difficult to imagine an apartment that does not have air conditioning. As can be seen from what has been written, even this complex technique, if necessary, can be installed independently, without the involvement of a specialist.