It is on the serviceability of the headlights - adjustments and settings - that the safety of driving a car for passengers, drivers, and pedestrians directly depends.
On domestic cars, manufacturers install the following lighting devices:
- block illuminators capable of producing high and low beams;
- anti-fog systems;
- direction indicators;
- dimensions.
Installation of lighting devices on a VAZ 2120
In order to improve visibility when driving on roads at night, it is important to periodically adjust the headlights. You can adjust the headlights yourself, or seek help from service center professionals. We offer some information on how to adjust the low beam, relying on your knowledge.
- Check the serviceability of the electric corrector or hydraulic corrector. Before starting the adjustment, make sure that the corrector is in working order, otherwise you will not be able to fully adjust the optics.
- Find a level area before starting work. If there is the slightest misalignment, you will not be able to adjust the headlights perfectly.
Advice! To check the levelness of the site, use a building level.
- Approximately five meters from your car, install a vertical screen - a shield, use it for drawing.
- It would be ideal to choose a level area near your garage door; you can use the chalk without much damage.
- Carry out adjustments to the vehicle while it is fueled, placing a person in the driver’s seat, and checking that the tire pressure is normal.
- On the garage door or a specially placed screen, draw three straight vertical lines and make special markings on them:
In the video you can see in more detail how to do it:
How to adjust optics yourself
- cover the right lantern with a sheet of cardboard or other dense material, absorbing sunlight;
- turn the hydraulic corrector to position 1;
- open the hood, look for the screws necessary for adjustment, turn them;
Attention! When adjusting the left lamp, the light should be at the top level of the N line, and at the bottom it should reach the P line.
- After adjusting one headlight, adjust the second one, cover the first one with cardboard.
If car headlights shine too low when adjusting the light, the headlights need to be raised. Otherwise, the driver will not see the pedestrian in poor visibility conditions.
With a high incidence of light, the car will “blind” pedestrians and oncoming traffic.

Upgrade option
In case of minor modifications, you can increase the brightness car headlights. Full adjustment of headlights with your own hands is carried out in a clear sequence:

Other headlight adjustment options
If you follow all the rules for adjusting car headlights with your own hands, if the vehicle load changes, you will have to change the angle of the light beam. Such problems can be solved by using a hydraulic corrector.

This part is non-separable, so if the hydraulic corrector malfunctions, you will have to replace it with a new one. The main cause of the malfunction is a fluid leak or a “wedge” of the pistons.
Advice! To prevent wear and tear on the corrector, it is better to immediately install a modern electric corrector, which includes a headlight adjustment control, as well as a mechanism with O-rings and electrical wires.
How to change a hydraulic corrector
The negative terminal of the battery is removed. After pressing the lock, turn the hydraulic corrector clockwise and remove it. The headlight O-ring is removed, replaced with a new one, and a modern electric corrector is installed. The hydraulic corrector of the second headlight is replaced in the same way.
Manufacturers of automotive optics offer adjusted headlights, but after some time they require additional adjustment and adjustment. Among the situations that force the car owner to carry out unscheduled adjustment of the optics, we highlight:
- emergency situations;
- planned body replacement;
- repair of suspension struts, change of springs.
Correct operation of the vehicle does not imply significant changes in the location of the headlights; it is enough to make minor adjustments.
Features of adjusting automotive optics
Adjusting headlights on modern cars does not involve complete disassembly of the main optics. There are special adjustment screws at the rear of the headlights ( plastic handles), when moving them, you can lower or raise the main headlights down or up vertically. The handles help to turn the light stream to the center, move it to the edge, shift it to the left and right.
To adjust the headlights with your own hands, you will need a spanner or a Phillips screwdriver.
Adjusting headlights on a Renault Logan yourself
- To adjust the headlights, you need to find a flat area in the garage or on the street. On a fence, garage wall, or special screen an improvised calibration screen is performed.
- The foreign car is placed from the wall at a distance of five meters. Markings are applied to the wall, marking the center. It must coincide with the axis of the car. Next, measure the distance between the headlights. Transfer the number to the screen, making a line for the right and left headlights.
- Then they measure the height of the centers of the headlights from the floor or ground and draw them on the screen horizontal line. Renault has an electric corrector; it is placed in the zero position. Next, turn on the low beam of the main optics.
Advice! It is advisable to adjust each headlight separately, covering the second headlight with thick material, or turning off the power to the headlight. The light beam of the fog optics is adjusted only in height.

Boundaries of the light beam
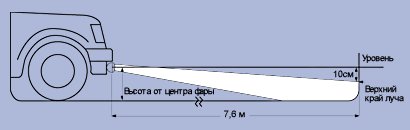
If the low beam beam is adjusted correctly, it is directed at a certain angle downward and forward. The angle size is different for each vehicle.
A 1.0% inclination angle indicates that a car moving one meter away is accompanied by a cut-off line of 1 cm.
With a height of the centers of the headlights of 0.8 m and a tilt angle of 1.0%, the boundary of light and shadow will be located at a distance of 80 m from the road surface. With an angle of 1.5%, such a boundary will be at a distance of 53 meters from the road. Low beam is necessary to illuminate the right side of the road, road signs, and pedestrians. But on potholes in the road, it should not blind the owners of oncoming vehicles. Practice shows that if the adjustment of the head optics is insignificant, the efficiency of roadway lighting decreases.
We are preparing the work front
In order for the adjustment of automotive optics to be carried out correctly, it is necessary to create conditions that are close to the daily operation of the vehicle. The trunk should have the following equipment:
- spare wheel;
- jack;
- fire extinguisher;
- set of tools.
To ensure that the body is in the correct position, it is important to check that there is sufficient pressure in the wheels before adjusting the optics. If the parameters are below the norm, use the pump to increase the indicator to the recommended norm.
Advice! You can speed up the setup of the optics by inviting an assistant.
Be sure to check all fastening connections on the lights. If you find traces of rust, remove the deposit immediately.
Before adjusting the optics, remove any dirt that has accumulated on the surface of the optical instruments (the glass must be completely transparent).
If the sealing of the connections of the optical unit is broken, the light bulb becomes cloudy and the quality of light deteriorates. The main problems that cause deterioration in optical performance are indicated in the technical manuals supplied with the vehicle. Recovery luminous flux, the cloudy lamp is replaced, all components of the structure are sealed with sealant.
Professional adjustment at the service center
Unless you have special equipment, it is difficult to achieve the optimal headlight setting on your own. You will have to readjust them every time you go out on the road, spending a significant amount of time on this.
Specialized stations Maintenance have high-quality optics testers, offer the option of setting up the main optics depending on technical features vehicle.
IN Lately“left-handed” lamps began to appear on the market - fake xenon lamps.
Developers of fashionable automotive lighting paint llamas blue, trying to increase their maximum power, simulating a xenon beam. Such lamps are not suitable for installation on cars; they quickly overheat and blind oncoming cars. Such pseudo-optics are practically not adjustable; professionals do not recommend installing them on cars.
In specialized service centers There is a device for adjusting the light of the optics, so it will not be difficult for professionals to make the adjustment high beam. The low beam is adjusted automatically. When adjusting the optics yourself, there is a high probability that you will have to constantly adjust both flashlights, since without special equipment it will not be possible to make an ideal adjustment.
While operating a car, almost every driver had to look for a solution to such a common problem as improper functioning of headlights. Incorrectly adjusted headlights significantly reduce visibility in poor conditions or at night.
Another danger is that your car may not be seen in time from afar by drivers of vehicles moving in the oncoming lane.
How can you adjust headlights?
You can adjust the headlights using one of three methods. You can contact those craftsmen who work in a car service center and use a special device to adjust the headlights. Well, what is convenient for many, do this work manually.
Many are confident (and it must be said in vain) that it is impossible to perform such a procedure with one’s own hands, since without the appropriate knowledge and skills it will be difficult to avoid mistakes during the setup process. But what if there is no special equipment, and it is not possible to contact specialists in a timely manner? Well, you should arm yourself with knowledge of certain rules for adjusting the light. So how is this done? important procedure, setting up, adjusting headlights with your own hands? Experts say there are three the most important stages of this process:
- making markings according to certain patterns on the wall;
- marking the position of the lamps;
- directly adjusting the light itself.
Important note: before you start adjusting, check whether the vehicle itself is in good working order.
The fact is that The direction of light will directly depend on the following important factors:
- car tire pressure;
- serviceability of suspension springs of a passenger car;
- the load on the suspension, or rather its distribution.
If your vehicle is faulty and has one of these problems, you may have your headlights set at the wrong angle. Accordingly, adjusting the headlights yourself will most likely be done poorly. Some manage to make things even worse than they were before the adjustment began..
 To ensure that the work is completed to a sufficient degree of quality, you must comply with a number of important requirements:
- You need a flat wall in front of which you can park the car. There should be 7-8 meters of free space in front of the wall.
- Prepare chalk or duct tape. They are needed for marking.
- Before tuning, try to mark the surface as carefully as possible, guided by the individual parameters of your car. Or - using universal meanings, suitable for the prevailing number of passenger cars.
After “washing” a new car, it must be run in so that possible factory defects appear. An article about running in a new Lada Granta car with all the details and nuances.
Winter is coming, which means you need to prepare your car for the cold. about preparing the car for wintering.

Carrying out marking
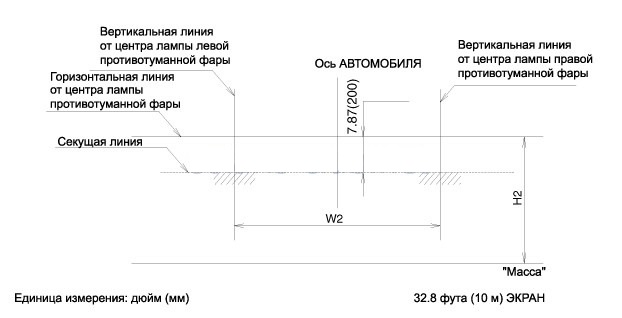
Adjusting PTF or headlights is a responsible process, but not as complicated as it might seem at first glance. First, you should drive up to the wall at a distance of about 2 meters and mark the center of the axes of the headlight lamps on the wall. Then you need to drive off to a distance of approximately 7.5 m.
The dots marking the center of each of your headlight bulbs need to be connected with a line. Next, add a vertical line to this horizontal line.: It will connect to the dot representing the central part of your car. You will also need an additional marking line. It will run parallel to the line that connects the center points of your headlight bulbs. This additional line should be placed lower, at a distance of approximately 6-7 centimeters.
The wall marking is complete, it's time to move on to the actual setup stage. Turn on the low beam. You need the right beam of light - gradually and carefully tighten the adjustment screws. They can be found under the hood of a passenger car, on the back of the headlights. Ideally, the light will be positioned lower than the point on the wall that marks the center of your headlight bulbs. Similar in a simple way headlight lamps with combined light can be adjusted(that is, “near-far”).
If the “far and near” are separate, then you will have to adjust the light separately, according to different schemes. Accordingly, the markup will be slightly different. Although, adjusting the low beam headlights will be done according to the method described above. If you are adjusting the high beam headlights, you need to ensure that the beam of light falls exactly on the center of the marking. However, it should be said that manually, even with the most careful adjustment, the result will still be slightly inferior to tuning headlights using special equipment.
This video clearly shows the entire process of adjusting the headlights:
Headlight adjustment for VAZ 2110
 How to adjust headlights on a VAZ 2110? Almost the same as in the configuration schemes described above. Even before the headlight adjustment begins, be sure (and thoroughly!) wash the lamps. Sometimes it is precisely because of dirty lenses that the light flux cannot find a sufficient “road” out. In other cases, the cause of insufficient or scattered light from car headlights is defects on the glass.
After you have washed the headlights, carefully inspect their surface. Did you find any defects – cracks or chips? Adjustment is unlikely to help: you first need to replace the headlight lenses with new ones. Also, if there are defects, the reflector should be replaced. How else to increase the flow of light? Install xenon or halogen lamps on your car; their use is very effective. 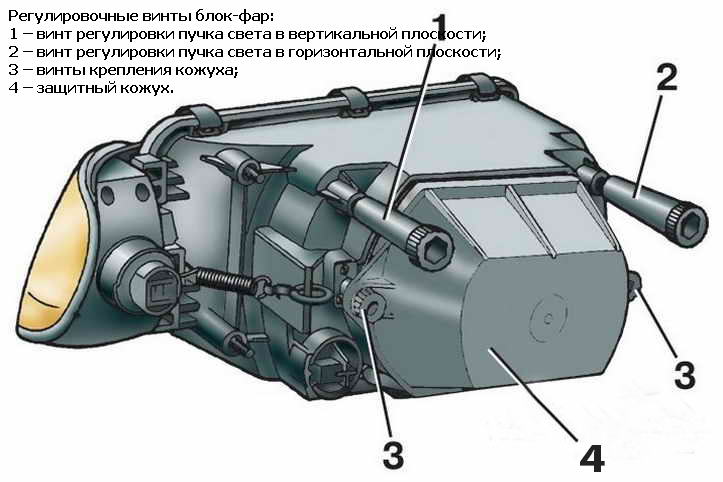
Adjusting the VAZ 2110 headlights is done in this way:
- find a large area with a flat and high enough wall;
- place the car at a distance of 5 m from the wall;
- ask someone to sit behind the wheel: the assistant’s weight should be about the same as yours;
- draw lines that will pass through the central points of the headlights, symmetrically to the center line of the car;
- additional lines will run: the first - where the center of the headlights is (measuring should be done from the floor), and the second - 6 centimeters below the first line;
- turn on the low beam of one of the car headlights, cover the other with cardboard. Check that the headlights match the marked lines and dots. Does everything match with you? This means that the adjustment was successful, and if not, repeat it all over again.
Video on how to improve headlights on a VAZ 2110:
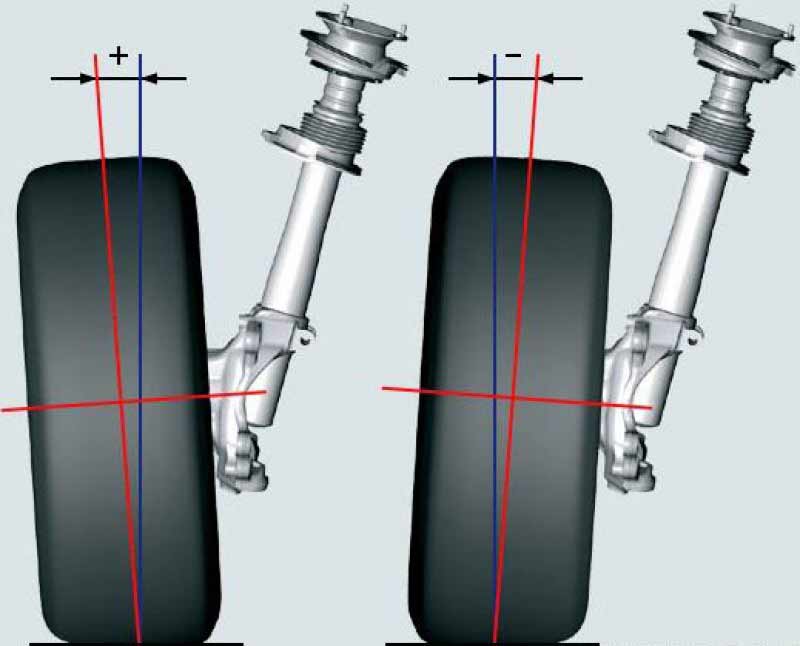
If the steering wheel is tilted to one side, then the axles need to be adjusted. Wheel alignment - what is it and why should it be adjusted? The answer is in our article.
Before adding coolant, what is more suitable for your car - antifreeze or antifreeze?
Some tips on warming up the engine in cold weather can be found here /tehobsluzhivanie/alert/kak-otogret-mashinu.html Is it possible to warm up a car in 5 minutes?
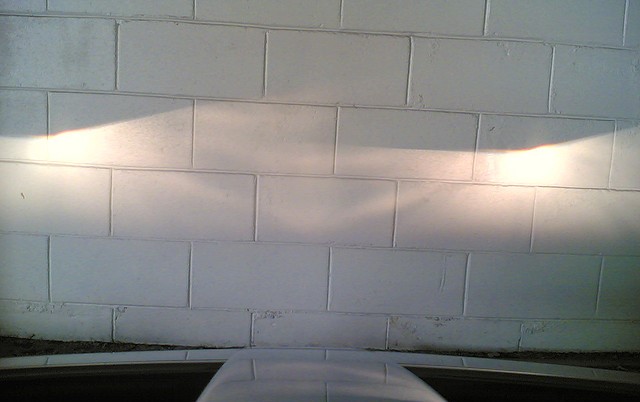
Adjusting the foglights
 How to make adjustments fog lights? Manual adjustment of the optimal light is carried out using the rotation method. That is, you need to turn to vertical plane and horizontally the optical element of car headlights.
You need to loosen the bolts in advance, with which the headlights are attached to the bumper.
It is very convenient to adjust headlights and fog lamps using modern devices specially designed for this purpose. Well, if there is no special equipment, proceed as follows:
As a rule, manual configuration is done quite quickly, but if you have the opportunity to use special equipment, be sure to take advantage of this opportunity!


