Replacing old frames with modern plastic windows is half the task. The next step, which is often forgotten, is the installation of window slopes. Proper execution and finishing of slopes plays an equally important role in warming an apartment as. You can invite a craftsman to carry out the work or save a little on builders and make slopes yourself.
In contact with
Classmates
Types of slopes
The complexity of the work on finishing the slopes depends on the quality of the walls, the accuracy of the craftsmen when working with windows and the selected material for finishing. There are only three basic ways:
- with subsequent decor (painting or wallpapering);
- plastic framing;
- cover .
Slopes are also made of wood - coniferous (most often pine) or valuable species (beech, oak, mahogany). This is a rather laborious method that requires professional work with wood. Stylish wooden slopes look in expensive interiors, where the rest of the furnishings are also made using wood. Do-it-yourself repairs can be completed if you choose a simpler material for slopes of plastic windows.
Plastic slopes
Plastering and painting slopes
This method of processing slopes is the most economical and simple. The finished dry mix, which is based on gypsum or cement, is mixed with water in the proportion specified by the manufacturer, after which the material is ready for use.
Note!
Before applying the plaster, the surface around the window is cleaned of dust, dirt, sagging or mounting foam.
The seams of corners and slopes are expanded so that the plaster adheres better to the base - a brick wall. The wall is plastered first, and only then proceed to the slopes.

Slope installation
Crack sealing
When performing slopes, the tightness of the joints of the wall and window is additionally checked. The found gaps are sealed with mounting foam, you can use tow or felt. Fabric materials are treated with a gypsum solution and fixed along the perimeter of the frame.
2-3 cm should remain to the side parts of the window opening - this gap will be filled with plaster. When the material dries, work can continue. Do-it-yourself window slopes are not very fast, but you can be sure of the quality of each stage of work.
Plastering slopes - the final stage
A little mortar is placed in the groove of the slope, leveled, waited for drying and moved on to the next layer. At one time, you can apply 5-7 mm of the solution, then you need to wait for the material to dry completely. Align the layers from bottom to top.
Before applying the plaster, the upper part of the slope is fixed with a horizontal plank of wood - its edge must be perfectly even. Fix the rail to the plaster or nails, exposing the guide along.

Slopes on windows
Advantages of plastic slopes
Installing plastic slopes will take much less time than working with plaster. This option for finishing windows will cost a little more, but there will be less dust and dirt after the slopes are completed, and the process will go faster.
The plastic panels are made of the same material as the window frames. With temperature changes, the slopes and frames expand in the same way, excess stress is not created. There is no need to paint or prepare PVC panels for installation. To eliminate the "consequences" of the repair, a damp cloth is enough, and the entire installation process will take no more than 2 hours.
For slopes, plastics are suitable that are not exposed to the harmful effects of solar radiation and are strong enough, resistant to scratches and impacts. Typically, sandwich panels are selected with a top layer of plastic, an intermediate layer of insulating material and a bottom layer of moisture-resistant PVC.
How to make slopes on windows with your own hands video:
Installation of plastic slopes
Previously, fragments are cut out of the panels according to the size of the slopes. The panels are fixed on the cleaned surface with the help of "liquid nails". With a rail with a snap-in corner, the plastic is attached in the selected position. Instead of such a design, you can also use simple wooden slats, fixing them at the top and along the sides of the window opening. The panels are attached to the guides with a stapler.
The joints of the walls and slopes are made out with plastic corners. Their purpose is to keep the wallpaper intact on the walls adjacent to the window being designed. It is these parts that are most often damaged by children and pets.

Performing slopes on the windows with your own hands, it is worth observing the technological nuances. It is better to choose plastic panels to match the shade of the window, since they do not have to be painted. Before using the panels, the mounting spike is cut off from them. Panels should be cut with a special knife or jigsaw.
Mounting foam may deform during solidification. To prevent this from happening and the slopes remain smooth, they select foam with a minimum expansion coefficient. The slopes must be additionally fixed for 5-10 minutes until the foam "grabs".

Drywall slopes
Do-it-yourself slopes for plastic windows are quite easy to make from drywall. For work, a moisture-resistant material is chosen that will not suffer from accidental raindrops and condensate that accumulates on the glass. An alternative option is to use ordinary drywall, which will additionally be covered with several layers of primer or a special protective compound.
When performing drywall slopes, sometimes they put a window block with profiles on the sides - it will be the basis of the whole structure. Before mounting the block, the profile must be fixed in the window grooves. Then the system will be more reliable and tougher, and installation will be easier.

Installation of plasterboard slopes without a window block
You can do without ready-made frames by doing all the preparatory work yourself. In this case, you will need a profile in the shape of the letter "L" and fix it along the edges of the frame, creating a base for attaching drywall sheets. The material is cut exactly to size, inconsistencies can later be masked and corrected with plaster. An acrylic-based sealant is applied to the profile, then a drywall sheet is inserted. The distance between the window and the slope is laid with a layer of mineral wool, a layer of glue is applied to the near edges, and using a level, the drywall sheet is carefully pressed against the wall.

Alternative ways to install drywall slopes
It is not necessary to use a profile when making slopes. You can fix drywall:
- on mounting foam;
- on glue.
It is convenient to use metal frames in cases where the surface under the slopes was badly damaged during the installation of windows. Fastening drywall panels to glue or foam is carried out in the same way as fastening to a profile. In this case, the sheets are installed end-to-end or behind the frame, the seams are filled with sealant. After the work is completed, the surface is primed, covered with putty and two layers of paint.
Note!
The corners of the slopes can be covered with decorative corners.
Drywall slopes are not only profitable and easy to install. The surface of the material can be additionally decorated, which allows you to design windows in the style of the entire room. The slopes will not contrast with the design of the room and spoil the impression of the interior.
Please help us make the site better! Leave a message and your contacts in the comments - we will contact you and together we will make the publication better!Not all companies involved in the installation of plastic windows include the installation of slopes in the list of services provided. For the arrangement of slopes sometimes require unreasonably high fees. With the appropriate equipment, materials and basic knowledge, this task can be done with your own hands.
Slopes protect the seams from moisture and provide thermal insulation. There are several ways to install slopes: plastering, installation of drywall or PVC sheets.
Installation of plaster slopes (plaster slopes)
Do-it-yourself installation of plaster slopes will require a lot of time to complete. This method is usually chosen for the restoration of existing slopes during a major overhaul. To create slopes in the process of in-line redecoration, it is better to choose other materials. Indeed, when performing plaster and putty, the wallpaper coating around the window opening will inevitably deteriorate. If, during the dismantling of the old surface, the slope edge crumbled, then it is necessary to install a metal corner.
Installation of beacons

Professionals carry out plastering on beacons - wooden or metal fixtures. If you need to “build up” a small layer, then you can get by with marks from a mixture with the addition of gypsum. For beginners, it is better to purchase ready-made plaster beacons. The first beacon is placed at the very window or door block so that the plaster layer lies on the frame by at least 50 mm. During the installation of beacons, all distances are verified with a building level or a laser level. The second beacon is placed at the corners of the box. The distances between the first and second beacons should be the same along the entire perimeter of the window opening.
Slope plastering
Gypsum dry plaster can be used for plastering slopes indoors. Such a solution is quick-drying, it is better to knead it using a construction mixer. This type of plaster can be applied in a thicker layer than cement-sand, which is important if you have to cover up deep potholes in old slopes.
Sand is added to the cement mixture at the rate of ½, if you need to apply a layer of plaster more than 3 centimeters. So the layer will harden faster. Before adding sand to the solution, it is better to sift it. External slopes on windows are treated with a cement mixture or facade starting putty in combination with water-repellent additives. If the house has plastic windows, then before plastering, you will also need to carry out thermal insulation. Otherwise, in the cold season, the glasses will sweat a lot.

The plaster is applied in several layers, each of which requires drying. First, spraying is carried out, then soil is made in 1-2 layers. The last layer is done. The next layer of the mixture is applied only after the previous one has completely dried. After that, the surface is puttied, thus getting rid of smaller irregularities. It is impossible to apply putty in a thick layer. If you need to apply another layer of putty, then the previous one must be primed. The very last layer is the finishing, fine putty. As it dries, it becomes lighter. The next step is grinding, which is performed by a grinder.
Small gaps at the junction of the putty and the window or door block are covered with a sealant that can be painted. The junction is cut by 2-3 mm with a clerical knife at an angle of 450. The resulting recess is primed. Using a gun, the surface is covered with sealant so that the groove is completely filled. The bead of sealant should be as even as possible. To do this, apply masking tape. The sealant is leveled with a small rubber spatula, after which the masking tape is removed.

The slope surface must be primed with a wide brush in order to prevent cracking and prepare for subsequent painting. Can be painted with solvent-based enamel. But recently, acrylic paint has been increasingly used. Finishing slopes takes place in two layers. The second layer is applied after the first has completely dried. So the base will not show through the paint layer. It will take about a week to complete all the steps.
Drywall slopes
One of the advantages of drywall slopes over plastic ones is their practicality. In the case of minor damage or contamination of the top layer, drywall, unlike plastic, must be repaired. To return the slope to its original aesthetic properties, it is enough to putty it again, sand it and paint it. To perform drywall slopes, special skills are not required, but it will take a lot of time to make them. Installation takes place in several stages: creating a frame (with a frame method), laying drywall, puttying, priming, and painting. Such slopes are durable and practical. However, they have a significant disadvantage - they absorb moisture. Therefore, they are not suitable for rooms with high humidity and outdoor decoration.
Laying slopes of plasterboard on the frame

The package of high-quality metal-plastic windows always includes a profile for mounting plasterboard slopes. The availability of the profile must be checked directly with the manufacturer or supplier. In case of its absence, a galvanized profile can be used. For laying drywall on the slopes of doorways, a metal profile is also used. Before installing the window block, the profile is mounted in the groove provided for this purpose.
Typically, the installation of slopes is carried out the next day after the installation of windows. Then the surface is treated with mounting foam.

Now the window block should stand. After a day, plastic or wooden spacers are removed, and the excess foam is cut off.

They put it in the groove around the perimeter of the opening, and then, along the line of joining the drywall with the window block, screw the guide profile with self-tapping screws. The frame is installed before the slope is insulated with mineral wool. Insulation is laid in the voids between the profiles. The slope angle is set to 950. Drywall is mounted to the frame.
Regardless of the method of installation of slopes, drywall is polished. The gaps between the sheets are puttied. Only after that proceed to the priming and painting. So that the corners do not delaminate, a galvanized metal corner is mounted around the perimeter.
As with plastering slopes, at the junction of the window frame and the slope (in this case drywall), a recess is made at an angle of 450, pasted over with masking tape and treated with acrylic-based putty. Acrylic will completely harden in 12 hours. After that, the slopes are painted.
Frameless slope mounting method

It is rational to use frameless technology when you need to lay drywall on old slopes. To do this, the surface is cleaned of previous finishing and building materials and a primer is produced.
When performing slopes along existing ones, a drywall sheet is attached to the guide profile with self-tapping screws and glued to the base with a Perfilix mixture. The glue prepared from this mixture sets very quickly. Therefore, drywall must be cut in advance.
For better fixation, drywall is pressed with a wooden bar, which is beaten with a rubber hammer. To maintain the upper horizontal slope in the desired position for the time of gluing, spacers from the window sill are used. The minimum time during which it is necessary to fix the surface is an hour. The slopes are left for 2-3 days until completely dry. At this time, the outer edge of the slope (the place where the drywall and wall join) is left open. This will make the glue dry much faster. After the glue has dried, the edges of the slopes are covered with acrylic. Next, the surface must be finished with a finishing putty.
Plastic slopes
The easiest way to complete the installation of a window block is plastic slopes. They are easy to install, do not require special care, durable and moisture resistant. Depending on the style of the room and the color scheme of the windows, you can choose the desired tone. For heat and sound insulation, you will need mineral wool or penoizol. Plastic slopes can be installed both from scratch and on an old wooden or plastered surface.

Types of plastic slopes
Plastic slopes are suitable for exterior and interior decoration. They can be installed on the day of installation of the double-glazed window. There are several types of PVC slopes: foamed plastic, plastic-coated drywall and sandwich slopes.
Plastic sandwich panels
Recently, slopes from sandwich panels are often installed. Their cost is low, they are not at all afraid of moisture, they can be matte, glossy or with wood imitation. The structure of this material resembles a sponge, thanks to which the slopes retain heat better. After installing such slopes, the appearance of condensate on the glass is a rare phenomenon. The reason for the “fogging” of windows in this case lies in an improperly equipped ventilation system. In the production of sandwich slopes, panels with a thickness of 1 cm are used.
Along the perimeter of the outer edge of the window opening, we strengthen the wood rail with self-tapping screws, determining its location with a level. The rail will take on the load of the slope. Therefore, it must be securely fastened.
The starting profile is installed in the grooves. The slope itself is attached to the profile, after which insulation is made (the insulation is laid behind the plastic). The outer edge of the slopes is mounted to the wall using self-tapping screws, dowels or brackets. The first way is the easiest. Do not worry that the caps of the screws will be visible. Self-tapping screws are screwed as deep as possible into the panel and hidden with plugs.
Installation of slopes using brackets is carried out as follows: the first bracket is attached to the wall with a double-sided mounting tape, and the second bracket is attached to the slope. Brackets are attached to each other with self-tapping screws. The side slopes are fixed to the window sill with glue, then glued to the neighboring ones. Slots are treated with sealant.
PVC foam slopes

Integral PVC slopes have a fairly smooth top layer and can be easily cut with a grinder. In order to bend PVC at an angle, small cuts are made at the folds. If you need to make a slope in the shape of a semicircle, then there is no better material than foamed polyvinyl chloride. To form the necessary arc, frequent incisions are made. However, it should be remembered that the furrows should not exceed one third of the slope thickness. The cuts must be treated with glue.
We apply glue into the previously prepared grooves in the mounting foam and put the panel. As with the installation by the previously described methods, we attach a metal profile to the box and fix the plastic into it. We blow out the space between the PVC and the wall with a strip of foam, leaving a small space for it to swell. Next, proceed to fasten the profile to the outer corner. Docking points are treated with silicone, smoothing its surface with a rubber spatula or a damp cloth. Installation of PVC-coated drywall slopes is carried out in the same way as from plastic.
Do-it-yourself slope installation is a great way to learn new skills and save money at the same time. A properly executed finish will help hide some of the shortcomings of construction and repair work and minor mistakes made during the installation of PVC windows.
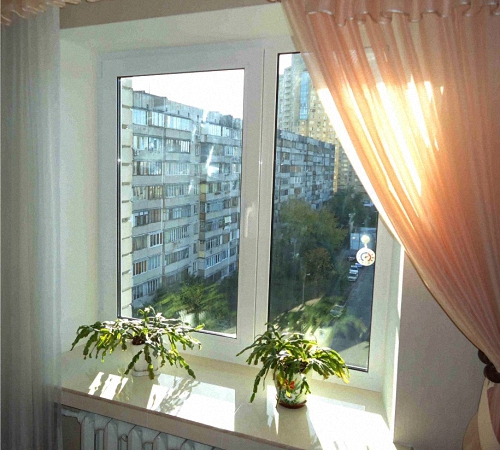
An important stage in the installation of plastic windows is the design of window openings. Slopes for plastic windows are made of the same material as the windows, or they are finished in a different way. However, nothing is more in harmony with the look of white PVC windows than neatly installed plastic slopes that hide all the defects of window openings, mounting foam and fasteners. Properly designed slopes give the windows an aesthetic finished look.
Why install plastic slopes?
Modern plastic windows can be considered ideally installed only if their slopes are carefully designed in compliance with the sealing rules. Neatly made slopes are aesthetic, they carry part of the heat-insulating load, preventing the assembly joints from fogging. With an illiterate finish during the ventilation of windows, due to temperature changes, the structure of building materials is destroyed and the attractiveness of window openings is lost. It is important to install plastic slopes, external and internal, in stages, according to all the rules, in compliance with the technology.

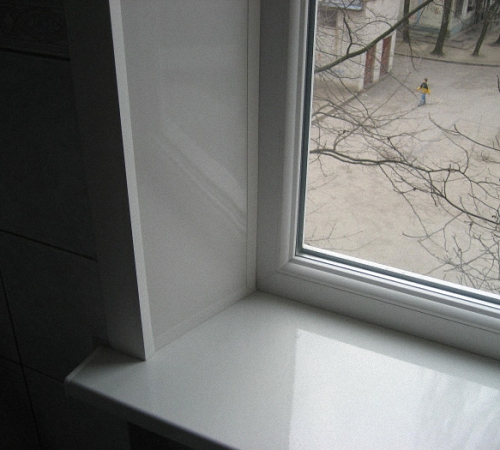
For those who are not very versed in terminology, we recall that slopes are the side surfaces of the walls along the perimeter of the window opening, adjacent directly to the window frame. They are internal, that is, installed on windows inside the room, and external, overlooking the courtyard of the house. The lower horizontal is usually framed by a window sill. But the side parts of the walls and the upper plane near the window require careful finishing - plastic slopes.
More recently, the slopes were leveled and decorated with wood or plaster for whitewashing. Modern PVC windows are in harmony with the same finish. Since much attention is paid to the quality of finishes today, thin plastic trim is preferred to be placed on internal slopes.
Old plaster slopes cannot fully provide sound insulation and sealing, and it often blew through the cracks near the frame and under the window sill, especially in winter. Under the destructive influence of the external environment, plaster and putty crumbled and became unusable, so everything had to be redone. With the introduction of new technologies for the rapid installation of hermetic PVC windows, it has become easier to make plastic slopes for windows with your own hands than to decorate window openings in the old way.

One of the additional complications of low-quality windows is condensation, which appears on the windows due to temperature differences. When the junction of the wall and the window frame is illiterate, the double-glazed window is too cold, and the windows “cry”, forming dampness on the windowsill. Competent finishing of slopes minimizes this factor.
Before the start of the production of plastic windows, the problem of condensation due to insufficient sealing could also be dealt with with the help of plasterboard slopes and polyurethane foam. They were more effective than the old-fashioned white-painted stucco. This option is better succumbed to the insulation of the window opening. However, their main drawback is low moisture resistance, and the installation of plastic slopes today also solves this problem.
Today, plastic slopes for double-glazed PVC windows are a universal solution to many problems. For their insulation, mineral wool is usually used to provide the window with effective hydro, heat, and sound insulation.

The main advantages of plastic slopes
If we compare plastic, plaster finish or drywall slopes, then plastic can be called a lot of advantages:
- durable operation;
- perfectly smooth texture harmonizes with PVC windows;
- aesthetic appearance;
- the ability to effectively close all joint defects;
- it is possible to use flexible platbands;
- no need for additional finishing and painting of the window opening;
- moderate cost of finishing works;
- effective thermal insulation of the opening;
- the ability to complete the window finishing on the same day as the installation of PVC windows or postpone the finishing for certain construction and design tasks;
- clean work with quick installation;
- if you have a tool, all the work can be done independently and quickly (in 2-3 hours);
- simple subsequent operation - the surface is easy to clean and clean;
- it is possible to choose a color palette for any stylistic decision;
- does not need additional alignment of the window opening after dismantling the old frame;
- relatively low thermal conductivity;
- high moisture resistance and the possibility of unhindered removal of liquid;
- frost protection.

Insulation of plastic slopes
When replacing old wooden windows, dismantling can significantly destroy the window opening, so all voids that have formed must be filled in order to eliminate the slightest gaps. Sometimes the cracks are not visible, but cold is felt in the area of the window and mold starts, which indicates depressurization of the seams after mounting or poor-quality installation of the window.
If you finish and install plastic slopes in accordance with all the rules, then they must be properly insulated so as not to transfer a portion of low temperature to the room. Effective thermal insulation is achieved in a fairly simple way - a heater is mounted under a layer of plastic up to the area where the frame adjoins the window opening.

Several schemes have been developed for insulating the plastic slopes themselves and the area where the frame adjoins the opening. Today, different types of heaters are used, and this range is enough to provide reliable protection of the window from negative external factors. The easiest way to solve the problem of effective window insulation is in 2 ways:
- fill the space with mineral wool or foam plastic on the inside of the window;
- at the junction of the window opening and the frame of their PVC slots, fill with mounting foam and close with finishing materials from the side of the street.
Materials for insulation today are:
- mineral wool;
- foam sheets;
- sandwich panels;
- extruded polystyrene foam;
- isover or fiberglass.

Attention: The choice of insulation should be dictated by the width of the gap and the features of the surface of the window opening and the joint with the PVC frame.
A small mounting gap within 40-50 mm on a smooth surface is easier to insulate with sheet foam, isover or polystyrene foam up to 2-3 cm. With a small gap and some irregularities, mineral wool is used. Outside the window, the gaps are filled with ordinary mounting foam, it is also used for gross defects in the window opening after dismantling the old frames.
Multi-layer walls, which are equipped with insulation approaching the window frame, provide sufficient protection from external factors. In this case, it is not necessary to insulate the plastic slopes themselves; it is enough to eliminate all gaps with mounting foam from the outside. If the building has cold single-layer walls without thermal insulation, then it is recommended to make effective insulation of the slopes with thermal inserts laid along the slopes.
The insulation layer is fixed over the entire surface of the window opening, without crawling out beyond the seams. When installing plastic slopes, the thermal insulation layer will be closed. Sometimes an additional layer of drywall is mounted - to level the knocked down plaster. Sheets of extruded polystyrene foam do not require additional processing when installing plastic slopes with your own hands.
When insulating slopes with foam plastic, the joint with the frame at the window opening is filled with cement mortar. Only after it all dries well, a layer of foam up to 5 mm can be glued onto a flat surface. From the outside, the window is protected with extruded polystyrene foam or another method. Any type of insulation should fit snugly to the surface. With external thermal insulation of window slopes, it is important to ensure the removal of moisture from the assembly seam.
Attention: Insulation of slopes will not be effective if there is no thermal insulation along the perimeter of the window, and the insulation is laid fragmentarily, only in problem areas with surface defects.
To do this, you need sheet plastic 8 mm, about 6 m, as well as a starting U-shaped and F-shaped strip of plastic or "F-ka". They are conveniently mounted on a wooden rail 10 - 15 mm. Of the tools you need a puncher or drill, metal scissors, a building level, a square and a marking pencil. Do not forget self-tapping screws, white sealants or silicone.
Self-assembly of plastic slopes
There are several ways to install the outer slopes of plastic windows and prepare the slopes themselves.
There are 3 common methods for manufacturing plastic slopes:
- from sandwich panels;
- from drywall covered with strong plastic;
- foamed plastic.
Sandwich panels with a porous structure do not form condensate, are not afraid of moisture, retain heat and are quite durable. They are available in different types, including glossy and matte, as well as colored and laminated "under the tree." There are different ways to fix external and internal slopes adjacent to PVC frames, and options for preparing a window opening with cutting parts for plastic slopes.
1. An electric saw or metal shears is used to cut sandwich panels or plastic panels of small thickness. The starting profile is mounted with dowels in the window opening during window installation. slopes are attached to this base. For installation, galvanized brackets and double-sided mounting tape are used. The brackets are fastened with self-tapping screws, and on their basis the slopes are fixed close to the window sill. It is better to grease the corners with silicone sealant.
2. Plasterboard slopes lined with PVC sheets are mounted directly to the drywall with “liquid nails”. It is important to ensure that there are no defects and traces of deformation on the plastic. Their special glossy surface is susceptible to dirt, which is sometimes difficult to remove.
3. As an option, PVC foam with a smooth face is used. When notched, it can even be bent to the desired shape using frequent radial cuts, they must be fixed with mounting adhesive. Otherwise, it has general installation rules with sandwich panels.

Installation of external slopes
Experts recommend making external slopes for PVC windows from a sandwich panel, the reliability of which has been tested. The material easily withstands the effects of the external environment and is a reliable barrier against cold, precipitation and temperature changes.
Before starting the installation of external slopes, it is important to make accurate measurements in order to eliminate gaps and cracks. The height, width and length of window openings are measured in order to transfer the panel cutting to a sheet of plastic. After cutting 3 blanks with a circular saw or metal shears, you can proceed with the installation.
First, the upper horizontal part (slope) is fixed, while its base is sunk as deep as possible, and the space in this niche is filled with mounting foam. It should not be allowed in too much, so as not to warp the plastic, which easily bends when the foam bursts during hardening. The slope must be pressed against the upper part of the opening, fixed with construction tape at the reference points.
When the horizontal slope is checked, the side parts can be mounted in the same way, checking the parallelism and compliance with the vertical. Set up spacers. In the same way, plastic slopes are mounted in a wooden house, but it is better to fix them with self-tapping screws.
The design must stand for a day or two, so that the mounting foam finally hardens. But if the plastic is stained, it is better to immediately cut off the smudges with a knife and wipe the slope with a rag soaked in a solution of vinegar. After the foam has hardened, the mounting tape and spacers are removed. Next, the decorative corner is fixed with sealant or transparent silicone.
Installation of internal slopes
Before installing plastic slopes indoors, it is advisable to complete the wall decoration. Plastic is mounted on a solid solid surface. If a plastered window opening crumbles in an old house when replacing a wooden window with PVC, then it is better to knock it down to the base of the wall, and then level it and fill it with insulation. This is not necessary for new buildings.
Along the perimeter of the installed window, along the inner joint, wooden slats are fixed with self-tapping screws. They are convenient to use for leveling walls adjacent to the opening. Plastic slopes will be attached to them. The most reliable fastening is on the starting plastic profile. An F-shaped profile is also mounted on wooden slats, fixed with stapler brackets.
Internal plastic slopes are installed on the finished base, starting from the upper horizontal, under which it is recommended to lay mineral wool. Installation is in many ways similar to the described instructions for external slopes, and the gaps at the joints are also hidden with silicone or white sealant.

Attention: All work on the installation of plastic slopes is carried out on clean, dry surfaces at low or moderate humidity!
Do-it-yourself installation of plastic slopes is not limited to the description of the above installation technologies, options are possible, for example, plastic slopes - video:
Installation of slopes is not included in the scope of services of most companies that install plastic double-glazed windows. And if it does, it is often exorbitantly paid for their arrangement. However, if you have the appropriate materials and equipment, as well as basic knowledge, this task can be completed without the involvement of specialists. How to make slopes of plastic windows with your own hands will be discussed in this article. There are 3 main ways to install slopes: installation of PVC or drywall sheets, plastering. Thanks to the slopes, hydro and thermal insulation is provided.

Plastering slopes will take time. This method of finishing slopes is usually performed during major repairs. At the same time, in the process of in-line cosmetic repairs, as a rule, other methods of finishing slopes are chosen. This is due to the fact that in the process of plastering and puttying, the wallpaper around the opening will certainly be damaged, which will lead to the need to replace them. If, during the dismantling of the old surface of the slope, its edge crumbled, then it is necessary to install a metal corner.

The first beacon should be installed at the window block in such a way that the plaster lies on the frame by at least 50 mm. At the same time, it is installed strictly horizontally. The second beacon should be installed at the corners of the slope. Along the entire perimeter, the distance between the beacons should be the same.

Dry gypsum plaster is quite suitable for finishing window slopes from the inside of the room. The easiest way to mix it is with a construction mixer. If you need to cover deep potholes in old slopes, then this type of plaster is just right for you better than a sand-cement mixture.
So, add sand to the mixture at the rate of ½. This is if you have to make a layer of more than 3 cm. In this case, the sand must be sifted. As for the outer window slopes, they must be treated with a cement mixture or with a starting facade putty. At the same time, it should contain a water-repellent composition.
To prevent the glass of plastic windows from sweating in the cold season, the slopes should be insulated before plastering. It is worth considering that single-chamber double-glazed windows will definitely “sweat”, and if the slopes are not insulated, then condensate will also collect on them and then bloom will appear.

The plaster should be applied in several layers. However, each of them requires pre-drying. First, spraying is done, then in 1-2 layers the primer and the finish layer. For the final leveling of the surface, the slopes should be puttied. In this case, the putty layer should be small. After drying, the fine putty is sanded with fine-grained sandpaper or a grinder. The gaps at the junction of the putty and the door block should be covered with sealant, which can later be painted. The joint should be cut with a clerical knife by 2–3 mm at an angle of 45º. Then the recess is primed. The resulting groove should be sealed. In this case, the strip should be as even as possible, in which masking tape will help you. The sealant is leveled with a rubber spatula. You can then remove the tape.
Before painting the slope, it must be primed. The paint on the slope is applied in two layers. The next layer is applied after the previous one has dried. It will take you about a week to complete all stages of work on plastering the slope.

Drywall slopes are more practical than their plastic counterparts. If such a slope from the GKL (drywall) is damaged, then it can be repaired. To do this, you will need to putty the slope of the drywall, sand it and paint it. Installing slopes from GKL does not require special skills, but it will take a lot of time to install them.
All work consists of several successive stages:
- frame installation;
- drywall laying;
- primer before puttying;
- putty;
- primer before painting;
- painting.
A significant disadvantage of such slopes is that they absorb moisture. In view of this, they cannot be installed in rooms with high humidity and for outdoor decoration.

High-quality metal-plastic windows are equipped with a profile for mounting slopes made of moisture-resistant gypsum board. The presence / absence of a profile can be checked with the manufacturer before buying windows.
Immediately before the installation of the window, the profile is installed in a specially prepared groove. If there is no groove, then use a galvanized L-profile. This profile is screwed to the edge of the frame. You can insert cut strips of drywall into it. Drywall should have the most accurate dimensions. Apply acrylic sealant to the profile, and then insert drywall into it. Lay the distance from the side of the window to the slope with mineral wool. At the end of the drywall, gently and evenly press it against the wall.

If you have to install the slopes of expensive wooden double-glazed windows, then the algorithm of actions will be a little different:
- Drywall is installed on the edge of the window profile. To have the same gap around the perimeter of the window, you can make a template.
- The fragment that adjoins the window must be filled with foam. For a tight fit to the wall, glue is used.
- On the window profile, which is located closer to the edge, adjacent to the drywall, adhesive tape should be glued so that the indentation around the entire perimeter is 2-3 mm.
- Then the acrylic sealant should be applied with a gun. With a wet finger, smooth the sealant, and then remove its excess from the surface of the window. After that, remove the masking tape.

Installation of drywall without a frame is usually used when finishing old slopes. At the beginning of work, the surface is completely cleaned of the old finish. Prime the prepared surface.
Drywall is attached to the profile with self-tapping screws and pointwise apply the Perfilix adhesive mixture. Given that this mixture hardens very quickly, drywall should be measured and cut in advance.
In order for the drywall to be fixed and the glue to be evenly distributed, it should be pressed with a bar and gently tapped with a rubber mallet. To fix the upper slope, install a spacer to the windowsill. The upper slope is fixed with spacers to the window sill. In order for the surface to be fixed, it must be kept in this position for at least an hour. For complete drying of the glue, it is enough to wait up to three days.

During this time, the drywall joint and walls should not be sealed, due to this the adhesive mixture will dry faster. As for the edges of the slope, they can be covered with sealant. At the end, the surface is puttied with a finishing putty, sanded and painted.

Plastic slopes are the easiest to install. Their advantage is durability and resistance to moisture, and they do not need to be looked after in a special way. The tone of the plastic can be selected depending on the color of the window, as well as the style of the room. To carry out heat and sound insulation, you need to purchase penoizol / mineral wool in advance. Plastic slopes can also be installed on an old base or they can be installed from scratch.

The peculiarity of plastic slopes is that they can be used to finish window openings inside and out. It is possible to carry out their installation even on the day of installation of a double-glazed window. So, there are several types:
- Made of foamed plastic.
- Made of plastic-coated gypsum board.

Increasingly, sandwich panels have been used for finishing slopes. This is due to the low cost of the material, with high moisture resistance. So, sandwich panels can be glossy, matte or with a relief imitating wood. Their structure is similar to a sponge. This, in turn, improves the thermal insulation properties of slopes. In this case, panels with a thickness of 1 cm are used.
A wooden lath is fastened along the outer edge of the opening with self-tapping screws strictly according to the level. In this case, the load of the slope will be taken by the rail, which means that it needs to be fixed thoroughly.
The starting profile is installed in the groove. A slope is subsequently fixed to it, and then insulated. In this case, the insulation is placed under the plastic. The outer edge of the slopes should be fixed to the wall with self-tapping screws or dowels.

If the slopes are installed on the brackets, then the algorithm of actions will be as follows:
- The first bracket is attached to the wall. This will help you double-sided mounting tape, and the second - to the slope.
- Brackets must be connected to each other with self-tapping screws.
- The side slopes must be fixed to the window sill with glue, and then connected to the neighboring ones.
- Then the seams are sealed.

PVC foam slopes have a relatively smooth surface. They can be cut with a grinder. If you need to bend PVC, then make cuts at the folds. The shape of a semicircle for finishing the slope is easiest to make from foamed PVC. In this case, the furrows should not exceed one third of the thickness of the slope.
Cuts must be treated with adhesive.
Glue is applied to the grooves in the mounting foam, and then the panel is installed. As described above, in the subsection on the installation of gypsum slopes, you need to install a metal profile in the box. Then you can fix the foamed PVC into it. The space between the wall and the plastic must be sealed with foam, while leaving small gaps, as the foam will swell.
Then you need to fix the profile to the outer corner. Treat the joints with silicone. It is important to smooth its surface. This can be done with a damp cloth/rubber spatula. Installation of slopes made of plastic-coated gypsum is carried out in a similar way.
Self-installation of slopes is an opportunity to acquire new useful skills and at the same time save a lot. In addition, with proper installation of slopes, you can hide defects in construction and repair work and some shortcomings that were made during the installation of PVC windows.
Video
To better understand the progress of this work, we suggest you watch the video.
Today, many construction companies are moving to the use of new technologies and new standards. In all new buildings, only plastic windows are installed, windows are also changed in all houses. It is worth knowing that after the windows are installed, you have to make slopes. They can be made from any material, but drywall and plastic are the most commonly used.
Foam is not thermal insulation, for it it is necessary to use additional materials, they can protect windows from cooling.
Types of slopes for windows
The most commonly used plaster slopes, plasterboard and plastic.
Plaster slopes were popular in the old days. In fact, they have more disadvantages than advantages. First of all, they can lose their color, if the house sags, then the plaster will definitely move away from the wall. Such slopes are quite laborious, because their installation takes several days.
The plaster is applied in several layers, and each layer dries for a rather long time. Then the layers are primed and painted. In addition, such slopes do not provide protection from temperature changes, the windows will sweat.

slopes plasterboard are more durable, they have excellent thermal insulation, but at the same time they are afraid of moisture, that is, they are best installed in rooms where thermal insulation is provided. However, to install this option, a good specialist is required, besides, then priming and painting are still required.

The most universal is considered plastic slopes. They are very practical, do not fade and care for them is quite easy. Plastic is durable and can last more than fifteen years. Such plastic will be in perfect harmony with the window, if you choose the right shade. Plastic is quite easy to mount, if you study the technology itself, then there is always the opportunity to do this work yourself.

As an option, plastic sandwich panels are often used. They are matched to the frame and can be matte or glossy.
Installation of slopes from sandwich panels
The profile for fastening slopes is made of sandwich panels whose thickness is not more than 1 cm. The profile is attached to the opening, and any options can be used, most often fastening is carried out using self-tapping screws and dowels. In some versions, fastening with galvanized iron brackets with a thickness of not more than 1 mm is used. The bracket is attached to the wall and to the slope with foam. The brackets are connected to each other by means of self-tapping screws.

If it is supposed to design the window with integral PVC or drywall, then you can give it any shape. Integral PVC is able to bend at any angle, while special cuts are made. The incisions are fixed with a special adhesive. In fact, the installation is done in the same way as the installation of sandwich panels, using self-tapping screws, dowels and a profile.

Sandwich panels are fastened in a certain sequence:
- along the perimeter of the entire opening, guides are attached using self-tapping screws of the appropriate size,
- holes in the wall for guides are made using a drill or puncher. It should be ensured that they are attached completely evenly, it is better to control the process with a level,
- the plastic panel should be adjusted in size so that it clearly fits into the guides,
- excess panels are cut off according to the depth of the slope and the empty spaces are filled with sealant and sealed with special masking tape until completely dry,
- after the sealant dries, decorative plastic corners are installed.
- six-meter strip of plastic 8 mm thick,
- start line,
- strip F-ka, that is, a strip of plastic of a special shape,
- rail 15 mm thick,
- level,
- staples and stapler
- white silicone,
- perforator,
- mineral wool,
- metal scissors,
- self-tapping screws.


Useful. What are the best blinds for your home? Let's try to break it down together:
Tools and materials
To install conventional plastic slopes, the following materials and tools are required:


Useful. During the operation of plastic windows, they may need to be adjusted - more on this.
Stages of installation of slopes
Installation is carried out in several stages. Initially, wooden slats are recruited, the main thing is that the lights do not protrude. The slats are attached to the wall with a perforator. For leveling, you can use wooden blocks. At the same time, ideality at the joints is not so necessary.

A starting strip is nailed along the edge of the plastic window. It is important that a strip of plastic will be attached to the groove of the starting strip. If you didn’t have wallpaper pasted over, then you can tear off the film and glue them, because the dirty work will be finished. Before stuffing the F-ki, it is important to cut it correctly.

After the strip is stuffed, an overlap will remain, which is removed with metal scissors. It is attached with a stapler to a wooden rail. At the last stage, plastic is attached and the wall is immediately insulated.

The plastic is attached, and cotton wool is put in front of it, everything will turn out tightly and beautifully. If even and beautiful corners do not work out, then they can always be rubbed with white silicone.