High chair, as a rule, is oriented only for its owner, since, unlike an adult, such furniture belongs to a child, who has his own characteristics and is constantly growing. Manufacturers offer a large number of various options children's high chairs, among which it is easy to choose the right one. If there is a desire and opportunity, then create a wooden child chair Making a little one with your own hands is also easy.
Assortment of chairs
Among the variety of different chairs for preschoolers, there is a certain classification that divides all models according to certain qualities.
Classic high chair
This version of children's products is no different from ordinary adults. All the same elements are used in their design. The only thing that distinguishes the high chair is its dimensions, which are adapted to children’s height. Most often, such models are made of wood.

Folding highchair
The convenient design of this piece of furniture allows you to store it compactly in any closet and disassemble it as needed. This is a very valuable quality for small apartments where there is not enough space to place full-sized chairs for children. These children's models have a simple configuration and are most often folded like a book. They are made from wood or metal in combination with plastic. It is very convenient that you can take this type of highchair with you to the country house or to the park, and it will take up practically no space in the car.

Growing chair
This version of a children's high chair requires a variety of adjustment mechanisms. Thanks to them, you can install the desired height sitting on a chair or adjusting the position of the backrest. This approach helps, having bought a high chair while the child is small, to adjust it to size as the baby grows. Such chairs are used right up to school and even during first grade.

Orthopedic model
These chairs are similar to office chairs, on which the baby can sit at the table and do creative work. But they are already designed for older preschoolers who are preparing for school and schoolchildren. Their design is made in such a way that it allows the child not to get tired during prolonged sitting. Most often, the back of a highchair of this type consists of two parts that adapt to the position of the baby’s body and allow him to feel comfortable.
There are also separate varieties, which are represented by high chairs for feeding and rocking baby structures, which, although considered chairs, still stand out as a separate group.

Varieties by material
Depending on the material used, children's chairs can also be different. Let's look at the most popular ones this moment.
Plastic children's chair
Many parents choose this particular option for a highchair due to:


But it is worth noting that some plastic can still be toxic. Such products are supplied by unverified manufacturers. You can distinguish such a highchair by its pungent chemical smell.
Children's wooden high chair
The use of wooden children's chairs is no less common. This is a more familiar model that everyone has known since childhood. Now manufacturers use MDF, laminated chipboard or solid wood for such chairs, which perform well during operation and are completely safe for the child.
Children's wooden chairs, especially those made of solid wood, fill the children's room with an incredibly clean and bright atmosphere, and the smell of wood gives a feeling of calm and tranquility. Those essential oils, which are released from wood, have a beneficial effect on human well-being, creating a favorable indoor climate.

The cost of such wooden children's furniture is, of course, higher than plastic, but the difference in quality is significant.

Criteria for choosing a high chair
Children's furniture needs to be selected much more carefully than adult furniture, this also applies to high chairs. Here are a few factors that are important to consider when buying a high chair for a preschooler:


DIY baby high chair simple
Although there is now a significant selection of furniture items for children in stores, their cost is high. If the father or grandfather has primary skills in working with wood, then you can create a wooden children’s high chair with your own hands, which will delight the child and give him the love of a loved one, which was invested in the process of work.
The easiest way to make a wooden children's chair is due to the availability of the material and the ease of its processing.
Materials and tools
To make a full-fledged wooden highchair, you will need some materials. First of all, these are bars, boards, plywood, from which the structure as a whole will be made. For fastening you will need screws or self-tapping screws. It is better to take more of them so as not to be distracted during the process of assembling the chair. Sandpaper is needed to make the surface of the chair smooth. Also, do not forget about decorating the finished wooden children's high chair, which is done at the discretion of the craftsman. You can leave it unprocessed.
To create the simplest children's highchair made of wood, you will need bars of the following sizes:
- for 2 supporting rear legs – 3*3*55 cm;
- for 2 front legs – 3*3*30.5 cm;
- for 1 top crossbar – 1.9*4.1*16.5 cm;
- for 1 seat made of two boards – 1.4*10.5*26.3 cm.
To carry out the work you will need a jigsaw or saw, a screwdriver or screwdriver and a drill.
Manufacturing and decoration algorithm
The first step is to make a drawing on paper indicating exact dimensions future wooden chair. This is the only way to end up with the piece of furniture that was planned in advance. After this, the work proceeds according to the following algorithm:


After the wooden chair is completely ready, it can be used. If desired, the design can be decorated.
Important! If you plan to apply carvings to the chair, then do this before varnishing.
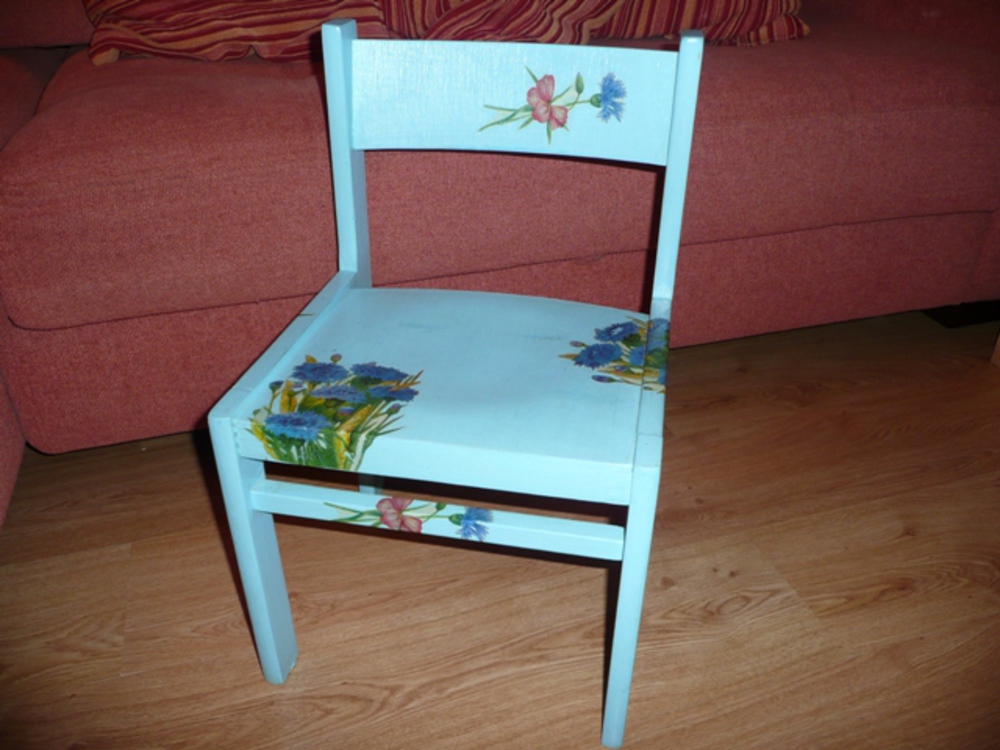
To make a piece of furniture look brighter and more interesting, you can apply a pattern to its back and seat. This is done if you have drawing skills yourself or, if you don’t have them, using a stencil. In this case, any color scheme can be selected, but it is better to choose a bright and cheerful one, since the furniture is, after all, for children.
Nowadays there are many adhesive films on sale that can also be used to decorate a children's chair. Due to the fact that the high chair is small enough and the image on it will be larger, the child’s attention will focus on this fact.
You should not use it in decorating the seat and backrest. voluminous jewelry that will interfere with the baby's ability to sit in the high chair. As a result, such furniture will be uncomfortable and the child will not use it.
Folding highchair made of plywood
If you don’t want to make a simple wooden chair and your imagination requires something unusual, then you can try your hand at making a folding chair from plywood. Its design means the chair can be folded into a compact sheet, which is very convenient for storage and transportation.

Making such a chair is not difficult, you just need to make a drawing in advance on a scale of 1:1 on graph paper and prepare necessary materials and tools:
- moisture-resistant plywood with a thickness of at least 2 cm and sheet dimensions of at least 90*600 mm;
- bolts with sleeves for use as hinges;
- epoxy adhesive;
- jigsaw;
- pencil;
- roulette;
- sandpaper or sanding machine.
Work execution technology
Drawing wooden chair Made from plywood and made to specific sizes. They must correspond to the height of the child, so it is best to use the dimensions for high chairs from the table given earlier. After completing the drawing, all actions proceed according to the following algorithm:

Transformable chair
Often parents try to use furniture for their child as rationally as possible. For this purpose, transformable children's chairs were invented, which first act as pieces of furniture for feeding the baby, and later become a separate table and seat for creative activities.

Required Parts
To make such a kit you will need separate parts for the table and chair. So, for making wooden seat will need:
- legs with a length of 39 cm in the amount of 4 pieces;
- rounded corners, cut from a board with a thickness of 2 cm - 4 pieces;
- 2 top bars with a length of 22 cm;
- 3 crossbars 30 cm each;
- 1 seat base with dimensions 20*30 cm.
For the table you will need:
- 4 legs with a length of 50 cm;
- 4 strips of 41 cm;
- 4 crossbars 34 cm each;
- 1 tabletop with dimensions 4*38 cm.
Legs, slats and crossbars are made of timber with a cross-section of 2*4 cm; plywood with a thickness of 1.8 cm can be used for the seat and table top.
Important! Only high-quality wood is selected, well-dried and free of cracks and knots.

Execution of the frame
All wooden parts They are attached to each other with glue, but for tight fixation, wooden dowels of 2 * 5 cm are also used. For them, you need to make special grooves in the places where the parts are fixed. To do this, first drill a hole with a 6 mm drill, and then make the groove itself using a chisel with a cross-section of 8 mm.
Thus, all side elements of the structure are secured. It is important to fix the elements with clamps during installation, maintaining an angle of 90 degrees. After the glue has dried, everything wooden joints processed with sandpaper.

Installation of chair and table
The back and seat of a children's product of this type are made from sheets of plywood with overall dimensions 25*30 cm, which are glued together. All corners must be rounded, and foam rubber is glued to the top of the seat and back, which is covered with the selected fabric. It needs to be attached to construction stapler With reverse side products. In some cases, the filler and fabric are not attached directly to the plywood, but are used to make a removable cover for a children's wooden transformable highchair.

The product is assembled as follows:
- Connecting finished sidewalls using strips.
- Installing a seat supported on slats and securing it with dowels.
- Installation of bottom and back strips.
To install the table, you also need to connect the side parts with the transverse strips and sand them thoroughly. Then you can install the countertop.
The finished children's wooden transforming chair is coated with several layers of varnish and left for 2 - 3 days until completely dry. After this, it can be used as a high chair for feeding or for baby activities as a separate chair and desk.
Conclusion
A highchair is a piece of furniture that every child needs. With its help, the baby can comfortably engage in creativity, play and even eat at his own small table. If necessary, the product can be made independently. In addition, there are many options for wooden models, among which parents can find the one that suits them and their child. Using installation technologies and tips from this article, the job will not be as difficult as it seems at first glance.
A lady acquaintance once asked one of the founders of the Encyclopedia Denis Diderot: at what age should one begin raising a child? “How old is yours?” – he asked in response. “Oh, he’s only one day old!” The philosopher shrugged: “In that case, you’re already a day late.”
A child will need a high chair not on the first day of his life, but when the baby begins to sit up independently, at about 6 months. But its role in the formation of the personality of a new person is by no means small. Firstly, the formation of the musculoskeletal system and correct posture begins on the chair. Secondly, from the high chair the child learns to handle things. This is his first property that is not a toy. Children who grew up on the lap of their mother or grandmother, on average, get along worse with others and realize their abilities less well.

The interests of parents also, of course, cannot be discounted. Feeding a small child often brings out a storm of emotions that parents may simply find exhausting at the moment. Feeding something that is spinning like a spinning top on your lap, calmly and kindly, costs a lot of effort; the child feels it and only gets more excited, which does not benefit him at all. In addition, you need to protect clothes, carpets, and furniture from volleys of porridge, soup or puree.
Therefore, out of a fairly large number of varieties of children's chairs, the first in importance and time to start using is a high chair. A little later, after about another 4-6 months, he will need a play/work chair. We will deal with them in that order.
General requirements
To make a useful and comfortable high chair for your baby with your own hands, you first need to take ergonomics into account.
First, a chair for children younger ages should not be too soft: In order for a child’s skeleton to grow correctly and muscles to develop, his body must feel reliable support. It is advisable to make the play chair generally rigid, but on the high chair and work chair, relatively thin soft pads on the seat and back are needed. A gaming chair and a work chair are most often the same, so what should we do?
These conditions can be combined by sewing cushions of the following structure according to the size of the seat and back (from bottom to top): canvas or burlap - padding polyester 5-7 mm - flannel, calico or flannel - decorative fabric. To secure them, you will have to sew on straps that tie/fasten under the seat or behind the back, but this makes making the chair itself and caring for it easier.
Second, avoid plastics. The safety of polyethylene has now been unconditionally confirmed for children's items. high pressure(produced without the use of catalysts) and PET, but there are no suitable blanks from them for home craftsmanship. PVC seat upholstery is a relic of the past: when there were no diapers, without it diaper rash in babies was more common.

The next point is the size of the chair. The table of recommended sizes of children's chairs for games and activities is shown in Fig. Main parameter the choice for it is the growth group. The back height is obtained by subtracting the seat height from the total height of the chair; in a high chair it must be determined separately, because his seat is raised for the mother's comfort. The table has been compiled for child care institutions; the dimensions of a chair for a child in a family can be found more accurately and simply: we look carefully at who he matches in height and build; about eyes, eyebrows, etc. disputes later. Then the prototype parent shows which chair she/he is most comfortable in, we take the dimensions from it and multiply by 0.55. A child on such a seat will be fine from about a year to 4-5.
Note: Based on the above, all dimensions of the product samples given below are subject to adjustment if necessary.
Materials

What to make a chair from little question also important. It is better not to use metal at all, or in small quantities (for example, fasteners) and so that the child does not have access to it. Children's bodies are generally more resilient than adults, but babies' skin is very sensitive. This is determined by the instinct of self-preservation: what is simply slippery and a little cold for an adult is a danger signal for a child. Since he himself cannot yet avoid her, he has to appeal to his parents. Those who have children know how. But they don’t always understand why, and that’s what makes them cry out loud.
For example, in Fig. on the right is the erroneous use of steel fasteners.“Intensive use of corners” not only does not strengthen the structure, contrary to the claims of its author, but it is also dangerous for the baby. An adult’s finger will go unnoticed in the corner with a self-tapping screw, but the baby may get scratched. In general, children don’t mind scratches, but if he is regularly placed in something that bites for feeding, then how will this chair affect the child’s psyche? The question is rhetorical.
Processing and finishing
So, we are left with practically only wood, MDF and laminated chipboard of class E0 in terms of phenol emission. In a high chair for a very young child, it is still better to use hardwood or MDF, they are completely chemical-free. Hypersensitivity to pine resin or traces of phenol-containing compounds occurs in about 1 in 400,000 babies, but how can you be sure it's not yours? It is impossible to identify in advance.
The baby chair is exposed to external chemical influences approximately of the same nature and to the same extent as a kitchen stool, but the sanitary and hygienic requirements for it are much stricter. Therefore, before assembly, the parts of a wooden children’s highchair must be treated with a water-repellent and bactericidal composition, and ready product cover with a protective layer.
There is also almost no alternative here: impregnation is a water-polymer emulsion or, instead, PVA diluted three to four times with water. Coating – acrylic varnish on water based. There is no reliable evidence of complete safety for children of other compositions for processing/finishing furniture. Be especially wary of stains; Children's furniture with varnish is best left as is. Design and decor in this case are by no means determining factors.
About plywood

When making a high chair for the firstborn from wood, an amateur craftsman (who may be taking on furniture for the first time in his life) will have to face a number of technological difficulties, see below, respectively. section that cannot be overcome without a workshop and special tools. Plywood can help out; You can use it to do almost everything at home. But not every one. Simple birch (not waterproof and not baked) and also simple construction or packaging are definitely suitable. The latter is covered with so-called veneer. pine trees cut down in winter. Dried pine already contains almost no resins, and in the process of making plywood, their remains are completely removed. These types of plywood are made with casein glue, which is absolutely safe for children. Moisture resistance and additional strength are given to them by the impregnation described above, but twice: secondly after completely dry(approx. days) initial.
About the glue
Due to its combination of qualities, PVA is most suitable for gluing and gluing in the manufacture of children's furniture. Modern furniture pur-glues are much stronger, but also more expensive; for a product whose service life does not exceed 5-7 years, the first is unimportant, but the second can “bite”. But PVA has the following advantages:
- Absolutely harmless and safe, which has been proven by more than half a century of experience. As they say, at least eat it; even if the liquid gets into the eyes, it is washed off without any residue with water, if you rinse it immediately.
- PVA stains are easily cut off assembly knife, and their remains can also be easily sanded clean.
- The PVA joint can be separated by warming it up properly with an ordinary household hairdryer. This is important if the high chair needs to be disassembled and stored until the next addition to the family. Also, if you need to replace its individual parts as the child grows, see below.
The very first high chair
The most commonly used designs for chairs for feeding children are the following, in order of increasing complexity of manufacture:
- Stands/holders – boosters – for feeding the baby on an adult chair, hard and soft;
- Typical (classic) home folding high chairs;
- Children's transforming sets and “growing” (for growth) chairs;
- Stationary chairs for feeding babies.
The latter are used either in children's institutions for the youngest, or in wealthy households with excess living space. In both cases, the chair requires high strength: in children's homes it will be used by many generations, and wealthy owners care about prestige and also design. As a result, a stationary chair for feeding children turns into a rather complex product, the manufacture of which requires special tools and production conditions; for an example, see the drawings in fig.

Boosters
These are attachments or devices for feeding a child on a chair and at a table for adults. Rigid booster chairs (the first 3 from left to right are shown in the figure) save space in small apartment, so quite popular.

However, it is impossible to make them fully compliant with the requirements of children's ergonomics. The second is for children from 6 to 9-12 months. they are of little use. Third, soft attachments to an adult chair (leading manufacturers invest a lot of money in their development) do not provide a complete guarantee that an angry fidget, delighted with his favorite juice, will not fall on his side along with himself, the booster and his dad’s chair.

Much more practical are soft boosters for feeding babies, which are no longer chairs, but something like a kangaroo pouch, on the right in the top pic. They cannot be used constantly; there is a risk of ruining the child’s posture. But at the dacha, picnic or on a trip, the pocket for feeding - the booster will be very useful, especially since it will take up almost no space in my mother’s bag.
Making a soft booster for feeding a child is already a more feminine task, because... it is sewn; the pattern is shown in Fig; they are given without allowances for processing.
Note: the slings are wound from the sides of the cape onto the back of the chair from under the bottom, brought out through the openings and tied or fastened.
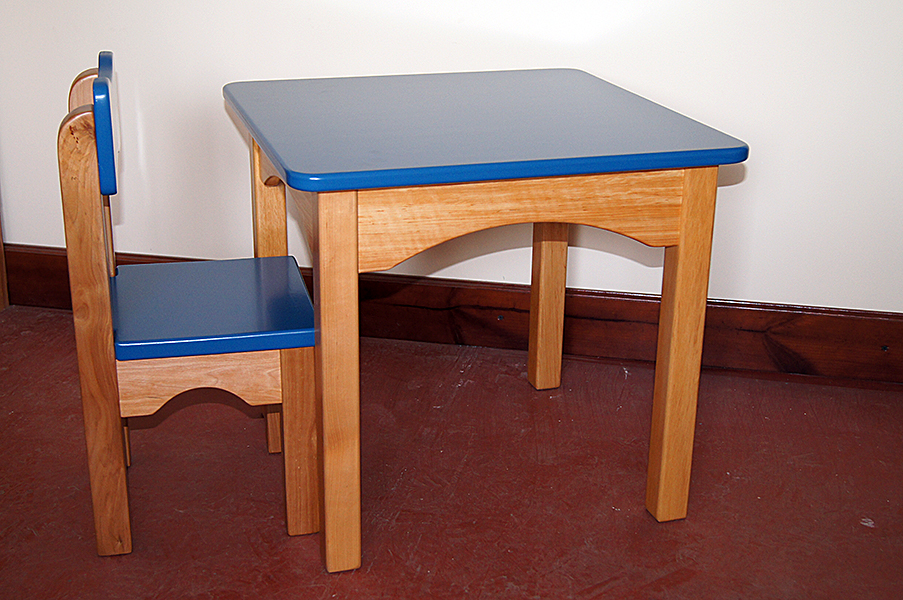
Home classics

How the familiar folding high chair for feeding babies at home is constructed, and its dimensions are shown in Fig. Materials - timber 40x20, 75x20 (footboard and leg ties), 16x25 (backrest slats, seat apron, tabletop frame), board 100x20 (inserts into the frame of the front legs) and plywood 6-8 mm (seat, tabletop). Assembly, except for hinges, is on confirmats (furniture screws) 60x6.
The connections marked in red are hinged: the table tilts up, and the frame of the rear legs is pressed against the front ones. The bolt heads (M6-M8) are on the inside and covered with plugs, red mark with an exclamation mark. The seat is hung on the front support bar on card hinges.
To fold the chair, first lift the table and move the frame of the rear legs slightly back. Then the seat lowers itself, and the frame of the rear legs is pushed forward until it stops - the chair is folded. And when unfolded, the entire kinematics of this chair locks without additional clamps according to the principle of a dead center, and let the little eater wriggle there as he wants - the chair will stand under him.
The only technological difficulty in the manufacture of this chair is the joining of blanks for the side frames of the front legs on dowels (lamellas) in the mustache or dowels. But you can get around it if you make the front frame from plywood, see below. Its operational drawback is that the thickness of the package is more than 10 cm. For a pantry in a small apartment or a closet in the hallway, this can be too much. And here plywood comes to the rescue, see below.
Transformers and growing
Transformable children's chairs for all ages are on sale, 3 positions. on the left in Fig. They are really convenient and functional, but technologically complex: part necessary details It can only be done in a workshop at a factory. Accordingly, the cost of such chairs is quite high.

For repeating with your own hands, a more accessible set is a chair with a table, on the right in Fig. Which is what many people do, but they immediately discover that a set with an upside-down table takes up more space in the apartment than a children’s high chair and table separately.
But the main thing is that this building is unhygienic. When the child sits down at the table, the edge of the large tabletop closest to the floor in the feeding position will be literally under his hands. And also - the undersides of the legs in the 6-12 month position, which have now become legs, and even awkwardly protruding upward.
There are no materials that do not scratch or cause microcracks. It is impossible to remove ingrained dust from the floor, which is what microbes need. Changeling kits for small children have been on sale relatively recently, but there have already been cases when they became foci of infection. Self-made ones from wood only make the danger worse.

The epidemic of fashion for transformable furniture (in this case there is no other way to say it) has given birth to real monsters, see fig. on right. When the child reaches table age, the chair is simply... sawed off, and the former supporting pyramid is turned over and becomes a table. Everything is clear about the hygiene of a large countertop, see above. As with a feeding table that is too narrow: there will be no food on the mother and on the floor only if a specially programmed robot is sitting on the chair.
And first of all, put yourself in the child’s place: there is a rigid fence on all sides. All that remains, as they say, is to put him on a chain. Secondly, a large table will be unusually rolly. Well, have you ever seen tables for adults? neat people, whose legs converge downwards? It’s funny, of course, but whoever starts this at home will probably not be laughing.

“Growing” chairs
In general, if we're talking about For a small child, it is better not to experiment with transformable furniture, excluding proven folding designs. For example, let’s take “growing” chairs, see fig. left. You can really sit on this from a simpleton to his dad, but it won’t be quite comfortable at any age. And in order to adapt the chair for growth for feeding, it will have to be turned into a product comparable in complexity to a stationary chair for babies.
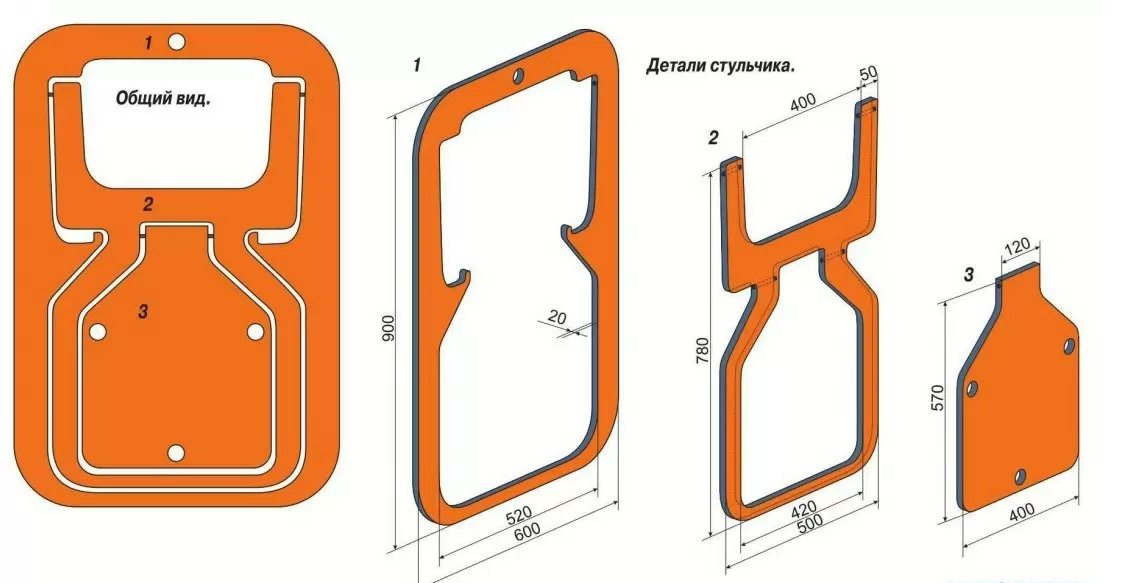
How to take everything from plywood
High chairs for babies are often made from plywood. Many homemade designs turn out to be quite practical and good looking, on the left in Fig. However, once the need has passed, it is hardly possible to adapt them for something else, first. Second - see on the right in Fig. laid out parts. Material waste - by eye no less than 60% Although good plywood You can buy it for 300 rubles per sheet 1550x1550, anyway, it would be advisable to do without crooked scraps that are now useless.

This is where it’s time to realize that an adult folding board chair made of plywood can be easily adapted for feeding a baby, see next. rice. Dad's for fishing or mom's garden, depending on who is in charge in the family. In terms of sanitation and hygiene, it is better, of course, to make this chair right away for a little one, and use it for adult use when he grows up.

From the remainder of cutting out opening A, you will get 2 struts for a child’s table with L-shaped legs; You will need to cut grooves for them in the sides of the chair. To feed a child, it is advisable to add a fabric back to such a chair: it will not reduce the comfort for adults, and it will not interfere with the folded chair hanging on the wall. A small tabletop is attached to struts on piano or card hinges, then the feeding table will also fold into a compact package.
Note: It is better to measure the dimensions of the struts using a ready-made, unfolded chair. This will be easier and more accurate than fiddling with trigonometry.

Another folding chair of the same type is shown in Fig. on right. It is smaller, 500x750 when folded. It’s not bad because from a sheet of plywood 1550x1550 there are exactly 6 of them, and the length fits into the trunk of almost any car. The letter w indicates the cutting width. In general, look at your child, yourself and your needs.
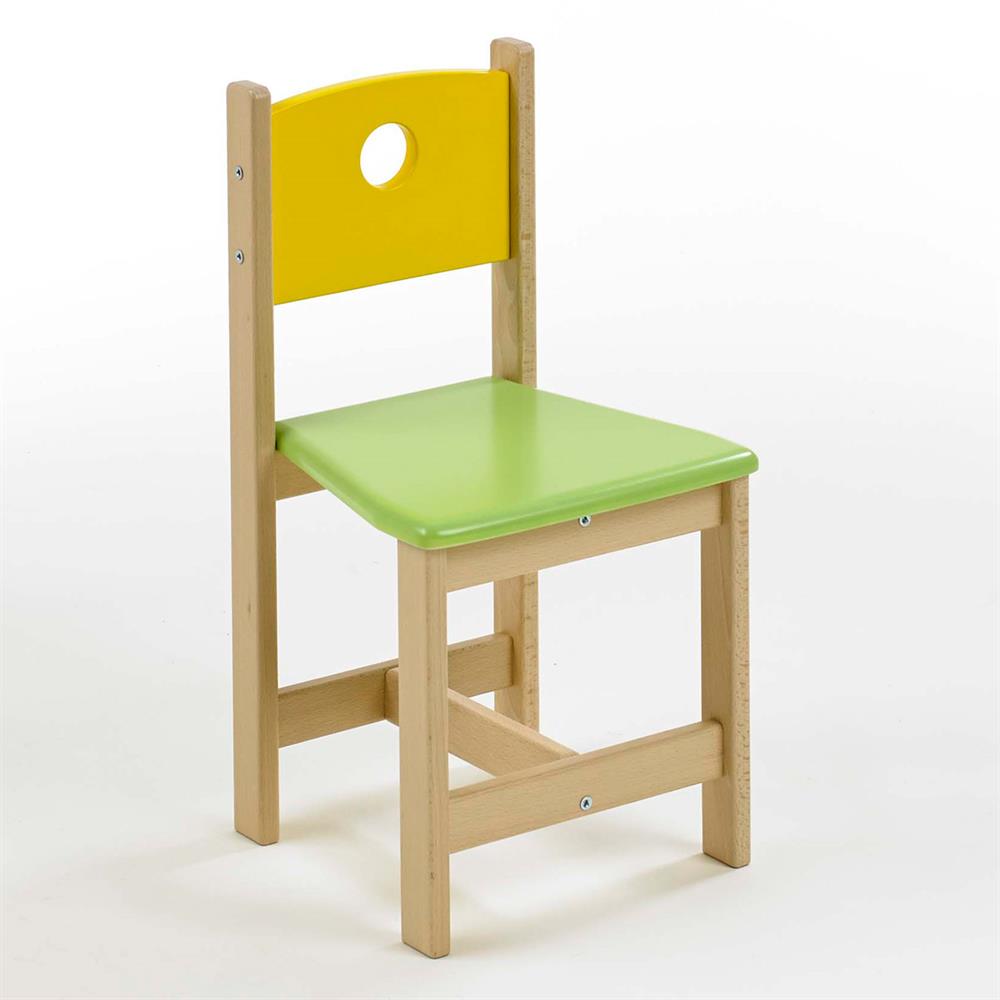
Older chairs
At the age of about one year, the child will already need a chair on which he can sit down, move it, and rearrange it. Chairs for small children in the age category following babies are play chairs (on the left in the figure below) and work/study chairs, in the center. Working chairs for children differ from play chairs primarily in their armrests; They are necessary for the child to develop correct posture. Then, the seat height of the work chair can be immediately taken based on the oldest person. preschool age, i.e. up to 400 mm. In this case, you need a step; preferably repositionable. The approximate dimensions of a high chair for babies of the “second stage” are given on the right, but, as mentioned above, they need to be specified according to the child.

Drawings of chairs for older children are given below. rice. On the left is the gaming simplest design. Legs optimal length for a child 12-36 months old who often plays on the floor. Fasteners – wood screws 40x4.2.

High chair for a child “like an adult’s”
The chair on the right is more complicated; its parts need to be marked on a grid and grooves cut to connect them. But it is universal, playable and working. The small protrusions of the sidewalls above the seat are enough to prevent a normally active child from sitting down with half of his butt hanging in the air. The seat height of 400 mm is the maximum for very young children. It can be made minimal first, approx. 220 mm, and then change the sidewalls as they grow; It will take a little labor and plywood, but mom will have something to say to dad on occasion. So, if dad is prudent, it is better to immediately cut the sidewalls for growth.
This chair is basically easy to assemble, like a puzzle. In the mobile version, say, for trips to the country, you can leave it like that. But with constant use, the chair will soon become loose, no matter how tight the joints were initially. Therefore, it is better for a child of this kind to glue his home chair with PVA. Dismantling, if necessary, put into storage - see above, about glue.
Finally, there is a category of children who, having barely realized themselves in this world, want everything to be like an adult. This is in general useful quality, but dad will have to work harder on a chair and other furniture for the child. The design and dimensions of a highchair “like an adult’s” are shown in Fig. on right. Wooden high chair such a design would require quite complex technological methods, but even in this case plywood will come to the rescue, see next. chapter.
Video: example of a simple DIY mini-chair
Technology and plywood
To make a high chair for children from wood, you need to know or will have to master how to make some carpentry joints: on dowels, using dowels (lamellas) and tongue and groove. How they are produced, using examples of carpentry, see the videos, arranged in order of increasing complexity:
Video #1: dowel connections
Video #2: corner connection with dowels for frame structures (bursting corners)
Video #3: tongue-and-groove connection
Video #4: direct keyway connection for joining board panels
As you can see, the houses are simple hand tools Only pos. can be done with sufficient quality. #1. Pos. #2 and #3 for a novice carpenter will turn out by hand with ease, and for poses. #4 and a good professional you can’t do without a workshop and special equipment. And now - shhh! - all this can be done at home by a “complete teapot”, using only a jigsaw and a little chisel. If the parts blanks are assembled with glue from 3 layers of plywood, the thickness is, respectively, 1/3 of the required one. Among other things, this technology allows you to assemble parts complex shape from small-sized fragments, which makes it possible to denser, i.e. cut the material economically.
How straight and angular tongue-and-groove joints are made in this way is shown in pos. 1 and 2 fig. resp. If the tenon is made trapezoidal with rounded corners, then the strength of the joint will increase several times, i.e. will be sufficient for adult furniture. This technology is not used in production - it’s a hassle and therefore unprofitable, but at home it’s better than buying or renting a machine for 60-100 thousand rubles.

To glue a package of blanks into a PVA part, you also do not need any special devices:
- Lay plastic film on a flat floor or table.
- Both surfaces to be bonded are lubricated thin layer glue; It's better to use a brush.
- Leave the adhesive layers until they are semi-dry and tack-free, when the adhesive film begins to become translucent at the edges.
- Place the blanks in a bag and press them.
- Cover the bag with another layer of film and place pressure on it from a dispersed load (books, for example) at a rate of at least 20 kg per 1 square meter. m of glued area.
Note: because The blanks in the bag may “float away” a little during gluing; they need to be cut with an allowance of 1-2 mm for finishing.
The tongue-and-groove corner joint must be reinforced with self-tapping screws with a diameter of no more than 0.5 times the thickness of the tenon, a pair per tenon. For example, if a part is 15 mm thick and consists of 3 layers of 5 mm each, then the diameter of the hardware is 2-2.5 mm. Glue is applied to the tenon and groove; the first is inserted into the last, as soon as the glue begins to come off (after 2-3 minutes), and immediately the connection is tightened with hardware.
How to tighten screws
In the above and all other cases of fastening parts with self-tapping screws, it is necessary to pre-drill blind holes for them with a diameter of the body (rod) of the self-tapping screw without threads and a depth of 2/3 of the length of its threaded part. A hole for the screw head is also selected in advance. After screwing, the head is covered with putty made from sawdust of the same plywood on the same PVA; Up to 2.5-3 volumes of sawdust can be added to 1 volume of glue.
Finally
Well, now on to the new thing - new impressions and bon appetit. Just don’t throw porridge in celebration, my parents tried.
With the arrival of a child in the home, parents have to buy a lot of new things, including children's clothes furniture, but the prices are considerable, and the quality leaves much to be desired.
For a person who knows how to work with wood, it will not be difficult to make something comfortable, durable, and most importantly, safe for your baby. high chair.
Homemade children's high chairs come in different varieties. This article talks about the technology of making a chair combined designs.
Material selection
For making a nursery furniture will fit wood coniferous species - spruce or pine, it is soft, durable, easy to process, pleasant to look at and inexpensive.
To protect the child from injury and splinters, all parts must be handle sandpaper.
Carpentry will also be needed tools, nails, hinges, varnish or paint for finishing coating finished product.
In this case, it is better to take paints acrylic base, and the varnishes are exclusively non-toxic, because the baby will breathe them, and Maybe- even try it on the tooth.
Types of chairs
The child begins to eat at the common table at about 6 months, but, naturally, he cannot sit with the others.
For comfort were invented various designs, in which you can put your baby, without fear that he will fall:
- for feeding, which is placed near with an adult table, but it is inconvenient due to the difference in height - the child’s head is at the level of the adults’ knees. The design of such a chair can be improved with the help of small wheels for convenient transportation of the chair;
- Soft case, which is attached to the back of an adult chair, is similar in design to sling;
- Chair for feeding with a small table on long legs;
- Combination chair– a small one is installed on a special stand-table, the design can be used as high chair for feeding or a desk for games.
Making a high chair with your own hands
Preparation of parts
 To complete the combined design of a children's highchair, we will come in handy:
- timber with section 200x400 mm on legs and crossbars;
- Board small size thick 200-250 mm for curves on armrests. To cut out parts for a chair, you can use a wooden board -. This durable material perfectly imitates timber and can be used not only for cladding facades, but also for construction. For example, to create a cover for a dacha;
- Fiberboard sheet 2x2.1 m (fibreboard) for making a seat;
- Plywood on the tabletop.
Chair parts
- Legs, length 390 mm, 4 things;
- Crossbar, length 300 mm, 3 details;
- rounded elements, 4 things;
- Tabletop 200x340, if desired, the size can be changed;
- Top crossbar 220 mm, 2 parts;
- Bottom crossbar in 340 mm, 2 pcs.
Note! To ensure a beautiful and even chair for feeding a child, the dimensions of the parts must correspond to the drawing of its design.
Details for the table
 To make a stand-table you will need to prepare the following parts:
- Legs length 500mm, 4 things;
- Transverse slats length 340mm, 4 things;
- Planks length 410 mm, 4 things;
- Plywood for table top size 380x450 mm.
It is not necessary to buy all the material; you can partially use what is available on the farm wooden boards and trimmings, adjusting them to the required dimensions.
Making a high chair: stages of work
Stage one: wood preparation
 timber sawed according to specified sizes. Its individual pieces are processed (sanded) with sandpaper, thanks to which all irregularities and scratches are removed from the surface of the wood, so that in the future the child will not drive splinters into the wood.
It is better to connect the bars using wooden dowels(connecting elements), you can make them yourself by cutting out blocks of size 10x20x50, or buy ready spikes in a furniture fittings store.
Advice! If you don’t have the time or desire to tinker with dowels, you can simply connect the parts using self-tapping screws.
In the bars themselves and the board at the attachment points you need to cut or drill holes, suitable for the size of the dowels (approximately deep 30-40 mm), being careful not to hole the tree all the way through.

Second stage: assembling the sidewalls
The future chair will have two sidewalls, for each you will need 2 roundings, By 2 top and bottom slats And two legs. Each side panel is assembled apart, first the legs and the lower crossbar are connected, separately to top crossbar the roundings are attached, after which these two elements stick together together.
Before connecting two bars, the connection point and dowels are well miss the mark glue, you can even use regular glue PVA. The second side panel is assembled in the same way, then these parts need to be left for a day let it dry and then sand it again.

Attention! During the assembly process, you need to ensure that the angles between the bars are straight and the sidewalls are completely identical.
Third stage: seat connection
Chipboard cut into 6 rectangles 300x250 mm, each has two adjacent corners rounded along long side. To secure baby, all edges need to be carefully sand, and then glue the plates together three pieces and put them under a press for a day. The result is a solid, durable back and seat.
Finished parts They are fastened together with a corner or a strip of metal bent lengthwise, and screwed with screws.

Stage four: chair assembly
Sidewalls They are connected by transverse strips using dowels and secured with glue. In the same way, strips are attached to the structure to support the back and plywood table top.
Advice! It is more convenient to first fold the structure, mark places for the dowels, drill holes and attach the bars without glue - this way you can replace the defects in time and correct them.
Find out how to make a step stool with your own hands:
Fifth stage: creating a table
 Technology Assembling a table is similar to the process of assembling a chair. First, the upper and lower planks are attached to the legs, then the resulting sidewalls are connected to each other by transverse bars a length of 340 mm.
Sidewalls preferably sand with fine sandpaper to make their surface even, smooth, and safe for use.
The next step is fastening table tops. We screw it to the end of the structure - and that’s it, a reliable children’s table-chair ready.
Stage six: making a soft seat
 In principle, this is not necessary, but for the child’s comfort it is better to make seats, and, if desired, a backrest soft.
To do this on chipboard sheet need to be glued foam rubber thickness of 1-2 cm and cover it with non-staining fabric or bright oilcloth children's colors.
Fabric on the back of the seat easily fastened using a construction stapler.
Advice! To save money, foam rubber can be replaced with several layers of padding polyester.
.Manufacturing baby high chair at home will take only a couple of days, and then on the basis that the work will be carried out only in free time in the evenings. So if you want you can fast, build a cute chair for your baby with high quality and inexpensively.
From this video You will learn how to make your own baby high chair:
Making a chair from plywood is not difficult at all. Made by hand under custom sizes such a piece of furniture will become a comfortable and original element of the interior with little material investment. 
Similar articles:
Types of features of plywood chairs
Making folding chairs from plywood different types and designs. The easiest option to start with is this. The transforming chair is more complex structurally. You can’t do this without pre-prepared drawings and carpentry skills.
Experienced craftsmen bring unusual ideas to life, producing unique products. It’s nice to make almost designer chairs with your own hands, simultaneously acting as a developer, manufacturer, and decorator.
There are no analogues of the product either in a furniture store or in relatives’ homes. An important point is the significant savings in the family budget. Homemade stools cost much less than factory-made options. Almost every owner has the tools necessary for production at home. The main thing is desire and patience.
Step-by-step instruction
A well-written instruction or work plan will help you make chairs from plywood with your own hands. detailed description every step and action.
First, they create templates for the details of the future piece of furniture. They are made from cardboard. Using a ruler and pencil, draw all the components and details of the product on cardboard and cut them out. Then transferred directly to plywood.
On next stage All parts needed for assembly are cut out. By using electric jigsaw sawing out parts from plywood.
It is recommended to sand all elements thoroughly. The surface should be as flat and smooth as possible. Without availability grinder It is difficult to completely align the parts and give the back the desired shape. If you use sandpaper, it will take a long time and require a lot of effort.
Drill holes for the hinges according to pre-prepared drawings. It is recommended to use bolts with sleeves as hangers. The sleeves are attached to the holes made with glue, which will increase the reliability of their fixation.
Special wooden spikes are needed to keep folding chairs in place. open state. To prepare the mounting points, holes are drilled. The wooden spikes themselves are made from timber, cutting 4 pieces to the length required for their manufacture.
Then you can begin assembling according to the project or diagram. The final step is making the seat. The foam rubber is cut to a given shape, covered with fabric and attached to the seat using a construction stapler.
Required materials and tools
Properly selected tools and materials for making furniture will make the process as comfortable and productive as possible.
You will need:
- a sheet of plywood, preferably 20 mm thick and 600x900 mm in size;
- foam rubber for a soft seat, 70 mm thick;
- fabric for decoration;
- cardboard to the size of plywood;
- ruler with pencil;
- construction stapler;
- jigsaw;
- surface grinding machine or sandpaper;
- PVA glue;
- self-tapping screws;
- bolts with sleeves;
- hammer.
If you can get or borrow a conductor for assembling furniture, this will be an excellent help in your work.
Project
Plywood chairs, like any other type of furniture, should be durable and comfortable. It is difficult for novice craftsmen to independently develop a model and calculate the loads that allow them to withstand the required weight. Therefore, the design and drawing of the future chair can be found ready-made or you can consult with more experienced craftsmen.
There are special tables corresponding to a person’s height and the required chair height. Before manufacturing, you need to think about who will most often use the product. A model made to individual sizes will be comfortable and convenient.
Manufacturing procedure
Before you start making a chair with your own hands, it is advisable to draw up a work plan. You need to decide on the size and design of the product, prepare tools and materials for making the chair, and choose the type of decor and upholstery.
To avoid damage to the material, do not rush. The main thing is to do everything in accordance with the drawings.
Decoration
Simple decor will help to give your self-made furniture module stylish and original look. Ordinary plywood is not the most visually attractive material, so it is worth spending time on giving the product a more interesting and beautiful surface.
The easiest way is to process finished model varnish. This will improve visual perception product and decorate it externally. You can paint the surface of the furniture with wood paint and then varnish it. This way we can achieve unity color scheme the interior of the room in which the chairs will be located.
Quite labor intensive, but more interesting option– apply an ornament or complex design. In this case, a wide scope for creativity opens up and everything depends on the imagination and skill of the author. It is recommended to use waterproof paints rather than ordinary ones. In addition, it is advisable to purchase brushes different sizes for ease of application.
Decoration soft seats chairs with fabric to match the furniture in the room will make the interior harmonious and stylish.
What do you do with old furniture?
Almost every parent faces the problem of purchasing children's furniture. You can make a highchair at home - it will save a lot family budget, and you yourself will be confident in strength and quality. It’s not difficult to make a children’s highchair with your own hands, the main thing is to draw up the correct drawings and dimensions, choose the right wood and don’t forget about decorating with jewelry.
When a child can already sit, eat and play on his own, standard furniture becomes a little big for him. A children's chair made independently becomes a wonderful alternative to plastic store-bought options, because it is non-toxic, more durable and even looks more solid in appearance. Their use becomes necessary already in the first year of a baby’s life, because he needs to be taught to be independent. Before wondering how to make a children's chair, you need to decide on its model. Today they come in two types:
- standard chairs;
- transformable chairs.
Children's chair Children's chair with armrests Transformable chair
Every day the child develops more and more new hobbies that require a sitting position. A DIY wooden chair will definitely appeal to little pioneers. Don't forget about the decor. A self-made chair can be decorated to match the already created interior of the room, or you can make it into some kind of highlight that is clearly expressed in any room. What you were able to do with your own hands should definitely please your child, because you will put a piece of your love into this work.
Procurement of necessary materials
A DIY plywood chair requires certain tools, like any other furniture. Of course, you don’t need carpentry machines, but you will have to prepare some accessories for a wooden chair:
- a small number of bars, based on the selected chair model, with a cross-section of at least 50 by 50 millimeters;
- bars with a cross section of 25 by 50 millimeters;
- bars with a cross section of 25 or 25 millimeters;
- drill, screwdriver;
- screws and self-tapping screws of various lengths;
- sandpaper or sanding machine.
Since the do-it-yourself stool is intended specifically for children, you should take care of the quality of all purchased materials. Wood is generally considered safe and not harmful product, so its use does not pose a security issue. It is better to use linden wood for a children's high chair; it lasts much longer than others. But, such a tree costs a little more. Experts recommend making a children's table from linden, because it is one of the parts of this furniture that is most subject to mechanical stress.
Go to work
The first step in creating a chair for a child with your own hands is to create diagrams and drawings. Without this main action it will not be possible to collect quality product. There is a large amount of photo and video materials on the Internet, as well as detailed diagrams various products, which you can easily navigate when creating your own masterpiece. The main thing is not to get hung up on the presented templates; the presented options should only be samples, especially useful for novice builders.
Preparing parts for a children's stool with your own hands also takes time. The cut parts need to be dried well, then there will be no deformation during the work and the finished chair will delight its owners for a long time. After drying, the wood must be sanded thoroughly, leaving no unevenness or splinters. Knowing how to choose quality material, there will be much fewer problems with its preparation.
After the cleaning process is completed, you can begin assembling the table and chair for the child. You should start connecting the parts of a children's wooden chair from the legs, so you can achieve a more stable position. Children's table It is also assembled with your own hands in a similar way. After collecting all the parts, you will receive ready-made option design, but don’t rush, you still have to do a lot of work with it.
How to fasten parts using a dowel First, glue the back pair of legs and the crossbar. Next we connect a pair of front legs. Then we connect each other with hags and crossbars. All gluing points are compressed with clamps, but with the obligatory control of right angles
Decoration and decoration
The last stage of DIY children's furniture made of wood will be its decoration. You should always start with varnish. We choose to work only acrylic options, because they are less toxic. Don't forget that Small child will be in constant contact with its furniture, and therefore breathe in the vapors emanating from it. You need to know how to choose a covering product so that your child remains completely safe.
Experts advise applying the coating at least twice, this will highlight the decor and smooth out any possible roughness. Don't limit your imagination! A children's table and chair can be decorated not only with varnish. Add bright prints, match the design of the product to the interior of the child’s room and then he will definitely love his furniture. Do not forget that decorations should be safe for the baby and, if he is still too small, you should not complete the decoration with small objects attached, because he may tear them off and try to try.
A plywood chair for a little princess can be decorated with a beautiful cover and lush bows. This will make her room more gentle, and the child will want to be creative while sitting on a chair made by loved ones. For boys, decor with painted cars, airplanes or rockets is perfect. If you are not very good at drawings, then use regular stickers. Only after gluing them to the chair, go over the entire surface with another layer of varnish. Then the baby will definitely not be able to tear them off and ruin the original appearance.
Decorating a children's chair (option 1) Decorating a children's chair (option 2) Decorating a children's chair (option 3)
Decorating a children's chair (option 4) Decorating a children's chair (option 5) Decorating a children's chair (option 6)
Decorating a children's chair (option 7) Decorating a children's chair (option 8) Decorating a children's chair (option 9)
You can easily make a children's chair with your own hands, drawings for which are available on the Internet. Your loved ones will be delighted with this original gift and may be asked to repeat your work. If you work with selected materials, there will be no problems with production.
Be sure to follow the drawn drawings and diagrams, then the product will stand level and the child will sit on it in complete safety. Don’t forget how to make a highchair, because perhaps these skills will be useful to you more than once in your life.


