One of the important aspects of the premises is ceiling lighting, the main purpose of which is not only domestic purposes, but also the decoration of the home as a whole. Today there are a lot of lighting devices of various models and shapes that can not only decorate the interior with their appearance, but also illuminate the room well enough. When choosing, you should pay attention to the type of ceiling and the desired volume of light.
What kind of lighting to choose
It is possible to install such lighting independently, regardless of the area and purpose of the space. It can be in different rooms, such as: bathroom, living room, bedroom, kitchen or hallway. And each of them requires its own version and power of lighting devices. There are a lot of them. The most used and popular in this process are:
- Pendant lights. They are considered a classic option and have a wide range of choices. They are mounted using a specific cord included in the kit when purchasing the chandelier itself.
- Near-surface options are attached directly to the surface of the ceiling itself, and in some cases even inside it.
Based on this classification, you can decide in advance which variety you will use. The variety of lamp models is very large, they are different in size and power. The choice depends only on the individual needs and wishes of the person himself.
Ceiling with different lighting
Lighting devices can be classified according to such characteristics as:
- Suspension method.
- Number of lamps.
- Directionality of light.
When choosing, you should pay attention to aspects such as:
- Ceiling height.
- Room area.
- The purpose of the room.
It is on the basis of these indicators that you should make your choice. Ceiling lighting in a bathroom doesn't require as much light as the kitchen or living room needs.
Luminaires, in turn, also have a classification that includes the following types:
- Multi-tube. Perfect for lighting a large enough area of the room. Found widely in bedrooms and living rooms.
- Single-lamp fit perfectly into the design of a small room. They are often used for kitchens or corridors. An interesting approach can be considered a grouping of single-lamp devices in a room. They can be combined together or divided along the entire perimeter, which will give the interior a touch of originality.
Spotlights have recently gained immense popularity. They are installed directly into the base of the ceiling over the entire area or selectively, depending on the wishes. With their help, it is possible to create a very comfortable, unobtrusive environment. In this case, the power is regulated, and it becomes possible to create both semi-darkness and a brightly lit room.

Multidirectional luminous fluxes from the chandelier
Another important aspect is the choice of the direction of the light flux. This is not only reflected in the overall picture of the room lighting, but also in the functional features of the room.
There are such options for the direction of light, such as:
- Directional - illuminates only a specified portion of the surface.
- Reflected. Usually directed towards the ceiling or walls, the room is illuminated in this case through reflection from other surfaces.
- Diffuse - passes through certain types of diffusers. They can be made from fabric, plastic, paper, or glass. They are also called plafonds, which can create their own unique atmosphere in the room.
The choice of plafond should be approached very carefully. The main aspect is the purpose of the room. Paper ones are flammable and should not be used in the kitchen, as they quickly ignite and can cause a fire. Glass looks great and allows light to pass through. Plastic ones are suitable for rooms where there is a risk of damage, for example, in a nursery. They have a low cost and a very wide selection of different shapes, and simply gorgeous colors. Fabric options will give your home an aura of intimacy and spontaneity.
Original types of lighting
Regardless of the size of the room and its purpose, light is very important. For lovers of originality and uniqueness, there are such types of ceiling lighting as:

Regardless of the type, its creation requires compliance with certain rules. It is usually mounted on a plasterboard ceiling. Backlight installation instructions include processes such as:
- Take measurements.
- Come up with the future shape of the drywall box. Based on the size of the room, cut the layout out of the material.
- Fastening is carried out using metal profiles.
- After fixing the plasterboard base, you should pay attention to its decoration.
- The final stage is the installation of the backlight, which is usually carried out around the perimeter of the base made of plasterboard.
It is important to remember that the backlight is not the main light source, it just complements it.
Stretch ceiling lighting
There are different types of ceilings, and lighting should be chosen based on this. For tensioning options, spotlights are the safest and easiest to install. They are capable of operating for a long period of time without replacement, since their power must be low due to the fact that the stretched film at high temperatures can melt, leading to damage.

Stretch cloth lighting
The advantage is the efficiency of such bulbs. They don't require a lot of electricity. Motion sensors will also help reduce electricity consumption. These are special devices that respond to movement in the room, and if it is completely absent, the light is extinguished automatically. When detected, it turns on in the same way. You can connect them to any kind.
Also possible. But in this case, the installation of the lighting device itself is carried out in the base of the concrete ceiling, but the type of fastener is created precisely on the suspended ceiling.
Its advantages are considered to be its impeccable appearance and reflectivity from the surface of the film itself, which creates an atmosphere of comfort and spontaneity. Thus, making the room more comfortable and calm. Great for bedrooms and living rooms.
Plasterboard ceiling
How to make a ceiling light in a plasterboard ceiling? This material allows you to install almost any model. There is a possibility of installation, both in multilevel and overhead views.
The so-called "hidden" is especially popular. Its essence lies in light bulbs, properly hidden in the base of drywall or cornices from it.
The technology for installing such a box is as follows:
- Measurements are taken of the area of the room.
- A box is cut from drywall or similar material. It is mostly square or rectangular in shape.
- Drawing marks on the shape where the bulbs will be located.
- With the help of profiles made of metal, installation to a concrete base is carried out.
- Holes are made in the attached base for lighting fixtures.
- The bulbs are connected to the electrics in the box.
Such structures externally look like ceiling cornices for indirect lighting. They can be placed not over the entire territory, but only attached to one wall. It is best to do this on a surface parallel to the window. Thus, the light will spread better in the dark.
In the case of finishing the box completely with lamps, the need for the main light disappears, since small bulbs are installed around the entire perimeter of the box and are able to illuminate the room well enough.
The advantages are:
- The ability to hide under the box not only electricity wires, but also various communications.
- Installation can be carried out directly to the profile.
- There is a choice of any types, since drywall provides for the use of lamps of any power.
You can do the installation yourself. The main criterion in the process of work is only the observance of the installation technology.
What you should pay attention to
It is better to choose the type of lighting in advance and coordinate it with such nuances as: the height and type of the ceiling. At a low height, you should not choose with an overly long base, since there is a possibility of hitting your head on it.
For rooms with a large enough area, it is better to choose more massive chandeliers with more than three lamps. For the play of light, you can purchase chandeliers with shades that are able to diffuse light.
With a small area of \ u200b \ u200bthe room, it is better to opt for lamps that can diffuse light. Thus, the room will visually become larger. And the directional light upward will help hide minor errors and surface irregularities.
It is imperative that the luminaire blends seamlessly with the overall interior design. If your home is decorated in a classic style, a crystal chandelier is perfect. The Art Nouveau style is characterized by unusual and very unique lamps. For him, you can pick up a chandelier with opaque shades of the original shape. Hi-tech welcomes almost all types, except crystal ones. Country music will be wonderfully complemented by pastel-colored lighting fixtures made from natural materials.
Today, such lighting is becoming increasingly popular among the population. There are many ways to use chandeliers and lamps to illuminate the space, but give it originality and sophistication.
Before we consider the main options and ideas for lighting the ceiling, I would like to devote a little time to the requirements that apply to this issue. It should also be clarified that these requirements apply not only to the layout itself, but also to their design, as well as design features.
So, during electrical work, you must take into account the following requirements:
- The light should be evenly distributed over the entire area.
- All luminaires (or each specific group) must have the same power, light spectrum and backlight intensity. Otherwise, there will be a lack of harmony and the interior will noticeably deteriorate.
- Lamps must be economical, bright and durable at the same time. The leaders in this case are.
- If the ceiling lighting will be hidden, the luminaire bodies should be hidden in a special cornice.
- The design of plafonds (or other products) should be combined with furniture and wall decoration.
- Light bulbs should not dazzle the eyes. Point the lamp up to create a soft floodlight. To create a bright light, the lamp must be facing downward.
- All wires must be hidden. When the track is hidden under the wall decoration. When laying the wire open, it is necessary to hide it in special cable channels (most often this option is used in the garage).
Most popular lamps
Most often, the following can be used to illuminate the ceiling in a house and apartment:
- chandeliers;
- Spotlights;
- directional light lamps;
- LED and neon strips.
Let's consider the features of using each option.
Chandeliers are a classic option for lighting not only the ceiling, but the entire room. There are no special requirements for them, the only thing is weight. This is due to the fact that some types of ceilings may not withstand the load and collapse (for example, plasterboard). The luminous flux of these products is quite diffuse and bright, so in most cases, only one chandelier is enough for the whole room.The advantage of these devices is their versatility - you can easily make lighting of a two-level, flat ceiling and even an inclined one (if you use a pendant lamp on a chain) ... 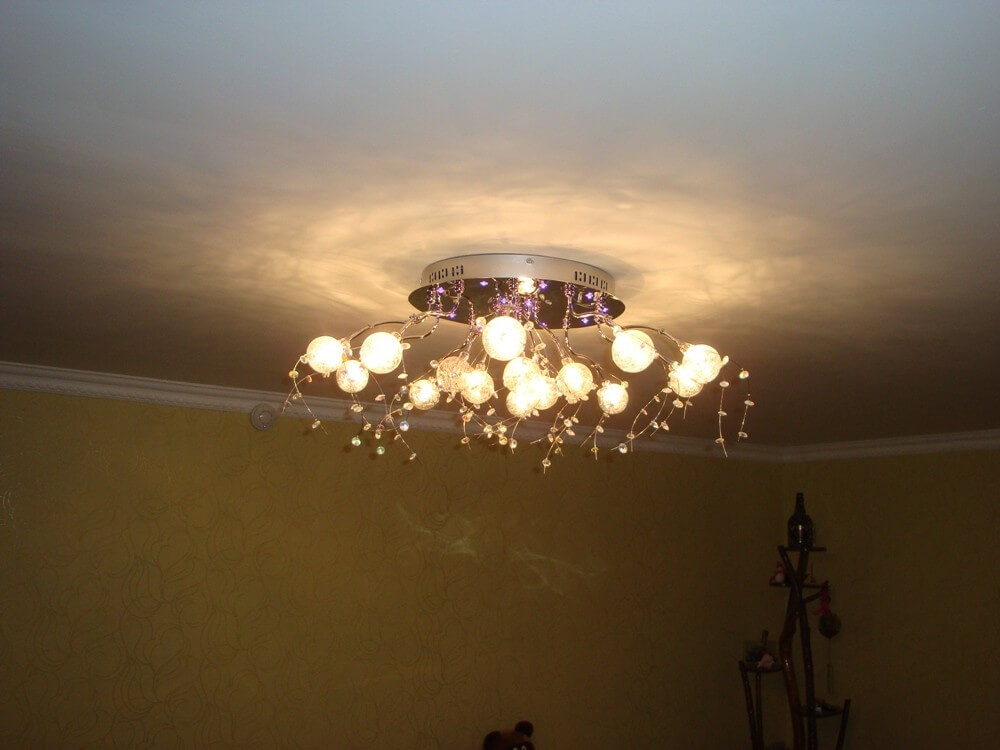
Spotlights belong to the modern backlighting option. They are of outdoor and built-in type. The first option "floods" the surface with light in a better quality. The products have a lot of advantages, the main of which are simple installation and attractive appearance. The disadvantage is that some light sources can damage the surface when heated. This problem often occurs with stretch ceilings.


Directional lamps can illuminate a specific area because their luminous flux is not scattered, but concentrated in one area. Most often, such products are used to visually change the area of a room. In addition, directional lamps can be used to illuminate certain areas of the room itself, for example, the working area of the kitchen. 
LED and neon strips have proven to be excellent for. The products are placed inside the prepared cornice and act as a decorative illumination of the perimeter of the room. Today, LED strips are commonly used in the kitchen, bedroom, corridor and living room. The bathroom, due to high humidity, is not suitable for these products. 
You can also illuminate the surface with shades, but they are rarely used. This is due to the fact that the luminous flux of the products has a small scattering radius, and the dimensions take up a lot of space.
Backlight options
Today, there are many options for lighting the ceiling with your own hands. The main factor by which a suitable option is determined is the design feature of the surface. Recently, concrete, wood, suspended and stretch ceilings have been used.
Suspension
It is a plasterboard structure fixed to a frame made of profiles. For lighting a plasterboard ceiling, it is most often used. Products can be installed in a spiral, along a contour and in a row (it all depends on the room). Lighting should be designed during renovation, at the stage of creating a plasterboard frame, because at this time, care must be taken to lay the wire to the installation site of all housings.
Also, for this option, the fixing of chandeliers can be used, the main thing is only to choose the right way to fix the products. If the body is not heavy, it can be fixed to the concrete ceiling using a special hook dowel or butterfly dowel. For a heavier chandelier, anchoring must be provided. LED strips are used if there is a special cornice for hidden lighting. In this case, the tape with the power supply fits into it entirely along the entire perimeter.
Video review of creative options
Tension
With the lighting of stretch ceilings, things are much more complicated. This is due to the fact that PVC tape, which is actually stretched, has low mechanical strength and heat resistance. In other words, it is impossible to attach lamps to the film, because under such a weight, it will immediately tear. Even when creating a special mount, you still need to take care that the lamp does not burn through the film. This problem can occur when using halogen.
Spotlights in this case have proven to be the most successful, because they are attached to specially prepared seats, and the LEDs themselves generate virtually no heat. It is best to use outdoor products in this case, because they have an external light source. If a hook is already installed under the chandelier, then you can make the ceiling lighting using this lamp. All you need is to cut a hole for the wires in the film during the repair, connect them to the chandelier and hide it under the decorative cover provided in the kit.
When using an LED strip, you can make a hidden stretch ceiling illumination. In this case, you will still have to create a cornice under the tape slightly below the level of the film. The material for the construction is chosen according to your taste, but a simpler option is a polyurethane cornice. LED strip has proven itself well for lighting multi-level ceilings, especially when combined with other lighting options, such as spotlights.
Backlight example
We draw your attention to the fact that stretch ceiling lighting has one feature. If the film is glossy, then all the light bulbs will be reflected on its surface and, as you understand, visually their number will double. Sometimes such a consequence spoils the interior of the room. Reflection also affects the interior if the chandelier is dirty (it will be displayed immediately) or if the LED strip is laid crookedly.
Concrete / wood
The lighting of a wooden ceiling has no special requirements, as is the case with concrete. Of course, a chandelier, like a directional lamp, in this case will feel confident, because the anchor (or dowel) will reliably "sit" in the ceiling. Stylish chandeliers are well suited for lighting a ceiling made of wooden beams or clapboard. 
As for the spotlights, then it is inappropriate to use them here, tk. installation work in a wooden ceiling will be significantly complicated. 
LED strip can be used, but the installation process is similar to the previous one - you need to think over and make a special cornice in advance to do without a chandelier. In a wooden house in the country, you can even use wall lamps directed upwards, which will create a cozy atmosphere in the room.
Finally, I would like to provide some interesting ideas for installing lighting in each of the rooms.
Original ideas for a modern house and apartment
The corridor
Very often, a corridor in an apartment is a room of an inconvenient layout: narrow and elongated, or small, in which there is nowhere even to put a closet. In this case, you can visually correct the situation using design techniques. To illuminate the ceiling in a narrow long corridor, you can install several bright spotlights along the entire path, directed straight downward, which will visually shorten the room,

If you need to, on the contrary, slightly increase the volume of the room, the products should be directed upward, as shown in the picture. 
We talked about in detail in the corresponding article. As for the ceiling, it should be noted that it is best in this case to use several groups of spotlights and an LED strip. The latter will increase the free space and create a creative interior. 
Anything can be used to illuminate the ceiling in the bedroom: from sconces to floor lamps. If the bedroom is small with a low ceiling, direct the lamps upward, illuminating the room from all sides. This idea will allow, as you understand, to increase the volume of the bedroom. 
A spacious bedroom can be reduced by using lights directed straight down the wall. In this case, the ceiling will be darkened, and therefore lowered.
Living room
Very often, with the help of ceiling lighting in the living room, they create a "highlight" of the interior. For this, LED strips and spotlights are used, located in several rows. 
If it is necessary to make repairs to the ceiling surface, many property owners give preference to structures with a stretch canvas, which look very attractive. To illuminate such ceilings, you can use different lamps and LED strips.
Features of creating lighting on tension systems
First of all, it must be borne in mind that it is impossible to fix the lamps directly to the surface of the canvas, since it is made from thin PVC film or special fabric.
Most often, the first option is used, although such a material does not differ in sufficient strength and heat resistance. Lighting fixtures with traditional incandescent lamps cannot be used, as the film area next to such lamps will melt.

When arranging lighting in a room with a stretch ceiling, you must adhere to a number of requirements:
- The light should be evenly distributed over the area of the room.
- It is advisable to choose lamps that are economical and not very hot. The leading positions in quality are occupied by LED bulbs, since they are quite bright and durable.
- The power, intensity and spectrum of luminescence for all lighting devices or for their individual group should be the same.
- When organizing a hidden type of lighting, the luminaire bodies are placed in the cornices, and rings are attached around the lamps to prevent a rupture of the canvas.
- It is necessary that plafonds and other elements of lighting fixtures go well with the interior, furnishings, and wall decoration.
- To create a soft illumination, the light in the stretch ceiling is directed upward, and to obtain a bright glow - downward.
- The wiring must be hidden. With a hidden installation method, the route is placed inside the walls. This option implies the creation of cable channels for wires.
Lighting scheme drawing
To find out the number of lighting devices, you should decide on the option for lighting the stretch ceiling and only then with the scheme for their placement. If you plan to install a central chandelier, then the remaining lamps are located where part of the room will not be covered by the main luminous flux.
Typically, these lighting fixtures are placed where there are dark areas, or in places that require additional lighting, for example, above the working area - the kitchen table.
If the chandelier is not planned to be mounted, then before making the light in the stretch ceiling, you need to calculate the required number of lamps, taking into account their technical indicators and the type of lighting devices. Their number depends on the installation location. If there is no need to arrange bright light, the lamps are not placed there, but in other areas this is done without fail.

To find out the number of lamps, take into account important nuances that affect the degree of illumination:
- the height of the walls in the room;
- room configuration;
- the installation of the chandelier is planned or not;
- the presence of additional light sources.
When calculating the lamps, they also take into account such a norm - the power of the lamps, equal to 20 W per 1 sq. m. The above calculation is relevant if there is no chandelier in the center of the room. By dividing the sum of the power of all devices by the area, they find out if there is excessive brightness - in this case, the result exceeds 20 W, if the resulting figure is less, then there will be not enough light in the room.
If you can't do without a chandelier, then another formula is used, for which the power of the main light source is important. A chandelier usually illuminates a large area. In this case, point devices (spots) will function as local illumination. They are installed in areas where it is impossible to be without additional light.

When installing spots, the following rules are used:
- They are placed no closer than 30 centimeters apart.
- The distance between the wall and the nearest appliance must be at least 20 centimeters.
- In rooms with a ceiling height of less than 270 centimeters, it is not recommended to use lamps with a power of more than 35 watts.
When calculating, the type of lamps matters - for example, halogen with a power of up to 35 W can illuminate 1.5 square meters. m. area. An 11 W energy saving light bulb can fill 1.5-2 sq. m.
Light accents
Lighting devices allow you to focus on different interior items. For example, an LED strip will help emphasize the geometry and contours of the living room. It is attached to special cornices or to vinyl with double-sided tape. The diodes have a bright glow, and they are also economical.
When creating lighting for false ceilings, the lamps are either placed on top or deepened into the canvas. The glow of built-in ceiling appliances is diffused and soft, which is important for bedrooms and separate areas in rooms.

Subdued light is used to create original compositions on the ceiling surface, to organize night light, and is used for niches and arches. If you aim the lamp at certain details, the beam will be concentrated and bright.
Spots and pendant lights can be adjusted and thereby adjust the direction of the light flux. They are used to illuminate work areas in rooms or interior items.
Correction of space with light
The stretch ceiling structure takes a few centimeters from the height of the room. Since most apartments are small, such systems visually reduce the space. The light on the false ceiling will help to solve this problem.
If you direct the light flux from the chandelier and additional lighting devices to the ceiling, it will appear higher than in reality. The best effect is obtained on glossy vinyl canvases.

When a glossy film is mounted in the living room, and a sconce is installed on the wall, the light of which is directed upward, the illusion of a floating ceiling arises, and the space seems more voluminous.
LED strips help to correct the geometry of the room. Since they are flexible, they allow you to embody any design of lighting on a stretch ceiling. The tape is hidden in the ceiling cornice, which makes it possible to correct the geometry. With its help, they also emphasize the steps in a multi-tiered structure. If the transitions are not selected, they will not look three-dimensional, as the design requires, and the levels will merge together.
Stretch ceiling lighting options
Now you can implement various lighting options for a room with a stretch ceiling, involving the use of chandeliers, spotlights, LED strips and complex solutions. The usual option is to install a stylish, large-sized central chandelier.

Spot light allows you to embody unusual design ideas. In this case, the solution options are not limited. You can select individual elements in the interior, use light scenarios, apply zoning. Combining the above ceiling lighting options creates unique lighting compositions.
Light fixtures
Lighting devices are classified according to different characteristics.
Lamps according to the method of fastening are:
- suspended;
- invoices;
- embedded.

Depending on the number of light sources, the devices are divided into:
- point;
- cascading.
If it is possible to regulate the luminous flux, there are models:
- static;
- swivel.

In accordance with the light source, there are:
- luminescent equipment;
- appliances with halogen bulbs;
- LED design of the tensioning system.
Installation of spotlights
When choosing a lighting option for stretch ceilings, experts recommend using low-power products so that they do not harm the canvas. Hidden models are best purchased from well-known manufacturers. Lamps are placed so that the light stream falls on the floor.

When installing the luminaires, proceed with extreme caution so as not to damage the canvas. For this work you will need: a knife, glue and a lighting device. An acrylic box and special rings are also required. All communications must be laid before installation.
Installation sequence:
- Install the profile. At the required height, a box is attached under the lamp. There must be a nut on it to adjust the height. The lower edge of the box is placed not below the level of the stretch web.
- In order not to forget the place of installation, they are marked on the floor with a laser. Then the fabric of the structure is pulled.
- The center for the installation of all lamps is marked on the PVC film, then glue is applied and the mounting ring is attached.
- A hole is cut out in its central part, through which the height of the box is adjusted, and the light source is placed in it.
Chandelier and its mount
Often, lovers of classic design prefer traditional chandeliers, which are fabulously beautiful. When installing this lighting fixture, you must first mark the exact location and make a mount under it. It comes in the form of a hook on which a chandelier is hung. You can also attach a mounting strip to the ceiling ceiling, and then the chandelier itself to it.

The bar is of three types:
- standard;
- cruciform;
- I-beam.

When installing the chandelier, a number of rules are observed:
- The electricity needs to be turned off in the apartment.
- Do not make holes while moving towards the switch.
- Do not press the chandelier tightly against the ceiling.
- Before making cuts in the material, a plastic ring is glued on.
Indoor Lighting Ideas
To understand the features of ceiling lighting, depending on the purpose of the room, it does not hurt to get acquainted with examples of lighting stretch ceilings:
- Children... According to experts, it is better to choose round or square spotlights for this room. Lamps for them must be LED or halogen. You can use multi-colored. Lighting devices are placed in accordance with the design - strictly in a row or staggered. Experts prefer the second option, since the result is more effective and allows you to evenly distribute the light flux in the child's room.
- Living room... Lighting in a hall with a stretch ceiling is usually created using spotlights, since they will harmoniously fit into an interior decorated in any style. Spot light allows you to create all kinds of effects. For example, using LEDs, you can get a structure in the form of a night starry sky on the ceiling. Directional spots perfectly match the situation. A similar design is used as an auxiliary device. You can apply other lighting options, depending on the style.

- Bedroom... In this room, a variety of lighting layouts are used. If the light in the hall on stretch ceilings is made bright, then warm and soft lighting should be preferred in the bedroom so that it creates an atmosphere conducive to rest and relaxation. When the ceiling structure is multi-level, spotlights are used. Often there are cases when two or even more lighting arrangements are laid. The main thing is that the light in the sleeping area turns out to be matte and soft. Spotlights are placed along the perimeter of the room. In the bedroom, a floor lamp is placed near the headboard or lamps are built into the plasterboard structure. The illumination with LED strips, which are hidden in the cornices and other interior elements, looks unusual.
- Bathroom... A lot of light is not required for this room. A pair of perimeter-mounted luminaires will suffice. It is better to implement different schemes in the bathroom (read: "What kind of lighting in a bathroom with a stretch ceiling is better to do - choosing devices, planning lighting points"). Then, when washing, cleaning and other household chores, the lighting will be bright, and for relaxation it will be soft. It is convenient when it is possible to choose the degree of illumination depending on the situation.
- The corridor... In apartments, as a rule, the area of the hallways is always small. You will have to work hard on the design of the ceiling in the corridor to make it look more spacious. The glossy texture of the canvas will reflect every ray of light, in addition to providing an even incidence of light, but also giving additional volume. To create lighting for stretch ceilings, small chandeliers and recessed lamps are mounted.

- Kitchen... Different types of lighting are used in this room. It is usually divided into functional areas: in the work area, bright light is required, and in the dining room, it is better to create an unobtrusive and pleasant light with warm shades. Pendant and spotlights, as well as chandeliers are used. If you combine different types of lighting fixtures, you can get unique combinations.
- Balcony or loggia... Stretch ceiling structures are installed on it extremely rarely due to the fact that the canvas does not withstand negative temperatures. When the loggia is heated, the "starry sky" ceiling will be a great idea.
Using different types of lamps, it is possible to create unusual effects and beautifully decorate a room for any purpose.
With the development of lighting equipment, more and more new design solutions are constantly appearing, as well as methods for organizing indoor lighting. It is the use of lighting effects that gives an unusual feature and flavor to the design of various rooms. At the same time, it is possible to produce a special, exclusive entourage of one direction or another. Making any kind of ceiling lighting with your own hands is not a difficult task.
Types of ceilings and their highlights
There are several options for the design of the ceiling, and each of them can be combined with each other. It all depends on the invention of the master. So, here are their main types and material:
- Drywall;
- Two-tiered stretch film ceiling;
- Finishing with skirting boards or cornices;
- Just the usual whitewashing, plastering and painting.
For each of this type of ceiling, you can apply an individual type of lighting:
- Neon;
- LED;
- With the help of chandeliers and spotlights.
Let's consider in detail the options for how to perform the highlighting.
LED ceiling lighting
 Lighting based on a semiconductor device - LED appeared not so long ago, but at the same time it managed to confidently win the leadership among lighting equipment. With the help of LED lighting and backlighting, you can create not only a unique design for any room, but also save money during its subsequent use. Even a beginner can make a LED ceiling light. The LED, in turn, is a light source that has the following advantages:
- Low power consumption along with good light output;
- Environmental friendliness, since it contains neither dangerous nor even harmful gases for humans and the environment;
- The duration of the "life" of all lighting and of each device in particular does not depend on the number of switching on and off;
- No vibration will affect the lifespan of the LED;
- Low rates of heat generated during operation.
Most often, LED lighting installed on the ceiling is carried out in a suspended version. So, when performing a suspended ceiling in a room, you need to decide on its type:
- Contour. Diffuse light emitted by LEDs located on the shelf, their light directed upwards. It forms a continuous strip of light;
- Directional illumination. In this case, semiconductor devices are mounted on a slope, and their luminous flux is directed along the stream. If these are not LED strips, but individual light sources, then the rays diverging to the sides are clearly visible;
- Spot lighting of the ceiling. LED luminaires are installed parallel to the floor and shine directly downward.
- Starry sky. One of the most difficult types of lighting, since it is necessary to place many separately burning LEDs throughout the ceiling, and an LED strip is no longer enough here.
- Figured backlighting. LED lamps are installed in small-sized ceiling lamps.
At the moment, among the LED lighting, tapes are in the lead, on which not only the semiconductor devices themselves are located, but also the elements of their individual power supply. Diode ceiling lighting is safer in terms of fire hazard and electric shock to a person, as it operates from low voltage.
How to choose an LED strip
To select a suitable LED strip for lighting, you need to understand its varieties and functional features:

LED strips are mounted on a special adhesive tape. Therefore, it is better to install and glue them on plastic than on drywall or concrete. The connection of several tapes and their bending must also be done carefully using a reliable connection - by means of soldering. During installation, it is imperative to observe the indicated polarity, since the LED turned on in the opposite direction may fail.
The suspended ceiling with LED strip lighting looks extremely modern and elegant, and most importantly, practical. Ready-made sets for lighting ceilings of this type can be purchased in specialized stores or Internet sites, where a wide range of these products is offered.
Neon ceiling lighting
 To create this type of illumination, classic glass or plastic tubes are used, on the walls of which a phosphor is applied. It is he who allows the device to emit light radiation. At the ends of the lamp tube, electrodes are installed to supply the supply voltage, and an inert gas, neon, is filled inside the tubes. In order for the device to emit light, a voltage converter is needed from the usual 220 Volts, to a special high value for the ionization of neon. In this case, the color emitted by this device depends on the composition of the phosphor. A distinctive feature of this luminaire is the absence of an incandescent filament, so the duration of their operation is 10-15 years. Most often, the length of such tubes is 1.5 m, and the diameter is from 8 to 15 mm. Multilevel ceilings with neon lighting create a unique soft color.
Several practical options for lighting different types of ceilings
A suspended ceiling with illumination based on an LED or a neon tube can differ in both shape and structure, it all depends on the imagination of the designer.
Illuminated ceiling skirting board
One of the most common types of modern lighting. A niche is left between the ceiling and the plinth for laying the LED strip. It is attached both to the vertical surface of the ceiling and to the upper part of the plinth. Ceiling lighting with LED strip under the plinth is very rarely used, since without turning on the lighting in natural light, the tape itself does not look aesthetically pleasing. Ceiling skirting board for lighting is worth choosing and using a special one. A regular fillet will not work, as it is simply a corner strip that covers the joint between the wall and the ceiling. Here another configuration is needed, shown in the figures below.


An illuminated ceiling skirting board is considered to be uncomplicated and very effective both as a main light and as an additional light. The backlighting skirting board can be polyurethane or polystyrene. Ceiling lighting with LED strip under the skirting board can only be performed with a certain configuration of this decorative element.
Illuminated ceiling cornice
LED strip ceiling lighting is one of the simplest solutions for organizing ceiling lighting. It is located most often around the entire perimeter, and can be paired with other types of lighting. In this case, it is recommended to turn on from different switches so that it is possible to turn on each of the types of lighting either in tandem or alone. Most often, such lighting for the ceiling does not require the installation of chandeliers or other lamps.

A distinctive feature of this type of lighting is the presence of a special ledge under the ceiling, into which the LED strip is recessed. You can choose various options for its location, which will determine the direction of incidence of the rays of light (reflection from the side of the cornice, wall or ceiling). Curtain rod manufacturers have long thought about how to make them the most convenient for electrical work. For this, the standard shape of the fillet has changed somewhat; it has a small recess in the body for placing an LED strip or a neon tube in it.
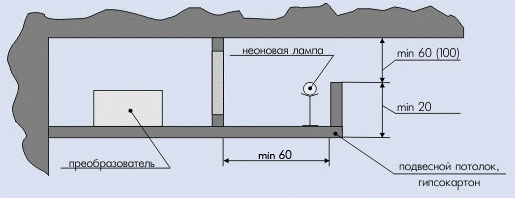
Installation of a ceiling box with illumination for LED strips is carried out as shown in the figure. in this case, two options can be distinguished. With the installation of the light source on the wall or inside the box.

Illuminated stained glass ceilings
To perform this type of ceiling lighting, acrylic or ordinary silicate glass is most often used. Stained-glass windows give the room a rich appearance and spirituality. To fix the stained-glass window frames are used for stained-glass ceilings from different types of material:
- Brass;
- Aluminum;
- Become.
An interesting point of application, namely metal profiles for fasteners, is their decorative finish, and brass takes on the appearance of antique bronze.


Illuminated glass ceilings
Glass can be matte, or painted for a specific design project. The light source is selected separately depending on the room and its structure. In this case, the lighting is produced as if from the inside of the ceiling.
This type of lighting is more suitable for offices, premises of large organizations, or studios. Some craftsmen perform this type of lighting, as well as lighting for living quarters, bedrooms, living rooms and halls. 
A two-level ceiling with lighting and a glass insert is often used in the suites of hotel complexes and hotels.


It is not difficult to make ceiling lighting, the main thing is to observe safety precautions when working at height, as well as when working with voltage.
DIY ceiling lighting video
Do-it-yourself LED ceiling lighting is, generally speaking, not new. With light emitting diode (LED, Light Emission Diod) lighting design, radio amateurs began experimenting back in the 70s, as soon as LEDs appeared on the market. An obstacle to its wide distribution was, first of all, the imperfection of the diodes themselves - a limited color range and a "sharp" spectrum. Too bright light from the first LEDs hurt the eyes.
Nowadays, LEDs provide light of all colors of the rainbow with a smooth, “soft” spectrum. On sale there are special assemblies of LEDs for lighting design - LED strips, power supplies for them and controllers that allow you to smoothly adjust the color and brightness of the radiation. Now a person who is not versed in technology can do it. There are countless options, so we will consider the most popular and technically the most difficult one: illumination of a suspended and stretch ceiling. Everything else will be easier to do.
Types of LED backlighting
A suspended ceiling can be illuminated in four ways:
- Contour diffused illumination- LEDs are located on the shelf (bottom row in the figure) and shine upwards. The backlight forms a continuous light strip.
- Directional illumination- LEDs are mounted on the slope and shine along the ceiling. Diverging rays are visible on the main (base) ceiling.
- Spot illumination("Starry sky"). LEDs shine straight down from the ceiling. This backlight is more difficult to make; tape is not enough here, and some (however, elementary) technical knowledge is needed.
- Figured backlight... The LEDs are housed in small ceiling lamps. For the device of such a backlight, in addition to technical knowledge, the skills of a home master are also needed.
Ceiling lighting with tape
Contour and directional lighting of the ceiling with LED strip is the easiest way of lighting design and at the same time, a wide field for creative imagination. Its technical details boil down to the choice of tape, power source and some subtleties of installation. We will talk about installation below, but for now we will consider how to choose the right technique.
The choice of LED strip
- Ribbon color. Here the choice is unambiguous - a full-color RGB tape with a controller. The price of the ribbon itself is the same as that of the single color ribbon, and the controller is cheaper than the complementary color ribbons. The question is, why then do single-color ribbons? For special lighting over a long distance, when the price of equipment matters: showcases, trees, large halls.
- The density of the emitters. The density of the emitters on the tape can be 30, 60 and 120 per meter. For contour lighting, of course, it should be more - 60 or 120. But for directional lighting, it is better to take a tape with a density of 30 or 60. If the size of a niche for installation allows, it is better to install two tapes: on the shelf - 60 and 120, and on slope - 30 and 60. then 4 power supplies with controllers will be needed, but such an installation will give a wide range of lighting effects: after all, the tapes can be switched on and adjusted together. You can get double color borders, intermittent rays, etc.

- The power of the tape. LED strips are designated by the letters SMD and four numbers, for example SMD 3028. The first two numbers indicate the power consumed by the tape. SMD 6035 tape will be more powerful than the above. Also, the capacity of one meter of tape is indicated in its passport. For contour lighting, 8 W / m is sufficient; for directional - 5 W / m. It is better to put 7 and 12-14 W tapes on the shelf, and 5 and 7 W tapes on the slope. This will dispense with cheaper controllers without dimming and make color adjustments easier.
- The total power of the backlight. This parameter is calculated from the length of the light strip. We measure with a tape measure, calculate how many meters of tape will be required, and multiply by the power of a meter of tape.
- The power source and controller are selected according to the power required to illuminate the corresponding light strip. The supply voltage must of course also be suitable. LED strips are produced with an operating voltage of 5, 12 and 24 V. The same amount should be given by the power supply unit, and the controller should also be designed for such a voltage.
Installation of contour and directional lighting

How to mount tapes in a plasterboard ceiling is clear from the picture. Here are just a few tips:
- LED strips are mounted with Velcro; an adhesive layer is applied on the back of the tape and covered with a protective film. Before installing the tape, select a corner that is suitable in size for the shelf and the slope of the PVC, and fix it in the niche with small self-tapping screws. Velcro sticks to PVC tightly, but from drywall it can come off over time. If a stretch ceiling is highlighted, a PVC corner is required: after all, for the smallest repair of the backlight, it will have to be removed.
- Solder the wires to the tapes carefully. Their plastic base and the LEDs themselves are afraid of overheating. It is better to use a flux paste for soldering, POS-61 solder or similar, with a melting temperature not higher than 160 degrees, and solder with one poke. If you do not have a lot of experience in soldering small parts, it is better to invite a craftsman for soldering.
- Do not join more than 3 m of tape together. The conductive paths in the bulk of the plastic base may not withstand high currents. Connect 3 m sections to the controller with separate wires
- When wiring yourself, carefully observe the polarity and purpose of the wires: + from the IP - to the + controller; respectively and -. From the controller + V, R, G, and B to the corresponding tape terminals.
- Cut and cut the LED strips ONLY according to the cutting lines marked by the manufacturer. The exception is the last section, but you need to cut it with sharp scissors or side cutters in one motion exactly in the middle between the diodes.

connection diagram of LED strips to power supply and controller
As you can see, the hidden illumination of the ceiling with your own hands is quite simple and already allows you to get an excellent aesthetic effect. You can enhance it, especially since you have already gained experience, by using other types of backlighting.
Video: installation of LED strip on the ceiling in the "Housing issue"
Illumination "starry sky"
Components and element base
The tape is no longer suitable for the "starry sky"; separate LEDs are needed. First of all: do not try to turn on a lot of LEDs directly into the 220V network. Ignorant people sometimes argue: aha, 3 diodes in the flashlight glow from 6V; hence, 100 diodes can be turned on at 220 V after rectification.
It is impossible, it will end in an accident and in the literal sense of the word burned out money. In batteries, the internal resistance increases with increasing current, and the current through the diodes is limited. The internal resistance of the power supply network is practically zero. The damping resistor does not save: the LEDs do not hold a reverse voltage of 220 V (310 after rectification), they will immediately break through, and a short circuit will turn out - a short circuit with all its consequences.
Therefore, for the "starry sky" you need the same IP as for the tape, but at 5 V. The power of the IP is calculated based on the number of LEDs: 10 W per 100 LED. The extra power of the IP will not hurt. Simply, since 20 diodes are enough for the "starry sky", the simplest and cheapest IP is suitable. It is also advisable to purchase a controller-chopper for 4-8 diode sections. Then the stars will flash like real ones.
When soldering individual LEDs, observe the polarity: the positive lead of the diode is longer and marked with a key, and be careful - the leads break quite easily. Also, do not forget to put an insulating tube - "cambric" on each output, otherwise, after installation, you will not end up with short circuits.

Montage of the "starry sky"
The easiest way to illuminate the "starry sky" is to provide a stretch ceiling: LEDs are simply glued to the base ceiling with drops of construction silicone. It remains only to correct them so that they do not shine completely to the side, and enjoy the spectacle of the starry sky.
If the ceiling is plasterboard, you will have to cut an additional plate exactly under the ceiling niche, drill holes in it according to the number of diodes, close it with a translucent plate on the front side, mount the electrical part and install the entire structure in the ceiling niche. It is not a matter of a minute, and requires a certain skill. But, if the plate is finely grooved, then the "stars" will give spiky rays, like real ones. If, in addition, an image of a real starry sky with nebulae, galaxies, etc. is glued onto the covering plate, and holes for diodes are drilled in accordance with the position of real stars, and the brightness of the glow is selected with the help of quenching resistors, the effect will be amazing.
Video: ceiling "starry sky" - overview and installation
Figured backlight
For curly illumination in the false ceiling, holes are drilled with a feather or circular drill - a "ballerina", a centrobore for small shades, into which the LEDs are placed. A typical solution is one directed downwards in the center, and 4-6, giving rays along the ceiling. But, of course, the choice of a specific solution is entirely a matter of taste for the master and his household.
About colors and blinking
Important: Ceiling lighting has a profound psychedelic effect. First of all, about blinking - you cannot use frequencies of 0.5 Hz (once every two seconds), 2 Hz (twice a second) and 7 Hz (seven times a second). They coincide with the theta and alpha brain rhythms and can, especially in red light, even cause an epileptic seizure.
Absolutely unacceptable fast and sharp blinking with the help of the simplest breakers, for example, from an emergency flashlight. It is necessary to use a special controller, when connected to which the diodes will light up and go out smoothly. And for any, even the slightest deterioration in well-being during or after observing the blinking backlight, the blinking must be turned off. Especially if you hear a noise in your head, spots appear in front of your eyes, you feel dizzy.