I wish you good health.
Many of us sometimes hear the phrase “be careful, the doors are opening” several times a day on public transport, but few people pay attention to the specific word – “caution”. Meanwhile, the main emphasis in the phrase is on this word.
Every person passing through doorway into some unfamiliar room, we have the right to assume that the door will unexpectedly show its character and really play the role of the element it should be - an element of the building envelope.
Sometimes, of course, the door does not allow you to enter the room, because it is simply closed. But there are times when the door leaf comes into conflict with the door frame, or, simply put, the door “sticks.” To correct this defect, in some cases it is even necessary to replace damaged doors, and in some cases it is enough to simply adjust them.
Today we’ll talk about how to adjust a plastic door.
Why adjust a PVC door
Some time ago, answering your questions, I talked about how to adjust the opening sashes in plastic windows. Apparently, you have completely figured out the windows, and now new questions have already begun to arrive about how misaligned plastic doors can be brought into working order.
Discussion of the topic of adjusting PVC profile doors will take a little longer than window adjustment, because door hinged systems have a greater variety than window sash fastenings. In addition, the door structure is additionally equipped with complex locking fittings and a lock with a latch embedded in the profile.
It’s easier than ever to adjust the hinged and locking system of plastic doors if the warranty period indicated by the manufacturer or installer is still valid door design. Calling a repairman, complaining to him about a malfunction and waiting until he brings everything into perfect condition is not a difficult task at all.
We will look at another frequently encountered plot, in which the main roles are played by two characters - you and a misaligned PVC door.
Types of plastic doors
Attentive consumers, of course, noticed that All doors are divided into two types: entrance and interior.
But this is not the only difference between door designs.
Additionally, entrance door blocks are also divided according to the type of opening - automatic and mechanical.
Automatic entrance doors can be:
- sliding single-leaf or double-leaf, with opening to the left, right, behind the wall or behind a fixed sash;
- carousel, with three or four leaves with different types drive;
- hinged with one or two doors.
Interior doors, in turn, are divided into solid and transparent (French windows). A special place among interior doors is occupied by doors installed on the way out from the room to the balcony or loggia.
This type of door structure differs from the others in that it is not installed on its own, but together with part of the window block, and one of its sides is fixed not in the doorway, but in the window frame.
Another significant difference between plastic balcony doors and other door structures is that their curtains are similar to those used to fasten window sashes.
Previously, all balcony doors (first wooden, and then plastic) were made according to the same design: the lower half was blank, the upper half was filled with glass.
Recently, when people increasingly began to use balconies and loggias not as storage rooms, but as a cozy, good repair a place to relax, then balcony doors began to be made like French windows, that is, fully glazed.
A door in which the entire panel is glazed with a high-quality double-glazed unit weighs no less than its metal prototype, and is framed by a PVC profile. This means that such a design must have special reinforced fittings.
Immediately after installing the balcony door, it must meet the following requirements:
- the canvas around the entire perimeter should be pressed tightly against the door frame;
- in the half-open position, the door leaf must be in a static state, that is, it should not close or open arbitrarily;
- the canvas should not sag or cling with the profile or fittings to the strikers installed on the box;
- the locking handle should move around its axis freely, without visible resistance.
If the installers did a great job and did everything according to the established rules, then going out onto the balcony will not soon cause you certain difficulties, the cause of which may be a skewed door leaf.
But if the slightest signs of malfunction appear in the operation of the balcony door, then the “disease” should not be started, since its consequences will only get worse.
You should promptly seek help from a specialist or correct the defect yourself.
Technology for adjusting a plastic door in the video:
Adjusting balcony door hardware
If you carefully read my articles, then you have already come across recommendations for adjusting window sashes. The principle of their adjustment does not differ from the same process in relation to the door to the balcony, since the fastening fittings in both cases are absolutely the same.
There is only one small addition to the design of the balcony door. It is a hook at the end of the door leaf on the side where the load-bearing curtains are attached. The technical purpose of this element is to help the rather long side profile, when the sash is closed, not to bend, but to press its entire plane tightly against the frame.
This hook, like all other points of the locking mechanism, consists of a strike plate fixed to the frame and a movable pin installed at the ends of the sash.
Adjustment of the clamping force on the additional hook is carried out in the same way as at other points: by rotating the trunnion around its axis using a hexagon or a special spanner (the choice of tool depends on design feature the trunnion itself).
 In order to adjust the position of the sash, you need to remove the plastic plug from the lower pin curtain, use a hex key inserted into the cylinder fixed to the sash, and turn the adjusting screw. Turning clockwise will raise the door leaf. If you turn the hex counterclockwise, the sash will lower.
You can move the bottom of the sash left or right by turning the hexagonal adjustment located in the lower part of the curtain attached to the door frame.
To change the position of the upper part of the sash from left to right, you need to tighten the fittings that are part of the fastening of the frame to the upper curtain. The adjustment point is located in the horizontal plane of the upper end of the sash, next to the upper curtain.
Pay attention to one detail: the adjusting screw, responsible for the movement of the bottom of the sash to the right and left, has access from both sides. If the slope does not fit close to the curtain in which the adjustment is located, then the hexagon can be inserted into the screw on the side of the slope and try to lift the door when it is in the closed position.
I strongly recommend not to do this, because the door may be pressed too tightly against the frame, and if you turn the screw using excessive force, you can easily break the thread on it, which will lead to complete failure of the lower support curtain.
How to detect defects
Fans of various kinds of test events when checking the carried out construction work There is one trick that is aimed at checking the quality of the door frame rebate to the door leaf in a PVC profile structure. It consists in the fact that when the sash is slightly open, you need to put a piece of paper under it on the frame, and then close the sash tightly, moving the locking handle to the “closed” position.
A similar operation should be carried out by applying the sheet along the entire contour of the clamp.
If the force with which the leaf is pulled out in different places turns out to be different, it means that the door begins to slowly lose its position as a well-adjusted product. Therefore, you need to prepare for the fact that you will soon have to carry out a number of measures to return it to a properly working state.
Another way to detect pre-emergency operation of a door leaf is to closed door Draw the perimeter of the sash with a simple pencil. If, upon opening the door, you see that the pattern does not geometrically exactly match doorway, then this will also indicate that there are some deviations in the adjustment.
A similar operation should be carried out even when the door has already begun to touch the frame. The drawing will show how much the door has changed its standard position, and in which direction the adjusting screws should be turned to return it to its original position.
What tools are used to adjust plastic doors?
 Before you begin adjusting the mechanism that holds and presses the door leaf to the door frame, you need to prepare a simple set of construction tools:
- screwdrivers (pairs) different sizes) two types - cruciform and flat;
- set of hexagons.
The kit for these items requires knowledge, which I will now share with you.
I urge you: do not proceed with adjusting the door leaf without reading and viewing the necessary information.
The trial and error method is not suitable in this case, because, as a rule, it leads to breakage of the fittings. Replacing a damaged element is not a quick and difficult task, because only a complete analogue of the broken part can be suitable for this replacement.
How to adjust a PVC door
PVC profile doors are an indispensable attribute of most public and commercial establishments. In many country houses, their owners use plastic glazed doors to fence off hallways and exits from the premises to the terrace or winter garden.
In private houses, there is usually no increased load on plastic entrance doors (unless a small child sometimes rides on them, holding the door handles).
But in those places where crowds of people are constantly moving, and even some of them, leaving the room, dissatisfiedly slam the door, any door structures installed on this busy path have a very hard time.
Exactly because of this reason Plastic entrance doors are structurally different from PVC interior and balcony doors. They are more durable and have better heat and sound insulation.
PVC entrance doors serve not only as the building envelope, designed to provide entry and exit from the premises.
Their additional purpose is to prevent the spread of fire.
To do this, the surface of the plastic is covered with a special non-flammable polyvinyl chloride film., providing an increased fire safety class.
Of course, a film that provides protection in case of fire is very good, but it is even better if during the same fire the door leaf does not jam, it does not sag and allows everyone to quickly and unhinderedly leave the room. And this is only possible if the door curtains and locking mechanism are correctly adjusted and operating normally.
For the process of adjusting the pressure of the Alutex overhead hinges, watch the video:
Adjusting overhead curtains
The required number of door curtains connecting the frame to the leaf is calculated for each design individually and depends mainly on the weight of the door leaf.
If the sash design does not have a double-glazed window, and its leaf is only closed light sandwich panel, then two curtains are enough to fasten such a sash.
But, usually, on a plastic entrance door that has glazing, there can be from three to four curtains, each of which has three types of adjustment.
It is important to know that if you try to change the position of the door leaf by tightening the adjustments of only one curtain, this can cause a point curvature of the profile (that is, it will bend only in the area where the adjustable curtain is attached).
It is precisely this kind of illiterate adjustment that subsequently causes squeaks that appear at the place where the curtains are attached.
Some “experts” advise that if squeaks occur, lubricate the hinges by pouring machine oil into them. Yes, maybe for a while the lubricant will be able to reduce extraneous noise when opening the door, but over time they will still appear again.
I can responsibly declare that a properly adjusted door without any lubrication should not make any sounds when slamming, except, perhaps, a soft slap.
For an algorithm for adjusting the top hinge of a plastic balcony door, watch the video:
How to raise a door leaf
I want to make a reservation right away - There are several structurally different models of door curtains. How to regulate each specific model must be considered separately, using an individual approach. I’ll be honest: I used to come across such samples that, even with some experience, it was not immediately possible to guess which of the adjusting screws was installed in which place.
But for the last five years, there have been no new samples - apparently, the designers who are creating more and more new parts for attaching the sash to the frame have run out of imagination, or have they finally found best option door curtain designs.
Below we will look at how to adjust the most common type of door curtain.
If there is a need to change the position of the door leaf by lifting it a few millimeters up, you need to perform the following steps:
- find the place where the adjusting screws are installed on all curtains. As a rule, this place is located at the lower end of the cylindrical part of the curtain;
- select a wrench of the required size from a set of hexagons;
- move the sash from the “closed” position to the “half-open” position;
- insert the key into the upper curtain and turn it half a turn or a full turn as necessary;
- exactly the same radius of rotation to which the hexagon was turned when adjusting the first curtain, it is necessary to turn the adjusting screws of the remaining curtains;
- check the quality of the adjustment by closing the door;
- If the defect has not disappeared and the door needs to be further raised, then all adjustment steps must be repeated sequentially.
If the door leaf is heavy, you can lighten the load on the first adjusting screw, which, in fact, transfers the weight of the entire lifted sash.
To do this, you can build a kind of lever under the sash and, by lightly pressing on it, help the adjusting screw lift the heavy sash.
You can also gradually lift the sash by making small movements with a hexagon, adjusting each curtain in turn.
How to press a plastic door leaf to a door frame
Unlike a balcony door, where the pressure to the frame occurs due to the rotation of eccentrics installed at the ends of the frame, the entrance plastic door has a different adjustment principle.
The difference between both methods of closing is that in the front door the door leaf is fixed due to a latch located in the body of the lock or separately installed at the end of the door. Whereas in the balcony door, the clamping mechanism is fixed and adjusted by turning the locking handle, which pushes the trunnions located at the ends of the sash into the hook with the counter strips installed on the frame.
Let me remind you that we are considering one of several, the most common design options for a door curtain.
 Adjustment of the pressure of the plastic entrance door leaf from the side where the curtains are installed should be carried out according to the following scheme:
- remove decorative plugs from the upper cylindrical part of all curtains. Please note: sometimes the manufacturer provides a hint on the plug itself - in which direction the screw should be turned in order for the sash to move closer or further away from the frame;
- select the required hex key diameter;
- insert it from above into the lower or upper (there is no fundamental difference) adjusting screw;
- gradually, little by little (no more than 10 0) by tightening the key, achieve the desired pressure. You can check the strength of the prim using a piece of paper (see above).
Many “homemade” people, not understanding the principle of operation of this adjustment, begin to turn the hexagon like the steering wheel of a ship, hoping to find the ideal point by trial and error. Sometimes this leads to the fact that it will be difficult even for a real specialist to correct the screw-up and return the door to the right direction of operation.
Therefore, before adjusting this unit, you should first become familiar with its structure.
An oval-shaped adjusting screw protruding upward is attached to the lower curtain, onto which, when connecting the curtain to the frame, the part of the curtain fixed to the sash is put on.
In the upper cylindrical part of each curtain there is an oval-shaped hole into which an adjusting screw fits. Their connection is a regular eccentric, which, when turned by 90 0, changes the position of the sash clamp.
Having adjusted the pressure of that side of the door leaf on which the curtains are located, you should begin adjusting the leaf from the side of the door handle.
Plastic entrance doors can be equipped with a regular latch or a latch built into the lock. The latch striker mounted on the frame is usually equipped with a sliding insert.
To increase the pressure on the door leaf, unscrew the two screws securing the sliding insert and move it closer to the seal installed on the frame.
Having firmly fixed the insert in the new place, you should check the quality of the connection between the sash and the frame by conducting a test using a paper sheet (see above).
Various options for adjusting the doors to the balcony in the video:
How to change the tilt of a door leaf
Adjusting the tilt of the door leaf relative to the plane of the door frame in different versions curtains are carried out using various methods.
Let me remind you that we are considering the most popular design option for door curtains. In this case, the most difficult part is removing the curtain cover located on the door leaf - it is under it that the adjusting screw is located.
To gain access to the screw, open the flap completely and locate the locking bolt in the inside of the curtain that holds the curtain cover in place. Having selected a hexagon of the required diameter, you should completely unscrew the stopper and remove the cover, sliding it along the slide towards the door handle.
After the cover is removed, you will immediately see the adjusting screw, by tightening which you will visually notice how the canvas changes its position relative to the frame.
I remind you again that Under no circumstances should you turn only one screw several turns at once.. This may cause the threads on the screw to become stripped.
The sash should be tilted by gradually tightening each screw required quantity rpm
What can you do to make plastic doors less likely to require adjustment?
The long-term operation of the fittings holding a plastic door depends, first of all, on the measurer who did everything required dimensions and calculated the geometric parameters of the new door.
If a mistake was made at this stage, and the tolerance between the doorway and finished product exceeded the permissible standard of 10-20mm, then the installers, of course, will install the door, but its fastening to the wall will not be strong enough.
This defect cannot be corrected by installing an additional number of anchors, since the anchor simply fixes the position of the door frame, and the mounting foam, which plays the role of the main seal, loses this quality at a rate directly proportional to the increase in the thickness of the layer between the opening and the door frame.
Therefore, if the door is more than a couple of centimeters smaller than the opening, when the door leaf slams dynamic load each time it will be transferred to the box, which, due to its unstable position, will loosen the fittings.
The next reason for premature failure of door hardware can be created by designers who calculate the number of curtains for a specific sample.
 According to the technology, the number of curtains depends on the weight of the door leaf. If there is an error in the calculations, for example, after installing three fastening points instead of the required four, and when the door is operating under conditions of increased load, for example, at the entrance to a store, you should expect a quick failure of not only the adjustment, but also the fastening of the curtains themselves.
Another reason for frequent door leaf adjustments may be the intensive work of the door structure. In this case, it is possible and even necessary to equip the door leaf with a closer.
These parts protruding above the door, of course, do not add additional aesthetic appeal to the door structure, but the fact that they are very convenient and allow you to prolong the trouble-free operation of the door is beyond doubt.
Quite often, we ourselves are the cause of a loose door system. For example, when in a double-leaf swing door We forget to close one of the latches that secure the non-functional part of the door leaf from the bottom and top.
Features of plastic entrance doors
To produce a PVC entrance door, a particularly strong profile and special steel reinforcement are used. Therefore from three types plastic doors (balcony, interior and entrance) the last one is the heaviest, and for its normal functioning, reinforced fittings and special, more reliable types of door handles and special closers are used.
In order for the front door to serve as a reliable barrier to noise and cold, its design uses a double sealing circuit, which ensures that such a door unit performs all functional duties.
Everyone has entrance doors there is one common feature - the absence of the lower part of the protruding frame, like, for example, a window block.
If this lower section remained at the door frame, it would protrude above the floor surface and would certainly interfere with passing people. Therefore, the lower threshold of the entrance door is made flat, not rising above the floor surface.
In order not to leave this section of the door structure unprotected from the passage of cold air and sound waves, some door leaves are equipped with magnetic thresholds.
This system is designed in such a way that two magnetic bars, recessed into the level with the threshold, are magnetized to a metal strip attached to the lower end of the door leaf when the door is closed. When the door is opened, the magnets fall inside the threshold without interfering with the passage.
It must be taken into account that this part, important for heat and sound insulation, can only work with precisely adjusted adjustment of the door leaf, when it is located exactly above the magnets and at the height necessary for their operation.
One of the main functions of the front door (no matter whether it is made of plastic or other material) is to protect the room well from unwanted entry. Reliable performance of this function implies the use of a door lock in the design.
Excellent burglary resistance of a plastic entrance door is achieved by fastening load-bearing elements, locking devices in steel reinforcement profile.
 Existing locks for installation in plastic doors are divided into:
- single-lock, which have one locking point located approximately in the middle of the height of the door structure;
- multi-point, they are used for two- or three-point contact of the shutter locking mechanism with the door frame. Several points of contact along the entire height of the frame provide increased reliability and high-quality pressing of the sash to the frame.
Even a minor change in the position of the leaf may not allow the multi-locking mechanism to perform its functions, which is why it is so important that all load-bearing fittings installed on the door structure are in working, adjusted condition.
The door closer is a mandatory element of the fittings
Strong impacts of the door leaf on the frame and sharp tugs on the door handle seriously affect the operation of the door structure and have a significant impact on reducing the frequency of adjustments to door hardware.
Installing a door closer will help to avoid the premature onset of the consequences of too active operation of a plastic entrance door.
Closing the door leaf smoothly and not allowing the door to be pulled too sharply is the main function of this mechanical device. In addition to combating premature wear of fittings, one of the functions of the closer is to maintain the microclimate in the room.
The smoothness of the force of pressing the sash against the frame is adjusted both immediately when installing the device, and periodically during its operation.
The frequency of maintenance depends on the time of year - when cold weather sets in, the oil in the closer becomes more viscous, and the performance will deteriorate significantly if it is not adjusted in time.
The technical characteristics of each closer model must indicate the lower temperature threshold at which the device is subject to additional adjustment.
If there is no need for non-scheduled repairs, then The frequency of adjusting the plastic door is once a year., whereas installed on this door The closer should be adjusted at least twice a year. The frequency of adjustment also depends on the weight of the door leaf and how often it is used.
Additional functions appear on those closers that are equipped with additional internal valves. Such devices can fix the door at a certain point when it is in the open position, and can also “slam” the door to the frame for better abutment or operation of the latch.
There are universal models of door closers that can be installed both on the side of the door into which the leaf opens and on the opposite part. It is not advisable to install the device on the street side, because there it will be most exposed to temperature changes that negatively affect it.
For information about the capabilities of a door closer for a plastic door, watch the video:
Adjusting the closer
Before setting up the door closer, you should check whether the fittings of the door structure itself need adjustment. To do this, you need to disconnect the device lever from the sash and check for sagging or damage to the curtains.
The standard closer mechanism has two valves that can be adjusted.
The first is responsible for changing the speed of self-closing of the door leaf. To increase or decrease the speed, turn the screw installed on the side end of the device. If you turn it counterclockwise, the closing speed of the sash increases; if you turn it counterclockwise, it decreases.
The adjusting screw should be turned extremely carefully and no more than one or two turns, otherwise the seal of the housing may be compromised, which will lead to leakage of the oil filler.
The second adjusting screw is installed in the valve, which is responsible for the movement of the flap just before the moment of slamming.
This valve should be adjusted when the leaf is perpendicular to the door frame. Turning the screw clockwise increases the amount of time until the door leaf is quickly adjusted to the frame.
In the joint of the lever mechanism there is a special nut, which, when turned clockwise, increases the opening angle of the door leaf.
If it becomes necessary to leave the doorway in open state, then there is no need to place various objects under the corner of the leaf to fix its position - such actions will inevitably lead to damage to the door hardware.
Some door closers are equipped with a special function that locks the open sash in the desired position. To do this, you just need to tighten the locking element installed on the device itself.
The sash locking function can be configured to operate in automatic mode. Then, when opening to the point set in the closer’s settings, the door will close according to all the rules, and after passing the mark, the door will automatically lock in the desired position.
It is important to keep in mind that when installing a closer on a plastic door, you should screw the fastening screws not only through the PVC coating, but also through the steel profile installed underneath it, reinforcing the entire structure. Only in this case will the closer be securely fastened and withstand all loads during operation.
In order for the device to last as long as possible, you should not help it by applying force when closing the door. If not special device, fixing open position sash, then the lever mechanism should be disconnected in cases where it is necessary to leave the sash open for a long time.
The partially limiting function of the closer can be duplicated by installing a conventional bumper on the floor.
But you should know that this operation also occurs subject to certain conditions.
The bumper should be installed in such a way that the place of its contact with the door leaf is closer to the outer edge of the opening leaf. If the bumper is installed close to the door curtains, then the load on them will be higher than permissible, because in this case the principle of a lever will begin to operate, breaking the curtains out of the fastenings.
When to adjust fittings
You should turn to specialists for help or try to adjust the door fittings yourself (in accordance with the recommendations of the same specialists) when:
- became visually noticeable, or a strong draft appeared in the junction- this indicates that the leaf does not fit tightly to the door frame. You can verify the correctness of your suspicions using a sheet of paper, which should be placed one by one along the entire contour of the junction and taken out with the door closed, determining in different places the difference in the pressure of the connection between the sash and the frame;
- the sash appeared to sag. The first symptoms of this malfunction: when opening or closing, the door clings to the frame, the door latch does not fit into the lock striker, or the lock itself does not close well;
- The functioning of the door closer has changed. In this case, it is not necessary that this problem occurred due to the door hardware; perhaps the misadjusted closer itself is to blame. But it is imperative to find out the real reason.
Once a year, even with trouble-free operation of the door leaf, test measures should be carried out for preventive purposes in order to prevent the occurrence of serious malfunctions in the operation of the door structure.
Tips for adjusting the balcony door in the video:
Metal-plastic doors have a lot of advantages, but during operation they almost always require adjustment. However, this is a relative disadvantage: it is much more difficult, if not impossible, to return a warped wooden or deformed metal door to working condition. The purpose of this article is to give the reader an idea of how a plastic door is adjusted.
For what?
But why go through the door yourself? What are masters for? Door installers, especially in the periphery, are extremely reluctant to adjust installed door, or they refuse altogether: “We’ll set it up like it was done at the factory, and if anything happens, there’s a call center phone number in the contract.” What if the closest service center with an adjuster only in the regional center? And not even in your area? Acting according to the company’s instructions (if one is attached to the contract), you can “drive” the door so that you still have to call a company or a local craftsman for a decent amount of money, and even lose the warranty. Why? Metal-plastic doors have from 5 to 8 interconnected adjustable technological units. Operations with each of them individually are elementary (see below), but without a clear idea of what to do and how to turn it, the door will constantly blow out or completely jam. It’s good if it’s open. Therefore, everyone who has metal-plastic doors and windows in their home needs to know how to properly adjust them with their own hands without violating the warranty.
Tool
In order to avoid scratches and scuffs until the warranty expires, the door/window made of metal-plastic must be adjusted using a special adjusting key. This is the only tool you will need, but it is not included in the door package: routine service operations are a significant piece of butter on the bread of window and door system suppliers and their contractors.

At home, you can independently adjust a metal-plastic door/window using a regular 6-sided socket wrench of caliber 4 or (rarely) 6 mm (No. 4 and No. 6, respectively), pos. And in Fig. If you recently bought cabinet furniture, then perhaps the assemblers left behind a furniture key for confirmation (item B). This is exactly what is needed; in extreme cases (very tight slopes, etc.) one horn will have to be cut off. In a more or less large city, in a tool, construction or furniture store, you can also purchase a special door adjusting key, pos. B. It is much more convenient to work this way, and the adjustment time is reduced from 30-60 minutes to 10-15.
Note: very rarely, to adjust the most expensive doors in the elite price segment, you may need a special triangle or sprocket key with a caliber of 4 mm. It is difficult to find it on sale, but the contract for the installation of such doors usually includes a free one-year service maintenance with the possibility of switching to a subscription service in the future.
Adjustment units
In doors of regular price categories, depending on their manufacturer and design features (with ventilation, i.e. with or without a tilting leaf), there are from 5 to 8 structural units that can be adjusted. Some of them are for operational purposes (to transfer the door from summer to winter mode or vice versa), some are subject to regular maintenance in the form of lubricant, and some are used to eliminate problems that have arisen as a result of operational wear of the door itself, fluctuations in climatic conditions by season, and the inherent shrinkage of building structures and etc.
Note: to simplify the presentation of what follows, we will agree, in naval language, to call the vertical edge of the door leaf, fixed in the hinges, the root, and the free one, on which there is a handle and possibly a lock/locks, as the chassis.
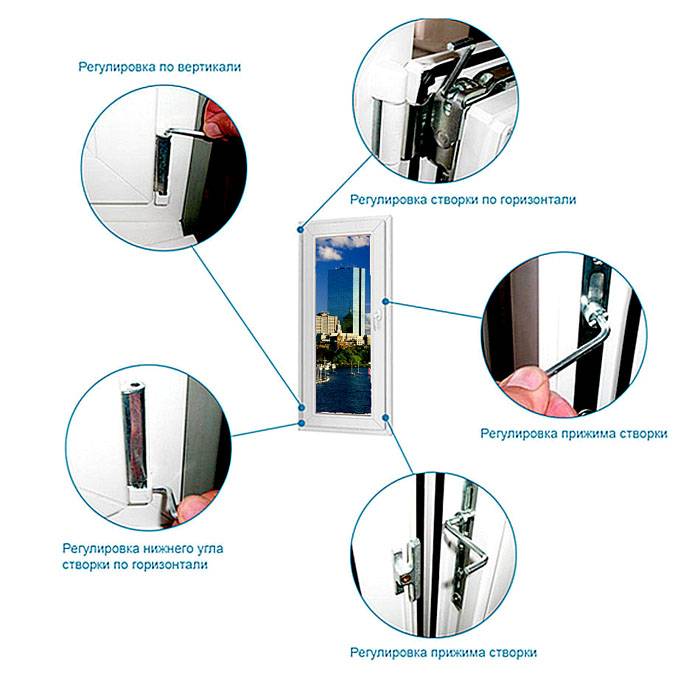
The operational adjustments of the plastic door (for troubleshooting) are shown on the left in the figure; operational adjustment (for changing the winter/summer mode) and subject to routine maintenance - on the right. Both of them, and possible manipulations with them, are described in more detail below; For now, we will note, for now we will only note that it is not recommended to “finish” the door with operational regulation bodies if there are “not enough” operational ones. Otherwise, the wear and tear of not only the parts to be replaced (sealing gasket), but also the door as a whole is greatly accelerated.

The purpose of those shown in Fig. door adjustment controls are as follows:
- The upper hinge (pos. 1 and 1a) by itself or in conjunction with the lower one regulates the skew of the door, i.e. tilt in the plane of the door leaf. Synchronously with the bottom - allows you to raise/lower the blade, adjust its clamping force and perform a lateral shift of the blade, i.e. rectilinear movement in its plane. On entrance doors without ventilation, full-function hinges (positions 1, 2 and 3) are often installed, providing adjustment in 3 planes. For ventilated balconies there are hinges with limited adjustment functionality, but they allow the door leaf to be tilted, pos. 1a and 2a. For more information about both, see below.
- Purpose bottom loop(pos. 2 and 2a) the same, but due to the skew it acts counter-acting from the top: if, for example, the canvas is moved forward (from the root edge to the running edge) and the top loop is not touched, then the front (running edge of the canvas will rise. If at the same time Use the top hinge to push the door leaf back (pull it towards the root edge), then the skew of the door will increase.If both hinges push/pull the door leaf out equally, it will move forward/backward without warp.
- The middle hinge (if any, item 3), regardless of its design, only regulates the clamping force and raising/lowering the door. An attempt to regulate the lateral displacement of the canvas with the middle loop - common reason door jamming due to improper adjustment.
Note: the pressure and, especially, the raising/lowering of the door are regulated strictly in concert with both (or all three) hinges. For example, if you unscrewed/wrapped the microlift (lifting and lowering device) of the lower loop by 0.5 turns, but you need to unscrew/twist the microlifts of the middle and upper by the same amount. They forgot - the door can open/close, but soon the pins will come out of the hinges, or the hinges themselves will become loose (which cannot be repaired), or something else will happen that will raise the question of replacing the door.
- Pressing teeth (item 4) in inexpensive non-ventilated balcony doors set the pressing force of the leaf, but using them to move the door from summer to winter is a gross mistake, which sometimes causes the seams of the door frame to burst. Doors with locking teeth instead of the rear branch of the shut-off valves and without its upper branch are the cheapest; switching them from summer to winter mode is not provided for by the design, even if the trunnions (see below) allow this. Also, locking teeth are sometimes called anti-burglary, because They are located approximately in the same places as the anti-burglary cones of entrance doors. But this is completely false - the clamping teeth do not help at all from breaking the door, because... mechanically free from the outside of the door.
- The locking pins (item 5), firstly, ensure the door is locked. Secondly, by turning them, the door is switched from summer to winter mode and back, which is not a violation of warranty obligations by the consumer, i.e. You can “twist the DAC” with a suitable tool (see above) yourself. Thirdly, the trunnions require periodic lubrication, which you can also do yourself, see below.
Typical problems
The second condition for the “non-burnout” of the guarantee and simply for the long successful service of the door is not to “twist the DAC” at random, groping for a solution at random, but to determine which of the typical door malfunctions the real problem is closest to:
- There is a blow through the latch door. Turn the knob down and the blowing stops. Don't do anything, that's how it should be. Switching the door to winter/summer modes prematurely, before the seal begins to wear out, prolongs the service life of the seal, but wears out the locking fittings more, which is a much more serious problem;
- The same thing, but after locking the door it still blows, albeit weaker. Check the clamp (see below). Weakened - it’s time to switch the door to winter-summer switching, because... The seal has started to wear out. It’s not a big problem, it will last for a long time, definitely until the end of the warranty, and replacing the seal can be done with your own hands. We switch the door to winter mode - the “barrel” has disappeared? Order. No - see next.
- Measures under item 2 did not help. The door is not the cheapest, with a locking mechanism of 2-3 branches. We increase the clamping force of the web using lateral displacement regulators in the hinges (pressure regulators, see below);
- pp. 2-3 helped partially: in the front, where the handle is, it doesn’t blow, but at the top and/or behind it does. We check the serviceability of the transmission units of the locking mechanism (see below). Does not work? If the door is under warranty, we file a claim – the case is 100% guaranteed. There is no way to make warranty repairs or the warranty has expired? Let's see if we can fix it ourselves, also see below;
- Same situation, but a cheap door with locking teeth. We strengthen the overall pressure by extending the teeth (carefully and carefully, see below!), set the locking pins on the running edge to the “winter” position;
- Measures according to paragraphs. 2-5 didn't help. We inspect the seal. Is it crumpled because the door is of poor quality or because the door was used incorrectly? The seal needs to be replaced. We buy a new sealing cord, the same as the old one. We take out the unusable one (it is simply pulled out of the groove), and install a new one. It is convenient to press it so that it fits into the groove using small pliers, but not too much so as not to tear the elastic plastic;
- Step 6 didn’t help either. The clamp is perfect, all possible adjustments have been made, but it’s blowing. Most often - through loops, which can sweat. This is a dangerous situation because... Thin-walled metal profile liners can become very rusty and the entire door will become unusable. The reason is a violation of installation technology. Possibly - forced, if the door in the house is of unsuitable design, see below. For example, the house is aerated concrete or new door placed in the opening of an old wooden one, and the groove under the frame in it is too narrow and/or deep to fit mounting plates. Inspection of the frame with the door open reveals through holes for anchors and/or turboprops (screws for stone), see fig., through them cold air leaks behind the seal. We plug the holes with stoppers from pharmaceutical bottles, a piece of foam film or penoizol, etc.

- It doesn't blow anywhere, but when there is wind, the hinges sweat. Hard case: Wind pushes cold air through the gaps of poor-quality masonry or wood construction to the fastening of the mounting plates. They, in turn, are attached through the plastic to the metal profile liners, like the hinges. This creates cold bridges, which also leads to rusting of the steel in the profile. If the house is wooden, re-caulk it in the spring, which may require removing the outer siding. The stone house will also need to be re-plastered on the outside in the spring. If the house is old brick (a Soviet-built apartment building), then the only way out, also in the spring, is to order external insulation with polystyrene foam or polyurethane;
- After all possible measures according to paragraphs. 1-9 still blows. Checking with a strip of newspaper or tissue paper shows that it blows unevenly along the contour of the door or in selected places. Checking the tightness of the seal (see below) confirms the determination based on drafts. The door is deformed, perhaps imperceptibly to the eye. Based on the strength of drafts, we determine the nature of the deformation and, if technically possible, correct the problems by adjusting the hinges, see below and further;
- It blows at the top on the running edge and at the bottom on the main edge. Perhaps the lower running edge is catching on the threshold. The likely reason is unreasonable savings. We ordered a door with warm, but expensive and heavy double-glazed windows, but decided to save on fittings and profiles. In this case, the horizontal imposts (beams) of the sash were bent. Using the lateral shift regulator on the lower loop, we move the blade forward (away from the loops), and with the same upper one back (towards the loops);
- With drafts the situation is the opposite (very rare). The door frame was distorted building structure due to savings on polyurethane foam or improper formation of mounting plates, see below. Correction - in the reverse order of paragraph 10;
- Blows at approx. evenly. There is either no blowing below, or a weak draft. The sash may be rubbing all over the threshold. Again, unreasonable savings, but now the fittings turned out to be weaker than the profiles and sagged. Using microlifts of the hinges we move the door up;
- It blows stronger at the back (near the hinges) than at the front. There may be a lull on the running edge. The sash may be catching the frame with its running edge. The door is locked tightly, and the profile “plays” when you turn the handle. Checking the locking mechanism (see below) shows its serviceability. Lateral deformation of the frame for the reasons of point 12. Using lateral displacement regulators in the hinges (clamping force regulators) we increase the pressing force of the sash;
- It blows strongly from below. Less from the sides, and stronger approx. at the middle of the sash height. The sash may be catching on the lintel (upper cross member) of the frame. We lower the door using hinge microlifts. If the drafts on the sides have not stopped, and the magnetic latch holds the door poorly or not at all, the worst has happened - the building structure’s own shrinkage, combined with improper installation of the door, has caused the frame to sag. A possible, but very labor-intensive repair option without replacing the door is non-destructive dismantling, straightening the frame and subsequent reverse installation. The plaster on the slopes will have to be beaten, the foam will have to be scooped out, the door will have to be removed from the opening and the sash will have to be removed. Then - measurements of the frame and straightening it with a jack with a T-shaped spacer made of wooden beam. Be extremely careful, the frame may burst at the seams! Passed by - reverse correct installation, how in wooden house, see below, foaming, plastering and finishing of slopes.
Note to clause 8: the situation is quite likely in old brick apartment buildings. The author knows of a case where in such a house experienced conscientious craftsmen installed balcony block. Then they didn’t know what to say to the owner - in a strong wind, the side trim flew off the window sill. “Barabashka’s things” stopped when external insulation was installed in the apartment.
How to check the seal

Checking the proper amount of pressing force on a plastic door is done with a sheet of uncoated and non-glossy writing paper with a density of 9-110 g/sq. dm. Test time - immediately after completion heating season or just before it starts. They check together; The controller operates from the outside. The edge of a sheet of paper is placed under the seal itself so that it is not pinched by the locking mechanism. The assistant locks the door from the inside, and the controller pulls out the paper, see fig. on right. The sheet should be pulled out tightly, so that smooth transverse folds appear along the paper, but not tear. It breaks - the clamp is too tight, it needs to be loosened, because... The seal, locking fittings and adjustment elements wear out intensively. The paper comes out easily, without wrinkling - the pressure is weak, it needs to be strengthened, otherwise in winter there will be a draft and you will have to tinker with the door, letting the cold into the house.
House for the door
The situation described in paragraph 14 of the list of typical problems with a plastic door is typical for wooden houses. With all its magnificent positive qualities, the own shrinkage of wooden houses (not settlement along with the foundation) reaches enormous values: up to 8-12% in height in the first 3-4 years, if the house is made of unseasoned wood. And then, depending on the temperature and air humidity, a wooden house “plays” in height up to 1 cm/m. Therefore, the installation of plastic doors in a wooden house should be carried out in compliance with the following. rules:
- Place the door frame only on the mounting plates. Do not use rigid main fasteners (screws, anchors).
- Leave technological gaps for foaming between the door frame and its opening at least 3-4 cm; better – 5-8 cm.
- Take longer mounting plates so that the technological bends of their legs are at least 135 degrees (no more than 45 degrees from the plane of the plate body.
- Technical clearances of all doors, incl. internal in a heated room, foam only with winter foam with a minimum pour point (not operational hardened foam!) not higher than –15 degrees. Winter foam is more elastic, stronger than summer foam and, in combination with long, flat plates, better counters the loads of the building structure that deform the door.
- Foam strictly according to technology, in layers no thicker than 10-12 cm. Under no circumstances should you foam the gap to its entire depth at once! Blow out the next layer when the previous one has hardened from the surface; Yes, there is no other way, otherwise the new foam will pull the old foam along with it and all together will crawl out of the gap.
- Foam only with a foam gun - with a manual sprayer required quality can't get work.
Note: another typical situation for wooden houses plastered inside with shingles is folds and rounded holes in the wallpaper at the junction of the walls and the ceiling, as if someone is gnawing on them (the wallpaper) from the inside. No alien cockroaches live under the wallpaper; again, due to seasonal deformations of the building structure, the wallpaper wrinkles, and sand or plaster crumbles out of the plaster, which rubs holes. But in this case, it’s easier for residents - just install polyurethane ceiling plinths (ceiling moldings).
Doors in a house made of SIP
It is generally not recommended to install metal-plastic doors in a wooden house, especially a new one. But there are buildings for which there is virtually no alternative to metal-plastic doors. These are houses made of SIP (structural insulated panels; SIP, structural insulated panel). Construction from SIP is, to put it mildly, a debatable topic - they have too many shortcomings. One of them is the high acoustic quality factor of the house. Metal-plastic doors do not slam, they click very quietly and they themselves perfectly dampen sounds, and they do not have their own shrinkage of the SIP structure. Therefore, plastic doors can be installed in a SIP house without fear, and its inhabitants will be much less likely to feel like they are living in the big drum of Ian Pace or John Bonham. But the anti-acoustic properties of plastic doors are fully manifested only when they are finely tuned; how to adjust metal-plastic doors in a SIP house, see video:
Video: adjusting a plastic door in a SIP house
Adjustment and maintenance elements
Let's consider the structural components of metal-plastic doors in descending order of their importance: from those intended for seasonal change of mode to those subject to inspection and maintenance. There's no escape from switching the door from summer to winter - it's blowing. Minor problems need to be corrected immediately for the same reason, and so that they do not develop into larger problems. Door maintenance is required 1-2 times a year, and it almost always takes time.
Trunnions and teeth
Trunnions not only switch the door into seasonal mode; They also ensure its reliable locking. The anti-burglary function of a trunnion lock is very relative, “from honest people”: a double-glazed window can be cut quite easily with a diamond glass cutter, and a sandwich insert can be cut completely silently with a sharp knife.

The design and operating principle of the trunnion locking mechanism are shown in Fig. (catcher configurations in specific mechanisms different systems are different). When closing the door (pos. A-B, the pin passes under the catcher with a small gap. It is under, and not above the catcher, so that if the shut-off valves malfunction (see below), the pin that falls down does not jam the door tightly. In position B, the door becomes magnetic latch. When the handle is turned down, the bolt lifts the trunnion, sliding in the slot of the crossbar bar, and pulls it behind the catcher - the door is locked. To avoid damage to the mechanism by careless users, the locking mechanism is equipped with a pendulum lock, which allows you to turn the handle up and down only when the door is locked latch.
Note: anti-burglary pins differ from conventional ones in their mushroom-shaped configuration, and their catchers have a groove with the side bent inwards, at the bottom right in Fig.
There are 2 types of locking pins: oval and eccentric. Oval ones (on the left in the figure) are gradually falling out of use. Installing them for summer and winter is easy; you can immediately see what pressure they are set to. But the oval trunnions do not hold the pressure well, especially at its average values, when the wear of the seal has just begun. In addition, to adjust the oval trunnions, you need a shaped wrench, and the pliers scratch their coating, which leads to mechanical damage and grounds for voiding the warranty.

There are quite a few varieties of eccentric journals; in the center in Fig. some are shown. The installation mark is made on the wide edge of the eccentric, which provides the greatest (winter) door pressure. Since switching the door according to the season is a necessary operation and is carried out by the user, doors with trunnions on planks (down in the center) are increasingly being found, both for a socket and for the more common open-end wrench 8/10, 9/11 or 10/12. But you don’t need to twist them with pliers: it’s inconvenient, and the coating (probably for “foolproofing”) is easily damaged by the wrong tool.
How the trunnions are adjusted according to the season is shown on the right in Fig. Oval ones can be turned in any direction, and eccentric ones for the winter are set with a mark in the warm direction (indoors), although some eccentric manufacturers make trunnions with the mark in the opposite direction. In this case, the desired position is determined by the draft from the door. There are also trunnions with a rotation limiter, so you need to twist them without using excessive force so as not to break them. If it doesn’t work, we turn in the other direction. It doesn’t work at all - either the shut-off valves are faulty (see below), or the door is a cheap single-mode door and the pins on the crossbar are riveted tightly. On transferring a plastic door with pins from summer to winter mode and back, see also the video:
Video: transferring a plastic door from summer to winter mode
Note: the eccentricities of producers of consumer goods and buyers of their products sometimes border on pathology. Thus, in the late 70s - early 80s in Hong Kong, a company producing wrist watch with reverse hands and a dial divided into 27 hours of 53 minutes each.
Teeth
The locking/clamping tooth structure of a cheap plastic door is shown in the following. rice.:

When the door is closed, the tooth creeps onto the shoe (most often plastic), which ensures that the root edge of the door leaf is pressed (in position A, marks from the tooth on the shoe are visible). The tooth is adjusted with a screw with a head for a 6-sided socket wrench, located to the hole on the bevel of the tooth, pos. B. By tightening the screw, the tooth is pushed out; unscrewing - pushing. The permissible displacement during one adjustment cycle (before the need for the next one) is 0.5-1.5 mm; this is 1-3 full turns of the key. There are 2-3 teeth on the door; they must be regulated strictly according to, i.e. unscrewing/screwing all screws the same number of turns. An exception is deformation of the vertical pillars of the door frame, but then after each turn of the key you need to check the pressure of the teeth with paper, as described above.
Loops
By adjusting the hinged hinges, minor problems with the plastic door are eliminated: skew of the leaf, its displacement in the frame, uneven and/or insufficient pressure at the bottom and top. Hinges for entrance and balcony metal-plastic doors are significantly different in design and adjustment methods.

Hinges for entrance doors made of metal-plastic (item 1 in the figure) are sometimes called barn hinges for some external similarity. But the “barn” hinge has only one wing, and its body is attached directly to the steel profile insert (item 2), so all manipulations with the hinges must be done carefully: if the profile is dented, the door will have to be replaced. Hinges for balcony doors are different in design: the upper one (item 3) has a pressure regulator, and the bottom pin (item 4) is almost always fixed on a hinge with 2 degrees of freedom. There are also non-adjustable hinges for interior plastic doors on sale; Structurally, they are identical to hinges for windows without ventilation and are the same (top and bottom).
For the front door
Structurally, the hinges on the same entrance unventilated plastic door are the same; there can be 2 or 3 of them. Each hinge is adjustable for pressure, lateral displacement (skew) and lifting and lowering, but do not forget: you cannot try to adjust the lateral displacement of the door leaf with the middle hinge, even if there is deformation of the frame! The middle hinge regulates only the pressure and height of the sash, and synchronously with the top and bottom! Otherwise, even if the door does not jam, its operational wear will be much greater than normal.
The location of the hinge adjustment controls for plastic entrance doors from popular manufacturers is shown in Fig. It is generally uniform, as is its feature: the microlift regulator (raising/lowering the sash) is located at the bottom, and the pressure regulator is at the top of the hinge. Psychologically, this is somewhat unusual, which explains many home craftsmen’s failures in adjusting their doors.

For balcony
The first feature of hinges for plastic doors with ventilation is that to access the adjustment controls it is often necessary to remove the thin-walled plastic decorative casing. If it cannot be removed by hand, you can pry it out with a blunt flat-head screwdriver: breaking the casing does not void the door’s warranty, although it cannot be replaced free of charge. The second is that the regulatory functionality in this case is distributed between the upper and lower loops, and for each of them is most often limited.

IN inexpensive doors without ventilation, the upper loop only regulates the lateral displacement/skew (pos. 1 in the figure), and the lower one also regulates the skew and rise/lower, pos. 4. The upper hinge of such doors almost always, and the lower one often, can be adjusted with a simple socket key or a furniture key, pos. 2. In doors that are more expensive to ventilate, the top hinge is most conveniently adjusted with a door adjustment key for lateral displacement (skew), pos. 3a, and along the clamp, pos. 3b. In this case, the entire height of the sash is adjusted by the lower hinge, pos. 5. If there is a nuance common to both cases: if adjusting the lower hinge for misalignment is difficult or the key “does not want” to rotate the adjuster at all, open the door and look at the lower hinge from the side of the frame. You will probably see the skew adjuster stopper, pos. 6. You need to loosen it, adjust the door, and tighten the stopper back. For more information on adjusting the bottom hinge of a metal-plastic door, see the story:
Video: adjusting the bottom hinge of a plastic door/window
More about balcony doors
In general, the plastic balcony door is adjusted in the sequence shown in the figure:

But here is a small mistake: according to pos. You must first adjust the width (i.e., lateral displacement and/or skew), and only after that adjust the sash height. However, this error is not fundamental, because The top hinge does not adjust the height of the sash; an incorrect height adjustment with the bottom hinge will not jam it, so you can always return the settings to the original ones and start over. In advance, you can also watch a video about adjusting a metal-plastic balcony door with your own hands:
Video: adjusting the balcony door
Ventilation adjustment

In some models of ventilated balcony doors, you can also change the angle of the door leaf according to the time of year and local climatic conditions. To do this, the end of the short limiter lever is moved from position A on the long one (see figure on the right) to position B. This will reduce the tilt angle of the sash. By completely turning off the short lever, you can increase it, but it’s better not to: if you suddenly set it for ventilation, the slider of the long lever can fly out of the groove, and the sash will slam onto the floor. This work must be done with an assistant holding the sash, otherwise it may fall down in such a way that it will twist the bottom hinge and distort the profile of the frame. An option, if there is a homemade durable dryer on the balcony or some other reliable piece of hardware at the top, is to tie the door to it by the handle. Having completed the readjustment, check whether the door locks. If not, alas, you will have to return the lever system to its original state, because... groove B in the locking fittings does not have the required length. Lever-slider door tilt limiters are almost identical and can be interfaced with different types of locking fittings.
Additional features
Any metal-plastic door can optionally be equipped with an opening angle limiter so that the door handle does not hit the slope. The door swing limiter is always structurally combined with a pneumohydraulic brake on the closing speed of the door leaf (to prevent knocking on the frame).
The cheapest door swing limiter is made using a rack-and-pinion kinematic scheme, on the left in Fig. The swing angle of the door with such a limiter is not adjustable. To set the swing angle of the lever-hinged swing limiter, you need to unscrew nut A (on the right in the figure), set desired angle, simply open the door as far as you like and tighten the nut back.

Locking fittings
The locking hardware of a plastic door is driven by the door handle, which most often jams or becomes loose. If the handle is jammed or it turns tightly, even if the profile bends, the handle needs to be disassembled and checked. To remove the handle, turn its internal decorative trim 90 degrees and unscrew the 2 mounting screws, pos. And in the figure:

After this, the handle can be separated and removed, pos. B. A square-section leash fits freely into either half of the handle; each of them should, with little effort, rotate 90 degrees from the middle position in 45-degree increments. That is, there are 5 handle positions in total, which is determined by the built-in ball lock. The handle halves are non-separable. If any of them, or both, rotate in your hands tightly or do not give in to pressure at all, put 2-3 drops of liquid machine oil into the sockets of the leash and try turning again. It sticks, it goes hard - the latch is broken or crumbled, the handle needs to be replaced with a new one.
The general diagram of locking fittings for metal-plastic windows and doors is shown in the following. rice.:

The lower branches of the reinforcement (highlighted in green) are placed only on windows, because under the door below there is a threshold along which people walk. To check the serviceability of the fittings, open the door, place the locking pendulum M vertically downwards with your finger and hold it - the locking mechanism is unlocked. Now we turn the handle down - all the pins, except one on the upper branch, should move simultaneously. If only the front branch works (on the running edge of the leaf), then the door will be locked, but in winter the malfunction will make itself felt with unavoidable drafts. In this case, you need to carefully inspect the transmission link from the front branch to the others (upper and rear), noted in Fig. letter L. It is often made of steel tape, which is visible through the slots of the crossbars. If the tape breaks, this is a warranty case. Any problems with warranty repairs? Can you work with your hands? A new transfer can be made from cash suitable material, but disassemble the locking system carefully: as soon as you clumsily disconnect the crossbars from the door profile, the entire system falls apart.
Let’s say everything is fine with constipation, but the sash is difficult to ventilate; This happens extremely rarely. We turn the handle up without releasing the pendulum - all the pins, except one on the upper branch, remain motionless, and the one that did not move when turning the handle down moves. Perhaps there will be 2 such pins, these are blockers for the sash tilt limiter. Repairing it yourself is sometimes possible after disassembling the fittings.
But most likely, all the mechanics and kinematics of the locking valve are intact; it breaks very rarely. The door will then function as it should, but it will be tight from a perfectly good new handle. If so, the fittings just need to be lubricated. Add a drop of liquid machine oil to the points shown in Fig. red arrows: into all hinges and on the crossbars under the trunnions through the slots in the crossbar strips. Then the trunnions and counter strips (catchers) are lightly lubricated with technical petroleum jelly, grease, grease, tsiatim, shahtol or any other grease. After lubrication, the fittings (again, without releasing the locking pendulum) are “driven” 3-4 times full speed, turning the handle all the way down and up.
Plastic doors are a well-proven competitor to classic wooden construction. They are known to everyone due to their use in shops and offices, but there is also a place for such doors in an apartment - they are installed in the balcony opening. Plastic doors are not so difficult to deliver to the owner big problems. But, like any mechanism, during operation they may also periodically experience minor malfunctions that require intervention. Adjusting plastic doors is a simple process; you can do this work yourself, but you need some knowledge to help you do it.
Malfunctions that arise during the operation of plastic doors
If the door closes tightly or a strong draft is felt from under it, this is already a clearly expressed problem that requires elimination. There is no need to bring it to this state, because the presence of obvious problems leads to great difficulties during adjustment, as well as to wear of some parts. There are simple methods for checking the correct operation of doors that will allow you to quickly determine whether adjustment is necessary.
Checking the door to frame pressure
The condition of the sealing rubber will first tell you whether the door is pressed correctly. If it is crushed from some angle or its thickness has decreased, this is a clear sign of improper pressing.
In addition to taking measures to adjust the door, the deformed rubber seal will have to be replaced.
Method for checking the uniform pressure of the door to the frame:
- A sheet of paper should be placed between the frame and the door leaf.
- The shutter must be closed and, remembering the applied force, pull out the paper.
- The previous steps should be repeated around the entire perimeter of the frame.
If in some place the paper is pulled out without effort or, conversely, it is impossible to remove it, this indicates the need to adjust the pressure.
Self-adjustment: tools
After identifying a defect, the metal-plastic doors will need to be adjusted, which, if there is a warranty, will be performed by a called specialist. However, after the expiration of the warranty period, a wait for a repairman is required, which sometimes drags on. If you take into account the cost of adjustment in addition to this, it makes sense to perform the adjustment proper operation doors yourself. To do this you will need a simple set of tools, including:
- pliers or pliers;
- two screwdrivers - flat and Phillips;
- hexagons - L-shaped keys with dimensions from 2.5 to 5 mm;
- plastic gaskets;
- roulette
Pressure adjustment process
This process eliminates the resulting cracks through which drafts leak.
Most often, you can adjust the clamping force only by rotating the eccentric screws, which are located at the end of the door leaf. Near the hexagon socket screw there is a special mark - a point in the form of a small recess that helps determine the clamping density. If it is necessary to weaken the clamping force, the screw is turned with the mark towards the frame, and when strengthened, vice versa, towards the room.
Difficulties may arise due to the fact that there are usually three such eccentrics - top, bottom and in the middle. Therefore, it is necessary to act through experimentation, turning the screws at the same angle. After each installation of a new position, it is necessary to monitor the result.
Please note: these screws only provide good clamping near the handle. In practice, additional adjustments may be necessary near awnings. In this case, adjustment is made using hexagon screws located at the top of the two hinges (top and bottom).
Important! The design of the doors may differ; sometimes the pressure adjustment is performed using a special pin, which is rotated with pliers; to increase the clamping force, it must be positioned perpendicular to the door leaf.
Elimination of horizontal and vertical displacement
The door may deviate from the desired position horizontally or vertically. The adjustment in each of these cases will be different.
Horizontal displacement of the canvas
To eliminate this defect, adjusting screws located in all three hinges are designed. Each of the screws is covered with a decorative trim, to remove which the door is opened and the fixing screw is unscrewed using a 3 mm hexagon. After this, the sash is closed and the linings are removed.
- If only the edge opposite to the hinges is sagging, tighten the horizontally protruding adjusting screws on the top and middle hinges. In this case, the number of revolutions by which the rotation is made should be different. There is more on the top loop, and less on the middle loop.
- To ensure uniform movement of the entire blade to the right or left, adjustment is made by turning three screws the same number of turns.
Vertical offset
At the bottom of each hinge there are adjusting screws with a 5 mm hexagon recess. They are responsible for moving the canvas vertically. In this case, to move up or down, you need to adjust all three screws.
Rotation to the right (clockwise) raises the door. Two turns are usually sufficient for adjustment.
There are times when there is not enough screw travel to complete the adjustment. In this case, you need to “pull out” the door. To do this, you need to remove the plastic beads and insert pre-prepared plastic spacers into the space between the profile and the glass unit, without applying much effort.
If the adjustment process cannot be understood, then it is better to call a specialist and entrust him with this work. In this case, you will have the opportunity to watch how a professional performs the adjustment, so that if problems arise again, you can perform the adjustment yourself.
We will send the material to you by e-mail
Calling a specialist is usually expensive, so you should only invite him in emergency situations. If we're talking about about how to adjust a plastic balcony door, you can try to carry out the work yourself, having first familiarized yourself with the basic principles.
The door to the balcony may need adjustment
Each door block has basic and additional parts. Before starting adjustment work, a novice master should become familiar with the structure of such structures. He must clearly understand the operating principle of the fittings used.
The standard set usually includes:
- frame made of PVC profiles connected using special fasteners;
- a sash assembled according to the same principle as the box itself;
- hinges that allow the door to open and close;
- a handle with a lock, necessary to lock the sash in the pressed position;
- seals for tightness;
- glass unit

Helpful information! The set of accessories may vary slightly depending on functionality. The standard equipment is usually supplemented with mechanical or hydraulic closers, stoppers and other parts.
Preventive measures
Before you begin to consider information on how to set up a plastic balcony door, you need to familiarize yourself with preventive measures that will help reduce the number of adjustments and other problems. They consist of careful operation and correct selection fittings elements.
The door serves to delimit space in an apartment or house and protects residents from street noise and winter cold. Many people install in their apartments plastic structures: They look good and have many other benefits. But they also have a drawback - the heavy weight of the doors. It leads to sagging and loss of tightness. To troubleshoot problems, there are instructions for adjusting plastic doors yourself.
Problems most often arise with the onset of autumn. The plastic sheet begins to close poorly, touches the frame, and requires additional effort when turning the handle. As a result, cold outside air may enter the room. To eliminate these problems, plastic doors are adjusted, which can be done on your own.
If a plastic product is under warranty, it is better to call a specialist. He can check the entire door structure and determine the cause of the problems. After this, he will carry out work on lubricating the parts and making the necessary adjustments to the plastic door.
The adjustment may involve adjusting the plastic product horizontally and vertically, as well as adjusting the pressure of the canvas to the box. The door will acquire the qualities of a newly assembled structure: it will have a tight seal against the frame and will not close or open arbitrarily.
Prevention
Make adjustments PVC doors will have to be done annually. To do this less often, you need to follow some simple rules of prevention. It is good to equip the doors with an opening limiter and a microlift. The microlift will protect the canvas from sagging, and the limiter will not allow the hinges to become loose when the doors are fully opened.

To prevent the handle from breaking, do not hang heavy bags on it. Plastic parts will remain intact longer if you wipe them with a clean, damp cloth. Any plastic door structure includes: rubber seals. They must be regularly lubricated with silicone compounds, which impart plasticity to the rubber.
The lock, eccentrics and other parts of the mechanism are also subject to lubrication. Over time, the handle turns more and more tightly; you have to lean on it with all the weight of your body. This causes distortions in the canvas. If you follow all the rules, it will last much longer. Metal fittings are lubricated with technical petroleum jelly.
How to adjust a plastic door
Adjusting a plastic door begins with identifying defects. This can be done using a paper strip. It is placed on the frame with the door open and the sash is tightly closed. After this, you need to pull the paper towards you. If it pulls out without effort, this means that the door is not pressed well against the frame. In this way it is checked along the entire perimeter. The adjustment pattern depends on those places where the paper is not held tightly.
If the blade has shifted in the horizontal direction, you need to remove the plug from the hinges and tighten the screws. After this, use a hex key to rotate the horizontally located adjusting screw. In this way, the horizontal displacement of the PVC door is adjusted.
Sagging of the canvas
Often the door sag under its own weight. When the canvas is displaced in the vertical direction, it is simply returned to its place by rotating the adjusting screws, which are located at the bottom of the hinges. To do this, use a hexagon. If the operations are performed correctly, the plastic flap will take the desired position and will be in close contact with the box.

If you move the door in height, it moves up to 2 mm. When the adjusting screw is rotated counterclockwise, the door leaf lowers. Clockwise - rises. The main thing is not to rush. Only brings the desired result correct adjustment door hinges.
Mashing
With a large degree of vertical descent, the leaf begins to touch the elements of the door frame. The fabric is rubbing. The malfunction is adjusted by moving the blade to the right or left. It is recommended to start work from the bottom. To perform the operation, you need to take a hexagon and insert it into the corresponding hole. The PVC door will begin to move towards or away from the hinge. In the same way, the upper part of the structure is moved to the desired location.

We adjust the pressure ourselves
Over time, a situation may arise that the PVC door does not open or opens, but with difficulty. In this case, frontal adjustment of the structure is used. You can adjust the pressure of a plastic door in two ways:
- using eccentrics;
- using a clamping mechanism.
The eccentrics are located along the perimeter of the end part of the door leaf. The clamping mechanism is located in the canopy area. To adjust the pressure using eccentrics, you need to rotate them around their axis. As a result, the pressing force of the canvas to the box will change. If the eccentric moves towards the room, the clamp will weaken. This position is recommended for summer season. For winter, you need to turn the eccentrics towards the street. All eccentrics rotate in the same direction. This can be done with a special key or pliers.
Loose fit
It is a little more difficult to adjust the door with your own hands if it does not fit tightly. You can notice this problem by the sensations when turning the handle - in this case, you have to apply more force. In this case, the eccentrics are already set to the winter position. You can put them in the middle position, which will loosen the pressure. If this does not help, the reason lies in the handle: its entire mechanism is clogged and the blade does not close well.
Instructions for adjusting the handle
There is often a situation where the handle has become loose. In this case, you need to adjust it. To do this, the decorative trim is rotated 90 degrees to release the mounting screws. These screws are unscrewed and the handle is removed. Then you should carefully inspect the parts and, if necessary, replace the faulty ones. Assembly is carried out in reverse order. An assembled and lubricated handle will serve you well for a long time.

Adjusting plastic doors yourself is a simple matter. To perform all operations, it is necessary to open the sash to gain access to all mechanisms. The adjusting screw is tightened with a 4 mm hex key.
Required Tools
To carry out repair and adjustment work, some tools are needed:
- hex keys;
- flat screwdriver;
- Phillips screwdriver;
- plastic gaskets;
- roulette;
- rubber seals (not always);
- adjustment instructions.

This set of tools is enough to carry out high-quality work. All that remains is to monitor the serviceability of the design:
- if necessary, the old seal is removed and a spare one is installed;
- you need to monitor the level of the canvas in the horizontal plane;
- the sides of the hinges must always be firmly secured;
- adjust eccentrics in a timely manner;
- regularly lubricate all components and parts.
These actions will extend the life of PVC doors.


