Collecting mushrooms is a fun activity. Chanterelles, boletus, boletus, milk mushrooms. There are no mushrooms, but the white mushroom is considered the king of all mushrooms, with a thick white leg and a wide brown cap. If you like not only picking mushrooms, but also drawing, then let's try together draw mushrooms, more precisely, we will draw White mushroom. Let's do the mushroom drawing in stages with a simple pencil, but on last step you can color the mushroom drawing with paints or colored pencils. And if you draw leaves and grass next to it, then the picture of the mushroom will be very beautiful and attractive.
1. Let's mark the legs of the mushroom

First, draw just two circles for the stem of the mushroom. The circles will help you further precisely maintain the correct proportions in the drawing of the porcini mushroom.
2. Add a hat to the leg

Draw two "ears" next to the leg, like those of Cheburashka. They will help you draw a mushroom cap. At the base of the leg, add a "flattened" oval. After all, mushrooms are not perfectly even, their legs are curved, their hats are dented, so in order to draw a realistic mushroom, you need to take these "little things" into account.
3. How to draw a general outline of a mushroom

You see how easy it is to draw the shape of a mushroom when there are geometric guidelines. It is enough for you to circle these “circles” with a pencil, almost an arbitrary line, and you will get a real white mushroom.
4. Drawing of a porcini mushroom in detail

Before draw a mushroom in more detail, remove unnecessary outlines from the drawing. Completely decorate the hat and draw the edge of the hat with two lines. All the beauty of the porcini mushroom is in its contrasting hat. It is white on the inside and brown on top. The gap on the edge of the cap will only emphasize this effect.
5. How to draw a mushroom. Final stage

You see how easy and simple it is to draw mushrooms if you draw in stages. How much simple steps and you are already preparing to paint over the drawing with paints or pencils. The drawing of the mushroom looks very impressive in the technique of applying shadows with a pencil. If you also think so, you can simply shade the mushroom with a soft pencil, as in my drawing.
6. Drawing of a mushroom. surrounding landscape

Small growing mushrooms painted around, yellowed leaves, grass, twigs. They will make the drawing more attractive and realistic. If you were able to draw a mushroom beautifully and correctly, try to continue the drawing and draw the surrounding landscape. You can even draw a hedgehog next to the mushrooms. These animals are very fond of picking mushrooms, preparing them for the winter.
Many mushrooms grow in birch forests, you can draw such a birch next to the mushrooms.
Not only people collect mushrooms, but some animals do too. Squirrel prepares a whole warehouse of dried mushrooms for the winter.
Next to the mushrooms, you can draw fallen leaves of trees, a hedgehog or a squirrel. The drawing of the mushroom will become more picturesque and realistic.
mushrooms grow in shady places but not under any tree. Even the name of the mushroom often indicates this: boletus, boletus. A lot of mushrooms grow in spruce forests.
Harvesting food supplies for the winter, the hedgehog pricks mushrooms and apples on its needles and transfers them in this way. Good plot if you're up to it draw mushrooms.
To make the mushroom pattern more attractive, draw a butterfly sitting on the mushroom cap. True, butterflies usually prefer flowers instead of mushrooms, but for the sake of a beautiful pattern, a slight inaccuracy can be made.
This drawing of a Christmas tree is designed for a New Year's picture or postcard. But it can be used to draw mushrooms, since many mushrooms, especially porcini mushrooms, "like" to grow in a pine forest, sometimes forming whole mushroom meadows.
The best way to learn to recognize edible and non-edible mushrooms on your own is to familiarize yourself with their names, descriptions and photos. Of course, it is better if you walk through the forest several times with an experienced mushroom picker, or show your prey at home, but everyone needs to learn to distinguish between real and false mushrooms.
You will find the names of mushrooms in alphabetical order, their descriptions and photos in this article, which you can later use as a guide to mushroom growing.
Types of mushrooms
Species diversity mushrooms is very wide, so there is a strict classification of these inhabitants of the forest (Figure 1).
So, according to their edibility, they are divided into:
- Edible (white, boletus, champignon, chanterelle, etc.);
- Conditionally edible (dubovik, greenfinch, veselka, breast, line);
- Poisonous (satanic, pale grebe, fly agaric).
In addition, they are usually divided according to the type of bottom of the hat. According to this classification, they are tubular (outwardly resembles a porous sponge) and lamellar (on inside caps are clearly visible plates). The first group includes butter, white, boletus and boletus. To the second - mushrooms, milk mushrooms, chanterelles, mushrooms and russula. Morels, which include morels and truffles, are considered a separate group.
 Figure 1. Classification of edible varieties
 It is also customary to divide them into nutritional value. According to this classification, they are of four types:
Since there are a lot of species, we will give the names of the most popular with their pictures. The best edible mushrooms with photos and names are shown in the video.
Edible mushrooms: photos and names
Edible varieties include those that can be freely eaten fresh, dried and boiled. They have high taste qualities, and you can distinguish an edible specimen from an inedible one in the forest by the color and shape of the fruiting body, smell, and some characteristic features.
 Figure 2. Popular edible species: 1 - white, 2 - oyster mushroom, 3 - volushki, 4 - chanterelles
 We offer a list of the most popular edible mushrooms with photos and names(picture 2 and 3):
- White mushroom (boletus)- the most valuable find for a mushroom picker. It has a massive light stem, and the color of the cap can vary from cream to dark brown, depending on the region of growth. When broken, the flesh does not change color, and has a slight nutty flavor. It comes in several types: birch, pine and oak. All of them are similar in external characteristics and are suitable for food.
- Oyster mushroom: regal, pulmonary, horn-shaped and lemon, grows mainly on trees. Moreover, you can collect it not only in the forest, but also at home, sowing mycelium on logs or stumps.
- Volnushki, white and pink, have a hat depressed in the center, the diameter of which can reach 8 cm. nice smell, and at the break, the fruiting body begins to secrete sticky, sticky juice. They can be found not only in the forest, but also in open places.
- Chanterelles- more often they are bright yellow, but there are also light species (white chanterelle). They have a cylindrical stem that expands upwards, and the cap is not correct form, slightly depressed in the middle.
- Butter dish there are also several types (real, cedar, deciduous, granular, white, yellow-brown, painted, red-red, red, gray, etc.). The most common is considered to be a real butter dish, which grows on sandy soils in deciduous forests. The cap is flat, with a small tubercle in the middle, and feature- mucous skin, which is easily separated from the pulp.
- Honey mushrooms, meadow, autumn, summer and winter, belong to edible varieties that are very easy to collect, as they grow in large colonies on tree trunks and stumps. The color of honey agaric may vary depending on the region of growth and species, but, as a rule, its shade varies from cream to light brown. Feature edible mushrooms - the presence of a ring on the leg, which is not present in false twins.
- Aspen mushrooms belong to the tubular: they have a thick stem and a cap of regular shape, the color of which differs depending on the species from cream to yellow and dark brown.
- mushrooms- bright, beautiful and tasty, which can be found in coniferous forests. Hat of the correct form, flat or funnel-shaped. The leg is cylindrical and dense, the color matches the hat. The flesh is orange, but in the air it quickly turns green and begins to secrete juice with a pronounced smell of coniferous resin. The smell is pleasant, and the taste of its flesh is slightly spicy.
 Figure 3. The best edible mushrooms: 1 - butter dish, 2 - mushrooms, 3 - aspen mushrooms, 4 - mushrooms
 Edible varieties also include champignons, shiitake, russula, truffles and many other species that are not so much interested in mushroom pickers. However, it should be remembered that almost every edible variety has a poisonous counterpart, the names and features of which we will consider below.
Conditionally edible
Conditionally edible varieties are slightly less, and they are suitable for eating only after special heat treatment. Depending on the variety, it must either be boiled for a long time, periodically changing the water, or simply soaked in clean water, squeeze and cook.
The most popular conditionally edible varieties include(picture 4):
- breast- a variety with dense pulp, which is quite suitable for eating, although milk mushrooms are considered inedible in Western countries. They are usually soaked to remove bitterness, then salted and pickled.
- Row green (greenfinch) distinctly different from others in green legs and caps, which is preserved even after heat treatment.
- Morels- conditionally edible specimens with an unusual shape of a hat and a thick leg. It is recommended to eat them only after careful heat treatment.
 Figure 4. Conditionally edible varieties: 1 - mushroom, 2 - greenfinch, 3 - morels
 Conditionally edible also include some types of truffles, russula and fly agaric. But there is one important rule, which should be followed when collecting any mushrooms, including conditionally edible ones: if you have even slight doubts about edibility, it is better to leave the prey in the forest.
Inedible mushrooms: photos and names
Inedible include species that are not eaten due to health hazards, poor taste and too hard pulp. Many representatives of this category are completely poisonous (deadly) to humans, others can cause hallucinations or mild discomfort.
It is worth avoiding such inedible specimens.(with photo and titles in Figure 5):
- Death cap- the most dangerous inhabitant of the forest, since even a small part of it can cause death. Despite the fact that it grows in almost all forests, it is quite difficult to meet it. Outwardly, it is absolutely proportional and very attractive: in young specimens, the cap is spherical with a slight greenish tinge, with age it turns white and stretches. Pale grebes are often confused with young floats (conditionally edible mushrooms), champignons and russula, and since one large specimen can easily poison several adults, it is better not to put a suspicious or dubious specimen in a basket at the slightest doubt.
- red fly agaric, probably familiar to everyone. He is very beautiful, with a bright red hat, covered with white spots. It can grow both singly and in groups.
- Satanic- one of the most common doubles of the white fungus. To distinguish it simply by a light hat and a brightly colored leg, uncharacteristic of mushrooms.
 Figure 5. Dangerous inedible varieties: 1 - pale grebe, 2 - red fly agaric, 3 - satanic mushroom
 In fact, every edible double has a false double that disguises itself as a real one and can fall into the basket of an inexperienced quiet hunter. But, in fact, the greatest mortal danger is the pale grebe.
Note: Not only the fruiting bodies of pale grebes themselves are considered poisonous, but even their mycelium and spores, so it is strictly forbidden to even put them in a basket.
Most inedible varieties cause abdominal pain and symptoms of severe poisoning, and it is enough for a person to give medical care. In addition, many inedible varieties have an unattractive appearance and poor taste, so they can only be eaten by accident. However, you must always be aware of the danger of poisoning, and carefully review all the booty that you brought from the forest.
The most dangerous inedible mushrooms are described in detail in the video.
The main difference between hallucinogenic and other types is that they have a psychotropic effect. Their action is in many ways similar to narcotic substances, so their intentional collection and use is punishable by criminal liability.
Common hallucinogenic varieties include(picture 6):
- Fly agaric red- a common inhabitant of deciduous forests. In ancient times, tinctures and decoctions from it were used as an antiseptic, immunomodulating agent and intoxicant for various rituals among the peoples of Siberia. However, it is not recommended to eat it, not so much because of the effect of hallucinations, but because of severe poisoning.
- Stropharia shitty got its name from the fact that it grows directly on piles of feces. Representatives of the variety are small, with brown hats, sometimes with a shiny and sticky surface.
- Paneolus campanulata (bell asshole) also grows mainly on manure-fertilized soils, but can also be found simply on swampy plains. The color of the cap and legs is from white to gray, the flesh is gray.
- Stropharia blue-green prefers stumps coniferous trees growing on them singly or in groups. Eating it by accident will not work, as it has a very unpleasant taste. In Europe, such stropharia is considered edible and even bred on farms, while in the USA it is considered poisonous due to several deaths.
 Figure 6. Common hallucinogenic varieties: 1 - red fly agaric, 2 - shitty stropharia, 3 - campanulate paneolus, 4 - blue-green stropharia
 Most hallucinogenic species grow in places where edible ones simply will not take root (too waterlogged soils, completely rotten stumps and manure heaps). In addition, they are small, mostly on thin legs, so it is difficult to confuse them with edible ones.
Poisonous mushrooms: photos and names
All poisonous varieties are somehow similar to edible ones (Figure 7). Even the deadly pale grebe, especially young specimens, can be confused with russula.
For example, there are several doubles of the boletus - the boletus le Gal, beautiful and purple, which differ from the real ones in the too bright color of the legs or hat, as well as bad smell pulp. There are also varieties that are easy to confuse with mushrooms or russula (for example, fiber and talker). Gall is similar to white, but its pulp has a very bitter taste.
 Figure 7. Poisonous twins: 1 - purple boletus, 2 - bile, 3 - royal fly agaric, 4 - yellow-skinned champignon
 There are also poisonous doubles of mushrooms, which differ from the real ones in the absence of a leathery skirt on the leg. Poisonous varieties include fly agaric: grebe, panther, red, royal, smelly and white. Cobwebs are easily disguised as russula, mushrooms or aspen mushrooms.
There are also several types of poisonous champignons. For example, yellow-skinned is easy to confuse with an ordinary edible specimen, but during heat treatment it emits a pronounced unpleasant odor.
Unusual mushrooms of the world: names
Despite the fact that Russia is a truly mushroom country, very unusual specimens can be found not only here, but throughout the world.
We offer you several options for unusual edible and poisonous varieties with photos and names(picture 8):
- Blue- bright azure color. Found in India and New Zealand. Despite the fact that its toxicity is little studied, it is not recommended to eat it.
- bleeding tooth- a very bitter variety that is theoretically edible but unappealing appearance and bad taste make it unfit for food. Found in North America, Iran, Korea and some European countries.
- bird's Nest- an unusual New Zealand variety that really resembles a bird's nest in shape. Inside the fruiting body are spores that, under the influence of rainwater, spread around.
- Blackberry comb also found in Russia. Its taste is similar to shrimp meat, and outwardly resembles a shaggy pile. Unfortunately, it is rare and listed in the Red Book, so it is grown mainly artificially.
- Golovach giant- a distant relative of champignon. It is also edible, but only young specimens with white flesh. It is found everywhere in deciduous forests, in fields and meadows.
- Devil's cigar- not only very beautiful, but also rare variety, which is found only in Texas and a few regions of Japan.
 Figure 8. The most unusual mushrooms in the world: 1 - blue, 2 - bleeding tooth, 3 - bird's nest, 4 - comb blackberry, 5 - giant golovach, 6 - devil's cigar
 Another unusual representative is the brain tremor, which is found mainly in temperate climates. You can not eat it, as it is deadly poisonous. We have given a far from complete list of unusual varieties, since specimens of a strange shape and color are found all over the world. Unfortunately, most of them are inedible.
An overview of the unusual mushrooms of the world is given in the video.
Lamellar and tubular: names
All mushrooms are divided into lamellar and tubular, depending on the type of pulp on the cap. If it resembles a sponge, it is tubular, and if stripes are visible under the hat, then it is lamellar.
The most famous representative of the tubular is considered white, but this group also includes butter, boletus and boletus. Everyone has probably seen the lamellar one: this is the most common champignon, but it is among the lamellar varieties that the most poisonous ones are. Among the edible representatives, russula, mushrooms, mushrooms and chanterelles can be distinguished.
Number of mushroom species on earth
The article describes in detail the process of drawing mushrooms with a pencil. It will interest those people who are fond of drawing or just dream of learning how to draw. Also, this master class will be useful to parents who want to captivate their children with drawing, teach them how to draw.
Many inexperienced artists think about how to draw mushrooms. To correctly draw mushrooms with a pencil and then color them, you can look at the beautiful and clear photographs that can be found in encyclopedias and educational magazines. And you can draw mushrooms in the forest from nature, if possible. In nature, it is most convenient to make sketches with a simple pencil or pen, and you can color them at home.
Before you draw a mushroom, you need to prepare:
1. Liner;
2. Pencil;
3. Pencils of various shades;
4. Eraser;
5. Album sheet.

It is better to draw mushrooms in stages:
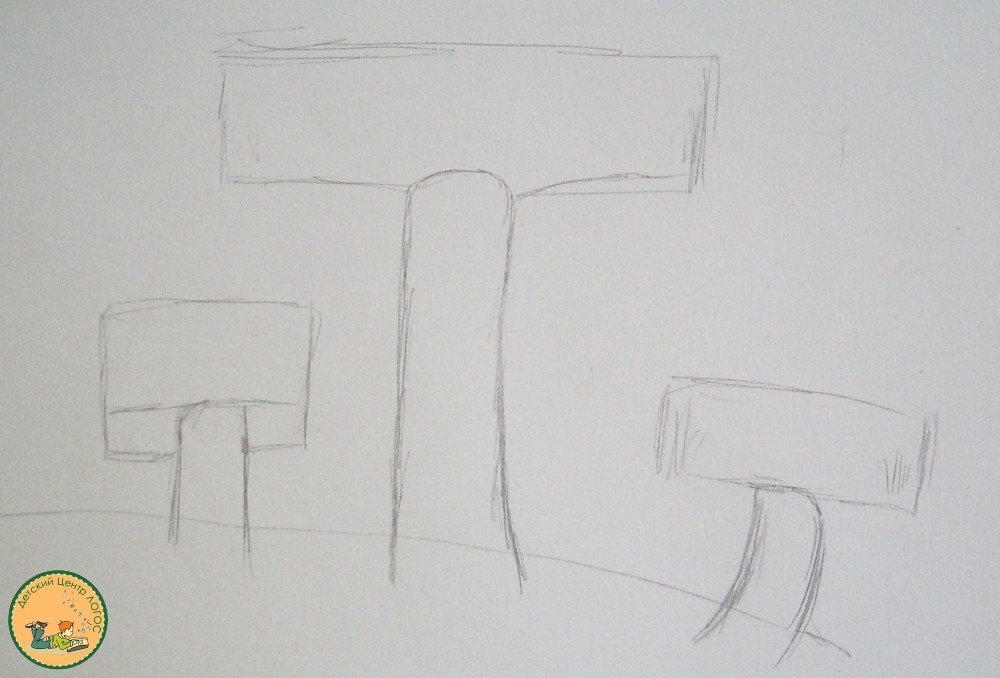
1. Draw the legs of three mushrooms and a line indicating the ground.

2. Sketch mushroom caps. So far, mushrooms look like hammers, but this is only a sketch, later the drawing will become more realistic.
3. Draw the hat of the extreme fungus.

4. Draw the bottom of the large mushroom cap.

5. Draw the top of the mushroom cap.

6. Draw the hat of the last fungus.
7. Draw blades of grass and a leaf lying on the hat of one of the mushrooms.

8. Outline the image with a liner.

9. Use an eraser to remove the pencil sketch.

10. Color the cap and fungus of the little mushroom. When coloring and drawing mushrooms, consider the features of their structure. For example, in this case, russula are depicted, the hats of which come in different shades. Caps of porcini mushrooms can be painted in Brown color and not in yellow or red. And fly agarics, for example, have a characteristic “skirt” on the leg.

11. Color the cap of a large mushroom using yellow, brown and red tones of pencils.

12. Stroke the bottom of the mushroom cap and its leg with gray and brown pencils.

13. Color the third mushroom with the same colors as the big one.

14. Grass, as well as a leaf, paint over with a green pencil.

The drawing of wild mushrooms is ready. It will also not be difficult for children to draw mushrooms, especially if their parents help them. Kids will surely like to paint mushrooms not only with pencils, but also with felt-tip pens or paints.

We invite you and your children to to our School of Painting "Art People Project"!
All mushrooms are divided into two categories: edible and inedible. How to draw a mushroom? The form largely depends on its variety. A mushroom is not always a familiar leg with a hat attached on top, because they come in the form of a fan, hoof, star, ball, bowl, and even coral. Among the edible most often found: milk mushrooms, chanterelles, russula, boletus and white. And a fly agaric and a pale grebe are considered a bright representative of poisonous ones.
 White mushroom |
 inedible |
 Children's example |
 fly agaric |
 Chanterelles |
 Realistic |
White mushroom
Let's try to consider the technology of how to draw mushrooms in stages. Let's take a pencil and with a slight movement of the hand make the boundaries of the earth, using curves and lines for this. In the middle of the sheet, we begin to draw a leg. It consists of two parts: the lower one is wide, which expands slightly towards the root, and the upper one with a skirt narrows upwards. The leg should take up one third of the sheet. Let's move on to the hat: the upper part resembles the outlines of an umbrella, but with jagged edges, and closer to the foreground you need to make two notches.

Now you need to take a pencil with a harder lead and draw all the lines, adding individual strokes. So, you will have to draw a few grains of sand on the ground, and draw three small and two large circles on the hat. We make notches in the form of a cracked part of the mushroom, shading it in the middle.

To add volume to the image, it is necessary to right places add chiaroscuro. So, in front of the mushroom, on the left and a little behind we make out small area shadows, since the main part will be located to the right of the mushroom. We darken the leg with horizontal strokes (they are parallel, but slightly beveled at an angle) to the left and in front of the border of the skirt and hat. In the upper part, chiaroscuro is needed on the left and along the edges of the hat skirt.
inedible mushrooms
Having practiced on a simple and familiar image of a mushroom, you can move on to a group composition and consider how to draw a mushroom with a pencil in a complex and step by step technology. We conditionally divide the worksheet into three parts, and start drawing from the middle one. We draw two vertical lines, which are located slightly at an angle so that the straight lines diverge upward. Under these skeletons of future mushrooms we draw small horizontal lines. All movements should be smooth so that the pattern is barely visible.

Set the boundaries of the hats: for a larger line, we do wide surface, and for a smaller one - rounded.

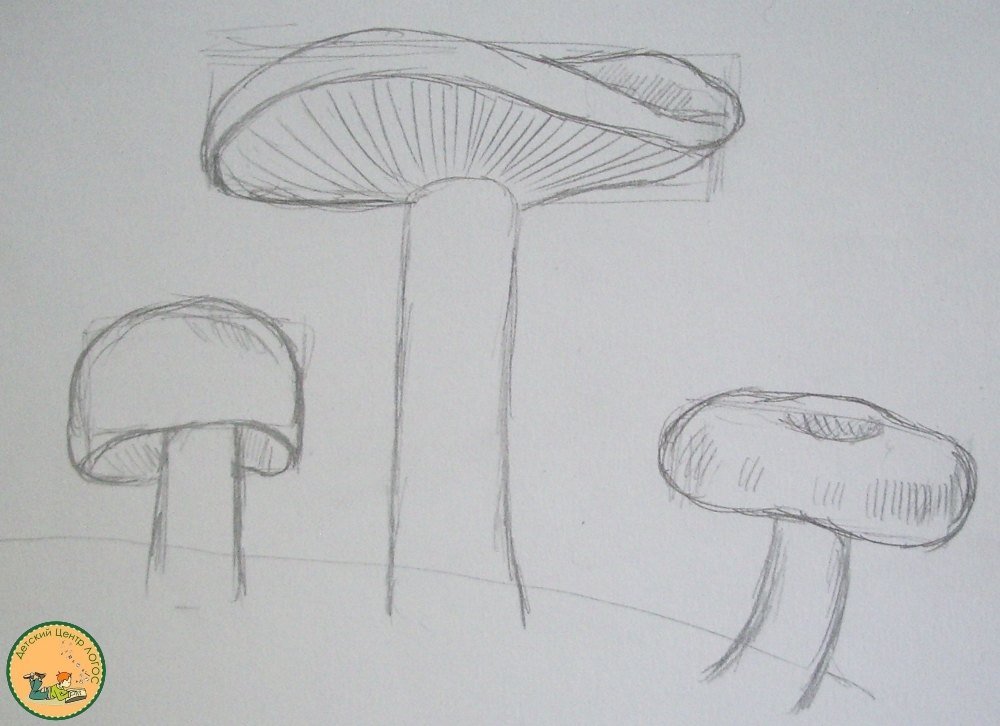
We draw up all the elements in more detail. For this, the movements must be smooth and zigzag.

Let's move on to the design of the surface of the earth. Near the legs we finish the blades of grass, and in front of the large mushroom we lower the leaf.

Now we change the pencil to a harder one and draw boundaries, increasing the number of blades of grass.

Let's move on to the hats: on each you need to make a lot of circles (correct and irregular shape) to cover the entire surface.

After that, you need to draw the legs of the mushrooms: add two or three vertical strokes to the left and right of the border, not forgetting to draw a few in the center. Draw the veins of the leaf.

We work with grass. It is necessary to make it voluminous and increase the number of small elements.

The next step is the volume of the hat. To do this, it is necessary to circle each circle along the contour again, adding chiaroscuro in different places.

The last step is coloring. Using the fine hatching technique, go through all the elements of the composition and shade. It should be remembered that the hat should be the darkest zone, the grass a little lighter and the lightest - the lower part and leaf.
Children's version of the mushroom
Not everyone will immediately be able to repeat the complex technology, so parents need to be told how to draw a mushroom for a child. We start with the hat. It should be wide and high.

From the middle part of the bottom of the cap we draw two borders of a thick leg.

In the background, add the border of the hat skirt.

To the left of the mushroom, draw the bottom of a small mushroom, directing the curves to the left.

We do the same on the other side of the mushroom, drawing the lines a little longer.

We put on the left the same hat as that of a large mushroom.

For the right element, we draw only half of the surface, since it is hidden behind a large mushroom.

In the foreground, we draw the border of the tooth-like grass.

It remains to decorate the drawing. The grass is green, the legs are pale yellow, the hats are red, but with white circles. A family of fly agaric came out.

Trio of poisonous fly agarics
Now you can carefully study how to draw a fly agaric. We start work with two mushrooms different sizes, tilting them in opposite directions so that there is an empty space between them. Thin legs with skirts and hats in the shape of triangles.

In the background between them we draw a long leg, bringing it high above them. Almost near the hat itself, we finish drawing the skirt. Top part mushroom looks like a flat plate.

For a large fly agaric, you need to make a high hat, pulling it up in the form of a triangle.

Coloring the composition. It is better to do this with colored pencils: we make the edges of the mushroom brown, the middle of the legs and the bottom of the skirt of a large hat - light brown, hats - red with white circles. Draw long and narrow grass at the bottom.
yellow fox
It's time to consider the technology of creating a completely different mushroom, the cap of which has a different shape. So, how to draw a fox? With a slight movement of the pencil, draw the outlines of the future mushroom. At first horizontal line, in the middle of which the leg skeleton passes in the form of a curve. Now it needs to be limited on both sides by two more oblique lines, which will show the size of the bottom element. Further, from the last element we take aside two curves that create the shape of a bowl. We finish the upper rim of the hat in the form of a compressed circle.

Near the root we draw a piece of grass with sharp teeth. From the end of the leg, we draw several curves along the bottom of the cap to its border.

Outline the mushroom with a pencil dark brown, painting it with a brown tint, leaving in some places areas for light shade. We paint over the grass with green, framing it with a dark tint, and let separate highlights of light green color over the blades of grass.
White mushroom (difficult option)
The next master class will tell you how to draw a white mushroom with a pencil in the most realistic way. We start with the skeleton: the horizontal line is the surface of the earth, the vertical line is the middle of the leg, half the circle is the hat.

We draw a leg, keeping the vertical strictly in the center. It should be wider at the bottom, tapering at the top. We make the top of the hat with humps, lengthening the lower part.

On the hat we draw circles of different sizes. We make out the lower part of the skirt in the form of notches, duplicating one more layer a little lower. We make a few strokes on the stem, and near the root we draw the borders of blades of grass.

We draw lines, leaving small strokes intact.

All over the mushroom we add groups of strokes, on the stem we draw only vertical single ones. We draw blades of grass in more detail.

To create a realistic hat, draw horizontal semicircles over its entire surface, interrupting them in the central part.

We do the same with the leg, but the lines should not be directed horizontally, but vertically.

With fine shading technology under different angles do the painting of the area of grass and leaves.

Now we need to add small dots all over the surface.

The last step is hatching in the opposite direction. On the hat we draw it vertically, and on the leg horizontally.
How to draw a mushroom - draw a boletus.
Well, well, it seems that I just drew a willow and a coltsfoot, I didn’t have time to look back, and summer is already in full swing - the market is already kind people they sell mushrooms, but what big ones! When did they grow up?
I don’t have time to go mushroom hunting myself, so I bought “gifts of the forest” and now I will draw and write a lesson step by step drawing mushrooms.
I went home and wondered - what kind of mushrooms? Boletus or boletus? They have the same shape, the difference is in the color of the hat: orange or brown. And who has what?
Looked it up on the internet - wow! With brown hats - boletus. So I will remember.
We draw boletus mushrooms in stages from nature
I choose a couple of prettier mushrooms, first I will draw with a pencil.
We repeat the theme "Mushrooms" more than once throughout the year - and the coloring of the mushrooms was painted and the squirrel was fed and the umbrella was compared with the mushroom. It seemed to me that I had a clear idea of \u200b\u200bwhat mushrooms look like - a hat and a leg. Yeah, but now I finally see real, not schematic mushrooms. Wow - what kind of legs are massive in boletus. And so interestingly flared down. And I thought - mushrooms have legs like an even column, but, it turns out, not everyone has them.
I designate the middle line - I will not call it the “axis of symmetry”, because the similarity of the halves of my mushrooms is very approximate. I draw the line of the hat - here it is necessary to correctly determine the angle of inclination: for a large mushroom, the hat is worn evenly, and for a small mushroom, on one side. The shape of the hats is domed, but also not ideal. On the underside of the cap is a spongy "hymenophore" - that for which the whole mushroom grew - the place where fungal spores ripen. In the boletus, the hymenophore looks like ... foam rubber, porous and slightly bumpy.

Outlines of mushrooms are drawn. The volume will be given by hatching.

By the way, the hat of a small mushroom is almost black, and the one that is larger is lighter, so we will draw. The legs are different too. I used to think - the legs of the mushrooms are white, but to look - they are gray with many black specks. So, my theoretical ideas were very different from how mushrooms actually look. Okay, it's important not to rest on your delusions, but to recognize and follow the truth.

Well, the mushroom drawing is ready.
Draw mushrooms - lesson 2
Now I will do what I have long wanted, but did not dare and put it off. I paint with watercolors.
The fact is that I did not like to work with paints since childhood. In art school, I hated painting. She shied away and pretended to be sick so that on the day of painting she would not go to the artist's. The teachers adhered to the impressionistic approach, and this was not at all close to me. Thoughtfully looking for matching midtones and contrasts in a black and white pencil drawing, I liked it, and it was even exciting. But my soul did not accept the work with a brush, color transitions, reflexes. I learned painting through force and gritting my teeth.
After graduation, I happily threw the box of watercolors on the mezzanine and forgot about it. Subsequently, as a graphic designer, I worked a lot with gouache, but this is a completely different technique. But now, when I undertook to write tutorials, it somehow turned out by itself that it became interesting for me to draw in color. Always favorite black and white drawings are already somehow few, not enough. The soul asks for more. Only now I have grown to color!
At first I colored the drawings with felt-tip pens, then I bought watercolor pencils. But recently, surprised at myself, I found a box with watercolors on the mezzanine. God, how long has she been there? Do you know how difficult it is to overcome the dislike received for any subject at school.
But, nothing, bolder.
The watercolor technique consists either in applying several transparent layers - glazing, or in working on a raw sheet. But I'll do it easier: for the first time, I'll just try to pick up the color as accurately as possible and paint in one or two layers.

I choose two other mushrooms - for a change. How to draw - we have already discussed with you. Now it's up to the colors.

When coloring, the hats were easily drawn, and the most difficult thing turned out to be the legs.

They have not only black specks on them - there are even something like small shavings.