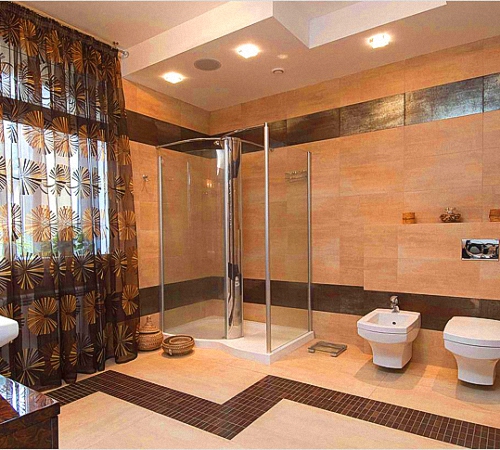
An excellent decoration and an extraordinary detail in the design of a bathroom will be the purchase wall hung toilet. This device does not take up much space, and when the right approach to installation, will last quite a long time. We’ll talk about how to choose a wall-hung toilet and how to install this device.
Construction and design of a wall-hung toilet
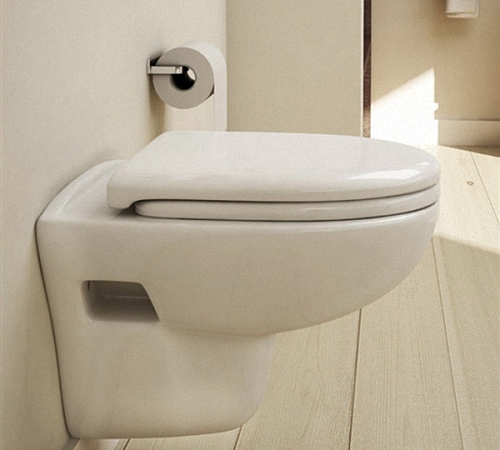
A wall-hung toilet is a structure consisting of a bowl and a cistern, which are placed in a suspended state.
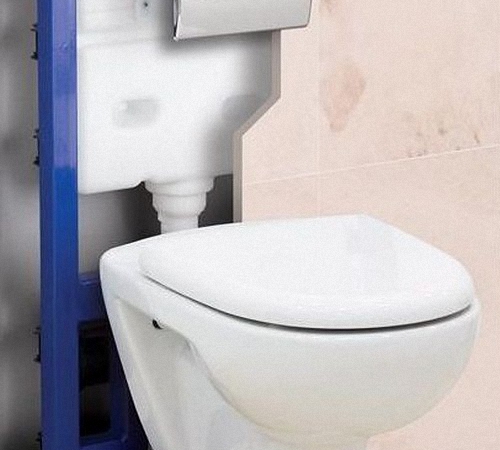
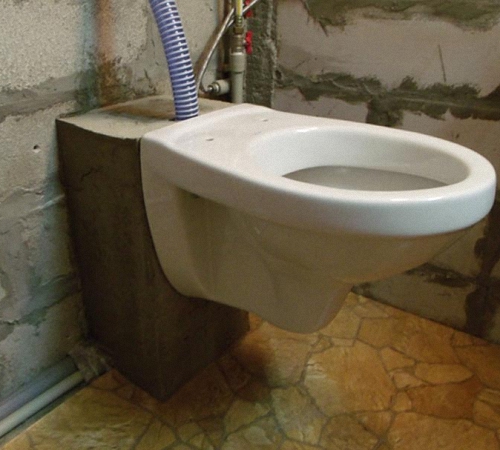
The bowl is a vessel made of porcelain. The only difference between a wall-hung toilet and a floor-mounted one is the type of fastening, which is done from the side.
Wall-hung toilets come with standard equipment. Wall-hung toilet dimensions:
- length: 50-60 cm;
- width: 30-40 cm;
- height 35-45 cm.
The system of wall-hung toilets is characterized by the presence hidden system drain, which consists of a cistern. It is located behind the partition and has the following features:
- small sizes, thickness 80-120 mm;
- the start button is located on the side;
- It has a plastic base and is equipped with a heat-insulating material that prevents the formation of condensation.
The standard tank volume is 8-10 liters. To install a cistern, you must have pipes, components, a side flush button and a flush panel.
Some toilets require the installation of a flush, which is carried out thanks to the presence of high pressure into streams of water. This system consists of a special button that is connected to the water supply system.
Wall-hung toilet photo:
Advantages of installing a wall-hung toilet
1. A wall-hung toilet allows you to save space in the bathroom, as it has a built-in tank and does not require a large distance from the wall for installation.
2. The high strength of the toilet will not allow the bowl to break even when suspended.
3. Due to the fact that the toilet is suspended, the floor under the toilet is easy to clean.
4. A variety of types will allow you to choose a toilet in relation to material and individual preferences.
5. Reviews about the wall-hung toilet characterize this device as a convenient, reliable and durable item.
6. Wall-hung toilets fully comply with sanitary and hygienic standards.

Types of wall-hung toilets
Depending on the size, wall-hung toilets are divided into:
- small, the length of which does not exceed 550 mm, are installed in small bathrooms, significantly saving space;
- medium, up to 600 mm long, are the most popular, as they are excellent for installation in any room;
- large ones, up to 700 mm, are installed if there are elderly or disabled people in the house.
In relation to the design, toilets are distinguished:
- wall type - the frame is fastened to the wall and to the floor;
- corner type - attached at a certain angle only to the wall, significantly saving space.
Depending on the shape, toilets are distinguished:
- round,
- rectangular,
- square,
- oval.
Mounting a wall-hung toilet
There are two ways to attach a wall-hung toilet:
- using a ready-made installation system,
- concrete screed.
The first option is more expensive, but less complex. Ready system The installation consists of a steel frame that is attached to the wall and to the floor. To fix the frame, four points are used: two are located on the wall, and two are on the floor.
More expensive systems offer a choice of the width of the dots and their adjustment.
This installation is installed at a distance of 15-18 cm from the wall. The set includes:
- toilet bowls,
- tank drain,
- flush button panels,
- open ceramic cistern,
- installation systems.

Installation of a wall-hung toilet without a finished installation
To install the toilet yourself, without using ready-made fasteners, you must have:
- two threaded rods, the diameter of which is 2 cm and the length is 50-80 cm;
- four nuts, four washers;
- 40 liters of concrete mass grade M 200;
- several sheets of plywood;
- wood screws.
To connect a wall-hung toilet you need:
- drain rectangular coupling;
- plastic sewer pipe with a diameter of 1.10 cm;
- silicone sealant.
Instructions for implementation preparatory work before installing a wall-hung toilet:
1. Get started installation work from installing the drain coupling. This process will help determine the height of the toilet.
2. When too high altitude, the coupling may be cut off. If the height is insufficient, a section of sewer pipe is added.
3. Measure the distance of the panels for constructing the formwork. Increase the distance by a few centimeters for extra space.
4. Using a tape measure, you should measure the interval between the place where the fasteners are attached. The standard distance is 20 cm.
5. After taking measurements, transfer the data to plywood sheets, for the manufacture of formwork panels. Chipboard, plywood or other boards are suitable as materials for the shield.
6. Check again that the measurements taken are correct.
7. Cut off the threaded rods. The length of the rods is the distance between the end point of penetration into the wall, the interval between the wall and the toilet, the installation length of the toilet and the end for screwing on the nuts.
8. There are two ways to attach the rods:
- wall mounting, which is carried out with a washer and a nut m 20, the simplicity and versatility of this method make it more popular, in order to attach the rod you just need to drill a hole in the wall, put on the washer and tighten the nut, this method suitable for any walls;
- in the absence of access to outside walls, secure the rod with glue or special means, for example, “chemical anchor”, Drill a hole in the wall, the minimum length of which is 14 cm, clean it from dust, fill it with glue and install the rod, this method is suitable for walls made of concrete, brick, foam blocks, wood,
9. After the formwork is assembled, a structure consisting of three panels is obtained, which has holes for installing rods.
Advice: Before fastening the formwork panels, the coupling outlet should be closed using plastic bag, so that concrete and dirt do not enter the drainage system.
10. Correct assembly wooden shields checked by the building level. To make the formwork more stable, install the rods and tighten the nuts.
11. Try on the toilet bowl, installing it in its future location after completing the formwork. If there are any shortcomings, it is not too late to correct them.
Tip: In order to ensure that after pouring the formwork with concrete there is still space for connecting the toilet, you should attach a small rectangular piece of foam plastic to the rod.
12. After completing the preparatory work, begin pouring concrete. To prepare concrete mortar for one part cement, take two parts sand, three parts crushed stone and a seventh part water.
Tip: To make the concrete lay easily on the surface, it is recommended to add a little liquid soap to the water.
13. To lay concrete, use a trowel and place it in small portions. Gradually leveling the surface.
14. The rods for installing the toilet should also be covered with polyethylene to prevent concrete from getting on them.
15. To compact the concrete, use a long rod, which gradually pierces the poured surface, paying attention to the corner places.
16. After pouring the formwork, 7-10 days must pass before it is removed.
17. To connect the cistern, use flexible PVC corrugation. Insert it into the toilet hole and secure it with sealant.
18. Secure the pipe in this position and leave for 24 hours to completely dry silicone.
Installation of a wall-hung toilet
1. To reliably seal the joint between the toilet bowl and the rubber ring, apply silicone around the entire perimeter of these devices.
2. Place the toilet on the rods and tighten the nuts.
3. Wait 12 hours for the sealant to cure.
4. Connect the toilet to the sewer drain.
5. Install the toilet lid.
6. To produce finishing finishing works concrete base use any moisture-resistant materials.
Installation of a wall-hung toilet with installation
Most frames for wall-hung toilets allow height adjustment. Before installation, you should take measurements and make markings. Before installation, it is recommended to study the instructions, which usually indicate the interval between the cistern and the floor. The average value of this distance is one meter.
Before starting installation work, take care of the outlet of the sewer and water pipes. The frame is fastened using anchor bolts. They are able to fix it in one position and ensure the immobility of the structure.
When installing the frame on a wooden floor, you should use the most powerful wood screws.
Before fixing the installation, you should once again measure the evenness of the structure. Use a regular level to level the frame. Measure front, back, top and bottom. To secure the correct settings, use pins and rods that can temporarily attach the frame to the wall.
The height of the bowl is selected in accordance with the individual parameters of the residents. The average height that is optimal for the average adult is 400 mm.
To connect the toilet, use a flexible hose; to connect to the water supply, use a metal hose to ensure the reliability and durability of the connection.
Tip: Close the valve on the cistern while connecting the toilet to the water supply.
For exterior finishing use any materials that must be waterproof.
Do not block access to the drain tank in order to carry out maintenance or repair work at any time.
Installation of a wall-hung toilet video:
Floor-standing toilets now have competitors in the form of wall-mounted models, which are increasingly being chosen by consumers to equip a bathroom in an apartment. Of course, installing a wall-hung toilet is a little more complicated, but if you wish, you can figure it out on your own using the included instructions. If you have any questions, then there are two options: either contact professionals or look for Additional information for installation of this equipment. This article will help you understand how to install a wall-hung toilet with your own hands and at the same time save several thousand rubles, which specialists ask for for providing this service.
This video shows in detail the installation process of the installation and wall-hung toilet, and each stage of work is examined in detail separately.
Installation of a wall-hung toilet
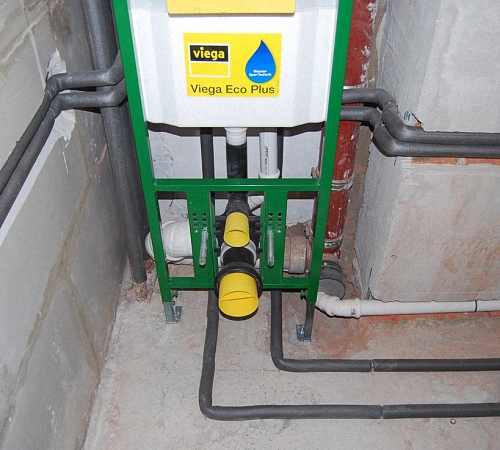
- The basis of the design is a steel rigid frame, which is supplied by the manufacturer special device for height adjustment. This frame is securely attached to the floor, as well as to a wall made of solid brick or concrete. Such equipment cannot be attached to false walls made of plasterboard. The toilet bowl is suspended on special pins to a steel frame.
- A plastic drain tank, which is additionally insulated with styropol - a material that prevents the formation of condensation. Cistern located on steel frame. There is a special cutout on the front of the tank through which a push-button type water drainage device is mounted. During operation, the same hole provides access to the mechanism for maintenance and repair if it is necessary to replace faulty components. IN modern models the volume of drained water is dosed using buttons; pressing one of them drains three liters, and the other – six liters.
- The toilet bowl is the visible part of the entire structure after installation.
- Hardware and tools included with the product in the packaging to complete installation. When purchasing, you should check the integrity of the package containing the fasteners. Otherwise, problems will arise during installation.
Materials for installation
To carry out installation work, it is necessary to purchase a set of parts needed to connect the device, a polyethylene outlet for organizing drainage, Teflon tape, studs, a flexible hose with an angle valve, through which the water supply pipe will be connected to the flush tank. Since the equipment is different manufacturers is different, it is better to first purchase a toilet, and then purchase all the materials recommended by the manufacturer in the instructions for its installation and connection.
Installation technology for a wall-hung toilet
Is it really the installation? wall-mounted toilet really much more difficult to install ordinary floor equipment? Let's take a closer look at this process.
- Installation work begins with the installation of a rigid steel frame (installation), which is firmly attached with dowels to concrete floor and to the main wall. In this case, a sewer pipe with a diameter of 110 mm must already be installed at the installation site. We also need to worry about the water supply pipe. The installation must be leveled relative to the vertical and horizontal planes, what is the regular one used for? building level. Adjustment is very easy, because the design of the steel frame includes retractable rods, as well as special studs for attaching the frame to the wall. You can adjust the height of the bowl depending on the height of the people who will use this indispensable sanitary product. Optimal height The installation of a wall-hung toilet can be selected experimentally. Typically, a wall-mounted toilet is mounted so that the seat is located approximately 40 cm from the floor.

- Next, water is supplied to the tank, while experienced craftsmen it is recommended not to use flexible liner, but a pipe whose service life is much longer. Do not forget that during the water supply the valve located in the tank closes.
- The next stage of work involves connecting the outlet of the wall-hung toilet with sewer outlet, in this case corrugation is used. To check the functionality of the connection, attach the toilet bowl to the frame and perform a test flush. After checking, the bowl will have to be removed, since its installation is carried out at the very last moment.
- Next, the installation site of the frame is covered with sheets of double waterproof plasterboard, which is attached directly to the installation and to the wall metal profile. A template for quickly cutting the front part of the casing is available in the instructions that are included with the hanging equipment by the manufacturer. Using this template facilitates the process of cutting all the necessary technological holes in a sheet of drywall.

- Next, surface finishing work is carried out. ceramic tiles, matching the color of the interior of the entire bathroom.
- After the tile adhesive has completely dried, the toilet bowl is secured, which is hung on two studs. They are wrapped directly in metal carcass installation system located under the cladding.
Advantages of purchasing a wall-hung toilet
- Hanging models perfectly complement the interior of a bathroom or toilet when the bathrooms are located separately. Fulfilling their direct functional purpose flawlessly, wall-hung toilets bring a touch of modernity to the bathroom space.
- The design of the wall-hung toilet is quite strong, as it can withstand a maximum weight of 400 kg. Therefore, overweight people can safely use hanging models plumbers.
- When developing the geometry of the bowl, manufacturers take hundreds of little details into account, which affects the comfort and ease of use of the toilet.
- With the help of water dividers built into the toilet bowl and helping water move at a higher speed, good washing of the inside of the bowl along the entire perimeter is guaranteed.
- By installing a wall-hung toilet, you increase the hygiene of the room and make it easier to further care behind the floor tiles.
Important! There is an opinion that installing a wall-hung toilet allows you to save space in the room. This is not entirely true, because we must not forget that additional space is also required to accommodate the installation.

Once upon a time, wall-mounted toilet models were installed only in luxury interiors and were considered expensive pleasure. However, with an increase in the supply of such equipment on the market, its cost decreases. Of course, wall-hung toilets are more expensive than regular ones. floor models, but an increasing number of buyers give them preference when replacing old plumbing fixtures. It is clear that installing a wall-hung toilet yourself allows you to reduce costs. If you feel that you can handle this task, then feel free to proceed. If you understand that you need the help of specialists, then contact a reliable, trusted company that guarantees the quality of the installation.
Installation simple toilet is not something complicated. But if the toilet is wall-hung, then the bathroom must be equipped with an additional link– installation. From this article you will learn how to carry outDIY toilet installation installation, as well as its connection to the sewer system.
While the toilets different brands may differ primarily in bowl shape or surface, the installation may cause many toilet problems in the next 20 years. Indeed, the tank, frame and other elements will be hidden, making access to them difficult.
The modern plumbing market can offer two types of installations.

Important! If the bathroom is located in the center of the living space, far from the main walls, then only a frame installation can be installed in it.
Regarding manufacturers, Vega, Grohe and Geberit are considered the most reliable today. But here everything depends mainly on personal wishes. It is important that the model belongs famous brand, which has already proven itself. The installation will be more expensive, but in terms of operation it will quickly pay for itself.

What will be required at work?
To install the installation, you need to acquire the following tools:

Correctly selected tools are already half the success.

Installation should begin with choosing a suitable location. If the layout is standard, then optimal place is a niche with risers located in it. The niche itself will have to be altered somewhat, “spreading” the risers to the sides.
Important! Metal risers should definitely be replaced with plastic ones.
Wall-hung toilet with block design

Step one. It all starts with the markup. If we're talking about O small apartment, then the toilet is installed in accordance with the axis of the room, since the area here is small. If the apartment is large enough, then the toilet is tied to the drain axis. This axis must be drawn with a marker.
Step two. The next step is a height measurement. Almost always it depends only on design features frames Points for installing dowels are marked.
Important! The dimensions for this should be taken only from the instructions supplied with the product, because they are different for different manufacturers.
It is also important to comply correct distance dowels from the center of the installation. For example, if its width is 60 cm, then 30 cm is retreated on both sides of the axis. Holes are made with a hammer drill, and dowels are hammered into them.

Step three. The drain tank is screwed on and the drain hole is twisted (both procedures are described in more detail in the instructions). The presence of all necessary gaskets is checked, after which the tank is connected to the water supply.
Step four. The pins that come with the plumbing fixtures are screwed into the pre-made holes. The distance by which they protrude outward depends solely on the size of the toilet. It is typical that the pins will be open until the installation is completed - only then is the bowl installed.
The last stage is fixing the drain hose with clamps (if provided for by the design).


Step one. First, the frame is assembled, after which the drain tank is attached to it. The position of the frame is adjusted using screws and brackets located on top. The frames are always sold separately - they are universal, so they are suitable for any toilet.

Upon completion of assembly, a structure with a height of 1.3-1.4 m comes out, while the width depends on the specific model. Maximum load that such frames can withstand reaches 450-490 kg.
Step two. When installing a drain tank, you must adhere to the following rules:
- the drain button should be a meter from the floor;
- toilet - approximately 40-45 cm;
- sewer outlet - 22-25 cm;
- the distance between the fasteners should be equal to the distance between the toilet lugs.
Typically the frame is attached in four places. There remains a small gap between it and the surface - at least 2 cm.
Step three. The assembled installation is installed, and clearly horizontally. To do this, use a plumb line to check the slope of the wall and, if found, draw a line at the point where the plumb line comes into contact with the floor. horizontal line. Then a second one is drawn from the line at the distance required for installation of the installation.
The frame is applied to the wall, fastening points are marked. Holes are made. The frame is screwed to the floor, its height is adjusted with screws, and its horizontalness is adjusted with a building level.
Step four. Supplied to the drain tank water pipe. This can be done from the side or from above, but in almost all modern models the connection location can be changed.

Important! It is not advisable to use a flexible hose when connecting a flush tank, since it will last much less than the toilet itself, and replacing it under a false wall, if necessary, will be quite difficult.
Therefore, plastic pipes are used for connection. The tank itself is insulated with material that prevents moisture condensation. Everything that is required for installation is included in the kit, except that the panel with the drain button must be purchased separately.
Step five. The toilet outlet is connected to the riser. It is often impossible to insert the outlet directly, so corrugation is used. After this, all connections are checked for leaks.

Step six. Before assembling the plasterboard box, you need to do the following:
- close all openings with plugs to prevent debris from entering;
- Screw the pins into the frame to secure the toilet.
All technological holes are cut out in the drywall, after which it is fixed to the frame with self-tapping screws. Drywall is finished with tiles.

Step seven. You can begin installing the toilet no earlier than 10 days after laying the tiles. The release is adjusted to sewer hole, and the place where the tiles come into contact with the toilet is covered silicone sealant. The toilet is placed on the shifters, the nuts are tightened.

After this, it is advisable to carry out a test drain of water in order to check the tightness.

Step one. The position of the knee is fixed using metal fasteners. The toilet outlet is treated with technical ointment, after which the device is placed at the installation site. Its outline is outlined with a marker, all mounting holes are indicated. Then the toilet is removed, and according to the markings made, the mounting angles included in the kit are installed. The toilet is put back, the outlet is pressed into the drain pipe.

Step two. The drain tank is installed according to the instructions. A connecting cuff is fixed at the toilet outlet, the bolts are tightened, and their caps are closed with special caps.
Step three. The drain button is inserted into the made technological hole.
Step four. Finished design checked for leaks.
Video - Installation for Geberit DuoFresh toilet - installation
- If a floor-standing toilet is leaking, check the tightness of the joints treated with sealant. Connections with corrugation are reprocessed.
- To simplify future repair work a technological hole must be provided under the drain button.
- Toilet instability can be corrected by tightening the bolts. This must be done carefully so as not to strip the thread.
- The drain button must be placed between the tiles.
- The cause of a leaking drain tank is most likely due to improper installation of the sealing gasket. To replace it, turn off the water and unscrew all fasteners. The gaskets are corrected, everything is screwed back on.
- The drain should be at an angle of 45°C, otherwise the water will stagnate in the toilet.
- When purchasing an installation, it is better to give preference to a model equipped with a water saving system. Often, such a system provides for two drain buttons - for complete or partial drainage.
Video - Installation and installation of a wall-hung toilet on a GEBERIT installation
Conclusion
Here, in fact, are all the nuances of installation. The main thing is to fulfill all the requirements, and at the end of each stage, check the tightness of the connections. All detected defects should be eliminated immediately, since it will be difficult to do this later, when the structure is hidden by drywall.
Video – Installation of the GROHE installation
Designers' quest for improvement appearance toilets, the creation of stylish bathrooms contributed to the popularization of block and frame structures with a hanging bowl.
The installation itself is not cheap, and you will also have to pay extra for its installation. Therefore, many home craftsmen hone their plumbing skills and carry out installation work themselves. Agree, would it be nice to save money by attaching the toilet to the installation yourself?
We will help you resolve this issue. In the article we describe in detail the device, operating principle and types of structures, and also provide step-by-step technology and photo instructions for installing the toilet.
If the appearance of the external elements of the installation depends only on the designer’s imagination, then its internal structure can be divided into 2 options: frame and block.
Image gallery
The drain button frame is secured with latches and can be easily removed. Underneath there is a hole for connecting a water hose with a compact tap. Within this “installation” window on the front wall of the tank there is and, which can be unscrewed from the tank by hand and repaired without dismantling the box.
Myth No. 3. A wall-hung toilet takes up minimal space.
Block and frame installations require an additional 20-25 cm of bathroom space. Therefore, these structures take up even more space than a floor-mounted toilet. The only option for reducing space is to place the installation in a wall niche.
Myth No. 4. There are no spare parts for block installations.
The sizes of components are standardized by most manufacturers, because repairable models have priority when purchasing. In plumbing stores, picking up a broken part will not be difficult. In addition, you can do it yourself.
Step-by-step installation of the installation and toilet
Installing a plumbing installation yourself is not difficult. The main danger is the leakage of the joint between the sewer pipe and the toilet pipe after final installation.
To avoid such problems, you must follow all the rules step-by-step installation installations. Next, installation schemes for toilets with various designs will be considered.
Required Tools
To install the installation and attach the toilet to it, the following tools and materials are required:
- Screwdriver.
- Adjustable wrench.
- Hammer drill with drills.
- Pliers.
- Dowels and bolts.
- Hammer.
- Level.
- Roulette with marker.
- Silicone.
The minimum tools and materials that will be useful when installing the installation itself are listed. When installing the box, other devices are needed, but this work is best left to professionals.
Installing a block installation
There are two ways to install a block installation:
- In a specially prepared niche in the wall.
- On a concrete slab, which is then covered with plasterboard.
Regardless of the type of installation, the list of steps to assemble the installation remains the same.
Step one. Applying markings in the bathroom. In small narrow rooms The toilet is installed along its axis, and in large ones it is better to place the bowl along the axis of the drain.
First you need to draw a line with a marker or chalk from corner to corner of the room along the wall where you plan to install the installation. Then, along the axis of installation of the bowl, you need to draw a line perpendicular to the first, using a construction corner.
Step two. Formation of attachment points. In accordance with the intended axis of installation of the bowl, the locations for fixing the block structure are determined. If the axis of the bowl and the wall is distorted, you can place wooden or plastic spacers under the fastenings to achieve an angle of 90 degrees.

In loose concrete slabs, preference is given to fastening with dowels, which provide maximum contact area between the fasteners and the wall
It is necessary to center the location of the dowels relative to the middle of the toilet drain hole. If the distance between the mounting points of the block is 60 cm, then each hole for the dowel should be drilled at a distance of 30 cm from the axis of the bowl.
After marking, you need to drill holes with a drill and insert the fasteners supplied with the product into them.
Step three. Fixation of block structure. The drain tank is screwed to the wall with screws or anchor bolts. After this, a water hose is connected to the structure, and pipes are connected that will connect to the toilet bowl.

Inside the “installation” window there is usually a flexible hose included in the kit, into which water is supplied through an adapter with a tap
Step four. Screwing in the bowl support pins. After fixing the block mechanism, the toilet bowl is attached to it. Metal rods are inserted into the holes for its fastening and the places for their fastening on the wall are determined so that the height of the toilet seat is 40-48 cm.

The rods are made of ultra-strong, rigid steel and can withstand loads of up to 450 kg without deformation. Change their location later without dismantling decorative box will not work
After this, the toilet is removed and holes are drilled in the concrete slab under the rods, which are then fixed in the wall with fasteners.
Step five. Installation of sewer drain. The toilet bowl is hung on support pins and a pipe for draining water from the tank is inserted into it. After this, the sewerage scheme is determined and its installation is carried out with rigid fixation of the 110-mm outlet pipe.

Rigid fixation of the sewer line is mandatory, because when installing the toilet bowl, the pipe should not change its position
Step six. Covering a block installation and installing a toilet bowl. After installing the sewer system, the toilet bowl is removed and the decorative lining of the entire plumbing design tiles or moisture-resistant plasterboard.

The drain button and its frame are installed in last resort. But the operation of the drain mechanism should be tested only after the sealant has dried at the sewer joint.
When the cladding work is completed, the drain button is installed, and the bowl is placed on the drain pipes and metal support pins. After this, the toilet is attached to the wall with nuts.
Instead of lining the drain hole of a block structure, support rods and sewers, they are sometimes filled with concrete.

When mixing concrete for pouring, it is necessary to buy only certified materials, and also follow the technology, because the structure will experience heavy loads
To do this, after the fifth step, a common wooden formwork, and its internal volume is filled with concrete. 5-7 days after pouring, the formwork is removed, and the toilet bowl is docked with support pins rigidly fixed in concrete, sewer pipes and a cistern drain.
Installation of a toilet with frame installation
The installation of a frame installation with a toilet can be carried out in any place in the bathroom. Single-frame structures are attached simultaneously to the wall and floor, and installations with a double frame can be installed in the middle of the room in a special partition.
The installation of both design options differs only in the location of the metal frame and the shape of the decorative cladding, so their installation will be discussed in one step-by-step instruction.
Step one. Assembly frame structure. Installation of the installation begins with the assembly of the metal frame. To compensate for uneven floors and walls, the frame design includes retractable legs. After adjusting the position of the frame according to the level, the legs are rigidly fixed in the required position.

There is a special mechanism to regulate the distance between the wall and the frame. The position of the foot must be fixed firmly to avoid possible distortion of the frame
The installation is applied to the installation site, and a marker marks the places where it is necessary to drill holes for dowels.
Step two. Installing the tank on a metal frame. The height of the water tank can also be adjusted, but not in all installation models. The recommended height of the release button is 1 m from the floor surface.

The height of the drain button is not of fundamental importance for the operation of the mechanism, but surveys indicate that 100 cm is the best option
Based on this parameter, the level of location of the drain tank inside the metal frame is selected. Fittings for draining water are installed together with the tank.
The frame structure often has a height-adjustable horizontal metal strip. It has holes or clips for attaching the support rods of the toilet bowl, pipes for draining water from the tank and sewerage.
Step three. Sewerage installation. A 110 mm sewer pipe is laid to the frame.
Step four. Fastening the frame structure. Holes are drilled to attach the metal frame, and then it is screwed with screws or anchor bolts to the wall and floor at the designated points. The optimal distance from the frame frame to the wall is 140-195 mm.

It will not be possible to screw the frame close to the wall, because a sewer pipe measuring 110 mm must still be placed behind the metal legs
The sewer pipe is fixed to the frame using available fasteners.
After the frame installation is completely assembled, it is necessary to ensure that the supporting heights of the pins and pipes are adjusted correctly. To do this, a toilet bowl is hung on the structure.
Step five. Checking for leaks. A water pipe is connected to the drain tank and the tap is opened. After filling the tank, a test drain is performed. If there are no leaks, the toilet bowl is removed and the installation begins.
Step six. Forming a box around a frame installation.
There are two ways to close a metal frame:
- sew up with plasterboard;
- cover with bricks and tiles.
Before insulating the installation, it is necessary to close its pipes with plugs or plastic bags. For cladding it is necessary to use moisture-resistant plasterboard sheet 12.5 mm thick. The box will be decorative element, which bears no supporting load.

The front panel of the box must be reinforced at the back with a metal profile so that if you accidentally press the drywall with your hand, it will not burst or fall through
When covering, it is necessary to provide in advance the formation of holes for the pipes and support pins of the toilet bowl.
Step seven. Attaching the toilet to the installation frame. You can begin installing the toilet bowl immediately after plastering and painting. plasterboard box. If the metal frame was lined with bricks and tiles, then the toilet should be installed on it 10 days after completion of the work.

Between the bowl and the wall, instead of silicone, you can place a 1-2 mm thick insulation gasket to prevent cracking of the ceramic coating under load
Before placing the toilet on the support pins, it is necessary to lubricate it with silicone. rubber gaskets sewer pipes and tank drain hole. A layer of sealant is also applied to back wall toilet bowl at a distance of 5 mm from the edge along the entire perimeter of contact with the wall.
The bowl is fixed to the wall with two bolts screwed onto metal pins. After a day, you can perform a test drain to check the operation of the entire installation.
Block and frame installations do not necessarily require the installation of a wall-mounted toilet bowl. It can be installed classically on the floor. Installation diagram floor-standing toilet differs from the above methods only in the location of the fastening elements and the sewer pipe.
When installing the toilet on the floor, it is fixed both to supporting horizontal rods and screwed to the floor. Bowl manufacturers choose the type of fastening based on the shape of the product.
When fixing the toilet to the floor, it is necessary to mark and drill in floor tiles two holes for mounting. After covering the installation with a box, the toilet bowl is mounted to the sewer and cistern drain pipes, and then screwed to the floor using the existing fasteners.

After final fixation of the toilet, it is necessary to coat the perimeter of the base with silicone sealant so that water and dirt do not get under the bowl
You can additionally use it to connect the sewer pipe and the toilet bowl.
Following the proposed instructions will protect the apartment from flooding and prevent the need to dismantle the decorative box during the first years of operation of the toilet.
Conclusions and useful video on the topic
The videos will allow you to put together a complete picture in your head in just a few minutes. puzzle scheme assembly of toilet installations. After viewing them, the step-by-step instructions described above will become more understandable and meaningful.
Frame installation assembly process:
Installing a block installation in a niche:
Attaching the toilet to the installation frame:
Proposed step-by-step instruction Installing a toilet with frame and block installations takes several hours of work, if you do not take into account the time to create a decorative box.
The essence of the installation comes down to smooth and strong fastening of the frame, connecting the pipes and docking the toilet bowl with the flush block. This can be accomplished by every business person who knows how to handle the necessary tools.
Do you have practical skills in attaching a toilet to an installation? Share your own installation experience or ask questions about the topic of the article. The comment block is located below.
A wall-hung toilet differs from a classic floor-standing toilet only in that the communications are hidden inside the wall. Only the toilet itself is visible from the outside. The entire rest of the water supply and drainage system is hidden behind the wall. This is called installation.
It is a rectangular metal frame with threaded holes for fastening, and a flat plastic drain tank. The system also comes with a drain key, which costs almost more than the installation itself (TW bronze key 16,920 rubles).
Recently, it was impossible to install a wall-hung toilet in a bathroom, but now, thanks to the huge selection on the plumbing market, you can install a wall-hung toilet yourself. Although many are afraid to install suspended structure, because there are some outdated myths regarding it.
Myths about wall-hung toilets
Myth 1. A wall-hung toilet, if a heavy person sits on it, will fall and break.
The toilet itself, if it is made with high quality, without cracks, can withstand weight up to 400 kg. The only thing that can let you down is a poorly installed installation. It is a welded metal frame with a square section. The installation is attached to the floor with two bolts of 12 mm in diameter, and also to the wall at a height of 1.2 m above the floor with bolts of the same diameter.
The toilet itself is hung at a height of 35-40 cm above the floor level. One such bolt can support a person, and there are two such bolts, and a pair at the bottom. If you find a 12 mm drill, then screwing in such bolts will not be a problem, and the installation will not collapse during daily use of plumbing fixtures.


