Very often we get rid of such seemingly unnecessary things as plastic bottles, old slopes, and we do not even suspect what benefit they can bring us. If you have small children in your family, then you can use the products to equip the playground, as well as the territory of the kindergarten. Making such crafts will bring your kid joy and special interest in games.
If you have a large number of plastic bottles lying around somewhere, then you should not rush to throw them away. They can come in handy when creating an artificial zoo on the crumbs' playground. In addition to decorating the site, it is important to think about safety.
Crafts and decorations for the garden from plastic bottles
Thanks to a wide range of shades and shapes, everyone can make very interesting products - palm trees, flowers, animals and others. Practicality is characteristic of such crafts, because they will not be afraid of rain or the scorching rays of the sun.
Plastic palm
To make a palm tree, adhere to the following plan of action:
- Remove the bottom from the bottles and string them on top of each other.
- Install a metal rod inside, which will be the main tree.
- To create "crowns", you need to use several bottles. Cut them from the base to the neck into several strips. You made the leaves of the future product.
- To make the leaves look similar to real palm leaves, you need to cut them at an angle.
- Insert the cut bottle with the neck into the trunk of the tree.
- If you need to create a classic palm tree, you can use the process of brown bottles for the trunk, and green for the crowns. But you don't have to follow these rules.
Butterflies and flowers
Using plastic bottles, everyone can create a truly interesting and fabulous playground for their child. A special technique is used for these purposes, the essence of which is to melt the elements. Thanks to this, it is possible to obtain amazing products from a simple material.
To create a small flower bed, you need two colors of bottles: green and brown.... In this case, you don't even need to melt anything. The action plan is as follows:
- Remove the top of the bottle and cut the middle into thin strips.
- Put on these strips (not on all, but on most of them) pre-made blanks of cardboard flowers. You can use beads or beads to decorate the petals.
It was a simpler version of making a flower bed. You can make the product more complicated. You will need a few bottles here. Cut flower petals from them. Make sure that their shape was approximately the same, but the size was slightly different. After you have cut them out, bend the petals in one direction. Using a candle, melt them a little in order to form curls and smooth bends. Connect the finished products to each other using heating from a candle or ordinary wire.
You will find all the information about the rubber coating for playgrounds in the country.
Princess Frog
In order for such a product to please your baby every day, you need to prepare the following materials: a 0.5 liter plastic bottle and two 2 liter bottles. The procedure is as follows:
- Cut out the bottom of a 2-liter container, leave 4 cm at the bottom. Cut strictly along the line.
- Do the same with the second bottle, only the indentation should be 5 cm.
- The tops of the bottles will be needed for the legs. First, you need to outline their contour, and then cut it out. Make sure that the front legs are slightly smaller than the hind legs.
- All cut out details will be painted green.
- While the paint is drying, take a 0.5 liter container and step back 7 cm from the top. Draw the teeth of the crown. Use scissors to walk over the traced and paint in golden color.
- Let's move on to assembling the frog. Use a hot awl to make a hole in the crown cap and the bottom of the 2 liter bottle. Connect with wire.
- Pierce the sides of the existing bottom and fix the hind legs to it. The front ones should be attached to the bottom of the workpiece.
- Take the larger part of the body and insert into the smaller one. If necessary, add sand, then your product will be more stable.
- Use paint to mark the frog's eyes, mouth and nose.
Read also about tracks made of corks from plastic bottles.

Video: do-it-yourself fakes for a playground
The video shows different options for crafts from plastic bottles for kindergarten:
Crafts from other materials
In addition to plastic bottles, you can use other materials to design a playground for your baby. For these purposes, wood, tires, logs, boards, and much more can be used.
Wooden crafts
What is most often made of wood for a playground? Naturally, the sandbox. Absolutely everyone can complete such a simple task. Indeed, for these purposes, you need to use in the process only 4 small bars of the same size and the same number of planed boards. If you want to make the sandbox more interesting and functional, then use logs to build it.
The size and shape of the future product is only from your imagination. You can make a round, square sandbox. It will also be interesting for your child to play in the sandpit, which is made in the form of his favorite animal.
But this version of wooden crafts is more suitable for young children. If your child is no longer attracted to playing in sandboxes, then using a bar of hardwood, you can assemble a frame and use your imagination, get an excellent sports corner. It will include various ladders, ropes, rings, and build an observation platform on top. Reliable connection of all parts remains a very important point, and the wood itself must be processed to avoid injury.
Crafts from logs
Using such material, you can build interesting stools and a table on the playground. To give the resulting products brightness and an unusual look, you can paint them with paints. At the end of the manufacturing process, it is necessary to cover the entire surface of the wood with a protective varnish. Otherwise, under the influence of water, such furniture will quickly deteriorate.
DIY boards
With the help of such material as boards, it is easy to make an interesting animal and a sandbox.
The action plan is as follows:
- Take a tire and dig it in half. This will be the back of the animal.
- Put a wooden board in front, to which after attaching a small wooden block. This will make the neck and head.
- Paint the resulting product in the desired color. For example, if you want to get a giraffe, then treat the surface with yellow paint with brown spots.
- Using the rope, complete the mane and tail.

To make a sandpit in the shape of a car, you need to use materials such as boards and tires. After the product is folded from the boards, take a large tire and nail the board to it. Dig a tire in the sandbox and nail the steering wheel to it. The machine is ready.
The second life of the stingrays
If you have old tires lying around at home, then do not rush to throw them away. They will make a very interesting animal for decorating a playground. To make a zebra, prepare the following materials:
- 1 tire;
- log;
- eyes from an old toy;
- plastic bottle;
- old watering can.
Procedure:
- Dig in the ramp in half.
- Make a muzzle from a log, connect it in the shape of the letter G and nail two chocks with nails. The body of the animal should be 70 cm in size, and the head should be 25-30 cm.
- Dig in a chock next to the ramp.
- Make the ears from a plastic bottle, and attach them with nails.
- For the eyes, we use the details of an old toy.
- The tail can come from the spout of a watering can, inside which you can install a brush made from an old tire.
- It remains to paint the zebra and the product is ready.
He will tell you how to make a swan out of a tire.

Using cylinders
To make a hedgehog that will decorate the playground, you must use a plastic can. Get an oval out of it, and then use an awl to make drainage holes. Pull the gray nose over the balloon. Sew on buttons that will serve as animal eyes and a black knitted nose. Fill the container with earth. Sow grass there, which will serve as hedgehog needles.
Hemp crafts
Wooden stumps can be used to decorate a playground. To do this, you just need to decorate them with bright colors such a table-chair will receive.
For a fun atmosphere with hemp material, can be made from the stumps of a large fly agaric... Take an old bowl for this, clean it of dirt. Apply an aerosol coloring composition to its surface, and then make white spots on the surface. Place the finished product on a tree stump.
Materials at hand
To make fakes for a child on a playground, you can use all the materials that you have left after the repair. For example, you can take ordinary construction helmets and paint them with bright orange paints, add the necessary additional drawings and you will get a beautiful and cute ladybug.
Another favorite fun for children will be a windmill or weather vane. Such items are a must for a playground. For their more effective appearance, it is necessary to treat the surface with a dye composition of a bright color. To prevent the products from flying away, careful fixation is required at the base. Use concrete mix for this purpose. For decoration, materials such as wood shavings or sea pebbles are suitable.
You will find out how to make a birdhouse with your own hands.
Flower pots can also make an interesting composition in the form of a lighthouse. To do this, you need to take the pots and set them on top of each other like a pyramid. Paint the surface in interesting colors, and attach a flashlight on top.
Video: what decorations can be made
In the video, you will see a site completely created from scrap materials:
Conclusion
Decorating a playground for your baby is a common thing. But not everyone knows that for these purposes you can use all the materials that are present in the barn or garage. All you need is desire and a little imagination, and on the playground your kid will have the most interesting toys and crafts that will appeal not only to him, but also to those around him.
Surely the inventors of plastic bottles had no idea how widely people would use them. Today, craftsmen have learned how to make a huge number of useful things from plastic bottles with their own hands, from toys to a boat or a house. We will restrict ourselves to considering crafts that will help you beautifully decorate your site, garden or vegetable garden.
The extraordinary qualities of homemade plastic bottles
Plastic bottles are extremely popular with garden craft enthusiasts. The explanation is simple: on the one hand, the material is readily available, on the other hand, it is not difficult to work with it. No wonder there are a huge number of women among the admirers of the "genre".
Note that plastic containers take an extremely long time to decompose like garbage, but they endlessly serve in the rain and sun in the yard. It's nice to compose something funny and useful from what was supposed to be thrown away. The presence of numerous interesting examples further provokes creative and inventive souls to create something better and different.
Plastic bottles have many colors, crafts from them can be painted and enriched with a variety of decorative elements, which is most often also an improvised material. The use of both small and large empty bottles from 0.5 to 5 liters allows you to create a variety of combinations of shapes. The author of the text sets himself the task of offering you the most interesting examples and acquainting you with the methods of working with your own hands with plastic bottles using the example of several descriptions. Thus, you can both choose interesting and beautiful homemade products for repetition, and learn how to implement your own ideas.
Please note: it is very important to choose a place for the figurine in the garden where it will harmoniously fit into the surrounding environment.
Bright crafts and decorations from bottles in the yard

 Such poppies always bloom, and for this they will not be fined.
 The most striking decoration in the yard is flowers. From plastic containers, they turn out remarkably and a considerable number of examples have already been invented. Do you want to build a tree from bottles with your own hands? It is possible!
 In winter and summer in one color
 Probably the easiest plastic bottle crafts to make are mushrooms. Do-it-yourself mushrooms are extremely simple and very similar to real ones. The cap of the mushroom is the bottom of the bottle, the stem is the top of the container. They should be colored as you see fit. It is most convenient to fasten both parts with a self-tapping screw.
To get the characteristic protrusions on the leg of the fly agaric, you can use two necks of bottles to make it. Weed can be created from the side of a green container.
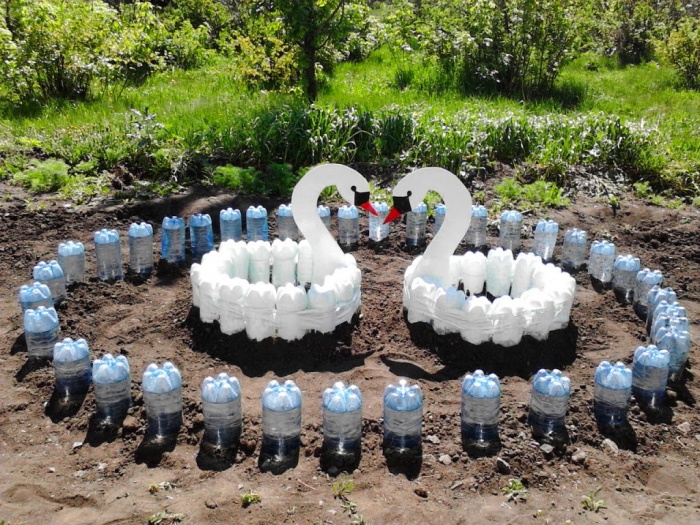
 In this lake, the water never freezes, and swans always live
 The blue lake in the yard is most realistic to arrange from plastic bottles. Its surface, even in the absence of wind, is covered with characteristic ripples. Making such a pond is as easy as shelling pears. You need to paint at least 100 bottles of blue paint from the inside, and then bury it with the neck down in the ground. Flowers are suitable for pond decor and
Funny figurines of animals and people for the garden from plastic containers
We all gladly decorate our garden with crafts of animals, gnomes and people. A considerable number of very different figures for the site have already been invented. Interestingly, even when copied, each creative invention has features introduced by the author. Nothing prevents you from leaving "your own mark in history" by inventing an original gnome.
All sorts of different animals in the yard and garden

 Here are several options for turtle designs. All of them are made from the bottom of the bottle, which resembles the shell of an amphibian. Using paints and other decorative elements, you can create a turtle with its own face.

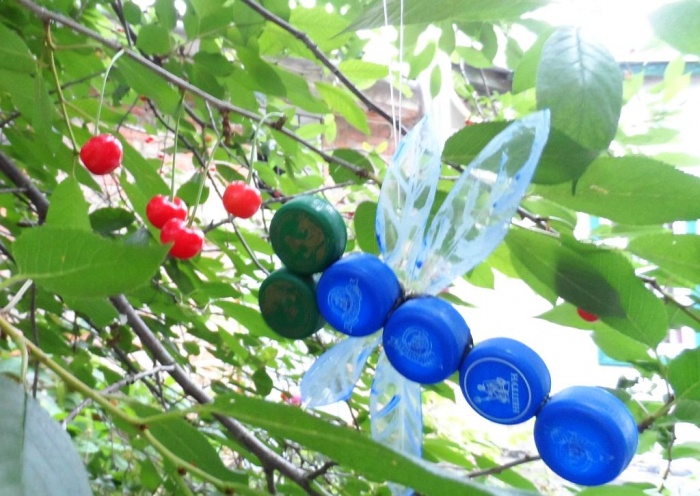
 The caterpillar in the garden and vegetable garden is quite appropriate. In this performance, it will not turn into a butterfly, but it will not be able to harm either. You can make an insect from the bottoms, lids and cases of plastic containers. The easiest way is to consistently collect the tops of the bright green bottles. There may be a wire inside that is bent on both sides of the figure.
 Funny gnomes for the courtyard can be made from a variety of containers. Perhaps, one cannot do without the use of paints. Decor takes a special place in the performance of gnomes: let your imagination run wild and try to use whatever comes along. This is exactly the case when you can compose something unusual and your own.
 The land with the help of horses in the country has not been plowed for a long time, but the presence of their figures is appropriate and desirable. The body of a horse is most often made from five-liter eggplants, and the legs, neck and muzzle are made from smaller containers. A horse is very similar to a donkey, so when making it you can use the instructions for assembling a donkey, which follows.
 Pigs in the country from plastic bottles are a classic of the genre. Of course, a 5-liter container is best for making a well-fed pig. It is often used as a flowerpot. Pig assembly techniques are exactly the same as for a donkey. A description of this follows.

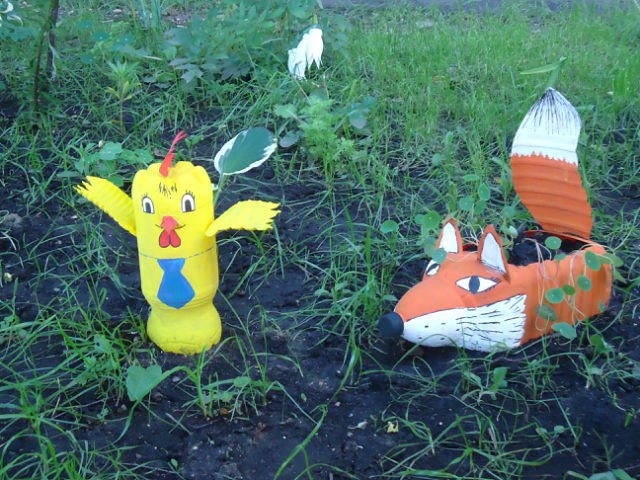
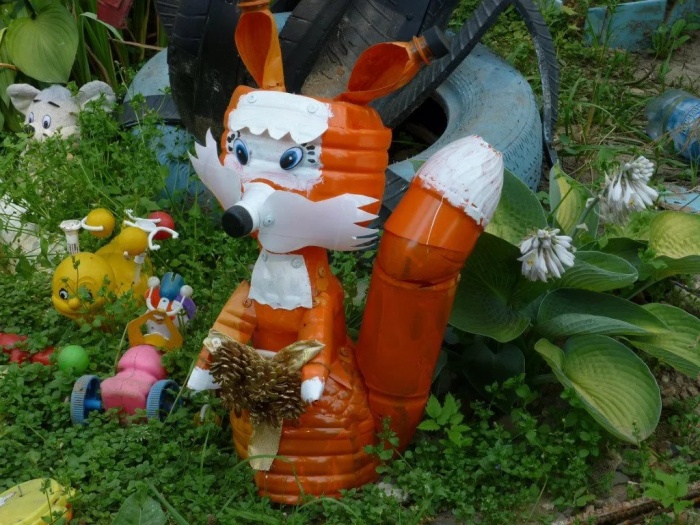
 A bright spot on the site will be a figurine of a fox or bear, covered with orange paint. We have already realized that large five-liter bottles are well suited for both the already mentioned and other animal crafts. Here again, fantasy and scenery are required. Assembly is the same donkey making guide that follows.
 We can say with complete confidence that it will turn out to be possible to build any animal from plastic bottles. Choose a sample to your liking and get creative!

 Here are some more examples of the use of plastic containers for making animals. Frogs, hares, bears and rams - everything is like in a real forest.
Hunting trophy from a plastic container

 If you are unable to hunt even with a camera, you can hang a hunting trophy from a plastic canister in your dacha house. In addition to a container for making a horned head, you will additionally need 30 pieces of multi-colored plugs, a piece of wire with a diameter of 3 mm and self-tapping screws.
Hunting trophy assembly instructions:

Funny donkey made of plastic bottles for your garden
 As the pictures show, donkeys are slightly different. I came up with my own collective image and prepared a master class for you:
- For the assembly of the craft, we have prepared 8 bottles. Subsequently, it took another, brown color, to make the animal's mane.
- The neck of a 5-liter eggplant was cut off and the bottle caps for the legs were screwed on with self-tapping screws. By screwing the screws in different places, you can adjust the inclination of the plugs. You must use at least three self-tapping screws to fix one cover.

- Cut off the neck of the head container.
- Cut out the donkey neck blank from the middle part of the bottle. In the side view, it is trapezoidal. On the sides of the part, we leave two protrusions for which the neck will be attached.
- We fasten the neck to the head with two self-tapping screws. They will be inside the torso.
- We bend the neck to the head and fasten the parts with another screw.


- Now we attach the neck to the body with two self-tapping screws. They will be inside the torso.
- We turn the neck to the body and fasten it with two more screws from the bottom.


- This is what the donkey's frame looks like at this stage.
- Cut out the ear blanks from the green bottle. For one ear, you need a fourth of the bottle cut along the length. In the lower part of the ear we cut the protrusions for attaching to the head, in accordance with the image.
- We bend the sidewalls of the protrusions so that they go into the narrow slots prepared in the head.

- We mark the slots on the head with a marker in accordance with the size of the ear. They should be sized to match the width of the raised ear protrusions. We carry out the slots.
- Insert the ear protrusions into the slots on the donkey's head. After installation, the folded parts will straighten and securely hold the ear on the body of the animal's head.


- This is what our ward looks like with ears. Paint it with gray paint and leave it to dry overnight.
- Cooking the donkey's mane from a brown bottle. The length of the workpiece corresponds to the length of the neck. To attach the part to the neck, cut out three protrusions in accordance with the image. We simulate the hair, cutting through the part with a step of 2mm and not reaching its edge 15mm.
- We bend the edges of the protrusions for subsequent fixation to the neck. We make two blanks for the mane.


- On the neck, mark three cuts with a marker in accordance with the location of the protrusions on the details of the mane. Their width should correspond to the size of the protrusions on the parts of the mane with curved edges. We make slots.
- We bend the edges of the protrusions on the details of the mane and sequentially insert them into the slots on the neck of the animal.


- Harness and donkey tail are conveniently made from garden curb tape. From it it is necessary to cut a strip 15mm wide and fasten it to the body of the craft with five self-tapping screws. Eyes will fit from an old toy. We fasten them with double-sided tape. We paint the muzzle and ears from the inside with white paint. We paint the nostrils and mouth with red and black paints.

- Can be harnessed! We use a plastic box as a cart. Wheels are good from old children's toys. They can be mounted on an axis of welding electrodes. We make shafts from thin branches. For good stability in windy weather, sand should be poured into the bottles of the donkey's legs.
Do-it-yourself will definitely come in handy on the farm.
Our articles on useful homemade products for your own yard from plastic bottles
You can familiarize yourself with the topic, or in our articles. Here is a list of a few more articles about useful summer cottages:
Interesting examples of container creations for household purposes
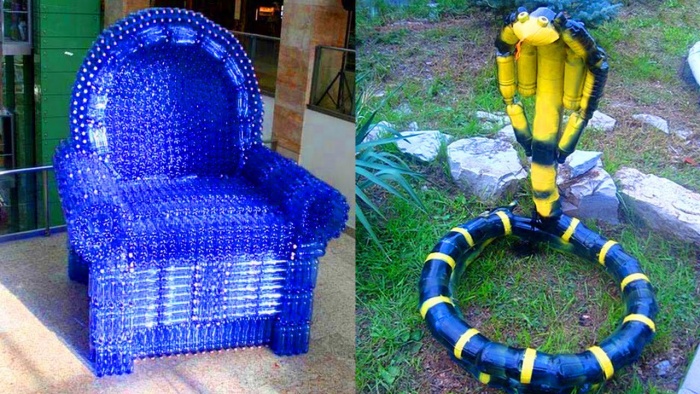
 As you can see, quite monumental structures can be built from plastic bottles. However, many of us, having appreciated the scale of the work and the large number of bottles, are ready to utter the words from the old anecdote: "I won't drink so much." What homemade products are good, you decide, and we offer a master class on making a prosaic broom from plastic bottles with your own hands.
Steps to guide the sequence of actions:

When collecting the craft, we set the task of using fewer bottles and getting a whisk of sufficient rigidity. However, it turned out not wide enough. To solve this problem, the entire length of the bottle should be used for preforms.

 In this case, the container will be required twice as much. In this case, to ensure sufficient rigidity of the broom, it will have to be tied with twine, as in the photo.
 Together with the broom, we made a scoop from a plastic container. To implement such an idea, it is better to use a thick plastic canister. Cut out the part in accordance with the image, put it on a wooden handle and get a scoop. The scoop does not dig the earth, but it is suitable for sand and cement and works with our broom!
The amount of garbage that each person “produces” grows from year to year. The problem is becoming global, as flying plastic bags and plastic bottles scattered everywhere have made everyone's eyes callus. I am grieving, it turns out, you can help, and even for the benefit of yourself. In any case, this applies to plastic bottles. You will be surprised how diverse and, importantly, useful crafts from plastic bottles can be made in literally a matter of minutes. Well, or the clock ... Depends on the scale.
The buildings
PET (polyethylene terephthalate) is the thermoplastic used in bottles. It will be useful to know its physical properties:
- density - 1.38-1.4 g / cm³,
- softening temperature (t melting) - 245 ° C,
- melting point (t pl.) - 260 ° C,
- glass transition temperature (t st.) - 70 ° C,
- decomposition temperature - 350 ° С.
Plastic bottles are very convenient to use, but harmful to the environment, since the polyethylene from which they are made takes more than 200 years to decompose. The same property makes it possible to use practically waste raw materials as a building material. Craftsmen are already building houses from plastic bottles, as well as sheds, summer cottages, hotbeds, greenhouses, fences. Various technologies have been worked out - the approach is quite serious.
How to build a house from plastic bottles
The main idea is to pour bulk material into bottles, screw them with lids and use them as bricks. The bottles are filled with sand and soil. Sand is preferable, as there is too much plant debris in the soil that can rot. It must be sieved, dried, filled into bottles, well sealed, filled up to the very top. It turns out a kind of bricks.

To build a house from plastic bottles, you will need a solution to fill the gaps between the "bricks". There are options here too. It can be an ordinary mortar, which is used when laying brick walls, you can make an earthen mortar. To keep the "bricks" in the wall until the mortar grasps, they are tied with twines from the side of the lids. Later, these "mesh" will come in handy when you plaster the walls. They turn out to be uneven, so alignment is indispensable.
We make a greenhouse, shed, greenhouse
You can build a greenhouse or greenhouse from plastic bottles. In this case, only transparent plastic is used, since it is necessary for the light to pass in sufficient quantity. For the construction of a barn, on the contrary, it makes sense to choose a darker plastic - it will be less visible what is inside.

The first technology - one to one
The second requirement for bottles as a building material is an even shape. Such, you know, without grooves. Otherwise, it will not work to fold the walls so that they retain heat - it will "siphon" into the curly cutouts. Remove labels from bottles and dry them. It is also necessary to prepare pins or rods - bottles are strung on them. Their diameter is small so that the neck passes freely. Now you can start building a greenhouse / shed from plastic bottles.
For the construction of a greenhouse or shed, pillars are dug in at the corners. Frames are assembled from the timber according to the size of the walls. These frames will be the base for the bottle walls. We collect them (frames) on the ground and, in a ready-made form, we attach to the dug-in pillars. When making frames, don't forget the doorway and windows.

We build a frame, cut off the bottom of the bottles, string them onto a pin. From such "columns" we assemble walls, a roof
The construction process begins with cutting the bottom. We string the cut bottles on pins, directing the necks to one side. We insert the bottles with effort so that they become very tight. Having assembled a row of the required height, we attach it to the frame. You can fasten it with clamps, strips cut out of metal, nails ... in any way available to you. We press the second row to the first so that there is a slight deformation. In this position, we fix it. So, row by row, we collect all the walls, then the roof.

Using the same technology, you can make a gazebo. But there is no need for tightness, so you can collect curly and colored containers. It will turn out even more interesting (example - in the photo).
The second technology - we sew plastic
Bottles will also need smooth, transparent or yellow bottles. The central part is cut out of them, obtaining a square-shaped piece of plastic. The pieces are sewn together in long strips. In the strip, the pieces are positioned so that they curl to one side. Then the stripes are sewn into linens. To make the canvas even, the stripes are positioned so that they curl in different directions. As a result, they align each other. Finished canvases are nailed to the frame. This completes the construction of a greenhouse for their plastic bottles.
Such a plan "casing" for greenhouses tolerates winters well, it does not need to be removed. Due to the stitching (many small holes), there is no absolute tightness, which makes it possible to regulate the humidity. You will not be able to heat such a greenhouse, but it will push back the autumn, and accelerate the arrival of spring.
It is possible to sew plastic for a greenhouse by hand, but it is not easy. It will be easier for those who have non-capricious sewing machines. Old Podolsk machines cope with this task. Others may have problems.
Fence and enclosure
You can make a fence out of plastic bottles in various ways. If you need a solid monolithic fence, bottles can be used like bricks. The technology is the same as when building a house. To avoid plaster (after all, there is a great risk that it will collapse) - select the color of the plastic to obtain the required rusink. But in this case, you will have to look for "building material" of the same diameter or lay out patterns from different sizes. In general, the process is creative, no matter how you look.

You can also make a filling for a fence out of plastic bottles. Make a frame, say, of wood, and come up with a beautiful filling from figured containers and their parts.
Furniture from scrap materials: recycling plastic bottles
Not only a house and a fence can be made from plastic bottles, they are also used as a basis for upholstered furniture. The idea is to use plastic containers for the frame, not wood. With tightly twisted lids, they have a high bearing capacity, and assembled in blocks, they are quite capable of withstanding loads of up to 100 kg or more.

A bed made of plastic bottles ... you need a good mattress, and the base is not too difficult to make
Although the furniture is made differently, the general algorithm of actions is the same:
- You select the "building material" of the same height, tighten the covers well.
- Collect blocks of the desired size, fastening them with tape.
- Having assembled the base of the required shape, sew the cover. For softness adding furniture foam rubber.
The trick is to make sure that the bottles fit very tightly to each other and do not move. The slightest backlash can lead to structural destruction. Therefore, collect the blocks slowly, carefully securing them. You can stack bottles in layers, fixing each layer in several places. For the inner layers, it is better to use double-sided tape - the fixation will be more reliable.
Ottomans / benches
The easiest way is to make an ottoman or a bench from plastic bottles. We proceed in the order described above. It is necessary to find bottles of the same height. It is better if they are of the same shape - it is easier to assemble. From plastic containers with tightly screwed lids, we assemble the base in the form of a cylinder. It is desirable that the radius of the base be greater than the height of the bottles, so that the bench will not turn over.

Next, you need to cut two circles from fiberboard, which will be slightly larger than the resulting radius of the base - this is the "bottom" and the base of the seat. We fix them with scotch tape. We take furniture foam rubber and, according to the dimensions obtained, cut out the necessary parts. We sew the cover from upholstery fabric, the colors that match the interior.

Such a bench can be not only round. It is quite possible to make a square one. And so that this furniture is not too light, it can be made heavier by pouring water. But water is not a very reliable business. Better to add sand. Both harder and more reliable.
Sofas, chairs, armchairs
If you need furniture higher than one bottle, proceed as when creating walls for a house. Find "material" of the same shape and height. The first bottle is left intact, the cork is tightened tightly (you can pour sand so that it does not turn over). At the other, the bottom is cut off, put one on top of the other. The bottle goes some distance and does not move further, no matter how hard you make it. If the obtained height is enough - great, if not - we put on the next one. In this way, collect the rows of the desired height, then fasten them into blocks.
There is one more way. It is more reliable in the sense that the bottles are held not by compressed air, but by a mechanical stop. And the walls in them are double, which is also important. The downside is more work, more raw materials are needed. The whole process is illustrated step by step.

- We take a bottle, cut it approximately in the middle of the height (the upper part with a smaller neck).
- The upper part with the neck (the lid is screwed on) is inserted all the way into the lower one.
- We take a whole one of the same size and shape, insert it upside down into the prepared structure.
- We cut the third one by about half and put the lower part on the top (with a lid).
From such modules, we assemble blocks of the desired configuration, fastening them with tape. Do not feel sorry for the scotch tape. You can first fasten two bottles, then collect blocks of large sizes from the double ones.
As you can imagine, this technology leaves a lot of bottle tops (half of the third bottle). They can be used to make other crafts from plastic bottles: flowers, more practical things for the household.
Methods for making flowers
The most common plastic bottle crafts are garden figurines and flowers. Read about garden figurines There are other interesting ideas, but there are many interesting animals and insects collected. And we will tell you about flowers from plastic bottles below - these are probably those crafts from plastic bottles that give the most pleasure. The process is simple, there are a lot of possibilities, the result is amazing.
You've probably noticed that the bottom of a PET bottle looks like a flower. All you have to do is find a bottle of a beautiful color, cut off the bottom of it. Now you have already got a pretty flower. In the middle, you can add petals cut from the central part, a core made of a strip of plastic cut into noodles, or glue beads inside, but about everything in a little more detail.

Using the power of fire
For work, you will need a marker, a lighter or a candle (it is more convenient with a candle). If available, use a pair of pliers, tweezers or pliers to hold the workpieces while processing. You will also need acrylic paints, you may need glue and beads. The whole manufacturing process boils down to several steps:

There are a lot of options here. Just start doing. Immediately, it may not work out perfectly, but you will understand what and how you can fix it. Look at a few more pictures with step-by-step photos of the process of making flowers from plastic bottles.
The most simple
For beginner craftsmen, you can try making flowers from simple shapes of plastic bottles to decorate the garden. In this case, milk containers can also be used. To avoid staining the plastic, look for colored ones. And it is not so important whether they will be transparent or not. They can be combined to produce flowers of different shapes.

To create such colors, use the part near the neck. It is cut to form petals. Next, warm it up a little, giving the desired bend to the petals, a little paint, a core made of a melted piece with a thread (a bottle of a smaller diameter, a pharmacy will do too). So it turned out a buttercup.
Another option is to cut from the neck into strips of equal width - 1-1.5 cm, bend them (warming up a little at the base). Make the middle whisk from the side of a milk bottle or paint the clear plastic with acrylic paint.

The middle is any bright one. Here is a piece of cork, but you can cut it into thin noodles, roll it up and then heat it. You will get a shaggy core.
It's all about the form ... Despite the imperfection, they decorate the site
The topic is actually inexhaustible. Flowers from plastic bottles are made in a variety of ways. From simple and uncomplicated to very realistic. It's not so much about skill as about different tastes and desires.
Useful home ideas
PET containers turned out to be such a good material that many useful things are made of them. In this section, we have collected useful crafts from plastic bottles that can be used on the farm.
For the kitchen and not only
If you cut off the bottom of a bottle with a capacity of 2-3 liters, you get a bowl or bowl, and so that its edges are even, they can be melted on a heated iron. But so that the sole does not have to be cleaned later, use a special silicone pad. If not, you can do it through a sheet of parchment for baking.

Food container. Plastic is food grade ...
Cut off the threaded part from the same bottle. 1-2 cm of plastic should remain around the thread (the edges are melted using the already known technology). Now it will not be difficult to hermetically close any package: we pass it through the cut neck, wrap it out, twist the lid.

The bottoms of the bottles attached to the bar make an excellent newspaper shelf (photo on the right). You can also store umbrellas.
From the plastic cut into strips, containers of various shapes can be weaved. Bottles need an even shape, with thick walls. They are cut into strips of a certain thickness. It is necessary to cut in a spiral - as a result, rather long stripes are obtained. If their length is not enough, they are perfectly sewn.

Lampshades
You can even make a lampshade, but on one condition: you will use such crafts from plastic bottles in lamps with - only they almost do not heat up. Plastic is incompatible with other lamps. Let's describe three ways to make a lampshade from a plastic bottle.
First. You need a large bottle. We draw it into strips of the same width. At the beginning and at the end of each strip, we make holes with a heated soldering iron or a nail heated on fire. We insert scissors into this hole, cut. Straight stripes are obtained.

When the strips are cut, we also make a hole in the bottom, pass thick fishing line through the neck, take them out through the hole in the bottom, and fasten the decor on the back side. You can - a button, you can - a pebble of a suitable color. Now pulling the line, we get an interesting shape of the lampshade. You can put a low power light bulb in it.
Another lampshade was made using a similar technology. But then a part of the bottle with a neck was cut into strips, the strips were wrapped and fixed on the neck. To give the desired shape, the fold can be slightly warmed up over a candle or lighter flame. We attach the resulting "flowers" to the base. So we get an unusual design.

They also make lampshades from the bottoms. It is necessary to find a sufficient number of identical bottles, cut off the bottom of them, glue together with the help of universal glue (choose transparent). The main thing is that it glue the plastic and freeze quickly.
Flower vases
Making a vase from a plastic bottle - what could be easier ... Just cut off the neck and you're done. But there is a technique that allows you to get patterned walls. You will need the thinnest soldering iron tip. Its power should not be too high. Then everything is simple: with the help of a heated sting, you burn out the patterns.

Magically! To make the drawing appear brighter, we take acrylic paint and paint the resulting beauty. The paint can be in a regular can, but it is faster and more convenient to work with a spray can.

These are the options ...
Photo ideas
Crafts from plastic bottles are such an extensive topic that it is impossible to tell about everything. What's nice, knowing a few tricks, you can easily find out how and what to do by looking only at the photographs. So here we have collected a few ideas that seemed interesting to us.


You can even make a boat….

And this is just a decoration….


The trend of rational use of household waste has recently become more and more popular, especially with regard to plastic containers. You can make almost the entire country interior and not only from plastic bottles with your own hands. One of the main advantages of such a material is its long service life, moreover, it is very elastic. Do not forget that plastic bottles are an affordable material that every owner or hostess always has in stock.
Cheap and cheerful - we make flower beds from bottles
Plastic containers are an ideal option for, because they have a big advantage over wood and even metal. Wooden fencing in flower beds or flower beds dries up or decays over time under the influence of moisture and sun. Even metal curbs are prone to corrosion and require periodic maintenance, such as regular painting.
What about plastic? For a long time, it does not lose its shape and does not collapse. This means that such a flower bed will last for more than one season and even more than one year, moreover, it does not require maintenance at all. Even if a "breakdown" occurs, the desired "element" can always be found in the pantry and can be easily replaced without resorting to long tedious shopping trips in order to find a suitable fragment.
So, what can you do with your own plastic bottles?
Bottle borders
 If it is necessary to protect the flower garden, plastic containers of different sizes will do an excellent job with this. This will not only limit space and prevent the growth of perennial plants, but will also retain moisture and prevent weeds from appearing.
The shape and size of the flower bed depends only on the fantasy of the summer resident: it can be either equilateral or in the form of some kind of animal or plant. You can also break the flower bed into segments with bottles.
Even a child can build a bottle curb (with the help of adults, of course):
- First of all, on the site, you should draw with a sharp object or pour sand on the contours of the flower bed.
- Free the bottles from the labels, wash, pour sand into them and screw the lid back on. If this is not available, you can use ordinary earth or water. This is necessary for stability, since empty containers will quickly fall out of the fence.
- Dig a groove along the marked contour so that the bottle can be deepened into it by about 1/3.
- Place the filled bottles in the groove with the neck down, as close to each other as possible, and cover with earth.
For a visual effect, you can use bottles of different colors of plastic (green, white, brown).
 Some summer residents do without dropping bottles. For example, bottles without bottoms are simply inserted into each other, forming a circle. The finished structure can be “put on” or taken into the ring by the tree trunk circle. To secure the curb, it must be pressed tightly to the ground with arcs.
Multi-tiered flower bed
 If you really want to have a flower garden, and there is too little space, you can do it yourself from plastic bottles. The principle is the same as in the construction of the curb, only after laying the first tier, it is necessary to fill it with nutritious soil, and only then lay out the next floor.
When planting plants for the lower tier, it is better to pick up moisture-loving specimens, since when watering, the water will flow down.
Mini-flower beds
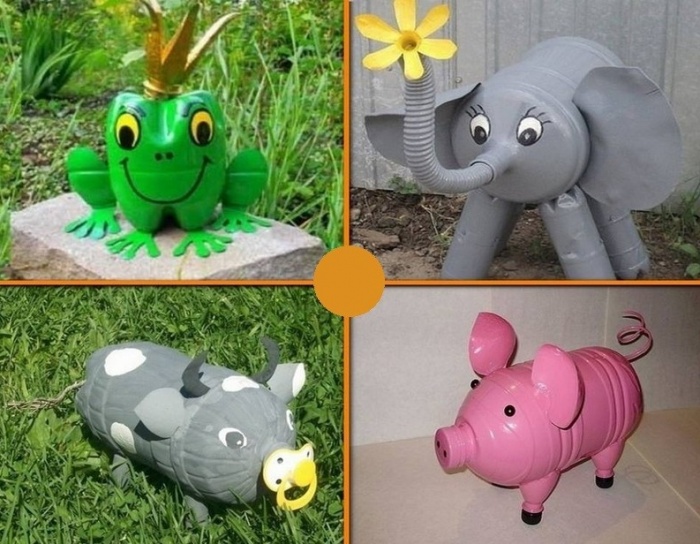
 Beautiful and useful crafts for a summer residence can be made from 5-liter plastic bottles. They will serve as miniature and cute little beds, for example, in the shape of everyone's favorite pigs.
 Group compositions in the form of trains with flowers look no less impressive.
 And if you sow lawn grass instead of flowers, a large bottle turns into a cute hedgehog with green thorns. It remains only to attach the eyes and nose.
 Those who are not afraid of small rodents will love cute mice from small (liter) bottles. It is good to plant petunias in them.
Flower pots and planters
 With a little imagination, plastic bottles can be easily transformed into small decorative pots for flowers or spicy herbs. You can make them even or cut them for a face-shaped marker. Such vases will look great not only in the garden gazebo, but also in the house on the windowsill.
 But if you put a cover made of fabric on the cut bottle and attach the ropes, you get graceful pots for a summer veranda.
 The easiest way to make hanging pots is to cut out wall fragments from both sides of the bottle, and fasten a tourniquet under the neck for hanging. Compact low-growing plants can be planted in such flowerpots.
Making a beautiful garden path
Especially popular with summer residents are paths made of plastic containers. The strength of such a path depends on the method of installation and which part of the plastic container serves as a building material:

Plastic bottle tracks become very slippery in winter.
Fun playground - decorating a place for children's games
Caring parents always strive to give their children a place for games in the country, where children can pass the time while adults are busy in the garden. Of course, it should be not only safe, but also colorful so that the little ones will like it. With the help of plastic bottles, it is easy to decorate a playground by making a variety of plants and animals. Ordinary paint will help to give them brightness.
In the shade under the palm tree
 What is a playground without a sandbox? And where there is sand, a palm tree must "grow". For the Tropicana, you will need green and brown bottles for the trunk and leaves, respectively.
Before proceeding with the assembly, you need to take care of a solid base. For example, fix a metal pin in a concrete screed, and it should be quite long so that the tree turns out to be tall, and children can freely walk under it.
When the base is fixed, you can start "growing" the palm:
- cut off half of the bottle (the top with a neck is not needed) and form a jagged edge;
- make a hole in the center of the bottom, string the blanks onto the base pin, while bending the cloves to the side for a more natural look;
- cut off the bottom of the green bottle and make straight cuts along the entire contour to the point where the wall passes into the neck (if you wish, the branches can be made curly - cut into 4 parts and each have cloves);
- string fragments of a branch onto the base;
- firmly attach the finished branches to the top of the stem (by welding or construction harnesses).
 If there are still many green bottles left after assembling the palm tree, you can make a small (or large) Christmas tree from them. Remove the bottom of the bottle and cut it into long narrow strips up to the very neck. Cut the edges of the stripes curly to resemble thorns. String the leaves onto the base.
Such a Christmas tree will look great on the playground in winter, especially under the snow, and will also help out on New Year's Eve those who, in a hurry, did not have time to buy a live tree.
Guests from a fairy tale - funny animals
 And of course, there must be toys. Children often take their old favorites out into the street. With the help of plastic bottles, you can easily diversify the "zoo", creating real masterpieces - from the fabulous Frog Princess and the Goldfish to modern cartoon characters.
 Take, for example, a handsome cat painted with black and white paint. Or you can use brown beer bottles, and you get a brown cat, also beautiful.
Form a head from two bottoms of the bottle (connect them), while the bends on the bottoms will really look like a real head. On one of them, paint eyes, eyebrows and a mustache with white paint, and a neat tongue with red. Insert the cut out small ears on top. For the body, string the same short-cut bottoms onto the base, the last to close the body. Fuse the edges of the bottoms. Walk with white paint along the melted contour of the ears and fragments of the body, and make a white speck on the breast on the front bottom.
Glue the head and legs - the upper parts of the bottles with an elongated neck will come in handy for them. Cut them off to the point where the bottle expands, cut the edges with sharp teeth and build legs from 4-5 parts, putting them on the base wire. Tighten the plugs on the upper necks, glue the legs to the body with them. For the tail, take a long wire and string the narrowest parts of the neck onto it, but without plugs. To make the tail fluffy, cut the edges into thin strips.
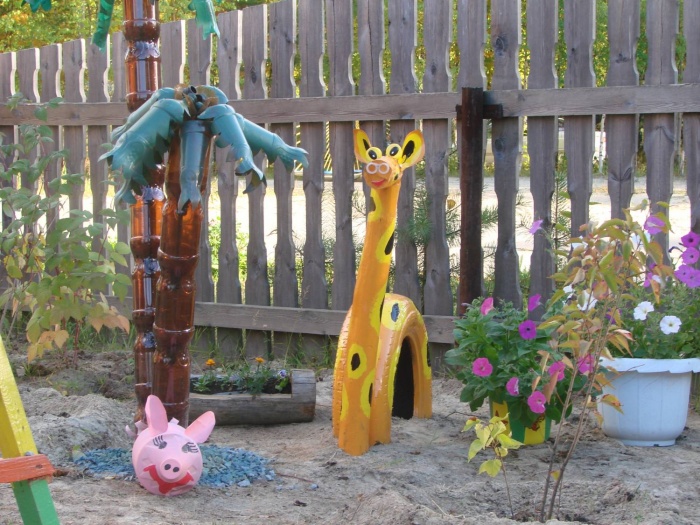
 Beautiful animals are also obtained from large 5-liter containers. With the right combination of bottles of different sizes and with the help of bright colors, a zebra, a horse, a cow, a donkey and even a giraffe can be placed on the site.
Flowers for my daughter
 In the sandbox, children do not only make Easter cakes. Little girls are very fond of flowers and often collect dandelions on the lawn (or from their mother in the flowerbed) to plant in their sandy garden. But you can make a whole greenhouse of flowers from bottles, while the girls will gladly take part in the manufacture of the simplest options. Chamomiles, cornflowers and tulips will decorate the sandbox, especially since young flower growers will be able to repeatedly "transplant" them from one garden bed to another without harming the plants and mother's nerves.
For flowers you will need:
- stem wire;
- even parts of bottles for cutting leaves from them;
- necks or bottoms for the very inflorescences;
- dye.
 More complex options can be made by adults. Plastic roses or poppies will decorate not only the playground, but also flower beds.
Plastic design for garden
Plastic bottles have a wide range of applications. So, if small animals and birds look appropriate in flower beds and playgrounds, then larger animals can be placed in the garden, among trees and bushes. They will give the garden a unique look and revitalize it.
Amazing garden sculptures
Representatives of large birds made of plastic look almost alive. With the help of multi-colored paints, you can achieve a stunning realistic effect. To make them, you just need to master the technique of cutting feathers from the sides of the bottles and prepare a frame on which they will be fixed.
They will look very impressive in the garden:

In the garden, you can settle sculptures not only of birds, but also of animals large enough so that they are not lost against the background of tall trees.
 Among the greenery, a bright spot will be a white lamb, which is quite easy to make if bottles of 2 liters and a few 1.5 liters are lying around in the pantry:
- Cut off the neck of two 2L bottles and put them on top of each other - this will be an elongated head. Cut out long ears from the third bottle, roll them up a little with a tube and attach to the head in the appropriate places with wire (or glue). Eyes can be drawn or two plugs can be glued.
- For the torso, insert a whole bottle into the bottle cut from the top with the neck inward. Make 3 more such blanks and attach them to the first one on the sides and on top, thus giving the lamb the required "waist" volume.
- The neck will be a whole two-liter bottle, which should be fixed on the body at an angle of about 120 degrees so that the cork is on top.
- Set the head to the neck (on the cork).
- For the legs, cut off the top of a two-liter bottle and insert a whole smaller bottle (1.5 liters) into it. Make three more such blanks and attach the legs to the body with the wide part up.
- From the cut-off bottoms of two-liter bottles, make a fleece, fastening them together, and put on the body. Tie the edges of the fur coat under the belly.
- Paint the lamb with white paint and draw black eyes.
Bird care
Plastic bottles can be used not only for decorative purposes, but also for the benefit of the garden. After all, little helpers of the summer resident always live in it - a variety of birds that collect pests from trees. In the warm summer, they have something to feast on, but in winter it becomes more difficult to get food. That's when the feeders hung around the garden will come in handy. And if you involve children in the process, you get a double benefit: for children - an interesting activity and pleasure, and for the birds - a cozy house with seeds.
 The simplest ones can be made from large 5 liter plastic bottles by simply cutting large arch-shaped holes on both sides.
To prevent the birds from cutting their paws on the sharp edges of the bottle, they must first be melted or pasted over with electrical tape.
For those who rarely visit their summer cottage in winter, a feeder that fills up automatically will come in handy.
 You can make it from a bottle and two wooden spoons:
- make two holes in the bottle opposite each other, while the second should be located slightly lower;
- unfold the bottle and repeat the procedure on the back side;
- insert into the holes of the spoon crosswise.
After the bottle is filled with food, it will be poured through the holes into the spoons as they are emptied.
A cozy place to relax from improvised means
Not only birds, but also the owners themselves should have their own secluded corner among the greenery, where on warm summer evenings you can enjoy a cup of tea, breathing in the aromas of nature. Many people prefer to put it in the garden. They are very beautiful, you can't argue with that, but they require certain financial investments. But from plastic it is cheap and cheerful to make not only a recreation area, but also to completely equip it.
Alcove? Easily!
The gazebo is one of the largest-scale plastic bottle craft projects. But the plastic gazebo has two big advantages:
- it is easy to assemble;
- will last more than one year without damaging the material.
Perhaps the only drawback of the building is the presence of a large number of bottles, which must be stored somewhere during the collection process.
How the gazebo will look like depends only on the owner's desire, and, accordingly, on the availability of "building material":

Practical curtains for the gazebo
There is a lot of fresh air in the summer gazebos, but, unfortunately, also dust. Ordinary tulle requires frequent washings, while a plastic curtain does not collect so much dust, and you can “wash” it without even removing it - just douse it with water from a hose (of course, if such a curtain is not hanging in the house). 
For dreamy and romantic hostesses, gentle curtains from the bottoms of plastic bottles strung on a base are suitable. 
For energetic people who like bright colors, cork curtains assembled according to the same principle are more suitable.
garden furniture
 A table, an ottoman, an armchair and even a sofa in a gazebo can also be made from plastic bottles. The old one from the house is also quite suitable for outdoor recreation, but it, like the curtains, will eventually become a bunch of dust. In addition, it is quite difficult to take a wooden sofa out into the street, because such furniture is rather bulky and heavy. But rearranging the plastic chair is not difficult.
It is not difficult to assemble furniture - you just need to put the bottles tightly and join together with adhesive tape, giving the desired shape. To knit or sew a cape for ottomans - no one from the outside will guess what they are actually made of.
 Leatherette covers are more suitable for a sofa.
Unbreakable garden chandeliers
 If you are planning an evening tea party, you must definitely spend it in the gazebo. To refine the light bulb, you can cut the bottle into two parts and make a simple shade from the upper half and paint it or paste over it with colored thread.
It is better to use economical light bulbs in plastic chandeliers - they do not heat up so much and will not melt the material.
In more sophisticated versions, chandeliers are assembled from fragments of leaves or flowers cut from colorful bottles. 
Garden supplies for gardening
To make the summer cottage look beautiful and tidy, you need to look after it all the time - weed weeds, collect fallen leaves and small debris. This will require tools. Of course, making a hoe or a rake out of plastic will not work, but simpler specimens are quite possible.
Craftsmen have long known how to use plastic bottles for the benefit of themselves and with savings for the family budget. After all, if the scoop suddenly broke, you no longer need to run to the store for a new one. From household waste that is in every home, a lot of useful things are obtained at no extra cost:

Garden worries
Plastic bottles can be used to make useful things not only for the garden, but also for the vegetable garden. These can be both small crafts in the form, and larger-scale structures such as greenhouses.
Greenhouses for seedlings
 Most summer residents grow seedlings of garden crops on their own. Some do it in apartment conditions, however, better quality seedlings are obtained from greenhouses - there is both heat and light enough.
You don't need to talk about the cost, but as for the strength - from plastic bottles they will certainly stand longer than film shelters or glass structures.
To increase the service life of a greenhouse made of plastic bottles, it is advisable to put it on the foundation, and use a metal profile for the frame.
The simplest version of the greenhouse involves the construction of walls from whole bottles, which are put on top of each other.
 You will have to tinker with the greenhouse made of plates a little longer, but it will turn out to be warmer. In this case, even parts must be cut out of the bottles and fastened (sewn) together in the form of a canvas. Mount the greenhouse from the finished canvases.
Watering "systems"
 For gardeners, watering is no less an urgent issue than the presence of a greenhouse. Instead of ready-made watering systems in the garden can be used. They must either be hung over the bush, having previously made holes in the lower part, or dug into the ground.
 It also makes a good sprinkler from the bottle - you just need to make small holes in it and connect it to the watering hose.
Getting rid of pests
A scarer from a plastic bottle will help drive out the worst enemy of the summer resident from the site. He not only plows the beds, digging his tunnels, but also damages the root system of plants in the course of action, depriving gardeners of the future harvest.
 If you cut the side walls in the bottle, bend them and put the container on a steel bar, the bottle will twirl and make noise when the wind blows. The sound through the rod will go into the ground and deprive the mole of the desire to manage in this noisy place.
The list of what you can do from a plastic bottle with your own hands is quite long. These are just a few of the crafts that make life easier for summer residents. Agree - it's better to get the most out of bottles than to pollute the environment. Protect nature and work with pleasure!
21 ideas for using plastic bottles - video
Plastic bottles, along with plastic bags, have become the main source of litter for the entire planet. In order to somehow deal with this problem, people develop various ideas for the rational use of empty containers. Today, PET bottles are used to make boats, build greenhouses and houses, erect fences and design furniture.
A simpler and more accessible way of disposing of plastic for an ordinary person is to make various decor from it. This idea is especially relevant in playgrounds or in gardens, because colorful bottles make wonderful crafts: bright, interesting and useful.
Decorations for the garden from plastic bottles will be the focus of this article.
Features of plastic material
Before you start building something out of plastic bottles, you need to get to know this material better and familiarize yourself with its properties. So:

Advice! It is much easier to work with plastic bottles of the same color.
And if a large product is conceived (for example, outdoor furniture), it is recommended to collect bottles of the same shape and size. For some small crafts, on the contrary, bottles of different shapes, colors and volumes are suitable.

What crafts can be made from plastic bottles for kindergarten
Crafts for a bottle garden can be very diverse: from fencing sandboxes to making fairy-tale characters, flowers or lanterns. Much depends on the imagination of the performer, as well as on the amount of collected plastic containers.
Important! In children's institutions it is better not to use toxic long-drying dyes. Therefore, for coloring plastic crafts, it is recommended to use water-based acrylic paints - they dry quickly, lay in an even layer on plastic, and have a bright palette of shades.
Bottle palm
You can build from plastic not only an exotic palm tree, but also any other tree - the principle of its manufacture will be almost the same. For work, you will need plastic bottles, scissors and a knife, metal wire or a wooden long rod, acrylic paint (if you could not find bottles of the desired shade).

The whole process of making a palm tree from plastic consists of several stages, which are very simple to implement:
- The stem of the tree will be made from dark brown plastic bottles. To do this, you need to cut off the bottom of the bottles - you will not need it in work.
- A metal or wooden rod is inserted into the ground, imitating the frame of the trunk of a palm tree. The length of this frame must correspond to the desired height of the tree.
- Cut brown plastic bottles are threaded onto the reinforced rod, neck up.
- When almost the entire rod is hidden behind the plastic, the last detail is strung - it is better that the bottle is green and merges with the crown of the palm tree.
- To roughen the trunk and make it look even more like the original palm tree, you can use scissors to cut the teeth on the free edges of the bottles and bend them slightly outward.
- Now leaves are made from green plastic bottles. Here, everyone can do at their discretion: you can cut the plastic bottle lengthwise into four segments, leaving only the neck intact, and form the carved edges of the leaves; someone else uses a different method - cutting the green plastic into long thin strips and collecting them in the form of hanging leaves of a palm tree.
- It remains to fix the leaves on the trunk, and the plastic palm is ready. It is perfectly possible to supplement it with plastic coconuts or bananas.
- If transparent bottles were used for the work, they must be painted with a suitable paint.
Advice! Several palms will look more organic than a single tree. It is better to immediately make a small "oasis" of three or five palms of different sizes.
Such plastic palm trees are not afraid of rain or snow - they will decorate the playground for a long time and delight the kids (an excellent example of a palm tree is shown in the photo below).

To prevent children from getting hurt on the plastic slices, it is recommended to melt them a little with a simple candle or a match.
Plastic flower beds from bottles
Many parents and kindergarten workers know how difficult it is to make a beautiful flower bed on the territory of the playground. After all, children often trample on flowers, and it happens that there is simply no one to take care of the plants.
But this is not a reason to leave the site without bright colors - fresh flowers can be easily replaced with artificial ones, and the easiest way to make them is from plastic bottles. To do this, it is not even necessary to cut out the petals of each flower; you can create a larger composition from plastic.
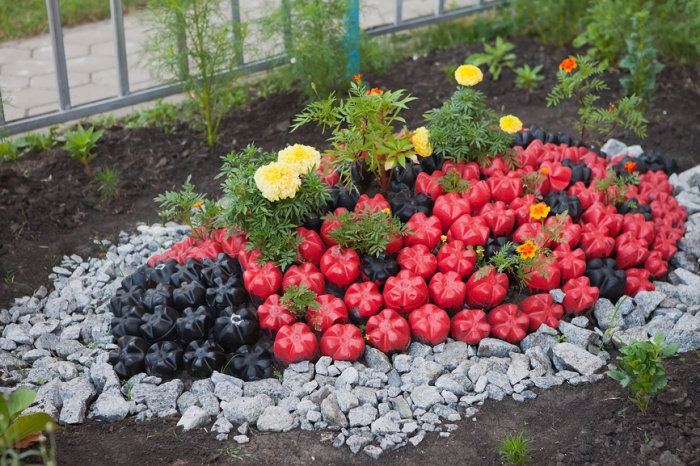
For such a flower bed, you will need the bottoms of plastic bottles - they are cut off with a knife or scissors, cutting the bottle approximately in half. Now the prepared elements must be painted in the desired color using a thick and uniform paint and a soft brush or dye from a spray can.
When the paint dries, the halves of the plastic bottles are inserted into the ground with their bottoms upwards - beautiful and bright flowers are obtained, collected in a certain composition.

Attention! To make the flower bed organic, it is better to first depict its project on a piece of paper. This will allow you to visually see the result and correctly select the shades of the "flowers".
Using this simple technology, it will be possible to make plastic flower beds of unusual shapes and of various sizes (as in this photo).
For those who are able to do more delicate work, the method of creating exquisite flowers, the details of which are cut from plastic bottles, are suitable. Such flowers can become an ornament not only on the street, they can be used to decorate a group or an assembly hall.

To work you need simple tools:
- plastic containers;
- dyes based on acrylic or latex (they are more uniform and non-toxic);
- sharp scissors;
- decor in the form of beads to create a "flower" core;
- strong wire for the stem and thinner wire for the stamens;
- glue gun or other reliable fast setting glue;
- a candle for melting the edges and shaping the plastic petals.
Petals of the desired size and shape are cut out of the bottles - it is convenient to use a cardboard template for this. Then they need to be heated over the candle and give the edges and center the desired shape. Now the petals are painted in the selected color and allowed to dry thoroughly.

Collect the petals from the inflorescence and fix the plastic parts on the wire stem. The middle is made of wire, thick fishing line and multi-colored beads. Also, flower leaves are cut out of plastic and attached to the stem with a glue gun.
A great example of creating such a flower from a plastic bottle is shown in the photo below.

Bottle fences
From plastic bottles, you can create beautiful and durable fences for flower beds or sandboxes, for example. Those who have been working with plastic bottles for a long time recommend strengthening vertical structures by filling containers with ordinary sand, earth or pebbles. In this case, if a child steps or falls on the fence, it will not break or deform.
With the help of the same paints, they give the necessary shades to plastic bottles and drop them around the perimeter of the flower garden or sandbox. Fences from several rows of painted bottles look even more beautiful - you can even create some kind of pattern inside the fence.
Lid Mosaic

You can also use containers for developing activities with the children themselves. One of these lessons can be a simple drawing, assembled from multi-colored plastic corks. If the children in the group are very small, the leader can make blanks for such a mosaic by drawing circles on paper in those places where the caps should be located.
The child only has to pick up the cork of the desired color and fix it on his panel with the help of glue.
This technique allows you to collect more complex patterns from plastic bottle caps. Good craftsmen create whole pictures on walls and fences from plastic covers of different diameters and shades (you can see them in the photo below).

Animal world and fairy tale characters from a plastic bottle
Most of all, children love the heroes of fairy tales and cartoons - these characters can also be easily made from plastic bottles. You just have to be patient and apply some skill to making such crafts.

The size of the hero and his difficulty completely depend on the skill of the master. Talented performers make real masterpieces from ordinary plastic waste. These are firebirds, flamingos, peacocks with huge tails, and large wolves, foxes, owls and bunnies, small funny bugs and bright butterflies.

As a rule, in such crafts, a metal frame made of a rod is used, onto which plastic parts of the body, head and limbs of the character are strung. The easiest way is to build a funny pig out of a container - children can also be involved in this process.
To create a pig from plastic you will need:
- five-liter water bottle;
- five regular one and a half liter plastic bottles;
- knife or scissors;
- pink paint and paintbrush;
- wire or something else for a pig's tail;
- peephole beads;
- glue or silicone gun.
The pig's body and head will be made from a one-piece five-liter bottle. From four small plastic bottles you need to cut off the necks, one side of the cut is made slightly lower than the other. These will be the pig's legs, and such cuts will help to better attach them to the body.
The ears are cut from the last plastic bottle. The easiest way is to cut them off near the neck, since in this place the plastic is already curved and has the desired shape. If you need larger ears, you can cut them out of the "body" of the bottle, and give the shape by heating the plastic with a match.
Now the whole structure is put together and all the plastic elements are fixed with glue. It remains to paint the pig in its inherent pink color and glue the eyes and tail (the finished pig is shown in the photo below).

Gazebo made of plastic bottles
For those who are not afraid of difficulties and have a sufficient amount of plastic containers, the method of constructing a gazebo is suitable. It can be the simplest structure of four supports and a roof, or a more complex round gazebo with windows and a doorway - it all depends on the skills of the master.
The main thing is that it will be interesting and safe for children to play in such a house, so it is worth making it for the garden.

A plastic building can be carried out on the basis of a metal or wooden frame, or you can use the plastic container itself as supports, only having previously filled it with sand or earth.
The roof is covered with a light material, such as ondulin or polycarbonate. Also, for this purpose, you can use the bottles themselves, connected like a raft or flattened into flat petals and fixed with wire or screws.
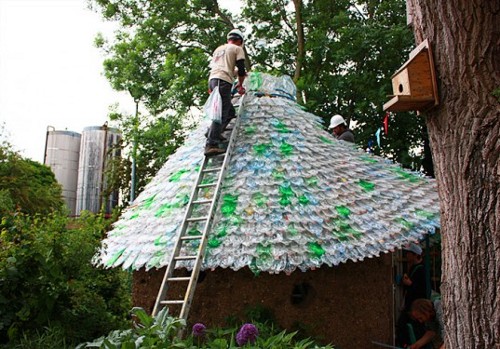
The walls are fastened with small screws. To facilitate the process or when there is not enough "building material", you can use a waterproof fabric or a bright film, the same polycarbonate, which is pulled and fixed between adjacent plastic supports.

The door and windows of the gazebo can be curtained with curtains made of corks from, all the same, plastic bottles. You can collect such curtains with the children. To do this, make a small hole in each cap and string all the plugs on a thread with knots or on a long fishing line.
Very beautiful gazebos made of plastic bottles are shown in the photo in this article.
conclusions
Instead of littering the planet, you can use plastic bottles to the advantage of decorating a playground or kindergarten group with them. The plastic is safe for babies and is also lightweight enough. If suddenly the structure of this material is damaged, children will not be hurt.

Another big plus of this venture is that it is easy to involve the pupils themselves in the work - even kids will be able to collect simple crafts for the garden from plastic bottles.